
Chapter 8
Getting More Out of Fire TV
IN THIS CHAPTER
![]() Connecting Bluetooth and USB devices to Fire TV
Connecting Bluetooth and USB devices to Fire TV
![]() Adding parental control to make Fire TV more kid-safe
Adding parental control to make Fire TV more kid-safe
![]() Making Fire TV accessible
Making Fire TV accessible
![]() Browsing the web with Fire TV
Browsing the web with Fire TV
![]() Listening to music and viewing your vacation photos and videos
Listening to music and viewing your vacation photos and videos
When you saw this book for the first time (on Amazon, right?), you may have asked yourself, “Does the world really need an entire book on Fire TV?” It’s a good question, and if you thought at the time that Fire TV was only about streaming Game of Thrones, then you no doubt answered your own question with a snort, followed by “No, duh.”
However, I hope this book shows you that Fire TV runs way deeper than merely streaming your favorite TV show. If so, then I’ve justified the time I spent writing this book. If not, then I’m certain this chapter will win you over. Here, you explore a long list of other features that you can do with Fire TV, including adding Bluetooth and USB devices, setting up parental controls, making Fire TV accessible, browsing the web right on your TV, listening to music, and even viewing your own photos and videos. It’s a veritable Fire TV smorgasbord. Belly up!
Connecting Bluetooth Devices
Your Fire TV device supports a wireless technology called Bluetooth, which enables you to make wireless connections to other Bluetooth-friendly devices. In particular, Fire TV can connect to Bluetooth headphones, which enables you to watch a show without disturbing people nearby. You can also connect to a Bluetooth keyboard for easier text input.
In theory, connecting Bluetooth devices should be laughably easy: You bring the devices within 33 feet (10 meters) of each other (the maximum Bluetooth range), they exchange the necessary technical pleasantries, and then they connect without muss or fuss. In practice, however, there’s usually at least a bit of muss (and sometimes some fuss, too), which usually takes one or both of the following forms:
- Making the devices discoverable: Unlike Wi-Fi devices, which broadcast their signals constantly, most Bluetooth devices broadcast their availability — that is, they make themselves discoverable — only when you tell them to. This makes sense in many cases because you usually only want to connect a Bluetooth component, such as headphones, with a single device. By controlling when the Bluetooth gadget is discoverable, you ensure that it works only with the device you want it to.
- Pairing Fire TV and the device: As a security precaution, Bluetooth devices need to be paired with another device before the connection is established. This is why making a device discoverable is also known as putting the device into pairing mode.
To make things even less convenient, Fire TV does have a few Bluetooth restrictions you should be aware of:
- You can connect up to seven Bluetooth accessories to your Fire TV device. However, you can only pair one set of Bluetooth headphones at a time.
- If you’re using a Fire TV Stick, you can only pair with Bluetooth game controllers.
- Fire TV isn’t compatible with Bluetooth microphones.
- Fire TV isn’t compatible with Bluetooth Low Energy (BLE) devices.
- Bluetooth accessories can only pair with one other device at a time, so if you’ve previously paired your Bluetooth device with something else, you have to disconnect that other device before you can pair it with your Fire TV device.
 You may think you can use Bluetooth to pair your smartphone or tablet with Fire TV to watch, say, a video on your TV. Nope, sorry. Fire TV doesn’t do that. However, it is possible to display mobile content on your Fire TV device. I show you how in Chapter 6.
In the following sections, I walk you through how to pair Bluetooth devices, connect to paired devices, and unpair Bluetooth devices.
Pairing your Bluetooth devices
Okay, so what can you pair with Fire TV? The four main categories of useful Bluetooth accessories for Fire TV are headphones, keyboards, remotes, and game controllers. The next four sections provide the pairing details.
Bluetooth headphones
If you want to watch a TV show or movie, or even listen to music (see “Listening to Music,” later in this chapter), but you don’t want the sound to disturb anyone within earshot, then pumping the audio through a pair of Bluetooth headphones is the way to go.
Follow these steps to pair your Fire TV device with Bluetooth headphones:
- On your Fire TV device, choose Settings ⇒ Remotes & Bluetooth Devices.
- Choose Other Bluetooth Devices.
- Choose Add Bluetooth Devices.
-
Turn on the switch or press the button that makes the headphones discoverable.
Wait until you see the headphones appear on the Add Bluetooth Devices screen, as shown in Figure 8-1 (the “MPOW H12” device, which is a pair of headphones).
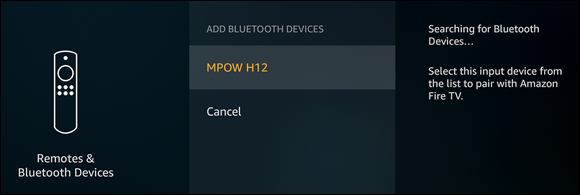
FIGURE 8-1: Wait until you see the headphones appear; then choose them to pair.
-
Choose the Bluetooth headphones.
Your Fire TV device pairs with the headphones.
When the pairing is complete, you see a Device Connected notification, and the headphones appear in the Other Bluetooth Devices list, as shown in Figure 8-2.
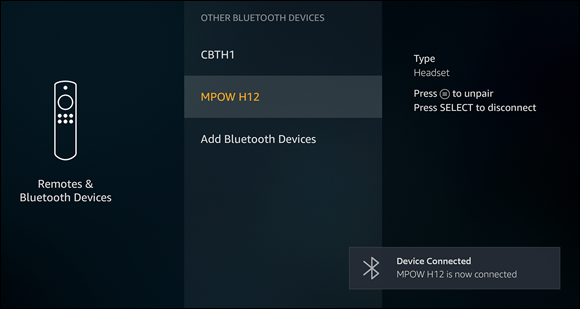
FIGURE 8-2: The Other Bluetooth Devices screen maintains a list of your paired devices.
 If you find that your Bluetooth headphones audio is out of sync with the video playback on your Fire TV, choose Settings ⇒ Display & Sounds ⇒ Audio Output ⇒ Bluetooth Audio Sync. Press and hold the Alexa Voice Remote Voice button until Fire TV tells you the sync is complete.
Bluetooth keyboard
Using the Alexa Voice Remote navigation ring to peck out text one character at a time is no one’s idea of a good time. Most people’s preferred option is the keyboard feature in the Fire TV mobile app, but if you don’t have your mobile device nearby, there’s yet another way to easily enter significant chunks of text into the Fire TV interface: a Bluetooth keyboard. Here are the steps to follow to pair a Bluetooth keyboard:
- On your Fire TV device, choose Settings ⇒ Remotes & Bluetooth Devices.
- Choose Other Bluetooth Devices.
- Choose Add Bluetooth Devices.
-
Turn on the switch or press the button that makes the keyboard discoverable.
Wait until you see the keyboard show up in the Add Bluetooth Devices screen.
-
Choose the Bluetooth keyboard.
Fire TV displays a six-digit passkey, as shown in Figure 8-3.
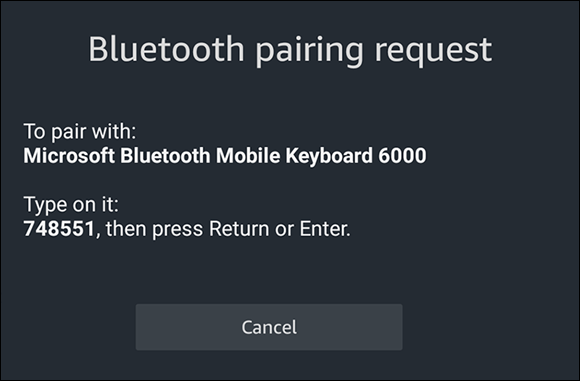
FIGURE 8-3: Fire TV displays a passkey that you type on the Bluetooth keyboard.
-
On the Bluetooth keyboard, type the passkey you see on your screen and press Return or Enter.
Fire TV pairs with the keyboard and you see a Device Connected notification. The keyboard also appears in the Other Bluetooth Devices list.
You can also pair a Bluetooth mouse with Fire TV. You can’t use the mouse to navigate the Fire TV interface, but some apps are mouse-friendly (such as the Fire TV web browsers; see “Browsing the Web,” later in this chapter).
A bonus you get with a Bluetooth keyboard is that you can also use the device to navigate the Fire TV interface. Here are the keys you can use:
|
Press |
To |
|
Up arrow |
Move the selector up. |
|
Right arrow |
Move the selector to the right or fast-forward ten seconds during media playback; press and hold for continuous fast forward (same as the Fast Forward button on the remote). |
|
Down arrow |
Move the selector down. |
|
Left arrow |
Move the selector to the left or rewind ten seconds during media playback; press and hold for continuous rewind (same as the Rewind button). |
|
Enter |
Choose the selected item (same as the Select button). |
|
Esc |
Go back to the previous screen (same as the Back button). |
|
Spacebar |
Toggle the current media between Play and Pause (same as the Play/Pause button). |
|
Keyboard characters |
Input text. |
Bluetooth remote
If you lose your Alexa Voice Remote, you can purchase a new one from Amazon. There are also some third-party remotes that are compatible with Fire TV and even offer extra features, such as a built-in keyboard.
PAIRING A NEW ALEXA VOICE REMOTE
If you purchase another Alexa Voice Remote instead of a third-party remote, pair it with your Fire TV device by following these steps:
- On your Fire TV device, choose Settings ⇒ Remotes & Bluetooth Devices.
- Choose Amazon Fire TV Remotes.
- Choose Add New Remote.
-
Press and hold the new remote’s Home button for ten seconds to put it into pairing mode.
Fire TV pairs with the new Alexa Voice Remote.
PAIRING A THIRD-PARTY REMOTE
Here are the steps to follow to pair your third-party remote with your Fire TV device:
 Note that only a few third-party remotes are compatible with Fire TV. Before buying a new remote, double-check that the device actually works with Fire TV.
- On your Fire TV device, choose Settings ⇒ Remotes & Bluetooth Devices.
- Choose Other Bluetooth Devices.
- Choose Add Bluetooth Devices.
-
On the remote, press the Home button for a few seconds to put the device into pairing mode.
After a short (hopefully!) delay, the remote appears in the Add Bluetooth Devices screen.
-
Choose the remote.
Fire TV pairs with the remote.
Bluetooth game controller
You can use a game controller not only to play games on Fire TV (no surprise there), but also to navigate the Fire TV interface.
Before investing in a new game controller, make sure the device is compatible with Fire TV.
Here are the steps to follow to pair a game controller with your Fire TV device:
- On your Fire TV device, choose Settings ⇒ Remotes & Bluetooth Devices.
- Choose Game Controllers.
- Choose Add New Game Controller.
-
On the game controller, press the Home button for a few seconds to put the device into pairing mode.
The game controller appears on the Add New Game Controller screen.
-
Choose the game controller.
Your Fire TV device pairs with the game controller.
Connecting to paired Bluetooth devices
If you’ve paired multiple Bluetooth devices of the same type (such as headphones), you can switch between them by connecting to the device you want to use. Similarly, if you’ve turned off a Bluetooth device, Fire TV automatically disconnects from the device, so to use the device again later you need to connect to it again.
Follow these steps to connect to a paired Bluetooth device:
- On your Fire TV device, choose Settings ⇒ Remotes & Bluetooth Devices ⇒ Other Bluetooth Devices.
- In the Other Bluetooth Devices list, highlight the device you want to use.
-
Press Select.
Fire TV connects to the device.
Unpairing a Bluetooth device
If you no longer want to use a paired Bluetooth device, you can unpair the device as follows:
- On your Fire TV device, choose Settings ⇒ Remotes & Bluetooth Devices ⇒ Other Bluetooth Devices.
- In the Other Bluetooth Devices list, highlight the device you want to unpair.
-
Press Menu.
Fire TV asks you to confirm.
-
Press Select.
Fire TV unpairs the device.
Connecting USB Devices
If your TV has one or more USB ports, you can connect some devices to those ports to accessorize your Fire TV system. What kinds of USB devices does Fire TV support? I’m glad you asked:
- USB storage drive (Fire TV Cube and Fire TV Edition TVs only)
- Wireless keyboard connected using a USB dongle
- Wireless mouse connected using a USB dongle
- Xbox 360 wireless gaming receiver
- Wired gamepad (as long as it’s not connected using a USB charger)
- Flirc USB dongle (connects some third-party infrared [IR] remotes)
A mouse? Yep, but it’s not what you think because Fire TV doesn’t support using a mouse to navigate the interface. However, some Fire TV apps and games are mouse-friendly, particularly the Fire TV web browsers (see “Browsing the Web,” later in this chapter).
Adding a USB storage drive
A wireless USB keyboard may come in handy for text-heavy Fire TV operations, but the real star of the USB device show is USB storage. Your Fire TV device comes with its own internal storage, but if you augment that storage with an external USB hard drive or flash drive, then you get some significant advantages:
- More storage for apps and games
- The option to move some apps from internal to external storage
- A longer live TV recording buffer, which gives you more options for pausing, rewinding, and fast-forwarding live TV. The larger the storage device you add, the longer the resulting live TV recording buffer.
Fire TV will format the drive you use, which means that any data on the drive will be gone forever. Therefore, before proceeding, plug the drive into a computer and check that it doesn’t contain any data you wouldn’t want to lose. If the storage device does contain data you want to preserve, copy or move that data onto your PC.
Follow these steps to add a USB storage drive to your Fire TV Cube or Fire TV Edition TV:
-
Insert the USB drive into a USB port on your Fire TV device.
If required, be sure to plug the USB drive into a power outlet.
If Fire TV can’t read the storage device, you see the screen shown in Figure 8-4.
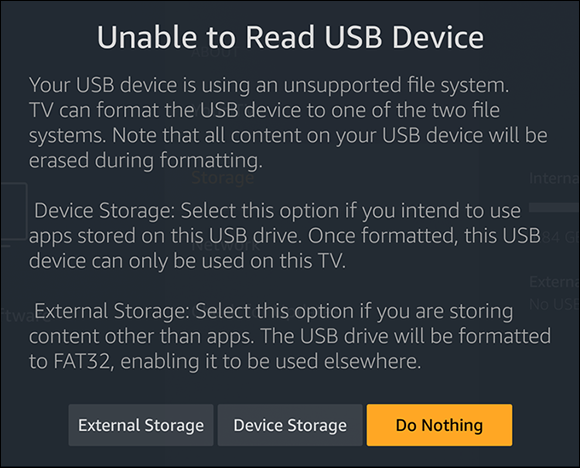
FIGURE 8-4: Fire TV displays this screen if it can’t read the USB storage device.
-
Choose an option to proceed.
- External Storage: Choose this option to format the drive in a way that also enables you to add media, such as photos and videos, to the USB drive (see “Viewing Your Photos and Videos,” later in this chapter).
- Device Storage: Choose this option to format the drive for exclusive use of Fire TV.
- Do Nothing: Choose this option to bail out of adding the USB drive.
If you choose either External Storage or Device Storage, Fire TV asks if you’re sure you want to proceed.
-
Choose Yes.
Fire TV formats the USB drive. When the operation is done, you see the Formatting Complete screen.
-
Choose OK.
Fire TV begins using the USB drive for storage.
If you formatted the USB drive for one type of storage and later on you decide you’d prefer to use the other type of storage, you can switch right from Fire TV. Choose Settings, choose either Device & Software (for Fire TV Edition devices) or My Fire TV (for Fire TV Cube), and then choose USB Drive. Choose the Format to External/Internal Storage option.
Ejecting a USB drive
If you no longer want to use an external USB drive with your Fire TV device, don’t just yank the drive cable out of its USB port. Instead, eject the drive safely by following these steps:
- Choose Settings.
- Choose either Device & Software (for Fire TV Edition devices) or My Fire TV (for Fire TV Cube).
- Choose USB Drive.
-
Choose Eject USB Drive.
Fire TV disconnects the drive and then displays the notification shown in Figure 8-5 when it’s safe to disconnect the drive’s USB cable.

FIGURE 8-5: Fire TV displays this notification when it’s safe to disconnect the USB drive.
Letting Your Kids Watch Fire TV
If your kids have access to your Fire TV device (or if they have Fire TV devices of their own), then you may be a bit worried about some of the content they may be exposed to in certain apps (such as YouTube). Similarly, you may not want your kids purchasing media or making in-app purchases in apps or games.
For all those and similar parental worries, you can sleep better at night by activating the parental controls on your Fire TV device. These controls restrict the content and activities that kids can see and do as follows:
- Require a PIN (that you set up) for any purchases.
- Require the PIN before launching apps.
- Require the PIN before accessing Settings.
- Restrict viewing of Amazon Video content based on ratings that you set.
Activating parental controls
Here are the steps to plow through to set up parental controls on your Fire TV device:
-
Choose Settings ⇒ Preferences ⇒ Parental Controls.
Fire TV displays the Parental Controls screen, which shows the Parental Controls setting as Off.
-
Choose Parental Controls.
Fire TV prompts you to enter a five-digit PIN, which Fire TV uses to prevent unauthorized access to apps and purchases.
The PIN is an important safeguard for your children (and your sanity), so don’t enter something easy to guess, such as 12345 or 00000. The PIN interface, which is shown in Figure 8-6, arranges the numbers 0 through 4 on an image of the Alexa Voice Remote navigation ring. To enter a number, press the corresponding button on the navigation ring. For example, press Up to enter 1 and press Select to enter 0. To get the digits 5 through 9 displayed, press the Menu button.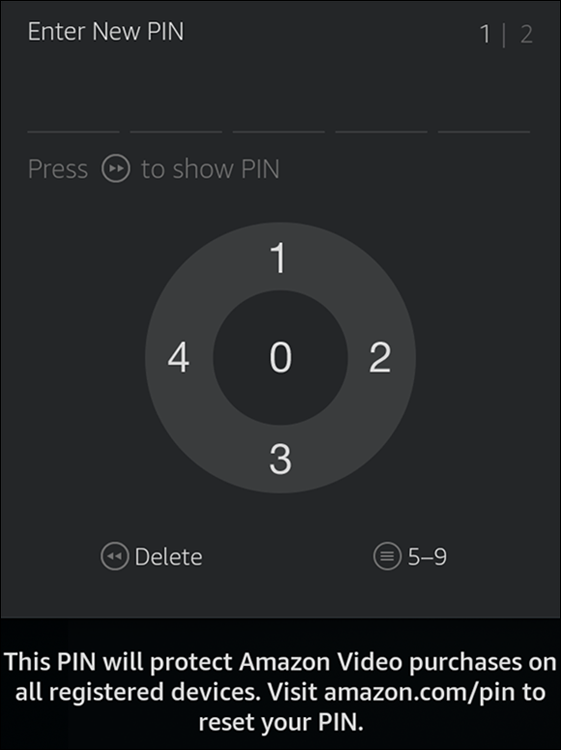
FIGURE 8-6: The numbers indicate which buttons to press on the navigation ring to enter your PIN.
-
Use the remote’s navigation ring to enter the five digits of the PIN you want to use.
By default, Fire TV hides the PIN’s digits with dots. To see the PIN’s digits, make sure no youngster is looking over your shoulder and then press the Fast Forward button.Fire TV prompts you to reenter the PIN.
-
Repeat the PIN again to confirm.
Fire TV enables parental controls and displays a summary of the default protections that are now in place on your Fire TV device.
- Choose OK.
Configuring parental controls
Fire TV enables parental controls with a default set of restrictions. To customize those restrictions, choose Settings ⇒ Preferences, enter your PIN, and then choose Parental Controls to display the Parental Controls screen. Figure 8-7 shows Parental Controls with the default settings.
Here are the settings you can play around with:
- Parental Controls: Choose this setting and then enter your PIN to turn off parental controls.
- PIN-Protect Purchases: When On, requires a PIN to make media, app, and game purchases.
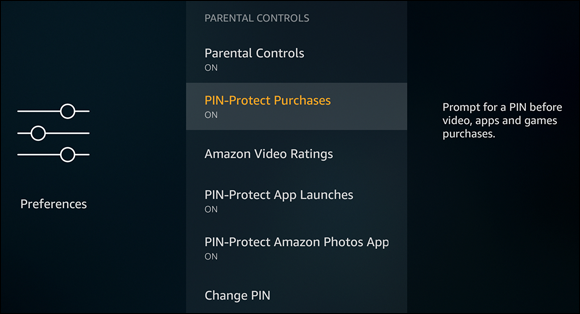
FIGURE 8-7: The Parental Controls screen showing the default settings.
- Amazon Video Ratings: Enables you to specify which ratings applied to Amazon Video content your kids can view. All other ratings require a PIN to watch. Choosing this setting opens the Amazon Video Ratings screen, shown in Figure 8-8. For each rating, press Select to toggle between available (a checkmark icon) and restricted (a lock icon).
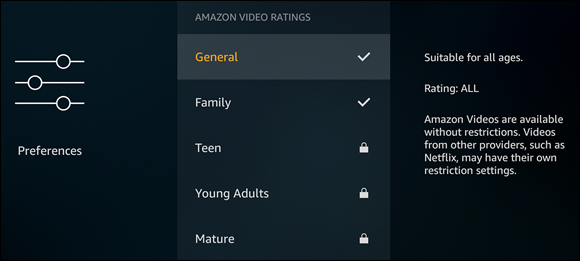
FIGURE 8-8: Press Select on a rating to toggle kids’ access to content that carries that rating.
- PIN-Protect App Launches: When On, requires a PIN to start apps.
- PIN-Protect Amazon Photos App: Toggles PIN protection for Amazon Photos. If PIN-Protect App Launches is On, then PIN-Protect Amazon Photos App must also be On; if PIN-Protect App Launches is Off, then PIN-Protect Amazon Photos App can be either On or Off.
- Change PIN: Choose this setting and enter your existing PIN to set a new PIN.
If you forget your PIN, you can reset it by directing your favorite web browser to www.amazon.com/pin.
For even more protection for your kids on Fire TV, set up Amazon FreeTime, which gives you a Parent Dashboard that you can use to monitor which content your children are accessing, use parental controls to restrict the types of content your kids can access, and set time restrictions on using Fire TV. There’s a free version and a paid FreeTime Unlimited version (www.amazon.com/freetimeunlimited) that gives you extra controls and content (although as I write this FreeTime Unlimited is only available in the United States, the United Kingdom, and Germany).
Making Fire TV Accessible
For people with vision issues or mobility challenges, having Alexa as an integral part of Fire TV is a welcome feature because it means that much TV watching can be performed by voice only: Perfect vision or surgeon-steady hands are not required.
Similarly, Alexa also helps people with hearing problems, because Alexa often shows its results on the Fire TV screen.
Alexa’s benefits to people with physical challenges are significant, but they don’t mean that either Alexa or a Fire TV device is configured ideally for those same people. In the next couple of sections, I explore the accessibility features that can make Fire TV easier to use for people with hearing, mobility, and vision issues.
Enabling the Fire TV features for the vision impaired
If your eyesight isn’t what it used to be, or if your eyesight problems go beyond relatively simple afflictions such as farsightedness or astigmatism, then you may need help making sense of what’s happening on the Fire TV screen. Fortunately, a number of tools are available for enlarging screen items, making things easier to see, and even hearing audio transcriptions of what’s on the screen.
Making Alexa more vision accessible
Both your Fire TV device and the Alexa app come with a few features that you can tweak or activate to work around vision problems:
- The Alexa app supports the vision accessibility features — such as dynamic type sizes and high contrast — available on your smartphone:
- iOS: Choose Settings ⇒ General ⇒ Accessibility and adjust the settings in the Vision section.
- Android: Choose Settings ⇒ Accessibility ⇒ Vision.
- You can operate the Alexa app using a screen reader:
- iOS: Choose Settings ⇒ General ⇒ Accessibility ⇒ VoiceOver and tap the VoiceOver switch to On.
- Android: Choose Settings ⇒ Accessibility ⇒ TalkBack and then tap the switch to On.
- You can configure the Fire TV Cube version of Alexa to make it more vision accessible. First, in the Alexa app, choose Devices ⇒ Echo & Alexa, tap your Fire TV Cube, and then tap Sounds. There are two techniques you can use:
- Increase the volume for alarms, timers, and notifications. Drag the Alarms, Timers, and Notification slider to the right to increase the default volume for these features.
- Play a sound both when Alexa starts processing a request and when it finishes processing that request. This gives you a better sense of when Alexa is processing your voice commands. To set this up, tap the Start of Request and End of Request switches to On, as shown in Figure 8-9.
Navigating Fire TV with VoiceView
You can use the VoiceView feature as a Fire TV screen reader. As you open each screen, VoiceView tells you the name of the screen, and you can move the selector to a screen element to have the element’s name or text read out loud to you.
ACTIVATING VOICEVIEW
To activate VoiceView, follow these steps:
- Choose Settings ⇒ Accessibility.
- Choose VoiceView Screen Reader.
-
Choose VoiceView.
Fire TV switches into VoiceView mode and a voice says, “VoiceView ready” and prompts you to press Play/Pause to see a tutorial for VoiceView. You can either press Play/Pause to run through the tutorial to learn the basics, or press Back and then press Select on the VoiceView switch once again.

FIGURE 8-9: Tap Start of Request and End of Request to On to know when Alexa is processing your voice commands.
NAVIGATING WITH VOICEVIEW
While VoiceView is active, how you interact with the screen doesn’t change all that much. For example:
- To hear the name or text associated with a screen element, use the navigation ring to move the selector to that element.
- To open a screen element (for example, to launch an app), move the selector to the element and press Select.
You can also use the remote keys outlined in Table 8-1 to navigate your Fire TV device.
TABLE 8-1 Controlling VoiceView with Remote Keys
|
Press |
To |
|
Back + Menu for two seconds |
Toggle VoiceView on or off. |
|
Play/Pause |
Mute VoiceView for the current element only (that is, you hear VoiceView again when you navigate to the next element). |
|
Menu |
Hear VoiceView tips or information related to the current screen. |
|
Menu + Menu |
Display options for the current screen (this is the same as pressing Menu once while VoiceView is turned off). |
CONFIGURING VOICEVIEW SETTINGS
With VoiceView activated, the VoiceView Screen Reader screen now shows a long list of settings for customizing VoiceView to suit your style. Here’s a quick summary of the settings:
- Reading Speed: Sets the speed at which VoiceView reads the screen text.
- Verbosity: Lets you specify which screen elements VoiceView mentions.
- Speech Volume: Sets the VoiceView speech volume relative to the Fire TV current volume setting. By default, VoiceView uses 40 percent of the Fire TV current volume, but you can opt for a quieter playback (such as 20 percent of the Fire TV current volume), a louder playback (say, 70 percent), or the same volume as Fire TV (the Match Device Volume option).
- Sounds Volume: Sets the VoiceView sound effects volume relative to the Fire TV current volume setting. This setting also defaults to 40 percent of the Fire TV current volume, but you can instead opt for a quieter or louder volume or a volume that matches Fire TV.
- Key Echo: Specifies how VoiceView confirms what you’ve input when you’re entering text using the onscreen keyboard. By default, VoiceView says each character as you type it (that is, it echoes the keys you press). You can also opt to have VoiceView echo only words (that is, VoiceView says each word as you complete it) or both characters and words.
- Punctuation Level: Specifies whether and how much punctuation VoiceView includes in its descriptions.
- VoiceView Tutorial: Runs a tutorial that gives you a quick lesson in how to use VoiceView.
WORKING IN VOICEVIEW’S REVIEW MODE
The navigation ring’s Up, Down, Left, and Right buttons enable you to move through the screen, and as you land on each screen element, VoiceView speaks the element name or text. That’s handy, but many screens include lots of “nonselectable” text, such as the summary info you see when you open a TV show or movie (plot summary, length, release year, and so on). To hear that text, you can switch VoiceView into Review mode by holding down your Fire TV remote’s Menu button for two seconds. You hear VoiceView say “Review mode on” and VoiceView also changes how the navigation ring’s buttons work:
- Left: Navigates to the previous text element on the screen.
- Right: Navigates to the next text element on the screen.
- Up: Increases the Review mode granularity.
- Down: Decreases the Review mode granularity.
“Granularity”? It’s a word to warm the cockles of a nerd’s heart, I know, but it just refers to the level of detail that Review mode uses when you navigate to some text on the screen. Here are the four levels of granularity in ascending order:
- Character: When you press Right or Left, VoiceView speaks the next or previous character of the text.
- Word: When you press Right or Left, VoiceView speaks the next or previous word of the text.
- Sentence: When you press Right or Left, VoiceView speaks the next or previous sentence of the text.
- Element: When you press Right or Left, VoiceView navigates to the next or previous element on the screen.
Zooming in with Screen Magnifier
You may find that although you can make out most of the items on your Fire TV device screen, the occasional icon or bit of text is just too small to decipher. You could always grab a nearby pair of binoculars to get a closer look at the section you can’t make out, but Fire TV offers an electronic version of the same thing. It’s called Screen Magnifier, and it enables you to zoom in on a portion of the screen for a closer look.
To activate Screen Magnifier, choose Settings ⇒ Accessibility ⇒ Screen Magnifier. Fire TV turns on Screen Magnifier and displays a list of remote key combinations that you can use to control Screen Magnifier. I summarize those key combos in Table 8-2.
TABLE 8-2 Screen Magnifier Remote Keys
|
Press |
To |
|
Back + Fast Forward |
Toggle Screen Magnifier on or off |
|
Menu + Play/Pause |
Toggle zoom on and off |
|
Menu + Fast Forward |
Increase the zoom level |
|
Menu + Rewind |
Decrease the zoom level |
|
Menu + Up |
Pan a zoomed screen up |
|
Menu + Down |
Pan a zoomed screen down |
|
Menu + Left |
Pan a zoomed screen left |
|
Menu + Right |
Pan a zoomed screen right |
Switching to high-contrast text
If you have trouble reading text on the Fire TV screen, you may want to try a feature that was experimental as this book went to press: high-contrast text. With high-contrast text, Fire TV formats all regular screen text as follows:
- If the screen background is dark, Fire TV uses only white text with a black border.
- If the screen background is light, Fire TV uses only black text with a white border.
Note that when I say “regular” text, I’m talking about descriptive text, titles, settings, and so on. High-contrast text doesn’t apply to logos, artwork, or any proprietary text.
To switch to high-contrast text, choose Settings ⇒ Accessibility and then choose High-Contrast Text to switch that setting to On.
“Hearing” the action with audio descriptions
If you have trouble seeing what’s happening during a show, Fire TV offers a feature called Audio Description, which adds an audio track that describes what’s happening on the screen. You can enable Audio Description for over-the-air channels or Amazon Prime Video content. Here are the steps to follow:
- Choose Settings ⇒ Accessibility.
- Choose Audio Description.
-
To include the descriptive audio track on over-the-air TV, choose Over the Air Channels and then choose a volume level (Low, Medium, or High).
You also see a setting labeled Off, which is the one to choose if you later want to disable Audio Description for over-the-air TV.
-
To include the descriptive audio track on Amazon Prime Video content, choose Prime Video to switch that setting to On.
Note that the Prime Video setting doesn’t offer a volume level.
Fire TV now displays a descriptive audio track on the source(s) you selected.
Checking out the Fire TV features for the hearing impaired
If your hearing has deteriorated over the years, or if you have a hearing impairment in one or both ears, hearing Alexa’s responses and enjoying Fire TV videos can be a challenge. Fortunately, help is at hand. Fire TV has a few tools that you can configure to help or work around your hearing issues. The next few sections give you the lowdown on the hi-fi.
Making Alexa more hearing accessible
Fire TV and the Alexa app come with a few features that you can customize or turn on to work around hearing impairments:
- The Fire TV Cube Light Ring provides a visual indicator of the status of your device.
- The Fire TV Cube and most TVs have physical buttons you can press to adjust the volume.
- You can configure the Fire TV Cube version of Alexa to increase the volume for alarms, timers, and notifications. In the Alexa app, choose Devices ⇒ Echo & Alexa, tap your Fire TV Cube, tap Sounds, and then drag the Alarms, Timers, and Notification slider to the right to increase the default volume for these features.
- You can configure Fire TV to display subtitles on videos (see “Enabling subtitles” later in this chapter).
- You can connect Fire TV with Bluetooth headphones, as I describe earlier in this chapter (see “Pairing Bluetooth headphones”).
Enabling subtitles
The subtitles feature overlays text transcriptions — which Amazon calls subtitles — of the voice track in a TV show, movie, or video. Follow these steps to enable and customize subtitles:
- Choose Settings ⇒ Accessibility ⇒ Subtitles.
-
Choose the Subtitles setting.
Fire TV turns subtitles on and displays extra settings that enable you to customize the appearance of the subtitles. The phrase This is a preview that appears on the right of the screen shows you what your custom subtitles will look like. The main settings are as follows:
- Text: Changes the text size, color, and font, among others.
- Text Background: Changes the color of the background on which the subtitles appear.
- Window Background: Changes the color of the background of the entire horizontal strip on which the subtitles and their background appear.
For a bit more control over the look of your subtitles as they appear in Amazon videos, send your nearest web browser to www.primevideo.com/ccand use the Subtitles tab to configure your subtitle presets. Back on the Fire TV Subtitles screen, make sure the Use Amazon Web Settings for Amazon Video Subtitles setting is set to On. - For each setting you want to customize, choose the setting, use the screen that shows up to adjust the setting to your liking, and then press Back to return to the settings.
If you end up with subtitles that look downright awful, you can start over again quickly by scrolling to the bottom of the Subtitles screen and then choosing the Reset to Defaults command.
You can also control the look of subtitles as you’re watching a movie or TV show. During playback, press Menu to display the show’s option, and then choose Subtitles (or, in some cases, Subtitles and Audio). Fire TV displays controls similar to the ones shown in Figure 8-10, which enable you to choose a language, type size, and subtitle style. Note that you only see the Size and Style options if you have subtitles turned on in Settings.

FIGURE 8-10: You can use these controls to customize subtitles as you watch a show.
Not all videos support subtitles. When you open the details screen for a TV show or movie, look for the CC label, which identifies shows that support closed captioning (subtitles).
Browsing the Web
Your big-screen TV is awfully nice for watching your favorite TV shows and the latest movies, so wouldn’t it be even nicer if you could also use that screen real estate for your other favorite pastime? I speak, of course, of surfing the web and all that entails, from searching to shopping to social media. You bet that would be nice, and it’s eminently doable thanks to Fire TV support for not one, but two web browsers:
- Amazon Silk: This is Amazon’s Fire TV browser. It has a few video-related features, but it’s easily used as a relatively full-featured browser.
- Mozilla Firefox: This is the Fire TV version of the popular Firefox web browser, and it’s optimized for viewing and locating video content.
To install a web browser, choose Apps ⇒ Categories ⇒ Web Browser, choose the browser you want to use, and then choose Download.
Surfing with Silk
When you first open Silk, you see a Home screen similar to the one shown in Figure 8-11.
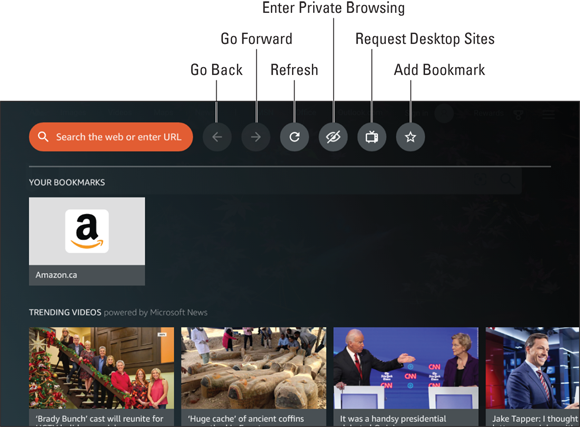
FIGURE 8-11: The Home screen of the Silk web browser.
There are four main sections on the Home screen:
- Toolbar: Icons for controlling Silk and page navigation:
- Search the Web or Enter URL: Enter search text or an address for the page you want to view.
- Go Back: Go back in the history of the current surfing session to the most recent page you’ve visited.
- Go Forward: Go forward in the history of the current surfing session to the most recent page you’ve visited.
- Refresh: Ask the web server to reload the current page.
- Enter Private Browsing: Run Silk in Private Browsing mode, which doesn’t save page browsing data such as the history of sites you visit and your search requests.
- Request Desktop Sites: Request the regular (desktop) version of the page rather than the default mobile version.
- Add Bookmark: Create a bookmark for the current page, which then appears in the Your Bookmarks section (see the next bullet point) for fast access.
- Your Bookmarks: Pages you’ve bookmarked for easy access. Note that Silk includes a bookmark for Amazon by default. Here are the techniques you can use to work with bookmarks:
- Opening a bookmarked site: Move the selector to the bookmark and then press Select.
- Bookmarking a site: Navigate to the site, press Menu to display the Home screen, and then choose Bookmark in the toolbar.
- Deleting a bookmark: On the Home screen, move the selector to the bookmark, press Menu, and then choose Delete.
- Trending Videos: A selection of videos curated by Microsoft News.
- Manage: Displays several tiles for managing Silk, including Clear Data (delete all your saved Silk browsing history, site data, and site files), Cursor Speed (change the speed of the cursor and scrolling), and Settings.
One setting you may want to change is the default search engine, which is Bing. To change the search engine, choose Settings ⇒ Advanced ⇒ Search Engine, and then select the search engine you prefer to use.
After you’ve used Silk to navigate to a web page, you see a large circle in the middle of the screen (pointed out in Figure 8-12), which Silk refers to as the cursor. You have two ways to manipulate the cursor:
- Use the Fire TV remote’s navigation buttons to move the cursor over the web page element you want to work with, such as a link or a text box. Press Select to choose that element (for example, open the linked page or enter text into the text box).
- Use a connected Bluetooth or USB mouse to move the cursor and click links and other page elements.
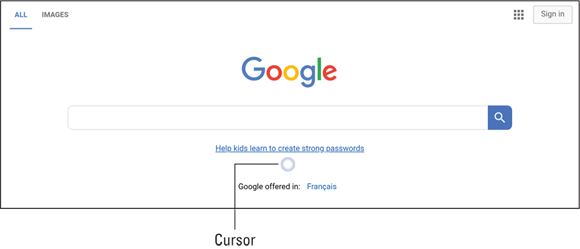
FIGURE 8-12: Silk displays a circular cursor that you manipulate to click links and other page elements.
To return to the Silk Home screen, press Menu.
Surfing with Firefox
When you first launch Firefox, the app asks if you want to leave Turbo mode turned on. Turbo mode automatically blocks trackers and ads, so it’s best to leave Turbo mode turned on. If you find that Turbo mode causes a website to break in some way, you can always turn off Turbo mode (as I describe in the following list) while viewing that site.
When Firefox opens, you see a screen similar to the one shown in Figure 8-13, which Firefox calls the homescreen.
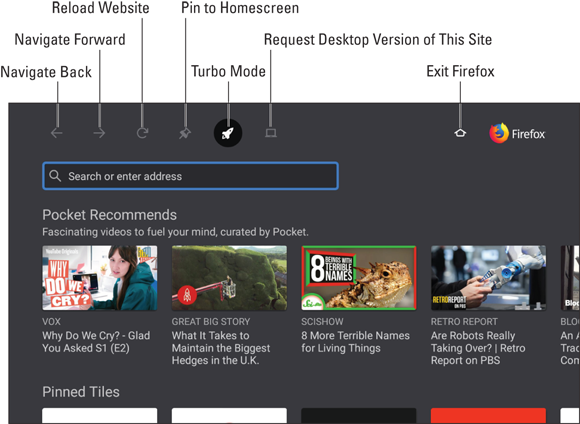
FIGURE 8-13: The homescreen of the Firefox Fire TV web browser.
There are five main sections on the homescreen:
- Toolbar: Icons for controlling Firefox and page navigation:
- Navigate Back: Go back in the history of the current surfing session to the most recent page you’ve visited.
- Navigate Forward: Go forward in the history of the current surfing session to the most recent page you’ve visited.
- Reload Website: Ask the web server to reload the current page.
- Pin to Homescreen: Add a tile for the current web page to the Pinned Tiles section of the homescreen.
- Turbo Mode: Toggle Turbo mode off or on.
- Request Desktop Version of This Site: Ask the web server to display the regular (desktop) version of the page rather than the default mobile version.
- Exit Firefox: Quit Firefox and return to Fire TV.
- Search or enter address: Displays the address of the current page and enables you to enter a search request or an address for the page you want to view.
- Pocket Recommends: A selection of videos curated by Pocket, a Mozilla company (the same company that makes Firefox).
- Pinned Tiles: Easy access to a selection of video-related web pages. Here are the techniques you can use to work with pinned tiles:
- Opening a pinned site: Move the selector to the pinned tile and then press Select.
- Pinning a site: Surf to the site, press Menu to display the homescreen, and then choose Pin to Homescreen in the toolbar.
- Unpinning a site: In the homescreen, move the selector to the tile of the site, press and hold the Select button, and then choose Remove.
- Settings: Enables you to configure a limited number of Firefox settings.
After you’ve surfed your merry way to a page, you see a large circle in the middle of the screen (similar to the Silk cursor pointed out in Figure 8-12), which is the pointer. You have two ways to manipulate the pointer:
- Use the Fire TV remote’s navigation buttons to move the pointer over the web page element you want to work with, such as a link or a text box. Press Select to choose that element (for example, open the linked page or enter text into the text box).
- Use a connected Bluetooth or USB mouse to move the pointer and click links and other page elements.
To return to the Firefox homescreen, press Menu.
Listening to Music
If you have an awesome sound system connected to your Fire TV device — or, even better, if your Fire TV device is an awesome sound system, such as a Fire TV Edition Soundbar — then cranking out tunes at an acceptably high volume is a must.
Although Fire TV is mostly about video stuff, it’s on speaking terms with a ton of audio content via apps such as Spotify and TuneIn Radio. To see and install a music or audio app, choose the Apps tab, choose Categories, and then open Music & Audio.
If you’re an Amazon Prime member, however, you probably want to get your music through Amazon, which offers two plans:
- Prime Music: This is free to Amazon Prime members and offers about two million songs ad-free.
- Amazon Music Unlimited: This costs Amazon Prime members $7.99 per month (or $79 per year) or non-Prime member $9.99 per month, but you get access (according to Amazon) to “tens of millions” of songs (and it’s ad-free).
Touring the Amazon Music app
Whichever plan you go with, you use the Amazon Music app on Fire TV to access your music and play it through your TV or its connected sound system. When you launch Amazon Music, you end up on a screen similar to the one shown in Figure 8-14.

FIGURE 8-14: The home screen of the Amazon Music app.
You navigate Amazon Music using the items displayed along the top of the screen:
- Now Playing: A thumbnail of whatever is currently playing. Choose the thumbnail to return to the current song.
- Browse: Displays a collection of playlists, albums, songs, and stations, many of which have been curated based on the music you’ve played in the past.
- Recents: Displays the albums, playlists, and stations that you’ve listened to most recently.
- My Music: Displays the artists, albums, playlists, genres, and songs that you’ve added to your My Music list on the Amazon Music website (
http://music.amazon.com). - Search: Enables you to search for an artist, album, song, playlist, or station.
Controlling music playback
Use your Alexa Voice Remote (or the remote feature in the Fire TV mobile app) to control playback using the following buttons:
- Play/Pause: Pause and restart the song.
- Rewind: Skip back to the beginning of the song. Press Rewind twice to skip to the previous song in the current album or playlist.
- Fast Forward: Skip to the next song in the current album or playlist.
- Volume Up: Raise the volume one notch; press and hold Volume Up to raise the volume quickly.
- Volume Down: Decrease the volume by one value; press and hold Volume Down to decrease the volume quickly.
- Mute: Toggle the volume off and on.
In the playback screen, shown in Figure 8-15, you can also access the following controls:
- Repeat: Choose this icon to start the current album or playlist over from the beginning when it ends. Choose this icon a second time to repeat only the currently playing song.
- Shuffle: Choose this icon to play the songs in the current album or playlist in random order.
- More Options: Choose this icon to display two extra controls: View Artist (to see more music from the current artist) and View Album (to see a list of the songs on the current album).
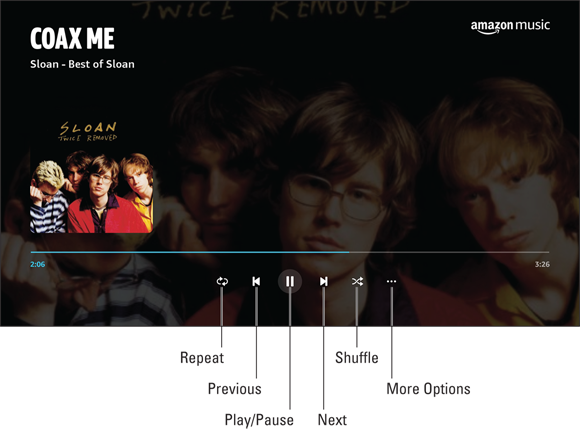
FIGURE 8-15: The playback screen of the Amazon Music app.
For voice control of the music playback, here’s a sampling of what you can say:
- “Pause.”
- “Resume.”
- “Previous.”
- “Next.”
- “Volume up.”
- “Volume down.”
- “Set volume to X” (where X is the volume setting you want).
- “Mute.”
- “Unmute.”
- “Turn shuffle on.”
- “Turn shuffle off.”
- “Turn repeat on.”
- “Turn repeat on song.”
- “Turn repeat off.”
In the preceding playback requests, if you’re using a Fire TV Cube or other Alexa-enabled device, remember to start the request with the wake word Alexa.
Viewing Your Photos and Videos
You’ll spend the bulk of your Fire TV career watching content produced by other people, but that doesn’t mean you can’t watch your own stuff, and by “stuff” I mean your own photos and videos. There are two roads you can take to viewing personal content on Fire TV:
- Media Player: On Fire TV Edition televisions, you can use this app to view photos and videos that are stored on an external USB drive. As a bonus, Media Player is also happy to play any music files that you add to the drive. Note that, for reasons unknown, Fire TV also refers to this app as Gallery.
- Amazon Photos: If you’re an Amazon Prime member, you get free unlimited storage of your photos and videos on Amazon Photos, which you can then access through Fire TV using the Amazon Photos app.
Viewing photos and videos using Fire TV Edition Media Player
Earlier in this chapter (see “Adding a USB storage drive”), I mention that if you ask Amazon to format the drive as an external device, then you can use the drive to store files such as photos and videos (and music files, too). After you’ve added your files to the drive, reconnect it to your Fire TV device, wait until you see the notification shown in Figure 8-16, and then press Menu to launch the Media Player app.

FIGURE 8-16: The home screen of the Amazon Music app.
The notification only appears onscreen for a few seconds. If you miss it, there are a couple of routes you can take to launch Media Player for the first time:
- Choose Settings ⇒ Inputs ⇒ Media Player.
- Choose Settings ⇒ Applications ⇒ Manage Installed Applications ⇒ Gallery ⇒ Launch Application.
The first time you launch Media Player (or Gallery, as Fire TV often insists on calling it), the app asks for permission to access the files on your device, as shown in Figure 8-17. Choose Allow.

FIGURE 8-17: When Media Player asks for permission to access your files, choose Allow.
When Media Player loads, it examines your external USB drive for photos, videos, and music files. Note that it looks both in the main folder of the drive and in any subfolders that the drive contains. You navigate Media Player using the following four tabs at the top of the screen:
- Your Files: Displays all the media files and subfolders found on the drive.
- Videos: Displays all the video files and subfolders that contain video files found on the drive.
- Images: Displays all the image files and subfolders that contain image files found on the drive.
- Audio: Displays all the audio files and subfolders that contain audio files found on the drive.
When you navigate to a tab, Media Player shows several subtabs — View All, 0, Photos, and Seagate USB Drive — pointed out in Figure 8-18. Choose View All to see everything; choose 0 to see what’s stored internally on Fire TV; and choose the other subtabs to see what’s in the drive’s main folder and subfolders.
Choose an item to display it; then use the Right and Left navigation ring buttons to cycle through the media.

FIGURE 8-18: Selecting a tab displays several subtabs.
Viewing photos and videos with the Amazon Photos app
If you’re an Amazon Prime member who has taken advantage of the unlimited storage you get with Amazon Photos, you may wonder if you can then view those photos on Fire TV. Sure you can! Choose Apps ⇒ Categories ⇒ Photo & Video, and then install the Amazon Photos app.
When you first launch Amazon Photos, the app takes you through a brief introduction. With the intro out of the way, the main app screen displays a long line of tabs across the top: Your Photos, Family Vault, Videos, Albums, Folders, People, and Places. Select a tab to view the photos (or videos) in that category; then choose a photo to view it full-screen. Use the Right and Left navigation ring buttons to move through the photos. When you’re done, press Back to return to the previous tab.
Running a Fire TV slideshow
Notice in Figure 8-18 that the upper-right corner of the screen includes a Start Slideshow command. The same command also appears in Amazon Photos when you open a photo location. Choose Start Slideshow (or press Play/Pause) to display the current folder’s photos in a slideshow on Fire TV.
During the slideshow, press Menu to set the following options:
- Album: Choose a different photo location on the external drive.
- Slide Style: Choose how you want Fire TV to display each image (such as Pan & Zoom or Dissolve).
- Slide Speed: Choose the rate at which Fire TV displays the photos: Slow, Medium, or Fast.
- Shuffle: Toggle shuffle on (to display the photos randomly) or off (to display them in the order in which they appear in the folder).
Fire TV also displays a slideshow as a screensaver when your Fire TV has been idle for a set amount of time. To configure this screensaver, choose Settings ⇒ Display & Sounds ⇒ Screen Saver. Besides the options I list earlier, you can also configure the following:
-
Current Screensaver: You can pull screensaver photos from Amazon, your most recent photos added to Amazon Photos, or from your Photo Booth folder.
To set a specific Amazon Photos folder as the screensaver source, open the folder, press Menu, and then choose Set as Screensaver. As useful as it may seem, I’m afraid that the Fire TV screensaver doesn’t offer the option of using a folder from your external storage drive. - Start Time: Specify how much time Fire TV must be idle before the screensaver kicks in.
- Alexa Hints: Toggles on or off the screensaver text that gives you hints on how to use Alexa.