CHAPTER 11
Working with Photos and Video

Your iPhone’s Camera app enables you to take high-quality still photos and videos. You can edit photos or apply filters to them, trim video clips down to length, and easily share both photos and videos.
Take Photos with the Camera App
Take Live, Timed, and Different-Aspect Photos
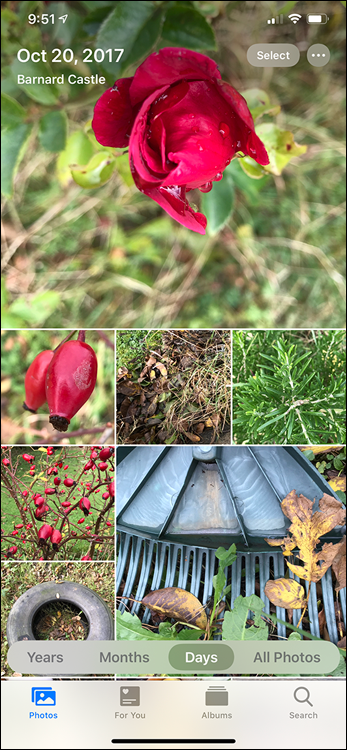
Browse Photos Using Years, Months, and Days
Browse Photos Using Shared Albums
Share Photos Using iCloud Photos
Take Photos with the Camera App
Your iPhone includes a high-resolution rear camera and a lower-resolution screen-side camera. Both cameras can take photos and videos, and the screen-side camera works for video calls, too. To take photos using the camera, you use the Camera app. This app includes a digital zoom feature for zooming in and out; a flash that you can set to On, Off, or Auto; and a High Dynamic Range (HDR) feature that combines several photos into a single photo with adjusted color balance and intensity.
Take Photos with the Camera App
Open the Camera App
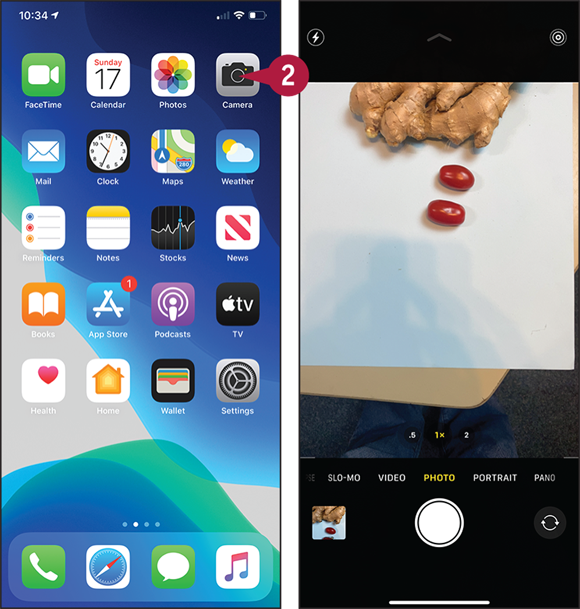
![]() Swipe up from the bottom of the screen.
Swipe up from the bottom of the screen.
The Home screen appears.
Note: From the lock screen, you can open the Camera app by swiping left.
![]() Tap Camera (
Tap Camera (![]() ).
).
The Camera app opens and displays whatever is in front of the lens.

Compose the Photo and Zoom if Necessary
![]() Aim the iPhone so that your subject appears in the middle of the photo area. To focus on an item not in the center of the frame, tap that item to move the focus rectangle to it.
Aim the iPhone so that your subject appears in the middle of the photo area. To focus on an item not in the center of the frame, tap that item to move the focus rectangle to it.
Note: If you need to take tightly composed photos, get a tripod mount for the iPhone. You can find various models on eBay and photography sites.
![]() You can tap the zoom buttons to zoom to .5X, 1X, or 2X using different lenses. The iPhone 11 does not have 2X zoom.
You can tap the zoom buttons to zoom to .5X, 1X, or 2X using different lenses. The iPhone 11 does not have 2X zoom.
![]() If you need to zoom in, tap and hold the Zoom readout.
If you need to zoom in, tap and hold the Zoom readout.
The zoom track appears.
![]() Drag along the zoom track to zoom.
Drag along the zoom track to zoom.
Note: You can also zoom in by placing two fingers together on the screen and pinching outward. To zoom out, pinch inward.
Choose Flash Settings
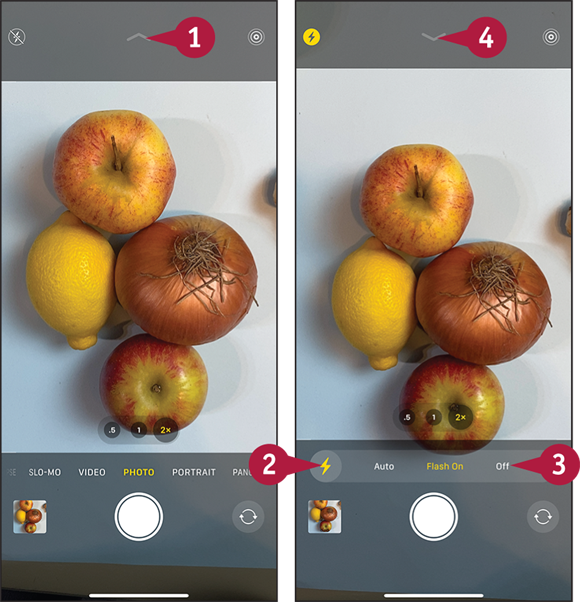
![]() Tap Show Controls (
Tap Show Controls (![]() ).
).
The Controls bar appears above the Shutter button.
![]() Tap Flash (
Tap Flash (![]() ,
, ![]() , or
, or ![]() ).
).
The Flash settings appear.
![]() Tap Flash On to use the flash, Auto to use the flash if there is not enough light without it, or Off to turn the flash off.
Tap Flash On to use the flash, Auto to use the flash if there is not enough light without it, or Off to turn the flash off.
![]() Tap Hide Controls (
Tap Hide Controls (![]() ).
).
The Controls bar disappears.
Take the Photo and View It
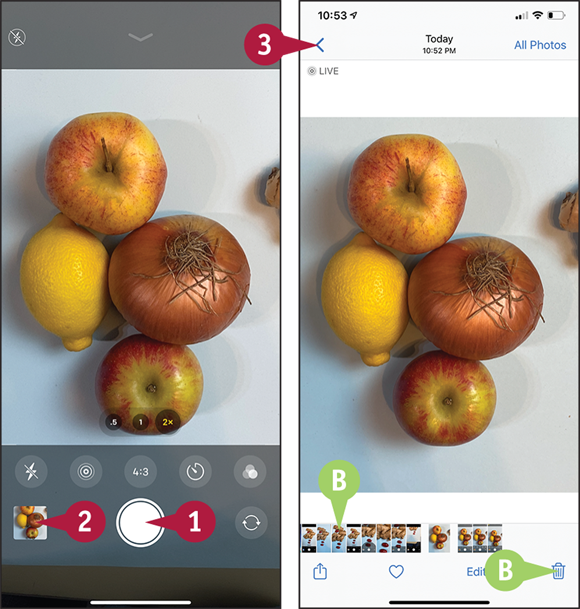
![]() Tap Take Photo (
Tap Take Photo (![]() ).
).
Note: You can drag Take Photo (![]() ) left to take a burst of photos.
) left to take a burst of photos.
The Camera app takes the photo and displays a thumbnail.
![]() Tap the thumbnail.
Tap the thumbnail.
The photo appears.
![]() From the photo screen, swipe or tap a thumbnail to display another photo. Tap Delete (
From the photo screen, swipe or tap a thumbnail to display another photo. Tap Delete (![]() ) to delete the current photo.
) to delete the current photo.
![]() Tap Back (
Tap Back (![]() ) when you want to go back to the Camera app.
) when you want to go back to the Camera app.
Take Live, Timed, and Different-Aspect Photos
The Camera app’s Live Photo feature enables you to capture several seconds of video around a still photo. Live Photo is great for photographing moving subjects or setting the scene.
The self-timer feature lets you set the app to take a photo after a delay of 3 seconds or 10 seconds, which is good for group shots and for avoiding camera shake. You can also take photos in different-aspect ratios, such as square photos, and capture panoramas.
Take Live, Timed, Portrait, and Different-Aspect Photos
Open the Camera App, Take a Live Photo, and View It
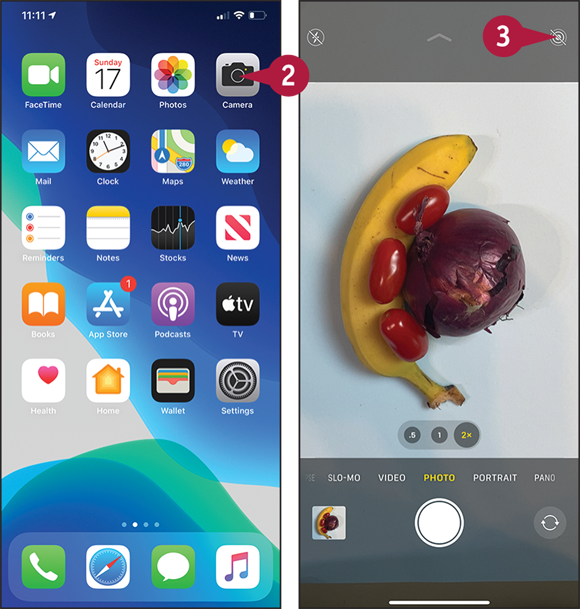
![]() Swipe up from the bottom of the screen.
Swipe up from the bottom of the screen.
The Home screen appears.
![]() Tap Camera (
Tap Camera (![]() ).
).
The Camera app opens.
![]() Tap Live (
Tap Live (![]() changes to
changes to ![]() ).
).
Note: Live Photo starts recording video as soon as you enable the feature. Live Photo discards the video except for the segments before and after photos you shoot.
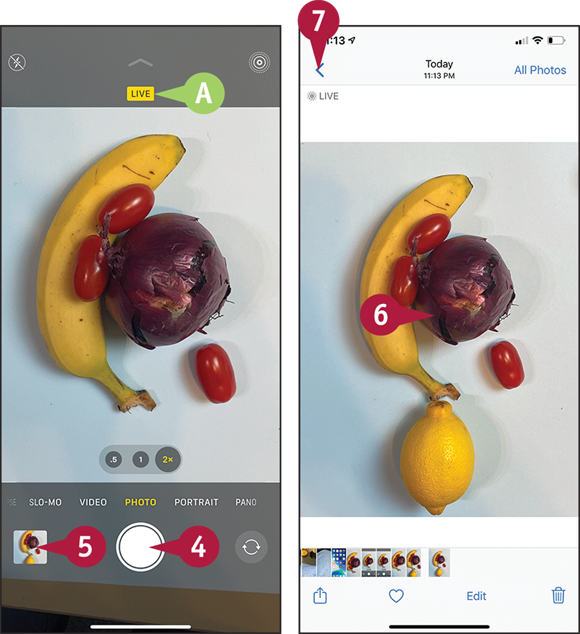
![]() The Live badge appears briefly.
The Live badge appears briefly.
![]() Tap Take Photo (
Tap Take Photo (![]() ).
).
The Camera app captures the Live Photo.
![]() Tap the photo’s thumbnail.
Tap the photo’s thumbnail.
The photo opens.
The Live Photo segment plays.
![]() Tap and hold the photo to play the Live Photo segment again.
Tap and hold the photo to play the Live Photo segment again.
![]() Tap Back (
Tap Back (![]() ).
).
The Camera app appears again.
Take a Timed Photo
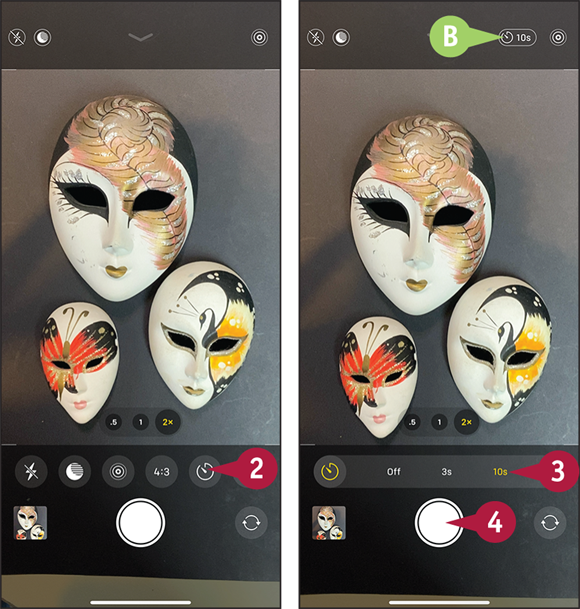
![]() Tap Show Controls (
Tap Show Controls (![]() ).
).
The control bar appears.
![]() Tap Timer (
Tap Timer (![]() ).
).
The Timer settings appear.
![]() Tap 3s or 10s to set the delay.
Tap 3s or 10s to set the delay.
![]() The delay appears at the top of the screen.
The delay appears at the top of the screen.
![]() Tap Take Photo (
Tap Take Photo (![]() ).
).
Note: The Camera app displays an on-screen countdown, and the rear flash flashes to indicate the countdown to the subject.
When the countdown ends, the Camera app takes a photo.
Note: The timer remains set until you change it.
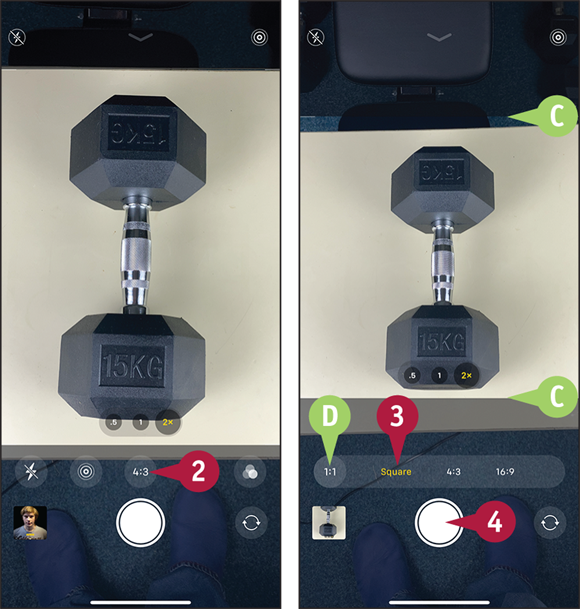
Take a Photo with a Different-Aspect Ratio
![]() Tap Show Controls (
Tap Show Controls (![]() ).
).
The control bar appears.
![]() Tap Aspect Ratio, the button that shows the current aspect ratio, such as 4:3.
Tap Aspect Ratio, the button that shows the current aspect ratio, such as 4:3.
The Aspect Ratio controls appear.
![]() Tap the aspect ratio you want, such as Square or 16:9.
Tap the aspect ratio you want, such as Square or 16:9.
![]() The capture area takes on the aspect ratio you chose.
The capture area takes on the aspect ratio you chose.
![]() The Aspect Ratio button shows the aspect ratio. If you chose Square, the button shows 1:1.
The Aspect Ratio button shows the aspect ratio. If you chose Square, the button shows 1:1.
![]() Tap Take Photo (
Tap Take Photo (![]() ).
).
Using Portrait Mode
The Camera app includes Portrait Mode, a mode optimized for taking portraits. After switching to Portrait Mode, you can apply special lighting presets to make the subject look the way you want. You can also edit or remove the Portrait Mode effect after taking a photo.
You can use Portrait Mode with either the main camera on the back of the iPhone or with the front-facing “selfie” camera.
Using Portrait Mode
![]() Swipe up from the bottom of the screen.
Swipe up from the bottom of the screen.
The Home screen appears.
![]() Tap Camera (
Tap Camera (![]() ).
).
The Camera app opens.
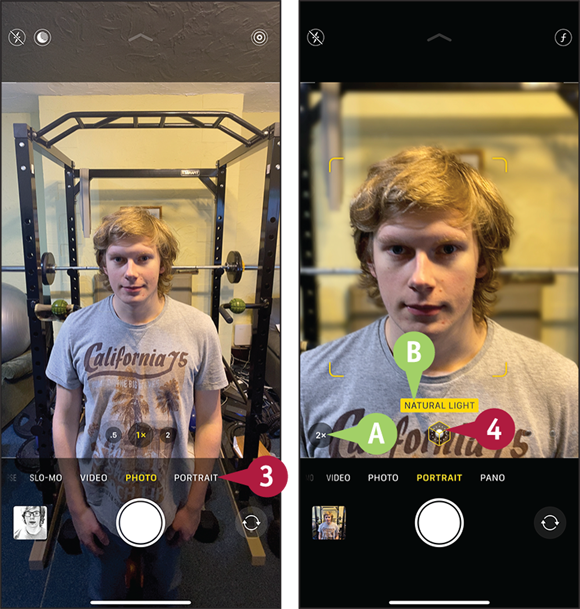
![]() Tap Portrait.
Tap Portrait.
The Camera app switches to Portrait Mode.
![]() On iPhone 11 Pro models, the Camera app switches to its 2X lens, making the subject appear larger. The 2X lens also gives better focus separation.
On iPhone 11 Pro models, the Camera app switches to its 2X lens, making the subject appear larger. The 2X lens also gives better focus separation.
![]() The readout shows the current lighting effect.
The readout shows the current lighting effect.
![]() Tap and hold Lighting Effect. The icon displayed varies depending on which effect is currently selected.
Tap and hold Lighting Effect. The icon displayed varies depending on which effect is currently selected.
The Lighting Effect wheel appears.
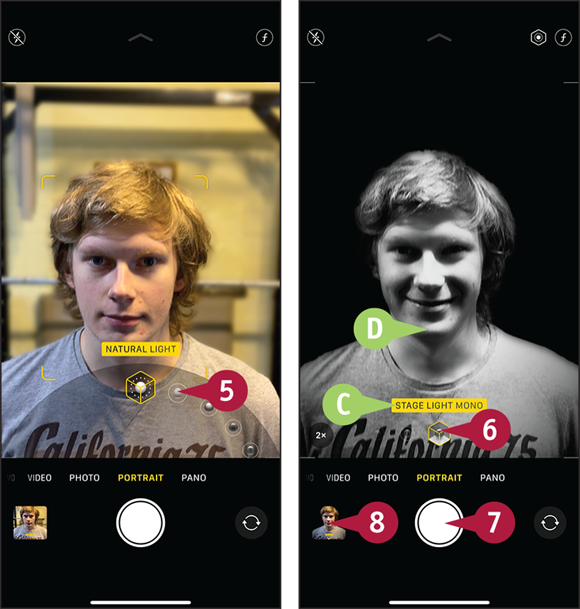
![]() Rotate the Lighting Effect wheel clockwise or counterclockwise.
Rotate the Lighting Effect wheel clockwise or counterclockwise.
Note: You can also tap Lighting Effect to display the wheel, and then tap an icon on it.
![]() The next lighting effect appears.
The next lighting effect appears.
![]() The preview shows the lighting effect applied.
The preview shows the lighting effect applied.
![]() Release the Lighting Effect wheel when you find the effect you want.
Release the Lighting Effect wheel when you find the effect you want.
![]() Tap Take Photo (
Tap Take Photo (![]() ).
).
![]() Tap the photo thumbnail.
Tap the photo thumbnail.

The photo opens.
![]() The Portrait readout appears.
The Portrait readout appears.
![]() Tap Edit.
Tap Edit.
The photo opens for editing.
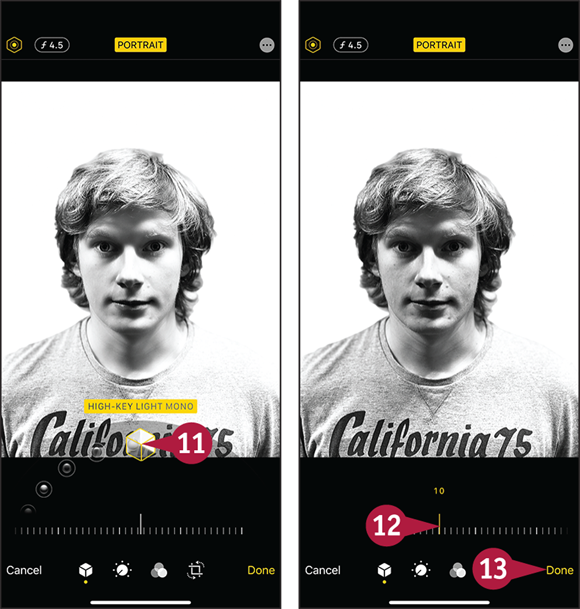
![]() Tap and hold Lighting Effect. As before, the icon varies, depicting the selected lighting effect.
Tap and hold Lighting Effect. As before, the icon varies, depicting the selected lighting effect.
The Lighting Effect Wheel appears.
![]() Rotate the Lighting Effect wheel to change the effect.
Rotate the Lighting Effect wheel to change the effect.
![]() To adjust the intensity of the effect, scroll the bar left or right.
To adjust the intensity of the effect, scroll the bar left or right.
![]() Tap Done.
Tap Done.
The photo closes.
Apply Filters to Your Photos
You can use the Filter feature in the Camera app to change the look of a photo by applying a filter such as Vivid, Dramatic Warm, Mono, Silvertone, or Noir.
You can apply a filter either before taking the photo or after taking it. If you apply the filter before taking the photo, you can remove the filter afterward; the filter is an effect applied to the photo, not an integral part of the photo.
Apply Filters to Your Photos
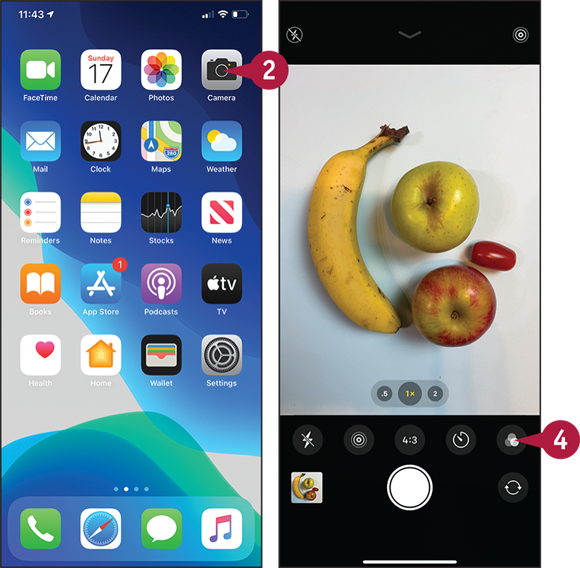
![]() Swipe up from the bottom of the screen.
Swipe up from the bottom of the screen.
The Home screen appears.
![]() Tap Camera (
Tap Camera (![]() ).
).
The Camera app opens.
![]() Tap Show Controls (
Tap Show Controls (![]() ).
).
The control bar appears.
![]() Tap Filters (
Tap Filters (![]() ).
).
The Filters screen appears.
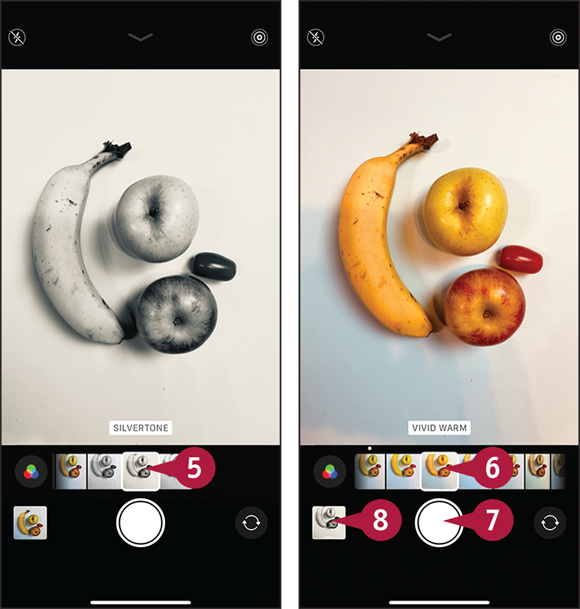
![]() Tap the filter you want to preview.
Tap the filter you want to preview.
Camera applies the filter to the screen.
![]() Tap the filter you want to apply.
Tap the filter you want to apply.
![]() Tap Take Photo (
Tap Take Photo (![]() ).
).
![]() Tap the photo’s thumbnail.
Tap the photo’s thumbnail.
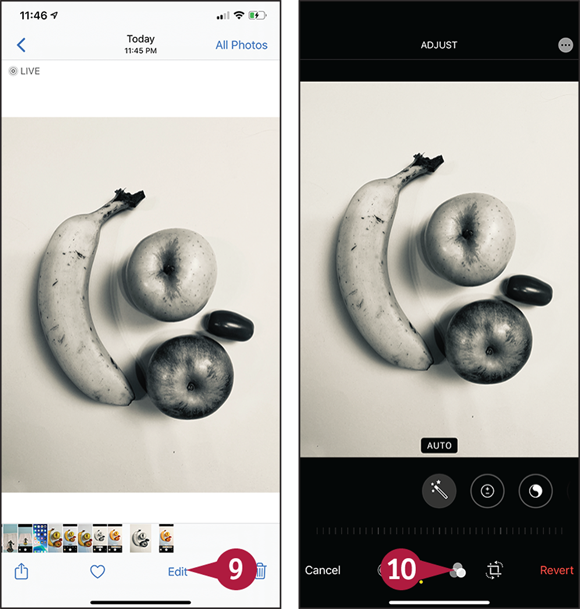
The photo appears.
![]() Tap Edit.
Tap Edit.
The Edit Photo screen appears, showing the editing tools.
![]() Tap Filters (
Tap Filters (![]() ).
).
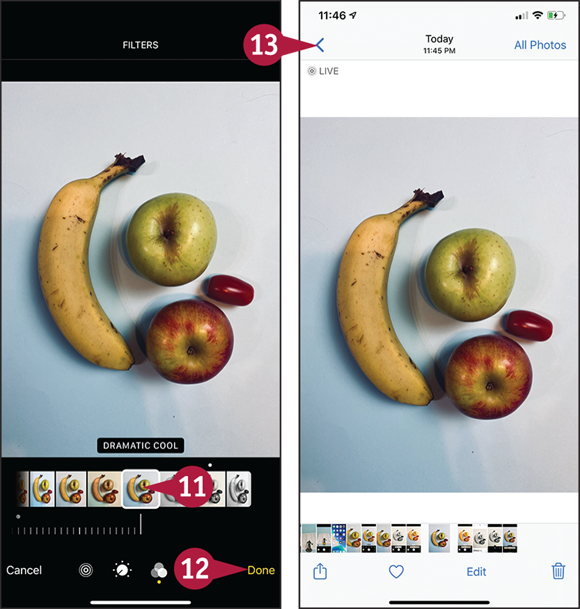
The Choose Filter screen appears.
![]() Tap the filter you want to apply.
Tap the filter you want to apply.
Note: Tap Original if you want to remove filtering.
![]() Tap Done.
Tap Done.
iOS saves the change to the photo.
![]() Tap Back (
Tap Back (![]() ) to return to the Camera app.
) to return to the Camera app.
Edit Your Photos
To improve your photos, you can use the powerful but easy-to-use editing tools your iPhone includes. These tools include rotating a photo to a different orientation, straightening it by rotating it a little, and cropping off the parts you do not need.
You can access the editing tools either through the Recently Added album in the Photos app or through the Photos app. To start editing a photo, you open the photo by tapping it, and then tap Edit.
Edit Your Photos
Open a Photo for Editing
![]() Swipe up from the bottom of the screen.
Swipe up from the bottom of the screen.
The Home screen appears.
![]() Tap Photos (
Tap Photos (![]() ).
).
The Photos app opens.
![]() Navigate to the photo you want to edit.
Navigate to the photo you want to edit.
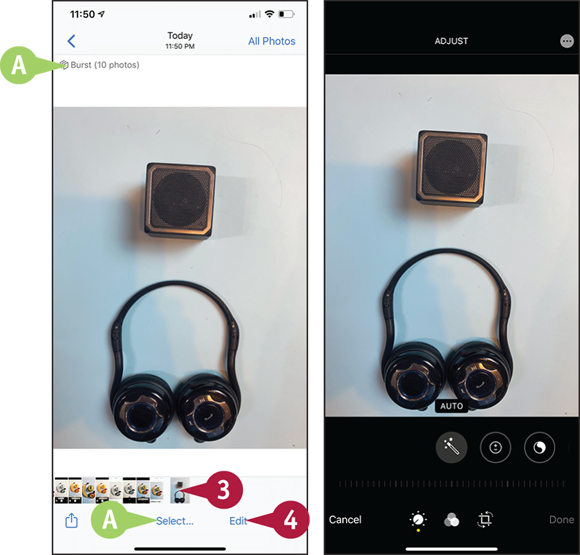
![]() If the photo is part of a burst, the Burst readout appears. You can tap Select to select another photo from the burst instead of the default photo.
If the photo is part of a burst, the Burst readout appears. You can tap Select to select another photo from the burst instead of the default photo.
![]() Tap Edit.
Tap Edit.
The Editing controls appear.
Crop, Rotate, and Straighten a Photo
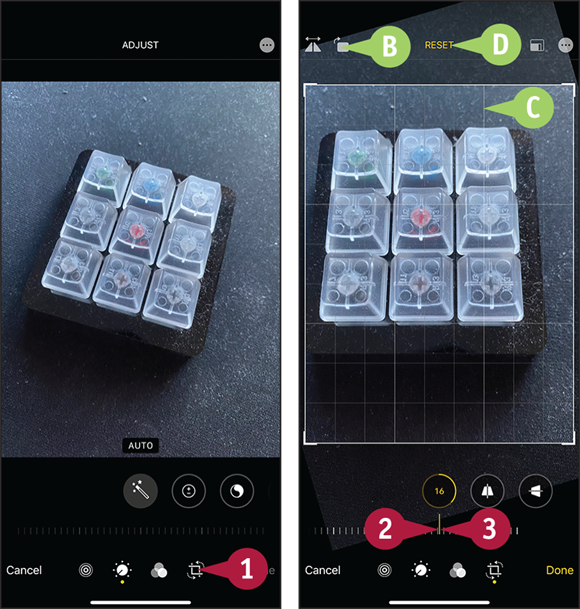
![]() Tap Crop (
Tap Crop (![]() ).
).
The tools for cropping, straightening, and rotating appear.
![]() You can tap Rotate (
You can tap Rotate (![]() ) to rotate the photo 90 degrees clockwise.
) to rotate the photo 90 degrees clockwise.
![]() Tap and hold the degree bar.
Tap and hold the degree bar.
![]() The grid appears.
The grid appears.
![]() Drag the degree dial left or right to straighten the photo.
Drag the degree dial left or right to straighten the photo.
![]() You can tap Reset to reset the photo.
You can tap Reset to reset the photo.
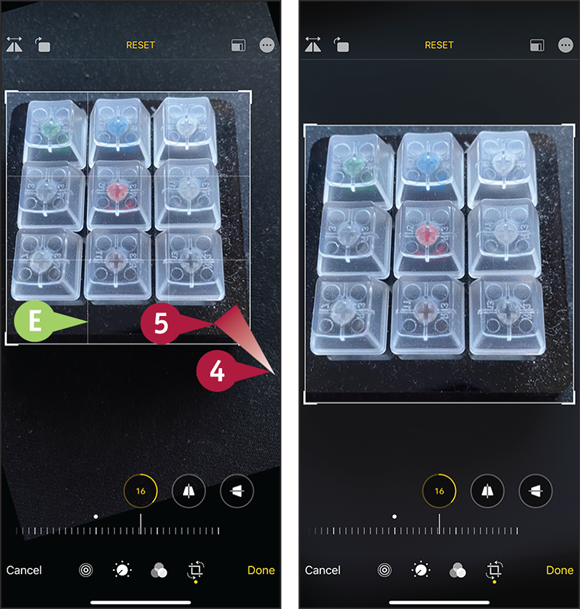
![]() Tap and hold an edge or corner of the crop box.
Tap and hold an edge or corner of the crop box.
![]() The nine-square grid appears. This is to help you compose the cropped photo.
The nine-square grid appears. This is to help you compose the cropped photo.
![]() Drag the edge or corner of the crop box to select only the area you want to keep.
Drag the edge or corner of the crop box to select only the area you want to keep.
Enhance the Colors in a Photo
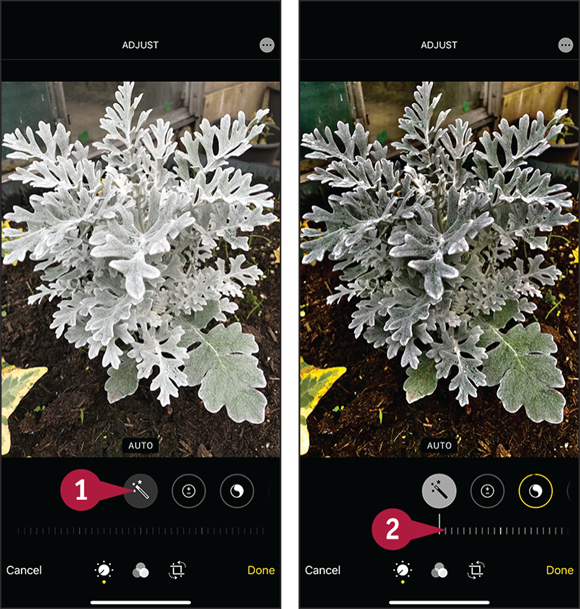
![]() Tap Auto-Enhance (
Tap Auto-Enhance (![]() changes to
changes to ![]() ).
).
iOS calculates a suitable enhancement and applies it.
Note: Tap Auto-Enhance again (![]() changes to
changes to ![]() ) if you want to remove the enhancement.
) if you want to remove the enhancement.
![]() Optionally, drag the slider left or right to adjust the degree of enhancement.
Optionally, drag the slider left or right to adjust the degree of enhancement.
The Red-Eye Reduction feature enables you to restore unwanted red eyes to normality. The Enhance feature enables you to adjust a photo’s color balance and lighting quickly using default algorithms that analyze the photo and try to improve it. The Enhance feature often works well, but for greater control, you can use the Light settings and the Color settings to tweak the exposure, highlights, shadows, brightness, black point, contrast, vibrancy, and other settings manually.
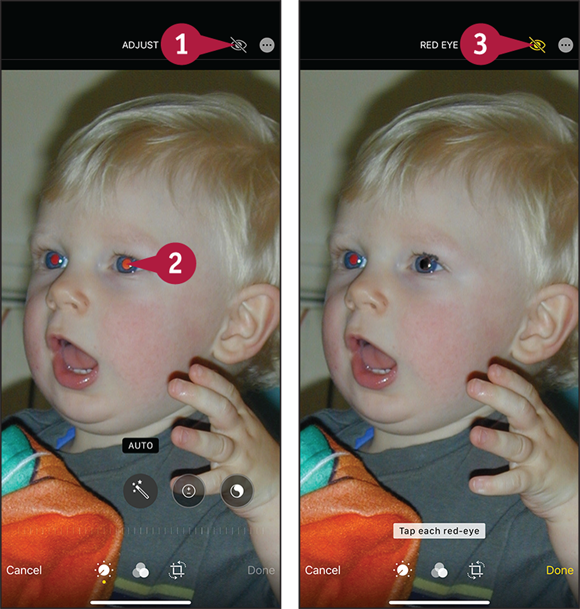
Remove Red Eye from a Photo
Note: You may need to zoom in on the photo in order to touch the red-eye patches accurately.
![]() Tap Red-Eye Reduction (
Tap Red-Eye Reduction (![]() ).
).
iOS prompts you to tap each eye.
![]() Tap each red eye.
Tap each red eye.
iOS removes the red eye.
![]() Tap Red-Eye Reduction (
Tap Red-Eye Reduction (![]() ).
).
iOS turns off the Red-Eye Reduction tool.

Fine-Tune a Photo
![]() Tap Adjust (
Tap Adjust (![]() ).
).
The Adjust controls appear.
Note: You may want to try tapping Auto-Enhance and then adjusting the automatic enhancements manually. This section demonstrates making the changes from scratch.
![]() Swipe left on the Adjust controls to bring the control you want to adjust to the middle of the screen, at which point it becomes active.
Swipe left on the Adjust controls to bring the control you want to adjust to the middle of the screen, at which point it becomes active.
![]() The name of the active control appears, such as Exposure.
The name of the active control appears, such as Exposure.
![]() Drag the slider left or right to adjust the intensity of the active effect. For example, if the photo is too dark, you might increase the exposure to lighten it, as in this example.
Drag the slider left or right to adjust the intensity of the active effect. For example, if the photo is too dark, you might increase the exposure to lighten it, as in this example.
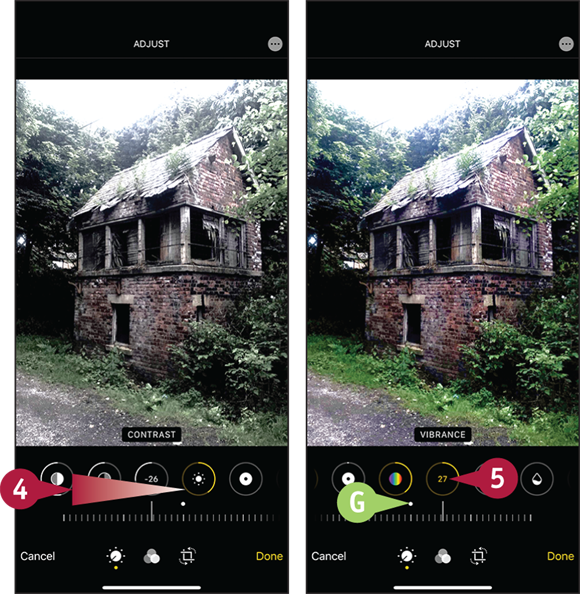
![]() Scroll the Adjust controls farther left to display more controls.
Scroll the Adjust controls farther left to display more controls.
![]() Tap the active control to enable or disable its effect.
Tap the active control to enable or disable its effect.
Note: Photos remembers the setting for a disabled effect, so when you re-enable an effect, it has the same value as before you disabled it.
![]() The white dot indicates the zero point, at which the effect is disabled.
The white dot indicates the zero point, at which the effect is disabled.
Note: A partial white ring (![]() ) indicates a negative value for the setting; a partial yellow ring (
) indicates a negative value for the setting; a partial yellow ring (![]() ) indicates a positive value; a gray ring indicates the effect has a zero value or is disabled.
) indicates a positive value; a gray ring indicates the effect has a zero value or is disabled.

![]() Adjust other settings as needed to make the photo look the way you want.
Adjust other settings as needed to make the photo look the way you want.
![]() You can tap Sharpness (
You can tap Sharpness (![]() ) to adjust the level of manufactured additional detail in the photo. This will not fix a blurry image but will accentuate existing detail.
) to adjust the level of manufactured additional detail in the photo. This will not fix a blurry image but will accentuate existing detail.
![]() You can tap Noise Reduction (
You can tap Noise Reduction (![]() ) to reduce “noise,” artifacts caused by taking photos in inadequate lighting. Reducing noise may also remove detail you want to keep.
) to reduce “noise,” artifacts caused by taking photos in inadequate lighting. Reducing noise may also remove detail you want to keep.
![]() Tap Done.
Tap Done.
Photos displays the photo with the edits you have applied.
Photos preserves the original photo, and you can revert to it if you want.
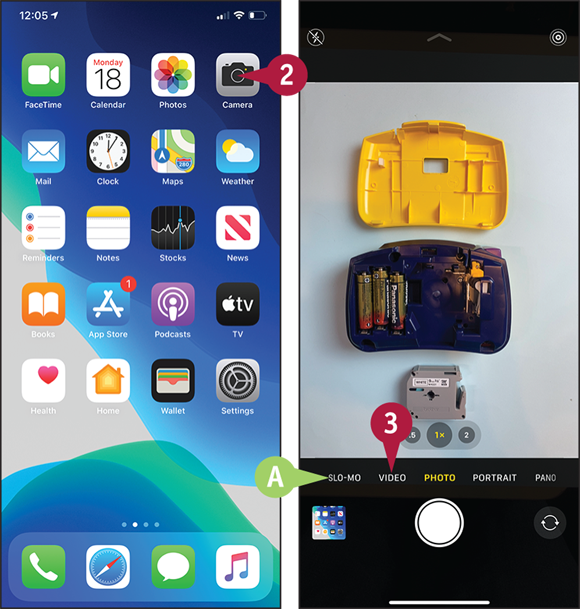
Capture Video
As well as capturing still photos, the Camera app can capture high-quality, full-motion video in either portrait orientation or landscape orientation. You launch the Camera app as usual, and then switch it to Video Mode for regular-speed shooting or to Slo-Mo Mode to shoot slow-motion footage. You can use flash, but it is effective only at close range for video. After taking the video, you can edit the clip by trimming off any unwanted frames at the beginning and end.
Capture Video
![]() Swipe up from the bottom of the screen.
Swipe up from the bottom of the screen.
The Home screen appears.
![]() Tap Camera (
Tap Camera (![]() ).
).
The Camera screen appears, showing the image the lens is seeing.
![]() Tap Slo-Mo if you want to shoot slow-motion footage.
Tap Slo-Mo if you want to shoot slow-motion footage.
Note: You can start shooting video quickly by tapping and holding Take Photo (![]() ). When you have time, it is better to tap Video to switch to the video view first, as the video camera has a different field of view than the still camera.
). When you have time, it is better to tap Video to switch to the video view first, as the video camera has a different field of view than the still camera.
![]() Tap Video.
Tap Video.
The video image and video controls appear.
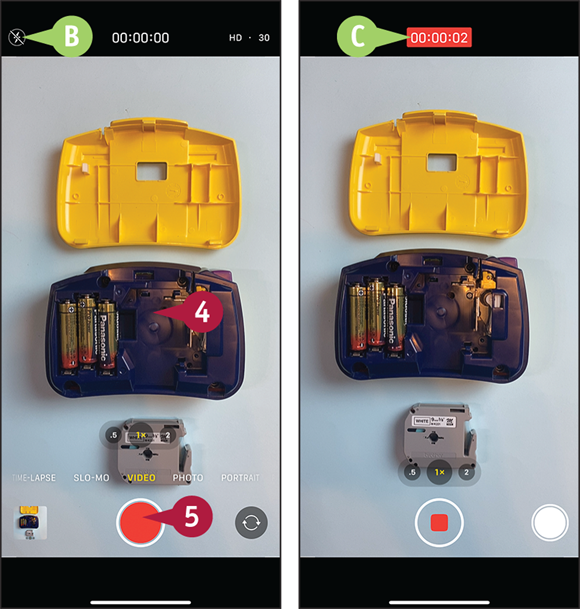
![]() Aim the camera at your subject.
Aim the camera at your subject.
![]() If you need to use the flash for the video, tap Flash (
If you need to use the flash for the video, tap Flash (![]() ,
, ![]() , or
, or ![]() ), and then tap Auto or On.
), and then tap Auto or On.
Note: To focus on a particular area of the screen, tap that area.
![]() Tap Record (
Tap Record (![]() ).
).
![]() The camera starts recording, and the time readout shows the time that has elapsed.
The camera starts recording, and the time readout shows the time that has elapsed.
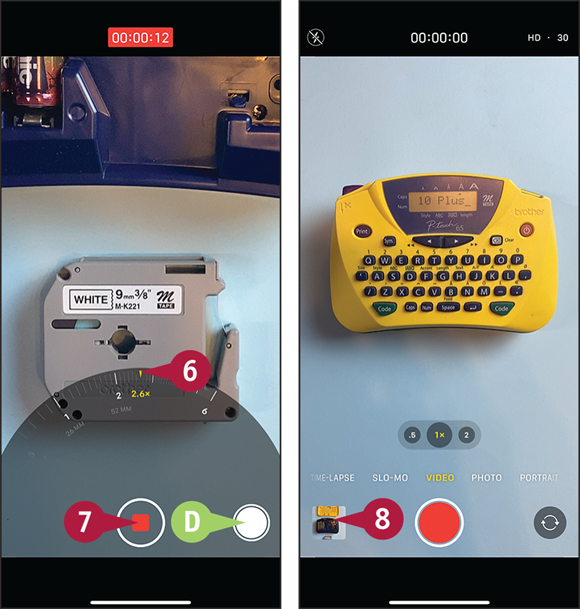
![]() To zoom in, tap and hold the Zoom readout, and then drag along the zoom track.
To zoom in, tap and hold the Zoom readout, and then drag along the zoom track.
Note: You can also zoom by placing your thumb and forefinger on the screen and pinching apart or pinching together.
![]() To take a still photo while shooting video, tap Take Photo (
To take a still photo while shooting video, tap Take Photo (![]() ).
).
![]() To finish recording, tap Stop (
To finish recording, tap Stop (![]() ).
).
The Camera app stops recording and displays a thumbnail of the video’s first frame.
![]() Tap the thumbnail.
Tap the thumbnail.
The video appears and starts playing automatically.
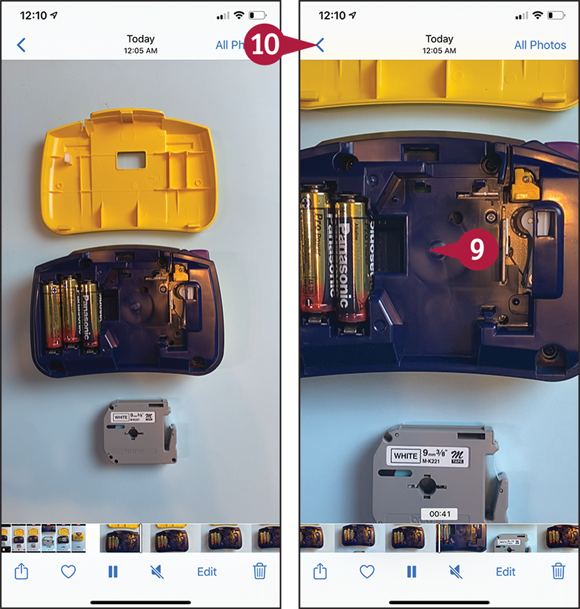
![]() Tap anywhere on the screen to display the video controls. These disappear automatically after a few seconds of not being used.
Tap anywhere on the screen to display the video controls. These disappear automatically after a few seconds of not being used.
Note: To trim the clip down to only the section you need, tap Edit. Tap and hold the left trim handle (![]() ) so that its background turns yellow, and then drag it to the starting frame. Drag the right trim handle (
) so that its background turns yellow, and then drag it to the starting frame. Drag the right trim handle (![]() ) to the ending frame. Tap Done, and then tap Save as New Clip.
) to the ending frame. Tap Done, and then tap Save as New Clip.
![]() When you finish viewing the video, tap Back (
When you finish viewing the video, tap Back (![]() ).
).
The Camera app appears again.
Browse Photos Using Years, Months, and Day
You can use the Photos app to browse the photos you have taken with your iPhone’s camera, photos you have synced using iTunes or via iCloud’s Shared Albums feature, and images you save from e-mail messages, instant messages, or web pages.
You can browse your photos by dates and locations using the smart groupings that Photos creates. Each Year grouping contains Months, which contain Days, which contain your photos. Alternatively, you can browse by albums, as explained in the section “Browse Photos Using Albums,” later in this chapter.
Browse Photos Using Years, Collections, and Moments
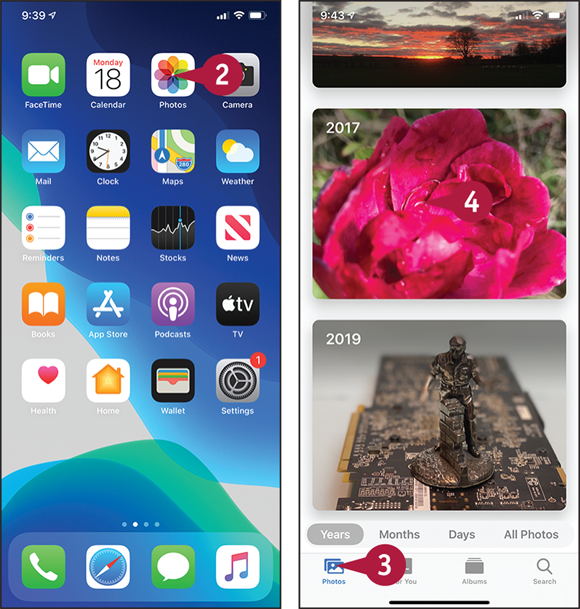
![]() Swipe up from the bottom of the screen.
Swipe up from the bottom of the screen.
The Home screen appears.
![]() Tap Photos (
Tap Photos (![]() ).
).
The Photos app opens.
![]() Tap Photos (
Tap Photos (![]() changes to
changes to ![]() ).
).
The Photos screen appears, showing the Years list.
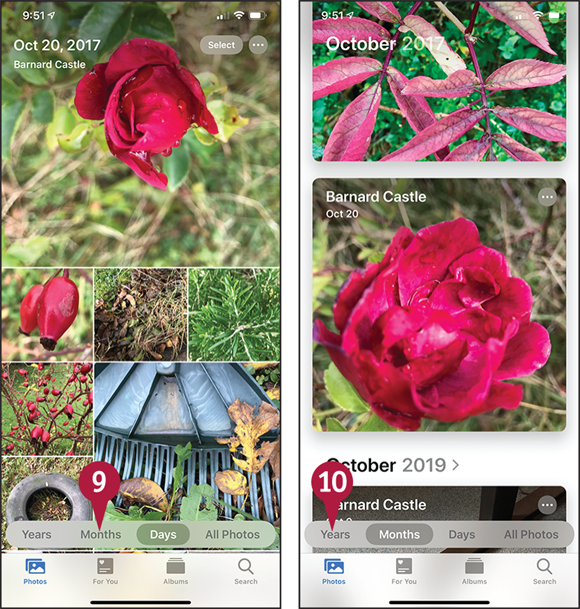
![]() Tap the year you want to open.
Tap the year you want to open.
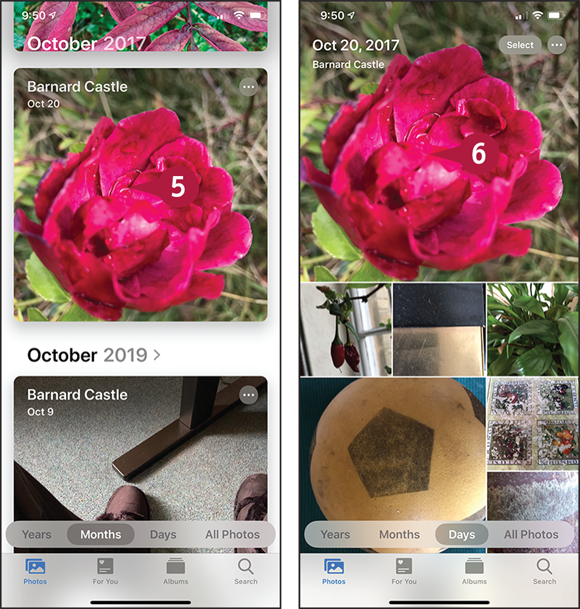
The Months screen for the year appears.
![]() Tap the month you want to open.
Tap the month you want to open.
Note: Scroll up or down as needed to see other months.
The Days screen for the month appears.
![]() Tap the photo you want to view.
Tap the photo you want to view.
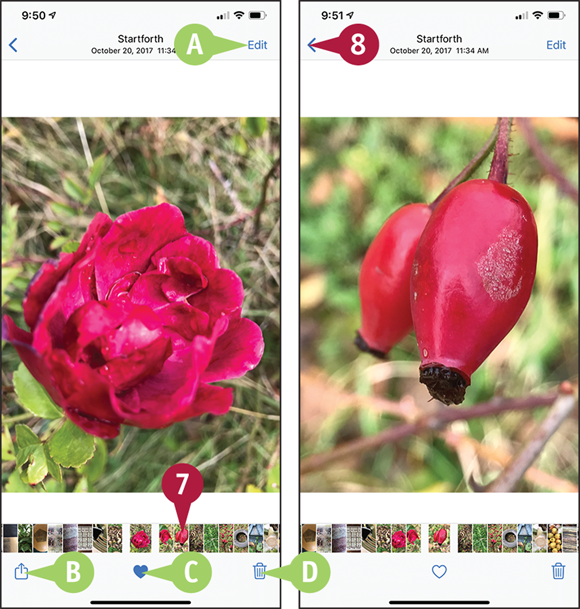
The photo opens.
![]() You can tap Edit to edit the photo, as explained earlier in this chapter.
You can tap Edit to edit the photo, as explained earlier in this chapter.
![]() You can tap Share (
You can tap Share (![]() ) to share the photo, as explained later in this chapter.
) to share the photo, as explained later in this chapter.
![]() You can tap Favorite (
You can tap Favorite (![]() changes to
changes to ![]() ) to make the photo a favorite.
) to make the photo a favorite.
![]() You can tap Trash (
You can tap Trash (![]() ) to delete the photo.
) to delete the photo.
Note: The Trash icon does not appear for photos you cannot delete, such as photos in a shared photo stream.
![]() In the thumbnail bar, tap the photo you want to view.
In the thumbnail bar, tap the photo you want to view.
Note: You can also swipe left or right to display other photos.
The photo appears.
![]() Tap Back (
Tap Back (![]() ).
).
The Days screen appears.
Note: You can scroll up or down to display other days.
![]() Tap Months (
Tap Months (![]() ).
).
The Months screen appears.
Note: You can scroll up or down to display other months.
![]() Tap Years (
Tap Years (![]() ).
).
The Years screen appears, and you can navigate to another year.
Browse Photos Using Memories
The Memories feature in the Photos app presents a movie of photos from a particular period of time, such as a given year or a trip to a certain geographical location.
You can customize the settings for a memory. You can either customize them quickly by choosing roughly how long a memory should be and what atmosphere it should have, or you can take complete control and specify exactly which items to include and which music to play.
Browse Photos Using Memories

![]() Swipe up from the bottom of the screen to display the Home screen.
Swipe up from the bottom of the screen to display the Home screen.
![]() Tap Photos (
Tap Photos (![]() ) to open the Photos app.
) to open the Photos app.
![]() Tap For You (
Tap For You (![]() changes to
changes to ![]() ).
).
The For You screen appears.
![]() Tap the memory you want to view.
Tap the memory you want to view.
![]() You can tap See All to display the Memories screen, which contains the full list of memories.
You can tap See All to display the Memories screen, which contains the full list of memories.
The screen for the memory opens.
![]() You can tap Show More to show more photos.
You can tap Show More to show more photos.
![]() You can tap Select to select the photos you want to include.
You can tap Select to select the photos you want to include.
![]() Tap Play (
Tap Play (![]() ).
).
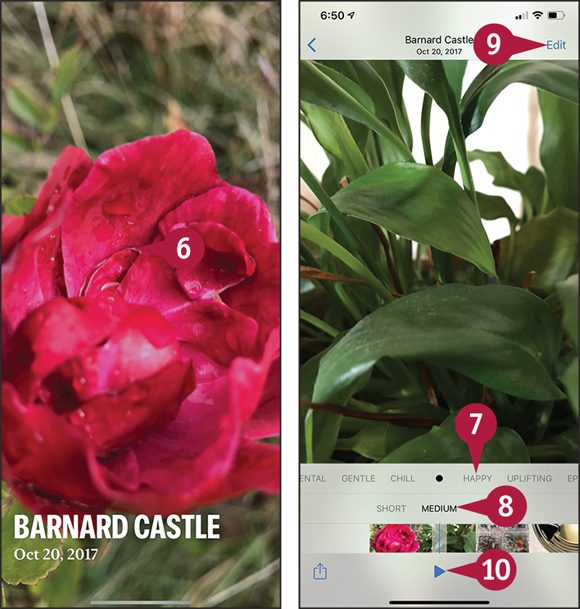
The memory starts playing.
![]() Tap the screen.
Tap the screen.
The customization controls appear.
![]() Tap the desired mood, such as Happy or Gentle.
Tap the desired mood, such as Happy or Gentle.
![]() Tap Short, Medium, or Long, as needed.
Tap Short, Medium, or Long, as needed.
![]() For greater control, tap Edit to display the Edit screen. Here, you can choose settings for Title, Title Image, Music, Duration, and Photos & Videos. Tap Done when you finish.
For greater control, tap Edit to display the Edit screen. Here, you can choose settings for Title, Title Image, Music, Duration, and Photos & Videos. Tap Done when you finish.
![]() Tap Play (
Tap Play (![]() ).
).
The memory resumes playing, using the settings you chose.
Browse Photos Using the Map
The Camera app automatically stores location information — the longitude, the latitude, and the direction the camera was facing — in each photo and video you take, enabling the Photos app to sort your photos and videos by their locations. Starting from any photo, you can display other nearby photos, identifying them by their locations on the map. You can then browse the photos taken in a particular location.
Browse Photos Using the Map

![]() In the Photos app, navigate to the photo from which you want to start browsing.
In the Photos app, navigate to the photo from which you want to start browsing.
![]() Swipe up.
Swipe up.
The Places section for the photo appears.
![]() The map in the Places section shows the area in which the photo was taken.
The map in the Places section shows the area in which the photo was taken.
![]() Tap Show Nearby Photos.
Tap Show Nearby Photos.
The Map screen appears, showing nearby photos.
Note: Zoom in or out on the map as needed by placing your thumb and finger on the screen and moving them apart or pinching them together.
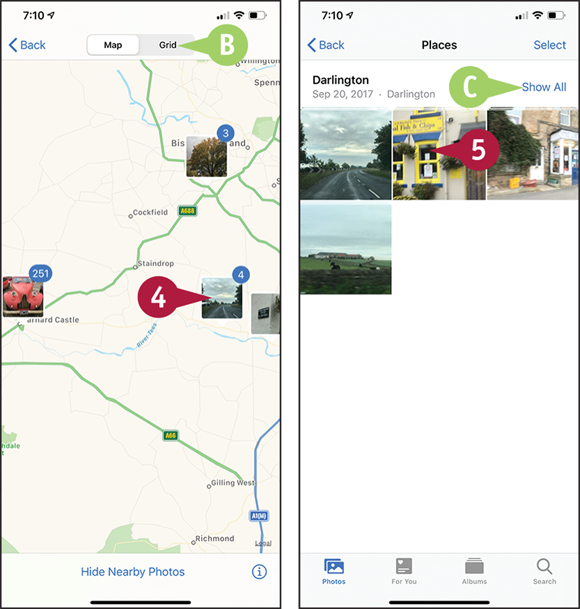
![]() You can tap Grid to display the places as a list.
You can tap Grid to display the places as a list.
![]() Tap the place you want to view.
Tap the place you want to view.
The photos in the place appear.
![]() You can tap Show All to display all the photos in a group.
You can tap Show All to display all the photos in a group.
![]() Tap the photo you want to view.
Tap the photo you want to view.
The photo opens.
Browse Photos Using Shared Albums
Your iPhone’s Photos app includes a feature called Shared Albums that enables you to share photos easily with others via iCloud and enjoy the photos they are sharing. You can add other people’s shared albums to the Photos app on your iPhone by accepting invitations. You can then browse the photos those people are sharing.
The section “Share Your Shared Albums,” later in this chapter, shows you how to share your own photos via Shared Albums.
Browse Photos Using Shared Albums
Accept an Invitation to a Shared Album
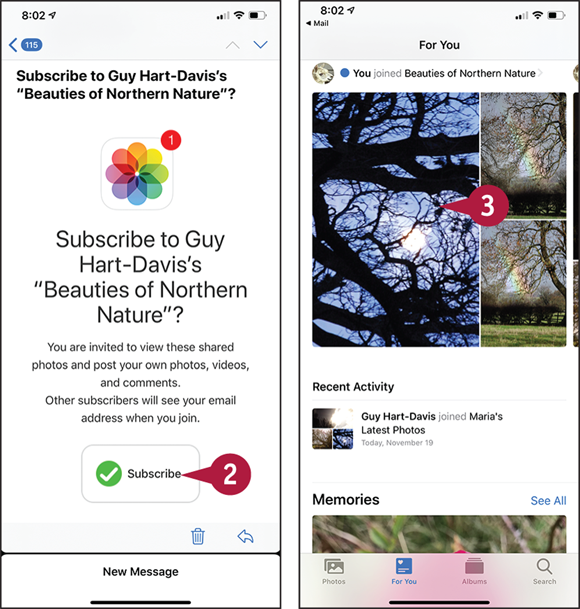
![]() When you receive an invitation to subscribe to shared photos, open the e-mail message in Mail.
When you receive an invitation to subscribe to shared photos, open the e-mail message in Mail.
![]() Tap Subscribe.
Tap Subscribe.
The Photos app becomes active.
The Shared screen appears.
![]() Tap the shared album.
Tap the shared album.
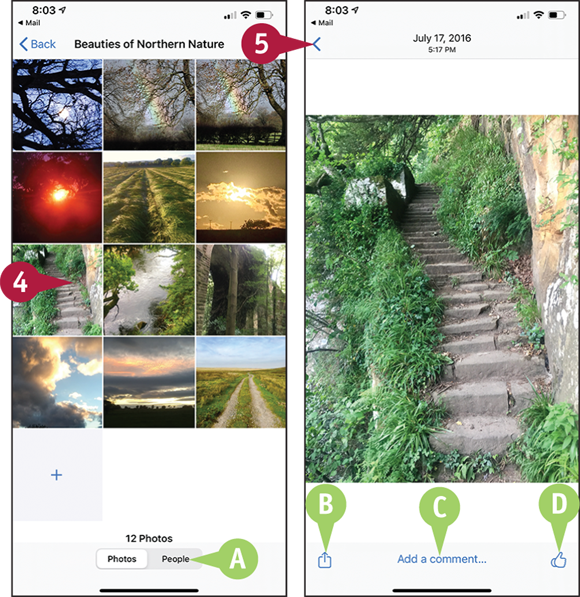
The album opens.
![]() You can tap People to view the list of people with whom the album is shared.
You can tap People to view the list of people with whom the album is shared.
![]() Tap the thumbnail for the photo you want to view.
Tap the thumbnail for the photo you want to view.
The photo opens.
![]() You can tap Share (
You can tap Share (![]() ) to share the photo with others.
) to share the photo with others.
![]() You can tap Add a comment if you want to add a comment on the photo.
You can tap Add a comment if you want to add a comment on the photo.
![]() You can tap Like to like the photo.
You can tap Like to like the photo.
Note: Swipe left or right to display other photos.
![]() Tap Back (
Tap Back (![]() ).
).
The album’s screen appears again.

Browse the Latest Activity on Shared Albums
![]() In the Photos app, tap For You (
In the Photos app, tap For You (![]() changes to
changes to ![]() ).
).
The For You screen appears.
![]() In the Shared Album Activity section, tap See All.
In the Shared Album Activity section, tap See All.
Note: The Activity item shows new activity on your shared albums. When you add a shared album, the Activity thumbnail shows the new album’s thumbnail.
The Activity screen appears.
![]() Swipe up to scroll down.
Swipe up to scroll down.

Other items appear.
![]() Tap a photo.
Tap a photo.
The photo opens.
![]() Tap Activity (
Tap Activity (![]() ).
).
The Activity screen appears.
![]() When you finish browsing the latest activity, tap For You (
When you finish browsing the latest activity, tap For You (![]() ).
).
The For You screen appears.
Browse Photos Using Albums
Along with browsing by collections and browsing shared albums, you can browse your photos by albums. The Camera app automatically stores each conventional photo you take in the All Photos album, each burst photo in an album called Bursts, and each video in an album called Videos. You can also create other albums manually from your photos or sync existing albums from your computer.
Browse Photos Using Albums
Open the Photos App and Browse an Album
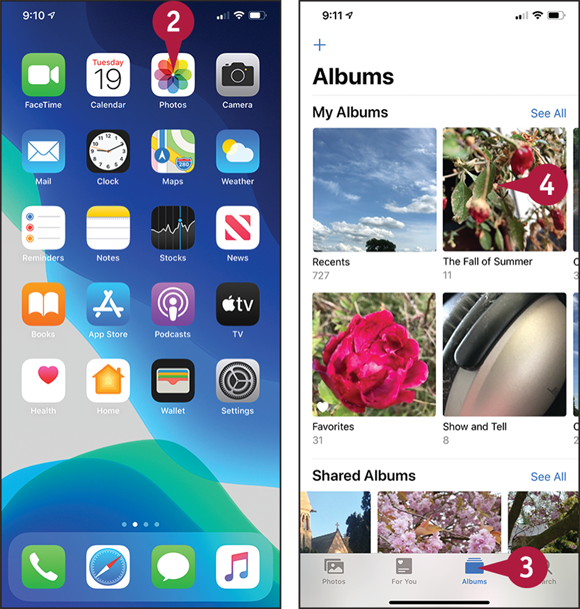
![]() Swipe up from the bottom of the screen.
Swipe up from the bottom of the screen.
The Home screen appears.
![]() Tap Photos (
Tap Photos (![]() ).
).
The Photos app opens.
![]() Tap Albums (
Tap Albums (![]() changes to
changes to ![]() ).
).
The Albums screen appears.
![]() Tap the album you want to browse. This example uses the Fall of Summer album.
Tap the album you want to browse. This example uses the Fall of Summer album.
Note: The All Photos album contains all the photos you take; photos you save from web pages, e-mail messages, instant messages, and social media apps; and photos you edit from other people’s streams.
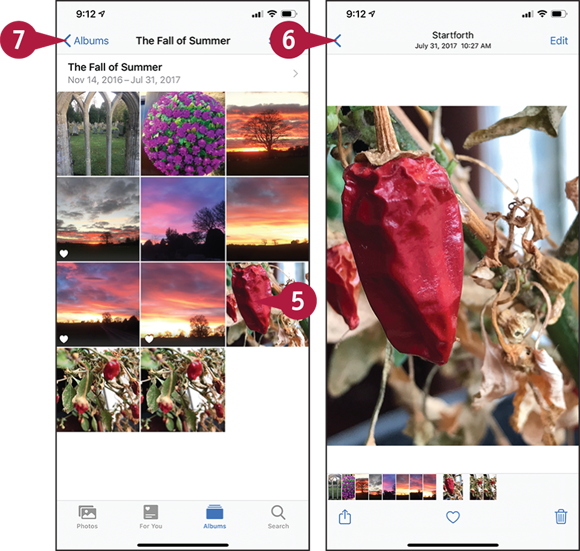
The album appears.
Note: The People album contains faces identified in photos. You can browse the photos in which a particular person appears.
![]() Tap the photo you want to view.
Tap the photo you want to view.
The photo opens.
Note: Swipe left to display the next photo or right to display the previous photo.
![]() Tap Back (
Tap Back (![]() ).
).
The album appears.
![]() Tap Albums (
Tap Albums (![]() ).
).
The Albums screen appears.
Create an Album
![]() In the Photos app, tap Albums (
In the Photos app, tap Albums (![]() changes to
changes to ![]() ).
).
The Albums screen appears.
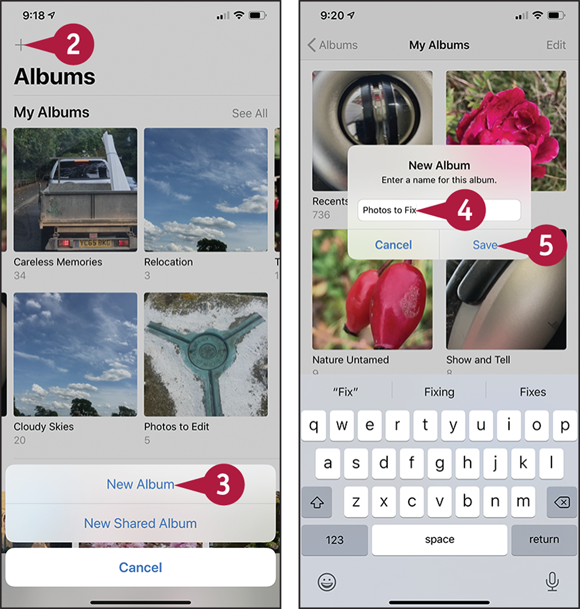
![]() Tap New (
Tap New (![]() ).
).
A dialog opens, giving you the choice between creating a regular album and a shared album.
![]() Tap New Album or New Shared Album, as appropriate. This example uses New Album.
Tap New Album or New Shared Album, as appropriate. This example uses New Album.
The New Album dialog opens.
![]() Type the name to give the album.
Type the name to give the album.
![]() Tap Save.
Tap Save.

The screen for adding photos appears.
![]() Tap the source of the photos. For example, tap Albums, and then tap the album.
Tap the source of the photos. For example, tap Albums, and then tap the album.
![]() Tap each photo to add to the collection, placing
Tap each photo to add to the collection, placing ![]() on each.
on each.
![]() Tap Done.
Tap Done.
![]() The album appears on the Albums screen.
The album appears on the Albums screen.
Share Photos Using iCloud Photos
If you have an iCloud account, you can use the iCloud Photos feature to upload your photos to iCloud, making them available to all your iOS devices, your computer, and your Apple TV devices.
After you turn on iCloud Photos on your iPhone, other iOS devices, and your Macs or PCs, Photos automatically syncs your 1,000 most recent photos among your devices and your computers.
Share Photos Using iCloud Photos
Turn On My Photo Stream on Your iPhone
![]() Swipe up from the bottom of the screen.
Swipe up from the bottom of the screen.
The Home screen appears.
![]() Tap Settings (
Tap Settings (![]() ).
).
The Settings screen appears.
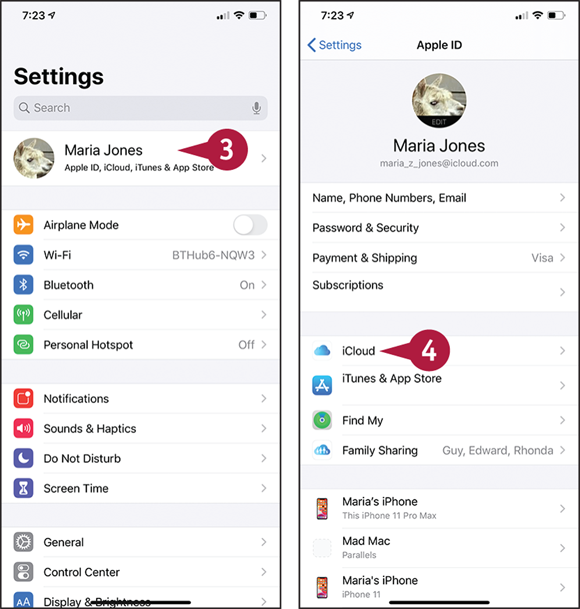
![]() Tap Apple ID, the button bearing your Apple ID name.
Tap Apple ID, the button bearing your Apple ID name.
The Apple ID screen appears.
![]() Tap iCloud (
Tap iCloud (![]() ).
).
The iCloud screen appears.
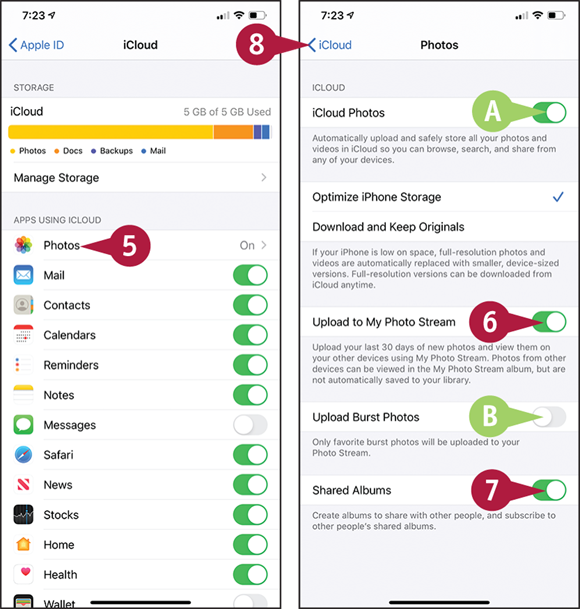
![]() Tap Photos (
Tap Photos (![]() ).
).
The Photos screen appears.
![]() You can set the iCloud Photos switch to On (
You can set the iCloud Photos switch to On (![]() ) to store your photo library in iCloud. You do not need to do this to use My Photo Stream.
) to store your photo library in iCloud. You do not need to do this to use My Photo Stream.
![]() Set the Upload to My Photo Stream switch to On (
Set the Upload to My Photo Stream switch to On (![]() ).
).
![]() You can set the Upload Burst Photos switch to On (
You can set the Upload Burst Photos switch to On (![]() ) to upload all bursts of photos instead of only favorite bursts.
) to upload all bursts of photos instead of only favorite bursts.
![]() If you also want to share your iCloud photo streams with others, set the Shared Albums switch to On (
If you also want to share your iCloud photo streams with others, set the Shared Albums switch to On (![]() ). See the next section, “Share Your Shared Albums,” for more information.
). See the next section, “Share Your Shared Albums,” for more information.
![]() Tap iCloud (
Tap iCloud (![]() ).
).
The iCloud screen appears.
Set Your Mac to Upload Photos to Your Photo Stream
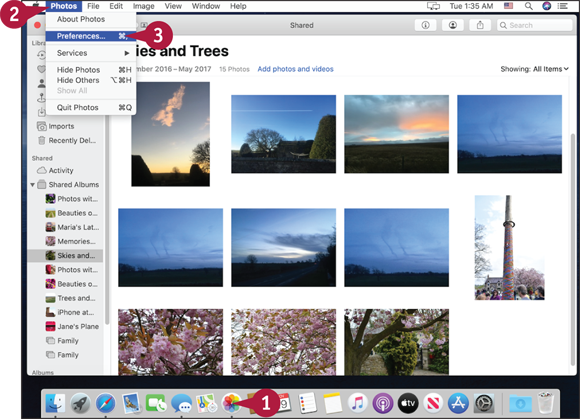
![]() Click Photos (
Click Photos (![]() ).
).
The Photos app opens.
![]() Click Photos on the menu bar.
Click Photos on the menu bar.
![]() Click Preferences.
Click Preferences.
The Preferences window opens.
![]() Tap iCloud (
Tap iCloud (![]() ).
).
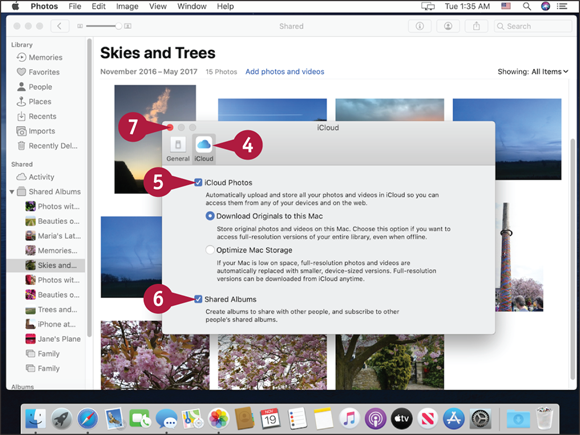
![]() Click iCloud Photos (
Click iCloud Photos (![]() changes to
changes to ![]() ) to enable the iCloud Photos feature.
) to enable the iCloud Photos feature.
![]() Click Shared Albums (
Click Shared Albums (![]() changes to
changes to ![]() ) to enable the Shared Albums feature.
) to enable the Shared Albums feature.
![]() Click Close (
Click Close (![]() ).
).
The Preferences window closes.
Share Your Shared Albums
After turning on Shared Albums as described in the previous section, you can create shared photo albums, invite people to subscribe to them, and add photos.
You can also control whether subscribers can post photos and videos to your shared photo album, decide whether to make the album publicly available, and choose whether to receive notifications when subscribers comment on your photos or post their own.
Share Your Shared Albums
![]() Swipe up from the bottom of the screen.
Swipe up from the bottom of the screen.
The Home screen appears.
![]() Tap Photos (
Tap Photos (![]() ).
).
The Photos app opens.
![]() Tap Albums (
Tap Albums (![]() changes to
changes to ![]() )
)
The Shared screen appears.
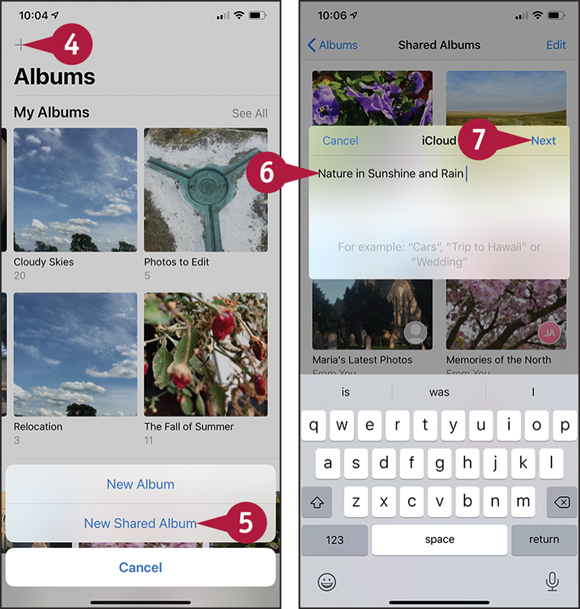
![]() Tap New (
Tap New (![]() ).
).
A dialog opens.
![]() Tap New Shared Album.
Tap New Shared Album.
The iCloud dialog opens.
![]() Type the name for the album.
Type the name for the album.
![]() Tap Next.
Tap Next.
Another iCloud dialog opens.
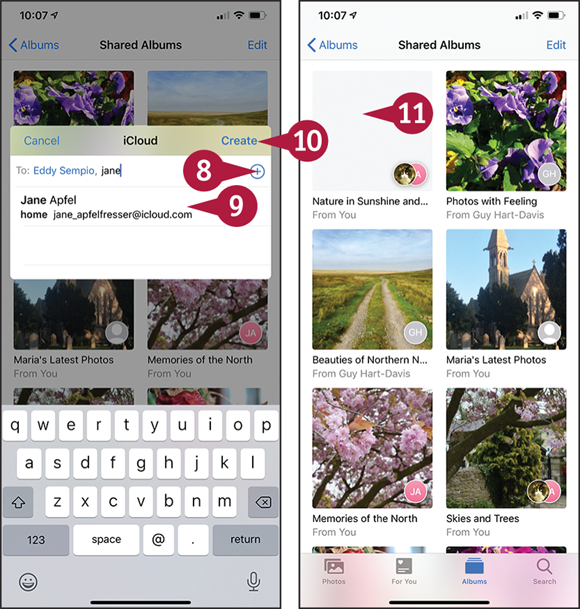
![]() Tap Add Contact (
Tap Add Contact (![]() ) to display the Contacts screen, and then tap the contact to add.
) to display the Contacts screen, and then tap the contact to add.
![]() Repeat step 7 to add other contacts as needed. You can also type contact names or tap names that the list automatically suggests.
Repeat step 7 to add other contacts as needed. You can also type contact names or tap names that the list automatically suggests.
![]() Tap Create.
Tap Create.
The Shared screen appears.
![]() Tap the new album.
Tap the new album.
The album’s screen appears.
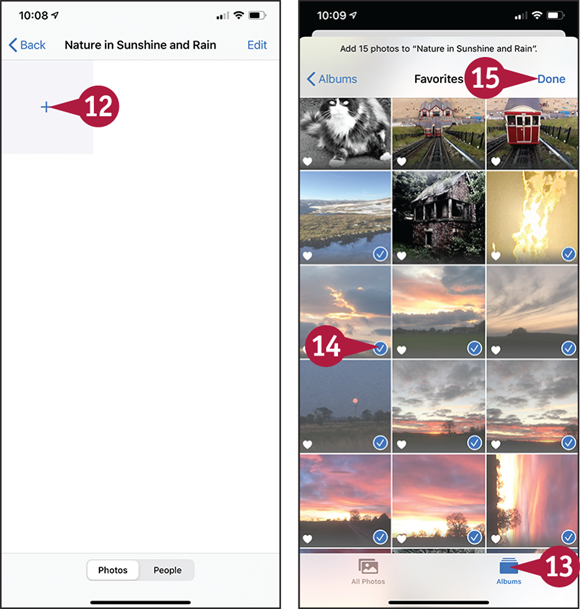
![]() Tap Add (
Tap Add (![]() ).
).
The Photos screen appears, with the selection controls displayed.
![]() Navigate to another album if necessary. For example, tap Albums (
Navigate to another album if necessary. For example, tap Albums (![]() changes to
changes to ![]() ).
).
![]() Tap each photo you want to add.
Tap each photo you want to add.
![]() Tap Done.
Tap Done.
Another iCloud dialog opens.
![]() Type the text you want to post with the photos.
Type the text you want to post with the photos.
![]() Tap Post.
Tap Post.

The album’s screen appears.
![]() Tap People.
Tap People.
The People screen appears.
![]() To invite others to the album, tap Invite People.
To invite others to the album, tap Invite People.
![]() Set the Subscribers Can Post switch to On (
Set the Subscribers Can Post switch to On (![]() ) or Off (
) or Off (![]() ), as needed.
), as needed.
![]() Set the Public Website switch to On (
Set the Public Website switch to On (![]() ) or Off (
) or Off (![]() ) to control whether to make the album publicly accessible on the
) to control whether to make the album publicly accessible on the iCloud.com website.
![]() Set the Notifications switch to On (
Set the Notifications switch to On (![]() ) or Off (
) or Off (![]() ), as needed.
), as needed.
![]() Tap Back (
Tap Back (![]() ).
).
The Albums screen appears.
Share and Use Your Photos and Videos
After taking photos and videos with your iPhone’s camera, or after loading photos and videos on the iPhone using iTunes, you can share them with other people.
This section explains how to tweet photos to your Twitter account, assign photos to contacts, use photos as wallpaper, and print photos. Chapter 6 explains how to share items via the AirDrop feature.
Share and Use Your Photos and Videos
Select the Photo or Video to Share
![]() Swipe up from the bottom of the screen.
Swipe up from the bottom of the screen.
The Home screen appears.
![]() Tap Photos (
Tap Photos (![]() ).
).
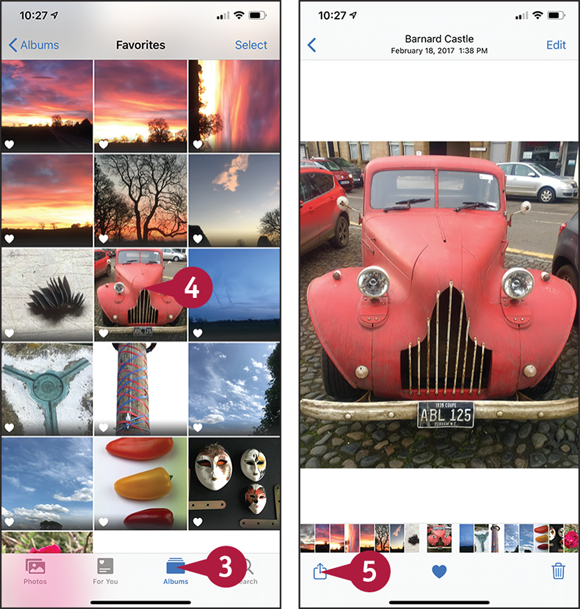
![]() On the Photos screen, tap the item that contains the photo or video you want to share. For example, tap Albums (
On the Photos screen, tap the item that contains the photo or video you want to share. For example, tap Albums (![]() changes to
changes to ![]() ), and then tap Favorites.
), and then tap Favorites.
![]() Tap the photo or video you want to share.
Tap the photo or video you want to share.
![]() Tap Share (
Tap Share (![]() ) to display the Share sheet.
) to display the Share sheet.
Share a Photo on Twitter
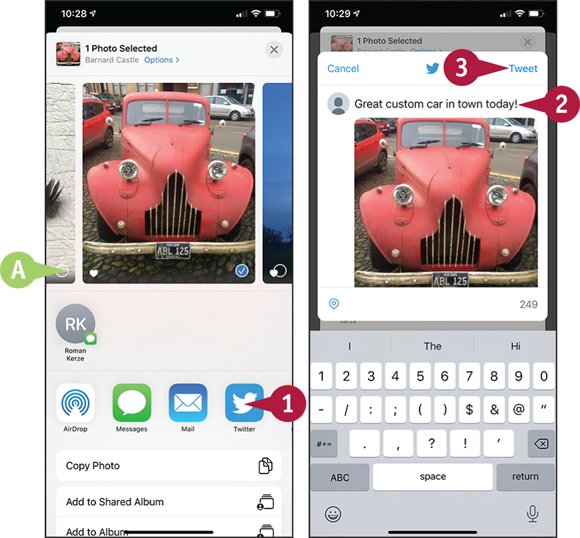
![]() You can tap the selection button (
You can tap the selection button (![]() changes to
changes to ![]() ) to include another item in the sharing.
) to include another item in the sharing.
![]() On the Share sheet, tap Twitter (
On the Share sheet, tap Twitter (![]() ).
).
The Twitter dialog opens.
![]() Type the text of the tweet.
Type the text of the tweet.
![]() Tap Tweet.
Tap Tweet.
Your iPhone posts the tweet to Twitter.
Assign a Photo to a Contact
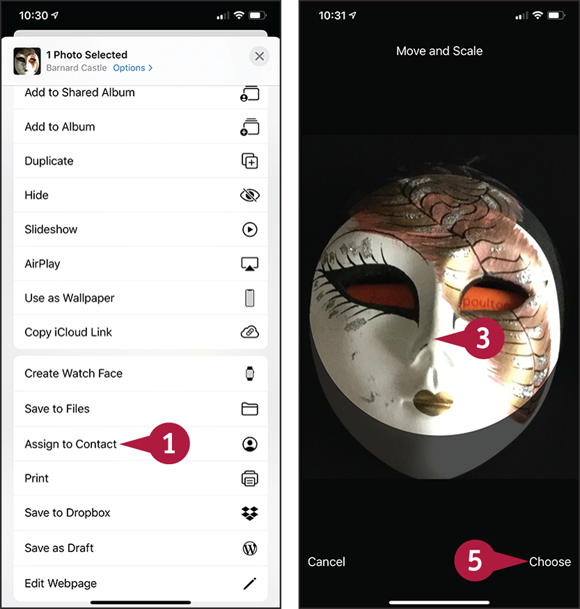
![]() On the Share sheet, scroll down and tap Assign to Contact (
On the Share sheet, scroll down and tap Assign to Contact (![]() ).
).
The list of contacts appears.
![]() Tap the contact to which you want to assign the photo.
Tap the contact to which you want to assign the photo.
The Move and Scale screen appears.
![]() If necessary, move the photo so that the relevant part appears centrally.
If necessary, move the photo so that the relevant part appears centrally.
![]() If necessary, pinch in to shrink the photo or pinch out to enlarge it.
If necessary, pinch in to shrink the photo or pinch out to enlarge it.
![]() Tap Choose.
Tap Choose.
Set a Photo as Wallpaper
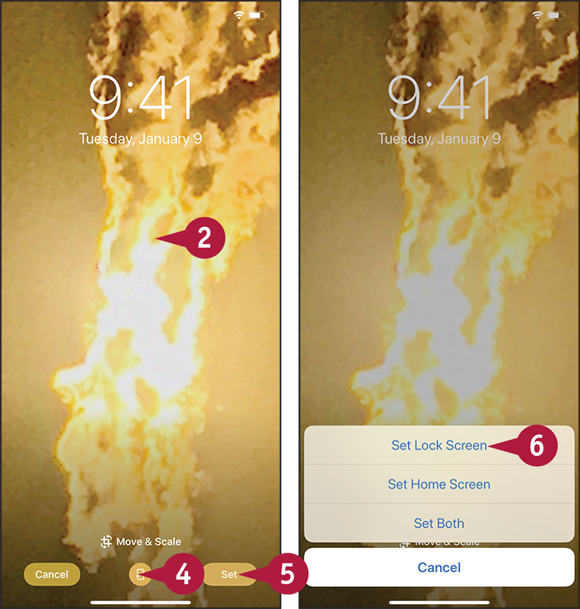
![]() On the Share sheet, tap Use as Wallpaper (
On the Share sheet, tap Use as Wallpaper (![]() ).
).
The Move and Scale screen appears.
![]() Move the photo to display the part you want.
Move the photo to display the part you want.
![]() If necessary, pinch in to shrink the photo or pinch out to enlarge it.
If necessary, pinch in to shrink the photo or pinch out to enlarge it.
![]() Tap Perspective (
Tap Perspective (![]() or
or ![]() ) to turn Perspective on (
) to turn Perspective on (![]() ) or off (
) or off (![]() ).
).
![]() Tap Set.
Tap Set.
The Set Wallpaper dialog appears.
![]() Tap Set Lock Screen, Set Home Screen, or Set Both, as needed.
Tap Set Lock Screen, Set Home Screen, or Set Both, as needed.
Play Slide Shows of Photos
Your iPhone can not only display your photos, but also play a sequence of photos as a slide show. You can choose which theme to use, which music to play, and whether to repeat the slide show when it reaches the end. You can adjust the running speed of the slide show as a whole, but you cannot adjust individual slides.
Play Slide Shows of Photos
![]() Swipe up from the bottom of the screen.
Swipe up from the bottom of the screen.
The Home screen appears.
Note: To play your photos on a bigger screen, either use AirPlay to play a TV connected to an Apple TV or use the Apple Lightning Digital AV Adapter and an HDMI cable to connect your iPhone to a TV or monitor with an HDMI input.
![]() Tap Photos (
Tap Photos (![]() ).
).
The Photos app opens.
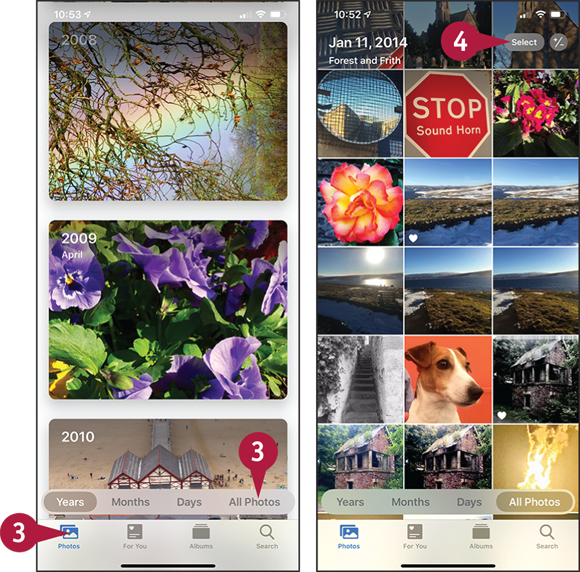
![]() Navigate to the photo with which you want to start the slide show. For example, tap Photos (
Navigate to the photo with which you want to start the slide show. For example, tap Photos (![]() changes to
changes to ![]() ) and then tap All Photos.
) and then tap All Photos.
The photo collection you tapped opens.
![]() Tap Select.
Tap Select.
Photos switches to Selection Mode.
The photo opens.
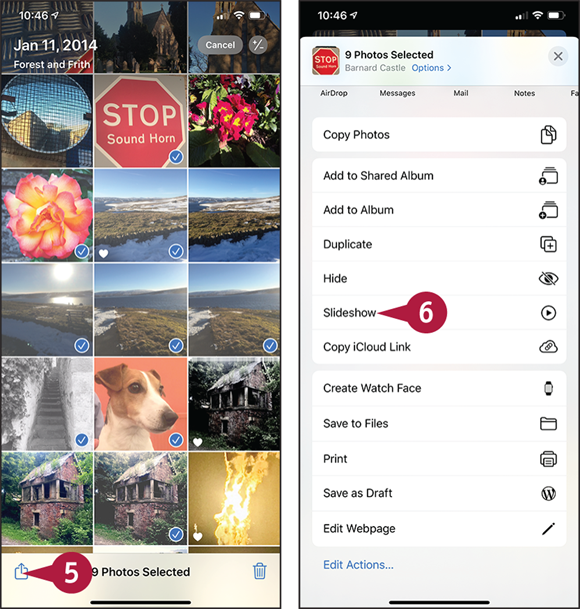
![]() Tap Share (
Tap Share (![]() ).
).
The Share sheet appears.
![]() Tap Slideshow (
Tap Slideshow (![]() ).
).
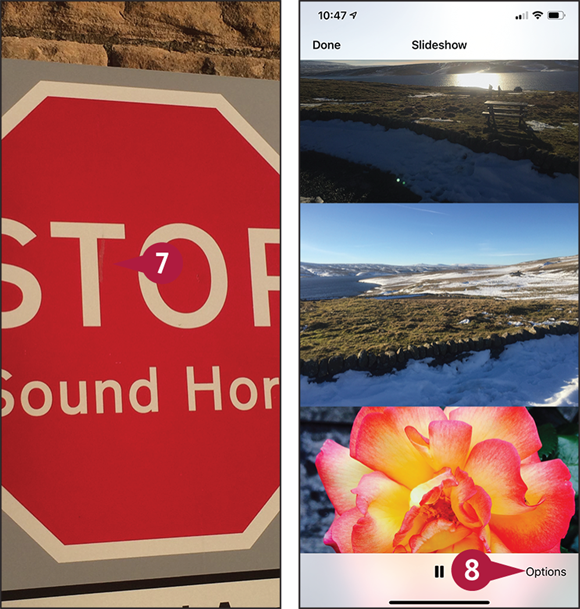
The slide show starts playing, using the default theme and music.
![]() Tap the screen.
Tap the screen.
The controls appear.
![]() Tap Options.
Tap Options.
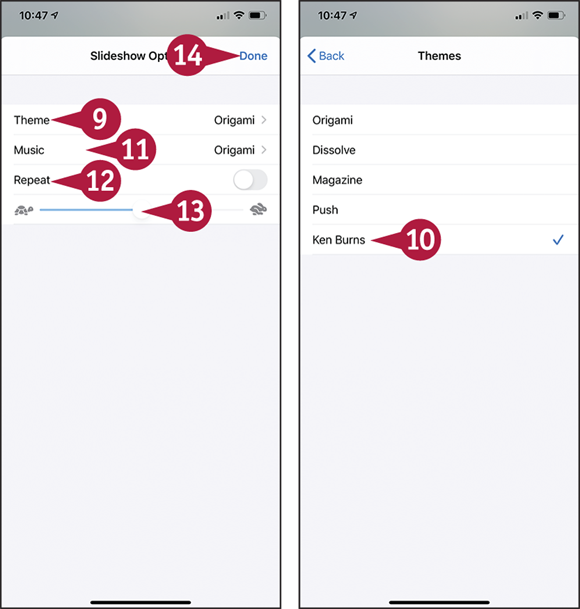
The Slideshow Options screen appears.
![]() Tap Theme.
Tap Theme.
The Themes screen appears.
![]() Tap the theme you want.
Tap the theme you want.
The Slideshow Options screen appears.
![]() Tap Music and choose the music to play.
Tap Music and choose the music to play.
![]() Set the Repeat switch to On (
Set the Repeat switch to On (![]() ) if you want the slide show to repeat.
) if you want the slide show to repeat.
![]() Drag the Speed slider as needed to change the speed.
Drag the Speed slider as needed to change the speed.
![]() Tap Done.
Tap Done.
The slide show resumes, using the settings you chose.