
Chapter 1
Introducing the Blues and Playing Blues Rhythm
IN THIS CHAPTER
![]() The roots of blues guitar
The roots of blues guitar
![]() Mixing up your playing with downstrokes and upstrokes
Mixing up your playing with downstrokes and upstrokes
![]() Applying syncopation to your sound and discovering different muting techniques
Applying syncopation to your sound and discovering different muting techniques
![]() Checking out some classic fingerstyle blues and playing different grooves and feels
Checking out some classic fingerstyle blues and playing different grooves and feels
![]() Access the audio tracks at
Access the audio tracks at www.dummies.com/go/guitaraio/
The guitar and blues go together like apple and pie. The guitar allows you to sing along with yourself (try that with a flute), and singing was the way the blues started. And it’s much easier to bring out on the front porch than a piano. It’s cheaper to own (or make yourself) than many other instruments, and that helped bring the blues to many poor folks — the people who really had the blues.
As the blues developed, guitar makers adopted features that helped bring out the qualities of the blues to even better effect. An electric guitar is played with two hands and leaves your mouth free to sing (as an acoustic does), but electric guitar strings are thinner and easier to bend (stretching the string while it’s ringing, producing a rise in pitch), and electronic amplification helps project the guitar’s sound out into the audience of (often raucous and noisy) blues-loving listeners.
Because the blues was concentrated in the rural South, in the time before musical instruments adopted electricity, the earliest blues guitar music was played on acoustics. The “Delta blues” style was the first recognized style of the blues and consisted of strummed and plucked acoustic guitars with chords formed the same way as in other forms of folk music.
Chords (explored in the chapters in Book 2) don’t by themselves convey anything meaningful. They’re just raw building materials of music — until you arrange and play them in a certain way. For guitarists, that playing part is done by the right hand. By playing chords with the right hand in a certain tempo, rhythm, and strumming pattern, you enter into the world of rhythm guitar — an indispensable part of the blues.
Beyond the Delta: Defining the Blues Guitar Sound
Blues guitar can take many forms. It’s grown dramatically since its humble beginnings in the southern United States. Blues players of this time were largely self-taught (and often illiterate), and one of the easiest ways to create different chords was to tune the guitar to an open chord, such as G major or E major, and then use a metal or glass slide (a pocket knife or bottle neck) to change chords. In both slide and fretted guitar styles, guitarists would emphasize the driving rhythm of the blues by thumping out steady bass notes on the low strings with their thumb while in turn, or simultaneously, fingerpicking upper strings to sound out chords, melodic riffs, and fills.
Playing simple chords to back up a blues singer is still a form of blues guitar — as is playing chords with a slide. You can’t help but sound bluesy when you move a slide from one position to another to play the different chords in a song — especially if you do it expressively. But beyond this, you can ascribe certain musical hallmarks to the blues that don’t make you play any more soulfully but provide you with a deeper understanding when you hear the blues.
The following sections break down the elements of the blues into four musical concepts. Keep in mind that these concepts are the main ones and there are certainly more, but thinking of and listening to the blues while considering these criteria helps in your understanding of this sometimes elusive music form. You may not be able to define the blues, but you know it when you hear it. Or as Sonny Terry says:
Sometimes I want to holler,
Sometimes I want to shout,
Sometimes I want to cry,
But I wonder what about.
I think I got the blues.
The method to the music: Chord progressions
What defines a blues song is the way chords are put together, or the chord progression. Although there’s such a thing as a jazz chord, there’s not really a blues chord (but don’t worry, there’s no such thing as a classical chord, either). But if you put certain chords together in a certain way, you can definitely have a blues chord progression. The most common blues progression is the 12-bar blues, covered in Book 5 Chapter 2.
Chords used in blues include major and minor triads (simple, three-note chords), dominant 7th chords — triads with the flatted (lowered by a half step) 7th added, and sometimes even jazz chords (with complex-sounding names like G13♭9/♭5).
The guitarist’s language of melody
The blues definitely has a harmonic and melodic language, and even a scale named after it: the 6-note blues scale. If music is described as bluesy, it usually means that the melody borrows or enlists notes from the blues scale (nicknamed blue notes) rather than the standard major and minor scales that make up other, non-blues styles.
 The blue notes are the minor third, flatted fifth, and minor seventh.
Figure 1-1 shows the C major scale with the blue notes appearing below their unaltered counterparts.

FIGURE 1-1: The C major scale with blue notes.
When playing the blues, guitarists incorporate aspects of both the major scale and the blue notes to come up with two new scales of their own: the 6-note blues scale and the 5-note minor pentatonic scale (covered in detail in Book 4 Chapter 2). Figure 1-2 shows both scales in letter names and in music notation.

FIGURE 1-2: The 6-note blues scale and 5-note minor pentatonic scale.
Playing blues expressively
One of the best things about the blues — and a huge relief to beginning guitarists — is that the blues isn’t all that hard to play, technically speaking. Playing lead or rhythm in most blues songs requires only intermediate technique. What is harder to do — in fact, you never stop figuring out how to do it better — is to play expressively. Expression in the blues is what turns craft into art. A lot of the following techniques of expression are covered in detail in Book 4 Chapter 4. Here are ways to make your music more bluesy:
- Use bent notes. Bent notes are notes where the pitch is raised slowly upwards in a continuous fashion, and this element is closely identified with the blues.
- Make your music shake. Vibrato is a technique that makes the notes of the music quiver by using left-hand finger wiggling, which gives blues a signature sound. B.B. King is well known for his expressive and soulful vibrato. Because much of the blues is set to medium tempos, players hold notes for long periods of time. Vibrato is a great way to bring notes to life, so they don’t just sit there.
- Give it some slide. If you don’t hit notes straight on and rather slide into notes from above and below, you give music a bluesy feel and breathe some life into your notes. Guitarists often draw their inspiration from vocalists and horn players (saxophone, trumpet, trombone, and so on), who exercise the slide technique on a regular basis.
- Slur your notes. Connecting notes through slurs — where you don’t restrike the second note with the right hand — is a good way to loosen up your playing in the typical way a blues player does.
- Allow the rhythm to flow. Blues also allows a certain rhythmic liberty to be taken with melodies and especially letting the melody notes deliberately fall after, or behind, the beat. Backphrasing is actually more of a rhythmic alteration, or rubato, but it’s generally thought of as a phrasing technique. It’s been described as lazy, devil may care, or cavalier — but whatever, it sure makes the notes sound more bluesy.
The groove that sets the pace
Groove is often used informally to mean “on the mark” or “in sync with,” but the term refers to the meter, rhythmic feel, tempo, and the instruments’ role in providing the accompaniment, or backing figures. Several different grooves exist within the blues:
- A shuffle is a type of groove that uses triplet eighth notes with the emphasis on sounding just the first and third notes played at a medium tempo. “Sweet Home Chicago” is an example of a song in a shuffle groove.
- A slow 12/8 blues (the “12/8” refers to the time signature) is another type of groove that’s also based on three-note groups, but the tempo is slower and all three notes of the beat are pronounced. “Stormy Monday” is a song in a slow 12/8 feel.
- A straight-four groove is where the eighth notes are evenly spaced apart, rather than in the long-short scheme of a shuffle. “Johnny B. Goode” is in a straight four, and so is Junior Wells’s “Messin’ with the Kid.”
- Jump is another groove that’s an uptempo shuffle, but it requires a slightly different approach in phrasing and rhythm, Like Louis Jordan’s “Caldonia.”
Given the infinite forms of expression the blues takes, it’s nice to know that at least from a technical standpoint, only a few grooves need to be mastered to play most of the blues music out there.
Strumming Along
Book 2 Chapter 4 covers different right-hand playing styles, including strumming. This section is a refresher, applied in particular to the blues. One of the most basic ways you can play chords is with a strum. Strumming involves taking your right hand and, with a pick, thumb, or the back of your fingernails, brushing it across several or all the strings, sounding them simultaneously. A strum can be slow, fast, hard, or gentle, or any of the infinite shadings in between. When you strum, bring your hand from the top of the guitar (closest to the ceiling) to the bottom (toward the floor) in one motion, striking the strings along the way.
Stroking down
You may not have thought of basic strumming as “executing a downstroke,” but that’s what you’re doing when you go to naturally strike the strings on a guitar. When you get to more complex strumming patterns — especially ones involving syncopation — you distinguish between downstrokes and upstrokes (see the next section). But for now, focus on the more popular and prevalent downstroke strum.
A downstroke (indicated with the symbol ![]() ) is played with a downward motion of the pick, toward the floor — the way you naturally strike a guitar. You can strum multiple strings or pick an individual string with a downstroke.
) is played with a downward motion of the pick, toward the floor — the way you naturally strike a guitar. You can strum multiple strings or pick an individual string with a downstroke.
… And stroking up
An upstroke (indicated by the symbol ![]() ) is played upward, toward the ceiling, in the opposite direction of a downstroke. So instead of dragging your pick down toward the floor, as you did in a downstroke, you start from a position below the first string and drag your pick upward across the strings, from first to sixth.
) is played upward, toward the ceiling, in the opposite direction of a downstroke. So instead of dragging your pick down toward the floor, as you did in a downstroke, you start from a position below the first string and drag your pick upward across the strings, from first to sixth.
In an upstroke, you don’t need to worry about hitting all the strings. The top three or four strings are usually sufficient. For example, when playing an E chord with an upstroke, you don’t have to strum the strings all the way from the first to the sixth, just up to about the third or fourth string. There are exceptions to this rule, but generally, in the blues, you don’t hit as many strings on an upstroke strum as you do in a downstroke.
 Upstrokes don’t get equal playing time as downstrokes do. You typically use upstrokes only in conjunction with downstrokes, but you use downstrokes by themselves fairly often in blues playing.
Combining down and up
In certain fast lead passages, upstrokes alternate with downstrokes, making them appear in virtually equal numbers. For fast eighth notes, the strict observance of upstrokes following downstrokes is called alternate picking and is the key for playing fast leads smoothly. So for now, practice upstrokes as they occur in their natural state — in an eighth-note rhythm in between downstrokes (see the section “Eighth-note striking, twice per beat,” later in this chapter).
Striking to a beat
Regardless of whether your hand moves up or down when it strikes the strings, the important thing to remember is that you’re striking in a rhythm — or in sync with the beat. If you strike the strings once per beat, you’re playing quarter notes. If you play two strokes per beat, you’re playing in eighth notes, which come twice as fast as quarter notes. (Book 1 Chapter 4 has a lot more on quarter notes, eighth notes, and beyond.)
Quarter-note striking, beat by beat
 Figure 1-3 (Track 68 at 0:00) shows two bars of an E chord with quarter-note slashes. You play four strums for each bar for a total of eight strums. The quarter notes tell you that the strums occur once per beat. Listen and play along with the audio track, and before long, your sound can sound just like the recording.

FIGURE 1-3: Strumming an E chord in quarter notes for two bars.
Eighth-note striking, twice per beat
Eighth notes come twice as frequently as quarter notes, in the same tempo, or two for every beat, instead of one. Instead of the previously used slashes, you now face slashes with stems (the vertical lines attached to the slash noteheads — not the round, normal noteheads) and beams (the horizontal lines that connect the stems). Quarter notes have just a stem attached to them; eighth notes have stems with beams connecting them to each other.
For the eighth notes that appear in Figure 1-4 (Track 68 at 0:12), you strum twice as fast (two per beat) as you do for the quarter notes (one per beat). You can do this easily with downstrokes at most blues tempos, which are slow to moderate (between 60–160 beats per minutes (BPM) on your metronome). To make things interesting, change chords and introduce A and B7 into the mix. Note that in the figure, the last note of each bar is a quarter note, which gives you a little more time than two eighth notes would for changing chords.

FIGURE 1-4: Eighth-note and quarter-note strums in downstrokes.
Figure 1-5 (Track 68 at 0:25) combines downstrokes and upstrokes in an eighth-note rhythm. As you practice this passage, keep a relaxed, free-swinging, up-and-down arm motion going. Also work to get equal emphasis on the downstrokes and upstrokes. You may notice that your downstrokes naturally include more and lower strings, while the upstrokes play just the top strings and fewer of them. That’s perfectly natural.

FIGURE 1-5: Strumming up and down in quarter and eighth notes.
At a moderate tempo, you can easily play Figure 1-5 with all downstrokes, but that variation gives the figure a different feel — more driving and intense. It may be a subtle difference, but playing an eighth-note figure in all downstrokes — versus playing it with alternating downstrokes and upstrokes — is a musical choice, not a technical consideration.
Mixing Single Notes and Strumming
Downstrokes and upstrokes are used for playing single notes as well as for strumming. Combining single notes with strums is an important part of rhythm guitar playing and gives the guitarist more options than just strumming. For example, a piano player doesn’t plunk down all her fingers at once every time she plays, and guitarists shouldn’t have to strike all the strings every time they bring their picks down (or up, for that matter).
Separating bass and treble: The pick-strum
Separating the bass and treble so they play independently is a great way to provide rhythmic variety and introduce different textures into your playing. In the pick-strum pattern, the pick refers to picking the single bass note, and the strum refers to the upper-string chord that follows. Both the pick and the strum are played with the pick in downstrokes.
Figure 1-6 (Track 69) is a simple pick-strum pattern that’s used in many folk blues and country blues songs. This notation mixes single notes (which appear with normal, rounded noteheads) and rhythm slashes (with the narrower, elongated noteheads).

FIGURE 1-6: Bass-and-chord pick-strum pattern for country blues.
Playing common pick-strum patterns
Most strumming patterns in blues are either all strums or a pick-strum combination, and which approach you use depends on the instruments in your ensemble at the time. A pick-strum approach is good for solo playing or if you’re the only rhythm instrument, because the bass notes fall on different parts of the measure than the chord parts.
If you’re playing solo guitar, you play a lot more pick-strum patterns. In a band setting, you usually have a bass player who handles the bass duties, and it’s more appropriate to play all strumming patterns, so as not to get in the bass’s way. The following sections include other pick-strum patterns for the most common blues feels.
Two-beat or cut shuffle
The two-beat or cut shuffle is sometimes referred to as a boom-chick pattern because the bass note and chords alternate, as shown in Figure 1-7 (Track 70). A two-beat feel is common in other forms of music (Dixieland and big-band jazz, polka, samba, and country), but it has its place in the blues, too.

FIGURE 1-7: Two-beat or cut shuffle feel alternates bass notes with chords.
The 12/8 groove
The 12/8 groove is the slowest pattern of the blues, so it helps to have the bass note play twice on beats one and three, while the chords play on beats two and four, as shown in Figure 1-8 (Track 71).

FIGURE 1-8: A pick-strum pattern in a slow 12/8 feel.
Shuffling the Beats with Syncopated Strumming
After you develop a feel strumming in different combinations of eighths, quarters, and sixteenth (which come four per beat, or twice as fast as eighth notes), you can increase the rhythmic variation to these various groupings by applying syncopation.
Syncopation is the disruption or alteration of the expected sounds of notes. In blues rhythm playing, you can apply syncopation by staggering your strum and mixing up your up- and downstrokes to strike different parts of the beats. By doing so, you let the agents of syncopation — dots, ties, and rests — steer your rhythmic strumming to a more dramatic and interesting course. (Book 1 Chapter 4 talks in detail about dots, ties, and more.)
A bit of notation: Dots that extend and ties that bind
A dot attached to a note increases its rhythmic value by half the original length. So a dot attached to a half note (two beats) makes it three beats long. A dotted quarter note is one and a half beats long or the total of a quarter note plus an eighth note.
A tie is a curved line that connects two notes of the same pitch. The value of the tied note adds to the original, so that only the first note is sounded, but the note is held for the duration of the two notes added together.
Syncopation: Playing with dots and ties
So how do dots and ties actually make syncopation in a musical context? There are two progressions — one in a straight-eighth feel and another in a shuffle — that you can practice playing in this section. They both have common syncopation figures used in the blues.
The normal flow of down- and upstrokes is interrupted in syncopation, so it’s important to remember which stroke direction to play a note to avoid getting your strums out of sync.
In both Figures 1-9 and 1-10, pay close attention to the downstroke (2) and upstroke (4) indications. Figure 1-9 (Track 72 at 0:00) is a straight-eighth-note feel, in the key of A. The use of dots and ties signals a syncopated rhythm. If the tied figures present a problem, practice the figure by first ignoring the ties (in other words, play the tied note).

FIGURE 1-9: Straight-eighth progression in A that uses common syncopation figures.
Figure 1-10 (Track 72 at 0:16) is in a shuffle feel in the key of A. A shuffle rhythm divides the quarter note into two eighth notes, but the first eighth note is held longer than the second, producing a swinging, lilting feel. The same syncopation scheme appears here as it did in Figure 1-9, but the shuffle feel makes it fall in a slightly different place in the beat.

FIGURE 1-10: Shuffle in A that uses common syncopation figures.
Muting: Stopping the String from Ringing
Listen to blues rhythm guitar and you hear that it’s not one repetitive wall of sound, but an open, varied sound with breathing room and subtle breaks. It’s these breaks that prevent the chord strums from running into each other and creating sonic mush. The little gaps in sound keep a strumming figure sounding crisp and controlled.
To create a rhythm guitar part with some breathing space between the notes, you need to stop the strings from ringing momentarily. We’re talking very small moments here — much smaller than can be indicated by a rest symbol in the music. You can stop the strings instantly with the left hand — letting the left hand go limp is the best and quickest way to stop a string from ringing — far faster and more controlled than anything you can do with the right hand.
This left-hand technique may seem out of place in a chapter devoted to the right hand, but it belongs here because it’s a coordinated effort between the two hands, which can only occur when the right hand plays.
Muting the sound between two chords (left hand)
To get the left hand to mute (indicated by an X notehead) the in-between sound between any two chords, just relax slightly the fretting fingers enough to release pressure on the fretted strings. The strings instantly deaden, completely cutting off the sound. If your right hand keeps going in the established strumming pattern, you produce a satisfying thunk sound as the right hand hits all these deadened strings.
The muted strings intermixed with the sounding strings create a percussive and syncopated rhythm. Allowing your left hand to mute means you don’t have to stop and start your right hand to produce syncopation. You can keep it going uninterrupted, in alternating down- and upstrokes.
Simulating syncopation with left-hand muting
Left-hand muting gives you the means to control the strings’ sound. Figure 1-11 (Track 72 at 0:32) is technically a straight-ahead down-up eighth-note strum in the right hand. But because you employ left-hand muting, the sound seems to cut off in just the right places, creating a syncopated sound. Your right hand isn’t performing true syncopation, because it’s playing straight through. It’s just that some of the notes don’t come through audibly.

FIGURE 1-11: Strumming pattern that employs left-hand muting to simulate syncopation.
Guitarists seem to develop left-hand muting naturally, almost as if it wasn’t a technique you had to learn but a way of playing that evolves. So don’t try to analyze it too much, or slow your playing down as you’re learning; just strum and relax and tighten your left hand in the context of a medium-tempo groove. Eventually, your two hands sync up without even thinking about it.
Muting the sound of a note (right hand)
Right-hand muting is a technique entirely separate from left-hand muting and produces a totally different effect. When you mute with your right hand, you still hear the pitch and tone of the vibrating string but in a subdued way — more like a true mute, in the musical sense. Right-hand muting keeps the string from ringing freely and reduces the volume and ringing of your strings while still maintaining drive and intensity. This technique is a great way to add dramatic variation to your playing.
Two ways to play the right-hand mute include the following:
- Palm mute: The palm mute is another name for the right-hand mute and is executed by resting the heel of your right-hand on the strings just above the bridge. If you place your hand too far forward, you completely deaden the strings, so place it just forward enough of the bridge that the strings still sound a little but are dampened. Keep your hand in position through the duration of the strum.
- Accent: The accent is the opposite of a palm mute: It highlights a strike and lets the resulting sound ring out. To accent a chord, just strike it harder than usual and allow the strings to ring free. The result is that the accented strum stands out above all the rest. An accent is indicated with a > just above or below the notehead.
Palm mutes are usually applied to only one or two strings, because the right hand is restricted when you rest it directly on the strings above the bridge. Figure 1-12 (Track 73) is a rhythm figure where you strike only the lowest two strings of the chord during the palm mutes and the upper strings on the accents. Play this progression by using all downstrokes to add intensity.

FIGURE 1-12: Rhythm figure with palm mutes and accents.
Copying the Classics: Plucking Fingerstyle Blues
If you want to make money playing the blues, you should probably get yourself an electric guitar and play it with a pick (make sure to practice the styles presented in the following section). But if you want insight into the roots of the blues, grab an acoustic and play it fingerstyle. Acoustic fingerstyle blues is a wonderful tradition, populated with such immortal figures as Robert Johnson, Skip James, Lightnin’ Hopkins, Mance Lipscomb, Leadbelly, Mississippi John Hurt, Reverend Gary Davis, John Hammond, Rory Block, Roy Book Binder, Bob Brozman, Jerry Reed, and Chet Atkins.
Early solo blues guitar players quickly realized that separating the thumb and fingers was a great way to get the bass line going independent of the chords and riffs above it. So acoustic fingerstyle blues is best played with an independent thumb. And more than just using the thumb to hit the bass notes while the fingers brush the treble strings, independent thumb means that the thumb and fingers can play separate musical roles — almost like a mini rhythm section. The thumb can be the bass player, and the fingers can provide chords like the guitar’s traditional role.
Figure 1-13 (Track 74) shows a basic fingerstyle pattern where the thumb drives out a steady quarter note rhythm on the low strings, and the thumb plays chords on the offbeats. Listen closely to the audio file to capture the shuffle feel in this figure.

FIGURE 1-13: Fingerstyle blues with a quarter-note bass.
The Right Hand’s Bliss: Different Rhythm Styles to Play
Blues consists of a few different feels, and if some songs sound like others (as some people say), it’s partly because of the relatively few feels. Table 1-1 is a list of the common blues feels and well-known songs written in that feel (and if you don’t know these songs, find them and listen to them).
TABLE 1-1 Blues Songs by Feel
Feel |
Song |
Artist |
|---|---|---|
Shuffle |
Sweet Home Chicago |
Robert Johnson, The Blues Brothers |
Blue Suede Shoes |
Carl Perkins, Elvis Presley |
|
Midnight Special |
Leadbelly |
|
Hide Away |
Freddie King, Eric Clapton, Stevie Ray Vaughan |
|
12/8 |
Stormy Monday |
Allman Brothers, T-Bone Walker |
Red House |
Jimi Hendrix |
|
At Last |
Etta James |
|
The Sky Is Crying |
Elmore James, Stevie Ray Vaughan |
|
Two-beat |
Maybellene |
Chuck Berry |
Got My Mojo Working |
Muddy Waters |
|
I Found a New Baby |
Charlie Christian |
|
Straight-four |
The Thrill Is Gone |
B.B. King |
Killing Floor |
Howlin’ Wolf, Mike Bloomfield, Jimi Hendrix |
|
Crossroads |
Robert Johnson, Cream |
|
Born Under a Bad Sign |
Albert King, Cream |
|
16 feel |
Hard to Handle |
Otis Redding, Black Crowes |
Little Wing |
Jimi Hendrix, Stevie Ray Vaughan |
|
Mary Had a Little Lamb |
Buddy Guy, Stevie Ray Vaughan |
The shuffle groove
The shuffle groove is certainly the most common feel in blues — more common than the straight-four and slow 12/8 feel. There’s one small hurdle to get over: A shuffle feel uses a triplet-based rhythmic division, where each quarter note is divided into eighth-note triplets. The typical melodic division is two eighth notes, where the first note is held for the duration of the first two notes of the triplet, and the second eighth note is the third note of the triplet. This yields a lopsided, lilting feel in the eighth-note flow that’s the heart of the shuffle sound.
Figure 1-14 (Track 75) is a progression in a shuffle feel. Practice while listening to the audio track on this one to make sure you get the sound of the shuffle.
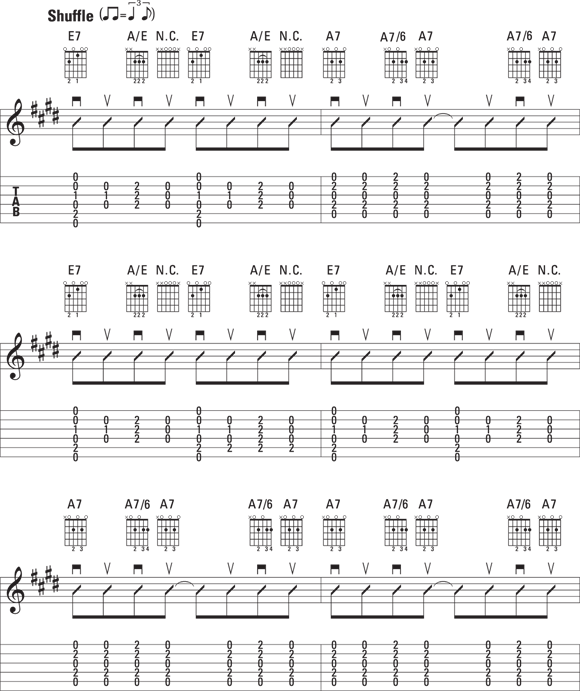

FIGURE 1-14: The shuffle feel is the most common groove in the blues.
The driving straight-four
The straight in straight-four refers to the eighth notes being evenly spaced, just as they are in most normal music forms you encounter. The four is four-four time, which is the most common time signature for blues. This explanation may sound mundane, except when you consider that most blues is in a shuffle feel, so the word straight indicates that you’re doing something a little uncommon for the blues. Figure 1-15 (Track 76) shows a driving straight-four groove.


FIGURE 1-15: Straight-four feel is used for a more driving, rock-based sound.
The slow 12/8, with groups of three
The slow part of the slow 12/8 feel is easy to grasp. The 12/8 is related to the shuffle, because a shuffle is a four-four feel based on triplet divisions of eighth notes. But in 12/8, the feel is slower, and the individual eighth notes (they’re not triplets, because their grouping of three is built into the time signature) are given more prominence.
Don’t be intimidated by the 12/8 part of this feel. There are twelve eighth notes to the bar, and each eighth note gets one beat. In practice though, the eighth notes are grouped in four units of three each. So it’s a lot like 4/4 time with eighth-note triplets on every beat. If it’s a slow blues, and you can hear note-groupings of three, it’s probably a 12/8 feel.
Famous blues songs in 12/8 include T-Bone Walker’s “Stormy Monday,” covered by the Allman Brothers on their Live at the Fillmore album. Figure 1-16 (Track 77) is a passage in the style of “Stormy Monday.”


FIGURE 1-16: The 12/8 feel is used for slow-tempo blues.
The two-beat feel
The two-beat feel came to the blues from Dixieland and big-band jazz and from novelty tunes. The lively pace of this style makes you want to jump, unlike the more sedate blues grooves. The two-beat feel, also called cut time or cut shuffle, is characterized by a pronounced boom-chick, boom-chick feel, where the booms are bass notes (usually alternating between the root and the fifth of the chord), and the chicks are the chords, shown in Figure 1-17 (Track 78).

FIGURE 1-17: The two-beat feel is used for more lively blues.
The slow and funky 16 feel
More modern blues grooves include the 16 feel, which has a slower tempo but funkier sound due to the sixteenth-note subdivisions. (James Brown’s “I Feel Good” and “Papa’s Got a Brand New Bag” are classic examples of sixteenth-note based funk.) “Hard to Handle,” written by Otis Redding and covered by the Black Crowes, is a famous example of 16-feel blues. Figure 1-18 (Track 79) is medium tempo, funky groove in a 16 feel.


FIGURE 1-18: The 16 feel is used for funky-sounding blues grooves.