
Chapter 2
Getting Ready to Play
IN THIS CHAPTER
![]() Positioning your body and hands before you play
Positioning your body and hands before you play
![]() Reading chord diagrams, tablature, and rhythm slashes
Reading chord diagrams, tablature, and rhythm slashes
![]() Playing chords
Playing chords
![]() Access the video clips at
Access the video clips at www.dummies.com/go/guitaraio/
Guitars are user-friendly instruments. They fit comfortably into the arms of most humans, and the way your two hands fall on the strings naturally is pretty much the position from which you should play. This chapter tells you all about good posture techniques and how to hold your hands — just as if you were a young socialite at a finishing school.
Just remember that good posture and position, at the very least, prevent strain and fatigue and, at best, help develop good concentration habits and tone. After you get positioned correctly with the guitar, the chapter goes over some basic music-deciphering skills and shows you how to play a chord.
Assuming the Positions
You can either sit or stand while playing the guitar, and the position you choose makes virtually no difference whatsoever to your tone or technique. Most people prefer to sit while practicing but stand while performing publicly. (Note: The one exception to the sit or stand option is the classical guitar, which you normally play in a sitting position. The orthodox practice is to play in a seated position only. This practice doesn’t mean that you can’t play a classical-style guitar or classical music while standing, but the serious pursuit of the classical guitar requires that you sit while playing. See the chapters in Book 6 for full details.)
The following sections describe sitting and standing postures for playing the guitar and show you how to position both of your hands.
Sitting down and playing a spell
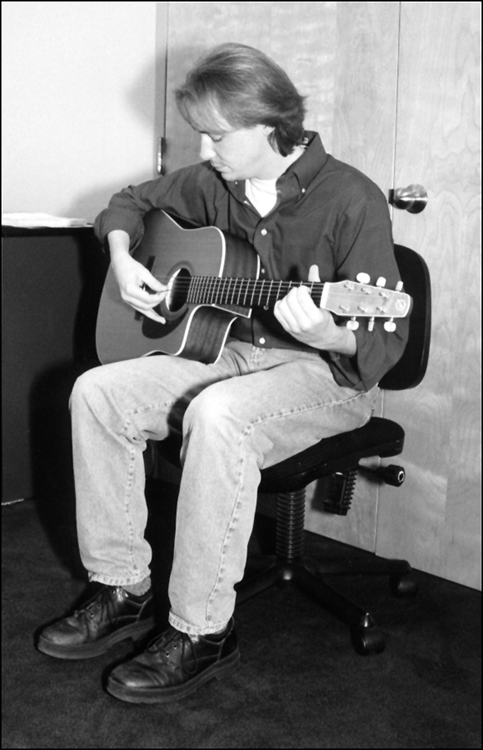
 To hold the guitar in a sitting position, rest the waist of the guitar on your right leg. (The waist is the indented part between the guitar’s upper and lower bouts, which are the protruding curved parts that look like shoulders and hips.) Place your feet slightly apart. Balance the guitar by lightly resting your right forearm on the bass bout, as shown in Figure 2-1. Don’t use the left hand to support the neck. You should be able to take your left hand completely off the fretboard without the guitar dipping toward the floor. You can also put on a strap to help you (see next section).
Photograph courtesy of Cherry Lane Music
FIGURE 2-1: Typical sitting position.
Classical-guitar technique, on the other hand, requires you to hold the instrument on your left leg, not on your right. This position puts the center of the guitar closer to the center of your body, making the instrument easier to play, especially with the left hand, because you can better execute the difficult fingerings of the classical-guitar music in that position.
You must also elevate the classical guitar, which you can do either by raising the left leg with a specially made guitar foot stool (the traditional way) or by using a support arm, which goes between your left thigh and the guitar’s lower side (the modern way). This device enables your left foot to remain on the floor and instead pushes the guitar up in the air.
Standing up and delivering
To stand and play the guitar, you need to securely fasten (or tie) a strap to both strap pins on the guitar. Then you can stand in a normal way and check out how cool you look in the mirror with that guitar slung over your shoulders. You may need to adjust the strap to get the guitar at a comfortable playing height.
 If your strap slips off a pin while you’re playing in a standing position, you have about a 50-50 chance of catching your guitar before it hits the floor (and that’s if you’re quick and experienced with slipping guitars). So don’t risk damaging your guitar by using an old or worn strap or one with holes that are too large for the pins to hold securely. Guitars aren’t built to bounce, as Pete Townshend has demonstrated so many times.
Your body makes a natural adjustment in going from a sitting position to a standing position. So don’t try to overanalyze where your arms fall, relative to your sitting position. Just stay relaxed and, above all, look cool. (You’re a guitar player now! Looking cool is just as important as knowing how to play … well, almost as important.) Figure 2-2 shows a typical standing position.
Fretting with your left hand
To get an idea of correct left-hand positioning on the guitar, extend your left hand, palm up, and make a loose fist, placing your thumb roughly between your 1st and 2nd fingers. All your knuckles should be bent. Your hand should look about the same after you stick a guitar neck in there. The thumb glides along the back of the neck, straighter than if you were making a fist but not rigid. The finger knuckles stay bent whether they’re fretting or relaxed. Again, the left hand should fall in place very naturally on the guitar neck — as if you’re picking up a tool you’ve been using all your life.
 To fret a note, press the tip of your finger down on a string, keeping your knuckles bent. Try to get the fingertip to come down vertically on the string rather than at an angle. This position exerts the greatest pressure on the string and also prevents the sides of the finger from touching adjacent strings — which may cause either buzzing or muting (deadening the string or preventing it from ringing). Use your thumb from its position underneath the neck to help squeeze the fingerboard for a tighter grip. Video Clip 2 shows you how to apply your left-hand fingers to the fingerboard to fret correctly.

Photograph courtesy of Cherry Lane Music
FIGURE 2-2: Typical standing position.
 When playing a particular fret, keep in mind that you don’t place your finger directly on the metal fret wire but in between the two frets (or between the nut and 1st fret wire). For example, if you’re playing the 5th fret, place your finger in the square between the 4th and 5th fret wires. Don’t place it exactly in the center of the square (midway between the fret wires) but closer to the higher fret wire (in this case, the 5th). This technique gives you the clearest sound and prevents buzzing.
Left-hand fretting requires strength, but don’t be tempted to try speeding up the process of strengthening your hands through artificial means. Building up the strength in your left hand takes time and practice, period. You may see advertisements for hand-strengthening devices and believe that these products may expedite your left-hand endurance. Sure, these devices may work (and the same goes for the home-grown method of squeezing a racquet ball or tennis ball), but one thing’s for sure: Nothing helps you build your left-hand fretting strength better or faster than simply playing guitar. Often.
Because of the strength your left hand exerts while fretting, other parts of your body may tense up to compensate. At periodic intervals, make sure you relax your left shoulder, which has a tendency to rise as you work on your fretting. Take frequent “drop-shoulder” breaks. You want to keep your upper arm and forearm parallel to the side of your body. Relax your elbow so it stays at your side.
To maintain a good left-hand position, you need to keep it comfortable and natural. If your hand starts to hurt or ache, stop playing and take a rest. As with any other activity that requires muscular development, resting enables your body to catch up.
The following sections give you additional, specific details on left-hand fretting for electric and classical guitars.
Electric endeavours
Electric necks are both narrower (from the 1st string to the 6th) and shallower (from the fingerboard to the back of the neck) than acoustic necks. Electric guitars are, therefore, easier to fret. But the space between each string is smaller, so you’re more likely to touch and deaden an adjacent string with your fretting finger. The biggest difference, however, between fretting on an electric and on a nylon- or steel-string acoustic is the action.
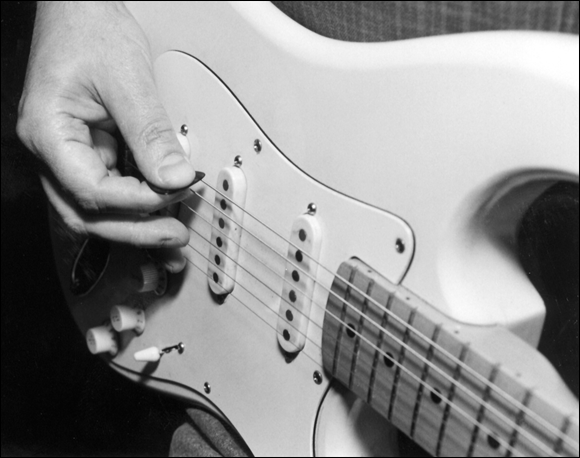
A guitar’s action refers to how high above the frets the strings ride and, to a lesser extent, how easy the strings are to fret. On an electric guitar, fretting strings is like passing a hot knife through butter. The easier action of an electric enables you to use a more relaxed left-hand position than you normally would on an acoustic, with the palm of the left hand facing slightly outward. Figure 2-3 shows a photo of the left hand resting on the fingerboard of an electric guitar, fretting a string.

Photograph courtesy of Cherry Lane Music
FIGURE 2-3: The electric guitar neck lies comfortably between the thumb and the 1st finger as the 1st finger frets a note.
Classical conditions
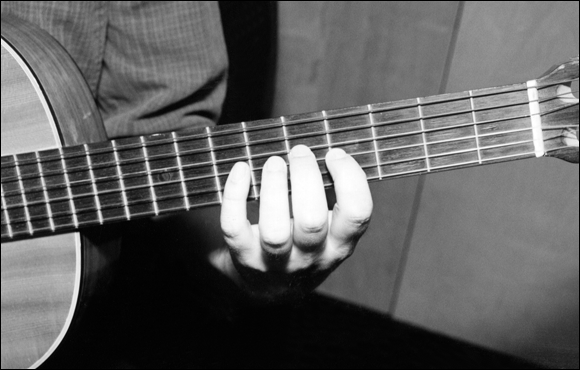
Because nylon-string guitars have a wide fingerboard and are the model of choice for classical music, their necks require a slightly more (ahem) formal left-hand approach. Try to get the palm-side of your knuckles (the ones that connect your fingers to your hand) to stay close to and parallel to the side of the neck so the fingers run perpendicular to the strings and all the fingers are the same distance away from the neck. (If your hand isn’t perfectly parallel, the little finger “falls away” or is farther from the neck than your index finger.) Figure 2-4 shows the left-hand position for nylon-string guitars.
Photograph courtesy of Cherry Lane Music
FIGURE 2-4: Correct left-hand position for a classical guitar.
Picking with your right hand
If you hold a guitar in your lap and drape your right arm over the upper bout, your right hand, held loosely outstretched, crosses the strings at about a 60 degree angle. This position is good for playing with a pick. For fingerstyle playing, you want to turn your right hand more perpendicular to the strings. For classical guitar, you want to keep the right hand as close to a 90 degree angle as possible.
The following sections provide guidelines on right-hand picking with a pick and with your fingers. Refer to Video Clip 3 to double-check that you’re picking correctly.
If you’re using a pick
You do almost all your electric guitar playing with a pick, whether you’re belting out rock and roll, blues, jazz, country, or pop. On acoustic, you can play either with a pick or with your fingers. On both electric and acoustic, you play most rhythm (chord-based accompaniment) and virtually all lead (single-note melodies) by holding the pick, or plectrum (the old-fashioned term), between the thumb and index finger. Figure 2-5 shows the correct way to hold a pick — with just the tip sticking out, perpendicular to the thumb.
Photograph courtesy of Cherry Lane Music
FIGURE 2-5: Correct pick-holding technique.
If you’re strumming (playing rhythm), you strike the strings with the pick by using wrist and elbow motion. The more vigorous the strum, the more elbow you must put into the mix. For playing lead, you use only the more economical wrist motion. Don’t grip the pick too tightly as you play — and plan on dropping it a lot for the first few weeks that you use it.
Picks come in various gauges. The gauge indicates how stiff, or thick, it is.
- Thinner picks are easier to manage for the beginner.
- Medium picks are the most popular, because they’re flexible enough for comfortable rhythm playing yet stiff enough for leads.
- Heavy-gauge picks may seem unwieldy at first, but they’re the choice for pros, and eventually all skilled instrumentalists graduate to them (although a few famous holdouts exist — such as Neil Young).
If you’re using your fingers
If you eschew such paraphernalia as picks and want to go au naturel with your right hand, you’re fingerpicking (although you can fingerpick with special individual, wraparound picks that attach to your fingers — called, confusingly enough, fingerpicks). Fingerpicking means that you play the guitar by plucking the strings with the individual right-hand fingers. The thumb plays the bass, or low, strings, and the fingers play the treble, or high, strings. In fingerpicking, you use the tips of the fingers to play the strings, positioning the hand over the sound hole (if you’re playing acoustic) and keeping the wrist stationary but not rigid. Maintaining a slight arch in the wrist so the fingers come down more vertically on the strings also helps.
 Because of the special right-hand strokes that you use in playing classical guitar (the free stroke and the rest stroke), you must hold your fingers almost perfectly perpendicular to the strings to execute the correct technique. A perpendicular approach enables your fingers to draw against the strings with maximum strength. See the chapters in Book 6 for a lot more information on playing classical guitar.
Getting Your Head Around Guitar Notation
Although you don’t need to read music to play the guitar, musicians have developed a few simple tricks through the years that aid in communicating such basic ideas as song structure, chord construction, chord progressions, and important rhythmic figures. Pick up on the shorthand devices for chord diagrams, tablature, and rhythm slashes (described in the following sections), and you’re sure to start coppin’ licks faster than Vince Gill pickin’ after three cups of coffee.
You really don’t need to read music to play the guitar. Many guitar pros do not read music. With the help of the chord diagrams, tablature, and rhythm slashes explained in this section, plus hearing what all this stuff sounds like through the magic of the companion audio tracks and video clips for this book (see the Introduction for how to access those), you can pick up on everything you need to understand and play the guitar. And the chapters in Book 3 are all about guitar theory — which is much more valuable to know about for most guitarists than knowing how to read sheet music.
Understanding chord diagrams
Don’t worry — reading a chord diagram is not like reading music; it’s far simpler. All you need to do is understand where to put your fingers to form a chord. A chord is the simultaneous sounding of three or more notes.
Figure 2-6 shows the anatomy of a chord chart, and the following list briefly explains what the different parts of the diagram mean:
- The grid of six vertical lines and five horizontal ones represents the guitar fretboard, as if you stood the guitar up on the floor or chair and looked straight at the upper part of the neck from the front.
- The vertical lines represent the guitar strings. The line at the far left is the low 6th string, and the right-most vertical line is the high 1st string.
- The horizontal lines represent frets. The thick horizontal line at the top is the nut of the guitar, where the fretboard ends. So the 1st fret is actually the second vertical line from the top.
- The dots that appear on vertical string lines between horizontal fret lines represent notes that you fret.

Illustration © John Wiley & Sons, Inc.
FIGURE 2-6: A standard chord diagram for an E chord.
- The numerals directly below each string line (just below the last fret line) indicate which left-hand finger you use to fret that note. On the left hand, 1 = index finger; 2 = middle finger; 3 = ring finger; and 4 = little finger. You don’t use the thumb to fret, except in unusual circumstances.
- The X or O symbols directly above some string lines indicate strings that you leave open (unfretted) or that you don’t play. An X (not shown in Figure 2-6) above a string means that you don’t pick or strike that string with your right hand. An O indicates an open string that you do play.
If a chord starts on a fret other than the 1st fret, a numeral appears to the right of the diagram, next to the top fret line, to indicate in which fret you actually start. (In such cases, the top line is not the nut.) In most cases, however, you deal primarily with chords that fall within only the first four frets of the guitar. Chords that fall within the first four frets typically use open strings, so they’re referred to as open chords.
Taking in tablature
Tablature (or just tab, for short) is a notation system that graphically represents the frets and strings of the guitar. Whereas chord diagrams do so in a static way, tablature shows how you play music over a period of time. For most of the musical examples that appear in this book, you’ll see a tablature staff (or tab staff, for short) beneath the standard notation staff. This second staff reflects exactly what’s going on in the regular musical staff above it but in guitar language. Tab is guitar-specific — in fact, many call it guitar tab. Tab doesn’t tell you what note to play (such as C or F♯ or E♭). It does, however, tell you what string to fret and where exactly on the fingerboard to fret that string.
Figure 2-7 shows you the tab staff and some sample notes and a chord. The top line of the tab staff represents the 1st string of the guitar — high E. The bottom line of the tab corresponds to the 6th string on the guitar, low E. The other lines represent the other four strings in between — the second line from the bottom is the 5th string, and so on. A number appearing on any given line tells you to fret that string in that numbered fret. For example, if you see the numeral 2 on the second line from the top, you need to press down the 2nd string in the 2nd fret above the nut (actually, the space between the 1st and 2nd metal frets, right?). A 0 on a line means that you play the open string.

FIGURE 2-7: Three examples of tab.
Reading rhythm slashes
Musicians use a variety of shorthand tricks to indicate certain musical directions because, although a particular musical concept itself is often simple enough, to notate that idea in standard written music form may prove unduly complicated and cumbersome. So musicians use a road map that gets the point across yet avoids the issue of reading (or writing) music.
Rhythm slashes are slash marks (/) that simply tell you how to play rhythmically but not what to play. The chord in your left hand determines what you play. Say, for example, you see the diagram shown in Figure 2-8.

FIGURE 2-8: One measure of an E chord.
If you see such a chord symbol with four slashes beneath it, as shown in the figure, you know to finger an E chord and strike it four times. What you don’t see, however, is a number of differently pitched notes clinging to various lines of a music staff, including several hole-in-the-center half notes and a slew of solid quarter notes — in short, any of that junk that you needed to memorize in grade school just to play “Mary Had a Little Lamb” on the recorder. All you need to remember on seeing this particular diagram is to “play an E chord four times.” Simple, isn’t it?
Discovering How to Play a Chord
Chords are the basic building blocks of songs. You can play a chord (the simultaneous sounding of three or more notes) several ways on the guitar — by strumming (dragging a pick or the back of your fingernails across the strings in a single, quick motion), plucking (with the right-hand fingers), or even smacking the strings with your open hand or fist. (Okay, that’s rare, unless you’re in a heavy metal band.) But you can’t just strike any group of notes; you must play a group of notes organized in some musically meaningful arrangement. That means learning left-hand chord forms.
After you think you understand (somewhat) the guitar notation described in the preceding sections, your best bet is to jump right in and play your first chord. Start with E major, because it’s a particularly guitar-friendly chord and one that you use a lot. And it’s pretty easy.
After you get the hang of playing chords, you’ll eventually find that you can move several fingers into position simultaneously. For now, though, just place your fingers one at a time on the frets and strings, as the following instructions indicate (you can also refer to Figure 2-6):
Place your 1st (index) finger on the 3rd string, 1st fret (actually between the nut and 1st fret wire but closer to the fret wire).
Don’t press down hard until you have your other fingers in place. Apply just enough pressure to keep your finger from moving off the string.
Place your 2nd (middle) finger on the 5th string, 2nd fret.
Again, apply just enough pressure to keep your fingers in place. You now have two fingers on the guitar, on the 3rd and 5th strings, with an as-yet unfretted string (the 4th) in between.
Place your 3rd (ring) finger on the 4th string, 2nd fret.
You may need to wriggle your ring finger a bit to get it to fit in there between the 1st and 2nd fingers and below the fret wire.
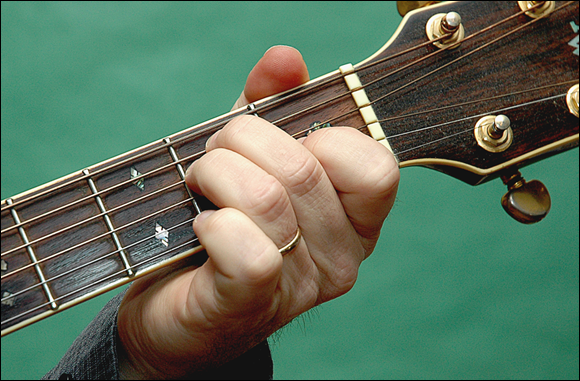
Figure 2-9 shows a photo of how your E chord should look after all your fingers are positioned correctly. Now that your fingers are in position, strike down through all six strings with your right hand to hear your first chord, E. To see how to form an E chord step by step, check out Video Clip 4.
Photograph courtesy of Jon Chappell
FIGURE 2-9: Notice how the fingers curve and the knuckles bend on an E chord.
One of the hardest things to do in playing chords is to avoid buzzing. Buzzing results if you’re not pressing down quite hard enough when you fret. A buzz can also result if a fretting finger accidentally comes in contact with an adjacent string, preventing that string from ringing freely. Without removing your fingers from the frets, try “rocking and rolling” your fingers around on their tips to eliminate any buzzes when you strum the chord.