
Chapter 1
Putting the Major Scales to Use in Your Playing
IN THIS CHAPTER
![]() Playing major scales using five patterns
Playing major scales using five patterns
![]() Performing pieces using the major scales
Performing pieces using the major scales
![]() Access the audio track at
Access the audio track at www.dummies.com/go/guitaraio/
Practicing scales may sound boring, but it’s a discipline that guitarists use to perfect their technique, especially their right-hand technique. Think about this: Classical guitar great Andrés Segovia recommended practicing scales two hours a day! For guitarists who use a pick, rather than their fingers and nails, these scales are an excellent medium to work on alternate picking.
Most music is based on scales. So if you learn and memorize where the scale patterns and positions are, your fingers will know what to do when you see a scale in music. Playing whole passages of notes becomes automatic.
So how do you get to such a place? By taking common scale patterns and playing them repeatedly until you know them cold. “Practice makes perfect,” the saying goes, and it’s true. You not only memorize the notes through repeated playings, but you gradually increase the strength and elasticity of your fingers, which allows you to play more difficult music later on. Sound like exercise? Well, it is, except that it’s exercise for your fingers and your brain. And just like swimming, running, or biking, you need to do it several times a week to improve. For learning guitar, it’s best to practice every day, even if you can manage only a little on some days.
In this chapter, you discover five patterns for playing the major scale. Each pattern has its own particular advantages, which we touch on along the way. At the end of the chapter, you get a real piece of music to play.
 After you memorize each fingering pattern in this chapter, simply move it up or down the neck to a different starting note to produce other major scales. The familiar do, re, mi, fa, sol, la, ti, do sound (think Maria von Trapp and The Sound of Music here) stays the same, but as you switch positions, the key, or letter name, of the scale changes.
Practicing Five Major Scale Patterns
You can play major scales in position (meaning that the left-hand fingers cover four consecutive frets and that the position is named for the fret played by the 1st finger) by applying five unique fingerings. So, with 12 major scales and five fingering options for each scale, you’re looking at 60 major scales in position. All of these options are what make the guitar so incredibly cool. You can play a lot of music by simply memorizing five patterns, and you can play it many different ways — according to the best pattern for the situation or by changing keys easily while maintaining a pattern. These options also show why you need to practice: There’s a lot to master!
As you practice, play each major scale from low to high, slowly, loudly, and deliberately at first to help develop the muscles in your hand and fingers — similar to the way athletes might lift weights. Then play it faster and lighter to more closely approach how the music is actually played in performance. Just be sure to maintain your starting tempo and dynamic level (loudness) throughout the scale.
Major scale pattern #1
 Major scale pattern #1 starts with the 2nd finger on the 6th string (see Figure 1-1, Track 114 at 0:00). Notice that the first note of the exercise has a fingering indication in the music staff. What we’re talking about is the small 2 to the left of the A notehead. This indicator tells you to use your left-hand 2nd finger to play that note. Keep in mind that the 2nd finger is actually one fret higher than the name of the position (which is always defined as the fret number that the 1st finger plays). Practice this pattern as many times as you need to in order to feel comfortable playing it.

FIGURE 1-1: An A major scale in 4th position in both a neck diagram and in music and tab.
After you can adeptly finger this pattern in all keys, practice it in rhythm using the exercise shown in Figure 1-2 (Track 114 at 0:35). This exercise is in the key of G major in 2nd position and in ascending and descending eighth notes. Play it in a steady beat (using a metronome or a foot tap) and try to make the music flow. The exercise may be “just a scale,” but you can still make it musical by employing accents (striking the string slightly harder on certain notes, usually on the beat), and varying the length of the notes from sustained (called legato) to crisp and clipped (staccato).
Try major scale pattern #1 in the key of B♭ major in 5th position in ascending and descending eighth-note triplets, as shown in Figure 1-3 (Track 114 at 0:54). In actual music (versus just scales), you encounter many different types of rhythms, not just eighth notes. So playing scales in triplets helps you mix things up a bit, rhythmically speaking. Try to give your triplets a skipping or lilting feel.

FIGURE 1-2: Practicing in the key of G major in 2nd position and in ascending and descending eighth notes.

FIGURE 1-3: Pattern #1 in the key of B♭ major in 5th position.
Figure 1-4 (Track 114 at 1:11) shows major scale pattern #1 in the key of C major in 7th position in ascending and descending sixteenth notes. This exercise brings you back to even numbers (from the triplets of the previous exercise), but the notes now come four to the beat instead of two. So play these sixteenth notes a little faster than you would play eighth notes. This way you get used to playing quickly as well as moderately.

FIGURE 1-4: Pattern #1 in the key of C major in 7th position.
Major scale pattern #2
Major scale pattern #2 starts with the 4th finger on the 6th string and includes one out-of-position note on the 4th string. An out-of-position note is one that doesn’t fall within the four-fret span defined by the position and that requires a stretch to play. You must stretch up (higher on the neck, toward the bridge) with your 4th finger to reach this note, because it occurs one fret above where the finger naturally falls.
Wherever these patterns contain out-of-position notes, pay special attention, because these spots are where you might play a wrong note or just have trouble playing the right one correctly. If you can’t perform the out-of-position note correctly, try isolating the passage with the problem note and playing it a few times by itself. Then play the whole pattern from start to finish.
Figure 1-5 shows major scale pattern #2 in the key of C major in both a neck diagram and in music and tab format. Note that in addition to the starting finger next to the first note in the music (a 4 to the left of the notehead), another fingering indication is included where an out-of-position note occurs (a 4 next to the 4th-string note B at the 9th fret). Throughout this book, fingerings are indicated for any out-of-position notes, including subsequent notes if there’s a chance you might use the wrong finger. Figure 1-5 is just such a case! Practice this pattern as many times as you need to in order to make all the notes sound smooth and effortless. When you use the correct fingerings automatically, you know you’re on the right track.
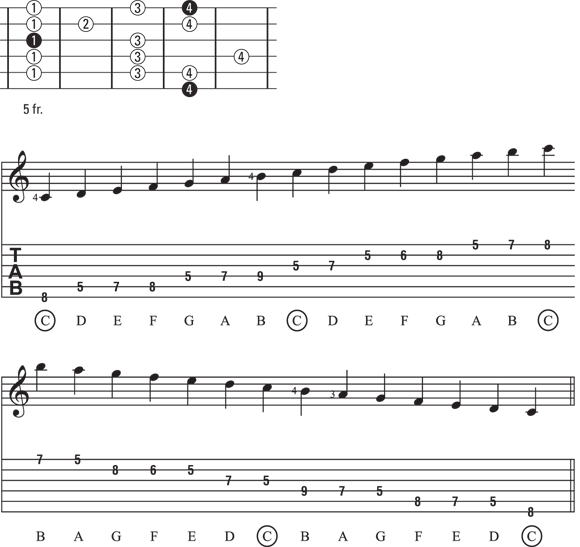
FIGURE 1-5: Pattern #2 in the key of C major.
After you can successfully finger this pattern in all keys, practice it in rhythm. Figure 1-6 shows major scale pattern #2 in the key of B♭ major in 3rd position in ascending and descending eighth-note triplets. Don’t be afraid of the flats in the key signature of this exercise. Usually guitar music is written in “guitar-friendly” keys, which contain sharps in the key signature. But because you’re learning patterns that can be moved around and played in any key with equal ease, a flat key is no more difficult than a sharp key or a key with no flats or sharps at all!

FIGURE 1-6: Pattern #2 in the key of B♭ major in 3rd position.
Major scale pattern #3
Patterns #1 and #2 have a range of two octaves, going from bottom to top. Major scale patterns #3, #4, and #5, on the other hand, span a bit less than two octaves. Playing just a single octave may seem a bit short, so in these patterns, as well as other patterns that span less than two complete octaves, we go as high as the position will allow.
Figure 1-7 shows major scale pattern #3, which starts on the 5th string (not the 6th as in patterns #1 and #2). The pattern is in the key of D major and is shown in both a neck diagram and in music and tab format. Notice that in addition to the starting finger next to the first note in the music (a 2 to the left of the notehead), we include the fingering for the out-of-position note (a 1 next to the 1st-string note G at the 3rd fret). In this stretch, unlike the stretch of pattern #2, you reach down (toward the nut) instead of up. This move helps you get used to stretching in both directions. Practice this pattern as many times as you need to in order to feel as confident starting a scale on the 5th string as you do on the 6th string.
After you can confidently play this pattern starting on any 5th-string note, practice it in rhythm with Figure 1-8 which shows major scale pattern #3 in the key of F major in 7th position in ascending and descending sixteenth notes. Because this exercise is in sixteenth notes (which are relatively fast compared to eighth notes or triplets), play it slowly at first to make sure the notes come at a steady rate. After that you can gradually speed up.

FIGURE 1-7: Pattern #3 in the key of D major starting on the 5th string (not the 6th).

FIGURE 1-8: Pattern #3 in the key of F major in 7th position.
Major scale pattern #4
Like pattern #3, major scale pattern #4 also begins and ends on the 5th string. This time, though, your starting finger is the 4th finger. The good news is that this position has no out-of-position notes (hooray!). So if you feel up to it, you can play the exercises using major scale pattern #4 with a little more brio (that’s music-speak for speed) than the patterns that require stretches.
Figure 1-9 shows major scale pattern #4 in the key of F major in both a neck diagram and in music and tab format. Because this pattern is in the middle of the neck and has no out-of-position notes, you may want to jump right in and play a little faster. Whenever you try an exercise a little faster than you normally would, take a moment to prepare. Then play the entire exercise completely. Don’t get into the habit of making “false starts,” which is an indication that your fingers are ahead of your brain.
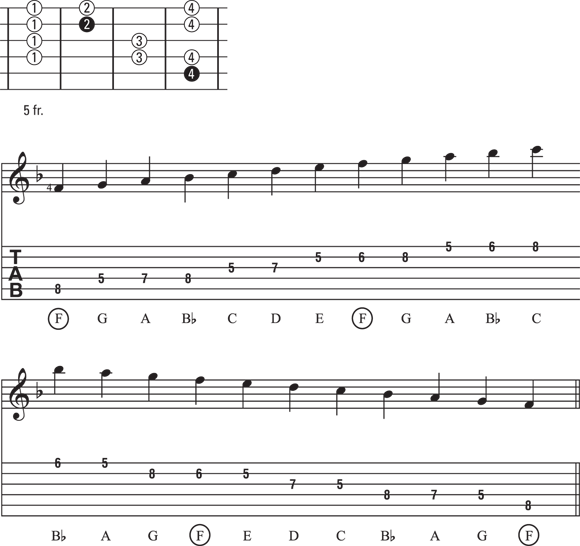
FIGURE 1-9: Pattern #4 in the key of F major.
When you’re ready, try the exercise shown in Figure 1-10 in rhythm. This figure shows major scale pattern #4 in the key of G major in 7th position. This exercise is an easy one. It’s up the neck (where the frets are nicely snuggled together for comfortable playing), it’s in eighth notes (which are a little easier to play than triplets or sixteenth notes), and there are no out-of-position notes to stretch for. So try playing this exercise fast from the get-go. You may surprise yourself by playing a lot faster than you think you can. Just be sure whenever you play fast that you don’t rush (or play ahead of the tempo). When something seems easy, it’s tempting to keep accelerating until you reach your limit. But you have to stay with the tempo established at the outset.

FIGURE 1-10: Pattern #4 in the key of G major in 7th position.
Major scale pattern #5
Major scale pattern #5 is a four-string pattern whose lowest note is on the 4th string. The pattern starts with the 1st finger on the 4th string and includes an out-of-position note that occurs on the 4th string. You have to stretch your 4th finger higher on the neck (toward the bridge) to reach this note, because it occurs one fret above where the finger naturally falls.
Figure 1-11 shows major scale pattern #5 in the key of G major in both a neck diagram and in music and tab format. The stretch for the out-of-position note comes right away — on the first string you play — so watch out for it. First practice the stretch in isolation and then try the full pattern. Play this pattern as many times as you need to in order to get it sounding as strong as the other four major scale patterns.
Figure 1-12 shows major scale pattern #5 in the key of A♭ major in 6th position in ascending and descending eighth-note triplets. Start with your 1st finger on the 4th string, 6th fret. Sixth position presents a moderately difficult stretch on the 4th string.
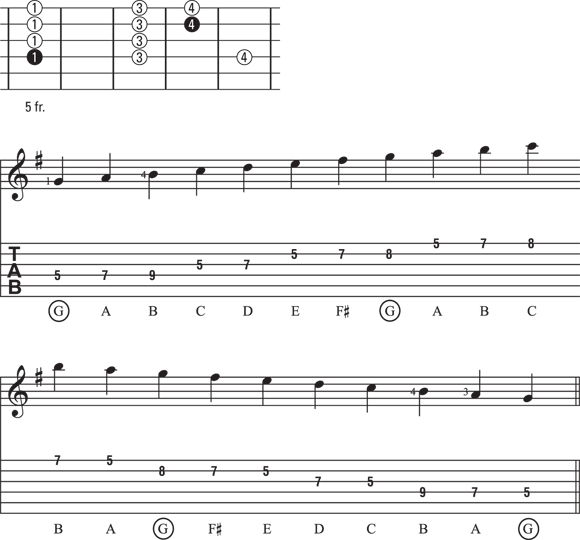
FIGURE 1-11: Pattern #5 in the key of G major.

FIGURE 1-12: Pattern #5 in the key of A♭ major in 6th position.
Applying Your Scale Work to Actual Pieces of Music
Okay, so you’ve practiced, and now you realize that playing scales on a guitar is about as interesting as watching paint dry, right? Well, don’t you drop your flatpick and grab knitting needles just yet. You’ve made it to the fun part where you get to use your scale-playing prowess to play actual music — you know, songs! It’s a reward to you for all the effort you’ve put in so far.
After you get the five major scale patterns “under your fingers” (musician lingo for knowing them cold), you can make those patterns work for you. It bears repeating that most music is made up of scales. And although you may not encounter a lot of music that runs a scale from bottom to top and back down again in eighth notes, you will play many pieces that contain passages of scale segments — the same material you practice here. When you run across a passage that’s similar to a scale you’ve practiced, it’s like the music almost plays itself. You can go into a kind of automatic pilot and enjoy listening to the music as it goes by.
As you practice scales more and more, you’ll find that playing passages of stepwise notes becomes easier and more natural. Scales are an efficient way to practice the notes contained in a song — even if the melody doesn’t lay them out in a strict, regular fashion. In fact, most music isn’t laid out in a strict, regular way because it would be boring and sound like, well, scales. So while practicing scales may not prepare you for a particular piece of music, it’s the best way to prepare yourself equally well for most music. The following sections include two pieces of music whose melodies are made up of primarily major scale passages.
“The First Noël”
“The First Noël” is a Christmas carol that you probably know, so you can use your familiarity with it to help ensure that you’re playing the song correctly — hitting the right pitches in the correct rhythms.
You use two major scale patterns to play “The First Noël”: major scale patterns #1 and #4. To begin, put your hand in 2nd position (with your left-hand 1st finger hovering above the 2nd fret). Then place your left-hand 3rd finger (your ring finger) on the starting note F♯ at the 4th string, 4th fret. Now you’re ready to play.
Notice in Figure 1-13 at bar 8 you switch positions, jumping up to 9th position between beats 2 and 3. Try to let that half note ring for as long as possible before making the jump, but don’t be late for beat 3! This mid-measure jump allows you to play the chorus of the second phrase an octave higher. The song doesn’t really do that, but we thought we’d make it more interesting for you. Plus it gives you a workout in different positions.
After playing eight bars in the upper octave, shift your hand back to 2nd position at bar 16 to finish out the last eight bars. Note that the last bar, like the first pickup bar, is incomplete. It contains two beats, which allows it to even out the one-beat bar that starts the song. You can repeat the song by mentally stitching together the first bar and the last as if the whole song were a repeatable loop.

FIGURE 1-13: “The First Noël” is a good song to practice scales on.