
Chapter 4
Building Finger Independence with Chord Exercises
IN THIS CHAPTER
![]() Playing patterns using outside and inside chords
Playing patterns using outside and inside chords
![]() Putting together a series of chords
Putting together a series of chords
![]() Performing pieces with chord progressions
Performing pieces with chord progressions
![]() Access the audio tracks at
Access the audio tracks at www.dummies.com/go/guitaraio/
Chords are the rhythm guitar yin to the lead guitar yang. In most musical settings, single-note playing is supported by some sort of chord-based accompaniment. The great thing about the guitar is that it can play chords or single-note leads with equal awesomeness — try doing that with a flute or saxophone. But, because the guitar plays chords as well as single notes, it’s important that you keep your chording and melody skills up to snuff. This chapter addresses chord playing.
As with the single-note exercises, the chord forms presented in this chapter are movable — meaning they contain no open strings. So after you can play a chord form comfortably, try moving it around the neck to play different chords. Doing so changes the letter name of the chord (for example, from A to C) but keeps the quality of the chord (major, minor, and so on) the same.
 You can play the chords in this chapter a number of different ways with the right hand, including plucking the individual strings with your fingertips, brushing the strings with the backs of your fingernails, and striking the notes with a pick. But whether you pluck or strum with the right hand, your left-hand approach is the same. Your fingers on your left hand must fret the notes in a way that allows the strings to ring clearly, and they must be able to change chords — that is, get off the old chord and grab the new chord — quickly and imperceptibly (or close to it, anyway). At a performance tempo.
The exercises in this chapter are designed to help get your fingers moving independently. The bountiful number of useful examples also helps you build up strength in the process.
Practicing Inversion Patterns
Chords come in many different guises; even chords with the same name can be played in various ways. For example, you can play an F major chord on the guitar in exactly one billion and seven ways. Okay, that’s a bit of an exaggeration. But you can find lots of chord options on the neck.
The first way you can narrow down the F major chord choices is to organize them by the low-to-high order of their notes. An F major chord is spelled F-A-C, bottom note to top. But the notes A-C-F and C-F-A are also F chords. Any chord with the combination of the notes F, A, and C constitutes an F chord, but if the lowest note of the chord is anything but an F, it’s called an inversion of F. So you get an F (with an F on the bottom), its first inversion (with an A on the bottom), and its second inversion (with a C on the bottom).
In addition to the order of notes from bottom to top, you can also group chords by which strings they’re played on. For example, you can play a chord using all six strings (as you do with a basic open E), just the top five strings, just the top four strings, or any other combination of strings.
 Playing all six strings may make the guitar sound full and complete in one setting, but it’s not always appropriate — especially if you’re playing in a band or with other instruments. (Playing all six strings all the time can sound too full and can muddy up the texture and crowd out other instruments, such as the bass.) Sometimes four-string chords are just right.
Two groups of four-string chords are called outside chords and inside chords:
- Outside chords: Outside forms refer to the top four strings closest to the outside, or edge, of the fretboard. Outside chords don’t include bass notes and are good for melody playing and a higher harmonic part.
- Inside chords: Inside forms — at least for the purposes of this chapter (the term can have other meanings) — are the 2nd, 3rd, and 4th strings (which are insulated from the outside of the neck by surrounding strings) and a 6th string for a low note. Inside chords, which include a bass note, produce a deeper, fuller sound. Good for when there’s no bass player.
Because the chord explorations start at the 1st fret, F was chosen to name the chords. But all the forms presented in this chapter are movable, so when you practice playing them at different frets, the letter name will change. For example, if you play the chords two frets higher than where they are in the figures, you’ll produce G chords of various qualities. F is an efficient way to present all the different forms. But we don’t favor F any more than G or B♭ or F♯. (Okay, F is a little friendlier than F♯, but only because the key of F♯ has six sharps.)
As with practicing scales and arpeggios, play each chord exercise in this chapter slowly, loudly, and deliberately at first, making sure you can hear all the strings that are supposed to ring — and none of the strings that aren’t! Then play the exercise faster and with a lighter touch. Just be sure to maintain your starting tempo and dynamic level (loudness) throughout each exercise.
Patterns using outside chords
Figure 4-1 shows the neck diagram and the corresponding music and tab for the three forms of an outside-string F major chord. Remember that when you practice these exercises, the Xs in the chord diagrams mean that those strings aren’t played. So avoid striking or plucking them with your right hand.
In all the rhythm examples that follow for outside chords, strum each chord lightly in quarter notes (one strum per beat) and avoid playing the lowest two strings of the guitar.
Now try the rhythm exercise in Figure 4-2, which uses the outside forms of F, played two to a bar, or two beats on each chord.
When going from the first form to the second, keep your 3rd finger on the string as you slide up the neck. That way, you only have to reposition two other fingers (rather than all three). Apply the same “common finger” approach between the fourth and fifth chords in the exercise.
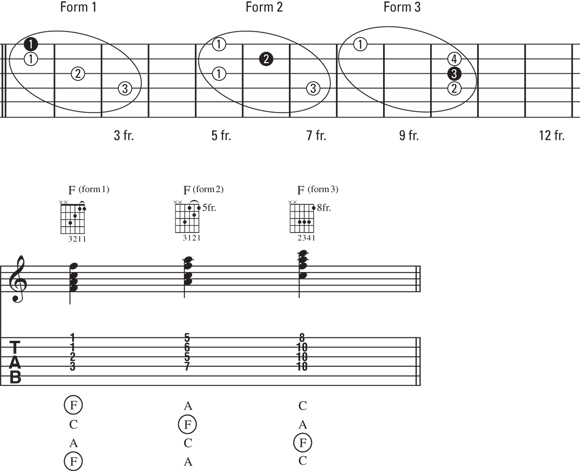
FIGURE 4-1: Three forms of an outside-string F major chord.

FIGURE 4-2: A rhythm exercise for outside F major chords.
Figure 4-3 shows the neck diagram for the three forms of an outside-string F minor chord along with the corresponding music and tab. Practice this pattern as many times as you need to in order to play it smoothly — especially form 3, where you have to squeeze your fingers together a bit.
The exercise in Figure 4-4 uses the four outside forms of F minor, played two to a bar, or two beats on each chord. The common finger approach that you use in the previous exercise works like a charm here: The 3rd finger plays the same string in all three chord forms. So keep it anchored on the 4th string as you move your hand up and down the neck.
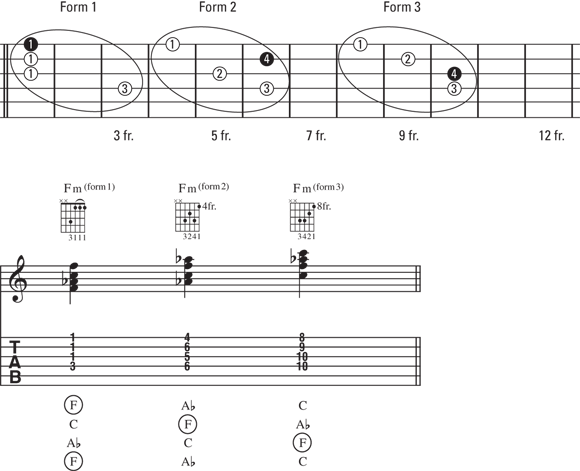
FIGURE 4-3: Three forms of an outside-string F minor chord.

FIGURE 4-4: A rhythm exercise for outside F minor chords.
To see the neck diagram for the four forms of an outside F7 chord, along with the corresponding music and tab, check out Figure 4-5. Practice the pattern until you can move comfortably between the forms in rhythm.
When you’re ready, try the exercise in Figure 4-6 in rhythm. It uses the four outside forms of F7, played two to a bar, or two beats on each chord. Seventh chords are a favorite choice for blues rhythm players, so if you’re interested, practice this progression with the blues chords of B♭7 and C7.

FIGURE 4-5: Four forms of an outside F7 chord.

FIGURE 4-6: Rhythm exercise using four outside forms of F7.
Now take a look at the neck diagram and corresponding music and tab for the four forms of an outside Fm7 chord in Figure 4-7. Try practicing this pattern in two ways: by playing it with a pick, and using just your right-hand fingers. Try to make the two approaches sound as close to each other as you can.
Figure 4-8 shows an exercise using the four outside forms of Fm7, played two to a bar, or two beats on each chord. Outside minor 7th chords are quite common in the jazz guitar style known as chord melody, so work for a smooth, even, and mellow sound as you play these chords. Imagine yourself jamming alongside a stand-up bass and a drummer using brushes.
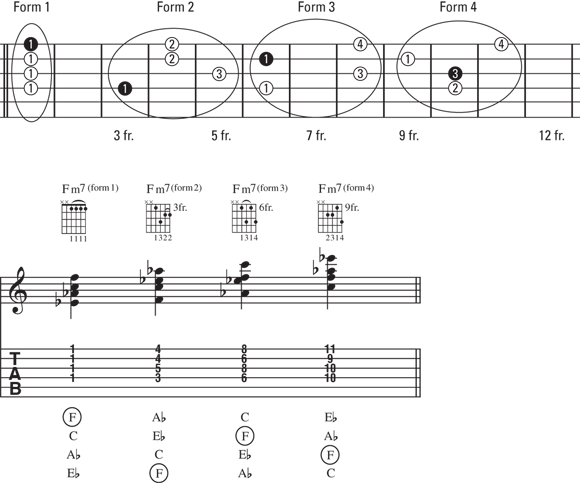
FIGURE 4-7: Four forms of an outside Fm7 chord.

FIGURE 4-8: A rhythm exercise using the four outside forms of Fm7.
Figure 4-9 illustrates the neck diagram and corresponding music and tab for the four forms of an outside Fmaj7 chord. Practice this pattern until you’re completely comfortable with the four-fret spread among your left-hand fingers in form 3.
As practice, try the exercise in Figure 4-10, which uses the four outside forms of Fmaj7, played two to a bar, or two beats on each chord. Form 3 is probably the trickiest chord in this series because it requires you to stretch your fingers out over all four frets in the position, and you have a wide space between the 2nd and 3rd fingers. Practice grabbing this chord in isolation (by removing your hand from the chord and replaying it several times) before playing the whole exercise up to tempo.
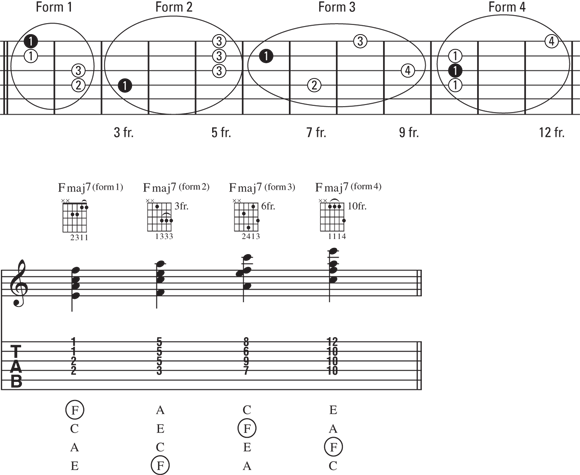
FIGURE 4-9: Four forms of an outside Fmaj7 chord.

FIGURE 4-10: A rhythm exercise using the four outside forms of Fmaj7.
In Figure 4-11, you see the neck diagram for the four forms of an outside F♯m7♭5 chord along with the corresponding music and tab. Practice this pattern slowly at first and as many times as you need to until you have it memorized. Then, when you get “off book,” work on playing it faster.
Now try your hand at the exercise in Figure 4-12, which uses the four outside forms of F♯m7♭5, played two to a bar, or two beats on each chord. Except for the first and last chords, every chord in this exercise is played with a barre. Be sure to check your barre notes (by playing the individual strings one at a time, slowly) to make sure they’re all ringing out clearly and with no buzzing.
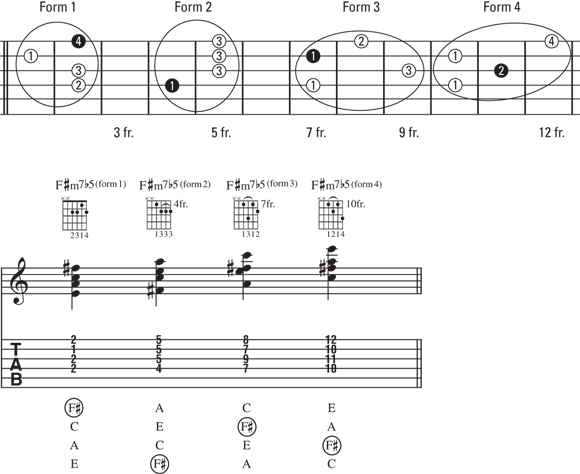
FIGURE 4-11: Four forms of an outside F♯m7♭5 chord.

FIGURE 4-12: A rhythm exercise using the four outside forms of F♯m7♭5.
To see the neck diagram and corresponding music and tab for the three forms of an outside-string F♯dim7 chord, check out Figure 4-13. Songs using the diminished 7th chord sometimes have you playing several forms in quick succession, so make sure you can play this at a fairly fast tempo.
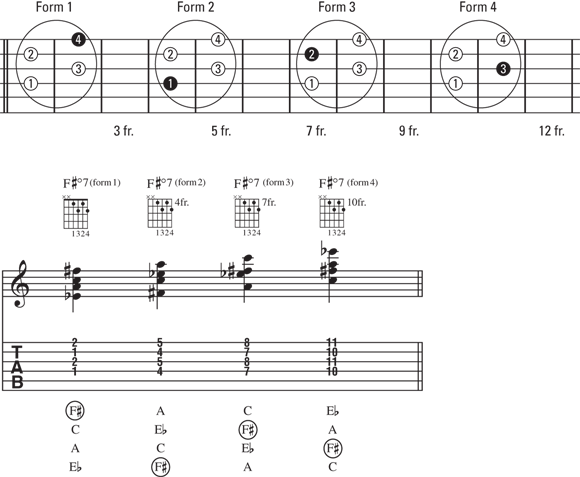
FIGURE 4-13: Four forms of an outside-string F♯dim7 chord.
When you’re ready to finish off your outside chord practice, take a look at Figure 4-14, which shows an exercise in rhythm using the four outside forms of F♯dim7, played two to a bar, or two beats on each chord. The diminished chord form has the same fingering for all of its inversions. So you get a free pass here and have to learn only one form, which you can slide up and down the neck with abandon. Because your fingers don’t have to switch strings, try playing this example at a brighter tempo than you normally would.

FIGURE 4-14: A rhythm exercise using the four outside forms of F♯dim7.
Patterns using inside chords
Figure 4-15 shows the neck diagram and corresponding music and tab for the three forms of an inside F major chord. Remember that the Xs in the chord diagrams indicate that those strings aren’t played. Practice this pattern as many times as you need to in order to get it to flow smoothly and so there’s no trace of that 5th string ringing through.
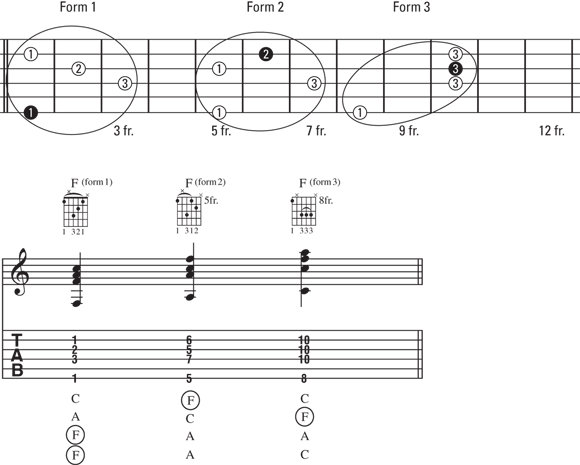
FIGURE 4-15: Three forms of an inside F major chord.
 In the case of inside chords, it’s difficult not to strike the 5th string when strumming (either with the backs of the fingernails or with a pick). So you should mute, or deaden, the string by allowing a left-hand finger to lightly touch it, which will prevent it from ringing out. This muting action is usually done by the finger that’s fretting the 6th string. For the 1st string, simply relaxing the left hand so the underside of the fingers touch the string lightly is enough to prevent it from ringing out.
You can practice this muting technique in Figure 4-16, which uses the three inside forms of F, played two to a bar, or two beats on each chord. Strum each chord lightly in quarter notes (one strum per beat), and avoid or mute the 5th and 1st strings of the guitar (indicated with Xs in the chord diagrams).

FIGURE 4-16: A rhythm exercise using three inside forms of F.
Figure 4-17 shows the neck diagram and corresponding standard notation and tab for the three forms of an inside F minor chord. You can practice this pattern by keeping the 3rd and 1st fingers in the same basic shape as you change chords; they never leave the string they’re on, and they’re always one fret apart from each other.
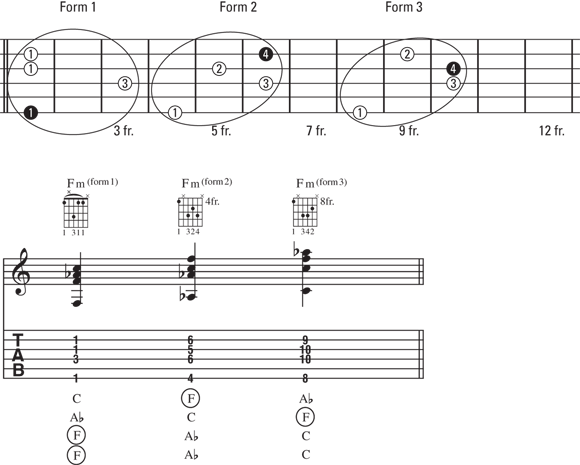
FIGURE 4-17: The three forms of an inside F minor chord.
When you’re ready, try Figure 4-18’s exercise in rhythm, which uses the three inside forms of F minor, played two to a bar, or two beats on each chord. You may have trouble muting the 5th string (which isn’t supposed to sound) on form 1. So for this exercise, try plucking the strings with your right-hand fingers rather than strumming them with a pick.

FIGURE 4-18: A rhythm exercise using three inside forms of F minor.
Now take a look at the neck diagram and corresponding music and tab for the four forms of an inside F7 chord, shown in Figure 4-19. Make sure you can blend all the notes together with your right-hand attack and that no one note stands out. Practice this pattern so you can change smoothly between the chords that use barres (forms 1 and 4) and those that don’t (forms 2 and 3).
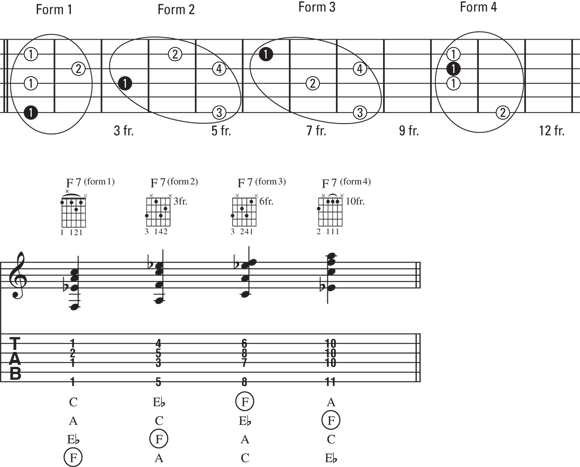
FIGURE 4-19: Four forms of an inside F7 chord.
Give the exercise in Figure 4-20 a try. It uses the four inside forms of F7, played two to a bar, or two beats on each chord. Some guitarists, especially jazz players, like to use an alternate fingering for form 1. Try playing this chord with your 1st finger (not barred) on the 6th string, 2nd finger on the 4th string, 4th finger on the 3rd string, and 3rd finger on the 2nd string. If you prefer this fingering to the barred version, you may be a jazzbo!

FIGURE 4-20: A rhythm exercise using four inside forms of F7.
Here in Figure 4-21 is the neck diagram and corresponding music and tab for the four forms of an inside Fm7 chord. Practice this pattern using two versions of form 1: the one indicated in the pattern, and an alternate form with the 2nd finger on the 6th string and a 3rd-finger mini-barre for strings 4, 3, and 2.
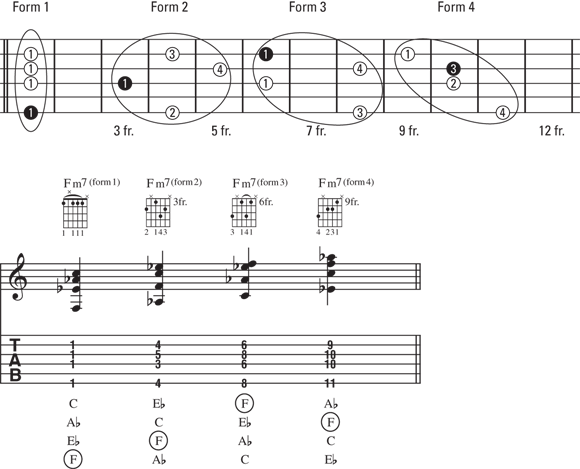
FIGURE 4-21: Four forms of an inside Fm7 chord.
Figure 4-22 shows an exercise using the four inside forms of Fm7, played two to a bar, or two beats on each chord. Most experienced guitarists (jazz and rock players alike) play form 1 with the 2nd finger on the 6th string and the 3rd finger (barred) across the 4th, 3rd, and 2nd strings, described in the previous paragraph. Playing the chord this way helps you to better keep the 5th string from sounding. Try form 1 the two-finger way, and if it seems awkward at the 1st fret, move it up to the middle of the neck.

FIGURE 4-22: A rhythm exercise using four inside forms of Fm7.
To see the neck diagram and corresponding music and tab for the four forms of an inside Fmaj7 chord, check out Figure 4-23. Practice form 2 first in isolation because it has a stretch between the 2nd and 1st fingers. Then try the exercise in its entirety.

FIGURE 4-23: Four forms of an inside Fmaj7 chord.
Figure 4-24 is an exercise using the four inside forms of Fmaj7, played two to a bar, or two beats on each chord. Between forms 3 and 4 you have an opportunity to make the chord change even smoother by leaving your 3rd finger on the 6th string as you move up and down the neck. Just be sure to relax the 3rd finger so it doesn’t make a sliding sound on the string as you change positions.

FIGURE 4-24: A rhythm exercise using four inside forms of Fmaj7.
Figure 4-25 shows the neck diagram and corresponding music and tab for the four forms of an inside F♯m7♭5 chord. Practice this pattern several times or until you master the three mini-barres that occur in this exercise.
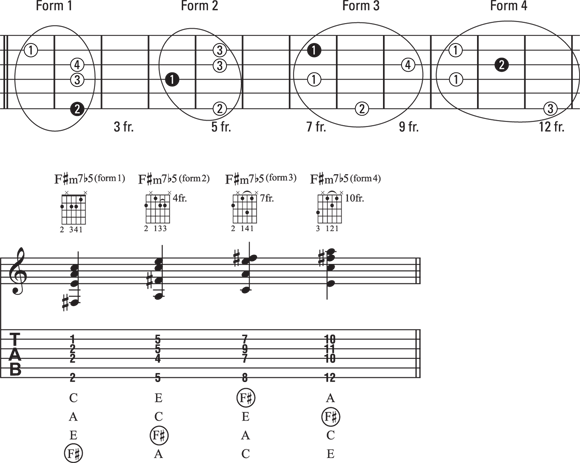
FIGURE 4-25: Four forms of an inside F♯m7♭5 chord.
As practice, try the exercise in Figure 4-26, which uses the four inside forms of F♯m7♭5, played two to a bar, or two beats on each chord. A very cool “common finger” chord change occurs between forms 2 and 3. Both the 2nd and 1st fingers stay on the same strings as they move to the new form. But the 1st finger goes from playing a single note on the fingertip to playing a barre on the flat part. So be sure to flatten out your 1st finger slightly as you move. To become familiar with this efficient finger movement, try isolating these two chords (that is, practice changing between the two forms a number of times before playing the whole exercise).

FIGURE 4-26: A rhythm exercise using four inside forms of F♯m7♭5.
Figure 4-27 shows the neck diagram and corresponding music and tab for the four forms of an inside F♯dim7 chord. Your fingering doesn’t change when moving among the four forms here, so work for speed and accuracy as you shift this pattern up and down the neck in three-fret increments.
To practice, you can try the exercise in Figure 4-28, which uses the four inside forms of F♯dim7, played two to a bar, or two beats on each chord. Just as in the outside forms earlier in the chapter, the inside form of the diminished 7th chord is the same for all four forms.
As if having the same forms didn’t make things easy enough, try the alternate, three-finger version of the chord: Barre the 4th and 2nd strings with your 1st finger. Then play the 6th string note with your 2nd finger and the 3rd string note with your 3rd finger. Many guitarists find this fingering faster to grab than the one presented (especially after they become better at playing barre chords). Try both versions and decide for yourself, however.

FIGURE 4-27: Four forms of an inside F♯dim7 chord.

FIGURE 4-28: A rhythm exercise using four inside forms of F♯dim7.
Playing Chord Progressions
Playing chords by themselves or organized by string assignment is a good way to get your fingers in shape. But in actual musical situations, you play chords according to another organizing principle: a chord progression. A chord progression is merely a series of chords that go together in a musically logical fashion — to support a melody or as the framework for a jam or improvisation (such as the 12-bar blues).
The chord progressions in the following sections may sound like real and familiar songs, and they should. That’s because many songs have used the following progressions either in whole or in part.
Progressions using outside chords
Outside chord forms use the top four strings of the guitar (which are the highest pitched), and they’re good for rhythm parts when you have a bass player in your midst (or when you’re joined by a pianist who’s playing low notes in the left hand). Outside chord forms are also nice when you want the brighter sound of the higher strings to cut through — the way a mandolin sounds when it plays rhythm.
 Figures 4-29 (Track 119) and 4-30 show two chord progressions, each of which uses nine different outside forms, played two to a bar. Play the chord progressions both legato (letting the strings ring out as long as possible) and staccato (where the strings are muted by the release of your fretting fingers) to create two different moods.

FIGURE 4-29: A chord progression using nine different outside forms.

FIGURE 4-30: Another chord progression using nine outside forms.
Progressions using inside chords
In this book, inside chords feature the 6th string as part of the chord, separated widely from the next highest note because of the skip of the 5th string. The presence of the low note in inside chords means that the inside chords provide a nice bottom, or bass part, which is good for solo guitarists, guitarists playing with other instruments but without a bass player, or accompanists backing up a singer.
Take a look at Figures 4-31 (Track 120) and 4-32, which show two chord progressions, each using nine different inside forms, played two to a bar. To help get the 6th string note to ring a little more clearly, try separating it from the rest of the chord by plucking it a little harder than the rest of the strings, or by playing the bass note with your right-hand thumb and the rest of the chord with your index, middle, and ring fingers. For extra practice, try playing just the bass note on beats 1 and 3 and just the upper three strings of the chord on beats 2 and 4.

FIGURE 4-31: Chord progression #1 with nine different inside forms.

FIGURE 4-32: Chord progression #2 with nine different inside forms.
Practicing Pieces that Use Chord Progressions
Seventh chords are great for playing jazz and jazzy types of arrangements, so we selected two songs to jazzify in the following sections: One is a traditional folk ballad, and the other is a standard by Jerome Kern. The first song has you working with outside chords, and the second one gives you an inside look at inside chords.
Putting outside chords to use with “Danny Boy”
The lovely Irish ballad “Danny Boy” is actually based on an old traditional melody called “Londonderry Air.” And if you’ve ever checked out the derrières in London, you can see why they changed the title. [Rim shot.] But seriously. The lyrics were added later, as a poignant message from a father to his absent son.
Play “Danny Boy” (Figure 4-33, Track 121) slowly and gently, and try to make the one-beat chord changes (which occur in bars 8, 9, 11, 12, 14, 15, and 16) sound smooth and unrushed. Don’t worry if you can’t play the F chord in bar 14 cleanly at first; it takes some effort to cram three fingers onto the 2nd, 3rd, and 4th strings at the 10th fret.
Try this alternate fingering if you’re having trouble: Use your 3rd finger to barre the 2nd, 3rd, and 4th strings at the 10th fret, lifting it just enough to allow the 1st string (fretted by the 1st finger) to ring. It’s tricky, but you may find it easier than using four separate fingers so high on the neck.
Playing inside chords in “Look for the Silver Lining”
Jerome Kern wrote “Look for the Silver Lining” for an all-but-forgotten musical called Sally, but most people who know this call to optimism are familiar with the versions sung by Judy Garland or jazz trumpet great Chet Baker.
Play this song (Figure 4-34, Track 122) moderately slowly, and try to let the chords that last only one beat (such as the Am7 and D7 chords in bar 1) sound as legato as the chords that receive two beats.
The trick to this piece is making quick and efficient motions between chord changes without affecting the ring-out of the chord strum itself. You need to change chords quickly, but you must also allow the chords to sound for their full duration.

FIGURE 4-33: Outside chords in “Danny Boy.”

FIGURE 4-34: Inside chords in “Look for the Silver Lining.”