
Chapter 3
Autostereoscopic Displays
Autostereoscopic displays do not require special glasses for viewing the two images needed for 3D perception and allow the viewer to freely rotate the head and even move around, but with limitations on the latter. This implementation will turn out to be more costly. In the simplest version of an autostereoscopic display the viewer can only perceive an undisturbed 3D image at some specific locations referred to as single view or multiview zones. This fortunately can be expanded to larger areas again, of course, at additional cost.
A further attractive feature of autostereoscopic displays is their capability to offer different 3D images depending on the viewing direction. This is a first step toward true 3D perception. Contrary to this, stereoscopic displays offer for each viewing direction always only the same 3D image.
Spatial and temporal multiplexing here are also the two basic approaches. The special components which avoid the need for viewing glasses are arrays of lenticular lenses or of parallax barriers, or various forms of light guides such as mirrors or directional backlights. They will be treated in different sections, while for each approach the multiview aspect, the use of projectors, and the switching between 2D and 3D, an essential sales feature for TV displays, will be included.
3.1 Spatially Multiplexed Multiview Autostereoscopic Displays with Lenticular Lenses
Figure 3.1 [1] depicts the basic structure of lenticular lenses. In front of a flat panel display (FPD), an LCD, an OLED, or a PDP, an array of lenticular lenses projects the image on the FPD screen into an image plane. Behind each lens an image is located for the left eye and for the right eye, as indicated in Figure 3.2. These images may consist of only one pixel or of a few pixels. Thus the area multiplex represents a sequence of local left and right eye images, contrary to stereoscopic displays which partition the LC screen into two halves for the left and right eye images. The lenticular lenses, abbreviated as lenticulars, as shown in Figure 3.3, are cylindrical and as such they have the same cross-section in the vertical direction along the columns of the FPD. This cross-section is either spherical or more often circular as depicted in Figure 3.2. The images on the flat panel screen are projected onto the image plane P in Figure 3.1, as investigated in more detail later. The lines originating from the lenses indicate the sectors in which light is entering the four spaces 1, 2, 3, and 4. It can be seen that in each of the four spaces the left eye and the right eye images receive from all lenses their left eye and right eye portions. This is illustrated again in the simpler Figure 3.4, understandable at a glance. As a consequence we encounter three reproductions of the full flat panel image in the image plane in Figure 3.1. This effect is called a multiview arrangement, allowing the viewer to change position in the image plane P. When moving in that plane the viewer passes through other views.
Figure 3.1 The array of lenticular lenses and the viewing sectors for the two eyes.
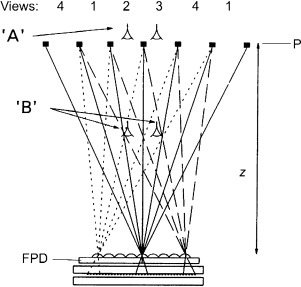
Figure 3.2 A lens in the lenticular array and the two partial images for the left (L) and the right (R) eye.
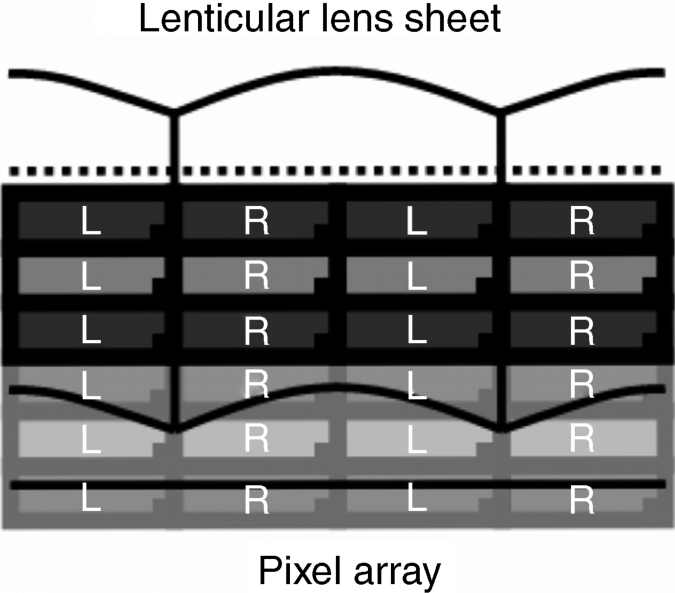
Figure 3.3 The cylindrical columns of the lenticular lenses.
Figure 3.4 The projection of the images behind the lenses onto the image plane P and the viewing zones R0 and L0 for the right and left eye images.
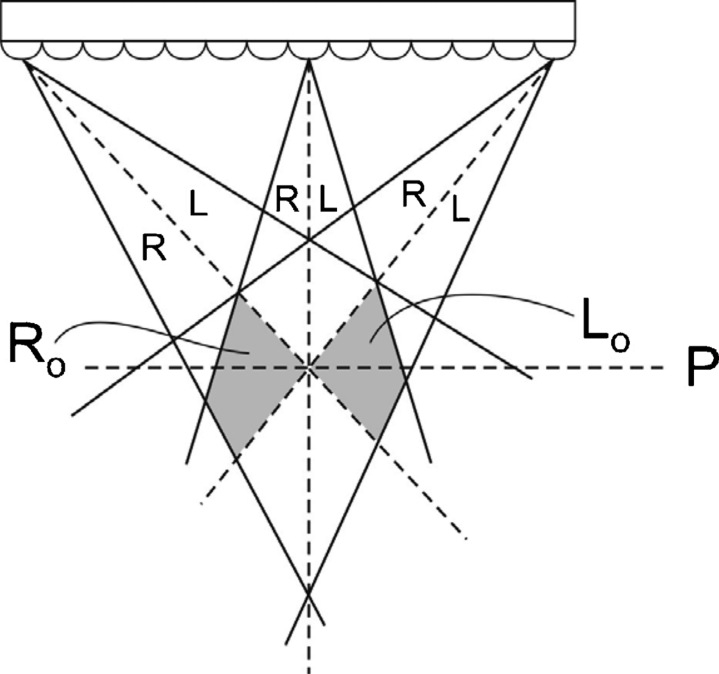
Figure 3.5 depicts these views for a lens just opposite a reproduced view and for a lens further away. The rays known from geometric optics show that portions of the right eye and the left eye images form a sequence in the correct order, reproducing the entire image. It is also obvious that the sequence of R and L images on the LC screen is reversed going down and goes up in the image plane P. The reproductions in P are different because, as depicted in Figure 3.5, in each reproduction the areas on the flat panel screen projected into the pertinent sector in P are different. This suggests the possibility to present in the different views in the image plane the object information that a viewer perceives when looking at the object from the side. This enhances the sensation of depth and will be elaborated upon later.
Figure 3.5 The contributions of two different lenses to the reproduction of the images on the screen of the FPD.
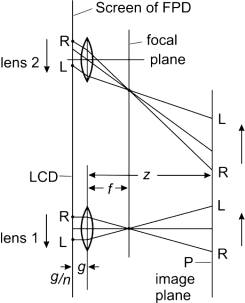
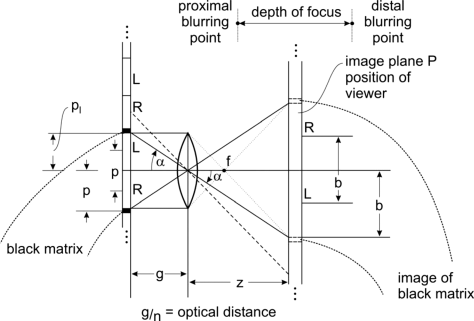
The design rules for the lenticulars [1] are derived with the help of Figures 3.5 and 3.6, which show a lens in the array with focal length f, the left and the right eye partial display, the optical distance g/n of the object on-screen, with n as the refractive index of that distance g, and the image plane P at a distance z from the lens. The lens equation
(3.1a)![]()
provides
and
The optic magnification m is given from tan α in Figure 3.6 as
where b is the interocular distance, on average 65 mm, and p the pitch of the L and R eye images, as shown in Figure 3.6. On the FPD the pixels are distributed over the length p, while the same pixels in the image plane cover the length b = mp. Therefore the resolution as the number of pixels per unit distance is smaller in the image plane by the factor m > 1.
Figure 3.6 The projection and magnification of the pixel pitch p into the image pitch b, the interocular distance in the image plane P.
The black dots in plane P of Figure 3.1 indicate the black mask around the pixels in Figure 3.6. As the lines of the black mask are very disturbing for a viewer, their visibility has to be diminished or even suppressed as done by the following means. To avoid the lenses projecting the full length of the black matrix into the image plane, the pitch pl of the lens array in Figure 3.6 is chosen to be slightly smaller than the pitch p of each of the two images, that is, pl < p. This is met by the assumption
(3.3a)![]()
and hence
where, as a rule, z ![]() g/n holds.
g/n holds.
The design of the lens array proceeds as follows [1]. From a given interocular distance b, on average 65 mm, and from a given pitch p of each of the two images, we find the magnification m in Equation 3.2; p also yields the lens pitch pl, as slightly smaller than p; g/n is given by the FPD design, preferably as small as possible. Now z in Equation 3.3b and f in Equation 3.1b can be determined.
As we know that pl in Equation 3.3b is slightly smaller than p, we are close to the point where, for p = pl, the value of z becomes infinite. Hence we encounter at this pole a steep rise in z for a small change of p; thus z is very sensitive to changes of p which as a consequence has to be realized very precisely. This reasoning does not apply to z in Equation 3.1c, as g/n and f are not very close together. Therefore the constraint on the accuracy of f is not as stringent as for the accuracy of z.
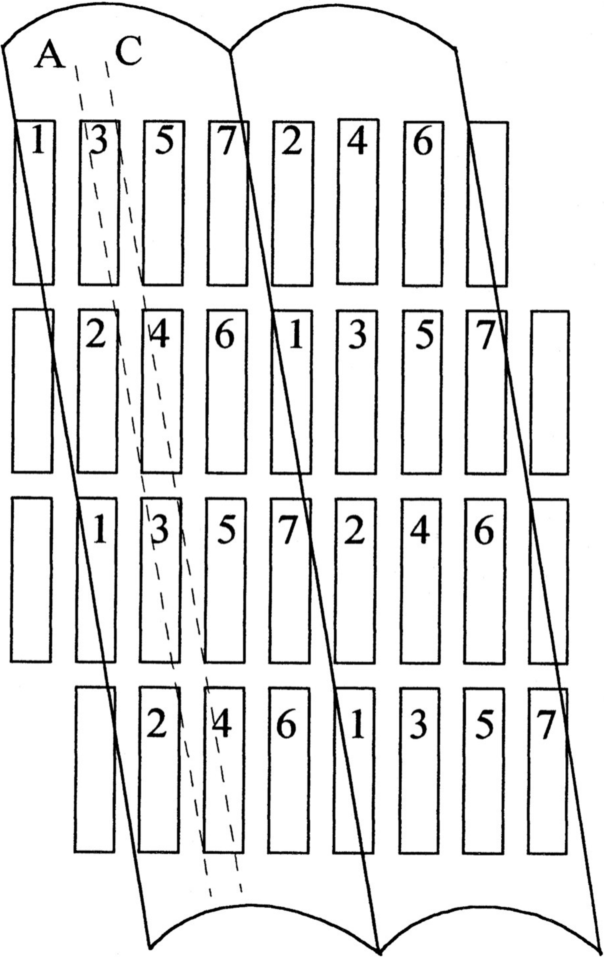
In the distance z from the lenticular array in Figures 3.1 and 3.6 the viewer encounters a focused and sharp image. But the viewer does so only in the image plane. As we have investigated in Figure 1.2, there is a distance forward from z to the proximal blurring point and backward from z to the distal blurring point, as shown in Figure 3.6, to where we still have acceptable depth perception. This alleviates the confinement to the image plane. If the viewer moves sideward, but still in the image plane in Figure 3.6, the eyes pass over the somewhat diminished, but still noticeable, black matrix. The remedy for this is the slanted pixels in Figure 3.7, covered by the vertical arrangement of lenticulars with their axes parallel to the dashed lines A and C [1]. These dashed lines represent different horizontal viewing angles or different positions of the viewer. This is further elucidated in Figure 3.8, where the location x on the FPD screen is emitting a ray of light at an angle ϕ. If the distance between the lens and the FPD screen is g, the angle ϕ is given by
Figure 3.7 Slanted pixels suppressing the black matrix and the flipping of images, when moving in the image plane P.
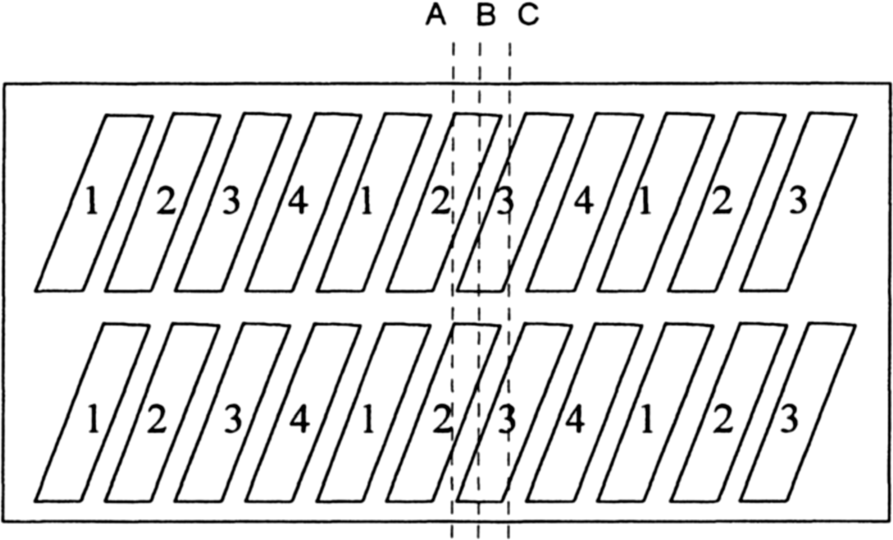
Figure 3.8 The location x on the LC screen and its projection onto the image plane under the angle ϕ.
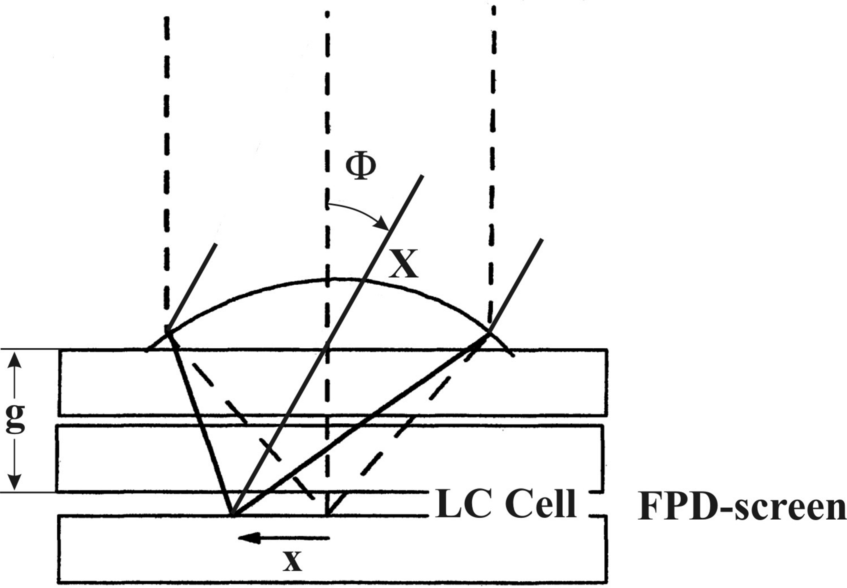
The position X in Figure 3.8 on top of the lens corresponds to the location x on the FPD screen projected at ϕ onto the image plane. This suggests a simpler designation for the locations on the FPD, the lenses, and on the image plane by ϕ in Equation 3.4 as a common angular measure. This will be done in later investigations.
It is assumed that one block of the pixels (1 to 4) in Figure 3.7 produces one of the two images required for 3D, while the adjoining quartet of pixels produces the other one. So looking only at one block involves monocular perception. The gap between the pixels, being narrower in reality, is filled by the black mask. Line A starts in the upper left corner of a pixel and passes through the lower left corner of the adjoining lower pixel. When looking down line A, the viewer sees only pixels with the number “2” and a sequence of short patches of black, but not a black line and hence rather a greyish background stemming from the distributed black patches. This is true for all monocular views vertically down the display. Hence the slanted arrangement of pixels is a powerful means for concealing and even suppressing the black matrix. When moving sideward from pixel “2” in Figure 3.7 the image of “2” gradually fades away while the image of pixel “3” appears. If the pixels were positioned vertically, as done conventionally, the change from “2” to “3” would be an abrupt flip into a new image. This uncomfortable effect is avoided by slanted pixels. The simultaneous appearance of a new pixel while the old pixel fades away induces the viewer to see more pixels during the transition, resulting in the perception of an increased resolution counteracting the loss of resolution experienced by the magnification of the pixels in the image plane. When moving away from a right eye pixel quartet, the monocular view for the right eye proceeds into the neighboring view destined for the left eye. This is noticeable as a reversal of the views, called the pseudoscopic effect. This is avoided by introducing wider vertical gaps between the two images.
The more frequently used arrangement shown in Figure 3.9 is slanted lenticulars and vertical pixels, which has the same effect.
Figure 3.9 Vertically aligned pixels covered by a slanted lenticular array.
The points with a common projection angle ϕ lie on a straight line parallel to the axes of the lenticulars as indicated by the dashed lines. The dashed lines in Figure 3.9 indicate points projected into the same viewing zone in the image plane. This leads to a rearrangement of the pixels such that in a stripe parallel to the long axes of the lenses all pixels are placed with image information belonging to this viewing zone. As an example, between the dashed lines A and C we encounter only pixels pertaining to viewing zone 3 or in similar dashed lines in the neighboring lens to viewing zone 2. The example in Figure 3.9 has seven viewing zones. Of course the stripes can also contain several pixels, or, as an especially attractive feature, a package of high-resolution pixels realized in LCOS technology, as we shall see later. The pixels in the stripes provide information pertaining to the corresponding viewing zone. This is enhanced by cameras providing images for different viewing angles which are then placed into the pixels of the stripes pertaining to those viewing angles. This enhances the natural perception of depth when a viewer moves through the different viewing zones and in that way experiences views from different angles. This is a great attraction for a 3D approach with lenticulars inducing the sensation of true depth and a natural 3D experience. But this is not the case for stereoscopic 3D, where the view from each direction onto the FPD screen is the same.
Both slanted solutions, slanted lenticulars or slanted pixels, may entail Moiré-like fringes running over the screen, when viewers move sideward.
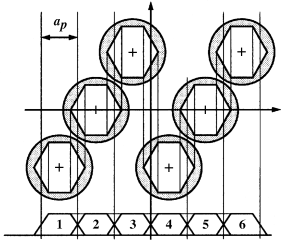
A common slanting angle defined by the straight line from the upper left corner of a pixel to the lower left corner of the pixel below, offset by one pixel pitch, as drawn in Figure 3.9, leads to a slant angle
with β = 9.46°, if it is assumed that the elongated pixels are three times longer than they are wide. The blurring of the images when moving perpendicularly out of the image plane is moderate, allowing enjoyment of an image from 0.3 to 1.5 m even though the designed viewing distance is 0.67 m. A characteristic effect of the lenticulars appears if a connected image content exceeds the width of a stripe for one viewing zone. As an example let us assume that the neighboring pixels 3, 5, and 7 in Figure 3.9 represent the colors R, G, and B of an image point. If they lie in different stripes, as is the case in Figure 3.9, they are torn apart and are projected into different viewing zones. In order to prevent this from happening, only pixel 3 representing R would stay in that stripe, while pixel 5 representing G and pixel 7 representing B have each to be placed underneath one of the adjoining lenses at the same angle ϕ as in the first lens. An arrangement of this type is shown in Figure 3.10, where as an example for view 3 the colors R, G, and B are placed at the same angle ϕ underneath three different lenses, while the same was done with R, G, and B for view 4. As there is more space at different angles ϕ underneath the three participating lenses, spaces at other angles may be assigned to other colors R, G, and B destined for other viewing zones.
Figure 3.10 Layout of the color pixels belonging to viewing zones 3 and 4.

In a conventional FPD the resolution in a row is three times larger than in a column, because the elongated pixels are three times longer than wide. This imbalance of resolution is partly avoided by placing more information and pixels into different rows as demonstrated in Figure 3.10.
The volume of information in an FPD image altogether increases, because new information not needed so far from different viewing angles is added in the case of lenticulars for 3D. In [2] and [3] formulas are presented establishing the connections between the location on the FPD screen underneath one of the lenses and the viewing zone.
The same effect as with slanted lenticulars can be achieved in a projection system where each projector generating a viewing zone carries a hexagonal aperture stop in front of its projection lens as shown in Figure 3.11 [4, 5]. The six projectors in the design example are grouped in a vertical direction. A beam splitter projects the groups into an overlapping sequence 1, 2,. . . , 6. The essence is that two adjoining viewing zones do not end abruptly but are overlapping trapezoids which avoid the image flipping and suppress the black matrix. As the output of the projectors is light intensity, the overlapping means that the intensity everywhere adds up to a constant, which is pleasing for a viewer moving between different zones. This approach can also be applied to lenticulars by placing a sheet with a hexagonal aperture stop in front of the lenses. In this case the lenticulars do not have to be slanted with respect to the pixels.
Figure 3.11 The hexagonal aperture stops replacing slanted lenticulars in the six projectors.
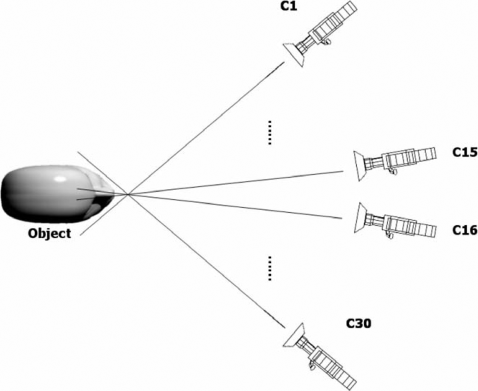
A multiview 3D display for mobile applications, the first larger volume manufacturing product for 3D, uses the lenticular lens array in Figure 3.12 [6]. The lens array was slanted at an angle β in Equation 3.5 and provided 30 views fed by the 30 cameras in Figure 3.13 arranged at an equal angular distance. The distribution of the pixels on the LCD related to the 3D viewing zones, indicated in Figure 3.12, were determined by the rules discussed in Figures 3.8, 3.9, and 3.10 and by a ray tracing program. This will be further detailed in the pertinent design example. The design equations are
Figure 3.12 Arrangement of the RGB pixel triplets for a 30-view display with a slanted lenticular lens array.
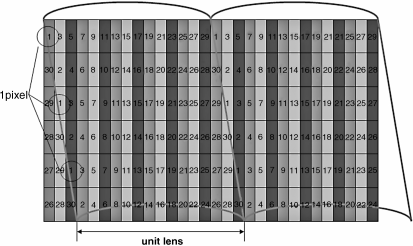
Figure 3.13 The 3D cameras providing 30 views of an object from 30 equally spaced angular positions.
(3.6a)![]()
and
(3.6b)![]()
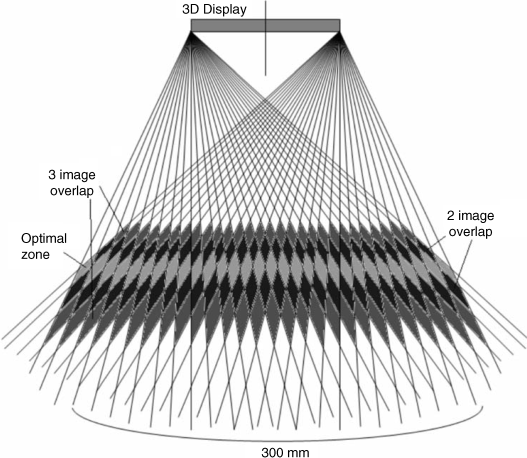
where z0 is the distance between two views, as a rule the interocular distance b; p is the pitch of the pixels, pl the pitch of the lenses, and n the number of views. The distance between the viewing zones is greatly affected by deviations of the pitch pl which was already identified as a sensitive parameter in Equation 3.3b. Figure 3.14 shows the intensity of light in % of three neighboring viewing zones with an interocular distance b versus distance in the image plane. There is a 5% permanent crosstalk within each view. The plot in Figure 3.15 depicts the 30 optimal viewing zones, where the right and left eye images from all lenses are received. This is demonstrated by the light sectors emitted only by the lenses at the end of the array. Similar plots are presented in Figures 3.1 and 3.4. Figure 3.15 also points out zones where two or three images overlap, which of course renders them unacceptable by the viewer.
Figure 3.14 Light intensity in different viewing zones.
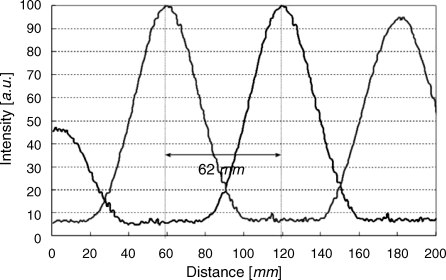
Figure 3.15 The optimal viewing zone of a display with lenticulars and some unusable zones with image overlap.
So far on a display with an array of vertical lenticulars, the views in a vertical direction, for a viewer the height, exhibit only the same horizontal angular information. If viewing from a different angle in a vertical direction has to be presented, an additional array of lenticulars with the axes of the cylinders in a horizontal direction has to be used [7]. Instead of the two crossed lenticular arrays on top of each other, one array as shown in Figure 3.16 is preferably used. The lenses are new arrays with a quadratic or rectangular base and spherical or circular cross-sections in the horizontal and vertical directions. In order to provide information from different vertical positions, there must be also cameras placed at different vertical locations. In [7] eight views in a horizontal direction and three views in a vertical direction are realized. Each viewing zone has a width of 7 mm with a spacing gap of 2 mm. For this, the base of the lenses has to be rectangular. The focal length of the lenses was 4.2 mm, the lens pitch 1.85 mm, and the distance to the image plane 85 cm, as appropriate for mobile applications. The backlight consisting of 6 × 6 point sources provided light spots with a width of 7 mm. So the projected spot contained an array of several pixels with an individual width of 270 μm as a block.
Figure 3.16 Crossed lenticular lenses.
The idea of projecting blocks or modules of pixels was further elaborated by assigning to each module a proximity microprojector. Such a system, investigated in [8], consisted of the 4 × 5 modules in Figure 3.17, where each squared module had a diagonal of 0.7 in. The module contained a microdisplay in LCOS technology with square pixels sized 111 μm and exhibiting interpixel gaps of 8 μm. The monocrystalline Si FETs provided very fast addressing. As the pixels did not contain TFTs and capacitors they had a high aperture ratio. The square pixel structure would have required anamorphic optics in order to produce the common elongated structure, which, however, was not used because it is too costly.
Figure 3.17 The 4 × 5 modules with proximity microprojectors for each module.
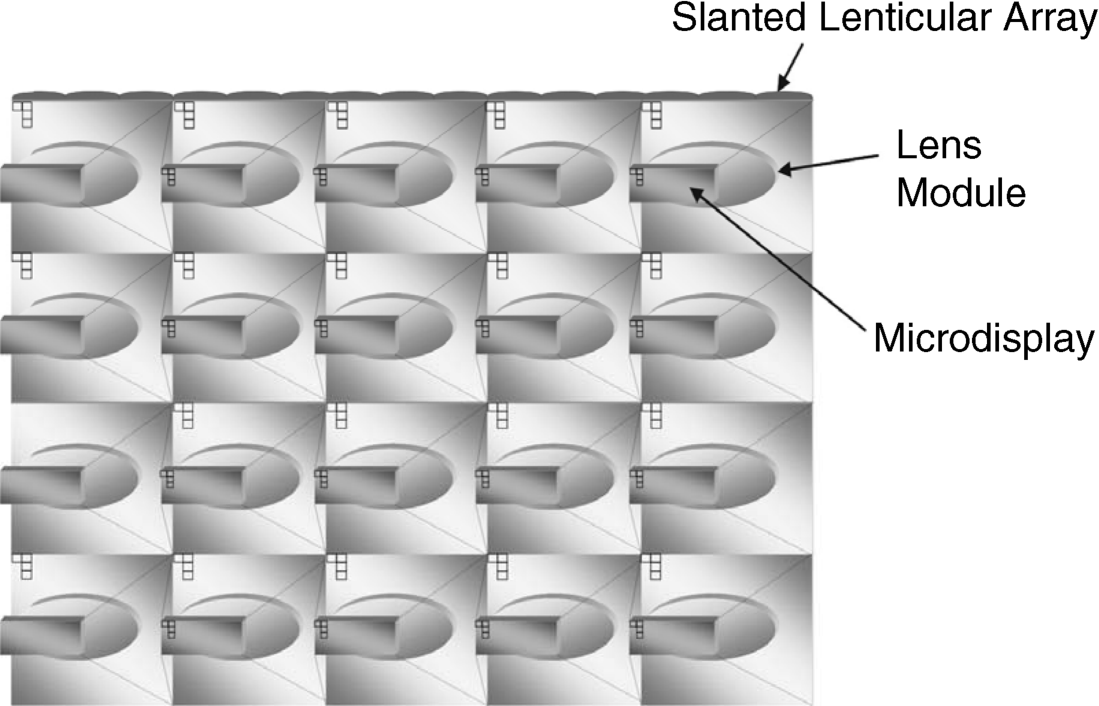
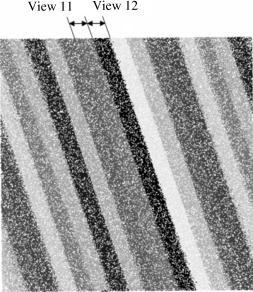
In the microprojector the light was first split into two beams by a PBS. Then it was guided into five lenses with different equally spaced projection angles. Figure 3.18 presents a view of the microdisplay and the slanted lenticular lenses on top with a lens pitch of 0.44 mm and a slanting angle of arctan 2/6 corresponding to 18.4°. The numbering of the pixels corresponds to the viewing direction parallel to the long axes of the lenticulars and hence also to one of the 3D viewing zones. On lines parallel to the axes of the slanted lenticulars one finds the numbering of the viewing zones. This numbering was introduced in Figure 3.9. The presence of four equal pixel blocks underneath the two lenses in Figure 3.18 not only enhances the precise view of the object from different viewing angles, but also reduces the resolution of images by using up space in the display area. Ray tracing revealed that parts of the areas of views 11 and 12 overlap. Due to these overlaps the distribution of the illumination across the view in Figure 3.19 no longer shows this distinct shape of the pixel pattern. It also leads to cross talk of 60% between two neighboring views. As a remedy the pixel mask depicted in Figure 3.20 was placed underneath the slanted lenticulars. Its openings for the passage of light have the elongated shape that pixels commonly have, but here in slanted form. This provided the distinct light distribution over the views shown in Figure 3.21, seen from a distance of 3 m. It also reduced crosstalk to the still high value of 33%.
Figure 3.18 The pixel layout for the numbered viewing zones that the pixels are destined for and the slanted lenticular.
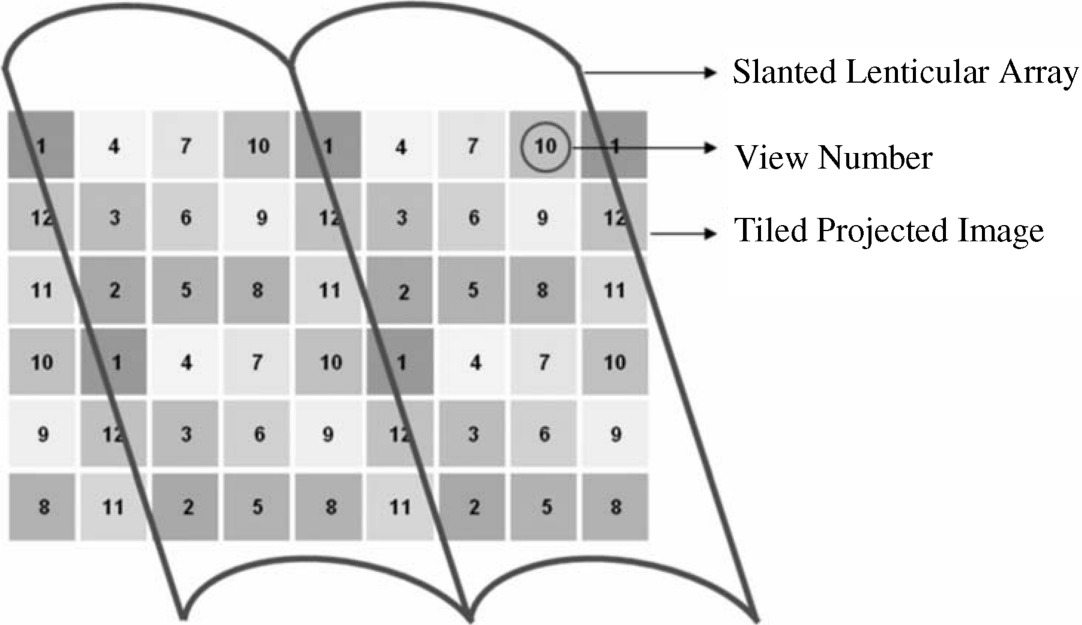
Figure 3.19 The diffuse distribution of illumination due to the partial overlap of viewing zones 11 and 12.
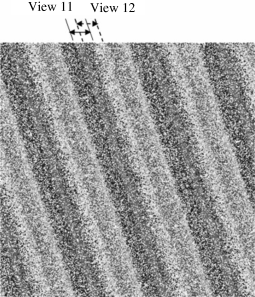
Figure 3.20 The parallelogram-shaped pixel mask eliminating the overlap in Figure 3.19.
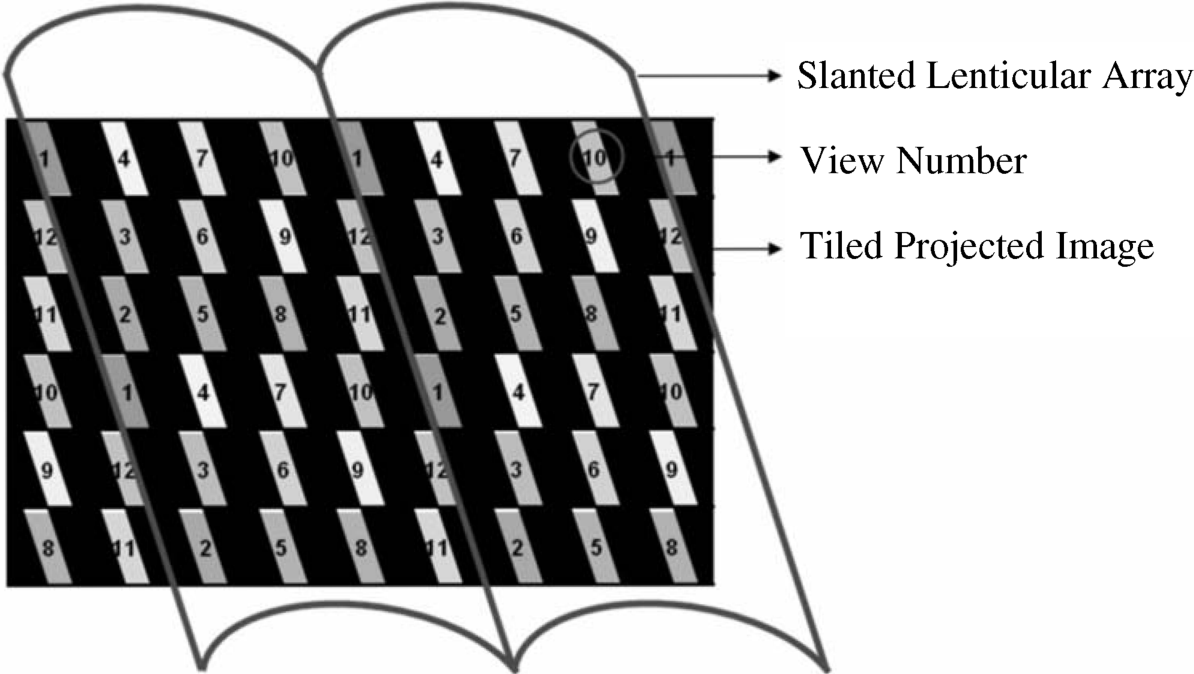
Figure 3.21 The distinct light distribution after insertion of the pixel mask into Figure 3.19.
3.2 Spatially Multiplexed Multiview Autostereoscopic Displays with Switchable Lenticular Lenses
In the previous section the lenticulars had fixed optical properties. Switchable lenses are as a rule realized by LCs where the molecules when rotated change their optical properties. This is used for switching from 2D to 3D, a feature that all 3D-capable TV sets must possess, and for enlarging the capabilities of lenticular arrays to more viewing zones and also beyond one image plane.
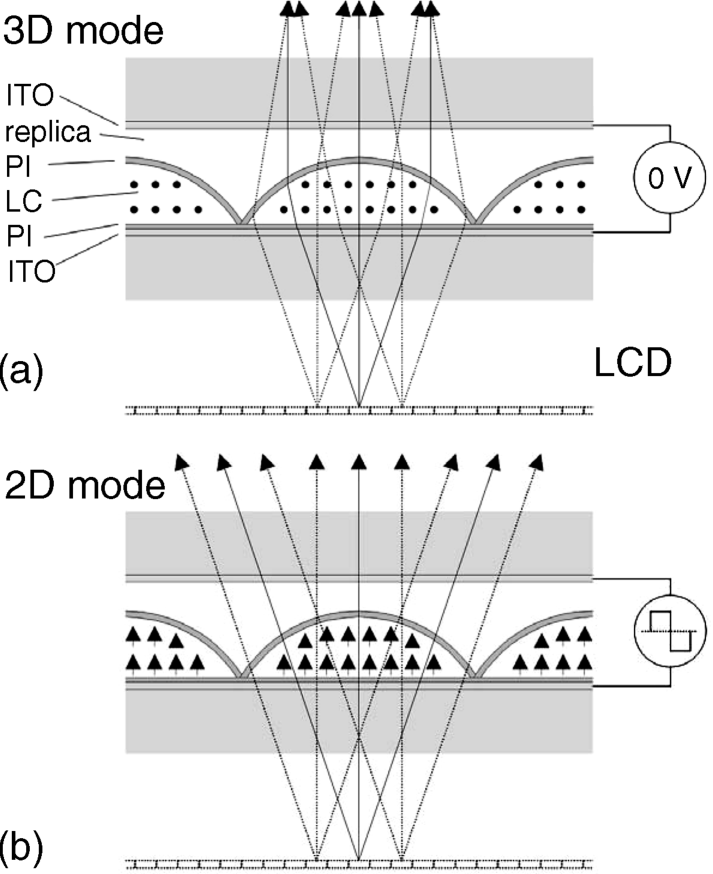
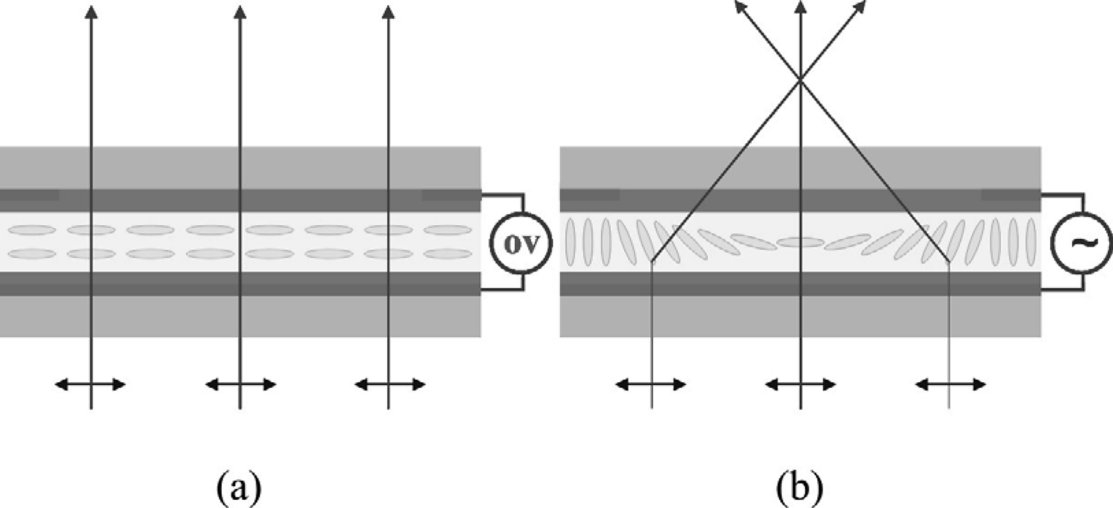
The basic scheme for switching LC-controlled lenses from 2D to 3D performance is depicted in Figure 3.22a and 3.22b [9]. The lenticulars in Figure 3.22a are filled with LC-molecules with directors perpendicular to the drawing plane, while no voltage is applied. The molecules are anchored on the polyimide (PI) rubbing layer. The light exiting the LCD is polarized perpendicular to the drawing plane and experiences in the lens the high refractive index n|| of the LC molecules. At the interface to the replica it encounters a smaller refractive index and hence is refracted toward the axis of the lens. This is the collimating effect of a lens needed for 3D presentation. If a voltage is applied across the lens, the directors align along the electric field as shown in Figure 3.22b. The refractive index n⊥ of the molecules at the interface with the replica matches the index of the replica. This means that the lens is optically not active as if non-existent. This is the common optical setup for a 2D presentation. If the LC screen presents a 2D image without left and right eye portions, 2D is received.
Figure 3.22 A switchable lenticular lens (a) working in the 3D mode (ITO = Indium–Tin–Oxide) and (b) working in the 2D mode.
A disadvantage of this approach is the relatively long switching time needed for the rotation of a larger volume of LC molecules by 90°. The problem with the switching time is alleviated by a polarization-activated microlens structure [10]. Figure 3.23 shows the entire setup with the essential components of a polarization-activated microlens and the polarization switch. This switch is very thin and therefore faster than the switching of a thicker lens. This is further elaborated upon in Figure 3.24.
Figure 3.23 The structure for the polarization-activated microlens.
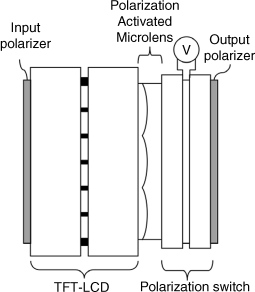
Figure 3.24 The 2D mode of the polarization-activated microlens.
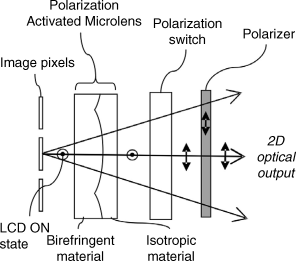
In the 2D mode in Figure 3.24 the linearly polarized light emitted by the LCD oscillates either parallel or orthogonal to the director of the LC molecules in the microlens. That way, the lens acts as an isotropic material. If it matches the index of another isotropic material covering it, the light passes through the polarization-activated lens without noticing it. This is the 2D mode. Then the light passes the polarization switch, where its polarization is rotated by 90° and as such can pass the analyzer at the output – this completes the 2D mode.
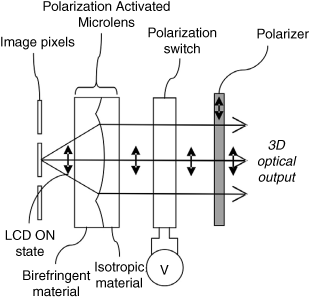
In the 3D mode in Figure 3.25 the LCD emits light linearly polarized in a plane orthogonal to the direction of the light in the 2D mode. In this plane, when entering the lens it hits the LC molecules under the angle where both components of the index, namely, n|| and n⊥, are present. In this way the lens is birefringent. At its surface to the isotropic material, refraction takes place; if n|| is the dominant portion the refraction proceeds toward the center of the lens. This is the operation needed for the 3D mode. Then the light passes the rotation or polarization switch, to which a voltage has been applied such that the light can pass unrotated, whereupon it finally passes the output analyzer. This approach avoids switching of the thicker lens and only switches the thin layer of the polarization switch.
Figure 3.25 The 3D mode of the polarization-activated microlens.
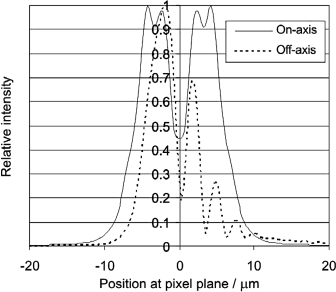
The line spread function, a measure in the form of an intensity, is the response of the system to a δ-impulse of light, as shown in Figure 3.26, versus the locations in the LCD plane. The full lines indicate a view along the axis of the lenses and the dotted lines stand for a view along 30 mm off-axis. A spot size of less than 20 μm width was achieved for 5% to 95% of the spot energy, resulting in low-output crosstalk. The 3D intensity at the center is for 3D operations 30% larger than for the 2D mode. This is due to the light collimation of the lens needed for 3D.
Figure 3.26 The line spread function of the structure in Figure 3.25.
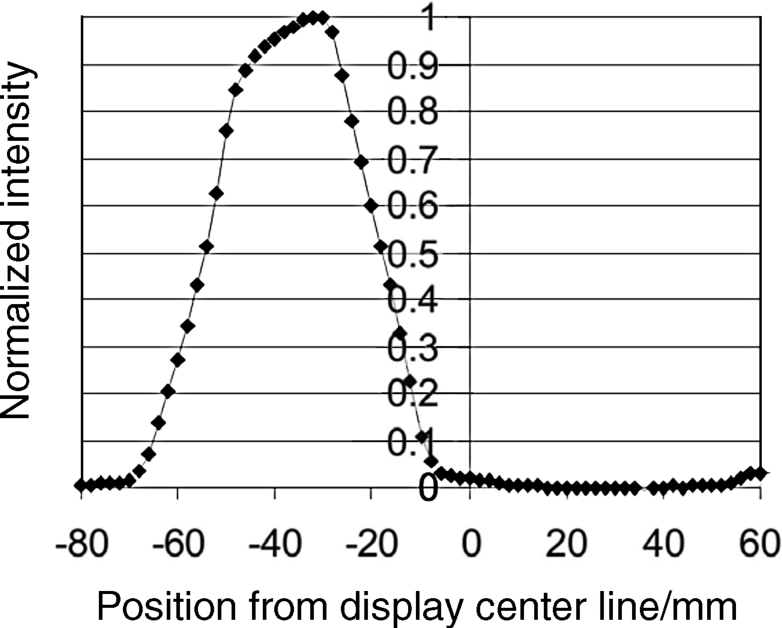
The normalized intensity for one view in a viewing zone in Figure 3.27 plotted versus the distance from the center of the display reveals a very low crosstalk to other views.
Figure 3.27 The intensity of one view with crosstalk into the neighboring view.
Free-standing microlenses realized in the approach presented above [11] do not limit the realizable viewing distance z.
The principle of the LC-filled lenses was greatly further advanced by an intriguing interpretation of a lens [12] and then especially by a Fresnel lens [13].
In [12] the Fresnel approximation [14] of a lens in the near field of the aperture
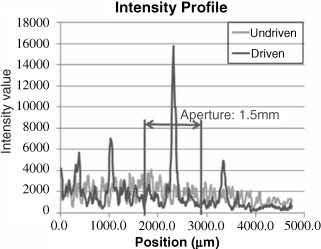
as plotted by the dashed lines in Figure 3.28, was used; Δn is the index difference between the center and the edge of the lens with radius r, f is the focal length, and d is the cell gap of the conventional LCD used for the approximation of the lens. This implies an attempt to realize the function of a lens without the LC filling in a lens-shaped volume but in the conventional LCD in Figure 3.29. The top electrode has an interruption which, when a voltage is applied, produces the fringe field of directors depicted in Figure 3.30. This field exhibits a Δn(r) given as a parabola drawn by the full lines in Figure 3.28. If this parabola could be moved closer to the ideal parabola a better lens approximation would be achieved. This led to the multi-electrode driving LC structure (MeD-LC) in Figure 3.31. Different voltages were applied to the sequence of electrodes and experimentally optimized to such a degree that the Δn(r) curve matched the ideal curve without visible deviations. As a result, the director field produced the lens-like shape seen in Figure 3.32. The set of voltages was also shifted sideways with the effect that the lens shape underneath the top glass followed the movement. This opened up the opportunity to realize a scanning lens. This scanning lens can project images to different viewing zones without sacrificing resolution because each image can occupy the entire area of the LCD. The high focusing capability of a multi-electrode lens is shown in Figure 3.33 for a driven and an undriven LCD; the aperture of the lens was 1.5 mm and the focal length 4.6 cm.
Figure 3.28 Δn(r) for the ideal parabolic lens approximation of a double electrode LC cell.
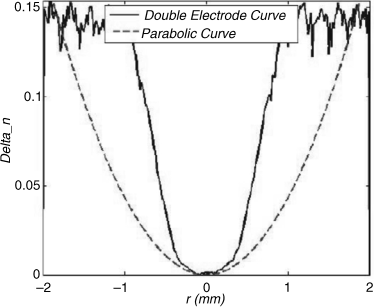
Figure 3.29 The LC cell with cell gap d and slit ws between the top electrodes.
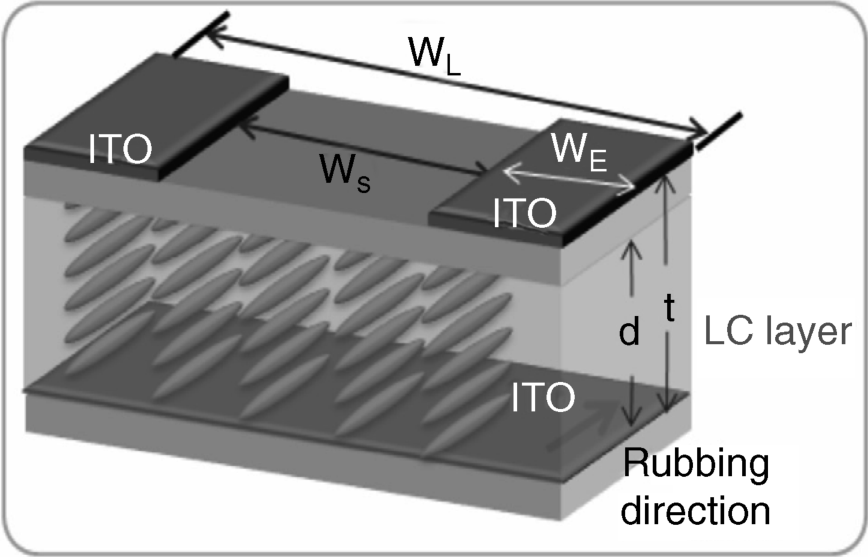
Figure 3.30 The director field of the LC cell in Figure 3.29.
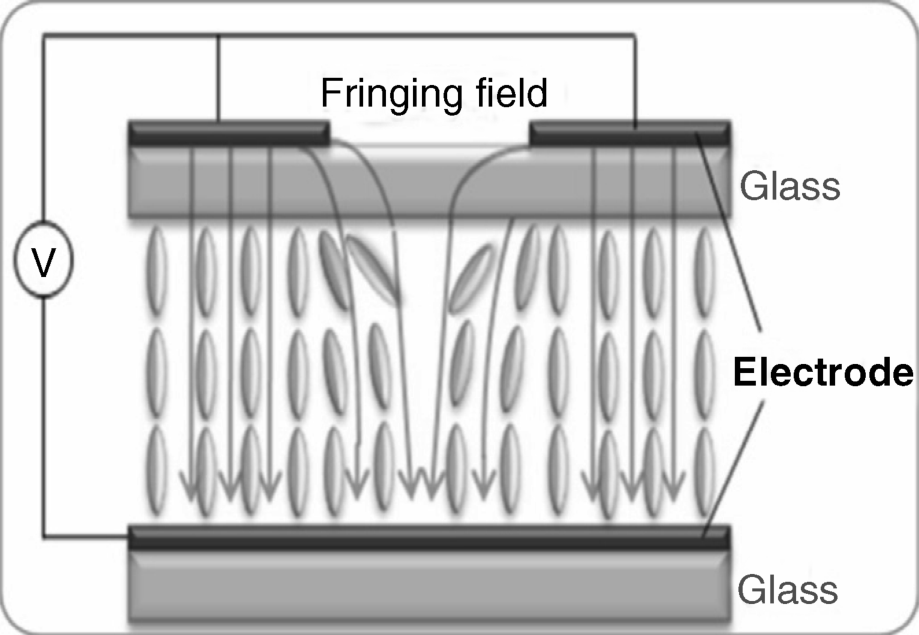
Figure 3.31 The structure of a multi-electrode-driven LCD approximating a lens.
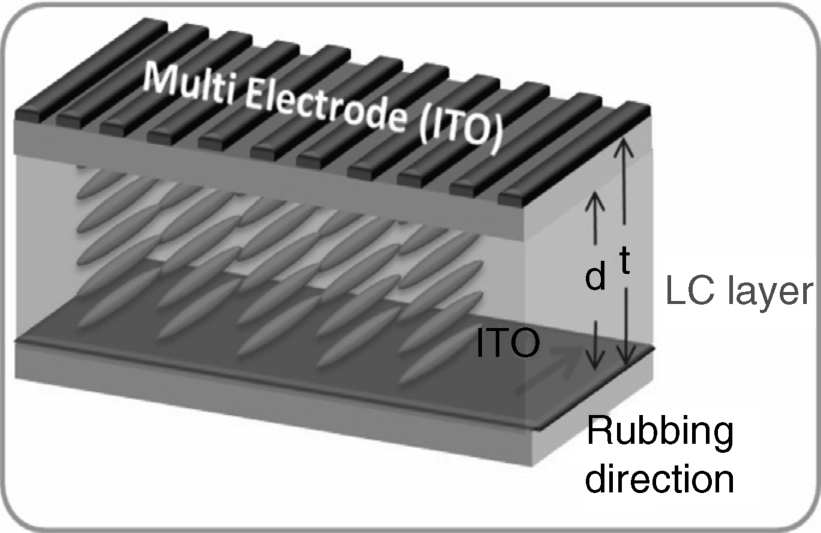
Figure 3.32 The lens-like contour of the director field and the scanning property of this shape.
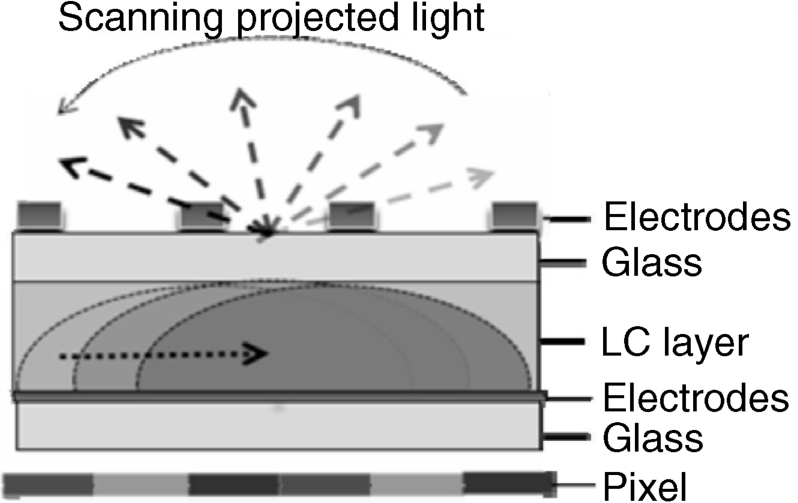
Figure 3.33 The focusing capability of the multi-electrode lens.
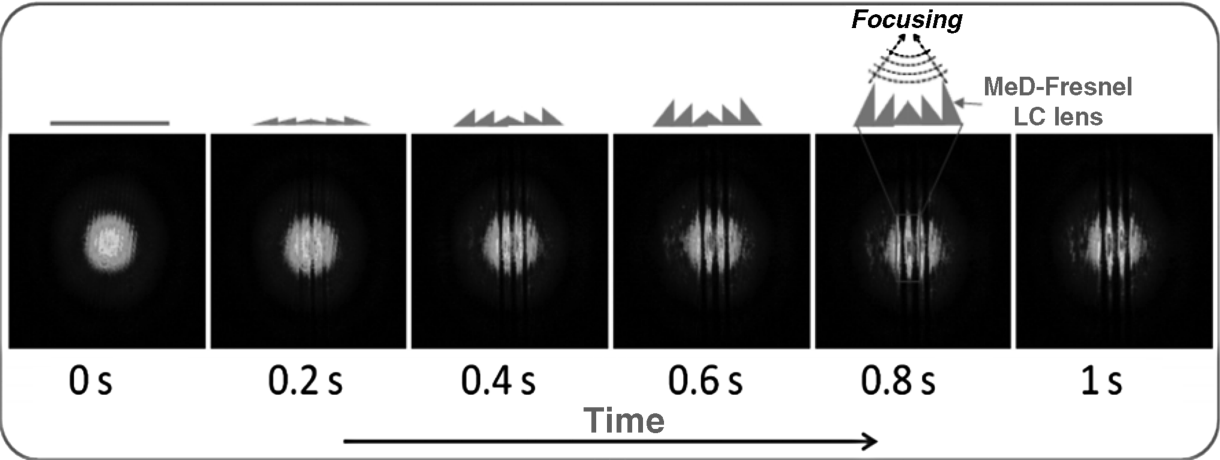
The lens structure was further optimized to become the lens cell in Figure 3.34, where the lower and the upper multi-electrodes were placed inside the cell to lower the addressing voltage [13]. If no voltage was applied the directors of the LC molecules were aligned vertically. The task for the LC cell was to realize a Fresnel lens as shown in Figure 3.35. Such a lens is generated by cutting slices out of a lens and lowering them with a reduced height into a sequence of slices, each preserving the upper contour of the lens. This lens exhibits the same focusing capability as the original lens while possessing a smaller volume of lens material and a reduced height. The better it meets the approximation in Equation 3.8, the better are the lens properties. The entire system was called a multi-electrode driving (MeD) Fresnel lens. The design parameters after experimental optimization are listed in Table 3.1. The approach with Fresnel lenses halved the original cell gap to 28 μm, which decreased the response time by a factor of four. The very precise approximation of the ideal Fresnel lens is depicted in Figure 3.36.
Figure 3.34 The LC cell with the electrodes inside the cell for the approximation of a Fresnel lens.
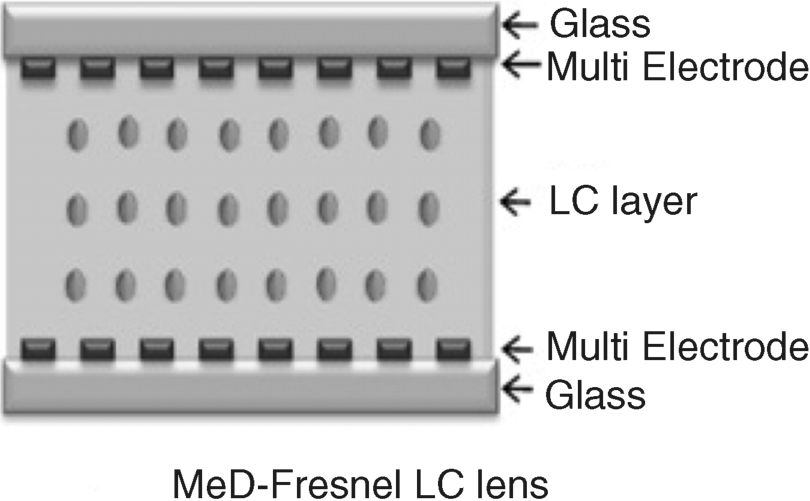
Figure 3.35 The Fresnel lens to be approximated.
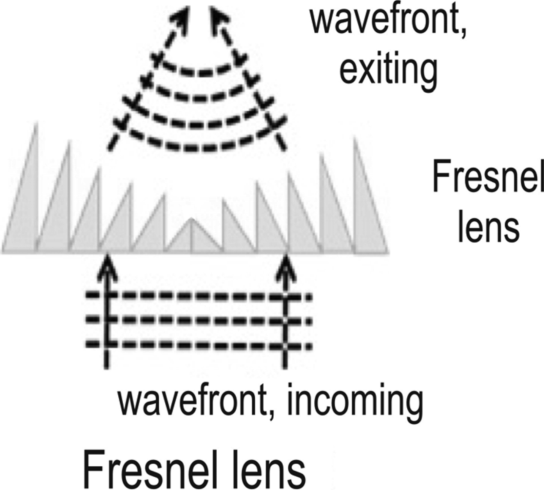
Figure 3.36 The shape of the ideal and of the approximated Fresnel lens.
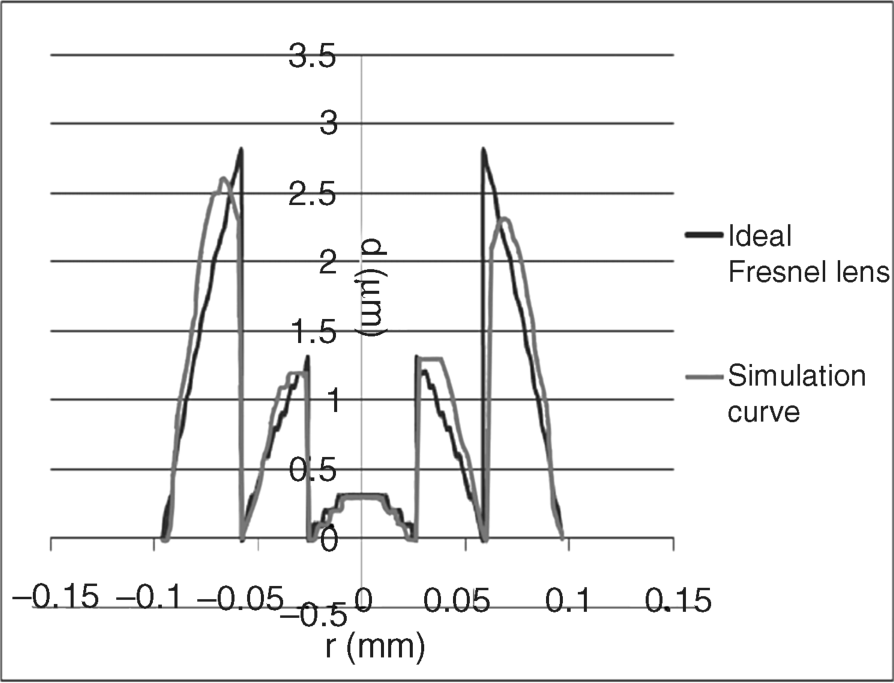
Table 3.1 Parameters for the approximated Fresnel lens.
| Lens parameter | Value |
| Lens pitch | 188 μm |
| Electrode width | 5.11 μm |
| Slit width | 2.67 μm |
| Cell gap | 28 μm |
| LC material | E7 by Merck, Δn = 0.22 |
| Focal length | 1 mm |
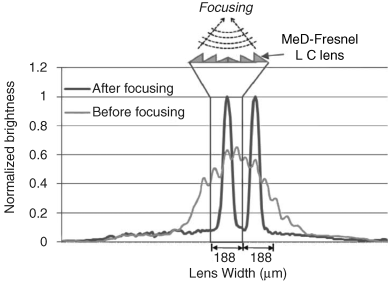
The focusing properties of this lens are shown in Figure 3.37. The left peak of intensity belongs to a Fresnel lens approximation. The full width at half maximum (FWHM) is 59 μm which compares very well to the 80 μm of the other switchable lenses. The peaks of intensity of the neighboring Fresnel lens to the right are 188 μm apart. The focal length of the Fresnel lens was 1 mm.
Figure 3.37 The focusing properties of two adjoining approximated Fresnel lenses.
The transient of the focusing properties during switching is shown in Figure 3.38 in five stages separated by 0.2 s. After 1 s the switching into the desired Fresnel lens was completed. This also compares very favorably to the switching times common for LC lenses of 4 to 10 s. In all cases overdrive could still further shorten switching times.
Figure 3.38 Transient of the focusing properties during switching into the state of a Fresnel lens.
The MeD-LC lens approach can, of course, be applied not only to 2D/3D switching, but also to electronically controlling the focal length f of a LC lens. This can be seen by solving Equation 3.7 for
An adjustable f leads, according to Equation 3.1c, to an adjustable distance z of the image plane, so the viewer does not have to look for the image plane but the image plane may seek the viewer.
The MeD-LC lens is a very powerful approach. A less versatile but also less costly system, based on common LCDs, is briefly discussed now [15–18]. Figure 3.39a shows the LC molecules of an LCD aligned horizontally if no voltage is applied [17]. Light polarized parallel to the directors experiences only the refractive index ne = n|| and hence no birefringence or no lens effect, as needed for 2D. If a voltage is applied in Figure 3.39b the electric field is stronger toward the two edges of the display than in the center. Therefore the LC molecules rotate at the edges further into the upward position than in the center, as indicated by the LC molecules in Figure 3.39b. This results in a change of the refractive index from ne = n|| at the center closer to n0 = n⊥ toward the edges. The values for the effective index neff in the rotated position are given by the ellipsoid of resolution (Chapter 2, ref. [3], pp. 104 and 105), as
(3.9)![]()
where Θ is the angle of the director to the horizontal, being zero at the center. The value Δn(Θ) at the location with director angle Θ is
(3.10)![]()
Assuming Θ = π/2 at the edges yields
(3.11)![]()
Figure 3.39 (a) The conventional LCD without lens effect; (b) an electric field-driven LC lens.
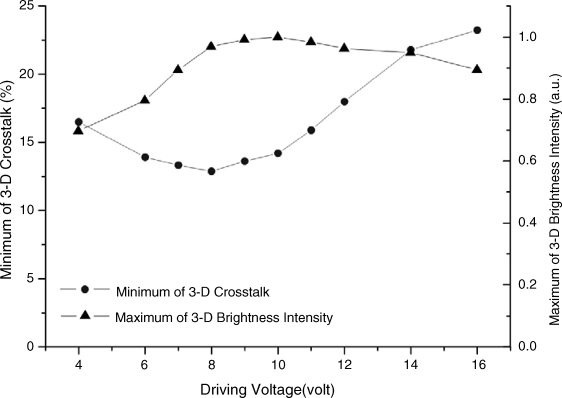
The system under discussion is also called an electric field-driven LC lens or a graded index LC lens (GRIN-LC lens). As we already know, the better Δn(Θ) approximates a parabola, the better are the light collimating properties of the LC lens.
Figure 3.40 depicts the 3D crosstalk and 3D luminance for a GRIN lens depending on the driving voltage. Crosstalk reaches a minimum of a still noticeable 12.5% at 8 V and a maximum luminance at 10 V. An advantage of this LC lens is in the low-cost manufacturing of conventional LCDs.
Figure 3.40 Crosstalk and 3D luminance dependent on the addressing voltage.
The switching speed of this GRIN lens is still several seconds too high, but it could be decreased by the introduction of a polarization switching layer [10] as already introduced in Figure 3.23.
3.3 Autostereoscopic Displays with Fixed and Switchable Parallax Barriers
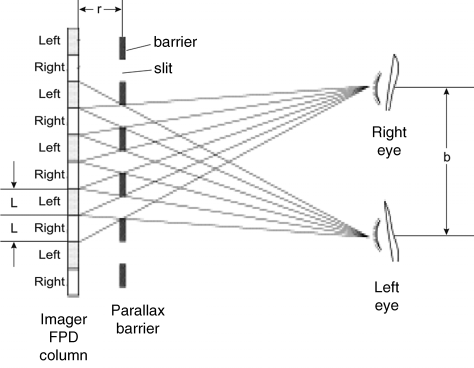
Similar to lenticulars, the horizontal sequence of 3D images can also be achieved by parallax barriers as depicted in Figure 3.41 [19]. The left and the right eye images are again spatially multiplexed in different columns of an FPD. At the distance r in front of the FPD a sequence of light blocking barriers and light transmitting slits guide the light of the left and the right eye images to the left and right eyes of the viewer. The downward-slanted sector of light emitted by the left eye image narrows to a point at the position of the viewer's left eye, while the upward-slanted sector originating from the left eye image is blocked by the barrier before it can reach the viewer's right eye. This is the operation of all sectors with emerging light [19]. The blocking of light by the barriers results in a loss of light which does not occur with lenticulars, where all light is focused, collimated, and transferred to the viewer. However, the collimation implies an inhomogeneous distribution of light. Barriers do not exhibit this collimation and hence provide a larger uniformity of luminance. For both the lenticular and the barrier approaches the resolution for the left and the right eye view is halved in comparison to the 2D image. The distance z between the FPD and the image plane exhibits the proportionality
where b is the interocular distance, as a rule 65 mm, and L is the width of the left or right eye image on the FPD. The proportionality to r and the inverse proportionality to L can be understood by the fact that, for an increasing r and a decreasing L, the lines in Figure 3.41 limiting the sectors move closer to being parallel, resulting in an intersection at a larger z. If b has to become larger the image plane has to be shifted further out, thus enlarging z.
Figure 3.41 The parallax barrier on an FPD with the right eye and the left eye images.
The barrier lends itself to a switchable realization in LC technology as shown in Figure 3.42 [19]. The polarized light exiting the FPD enters the LC-switchable barrier, which, in the case of Figure 3.42, is a TN cell. If no voltage is applied the incoming polarized light is rotated by 90° and can hence pass the crossed polarizer at the output. Thus there is no barrier to the passage of light. This is the 2D mode, where the FPD carries the conventional image for both eyes. If a voltage is applied at a section of the LC barrier, the LC molecules orient themselves parallel to the electric field and the rotation by 90° in the TN cell does not take place. The light can no longer pass the polarizer at the output and the barrier blocks the light in that particular section. This is the 3D mode. This switchable LC shutter offers the possibility to electronically adjust the width of the barriers and of the slits. A common concern is to keep the subpixels for R, G, and B together for emitting light through the same slit. A further objective is to place the left and right eye views next to each other without any overlap or gap. This convergence of the views adjusted electronically is shown in Figure 3.43, where the images of the two views are shifted close together. The luminance of the 3D mode is only about a half of that in the 2D mode, due to roughly a 50% blockage of the light by the barriers. The luminance diminishes from the center toward the outer positions. This is understandable from Figure 3.41, because the cross-section of the light beam originating from the outer positions of the FPD is smaller than for the beam from the center. The flexibility of the switchable LC barriers was also used to switch the display format from landscape (horizontally wide) to portrait (vertically high).
Figure 3.42 LC-switchable barriers in the 2D mode and the 3D mode.
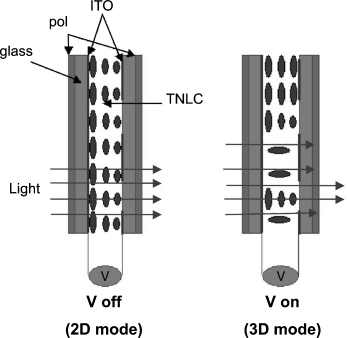
Figure 3.43 The convergence of two views by LC-controlled adjustment of barriers.
Crosstalk occurs if neighboring views partly overlap or if stray light from one view is visible in a neighboring view, which are the same effects as occur with lenticulars. An additional cause for crosstalk observed only at barriers is the diffraction of light at the edges of the barriers.
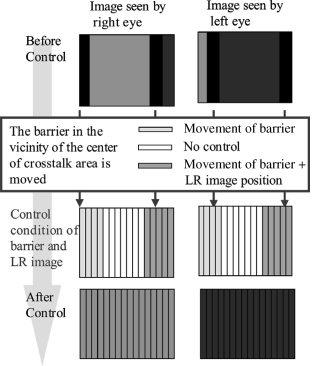
The flexibility of adjusting the size and location of LC-controlled barriers can be used to decrease crosstalk [20, 21]. In the upper portion of Figure 3.44 the light-gray area represents the view for the right eye and the dark area that for the left eye. The black area represents crosstalk. The barriers consist of stripes which individually and electronically can be moved. Most important is the movement of the stripes into the crosstalk area in order to block the light causing the crosstalk. Another adjustment consists of moving the image positions by moving the barrier stripes in order to eliminate any overlap of the left and right eye images. The result of these movements is shown in the lower portion of Figure 3.44 where the disturbance by crosstalk and overlap is eliminated.
Figure 3.44 The electronic movement of stripes in barriers in order to eliminate crosstalk.
Re-engineering the pixels of an LCD with respect to the peculiarities of the barriers is another way of optimization. As we already know from conventional LCDs, the angular transmission diminishes with increasing viewing angle as again shown in Figure 3.45 [22]. So it is advantageous to optimize the transmission of those pixels according to their specified viewing direction. As a rule all pixels on an LCD are designed for a perpendicular view of the LCD screen. The proposal in [22] consists of rubbing and anchoring the LC molecules differently in each pixel area in such a way that their transmittance of light is a maximum for the viewing angle of the pixels. Such angular transmittance profiles are depicted in Figure 3.46. These optimized profiles focus the light onto the angle where it is needed, thus reducing crosstalk and enhancing the total luminance also in the viewing zones further away from the center. Consequently, focusing the aperture of the barrier, that is, the width of the slits, can even be increased. The slit was 8.9% of the barrier pitch in order to keep crosstalk at 5% and could now be increased to 11.3% while still keeping the same crosstalk. The overall light efficiency was increased by 39%. For further improvements the pixel layout is modified such that the opaque components, the TFTs, capacitors, and protrusions, are placed in an area which emits light mostly being blocked by the barriers. By doing so, the aperture of the barriers can be further increased to 14.3% resulting in an overall light efficiency of the 3D mode of 46%, while crosstalk was still kept at 5%.
Figure 3.45 The angular transmittance of a conventional LCD.
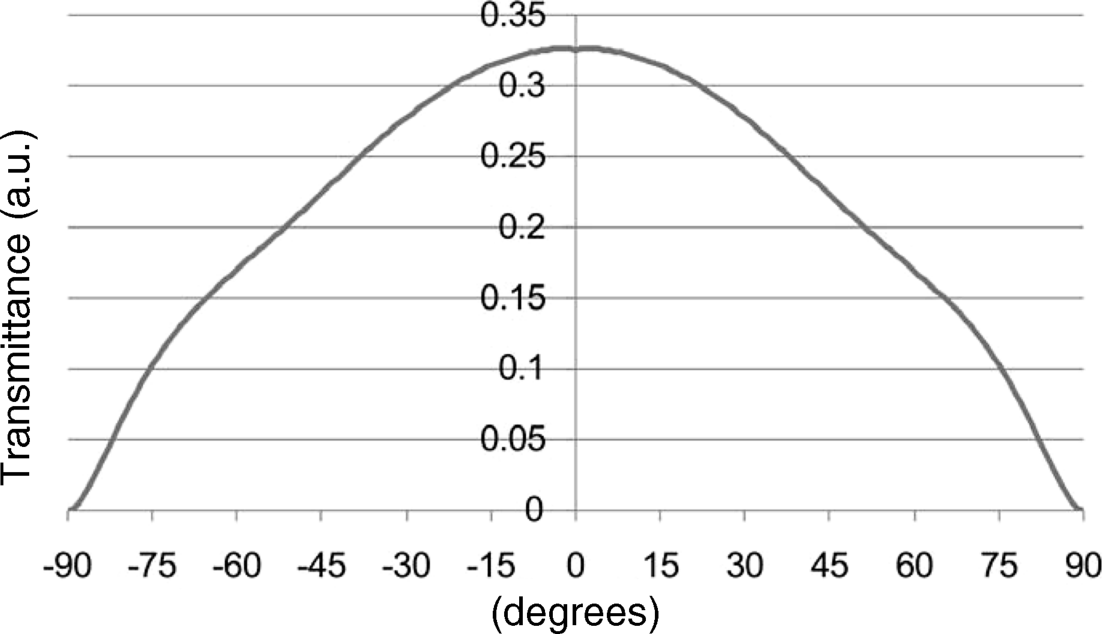
Figure 3.46 Transmittance of pixels optimized for their range of viewing angles needed in 3D displays with barriers.
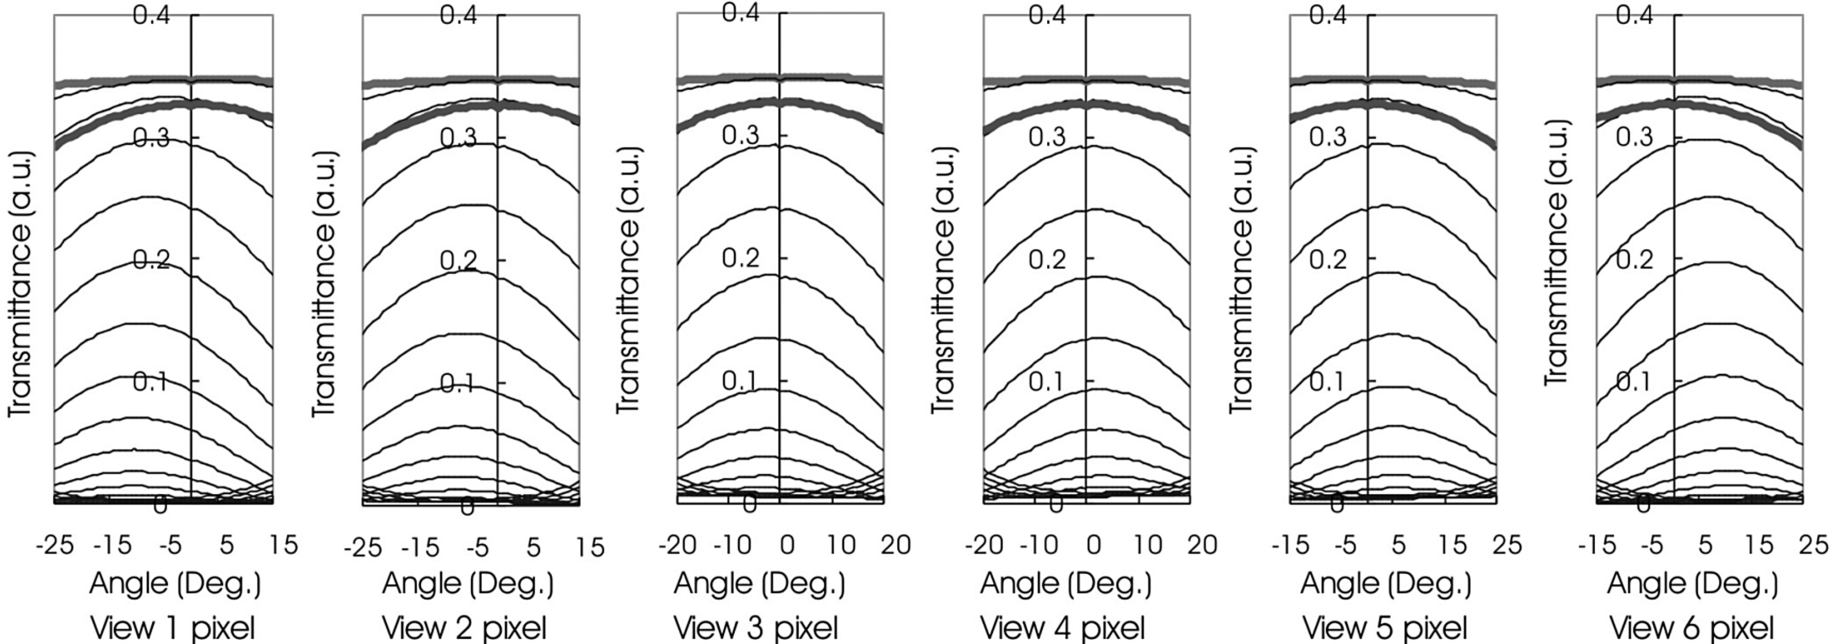
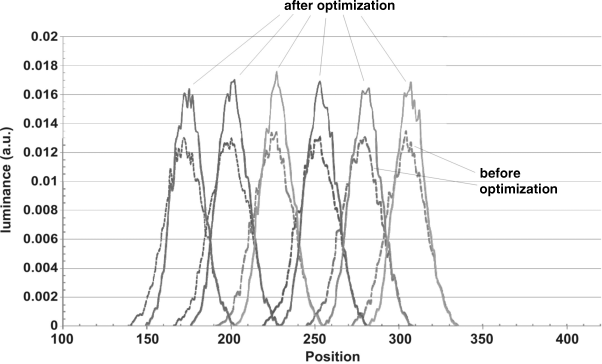
The distribution of luminance of a 3D display with six viewing zones is shown in Figure 3.47, where the luminance before and after optimization is demonstrated.
Figure 3.47 The luminance in six viewing zones before and after optimization of the pixels.
As a rule the structure of a 3D display with LC-controlled barriers requires four glass substrates: two for the LCD and two for the LC barriers. In [23] one of the glass plates with a polarizer was replaced by a WGP according to Figure 2.10. The glass plate of the WGP was used as plate for the LCD, while on the other side it carried an ITO layer facing the LC barriers. This saves one glass plate. As the WGP is also thinner than a glass plate the distance r in Figure 3.41 can be shrunk to 0.6 mm. This allows from the proportionality 3.12 the realization of a small distance z of the image plane, an essential feature for mobile 3D, where z is preferred to be 30 cm.
The autostereoscopic projector in Figure 3.48 [24] copes with the collimation of light beams and the suppression of aberrations of projected light in barrier 1, and with the generation of a sequence of viewing zones and the diminishing of crosstalk in barrier 2. The four projectors in Figure 3.48 pass their light through transparent LCDs and project it onto the projection screen. Two neighboring projectors provide the left and right eye views, so each image exhibits the full resolution of the LCD. Each of the two pairs of projectors emits images pertaining to the angular position of the projectors. As these projected images exhibit aberrations at the end of the screen, and as the pixel sizes do not perfectly match the pitch of the barriers, the light passes first through barrier 1 for collimation and for matching the periodicity of barrier 2. Then barrier 2 can produce the sequence of viewing zones based on precise pixel arrays on the projection screen which plays the role of pixels on an LCD.
Figure 3.48 A 3D projector with two parallax barriers.
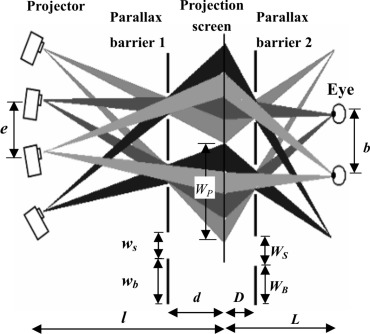
A prototype system for this approach possessed for both 2D and 3D resolution remarkably the same values of 1024 × 768 pixels with a luminance of 250 cd/m2. The viewer's distance from the projection screen was 1.55 m and the distance between the screen and projectors was 1.62 m.
A comparison of the lenticulars to the parallax barriers and a look at resolution issues and at an analytical investigation of the uniformity of luminance and of crosstalk [25] will conclude this section. From Section 3.1 and from Figures 3.10 and 3.12 we know that the layout of the pixels is given by the viewing directions and hence by the viewing zones pertaining to the image content of the pixels. This arrangement requires more display area than for a conventional 2D image. The more viewing zones are implemented, the more image area is necessary resulting in an increasing loss of resolution.
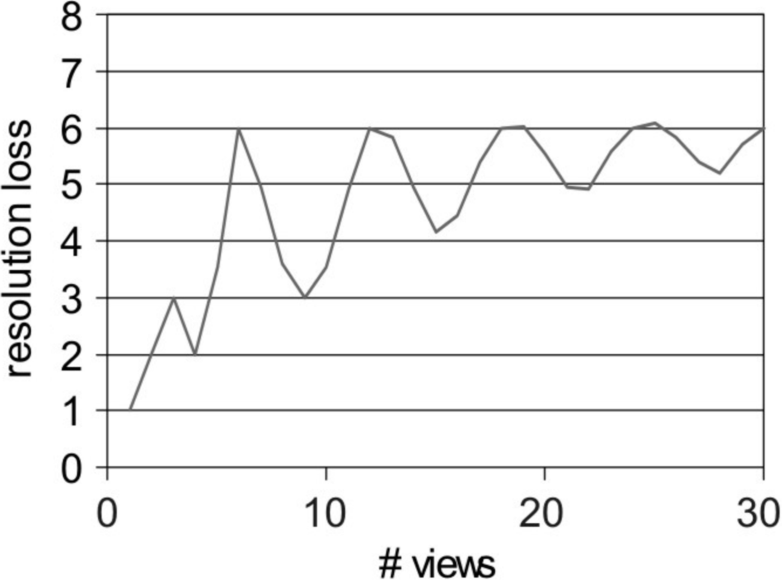
For a setup with vertically arranged pixels and slanted lenticulars with a slant angle of arctan 1/6 the optimum pixel layout for a desired number of views between 1 and 30 was designed. For each number of views the distance z to the viewing zone is calculated at which the pixel structure is just visible. This distance is divided by the distance r to the display, as a rule an FPD or CRT. The ratio e = z/r represents the effective loss of resolution. The nature of this value e is proven by the following equations:
(3.13)![]()
Based on tan α in Figure 3.6 for g=r the ratio z/r is equal to the ratio of the pixel pitch b in the image plane divided by the pixel pitch p in the FPD screen. Keeping this in mind, e represents the increase in the distance b between the pixels in the image plane compared to the distance p of the pixels in the FPD plane. Hence e > 1 is a measure of the loss of resolution expressed by how much the distance between the pixels in the image plane is larger than the distance in the FPD plane. The result of this investigation is plotted in Figure 3.49 with e versus the number of views. The very interesting result is that the loss of resolution e is a minimum for 4, 9, 15, 22, and 28 views. These numbers happen to be about equal to the square root of the pertinent loss of resolution. So a selection of nine views is very appealing as it offers a good look-around capability at a minimum loss of resolution.
Figure 3.49 The resolution loss e as a function of the number of views in 3D displays with a slant angle of arctan 1/6.
We have noted already that the luminance of a lenticular 3D display is larger than for a barrier display. Uniformity of luminance along ϕ, which is the angular distance between points in the image plane, is now investigated analytically.
The equation known from system theory for an electrical or optic input V1(ϕ) inducing the output V2(ϕ) is
(3.14)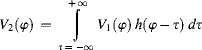
where h(ϕ) is the response of the system to a Dirac impulse, also called a δ-impulse at the input (impulse response h(ϕ)) (Chapter 2, ref. [3]). The δ-impulse does not meet the requirements of a mathematical function and was therefore called a distribution. Some basics of distribution theory are outlined in ref. [3] of Chapter 2 and in more mathematical detail in [26]. For a non-slanted arrangement with an ideal lens and for an infinitesimally small slit between the barriers the impulse response is h(ϕ) = δ(ϕ), a δ-impulse in the center of the lens or of the slit as shown in Figure 3.50a. All locations in the horizontal direction of the FPD, of the lenticular or the barriers, and of the image plane, are designated by their common angular distance. If the geometry of the pixels, lenses, and barriers is everywhere the same along the columns of the display, that is, a non-slanted case, the system is one dimensional with the variable ϕ, as we have started to assume. The impulse response of k + 1 lenses or barriers in an array needed for 3D images is the comb of δ-impulses in Figure 3.50b with the pitch of the comb pc being equal to the pitches of the lenses or the barriers, measured in angular coordinates. Assuming the input to the lenses or slits is a beam of parallel light with angular width w and a constant luminance over ϕ, then the input for one lens or slit is the rectangular pulse r(ϕ) in Figure 3.50c and for all lenses or slits the comb of rectangular pulses ![]() in Figure 3.50d. The output for one lens or slit is the convolution (∗)
in Figure 3.50d. The output for one lens or slit is the convolution (∗)

and for the comb

as depicted in Figure 3.50c and 3.50d.
Figure 3.50 Angular distribution of intensity for various cases of lenticulars and barriers: (a) impulse response of an ideal lens – a δ-impulse; (b) impulse response of a lenticular – a comb of δ-impulses; (c) a rectangular impulse as the response of a defocused lens to a δ-impulse; (d) a sequence of rectangular impulses as the response of a lenticular with defocused lens to a sequence of δ-impulses; (e) trapezoidal profile of luminance as the response of a slanted lenticular to a δ-impulse.

The second equalities in Equations 3.15 and 3.16 are based on the scanning property of the δ-impulse. More details can be found in ref. [3] of Chapter 2 and especially in the mathematically oriented book [26].
For slanted lenticulars or barriers the results in Equations 3.15 and 3.16 have again to be convoluted by a rectangular pulse the width of which depends on the aperture ratio of the pixels. The convolution of V2(ϕ) in Equation 3.16 results in the trapezoids in Figure 3.50e and in the sum with the hats in Figure 3.50e. The calculation for this is not presented.
For the non-slanted case w ≠ b, the interocular distance, which is equal to the distance between the viewing zones, the luminance in the image plane is not uniform. For w < b there are black stripes between the views and for w > b there is overlap of the views resulting in crosstalk from one view into the neighboring view. Only for w = b is there uniformity of luminance. This implies that for the ideal lens with a δ-impulse as the impulse response, luminance is not uniform. It can be made uniform by defocusing the lens such that it exhibits an impulse response as a rectangular beam with the width w = b in the non-slanted case. This is realized if the impulse response of the lens is no longer a line, a δ-impulse, in the focal plane but a stripe. In the slanted case the width of the stripe is given by the following considerations. The second convolution necessary in this case widens the rectangular to a trapezoidal pulse as shown in Figure 3.50e. In order to gain a constant luminance without the hats in Figure 3.50e the width of the stripe has to be half the width of a subpixel. Then the trapezoids add up to a constant. As a result the impulse response of a defocused lens should be a rectangular with a width half the width of a pixel or, in the case of a tri-color pixel, half the width of a subpixel of the tri-color pixel.
For the crosstalk the variance σ of the intensity I of light is considered; it is
![]() I2
I2![]() is the mean value of the square of the intensity I, while
is the mean value of the square of the intensity I, while ![]() I
I![]() 2 is the square of the mean of I. So the difference in Equation 3.17 indicates for how much the square of the intensity fluctuates around its mean, a measure for the uniformity.
2 is the square of the mean of I. So the difference in Equation 3.17 indicates for how much the square of the intensity fluctuates around its mean, a measure for the uniformity.
Crosstalk C is given by
where V1(ϕ) and V2(ϕ) are the angular normalized distributions of the intensity in two neighboring views. Where V1(ϕ) and V2(ϕ) in the numerator of Equation 3.18 do not overlap, there is no contribution to crosstalk; only where they do is there a contribution. The denominator of Equation 3.18 represents the total luminance of the two pixels. In [25] Equations 3.17 and 3.18 were evaluated for a nine-view display with a defocused lens or a slanted barrier. The apertures of the pixels in the horizontal and vertical directions were 80% and 70% respectively. The variance σ(Rlens) as a function of the radius Rlens of the ideal lens is plotted in Figure 3.51. The variance is a maximum at Rlens = 307 μm. This is the case of a focused ideal lens which exhibits the largest non-uniformity. The variance is zero at Rlens = 341 μm. Zero variance can only occur if the lens is appropriately defocused. For zero variance the crosstalk in Figure 3.51 is 0.58 units, while it is a minimum of 0.4 units for the focused lens with a maximum variance. So for the focused lens, crosstalk is 30% smaller than for a zero-variance lens with a maximum of uniformity in luminance.
Figure 3.51 Variance of the profile of the intensity and crosstalk dependent on the radius of an ideal lens.
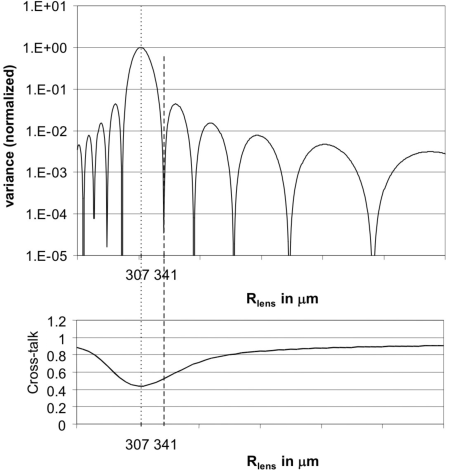
Another effect further deteriorating the uniformity for a focused and a defocused lens is spherical aberration or for barriers diffraction at the edges of the barriers. The lens involved is called non-ideal. The variance and crosstalk were again calculated for a non-ideal lens with spherical aberrations. The results are plotted in Figure 3.52. The maximum variance (focused non-ideal lens) and the zero variance (defocused non-ideal lens) were both shifted to a higher radius, where the zero variance occurred at Rlens = 395 μm, which is at a radius 54 μm larger than for an ideal defocused lens. The 54 μm represents the crosstalk in the focused and defocused non-ideal cases. In the case of the ideal lens the crosstalk in the focused and defocused case was similarly represented by 341 μm − 307 μm = 34 μm. Thus the aberrations and the defocusing have apparently a very similar effect on the crosstalk.
Figure 3.52 Variance and crosstalk for a non-ideal lens with aberrations.
As a check on accuracy, ray tracing in Figure 3.52 provided a very similar result as the calculations in Equations 3.15 and (3.16).
3.4 Time Sequential Autostereoscopic Displays and Directional Backlights
In the time sequential approach each of the two views required for 3D displays comprises as a rule the full area of a conventional FPD and hence exhibits the resolution of a 2D display without any loss. This is the main advantage of the time sequential system. The challenge is that twice the addressing speed is required as two images have to be sent instead of only one. We encountered this speed requirement for stereoscopic displays with an addressing circuit in Figure 2.25 in which the enhanced speed was provided by electronic parallel processing and by using faster LED panels. The viewer needed shutter glasses alternately blocking one view. As autostereoscopic solutions are supposed to be free of glasses we need a means to direct the views exclusively to the one single eye they are destined for.
This is achieved either by lenses or more recently by specially shaped mirrors supported by directional backlights. For these backlights, light guides or 3D films with prisms provide the separate views for each eye at a given location in space. A second solution consists of parallax barriers producing multiple views in an image plane, again in a restricted area, but in this case not a single spot but a plane.
The approach with 3D films lends itself to thin and light mobile applications.
3.4.1 Time Sequential Displays with Special Mirrors or 3D films
The idea of optically guiding a full area image to its pertinent eye is realized in Figure 3.53 [27–29]. Two light sources for the consecutive presentation of the views and a convex lens shine the views to the eyes. This early proposal in 1990 [27] initiated the attempts to guide the two views individually with a minimum overlap to the two eyes. The large single lens with aberrations toward its edges was replaced by an elliptical mirror as depicted in Figure 3.54 [29]. The light source for the right eye and the right eye itself are both placed at focal points of the ellipse, so the eye receives the light focused onto its position after having passed the full area of an FPD, in the present case an LCD. The two light sources needed for the two eyes in Figure 3.55 [30] are slightly off the focal point fLCD. This can be approximately corrected by shaping the areas of the mirror reflecting the light from one of the two sources as different ellipses with the light sources as focal points and the two eyes as the two corresponding focal points. In Figure 3.55 this is drawn only for one eye. An anisotropic diffusion plate, a 3D film, behind the LCD in Figure 3.56 [31] diffuses incoming light in a vertical direction, thus smoothing out some of the inconsistencies in the different focal points in one ellipse and allowing the viewer to see the full size of the LCD screen. The diffusion may cause crosstalk which is diminished by focusing the light onto the left side of the left eye and onto the right side of the right eye. Figure 3.56 shows the angular distribution of light for the left eye, where small crosstalk inducing a bump of light may occur.
Figure 3.53 The guidance of light of an image on an FPD screen to the eyes of the viewer.
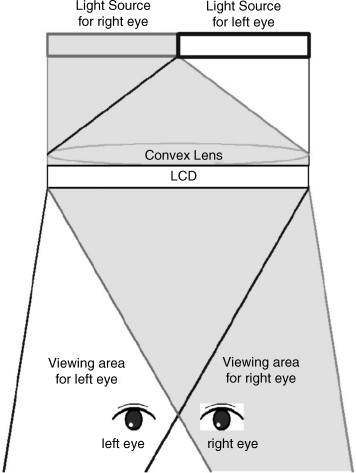
Figure 3.54 An elliptical mirror for guiding the light to one eye of the viewer.
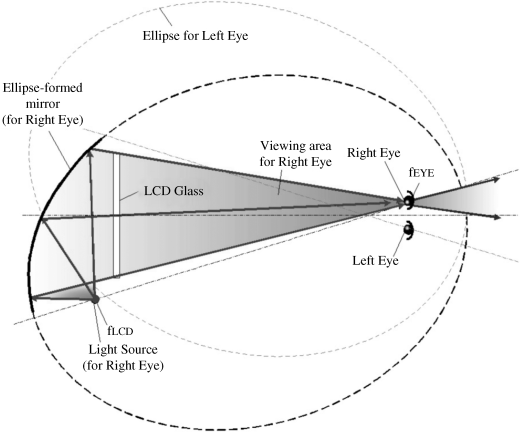
Figure 3.55 An elliptical mirror for guiding two light sources to two eyes.
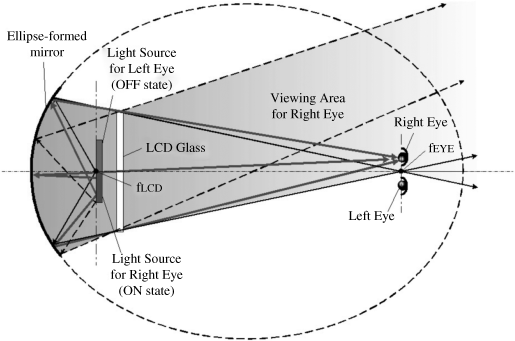
Figure 3.56 A two-view time sequential display with a light guide and a 3D film creating two directions for the backlight.
This mirror-based approach is also feasible for larger area displays with a larger distance of around 1 m between the FPD and the viewer.
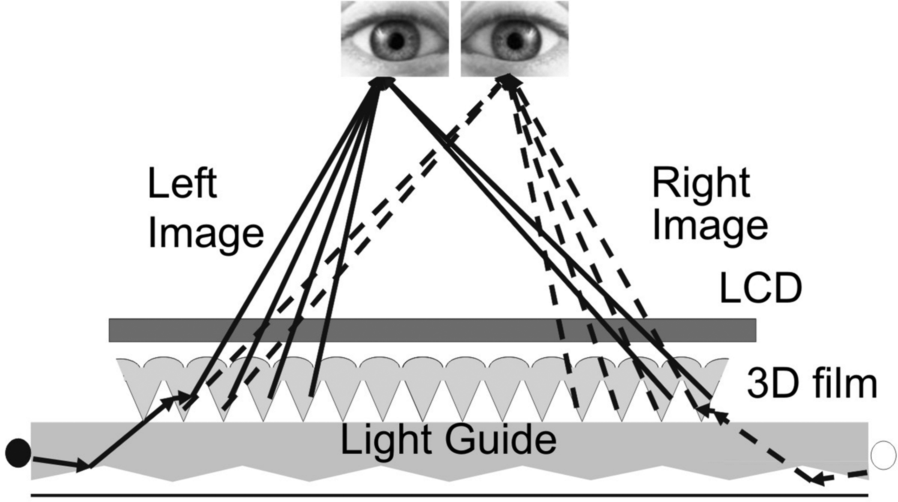
Lightweight, thin, and with a lower cost, time sequential displays are also suitable for mobile applications. They are based on prism sheets, also called 3D films, for creating the dual directions of the backlight. A prism sheet with a light guide plate and a lenticular lens array is depicted in Figure 3.57 [32]. The two fast response LED light sources, one for each eye, are located at the end of a polymer PMMA light guide with a shallow prism structure, 0.5 mm thick. It guides the light by internal reflection within an angle of 172°. A reflective film below collects stray light traveling underneath. The angular light output along the guide is, in the arrangement in Figure 3.57, concentrated within emission angles of ±70° to ±10° from the vertical. The two beams emitted at ±70° represent the beams to the right eye and to the left eye. The way they are generated is further demonstrated in Figure 3.58 [32] for light entering the guide from the left side. It always hits the surface C of the prisms, is refracted, and after total internal reflections (TIR) the beam E finally exits the diffusing bump on top, leaning left toward the right eye of the viewer. The same happens to the light entering the guide from the right, ending up with an exiting beam leaning to the right.
Figure 3.57 The angular light guide with a maximum of two output beams at ±70° from the vertical.
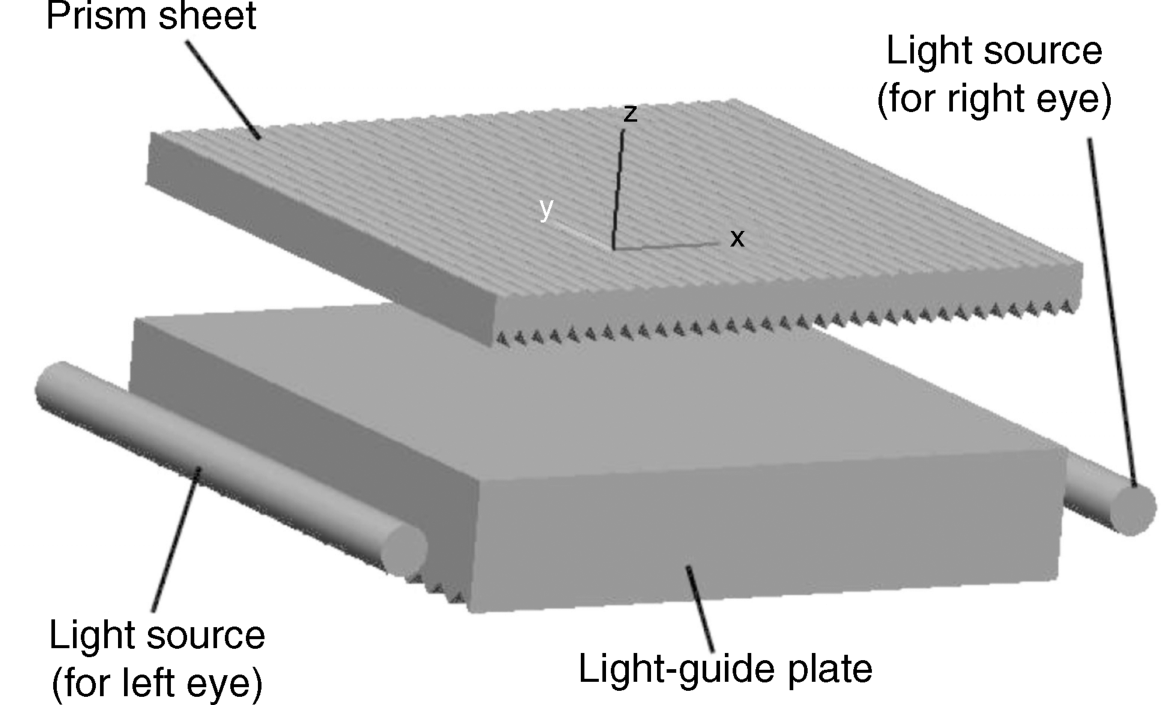
Figure 3.58 The generation of two light beams by the light guide and the prism sheet (3D film).
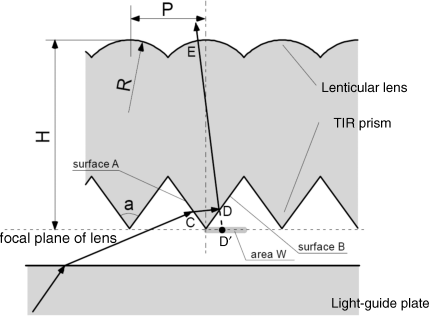
The angles of the prism can also be chosen such that the reflected beam entering from the left exits toward the right side as depicted in Figure 3.56.
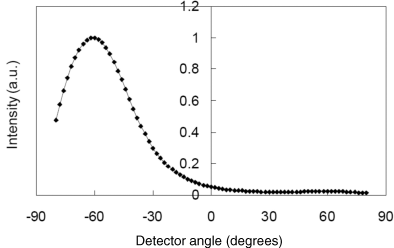
Figure 3.59 depicts the measured distribution of the luminance exiting the prism sheet in Figure 3.58 when only one light source is turned on. There is virtually no light seeping into the area of the second light source.
Figure 3.59 The angular distribution of luminance exiting the prism sheet if only one light source is turned on.
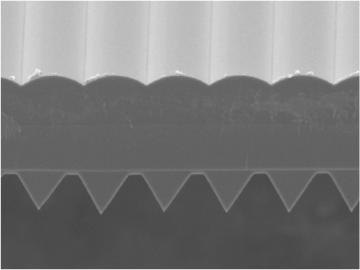
An essential component of this light guide technology is the prism sheet. It is manufactured as a thin 3D film out of PMMA [33], as shown by a SEM in Figure 3.60. Between the prisms flat regions were introduced contrary to the prism sheet in Figure 3.58. These regions improve the film's aging qualities. The avoidance of sharp peaks at the top of the prisms reduces the occurrence of stress fractures.
Figure 3.60 SEM micrograph of a 3D film.
The top lenticular and the bottom prisms were aligned during manufacture with a nanometer tolerance on individual feature registration. This eliminates the need for an alignment of the film to the pixels of the LCD or to the features of the light guide. In this context a key property of the 3D film is the nanometer difference in feature size between the lenticular and the prisms amounting to between 1 and 30 nm. As an example the pitch of the lenticular was 25.500 μm, while the pitch of the prisms was 25.5038 μm. So the differences in the structures in the 3D film were smaller than the pixel sizes, which helped to render an alignment unnecessary. The small deviations in feature sizes did not diminish the quality of the 3D images which are characterized by good 3D perception as long as disparity was kept within a range of 0.5° corresponding to a depth perception of ±0.5 in for a 3 in display.
As fast LCDs were required for a 120 Hz frame rate, OCB-LCDs were used.
For mobile applications the following requirements were found to be necessary [33]. For a satisfactory spatial uniformity of the backlight, the sum of the leftward- and rightward-propagating light in the light guide should exhibit a uniformity of 80% at an emission angle of 70°. The non-uniformity of the individual leftward and rightward components should not exceed the ratio 3:1.
So far we have considered systems which generated one pair of 3D views by employing fixed mirrors or fixed directional backlights. We proceed now to approaches in which the directions of backlights are switched.
3.4.2 Time Sequential Displays with Directionally Switched Backlights
The first system in this category is based on time sequentially switched parallax barriers providing multiple 3D views in an image plane. The structure achieving this is depicted in Figure 3.61a and 3.61b [34].
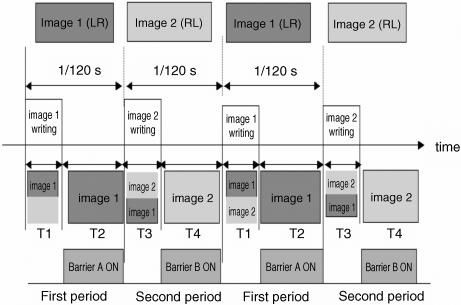
Figure 3.61 Time division switchable parallax barriers and slits: (a) the transparent slits (barriers A) for the first half of the image for the left and the right eye; (b) the transparent slits (barriers B) for the second half of the image for the left and the right eye.
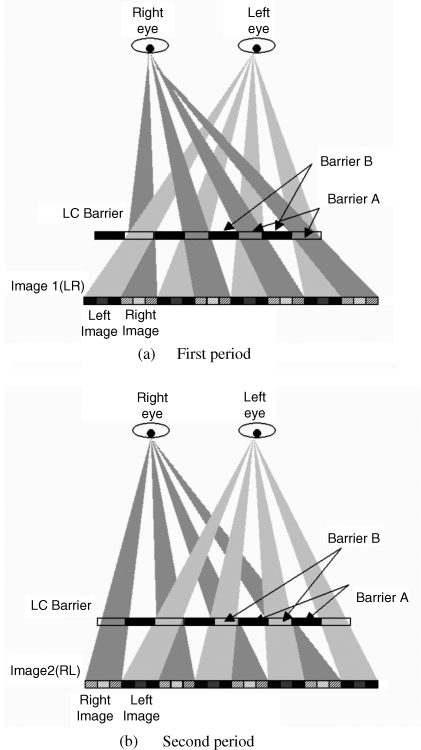
In both figures the images for the left and right eyes are arranged block-wise in a sequence in the rows of an FPD. This differs from the arrangement used so far for time division multiplex where the entire area of the FPD screen represented alternately the left eye and the right eye image. In front of the arranged block-wise left and right eye views, the slits (barriers A) of a barrier in Figure 3.61a allow in one frame the light through the left eye image only to reach the left eye, while the right eye only perceives light from the right eye image. The effect is known from Section 3.3. In the next frame the LC-switchable slits become barriers and the barriers B assume the role of slits. At the same time new right and left images are written into the FPD; however, in such a sequence that the so far the left eye blocks receive right eye images and the right eye blocks left eye images. The result of the two measures affecting the barriers and the image content is that the right eye now perceives image blocks which so far were destined for the left eye, and the left eye perceives right eye blocks. So both eyes are exposed to the full image in the area of a conventional 2D display without loss of resolution. The price to be paid for this is, again, as always with time sequential approaches, the need for addressing circuits with twice the speed as for 2D images.
The schedule in Figure 3.62 contains the time for writing in the information about the gray shades and for the rotation of the LC molecules into the position for these gray shades, as well as the time for switching the LC barriers A and B into slits. In a 120 Hz frame possessing a frame time of 8.33 ms, one of the two images is handled. The most challenging issue is the rather long optical response time of a TN cell of more than 10 ms or of an advanced OCB cell or a VA cell of 5 ms out of the 8.33 ms available. This cuts short the luminance of the cell. Due to an equally long decay time of the luminance, there is an overlap with the next image resulting in crosstalk.
Figure 3.62 The schedule for the two addressing steps of the LCD and for switching the barriers A and B.
In order to avoid the long response time much faster switching AMOLEDs have to be used. However, switching the slits is still slow since they are controlled by LCs. In order to provide more time for switching the slits, they were turned on earlier than the frame synchronization thus increasing luminance. They were also turned off earlier, again decreasing luminance, but also shrinking crosstalk. So an optimum for decreased crosstalk while luminance is still acceptable has to be found experimentally. The turning on prior to the frame sync is measured in H, where 1 H stands for an 8.7 μs offset from the sync. Figure 3.63 depicts the luminance for the left and the right eye for offsets between 0 and 150 H, while crosstalk versus H is listed in Table 3.2. As expected, crosstalk first decreases with increasing H.
Figure 3.63 The components of time sequential barriers with a four-directional LED backlight.
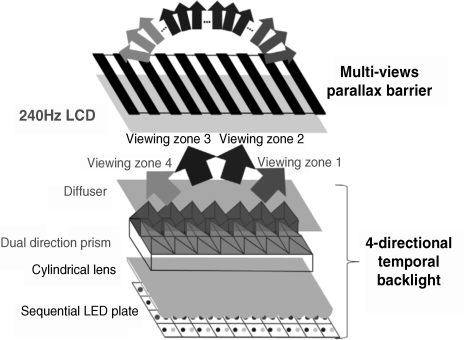
Table 3.2 Crosstalk versus the offset H (8.7 μs) from the synchronization.
![]()
As with all barriers the luminance is smaller than for lenticulars and it decreases the farther away from the center the views in the image plane are located. A remedy for this is the combination of a parallax barrier with a time sequentially switched directional backlight as depicted in Figure 3.63 [35]. This system is an extension of the solution in Figure 3.56. The parts of the system are now listed before being explained in detail.
The system in Figure 3.63 includes a four-directional temporal backlight with LEDs, consisting of a sequential LED plate further explained in Figure 3.64, cylindrical lenses for collimation, a dual direction prism further explained in Figures 3.64 and 3.65, a diffuser, and a multiview barrier.
Figure 3.64 The components of the four-directional LED backlight.
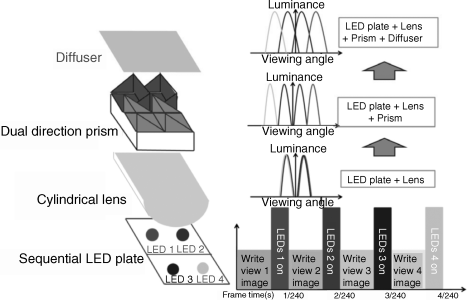
Figure 3.65 The two microprisms providing the two directions of the LED backlight.
The four-directional temporal light guide in Figure 3.63 is time multiplexed. Each of the two pairs of LEDs in the sequential LED plate in Figure 3.64 feeds time sequentially into a different light guide with microprisms 1 and 2 in Figure 3.65. These prisms create two pairs of light beams exiting in two different directions.
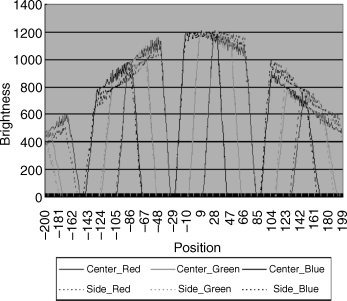
The LED light sources have the divergent angle Θ in Figure 3.66. To enhance uniformity Θ is chosen as large as possible, but as Θ > ±20° in order to avoid light leakage into the wrong image. The distance P between the two light sources in Figure 3.66 is kept at 4 nm, just avoiding hot spots. The cylindrical lens on top of the light sources has a radius of 10 mm and a distance of 12 mm to the light sources. That way, the rather small angular difference in luminance between the different viewing zones in Figure 3.67 and the small crosstalk in Figure 3.68 is created.
Figure 3.66 The geometry of the two LED backlights and of the cylindrical lens.
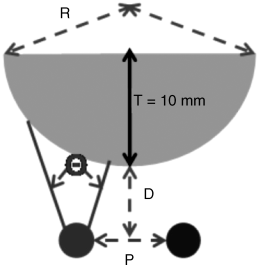
Figure 3.67 The angular difference of luminance between different viewing zones.
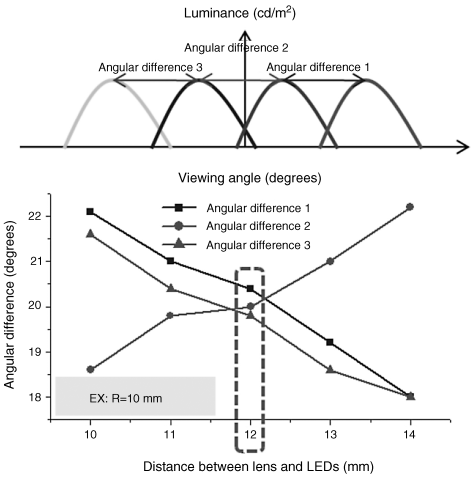
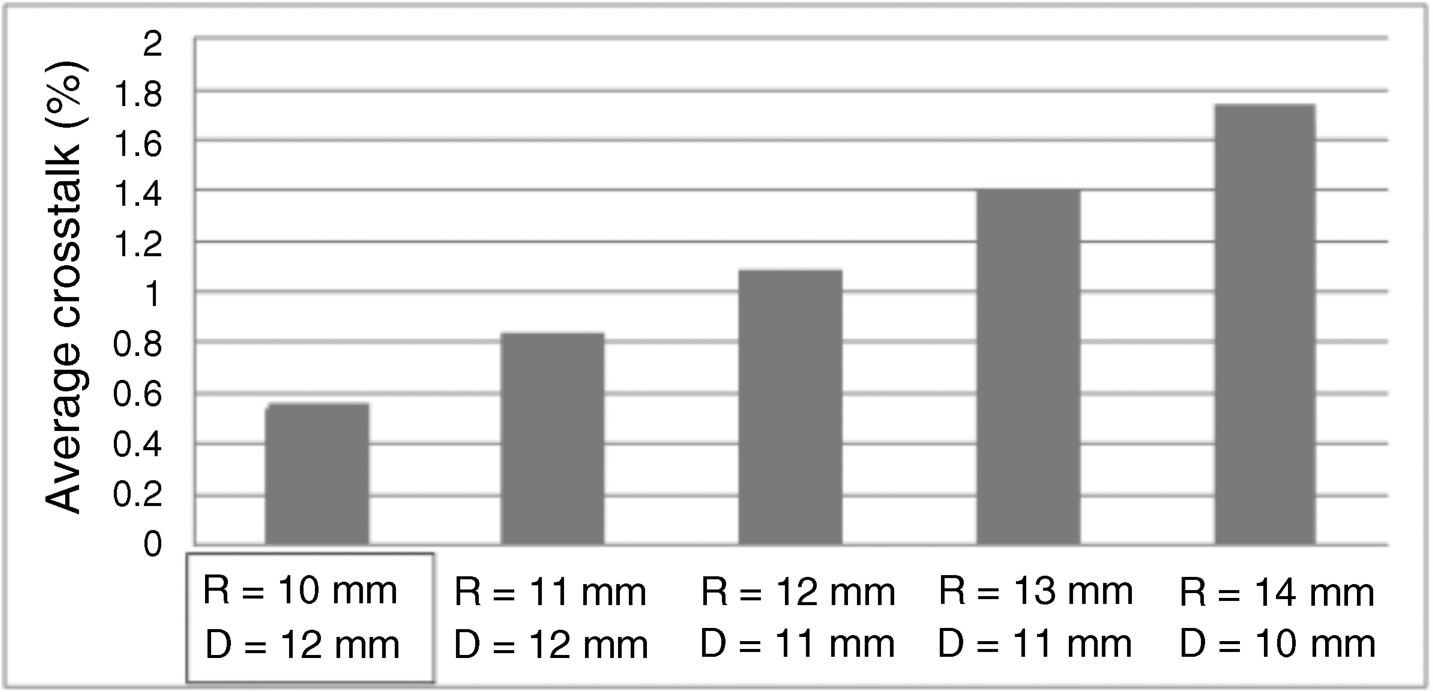
Figure 3.68 Average crosstalk versus radius R of the lens and the distance D in Figure 3.66.
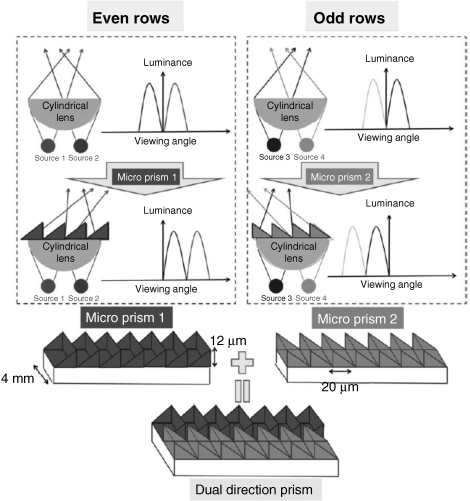
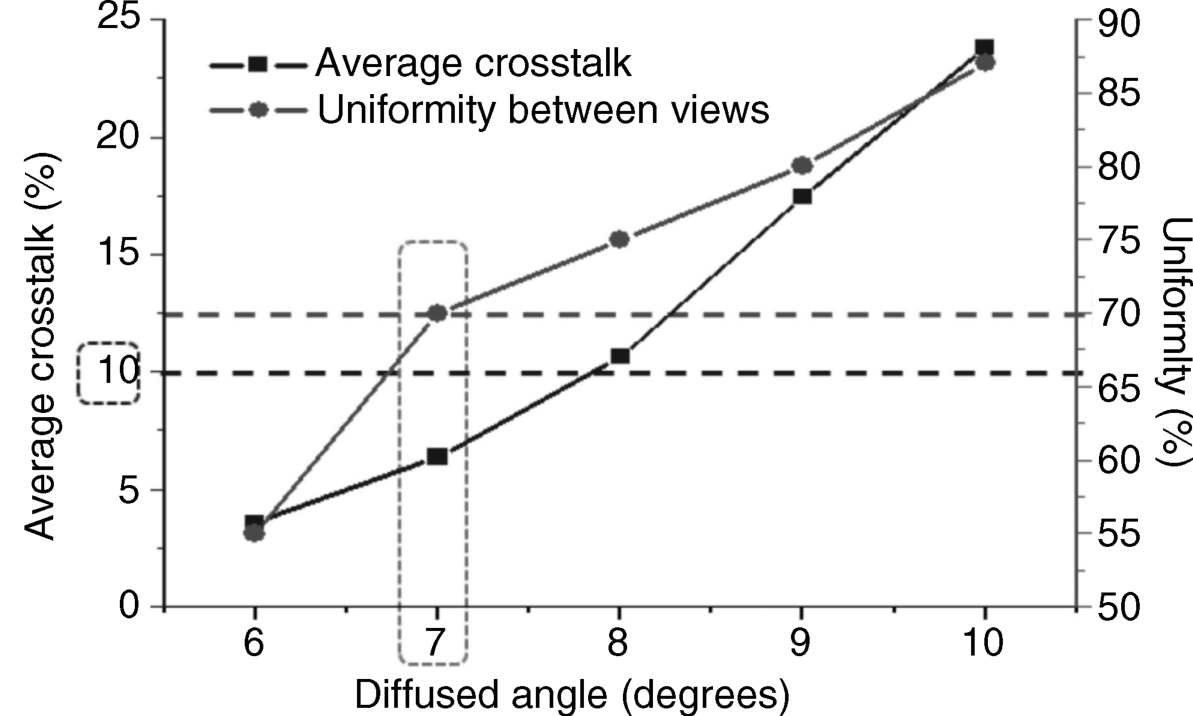
The flat panel is divided into odd and even rows. Microprism 1 shifts the light of LED 1 and LED 2 exiting the even rows as shown in Figure 3.65 to the right, while microprism 2 shifts the light of LED 3 and LED 4 exiting the odd rows to the left. The two pairs of LEDs are switched on and off time sequentially with 240 Hz frames and generate four viewing zones with two views provided for the two eyes, as shown in Figures 3.64 and 3.65. Finally, a diffuser on top of the entire setup with diffusion angle α > 7° fills in the black stripes between the views. Figure 3.69 shows the average crosstalk and the uniformity of luminance dependent on the diffusion angle α. For α > 7° crosstalk exceeds 6%, while at α = 7° uniformity still exhibits an acceptable value of 70%.
Figure 3.69 Average crosstalk and uniformity of luminance dependent on diffusion angle α.
In the solution just presented the time multiplex is applied to the two pairs of views presented time sequentially. This is contrary to the time multiplex developed so far consisting of presenting the two images required for 3D time sequentially but each with a full resolution. This is missing in the four-directional temporal backlight scheme, which stays with half the resolution for each view. However, it is still interesting as it extends the time sequential operation to the backlight.
In [36] a scanning backlight is introduced in which, along the contour of a circular mirror, swiveling facets generating the scanning are located. They reflect the light from LEDs. The scanning beams are used as backlights for 3D displays. The arrangement has the attractive feature that the backlight travels in the direction from which the views were captured, thus enhancing 3D perception. This effect is similar to the presentation of a side view under the angle Θ to an object by the lenticular lenses emitting their pertinent light just under the angle Θ.
The operation of depth-fused 3D (DFD) autostereoscopic displays is not based on the optical light guides, lenticulars, or parallax barriers that we have dealt with in previous sections. The new approach is derived from volumetric displays, which will be described later in detail in Chapter 7. The reason why a simplified version of volumetric displays is presented in this section is its relatively simple realization in a different but still autostereoscopic technology without glasses. It is remarkable that finally recourse was taken to the two separate view approaches treated in this chapter.
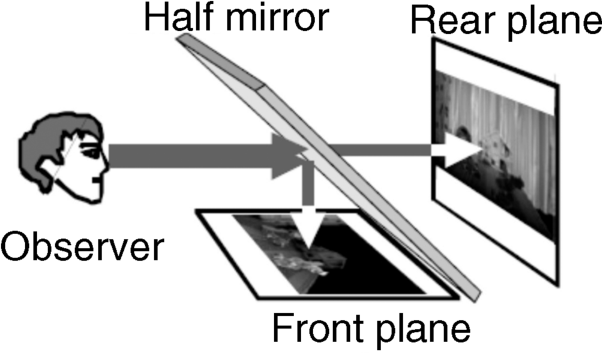
Depth fusion in its first version is based on two 2D displays with identical image content but presented to the eyes at different distances (depths), as schematically shown in Figure 3.70 [37]. As the image in the front plane may not be perfectly transparent, the arrangement in Figure 3.71 with a half mirror with the same optical effect is used [38].
Figure 3.70 The two 2D displays at different depths used for depth-fused 3D displays.
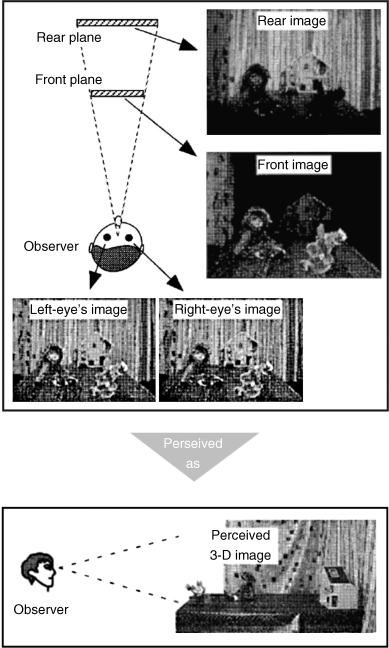
Figure 3.71 Optical setup for a depth-fused 3D display with a half mirror.
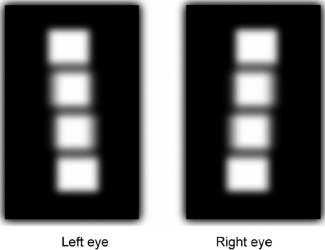
The two displays, identical in size, are placed in front of the eyes such that, when seen from the nose, they completely overlap. The image content supposed to appear closer to the eyes is assigned a larger luminance, while the content to appear farther away obtains a lower luminance. This is a similar physiological effect to the one treated in Section 2.5 which made an object appear closer if there are larger differences in gray shades between the object and its background. The two displays illuminated for depth fusion are seen by the left eye and the right eye, slightly from the side, and hence no longer completely overlap. This is depicted by the schematic drawing in Figure 3.72 [39]. The shifting of the images to the side translates the two illuminated displays into a difference in disparity or a sensation of depth. The schematic drawing in Figure 3.72 seen in reality on the retina is the blurred rectangles in Figure 3.73. The blurring can be modeled by the action of a lowpass filter with the sharp rectangles in Figure 3.72 as an input because lowpass filters suppress high frequencies present at a sharp edge, which renders the edges blurred.
Figure 3.72 Schematic drawing of the left and right eye illuminated images completely overlapping when seen from the nose.
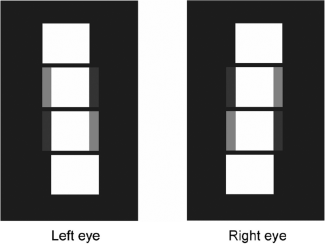
Figure 3.73 The image in Figure 3.72 appearing as a blurred image on the retina.
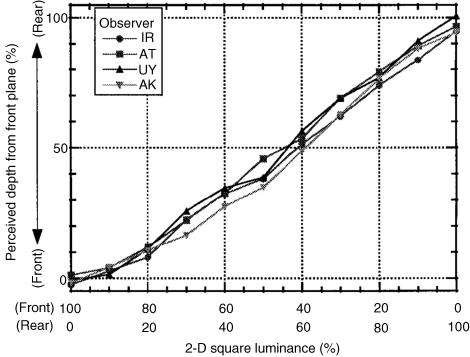
In an experiment the luminance of the front image was changed from 100% to 0%, while the luminance of the rear image increased from 0% to 100% [37]. Four test persons had to indicate their perceived depth between the displays at the front and at the rear by moving the reference plane in Figure 3.74 to the location where they perceived the depth of the two combined images. This perceived depth is shown in Figure 3.75 versus the luminances mentioned above.
Figure 3.74 The movable reference plane for the depth-fused experiment.
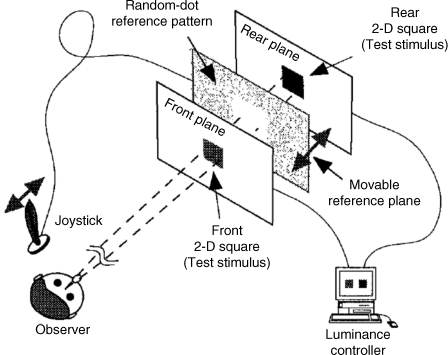
Figure 3.75 The perceived depth versus the luminances of the front and of the rear display.
The location of the perceived depth can also be expanded to areas closer to the viewer than the front plane and to areas behind the rear plane. This creates the sensation of a 3D image protruding out of the front plane or into the area behind the rear plane [38]. This happens under four very specific distributions of the luminance between the objects in the front and rear planes and their surrounding backgrounds, shown as cases A through D in Figure 3.76. Cases A and B describe the situation in which objects in the two displays appear to be ahead of the front plane, whereas cases C and D describe the situation in which the objects appear to lie behind the rear plane. In cases A and C the observed luminance of the object is brighter than the luminance of the background when the objects completely overlap. In cases B and D this observed luminance is darker than the background.
Figure 3.76 The four cases of the distribution of luminances of objects and of their surroundings for the appearance of protruding objects.
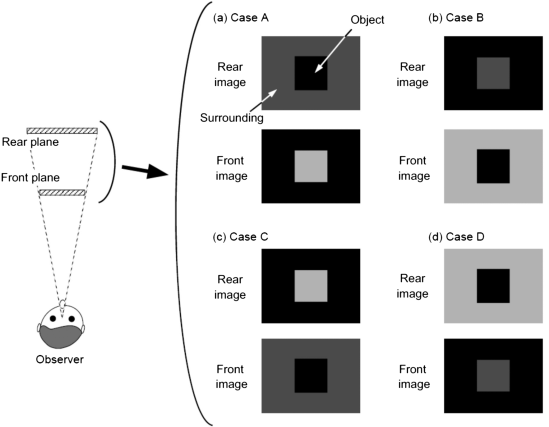
The common feature of all cases is that the object at the front is brighter than its surroundings and the object at the rear is darker, or vice versa. In the figures, darker will be indicated by a minus sign.
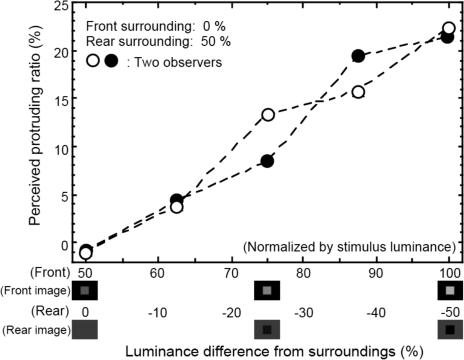
An experiment to verify this uses the reference plane in Figure 3.77 which test persons had to move to the depth they perceived as in Figure 3.74, but this time the reference plane was placed ahead of the front plane or, as is not shown, behind the rear plane. The result for two test persons is shown in Figure 3.78. The ordinate is the perceived protrusion ratio either toward the viewer or behind the rear plane plotted versus the illumination of the object in the front and rear planes. The luminance of the surroundings of the front plane was always 0% and of the rear plane always 50%. The largest protrusion was 22% and occurred when the object in the front plane was as bright as the surroundings and as the object in the rear.
Figure 3.77 The reference plane for the detection of protruding objects in front of the front plane.
Figure 3.78 The perceived protrusion ratio versus the luminance of the objects in the front and in the rear plane.
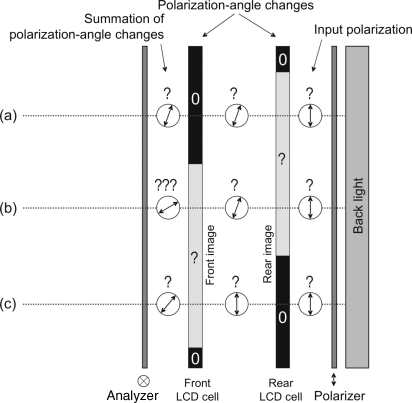
The volume of DFD with a half mirror can be considerably shrunk by replacing the addition of luminances by an addition of polarization angles [40]. The concept is depicted in Figure 3.79. The luminances needed for the depth fusion are transformed in linearly polarized light, that is, gray shades where the angle of polarization increases with increasing gray shade from 0° to 90°. The angles in both displays are summed until the analyzer in front of the viewer transforms them back into luminance. So the viewer sees the sum of the luminances as if looking at the original displays in Figure 3.71. This is explained by the examples in Figure 3.79. The polarization-based structure provides the opportunity to build a compact display as the distances of the front and the rear views are no longer needed as an essential feature for 3D perception. A prototype was built with a 4 in diagonal and a thickness of only 5 mm.
Figure 3.79 The addition of luminances performed by the addition of polarization angles for depth-fused displays.
A question arises concerning the explanation of the fusion in this compact solution. In the non-compact version in Figure 3.71 each eye had a different view of the two shifted displays shown in Figure 3.72 and on the retina in Figure 3.73. This served, besides illumination, as an explanation of the fusion effect. As this shift is no longer visible in the compact arrangement in Figure 3.79, a different explanation is required.
The polarization-based summation of the luminance alone provided the following results: the measured luminance differed by 15% resulting in a 12% deviation of the perceived depth from the calculated depth, which included illumination and the disparity.
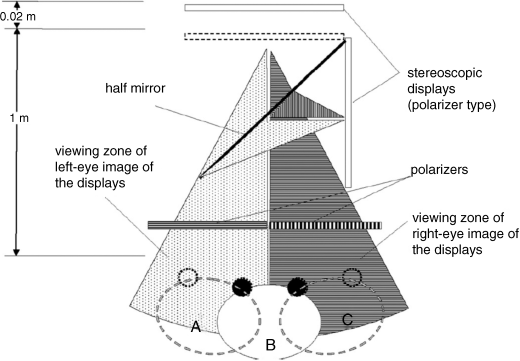
So far the two displays have involved conventional 2D images. An expansion of the viewing zone is brought about by replacing the 2D displays by stereoscopic displays which can contain two or more views [40]. By view, we understand an image for one eye. According to Figure 3.80, two two-view stereoscopic displays are combined by the half mirror. The stereoscopic images emit polarized light which is different for the left and the right eye. The two eyes of the viewer can be in positions A, B, or C in Figure 3.80. In position A both eyes watch the left eye image through a built-in polarizer replacing glasses. As both eyes see only the left eye image they do not perceive a 3D picture, but a conventional 2D picture. The same applies if both eyes are in position C. They only receive the right eye image with a different polarization. In position B the left eye is exposed to the left eye image, while the right eye sees the right eye image and hence a 3D picture is perceived. So two viewing zones have been generated. In the experiment the front and rear displays were spaced 20 mm apart. The distance between the viewer and the perceived depth was 1 m.
Figure 3.80 The viewing conditions for the depth fusion of two stereoscopic displays.
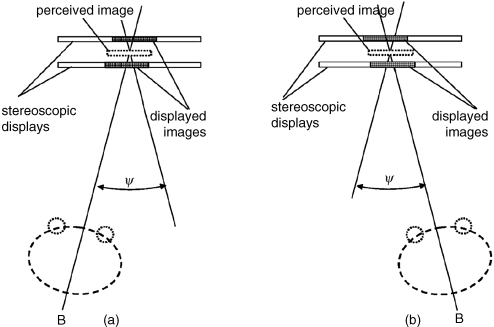
The so far perpendicular view of the stack of two displays was replaced by two side views with cross-angle Ψ in Figure 3.81 a and b. The front and the rear displays are rearranged such that they completely overlap as seen from the viewing direction along Ψ. The cross-angle Ψ in Figure 3.81 a and b is defined as twice the angle from the perpendicular to the viewing direction. Figure 3.80 indicates from where 3D perception takes place, that is, from the direction of complete overlap, which is from position B in Figure 3.80 corresponding to position B in Figure 3.81 a and to position B in Figure 3.81 b.
Figure 3.81 (a, b) View of the observer from cross-angles Ψ to the rearranged two stereoscopic displays.
The perceived depth is calculated by first determining the perceived depth in between the front and the rear plane based on the ratio β of the luminances of the object in the front plane divided by the luminance in the rear or by the total luminance. The image in the perceived depth has to be lowpass filtered, for which a Gaussian transfer function with a variance of σ = 3.4 arcmin was chosen. The interocular distance was assumed to be 72 mm.
This calculation was performed for the two conventional, that is, not stereoscopic, displays with a cross-angle of Ψ = 0. The result is shown in Figure 3.82. The calculated perceived depth between the two conventional displays is plotted versus the viewing angle Θ with the ratio β as the luminance of the front display to the luminance of the rear display as a parameter. The normalized luminance ratio β was changed in eight steps with β ![]() [0, 1]. For β = 0, 4/8, and 1 the perceived normalized depth was 0, 1/2, and 1 as expected. For a viewing angle of Θ = ±4° the depth fusion dropped to zero. So a usable viewing range lies around Θ = 0.
[0, 1]. For β = 0, 4/8, and 1 the perceived normalized depth was 0, 1/2, and 1 as expected. For a viewing angle of Θ = ±4° the depth fusion dropped to zero. So a usable viewing range lies around Θ = 0.
Figure 3.82 The perceived depth for two 2D display as a function of observation angle Θ and with the luminance ratio β as a parameter.
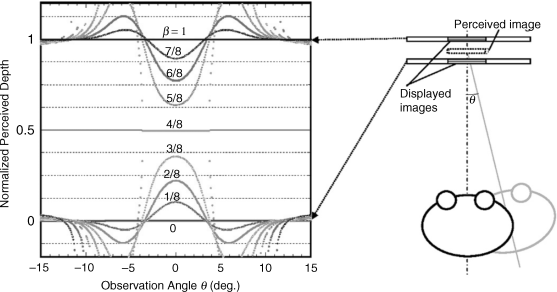
Figure 3.83a shows the result of the same calculation but this time for stereoscopic displays with a cross-angle Ψ = 7°. The viewing angle Θ is measured from the cross-angle Ψ as origin. Along the viewing angle Θ = 0 the stereoscopic display was perceived corresponding to viewing position B in Figure 3.80 as a 3D display. The 3D effect was even enhanced by the depth-fused 3D approach originating from the luminance ratio β. For negative and positive angles Θ the eyes were in the viewing positions A and C in Figure 3.80. For Θ < 0 or position A both eyes see the left eye image, while for Θ > 0 or position C they see the right eye image. That by itself is not associated with a 3D effect, but there is still the ordinary luminance-induced depth-fused 3D perception. That way, the Θ-range for a usable 3D perception was enlarged in comparison to the range of two stereoscopic displays with Ψ = 0 in Figure 3.82 or conventional 2D displays in Figure 3.75. For β = 0, 4/8, and 1 and Θ = 0 we encounter in Figure 3.83a the expected depth of 0, 1/2, and 1. The extension of the depth perception to positive and negative Θ-values does not continue with the same β-values. The depth calculated from the β-values for Ψ = 7° was 7% off from the observer's values. For Ψ = 10° in Figure 3.83b the fluctuations of depth in the viewing zone were too large, rendering the display no longer usable. The fluctuations for Ψ = 7° were still considered to be tolerable.
Figure 3.83 The perceived depth for two stereoscopic displays with two views with a cross-angle (a) Ψ = 7° and (b) Ψ = 10° and with the luminance ratio β as a parameter.
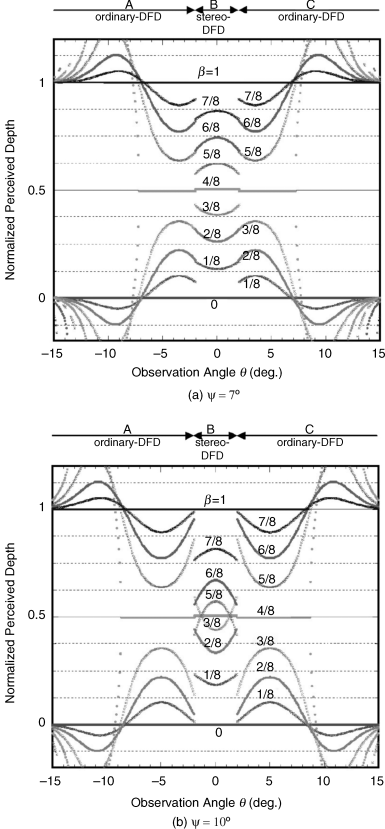
The usable viewing zone was further enlarged by using two stereoscopic displays with four views, that is, with two 3D images for different viewing angles to the object. Figure 3.84 depicts the calculated perceived depth for a cross-angle of Ψ = 5°. The usable viewing zone was increased from Θ = −7.5° to 7.5° with a fairly constant depth perception within this zone. At the transitions from viewing position B to A and to C and at the edges of the 15° viewing zone abrupt jumps in depth perception occur. This is understandable because the jumps are along the borderline where two optical effects meet, namely, the mainly stereoscopic effect with only the luminance-induced fusion effect and the contribution of the stereoscopic displays.
Figure 3.84 The perceived fused depth dependent on Θ for two stereoscopic displays with four views from two different angles onto the object and with a cross-angle Ψ = 5°.
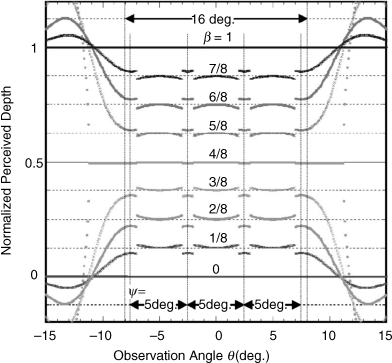
The example in Figure 3.84 demonstrates that multiview depth-fused 3D displays are feasible with a stack of only two displays. However, these two displays have two views which limit resolution. The range of depth was confined to the space between the two displays. The solution in Figure 3.84 opens up the way for a rather simple realization of an autostereoscopic display without mirrors, lenticulars, or parallax barriers, but with a limited range of depth and fluctuations of depth in the viewing zone.
3.6 Single and Multiview 3D Displays with a Light Guide
The light guides present an autostereoscopic alternative to the solution with lenticulars and barriers. The first solution of this kind is the single view, near-to-the-eye, autostereoscopic display in Figure 3.85 [41]. It receives the left and right eye images in a time sequential operation from a microdisplay. Lenses expand the images before they are coupled into the highly slanted asymmetric gratings. A high slant supports the splitting of the two images thus decreasing crosstalk. The slanting also enhances stereoscopic vision.
Figure 3.85 Two-source light guide for a near-to-the-eye 3D display.
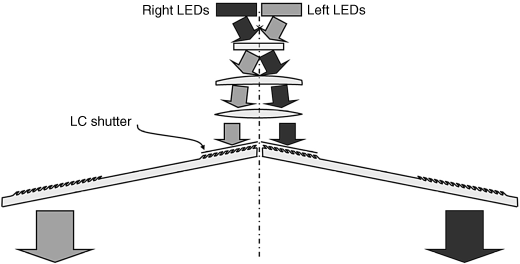
In Figure 3.56a 3D film together with a light guide was introduced with glow free provided 3D perception for one single viewer. The light guide possesses light sources at the two opposite ends which supply the light, one for the left and one for the right eye view. The two images are generated by a spatial multiplex arrangement on an LCD. This implies that each image possesses only half the resolution of the LC screen.
In [42] considerable advances of this simple 3D film–light guide technology are presented. It uses temporal multiplex, also called time sequential presentations, of the images, allowing full resolution for each eye's view. A 3D film consisting of a sequence of inverted trapezoids generates views for three observers.
Figure 3.86 depicts the operation of a light guide for the time sequential presentation of the left and the right eye's image displayed on the LCD shown in Figure 3.88 below. In the first step, light source 1 feeds in light which is reflected at the triangular shapes at the bottom of the light guide such that the light beams cover the entire area of the left eye image on the LCD. This image possesses the full resolution of the LCD. The reflected light beams in Figure 3.88 are directed toward the left eye of the viewer. The same happens in the next frame in which light source 2 feeds in the light for the right eye image now on the LCD. The reflected light is guided toward the right eye. The light guide works as a directional time sequential backlight for the LCD.
Figure 3.86 Two-source light guide for a time sequential autostereoscopic display.
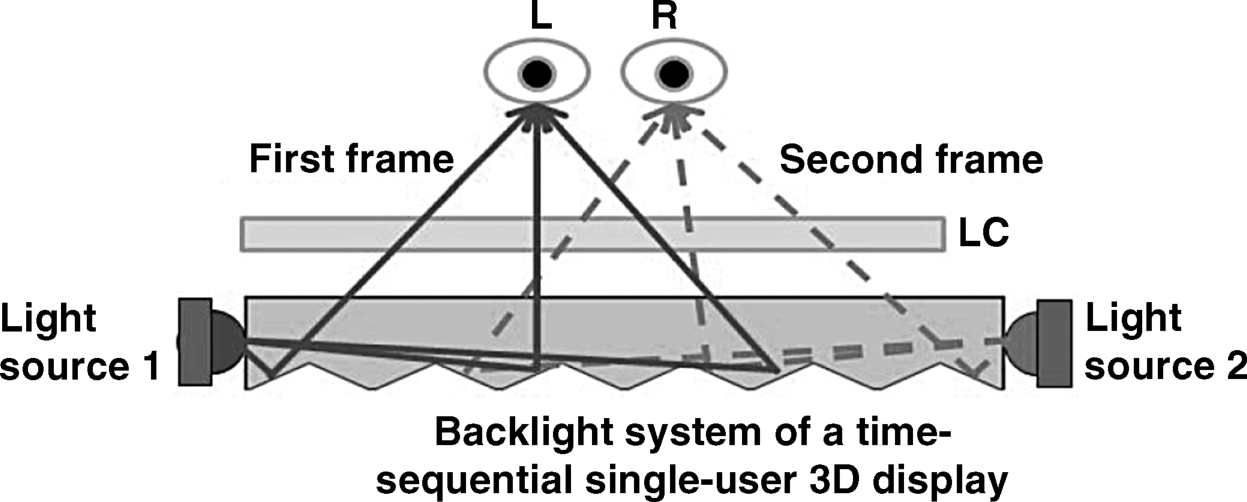
The extension to three viewers in Figure 3.87 uses a 3D film with a sequence of inverted trapezoids. Their flanks and horizontal portions refract the light from source 1 into the right eye of each viewer. That way, the viewers receive the right eye image on an LCD which is known from Figure 3.88 but is not depicted in Figure 3.87. The light from source 2 exits the light guide inclined by the same angle to the left as the light of source 1 was inclined to the right. This has the effect of guiding the refracted light toward the left eyes of the viewers in Figure 3.88.
Figure 3.87 The structure with the 3D film with inverted trapezoids for three viewers.
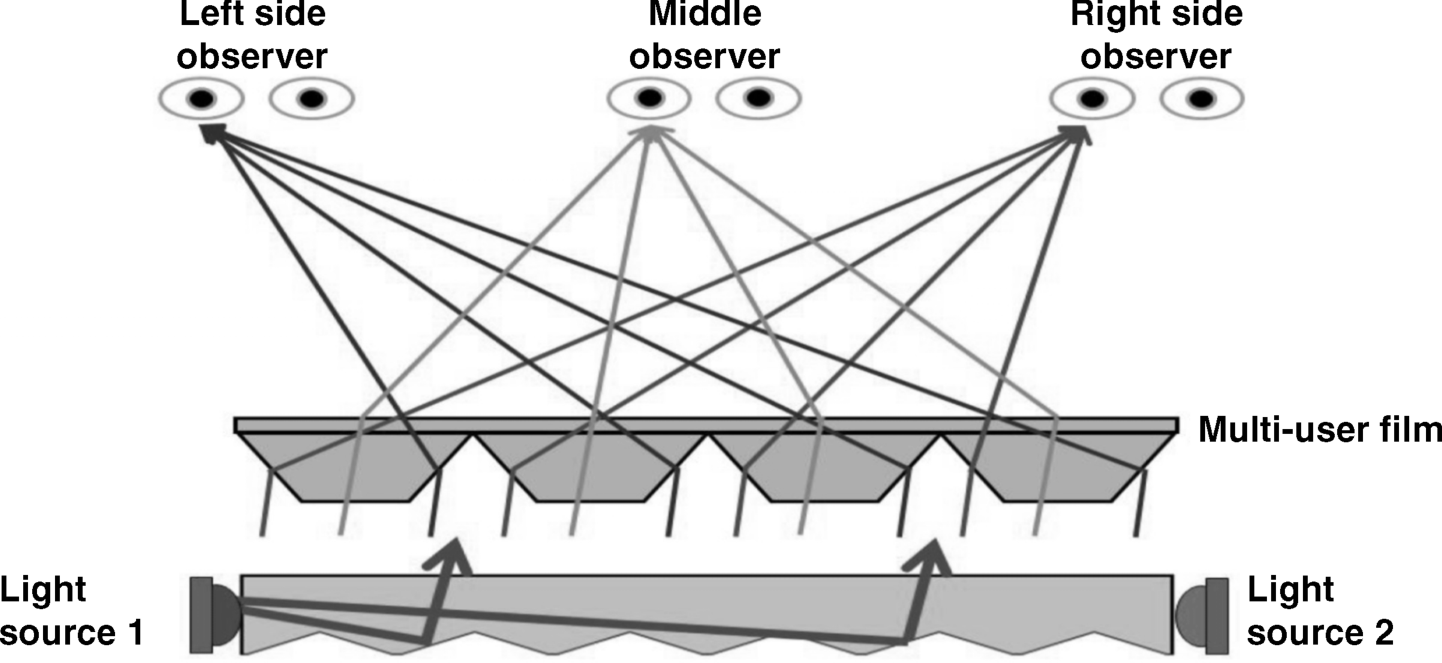
Figure 3.88 The multiviewer waveguide with angles ϕ1 and ϕ2 to the left viewer's eye.
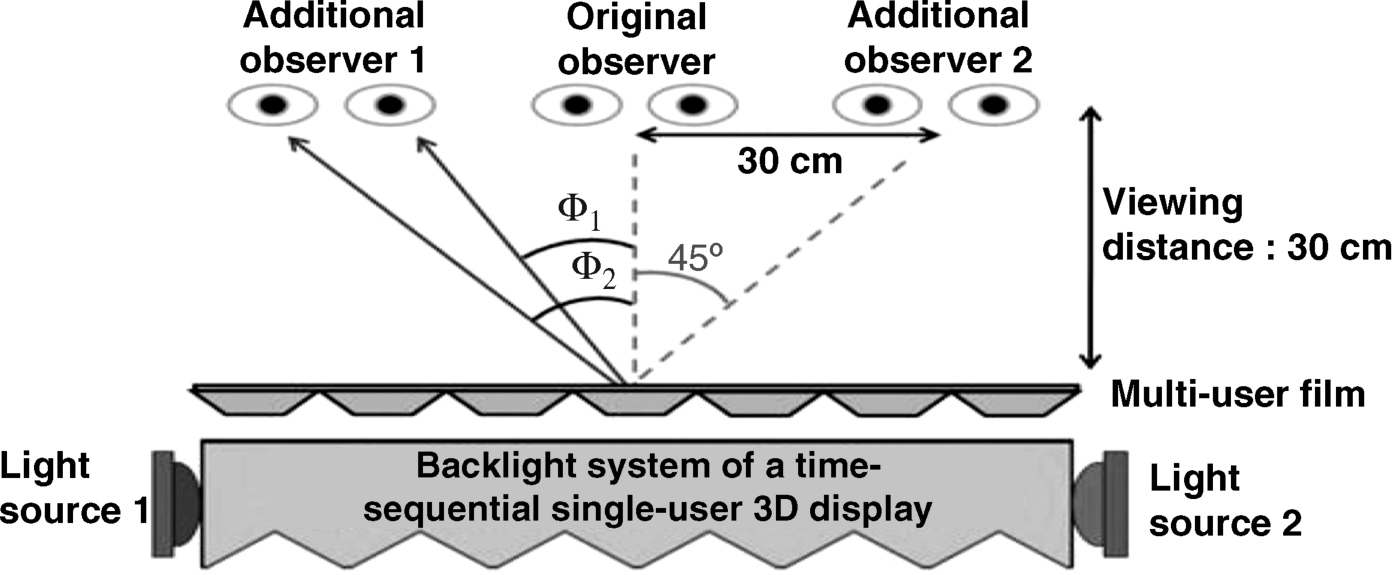
Figure 3.88 shows the angles ϕ1 and ϕ2 of the light emerging from the center trapezoid which is heading for the left and the right eye of observer 1. The trapezoid in Figure 3.89 has the vertex angles θ1 and θ2 which are assumed to be the same angle θ. The beam incident on the horizontal of width Wm of the trapezoid has the angle ϕi, while it emerges under the angle ϕo to the center viewer.
Figure 3.89 The trapezoid with the vertex angles θ1 and θ2 as well as the incident and emergent angles ϕi and ϕo.
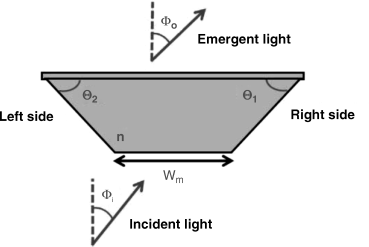
For the design of a 3D trapezoid film, Wm = 11 μm and a height of 15 μm were chosen. The distance between the viewers was 30 cm each. This is the case of a display for a mobile device. The only free parameter for the design is the angle θ.
Table 3.3 shows how the angles ϕ1 and ϕ2 to the left and right eye and ϕo to the center viewer's right eye depend on Θ = 59°, 60°, and 61°. A 1° change in Θ results in a change of about 2° in ϕ, which indicates a feasible accuracy in manufacturing. Table 3.4 lists the angle Φ to the eyes, which is from the design expected for Θ = 59.6°, the measured emerging angles of the peak of the luminance, and the finally selected angles for which crosstalk and intensity were improved. The second-last line lists the crosstalk for the three viewers, which was a maximum of 14.4%, a value not yet fully acceptable.
Table 3.3 The dependence of the angles ϕ1, ϕ2, and ϕo to the eyes of the viewers on the vertex angle θ of the trapezoid.
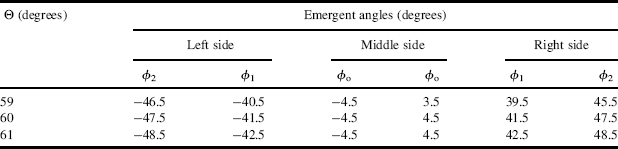
Table 3.4 The properties of the multiviewer autostereoscopic display for a vertex angle of 59.6°
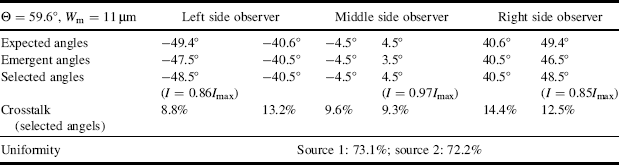
The normalized intensity for each eye's view is depicted in Figure 3.90 versus the emerging angle of the pertinent light beam. The intersection of the left and the right eye's intensity indicates the beginning of the crosstalk angle.
Figure 3.90 The normalized intensities perceived by the eyes of the three viewers.
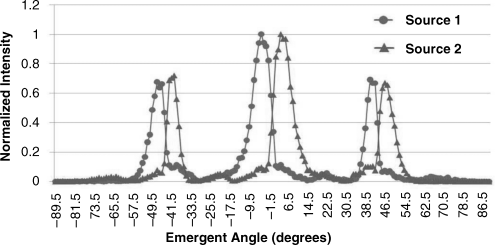
The authors of [42] report that for their multiviewer display designed for a distance of 42.4 cm, the viewer could still perceive a 3D image up to a distance of 62 cm. This is explained by the depth of focus in Figure 1.2 tolerated by the eyes. The results achieved so far with this autostereoscopic structure merit further work on this approach.
Crosstalk might be reduced by modifying the trapezoid into a shape creating narrower intensity curves in Figure 3.90. Blocking the light by “black insertions” at the trapezoid, suppressing the light transfer in the overlapped angle regions of the intensity, could also help.
3.7 Test of 3D Displays and Medical Applications
For both these areas, A. Abileah is the recognized expert and readers are referred to his publications [43–45].
The author gratefully acknowledges permission to reproduce figures and tables granted by the institutions named below. The sources of the figures and tables are also listed below together with their corresponding numbers in this book.
Society for Information Display (SID)
J. SID, 18.17, p. 508, figures 1, 2, 4; p. 470, figures 2, 3; p. 472, figures 4, 5, 6, 8, 9
Reproduced as Figures 3.53–3.55, 3.72, 3.73, 3.80, 3.81a,b, 3.82–3.84
SID – Symposia and Conferences
| Eurodisplay 2005, p. 109, figure 1 | reproduced as Figure 3.1 |
| SID 08 p. 256, figure 1 | reproduced as Figure 3.2 |
| p. 257, figures 2, 3, 5, 8 | reproduced as Figures 3.12, 3.13, 3.14, 3.15 |
| SID 02 p. 1422, figure 2 | reproduced as Figure 3.16 |
| SID 08 p. 760, figures 1, 4, 5, 7, 8 | reproduced as Figures 3.17–3.21 |
| SID 05 p. 98, figure 2 | reproduced as Figures |
| SID 03 p. 394, figures 1, 2, 3, 4, 5 | reproduced as Figures 3.23–3.27 |
| SID 09 p. 337, figures 3a–c, 4, 5, 10b | reproduced as Figures 3.29, 3.30, 3.28, 3.31–3.33 |
| SID 10 p. 429, figures 3a,c, 4, 6, 7 | reproduced as Figures 3.35, 3.34, 3.36–3.38 |
| p. 432, figures 2a,b, 4 | reproduced as Figures 3.39a,b, 3.40 |
| SID 05 p. 94, figures 1, 2, 4 | reproduced as Figures 3.41–3.43 |
| SID 09 p. 341, figure 6 | reproduced as Figures 3.44 |
| SID 08 p. 453, figures 1, 4, 6 | reproduced as Figures 3.45–3.47 |
| SID 09 p. 620, figure 1 | reproduced as Figure 3.48 |
| SID 07 p. 1156, figures 2, 4a–c, 5, 6 | reproduced as Figures 3.49, 3.50a–c, 3.51, 3.52 |
| SID 09 p. 128, figures 1, 2, 4 | reproduced as Figures 3.56, 3.57, 3.60 |
| SID 03 p. 399, figures 3, 5 | reproduced as 3.58, 3.59 |
| SID 06 p. 82, figures 2a,b, 3 | reproduced as Figures 3.61a,b, 3.62 |
| SID 10 p.863, figures 4, 5, 6, 7, 8, 9, 10 | reproduced as Figures 3.63, 3.64, 3.66–3.68, 3.65, 3.69 |
| SID 00 p. 1208, figures 1, 2, 3 | reproduced as Figures 3.70, 3.74, 3.75 |
| SID 01 p. 1300, figures 1, 2, 4, 5 | reproduced as Figures 3.71, 3.76–3.78 |
| SID 03 p. 1527, figure 2 | reproduced as Figure 3.79 |
| SID 07 p. 1158, figure 1 | reproduced as Figure 3.85 |
| SID 11 p. 460, figures 2, 3, 5 | reproduced as Figures 3.86, 3.88, 3.89 |
| p. 461, figure 4 | reproduced as Figure 3.87 |
| p. 462, figure 6 | reproduced as Figure 3.90 |
| p. 461, table 2 | reproduced as Table 3.3 |
| p. 462, table 3 | reproduced as Table 3.4 |
SPIE, an International Society for Optic Engineering
Proceedings of the SPIE, vol. 3012, 1997
| p. 179, figure 4 | reproduced as Figure 3.8 |
| p. 184, figure 5 | reproduced as Figure 3.9 |
| p. 185, figure 6 | reproduced as Figure 3.10 |
1. van Berkel, C. et al. (1996) Design and application of multi-view 3D-LCD. Eurodisplay, p. 109.
2. van Berkel, C. and Clarke, J.A. (1997) Characterisation and optimisation of 3D-LCD module design. Proc. SPIE, 3012, 179.
3. van Berkel, C. (1999) Image preparation for 3D-LCD. Proc. SPIE, 3639, 1.
4. Bader, G., Lueder, E. and Fuhrmann, J. (1996) An autostereoscopic real time 3D display system. Eurodisplay, p. 101.
5. Bader, G. (1999) Elektrooptische Signalverarbeitung zur Darstellung autostereoskopischer Bewegtbilder und zur Strukturerkennung. Dr.-Ing. dissertation, University of Stuttgart.
6. Im, H.J. et al. (2008) Mobile 3D display based on a LTPS 2,4″ LCD panel attached with lenticular lens sheet. SID 08, p. 256.
7. Kim, S.S. et al. (2002) Super-multiview three-dimensional display system. SID 02, p. 1422.
8. Hsn, T.H. et al. (2008) High resolution autostereoscopic 3D display with proximity projector array. SID 08, p. 760.
9. Zyzerman, W.L. et al. (2005) Design of 2D/3D switchable displays. SID 05, p. 98.
10. Woodgate, G.J. and Harrold, J. (2003) High efficiency reconfigurable 2D/3D autostereoscopic display. SID 03, p. 394.
11. Woodgate, G.J. and Harrold, J. (2005) A new architecture for high resolution autostereoscopic 2D/3D displays. SID 05, p. 378.
12. Huang, Y.P. et al. (2009) High resolution autostereoscopic 3D display with scanning multi-electrode driving liquid crystal (MeD-LC) lens. SID 09, p. 336.
13. Chen, W.C. et al. (2010) Fast switching Fresnel liquid crystal lens for autostereoscopic 2D/3D display. SID 10, p. 428.
14. Goodman, J.W. (2005) Introduction to Fourier Optics, 3rd edn, Roberts and Comp. Publishers, Greenwood Village, CO.
15. Hong, K.K. et al. (2008) Autostereoscopic 2D/3D switching display using electric field driven lens (ELC lens). SID 08, p. 348.
16. Kav, Y.Y. et al. (2009) An autostereoscopic 3D display using tunable liquid crystal lens array that mimics effects of GRIN lenticular lens array. SID 09, p. 111.
17. Lin, S.C. et al. (2010) Autostereoscopic 2D/3D display using a liquid crystal lens. SID 10, p. 432.
18. Takagi, A. et al. (2010) Autostereoscopic 2D/3D switchable display using liquid crystal gradient index lens. SID 10, p. 436.
19. Nam, H. et al. (2005) Auto-stereoscopic swing 3D display. SID 05, p. 9.
20. Sexton, I. (1989) Parallax barrier 3D-TV. SPIE Proc., 1083, 84.
21. Hamagishi, G. (2009) Analysis and improvement of viewing conditions for two-view and multi-view displays. SID 09, p. 3.
22. Chuang, S.C. et al. (2008) Liquid crystal panel for high efficiency autostereoscopic 3D display. SID 08, p. 452.
23. Kang, D.H. et al. (2009) Auto-stereoscopic TFT-LCD with LC parallax barrier on wire grid polarizer. SID 09, p. 344.
24. Wang, Q.H. et al. (2009) An autostereoscopic 3D projector based on two parallax barriers. SID 09, p. 619.
25. Willemsen, O.H. et al. (2007) Multi-view 3D displays. SID 07, p. 1154.
26. Lighthill, M.J. (1960) Introduction to Fourier Analysis and Generalized Functions, Cambridge University Press, New York.
27. Travis, A.R.L. (1990) Autostereoscopic 3D displays. Appl. Opt., 29 (29), 4341.
28. Travis, A.R.L. (1995) Three dimensional display apparatus, UK patent 8816465.1.
29. Kometani, T. (2009) High resolution and large size autostereoscopic display using directional backlight. 3D Image Conference, p. 127.
30. Hayashi, A. et al. (2010) A 23-inch full panel-resolution autostereoscopic LCD with a novel directional backlight system. J. SID, 18, (7), 507.
31. Schultz, J. et al. (2009) Full resolution autostereoscopic 3D display for mobile applications. SID 09, p. 127.
32. Sasagawa, T. et al. (2003) Dual directional backlight for stereoscopic LCD. SID 03, p. 399.
33. Brott, R. and Schultz, J. (2010) Directional lightguide considerations for full resolution autostereoscopic 3D display. SID 10, p. 218.
34. Lee, H.J. et al. (2006) A high resolution autostereoscopic display employing a time division parallax barrier. SID 06, p. 81.
35. Wei, C.W. et al. (2010) Spatial-temporal hybrid multi-view 3D display. SID 10, p. 863.
36. Travis, A. et al. (2010) Backlight for view sequential autostereoscopic 3D. SID 10, p. 215.
37. Suyama, S. et al. (2000) A novel direct vision 3D display using luminance modulated two 2D images at different depths. SID 00, p. 1208.
38. Suyama, S. et al. (2001) A new method for protruding apparent 3D images in the DFD (depth-fused-3D) display. SID 01, p. 1300.
39. Date, M. et al. (2010) Depth reproducibility of multi-view depth-fused 3D display. J. SID, 18, (7), 470.
40. Takada, H. et al. (2003) A compact depth-fused 3D LCD. SID 03, p. 1526.
41. Levola, T. (2007) Stereoscopic near-to-the-eye microdisplay. SID 07, p. 1158.
42. Ting, C.-H. et al. (2011) Multi-user 3D film on directional backlight system. SID 11, p. 460.
43. Abileah, A. (2011) 3D displays, technologies and testing methods. Workshop on 3D Imaging, Stanford Center for Image Systems Engineering, January.
44. Abileah, A. (2010) Display measurements of flat panel displays, Seminar Lecture Notes. SID 10, M2, p. 79.
45. Abileah, A. (2010) 3D display technologies and testing methods. Latin Display 2010, SID Conference, San Paulo, Brazil, November.