
Chapter 2
Integrating Digital Media Design into the Theatrical Team
Being the “new kid on the block” isn’t always easy for the digital media designer. Since the industry is still figuring out best practices and standardizations, there may be difficulties when working with new collaborators to find a common language and working method. Keep in mind that all members of the creative team are affected in one way or another by the inclusion of projections, video, and digital media.
Some of the issues the profession is still wrestling with include:
- Scheduling: How long is needed for
- Content creation
- Rehearsal
- System installation and tests
- Show control programming
- Dark time for mapping and cueing
- Cueing with actors and other design departments
- What is the equivalent of a master electrician for digital media?
- What crew is needed for the system installation?
- Can and should just one person create all the content, design the system, and program the media server?
- What show control/playback system(s) to use? Is there a theatrical standard?
- What is the proper stock gear that is needed?
You may find that several members of the team, including the director, do not have much experience working with digital media in performances. Expect training and translation of design and technical ideas to be a part of your job. While this can sometimes be frustrating, it helps if you can remain positive, don’t take things personally, and keep the focus on the work.
Throughout the following chapter, we explore how digital media design can be integrated into the theatrical process. While there are certainly some standards you can expect to adopt, it is good to be flexible, as there is no cookie-cutter method. Each theatre company has different protocols and each script has its own demands. But there are definitely steps that can be taken to ensure you have what you need to execute a polished design that is dramaturgically sound and is part of a cohesive theatrical design.
Producers and Production Management
Since digital media design can be varied and not all design approaches call for the same budget and scheduling needs, explain to the management team about the specific workflow needed for your approach, needs, constraints, and goals of your design. In the following section, we offer best practices for budgeting and scheduling the digital media workflow into the production pipeline.
Budget
In traditional theatrical models, such as regional theatre, producers and production managers start with stock budgets for shows. They have experience budgeting different types of productions and so they often allocate money to different departments long before the artistic team or concept is even assembled and created. Once the artistic team has a clearer vision of the approach they will take, line items in the budget are often shifted to reflect the actual needs of executing the production.
![]() For More Info 2.1 Budgeting
For More Info 2.1 Budgeting
See “First Steps” in Chapter 3.
Scheduling
A successful digital media design can live and die by the schedule. It is vital to fully communicate what your design for the show is trying to achieve in order to help the production manager create a specific calendar for the production. Here are some general things to consider when determining scheduling needs with the production manager:
- There is a tremendous amount of overlap with scenic, lighting, and sound. For instance, if a video is prerecorded, it needs to be clear not only who is going to record sound on set but also who is going to edit and master the sound. How will the sound for a video be played back in the theatre? Who is responsible for what affects the master schedule? Be sure that you and the production manager (PM) consider all the overlaps, including whether lighting, sound, and digital media can work at the same time once in tech or if you can share the same crew.
- How will you be implementing digital media? A basic question might be, “what type of content is it and how will it be created?” Will most of the content be 2D or 3D animations or video production with actors? These answers help guide you in scheduling. For example, if you are creating prerecorded videos, it is imperative to remember that these video shoots are mini productions. A video shoot often requires all of the same departments (actors, set, props, costumes, hair/makeup, lighting, sound, etc.) that are already working on the show, plus the addition of camera, postproduction, locations, and so forth.
- Decide how the videos will be created. You can’t always do every job that a video shoot requires. Sometimes you can, if the shoot is small enough. But sometimes you can’t, because the shoot is too large. You need to work with the production manager and artistic team to decide if the video shoot will use the same designers and technicians who are working on the production or you will hire additional designers and crew. Who is directing the actors? When do they rehearse? All of this needs to be considered and planned for accordingly in the schedule, since you are now planning a video production within a stage production. Work with the production manager to schedule preproduction, production, and postproduction of the video shoots. It isn’t feasible for all of this scheduling and managing to fall solely on the digital media designer when coordinating with a large production group. This responsibility must be shared with the production manager.
- We urge you to advocate that the PM coordinates the video production schedule inside the show’s master schedule. If you are using specific things that are also being used onstage, such as the same props or costumes or puppets, the due dates of those items from the various theatre production departments need to be due earlier than normal, to fit into the video production schedule. The PM also needs to make sure that the stage manager works with the director to schedule time for the actors to rehearse a scene that is going to be recorded. They can’t just show up to a video shoot unrehearsed.
- Like anything else in scheduling, you need to work backwards. So, make sure you leave enough time after shooting to edit the video, add effects, complete post production, and then export/render it to have it ready for playback in tech. This is also a good time to consider the video production workflow, as you need to be able to make constant changes to the assets as you get notes and feedback from the director and other creatives on the project.
- Understand how the media server is being used. Some media servers are easier and faster to program than others. Knowing how the media server handles the compositing and cueing of content ensures that you are able to generate content that is ready to be loaded and programmed during tech.
![]() For More Info 2.2 Media Servers
For More Info 2.2 Media Servers
See “Media Servers” in Chapter 5.
![]() For More Info 2.3 Scheduling
For More Info 2.3 Scheduling
See “First Steps” in Chapter 3.
Personnel/Crew
Other departments have established workflow and personnel. Most theatres have a staff master electrician, technical director, props master, seamstresses, and so forth. However, most theatres do not have a dedicated digital media technician. In fact, it is common for lighting and sound technicians to be tasked with acting as a digital media technician.
When a lighting designer designs a show, the theatre usually provides a master electrician, a board programmer/operator, and electricians to hang and focus. The same type of personnel should be supplied for the digital media department. If these crew members are not on the team, the digital media designer needs to know up front. If the designer is installing the system, programming the media server, and teaching a board operator how to run the show, the pay scale, workload, and expectations need to be negotiated to reflect the additional work on top of creating and designing content.
Often there is not a budget for an associate or assistant designer. This is important, because the size of your team radically affects the schedule and workflow. If, as a designer, you are installing the system and programming the show, that means the time you have to focus on content creation and other design responsibilities is greatly diminished.
When possible, advocate for a team. Producers and PMs have to work within the constraints of a budget, but remind them that you are only one person and can’t and shouldn’t be expected to do it all. Your design will be better if you have an assistant and a media server programmer. If you are unable to arrange for the extra help, it is your responsibility to manage the expectations of the director and collaborators to ensure they understand what is reasonable and to avoid burning out by overworking yourself.
Stage Management
The stage manager (SM) needs to understand how the digital media is working in the production so that he or she can help coordinate between rehearsals and production. Usually the rehearsal stage manager calls the show, so it is critical that he or she not only understands the artistic and aesthetics of the design but also has some knowledge of the technical requirements of the design.
Digital Media in the Rehearsal Hall
If interactive digital media is to be used in the rehearsal hall, the stage manager needs to work with the production manager and digital media designer to coordinate the technical needs, setup, and operation of a system that is installed in the rehearsal hall. This means you now have to coordinate with the PM and SM to schedule time to install/strike the rehearsal system, as well as allocate a technician/operator (or assistant designer) to be present at rehearsals. The rehearsal schedule needs to consider when interactive digital media is used and should reflect that in call times and so forth. The SM works with you and the director to come up with a schedule, so that working drafts of the content are ready and can be programmed for playback in rehearsal. Having interactive media in the rehearsal hall changes not only when content is due but also the programming of the rehearsal hall playback system.
![]() For More Info 2.4 Rehearsal Hall Integration
For More Info 2.4 Rehearsal Hall Integration
See “Rehearsing With Interactive Digital Media Under Artistic” in Chapter 2.
![]() Case Study 2.1 The Stage Manager and Digital Media
Case Study 2.1 The Stage Manager and Digital Media
By Sherée L. Greco
Production Manager for the Department of Theatre at The Ohio State University
[My] most recent and significant production experience that included media design was OSU’s Good Kids. It was utilized in a way that helped to tell the story. It wasn’t just ornamental or there for design’s sake. It had a purpose to tell the audience time and location and to mirror the emotions of the characters and performances. To me, the media design was a character itself. The show incorporated video, projections, and a live feed for one of our main characters. I honestly do not recall problems and that is probably because we avoided many due to our preparation months and months in advance. There were lengthy conversations, a few demos that produced definitive answers. To me, that is the biggest hurdle with the complexity of media design. With limited tech times that most theatres face, [the] director and designer need to commit and make decisions/choices. No production will ever be perfect and there are often “shoulda, coulda, woulda’s,” but time is money and in my opinion as a production manager, tech is for teching the chosen elements, not continuing to experiment. We avoided the latter with Good Kids.
I think media designers need to know that the stage manager is responsible for executing the cues and maintaining the vision of the director and designers. They should be prepared that a lot of stage managers do not know media design like they might lighting or sound. Operating those consoles has become standard for many coming up through the ranks. Media design is still not utilized often enough for SMs to get a solid grasp on operating the console for media. So, some initial training will need to be involved.
Stage managers need to know the complexity and hours it can take to produce images and video. They need to allow for demos and plenty of time during the tech process to give focus to media. Treat it like a huge moving set piece. You want to get it as close to right as you can before you introduce the other elements.
Artistic Team
Because digital media design casts such a wide net of both analog and digital disciplines and technologies, it is inherently different than other design elements. Digital media designers become writers and directors when shooting videos, creating three-dimensional worlds, animating characters, or creating avatars. Yet in the context of the theatre performance, they are designers. Lines are often blurred and it is good to understand your role in every context of the collaborative process.
Your primary job is to help tell the story. Not every scene needs digital media. Digital media designers can sometimes be heavy-handed because video can do so much to help tell the story. Realizing when a subtle choice can be made, such as the slight dimming of an image at a moment of dramatic action, is where the true inspiration of a well-balanced design lies. Even though much of the design process may be digitally created, we are often mimicking and reflecting off of the physical world, something that scenic, lighting, audio, and costume designers already do well.
Directors
Digital media can do just about anything—anything that money and/or time can buy and we can envision. The more compelling ways digital media in live performance weaves technology, systems, and design into the DNA of storytelling, the more it dramaturgically links them to the core of meaning making. When incorporating digital media into live performance, consider and respond to the director’s vision.
![]() Aside 2.2 Sample Communication with a Director
Aside 2.2 Sample Communication with a Director
A director of a production of Hamlet may want to utilize video to tell a story that is outside of the traditional Shakespeare text. A request for this could look something like:
Dear Projection Designer,
Thanks so much for joining our production as Projection Designer. I’ve been thinking about trying to add a little bit of background to the script by placing Hamlet in a more modern context. I’d like to create videos that simulate Hamlet posting to Snap-chat while he is away at school in Wittenberg. These would be little films that show his mood, him taking selfie videos, and so forth. You know, showing a little personality, maybe what he felt when he heard the news that his father died? Pretty simple, right?
Anyway, I know you’ll be awesome at this. Also, plan on doing the ghost of Hamlet’s dad as a hologram. Can we afford that?
Thanks,
Your Director
Here might be your reply, either by email or when you meet in person:
Dear Director,
I’m really looking forward to working with you and the team. It’d be great if we could have a meeting pretty soon to discuss all these exciting ideas you are proposing. I’d also like to meet with the rest of the creative team to make some dramaturgical decisions about the world of the play. Another really important conversation we need to have very soon is how projections are going to interact with scenic and lighting. We should all agree on surfaces and staging areas before a final scenic design is approved.
I really love the idea of the Snapchat and Hamlet’s dad as a hologram. A few initial thoughts before our meeting:
- Will this device of Hamlet using Snapchat to show his thoughts/state of mind be used anywhere else besides the Wittenberg scene? If it is used just in this one scene, it feels a little forced. If Hamlet is a Snapchatter, it seems like he’d be doing it far more than just the one scene. Does this mean he is Snapchatting with Ophelia and his other friends?
- This gave me an idea that maybe some scenes could actually happen via live video that simulates Snapchat or FaceTime, and so forth.
- How can we expand this idea and really weave it into the world of the characters and scenic? I’d love to brainstorm more on this with you. I think maybe we are onto something?
- Are you envisioning this happening in real time via an actual Snapchat account that we live capture and project or having it be simulated artistically? If we did the former it could be a way for the audience to interact with the show beyond the stage … Let’s be sure to discuss all when we meet.
- Regarding the ghost/hologram: Love this idea. Can’t afford an actual Pepper’s ghost hologram, but there are other things we can do, such as project the ghost image onto scrim and/or fog. All the choices involve scenic and lighting too. Another thing to consider is if the actor playing the Ghost is somewhere backstage in front of a video camera and we are displaying the image/audio in real time or if we prerecord the video/audio and just playback. There are pros and cons of each; let’s be sure to talk about that as well.
Looking forward to collaborating,
Digital Media Designer
As you begin your career, you may find yourself working with directors who are using digital media for the first time. In some cases, directors don’t have training or experience in what digital media actually can do, let alone how to use it effectively in a stage production. They may have no training or experience in animations, camera angles, color intensity, and so forth. As a designer, it is your responsibility to translate the possibilities into language and visuals they can understand and to set proper expectations.
If a director hasn’t worked with digital media yet, they most certainly have seen a production that has included digital media or projections. We find that discussing with directors what they have seen before and what they like and dislike about their experiences can be quite informative. The conversations seem to go best if you are able to delay focusing on technical details and focus instead on their perceptions of how the digital media meaningfully contributed to the production. This aids you in describing your ideas. Anything you can do to help the director think in the languages of the various digital media you are using is beneficial. These conversations are important to the process and help create a better end result.
In our experience, directors inexperienced with digital media tend to spend a great deal of time staging the production, yet often little time thinking about how to incorporate the digital image into the full stage picture. We encourage you to remind the director that it is her responsibility to work with you to also stage the digital media. Some things you and the director need to think about are:
- From what side of the frame and where onstage should an animation begin, or put another way, what is the media’s blocking?
- Where is the actor onstage going to stand in relation to the projected image and how do the two interact?
- Are these interactions passive, or do they need to be rehearsed?
- What does the interaction between digitally mediated elements and live elements mean or signify? How does it help tell the story? What does it mean to an audience?
- Since digital media can steal focus, where should the focus onstage be at any given moment?
- If using front projection, is it appropriate to see video on the actors’ bodies? How should you handle the shadows that performers will cast on screens they are standing in front of? Are there projector installation options that allow these shadows to be avoided?
![]() For More Info 2.5 Shadows Cast by Projectors and Lights
For More Info 2.5 Shadows Cast by Projectors and Lights
See “Lighting: Projector Placement” in Chapter 2.
You and the director must always be able to answer the fundamental question of why digital media is being used in this moment and how it relates to dramaturgy and story. The answer does not need to be complicated. It just comes down to you working with the director in order to really understand what your goals in the design are and how that is translated to an audience. You both need to understand the meaning behind your choices, including how content is displayed, use of real-time vs. rendered content, style, aesthetic, how the design interacts with the live performers, and how the design integrates into the space.
![]() Aside 2.3 Letter to a Director
Aside 2.3 Letter to a Director
Dear Director,
Really looking forward to speaking with you in person next week. I have been thinking specifically about how we can explore the ways digital media can be used within our timeframe, budget, and personnel. I’m really interested in doing something beyond the obvious digital scenography opportunities called for in the script. I have some ideas and wanted to know if you had any ideas along these lines as well? I’m also hoping to talk about how we can engage the creative team to come up with a vision that truly integrates digital media into the story. I think it is really important to have these discussions before we lock in any designs.
I know time is short on this process, but if we can carve out a little time to give ourselves the freedom to brainstorm and experiment we can really create something integrated into the story and production.
Talk to you soon,
Your Digital Media Designer
Actors
If you are using only atmospheric digital media you may hardly have any direct contact with the actors beyond being in the theatre together through the technical rehearsals. If you are using any kind of interactive digital media, you certainly need to directly work with the actors. You may need to teach them how to operate a video camera used live onstage, or how to control and perform with digital characters or avatars. You may also need to work with them if they are involved in any original videos in which they perform.
All directors are different, so make sure to consult with the director first about talking to the actors about anything beyond technical issues. Some directors want you to give them a note and then they will give the note to the actors. Other directors would prefer you to just talk directly with the actors. If the conversation is anything technical, such as framing, or camera angles from a live video camera or tips on any type of sensor interaction, we suggest you talking directly to the performer, the same way a choreographer or fight captain might.
Rehearsing with Interactive Digital Media
Rehearsal is the place to explore and experiment. Actors and the director spend weeks in a room together to explore, take risks, and create the physical and psychological world of human emotions and the spoken word. So why don’t we default to incorporating interactive digital media into rehearsals?
In addition to budgetary and scheduling reasons, and the fact that it can be labor-intensive or difficult to install in a rehearsal space, we sometimes exclude interactive digital media in rehearsals simply because we misunderstand or haven’t clearly defined it. We tend to simply define all digital media as an atmospheric design element. Since we haven’t been making the distinctions
![]() Case Study 2.2 Rehearsing with Interactive Digital Media
Case Study 2.2 Rehearsing with Interactive Digital Media
by Daniel Fine
¡Bocón! by Lisa Loomer
Arizona State University Mainstage School of Film, Dance and Theatre 2013
- Digital Media Designer: Daniel Fine
- Associate Digital Media Designer: Matthew Ragan
- Director: Megan Weaver
- Scenic Designer: Jacob Pinholster
- Costume Designer: Connie Furr-Soloman
- Lighting Designer: Celeste Lee
- Sound Designer: Stephen Christensen

Figure 2.1 On the Steps of the Palace, composite of four images. Some of the floor is cut off in the lower right.
Source: Matthew Ragan and Daniel Fine
This production had a traditional process and schedule, but I insisted that media be present in the room. Associate Matthew Ragan and I installed a projector in the hall the second week of rehearsals. Our final system consisted of five computers running nine projectors beamed onto a 20x20 foot square of floor space and 105 feet of surround screens. Yet, we used only a single projector—a crappy old one at that—in rehearsal. Since the images on the surround screens were atmospheric and didn’t affect the performers in any way, content for the screen was added in tech. However, the actors interacted with the projections on the floor, which meant they needed to be present in rehearsal. This way, the actors had time outside the pressures of tech to play with the floor projections.
Because the interactive media system was in the rehearsal hall, we discovered that the type of artwork I had originally conceived didn’t quite work. We also discovered that our interactive system could ultimately become a simpler, more straightforward playback system. These rehearsal hall discoveries saved the media department a lot of time finessing a system and creating a style of artwork that ultimately did not serve the production. We had the time to adjust the interactive media rather than scrambling in tech at the last minute. The key here is that we were all okay with risk, which inherently means that failure is a distinct possibility. Our design department was like a performer, trying something in rehearsal and ultimately learning that it didn’t work. This was a valuable lesson learned by being in the rehearsal hall early in the process.

Figure 2.2 ¡Bocón! system
Source: Daniel Fine
between types of digital media, as defined in Chapter 1, we’ve just gone along with the assumption that it is sufficiently proper to add interactive digital media into tech week.
Now that we have made a distinction between atmospheric media and interactive media, we know that interactive media is much more like a character and must be in rehearsal with the actors and directors. When we wait to incorporate the interaction between the actor and the system during tech week there is not enough time to teach the actor how to work the system, nor enough time to consider how to incorporate the interaction into the rest of the design elements. If the live actor needs to respond to a design element that is happening in real time, then the two must have adequate time to get to know each other. Tech week is a time to bring everything together, not a time to work on the nuanced moments that are created when incorporating interactive digital media and live performance.
![]() Case Study 2.3 SparrowSong: Rehearsing with Interactive Digital Media
Case Study 2.3 SparrowSong: Rehearsing with Interactive Digital Media
by Daniel Fine
SparrowSong
Arizona State University School of Film, Dance and Theatre 2013
- Digital Media Designer/Creator: Daniel Fine
- Director/Creator: Megan Flod Johnson
- Performer/Creator: Julie Rada
- Scenic Designer: Brunella Provvidente
- Lighting Designer: Adam Vachon
- Costume Designer: Anastasia Scheider
- Contributing Artists: Matthew Ragan, Tristan Bustamante, Aimee Leon, Amy Masters, Andrea Silkey, and Muharrem Yildirim

Figure 2.3 SparrowSong performer Julie Rada, interacting with a bird via a Kinect sensor
Source: Daniel Fine
This production was a performance installation created by three primary artists—a performer, a director, and myself as media designer. From the beginning, we embedded technology and projections into the story. The performance could not exist without media to extend the magical reality that was a foundation of the story. We created the physical space and the story with the central ideas of the performer and audience being able to interact with technology.
During the performance, the actor drew on the walls of the theatre, the floor, and the walls of the installation with chalk. Her chalk drawings came to life through animated drawings, which were projected onto the surface of the installation. One of the drawings that came to life was of a bird. When the actor noticed the projected bird, she stepped into a Kinect sensor activation area to become a bird like her new friend.
Since the audience also used the interactive technology, they relied on the performer to teach them how to use it during the course of the performance. The actor really had to be well versed in all the variables of the interactive media. So, early in the creative process, I brought part of the interactive system (laptop, pico projector, and Kinect sensor) into the rehearsal hall. It was by no means anywhere near what the complete system, projected onto a finished set, would look like. But it gave us a sense of what it would feel like and allowed the performer to play with the interactive media as if it were a fellow actor. By having a mock system in place in the rehearsal hall, the actor discovered the subtlety of how her movement controlled the avatar.
As a designer, I spent time tweaking settings, and discovered that I was tracking too many skeletal joints and feeding too much data into the system, causing an unworkable amount of latency. By having the system up on its feet, I was able to fine-tune these settings long before tech week. Having time to rehearse with the interactive media gave the director a clear understanding of how the interactions worked and what the limitations of the technology and interaction were. This knowledge helped her conceptualize and stage the action more clearly. It also allowed the entire team the time to create a real relationship between a character (played by a living actor) and a digital character (controlled by the same actor). Because we rehearsed with the interactive digital media, this relationship was crystal clear to the audience and the technology became an integral part of the production.
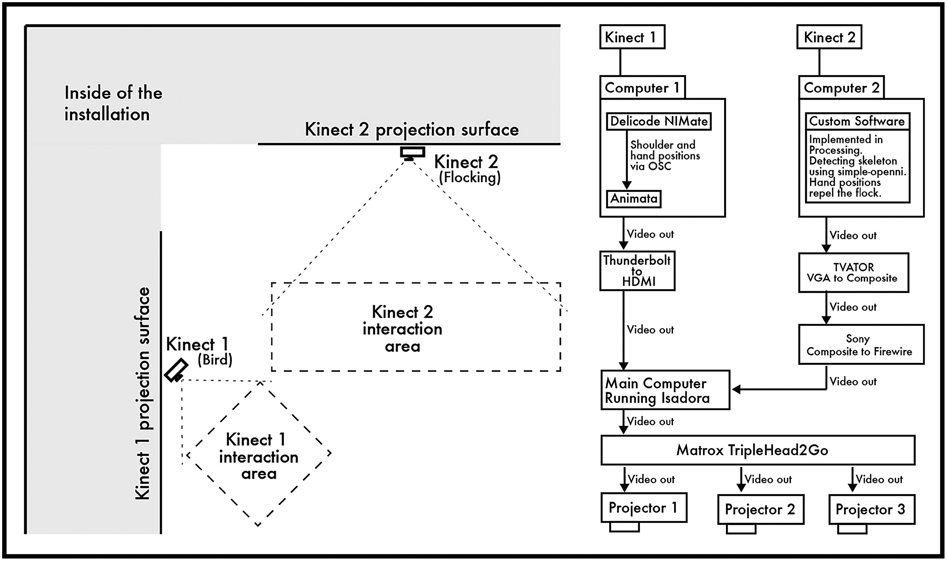
Figure 2.4
SparrowSong system
Source: Daniel Fine
Adding interactive digital media into the rehearsal hall can be daunting, time-consuming, and expensive. Those that do it well, though, such as Robert LePage’s Ex Machina, The Wooster Group, and The Builders Association, have learned that the complete integration of digital media design into their rehearsal and devising processes can yield amazing and dramaturgically meaningful theatrical results.
![]() Tip 2.1 Rehearsing with Interactive Digital Media
Tip 2.1 Rehearsing with Interactive Digital Media
As designers, we often don’t want to show our work until it is finished. We need to break this habit and share the work along the way, so it can grow and change in the rehearsal hall. Like actors finding their roles, rehearsal content does not need to be finished or fleshed out. It can be wireframes, or low-resolution as long as it somehow represents the intended end result.
Rehearsing in the performance space with technology is an ideal way to create work and a luxury not all productions can afford. But rehearsal halls can certainly be equipped with low-cost gear. Whatever our final system, no matter how complex, we can break it down to its core and replicate it on a smaller scale in rehearsal. It doesn’t have to be grand, robust, pixel-packed, or powerful. It simply has to be a version or simulation of the final piece. If we are truly doing our jobs correctly, rehearsal will inevitably change what the final system is anyway. After all, that is what rehearsal is all about.
Of course, it is more time-consuming and thus more expensive to have interactive digital media in the rehearsal hall. It costs more to add even a small interactive system (laptop, projectors, cameras, set pieces to project onto, cables, etc.) into rehearsal than to simply wait until tech week. But if we want to create meaningful, fully integrated interactive digital media into live performance, then we need to make sure to leave time and money to adequately do so.
In some cases, you need an entire system to truly explore the work being created, but for other projects a simple, sample system suffices. Since no two projects are the same, we need to assess the production goals and work with the producer and the production manager to determine how to realistically incorporate technology both financially and schedule-wise.
![]() For More Info 2.6
For More Info 2.6
See “Live Video/Cameras” and “Rehearsing with Cameras” in Chapter 5.
Toward a Unified Design
In order to create a cohesive digital media design that is in unison with all the other design elements, you need to be clear on how digital media is used dramaturgically in the show. It can work if digital media performs many functions within a single performance, such as in one scene being used as scenography and another as a character, but it is good to be clear about these different approaches. One way to successfully accomplish this is to have clear styles or types of technology that represent the different forms/functions of each type of digital media. This not only helps to create a cohesion in the digital media design itself but also is a way to work with all the design departments to create a visual style that has a unified look and feel.
Another method, besides style or genre, to create a unified design is color palette. Colors can be an incredibly important element in defining meaning, environment, and mood in a performance, as well as creating a cohesion between design elements. Regardless of your familiarity with color wheels or the concepts of complementary colors, pay attention to the colors the director and the other designers are using. Some designers draw this element directly to the surface and talk about it as a specific aspect of their design choices. Others show color, but do not explicitly state the details of their color choices. It is up to you to be on the lookout for this information and to consider it in relationship to your own design choices.
Scenic
There is a lot of overlap between scenic and digital media. The way the digital media designer thinks about the meaning of content is often determined by the final display. Display surfaces also directly impact the digital media design workflow, budget, and schedule. So, before the digital media design can really begin in earnest, the set design must be determined. The reverse is also true. Set designers need to understand how the digital media is to be used and what type and style of content will be created so they can design appropriate surfaces and architecture.
Establishing a good connection with the scenic designer and having your needs be heard by them early in their design process is critical to your success. All of the great content you make is lost without a thoughtfully considered surface to display it. The display method and the content are interconnected. The shapes, color, and texture of a set’s architecture, including screens, are symbols that convey meaning. Audiences understand different architectural design elements to mean different things unto themselves and in relation to one another. So, before there is any content displayed on the physical object that reflects the projections or displays the content, there is meaning, there is symbolism. You can participate in the designing of these surfaces if you work with the set designer and director before scenic roughs are due.
Join the director and scenic designer in their first meetings. Listen to the concept of the director and how the scenic designer interprets it. Go to the theatre with them both and pay attention to viewing angles, ceiling or proscenium arch heights, and other elements that restrict the physical layout of your projectors or rigging points for immersive displays, such as LED curtains. How large the set is and where it sits on the stage influences where you can put your projectors and restricts use of front and rear projection very quickly.
It is collaboration with the scenic designer and director that provides you an opportunity to make any significant requests supporting your own design. For instance, when working on the Wizard of Oz, if you have a specific idea for the scale, placement, and so forth about the surface where the Wizard is going to appear in his projected form, communicate this to the scenic designer as early in the process as possible.
Be prepared to have a dialogue with the scenic designer about the angles of walls and screens to best suit an audience viewing angle for a projection or about what the best treatment of a surface may be in order to best reflect projection light. Depending on the show, the scenic designer may be in the situation of dictating aspects of the media design as it relates to the support of the scenery. We have worked on shows where the scenic designer actually provided specific assets he or she wanted to use in correlation to the architecture. Projected content can shift the meaning and shapes of the architectural world of the play. If you are projecting on an architectural element, such as a wall, the content alters the scenic designer’s vision for that wall, in terms of how physical texture, color, and style are brought to life by the projections.
Establish the expectations that the scenic designer has for the digital media as early in your design process as possible. What role does digital media play in the production? Is it purely scenic? If so, then you should encourage the scenic designer to be more involved in the design of the digital content. If there were traditional painted backdrops, the scenic designer would provide renderings, so they logically could be involved in the creation of any atmospheric digital media that is acting as scenery.
Screens
Digital media can take over. Most audiences tend to watch moving content on a screen of any size rather than a live performer, especially projections on a giant white screen. So, you must carefully consider how the size, shape, and location of a screen amplify or otherwise frame the audience’s gaze, potentially stealing focus from the actors onstage.
The same content projected onto a set piece blends with the environment differently, and possibly means something else, than the same images projected onto what is clearly a screen. The audience already has a relationship with screens and understands what they represent. The semiotics of projected video on screens vs. architecture is different.
Don’t get us wrong—we like screens. The correct screen makes content look great. But is that the right choice for the narrative in a theatrical context, for meaning making? How does the inclusion of a screen, especially a giant white one, alter the world of the play? Why build a carefully considered, realistic scenic world that has a giant white screen in it?
A lot of digital media designers want to project onto actual architecture vs. screens. However, screens are often appropriate for the aesthetics of a show or can be prescribed by a director or scenic designer’s approach to the show’s design. There are also times the budget won’t allow for the build of additional detailed set pieces and projections are asked to simulate architecture and backdrops in a way that mimics painted backdrops and in turn demands large projection screens.
The shape, size, aspect ratio, surface, and so forth of the physical screens affect the style and aesthetic of digital media content. It matters in terms of both meaning making and content creation if you are creating one large image to be displayed across one giant surface vs. four smaller surfaces located in different areas of the stage. It makes a difference if digital media is projected on a 42′ × 30′ screen vs. three 14′ × 15′ freestanding screens vs. a brick wall. When using multiple screens, is there supposed to be one image spread across all of them or is there different content on each screen? If there is different content per screen, then it means that for the same amount of stage time, the amount of content that needs to be designed, executed, and programmed for playback is multiplied by the number of screens.
Another thing to consider when including a giant white screen is that with nothing on it, giant white screens really stand out. The answer? Put projections on it. The results? An entire show with projections on a giant screen, regardless of whether it is dramaturgically correct.
Most theatres cannot afford commercially manufactured projection screens, especially giant rear projection screens. So, we are often forced to use poly cycs or muslin as screen surfaces, which are not ideal surfaces for projections. They absorb more light or have rough surfaces that diffuse an image, either making the projections dim or otherwise reducing image quality beyond acceptable levels. These types of materials were not created or treated to hold projections, so they don’t have the proper type of reflective qualities that make for a vibrant image in a lit performance area.
![]() Tip 2.2 Projecting on Muslin and Creating Frames with Soft Goods
Tip 2.2 Projecting on Muslin and Creating Frames with Soft Goods
Muslin
If you cannot afford a projection screen and have to use muslin, there are several ways you can treat the surface to make it reflect projector light better. In fact, you can use these tips for any surface. The higher the screen gain or reflective quality of the surface, the lower the viewing angle of the surface becomes. Like any application, we suggest you test on a piece of muslin (or other surface) and project onto it with the type of content that will be used in the show before committing to any of these options.
- Use Screen Goo paint, a “specially formatted, highly reflective acrylic coating, designed specifically for the video projection industry” on the muslin (www.gooscreen.com). Screen Goo paint can also be used on any flat surface, such as flats.
- Add mica flakes to paint in order to help create a more reflective surface. An Internet search using the keywords “mica flakes, paint, projection screen” yields multiple resources.
- A non-commercial, open-source project entitled Black Widow (paint mix) has tutorials to create a paint mix for do-it-yourself projection screens.
Borders and Legs
When using any type of full stage projection surface, such as a poly cyc, you may want to create a black border where the edges of the projection raster end. This masks out the unused portion of the projection surface, so as not to call attention to it. A great way to do this is using softgoods, such as scenic borders andlegs. If the border or leg is dead hung and you make any adjustment to the size of the projection raster, it takes valuable time to reposition the softwoods. If possible don’t dead hang the soft-goods on the same lineset as the screen. Instead, try to have scenic use the closest downstage moving linesets to hang the borders and legs. This allows for easier and quicker changes.
Make sure that you have scenic or stage management spike the onstage edges of the legs for when they are invariably moved. Add a preshow check of the legs, to ensure they are on their spike, to either a stagehand’s or the digital media operator’s to-do list.
These materials are more porous than screens, so oftentimes you can clearly see the light source from the projector when rear projecting. This normally creates a distracting hotspot on the screen in the center of the projection cone and often is painful at worse and annoying at best for audiences to stare at. It is hard to get a crisp image on these surfaces, causing the images to look washed out in terms of color and contrast and/or soft in terms of focus. In situations where a hard focus is not wanted, these materials can be used to great effect to smooth out the hard edges of a digital image.
Materials and Textures
When using projections, there are many different types of materials that you will encounter. Some are surfaces that you are meant to project onto while others are costumes worn by actors who are standing in a projection cone. All of these various materials have different textures—some porous, letting more light pass through them, some with deep peaks and valleys that create shadows and uneven projection light. Work with the scenic and costume designer to settle on materials that are appropriate for the show’s overall design.
The colors, saturation, diffusion, and reflective quality types (matte, glossy, etc.) of the various surfaces matter. A surface’s reflection amount, known as screen gain, matters because it affects the details of images, such as color, contrast, sharpness, and viewing angle.
Leave time in the schedule for testing projection surfaces. This means the team has to research surfaces, order a sample, and conduct a projection test on said surface. If you can, use the projector that you will use in the production. Look at the test in the dark, under stage light, and at the relevant proximity and distance of the audience. For tests, be sure to have content that is in a similar style and color as the finished content will have. Consider gathering a database of test footage that you are familiar with and can use to hone your ability to evaluate a system’s display qualities. If you are projecting on scenic elements, you have to do all of this research and testing in conjunction with the scenic designer before he or she has committed to the paint and other treatments of the surfaces.
Self-Emitting Media Gear
What about TVs, LED walls, or curtains? Who decides what type of display equipment is used? The scenic designer, the digital media designer, or the lighting designer? Of course, it depends on the type and scale of the equipment being used and the skills of those working on the project. Individual designers can also end up taking a leading roll in defining the overall design of a show. But ideally, it is a collaborative process, because the physical presence of an object crosses departmental lines. It can be a different method of creating content, and a different method of programming content for an LED curtain than it is for a screen, or a brick wall, and so forth. This must be kept in mind when making design decisions. The presence of an LED wall also conveys its own meanings to the audience before any content is on it. Should there be an LED wall in a realistic play set in 1950 when LED walls did not exist? If the play is not realistic, then where in the story’s world do LED walls emerge from? Are you asking the audience to see this piece of gear/architecture as a stage device and not part of the designed world?
Staging
Are actors interacting with the digital media or is it atmospheric? What are the actors’ relationships to the digital media content and architectural medium? Are actors staged right next to projected images? These questions matter because of lighting and shadows. If there is an actor standing one foot away from a projection surface, the lighting designer needs to light that actor and in doing so will also spill light onto a projected image, thus washing it out. The scenic designer should account for acting areas near projected elements and allow ample space for lighting to be able to illuminate the actor, without overpowering or spilling onto the projections.
Floor Treatment
Consider the floor areas near projection surfaces. Light bounces off the floor and lightly colored surfaces onto a projection area. This means that the floor treatment becomes critical, so that bounced light doesn’t wash out projections or LED panels. While it seems instinctual to paint the floor a flat dark color, we have found that a darker color with a little bit of sheen to the paint is actually better. Discuss these areas with the lighting designer as well as the scenic designer, so they can take these issues into consideration.
3D Models
While it is traditional for scenic designers to build small-scale models it is not always done. Because the building of a model is often time-consuming and can add costs to the production budget you cannot assume that one will always be produced. However, if the scene designer is planning or willing to make a physical 3D model, it can be invaluable to your process to use it.
Set up a small pico projector to beam images onto the model. When it comes to rendering the way that projected light is going to read on organic or non-rectangular surfaces, or how the application of mapping or other special effects reads on the actual set, nothing beats this form of simulation. Using actual projected light on actual surfaces similar to those that will be used can be one of the most powerful ways to communicate your ideas and collaborate with the artistic team.
For most corporate entertainment projects and big-budget theatre productions, the set designer or production designer provides a digital 3D model of the proposed set. We find that it should be, but often is not the case in most theatrical scenarios. Yet, it is hugely helpful for the entire team as it allows the digital media and lighting designers to previsualize their work onto the virtual set. It is not always clear how a movie playing in QuickTime on a laptop will look on the set vs. seeing a previz of the content playing on a digital 3D model of the set.
In the future, it may become standard practice to have a digital 3D model provided. Yet it is not always done in practice. In these situations, you can request one be made by the scenic designer, or if you have the time, you could mock something up in a 3D software based on the ground plan. With all the various CAD software available, this is increasingly easy to do. It helps not only you but also the director and the entire team to previsualize, especially if no physical model is built.
These types of pre-visualization show what different content looks like on the set, provides glimpses into how transitions within the designed world might happen, and allows the digital media designer to get a head start on solving production- and postproduction-related issues (e.g., content creation, image warping, mapping, blending, projector placement), which can make for a smoother and quicker process once in the theatre.
Shared Documents Created by the Scenic Department
Every department in the theatrical process has its own documentation, forms, charts, and so forth. You need to work with and from several documents that are created by the scenic department.
Ground Plan
A floor plan shows a to-scale, top-down representation of the performance space. The floor plan includes the permanent architectural elements of the theatre and also the set. You use the ground plan to help determine your projector placement based on the width of the surfaces you need to project onto.

Figure 2.5 Sample ground plan from The Merry Wives of Windsor . Great River Shakespeare Festival. Winona, Minnesota, 2014. Scenic design by R. Eric Stone.
Source: R. Eric Stone
Elevations and Sections
Elevations are typically from front view. These help you see the height and width and any details of surfaces you will project onto. You may be able to use elevations in your presentations to show what images may look like on a specific surface. Sections are typically from the side view. Sections help you determine projector placement based on the height of the projection surface.

Figure 2.6 Sample front elevation from The Merry Wives of Windsor . Great River Shakespeare Festival. Winona, Minnesota, 2014. Scenic design by R. Eric Stone.
Source: R. Eric Stone

Figure 2.7 Sample side section from The Merry Wives of Windsor . Great River Shakespeare Festival. Winona, Minnesota, 2014. Scenic design by R. Eric Stone.
Source: R. Eric Stone
Line Set Schedule
Some theatres have a fly system that is made from series of line sets to hoist scenery, lights, projectors, and so forth into and out of the fly loft above the stage. The line set is the fundamental way to operate the fly system of battens (steel pipes) via ropes, cables, pulleys, counterweights, and so forth. A projection surface such as a rear projection screen or CYC is listed on the line set schedule by the scenic designer. You may need to work with the scenic designer to determine what line set a projection surface should be on based on the projection throw and projection surface size. You may also need to work with line sets to determine where you can hang self-emitting screens. If you are hanging a projector from a line set, you may need to bridle two line sets together for added stability.
The preliminary line set schedule is produced by the scenic designer, in consultation with the technical director and lighting designer (and sound designer and projection designer). Once this schedule has been created, the technical director then becomes in charge of everything that flies. The closer to load-in, the more the TD is in charge of “air traffic control.”
Lighting
Because digital media design regularly utilizes a light source, a lot of productions and educational institutions include video/media under the realm of the lighting department. Many rock-and-roll concerts, corporate events, and regional/educational theatres combine the roles of lighting and digital media designers. It is an obvious first choice, as both departments are dealing with light. However, not all lighting designers (LD) are video designers, or digital media content creators.
No matter the final display option we choose, all of the choices for presenting video or still imagery in theatre use light in order for the content to be visible. There are self-emitting light sources and interfaces, such as video walls, LED curtains/panels, TVs, and AR/VR. There are also light sources that can beam the content onto other pieces of physical architecture/screens, such as projectors. The digital media designer and the lighting designer must work together to integrate these additional types of digital media light sources with the lighting department’s traditional incandescent and LED lighting instruments, practicals, and so forth in order to achieve a unified design.
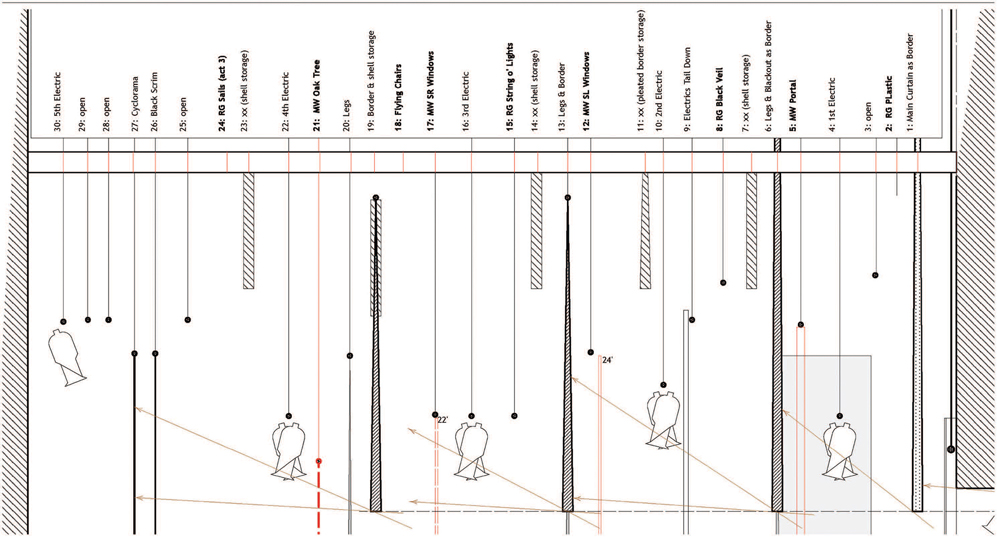
Figure 2.8 Sample line set schedule from The Merry Wives of Windsor . Great River Shakespeare Festival. Winona, Minnesota, 2014. Scenic design by R. Eric Stone.
Source: R. Eric Stone
Digital media designers need to understand lighting design in order to properly design a show that is cohesive in its appearance. Thankfully, many lighting designers now use pre-visualization to show early on how they will illuminate the set and performers. A modern lighting designer may come back soon after receiving set design sketches and show a rendering with their lighting included. It is helpful for the digital media designer to see early ideas of how lighting will actually be integrated with the set. However, there may also be times where you are handed a lighting plot, which is basically a map of where the lighting instruments will be placed, and you will have to envision how the design is going to look.
![]() Aside 2.4 Projector/Video Black
Aside 2.4 Projector/Video Black
When a projector is on, it will always beam light. In the absence of an image, the projector shines black light. This means that when there is no content being sent to the projector there will still be light being projected. This dark but still visible light is called projector black orvideo black. This is also true when using a projection mask or mapping content to a surface. The areas outside the mask/map are projected with projector/video black.
Projector/video black is still light and may be visible to an audience. It will still cast light, albeit black-colored light, onto everything, including performers who are in the projection cone. Depending on how much ambient light there is onstage and how well the projector processes contrast, an audience might perceive/see the projected black. This means that a true blackout cannot be achieved while the projector still casts light onstage.
Since powering off the projector is not an option, the only way to accomplish a true blackout is to physically block the projector light. This is typically accomplished with the use of a dowser. If for whatever reason you are unable to use a dowser, let the artistic team know that you cannot accomplish a true blackout.
![]() For More Info 2.7 Dowsers
For More Info 2.7 Dowsers
See “Dowsers” in Chapter 5.
Projections
Of all the various forms of presenting digital media in theatre, projections bear the closest resemblance to lighting design. A projector is the closest piece of gear that a digital media designer has in her tool kit akin to a lighting instrument. When using a projector, designers contend with many of the same properties as a lighting instrument, including color temperature, color palette, brightness, throw distance, angle of light, light cone, intensity, and quality of motion. Projectors often hang off the same rig as the lights, and are set up in similar ways, though a projector’s mounting options are not integrated into the unit like light fixtures’.
Direction of Light
Light bounces off of everything—the floor, the set walls, and so forth. Bounced and ambient light can quickly decrease the contrast and apparent brightness of a projection very quickly. Work with the lighting designer to determine light angles and shutter cuts that will not directly hit a projection surface and will also cut down on bounced light.
If a performer is standing in front of a projection surface, that performer is going to need to be lit. As mentioned in the scenic section, front light directly hits the projection surface and washes out the projections. The best way to avoid directly hitting projection surfaces is to use a higher/steeper front light angle or sidelight. This is not always possible, but whenever it is, anything that needs to be lit near a projection surface should use sidelight or a high-angle front light. This also means that lighting designers may be forced into using dimmer settings for their lights than they would otherwise prefer.
Dimming lights and using high angles can be limiting to a lighting designer, who may wish to use footlight to help tell the story of this moment, but can’t because that light will directly hit the projection surface. There are also practical concerns, such as the LD simply can’t hang a light at the desired angle to cut down on spill, because a scenic element is in the way or there is not a physical electric or pipe to mount a light where it is needed in the venue.
To help avoid these types of issues, the lighting and digital media designers should be involved in the scenic discussions long before a final set is decided upon. It’s always better when multiple designers are looking out for these types of scenarios.
Projector Placement
In addition to the physical set and location of projection surfaces, lighting considerations play an important role in projector placement. Hanging positions for projectors are sometimes shared with electrics’ line sets. Projectors need ample room for airflow around them, for both air intake and outtake, in order to cool the lamps. You shouldn’t hang a projector too close to a lighting instrument, as you won’t want the air intake to be right next to a hot lighting instrument. Another consideration is that projectors should not be on the same pipes or trusses as moving lights or flying scenery. The moving lights cause a vibration on the pipe, which adds a shake to the projected image and potentially causes the projector to fall out of alignment.
The angle of the projector hitting the surface becomes crucial in terms of staging and lighting. As we stated previously, shadows are cast on displays when a performer or a set piece is in the lighting cone of the projector and his or her body casts a shadow onto the projection surface. This needs to be accounted for when creating content. Additionally, the performers will be in projector light and will have any unmasked video content on their bodies. Make sure that it is dramaturgically correct for the moment, or work with the director to confine the performer within an area where you can mask the video off the performer. An easy fix is to work with the LD to make sure that he or she uses an angle and higher-wattage lamp to wash out the video projection on the performer’s body.
Color Temperature
The choice of projector and lighting instruments directly impacts how the color temperatures between these light sources match. Traditional incandescent lighting instruments cast a warm yellowish color temperature, while projectors tend to have a cooler blueish color temperature. This means that getting the quality of light to look the same is nearly impossible, because it is a foundational difference between the types of light sources. One way around this is for the lighting designer to use LED lighting fixtures, which have a cooler color temperature. It is more expensive, but the color temperature between the lights and the projections will match more closely. There are some color adjustments the digital media designer can make to warm up an image, but it never corresponds directly with an incandescent lighting instrument.
If it is crucial for the visual style of the show to have the color temperatures match, making it look and feel like the digital images and lighting live in the same world, it should be addressed as early as possible. It requires extra time and attention while making content and when in tech, so plan accordingly with scheduling.
Color Palette
Color palette is an important part of the collaboration between digital media and lighting. Oddly enough it is often overlooked. Traditionally, designers try to work with similar or purposefully contrasting color palettes to create a unified design and/or a specific moment in the show. Don’t be afraid to have a conversation with the lighting designer (all designers and the director, really) about color and how it applies to storytelling. Some things to consider are:
- Will an overall color grading, such as sepia, be added to all video?
- Will there be a purposeful muting of colors?
- Will x-color pop and glow?
- Will the color palette change over time?
- How can colors be unified (or not) among departments?
- How is digital media design treating color to help tell the story, or create a mood?
- Does the video need to have subtle gradations of color and/or provide saturated colors?
- Be flexible. Even though many discussions and planning may have happened, colors often need to be tweaked and refined in tech, once all the design elements are seen together.
- To help create unity once in tech, digital media’s colors can be modified in the media server and lighting’s colors can be changed by swapping gels or altering color if using controllable LED lighting fixtures.
The answers to these types of questions are just as important as answers to similar questions in all other design departments. Yet, sometimes it isn’t always easy to decide color palettes for projections in advance. The
![]() Case Study 2.4 Color Palette and Temperature
Case Study 2.4 Color Palette and Temperature
by Daniel Fine
Terra Tractus Lighting
Terra Tractus
Projects for a New Millennium 2014
- Digital Media Designer: Daniel Fine and Matthew Ragan
- Associate Digital Media Designer: Alex Oliszewski
- Director: Tom Burnett
- Lighting Designer: Jamie Burnett
- Music/Sound Designer: Istvan Peter B’Racz
I was co-media designer with Matthew Ragan on a production of Terra Tractus, for which we worked extremely fast. We created all the content for a one-hour-plus show in just a little over two weeks with a department of three. We projected onto the stone surface of a rock quarry, so there was a lot of trial and error in terms of finding the right colors that looked good on the stone. Lighting designer Jamie Burnett used mostly LED fixtures for the show, allowing him to easily change the color of his lights on the fly, versus needing to decide weeks in advance if he had used gels. This freed up the digital media design team so we were not restricted by color, which was difficult for us to ultimately get 100 percent correct until we were at the venue. Because of the ease with which lighting could make color adjustments, we decided that lighting would play off of media, basing the color palette off of the projections. Sometimes Jamie matched the color palette of the projections and other times he played against it, creating contrast with an opposite palette.
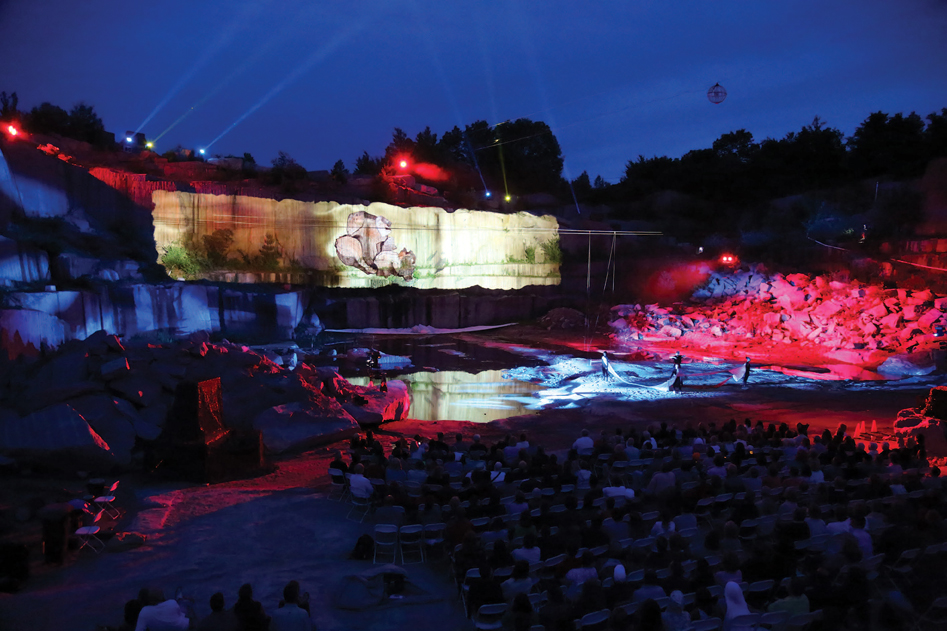
Figure 2.9 Contrasting color palette of Terra Tractus
Source: Alex Oliszewski

I have also worked in reverse on productions, where the lighting department utilized incandescent instruments with manually installed gels. This relies on projections to be more flexible and match color to lighting, manipulating the color within the media server and when needed, re-rendering content.
best results we have achieved in our own work has come when we have worked closely with lighting designers to consider their intended color palettes and we have provided enough feedback and examples of our work that they have time to consider and adapt to our designs.
Brightness
The projector light has to cut through all the stage light in order for an image to be seen. In too many regional, small professional, and educational venues, the projectors used just don’t have enough lumens (emitted brightness) to provide the needed punch to pop out among all the stage light. This is because projectors with enough lumens to do the job correctly cost substantially more to purchase, run, cool, maintain (cost of bulbs, clean, repair, etc.), or rent than their cheaper, lower lumens (less bright) cousins. To achieve the needed brightness, designers often double-stack projectors (two projectors beaming the same image on top of each other) in order to double the brightness. This of course comes with additional costs and technical complexity because it requires two projectors for every one channel of video needed, doubling the number of total projectors required and the costs associated with running them.
![]() For More Info 2.8 Using Multiple Projectors
For More Info 2.8 Using Multiple Projectors
See “Using Multiple Projectors” in Chapter 5.
Typical stock projectors for most small to medium venues are usually somewhere between 5,000 and 8,000 lumens. When viewing images in a dark theatre, this is usually bright enough. But as soon as the lighting designer starts turning on all her instruments, it gets dim really quickly. The total brightness of all those lighting fixtures make the projections seem dimmer in comparison, and also washes out the projections, diminishing the contrast and making them seem flatter.
Unless you are working on a production that has the budget or the resources to obtain bright projectors, there is going to be a dance between projections and lighting. The digital media designer is often going to ask the LD to lower the overall intensity of the lights and/or cut some lighting so it doesn’t spill onto projection surfaces. It rarely works in the opposite direction, where the LD asks for the projections to be dimmer. But sometimes not using full brightness or opacity can help blend the projections into the stage world. Making an image darker can also help bring focus to action downstage.
Tech
Remembering that projections are a light source, make sure that there is ample dark time given to the digital media design department in tech. Remind the production manager to integrate all of digital media’s needs into the schedule, so that both lighting and projections have the needed dark time in the venue.
In some cases, digital media cues are programmed using a lighting board. This happens more frequently on larger shows, such as corporate productions and rock concerts. Usually for these types of shows the lighting designer is also the digital media designer or the lead designer and he or she chooses to program the cues using a familiar piece of gear. When choosing to program digital media using a light board, an additional programmer is essential. If the digital media and light cues are going to be played back from one lighting console for the run of the show, thought must be given to how digital media and lighting are cueing in terms of numbers, auto-follows, and so forth. Time must be allocated in tech to integrate the lighting and digital media cues. There are pros and cons to this approach, the cons mainly being that most digital media designers who are not LDs do not program light consoles, but often can directly program a media server.
Most digital media servers and lighting consoles are set up to send and receive different kinds of commands, which act as triggers for events (cues). It is possible to send triggers via a networking protocol, such as Open Sound Control (OSC) or Musical Instrument Digital Interface (MIDI), from lighting to digital media, allowing for a lighting cue to trigger a projection/digital media cue or vice versa. This takes a bit more time to program, but is relatively easy and allows for fewer cues to be called by a stage manager and for cues to be precisely timed together. If you want to do this, iron out a workflow and test it, if you can, prior to tech. Also, consider any additional gear and time to set up a computer network so that the light board and media server can communicate with each other.
Sound
In much the same way that digital media and projection designers are just now being integrated into the standard theatrical process, audio has gone through a similar integration process since the 1990s. We now take for granted the ability and protocols to use audio in our productions, something the theatre profession is currently dealing with in digital media design.
In the production process, sound design and projection design often work in sync with each other. Think back to the AV Club in high school: audiovisual. Typically, if you have video there is going to be some kind of audio element associated with it, be it a person talking, music, or sound effects. This has the potential to affect the sound production pipeline from content creation to recording, editing, output, and playback.
The principles that define what a digital media design is can also be found in sound design. Terms like linear and nonlinear, timeline-based, and interactivity were often applied to sound design prior to being available to digital media design technology.
Often scripts or concepts call for recorded material like montages or music videos that require audio to exist. There is much inspiration to be gained by collaborating with sound design, and it is good to gain knowledge of sound design techniques, equipment, and processes, just like with lighting design.
You may find there are times that you are playing sound from the media server into the sound board, where the output is mixed or otherwise balanced with other elements. Other times, you may end up simply linking the video cues with the sound server to ensure that everything lines up. In the most complicated setups you will use some form of networked timecode based system.
![]() Tip 2.3 Collaborating with the Sound Designer
Tip 2.3 Collaborating with the Sound Designer
Here are some ways to inspire collaboration with sound designers throughout the design process:
- Ask the sound designer (SD) for a soundtrack early on of things that inspire them or that they are thinking of using for the show. Listening to curated music from the SD while animating and creating compositions is a great way to begin working.
- Offer inspiration to the SD by sharing your animations or content as early in the process as possible.
- What is cool about sound is that it lives in a physical space and is made of waves that can be visualized and syncopated with visual content in a way that brings greater presence and meaning to both. Use the audio assets provided by the sound designer and view them as a wave form. They will look like a mountain range showing the varying intensity of the sound over time. This provides a visual guide and one method of correlating the tempo of your media to the audio.
Who’s in Charge of What?
Who is responsible for creating the audio content for a video? Digital media designers come from different backgrounds, such as video production, animation, and lighting, so not all have experience in audio. Even if a designer is from a video production background this doesn’t mean she is a pro on how to set up microphones, record, and perform basic audio editing. More often than not the digital media designer’s strength is in visual storytelling and she works in audio simply because she has to, because of the A in AV.
Most theatrical sound designers do not automatically think it is their job to record, edit, and master dialogue that is being captured in a video shoot. But someone must. What about sound effects or music added for an animation? Who does this? On most video productions, there is a sound department and a camera department that have an established production and postproduction workflow. Yet this workflow does not exist in most theatrical scenarios. It is up to you and the team to agree upon a workflow between digital media and sound for each new production.
If the sound designer of the live performance is going to be responsible only for the playback of audio during the performance, then have whoever is in charge of recording, editing, and mastering sound for all video sequences be a key member of the design team for the live performance. How the sound is recorded and edited, and what types of effects and the music chosen all play a role in meaning making. The sound artist/technician for the video production needs to understand how the overall sound of the live performance is functioning. This is the best way to ensure that her audio and sound work for the video sequence and also fit within the greater story world/context of the live performance.
![]() Aside 2.5 Key Components and Workflow Between Sound and Digital Media in the Production Pipeline
Aside 2.5 Key Components and Workflow Between Sound and Digital Media in the Production Pipeline
- Recording of any location audio during a video shoot. (This can include dialogue, ambient sound, etc.)
- Decide who is in charge of recording and what gear is needed.
- Hire an additional sound technician if needed.
- Editing location audio.
- Path 1: The sound department edits/EQs all location audio and sends to the digital media department to sync audio with video. Digital media department edits picture with polished audio. Note: After picture lock (no more changes to the video—that is usually a few days before the show opens), the sound department needs to master the final video’s audio.
- Path 2: The digital media department syncs audio and video, and then edits picture with raw audio. Once there is picture lock, the digital media department sends the audio file to the sound department to edit/EQ. The edited, EQ’d master is then resynced to the video.
- If music is used in a video:
- Decide on music and establish availability of rights.
- Path 1: The digital media department cuts picture to music.
- Original music: The sound department composes/records/edits music first.
- Existing music: Either department acquires the rights to music.
- Path 2: The sound department composes music to edited video.
- Original music: The sound department composes/records/edits music to picture.
- Existing music: Either department acquires the rights to music.
- If sound effects are used in a video:
- The digital media department edits picture. Sends rough file to the sound department.
- The sound department creates all sound effects to picture.
- Depending on the production, the digital media department may have one more round of editing after sound effects are added.
- Master all audio:
- Once there is picture lock and all sound effects, music, and so forth have been created, the audio needs to be mastered. This step is usually skipped in live performance productions because videos change so frequently and at the last minute.
- Audio playback in the theatre:
- Who controls playback of the audio file?
- Digital media department:
- The video file needs to be outputted with audio for playback in the media server. Check the media server for optimal sound codec and settings.
- An audio line out (either digital or analog) from the media server needs to be connected to an input on the sound system control.
- Sound department:
- The video file does not need sound outputted with it. (You may wish to output the sound as a reference.)
- A separate master audio file that matches the exact length of the video file needs to be outputted separately from the video by the digital media department. (This is an extra step in the process.)
- The master audio file is loaded into the sound server for playback.
- There may be a lag/delay between audio and video, causing the audio and video to be out of sync. If it is only music, it may not be too noticeable. If it is a video of people talking, it may be very visible. Instead of a stage manager calling a video and audio cue together and two board operators trying to hit the GO button at the same time, you may want to consider:
- Using Open Sound Control (OSC) or Musical Instrument Digital Interface (MIDI) to fire the audio and video at the same exact time.
- Even doing so, you may have to put a delay on the video or audio so they are in sync.
- Digital media department:
- Who controls playback of the audio file?
Audio Playback in the Performance Space
In a lot of productions, media servers such as QLab and the like have become the show control software of choice for many sound designers. This type of cueing and control program offers designers great flexibility to directly program the visual and sonic digital media within one server. Like with lighting consoles, modern audio consoles and software can send and receive varied types of network messages to communicate directly with digital media servers.
If QLab is going to be used for both digital media and sound cues and if it is determined that one machine/one operator will control both sound and digital media cues, extra planning time is needed. Thought must be given to how digital media and sound will be cued during tech rehearsals in terms of numbers, auto-follows, and so forth, and tech time must be allocated to integrate the sound and digital media cues.
Costumes
Designers have been creating costumes that transform or reveal surprises for centuries. As evidenced by Loie Fuller’s work in the late 1800s, using costumes as a surface for lighting and eventually projections is not a new idea. Other art forms, such as music (concerts), dance, and performance art, have been quicker to incorporate analog and new digital technologies, such as embedding LED lighting into costumes. The growing consumer fascination with wearable technologies in the fashion and technology worlds is opening up tremendous potential for new and exciting collaborations between costumes and digital media design in the theatre.
An obvious and growing trend is to map projections onto bodies. This requires close collaboration with a costume designer to choose fabrics that reflect light, have the proper silhouettes, allow for the addition and inclusion of electronic components, and so forth. Another use for embedding digital technology into costumes is motion tracking. For example, a useful way to track a performer is through infrared (IR) LED lights. IR cameras can see these lights and thus track performers. In turn, this tracking data is used to maintain a direct placement and connection with projections following moving performers. Depending on the exact system that you are using, costume designers might need to include pockets for transmitters, so be sure to inform them as early as possible.
The most common overlap with the costume designer is when certain costumes need to be ready for a video shoot. If you are going to have a video shoot for a production with actors, you need to coordinate with the costume designer of the show. Often the characters need to wear the same costumes in the video as they wear on the stage. This demands that the costumes needed for the shoot are completed with enough time for the video shoot and postproduction time. This accelerated schedule demand is generally outside the realm of typical expectations and may well be outside the realm of a costume designer’s experience. It is crucial that video production dates are on everyone’s calendar and incorporated into the costume department’s master schedule.
It is best if the show’s costume designer also designs the costumes for the video sequences, so that the character’s clothing choices all live inside the same dramaturgical world. If another designer is used for the videos, make sure that there is communication between the two designers, so that a cohesive design is achieved.
A representative from costumes should be on set when shooting. Just as we have dressers, makeup artists, and wardrobe managers backstage during the show, we need this kind of support when producing our videos. This person is responsible for the costumes and must also be able to attend to any details that may arise on set.
On most theatre productions, by default, hair and makeup fall to the costume designer. This is not the case in video production. There is usually a separate designer or designers for hair and makeup. Hair and makeup may need to be refreshed throughout the day of a video shoot and you need an experienced professional on hand to do so. Makeup for the stage does not translate the same for a video shoot, where you may have a high-resolution camera in a close-up on an actor’s face. Don’t fail to factor in this element of a video shoot and hire an experienced video makeup artist.
If you are using live video onstage, make sure to set time for tests with costumes under stage lighting. You may find that a perfect costume for the stage does not translate to a live feed displayed either via projections or a screen. The stage lighting might be too dim and a dark color in a costume could be lost on the projection surface. Also, note that the pinstripes or fine geometric details of a suit’s textiles can cause weird, rainbow-like video-flicker.
![]() For More Info 2.9 For Rainbow Effects
For More Info 2.9 For Rainbow Effects
See “Moiré Patterns” in Chapter 4.
Since performers are often in front of screens and projection surfaces, it is good to collaborate with the costume designer regarding color palette. You don’t want to find yourself in a situation in tech where you discover all the main characters are in red and all the content has a red color grading, thus making the characters unintentionally fade into the images.
While costumes are typically a bit more removed in their direct involvement with a digital media design, the costume designer has a lot to offer in terms of defining the characters, color palette, and other important overall design qualities that are well worth your attention. A question to ask might be: Are there are any icons/insignias that the costume designer is integrating into the costumes that need to be reflected in your artwork? For instance, if is there a sports team that is referred to, you need to work with the costume designer to ensure that any reference to this team and its branding is properly consistent between the costumes and the digital media.
Props
Props are the physical objects in a performance that are held and used by performers onstage. There is typically an individual responsible for the design, construction, and maintenance of the props on a show. On smaller productions, this job can be wrapped into the responsibilities of the scenic designer, costume designer, SM, or any other individual(s) working on the production.
There are a number of exciting opportunities to integrate or embed digital media into physical objects. This is an area that is underexplored and has tremendous potential for exciting new collaborations and modes of storytelling. For instance, if you want to integrate a RFID sensor into a bicycle, the props person can probably help come up with a way to do it. The most common interaction with a props person normally involves diegetic digital media elements that need to be incorporated into an environment. Examples of this are television and other display devices that the characters watch and interact with during a show.
Like the other creatives in this list, getting to the props person early and expressing your needs are vital to success. As mentioned in all other areas of design collaboration, if you need to shoot video of a scene that uses props, you’ll need to clarify expectations and/or negotiate with the team to find a separate props designer for the video shoot and incorporate all props due dates for video into the production calendar.