
Chapter 3
Digital Media Design Process and Workflow
This chapter introduces key phases of digital media design in an order that approximates typical workflows and is representative of how each phase builds on another to impact the final design. The only real rule is that there are no rules. Every show is different. For one show, you may experience every single step of the process outlined in the specific order we have defined. But for the next show you work on, you may hit only a few of these steps and in a drastically different order.
First Steps
Salary
Congratulations—you have an opportunity to design a show. How much should you charge? What is the going rate? Is the amount you’ve been offered reasonable? The answers all depend on what the job is, the market (where in the world the job is located), and your experience level.
If you are a member of The United Scenic Artists Local USA 829, there is a guideline of base salaries set out by the union. Most likely you aren’t there yet, so here are some things to consider when negotiating:
- What the job entails artistically: Are you designing a show that requires you to create two hours of original, moving content? Or is it a show that needs only six predefined, static images? How much original artwork you need to create and the scope of it are key factors in determining a fair salary.
- What the job entails technically: Do you have to design a system? Or combine two different systems? Do you need to oversee and install the system? The broader your responsibilities, the more you should be compensated.
- Is there a media server programmer? If you have to program the media server, you should charge more.
- Do you have assistant designers? This is a double-edged sword. It is great to have assistants. It’s hard to do this type of work well all by yourself. On the other hand, if the team gets to be too big, you spend a good portion of your time managing the team and not designing. In general, ask for assistants and try to negotiate for them to have their own contracts. If this is not possible, charge more for your fee, knowing that you can pay the assistant from your salary.
- Negotiate travel, accommodations, and per diem if this is an out-of-town job. Most professional jobs should cover, at the very least, your travel and accommodation. Ask for a per diem for meals. Eating out every meal adds up quickly.
The following are typical salary ranges as of this writing:
- Community theatre: $0–$500 fee. No travel, accommodations, or per diem.
- Small professional theatre: $300–$1,500. No travel, accommodations, or per diem.
- Medium to large professional theatre: $1,500– $10,000. Travel and accommodations typically paid for if you are from out of town. Per diem varies.
- League of Regional Theatres (LORT): $1,500– $15,000. This is a huge range for fees. The fee you are offered depends on the theatre company’s LORT status, the production’s budget, and your experience level. Travel and accommodations should typically be paid for if you are from out of town. Depending on the LORT status, a per diem may or may not be offered if you are not local. You should also be able to negotiate royalties for a touring production and possibly the right of first refusal if the show gets picked up for a Broadway run.
- Broadway and touring: $5,000+. At this level, the fee is based on your experience, track record, and reputation, as well as the number of cues or complexity and type of content in the actual show. Travel, accommodations, and per diem are paid for if you are from out of town. On the highest end, you can expect business or first-class air travel.
When working in regional theatres and above, consider joining the union and working with an agent. An agent can help land you jobs and negotiates salary and so forth, in addition to royalties and licensing fees for touring productions.
Negotiating Deliverables
Set clear expectations and limits with the team about how much content you make and when it is due. If you are not being paid very much and the production timeline is shortened, negotiate for specific parameters to be placed on the amount of content you will create. This is tricky, since no one may know exactly what needs to be created at such an early stage. But you can at least give a best guess. You don’t want to find yourself in a position where you are getting paid $300 to deliver two hours of original 3D content. Have honest talks about this with the producer and production manager when negotiating your contract, and then make sure these parameters are communicated to the director and artistic team.
Setting Limits
You’ve negotiated salary, contract, and deliverables to the best of your abilities. You are now eager to get to the work, to be a good collaborator and to say “yes and.” But hold on—it’s important to set boundaries and limits. When working with your colleagues, be clear about what can and cannot be done. You need to define this in terms of: your skills, the skills of the team, the budget of the show, and the schedule. Be open to anything, as inspiration comes from everywhere. But you also need to be realistic about what you and the team can accomplish.
Remind the team that the tight time frame of a theatrical production can greatly affect the viewing of rendered assets that are ready to integrate into the stage picture. For instance, you are planning on using a complicated CG setup for animating some element of the design, and you know that it will take you between one and two days to render any changes out to a usable video. Let everyone know this, especially the director, as early in the process as possible. This way once you arrive at technical rehearsals the director and everyone else understand that if you have only four tech rehearsals, any changes requested in the animation need to be requested no later than the second day. Any time after that and you won’t have time to get it out of the rendering computer and onto the stage in a rehearsal before opening night. This may be a lesson you have to learn the hard way, but if you don’t set clear expectations early on, directors might be in for a rude surprise when they learn they cannot request changes in animation after a certain point in the process.
Working with Budgets
You will work with the producer, director, and production manager to figure out a realistic budget in order to execute the design. Even in regional theatres, digital media design budgets can be very small, ranging from $300 to $3,000. Advocate for a realistic budget as early as possible, so that you can coordinate the correct equipment and present design ideas that take into account the limitations of the actual budget.
It is your responsibility as the head of a department to stay within budget, keep accurate accounting records, track expenses, keep receipts, and so forth. You are in charge of working closely with a technician to rent and/or purchase needed equipment. It is up to you to determine how much to spend for content creation. Will you need to hire an animator, buy stock footage, and so forth?

Figure 3.1 Sample digital media design budget from Terra Tractus , designed by Daniel Fine and Matthew Ragan
Source: Daniel Fine
Theatrical projection is not cheap. If you want bright, high-resolution, low-latency video content on a well-designed surface that is also lit by theatre lights, it is going to require expensive projectors. Currently, an affordable professional projector is a minimum of about $15,000 to purchase and does not include a short throw or telephoto lens that you may need, to the tune of $2,500–$6,000 each. If the budget is anything less than $5,000 you likely will work with some set of stock equipment owned by the theatre company or will buy/rent a subprofessional projector. Depending on your market, rentals may not be a ready option. Research what is available for rental in the areas you intend to work.
Equipment
Even though it is still early in the process and you don’t know what the design is yet, gather as much information as possible about the equipment the theatre owns and has available to use. This information, along with budget, helps inform your design choices, because it provides valuable details regarding the available equipment you have to execute the design. The gear you use helps define the image quality, your ability to integrate the content into the lighting environment, and the artistic and visual styles that you are capable of rendering onstage.
![]() For More Info 3.1 Scheduling
For More Info 3.1 Scheduling
Refer back to Chapter 2.
Consider the Schedule
It is essential for you to work with the production manager, director, and entire team to break down the entire schedule of the digital media design pipeline and to determine how much time things will take once you get into the theatre. Plan extra time for unknowns and delays. How long something takes can vary a great deal, because everything is dependent on the complexity of the design. When creating a preliminary schedule remind everyone that you will need to revisit it once the actual design to be implemented is decided.

Source: Graphics by Daniel Fine; calendar template by www.calendarlabs.com
Know the Venue
If at all possible, try to physically visit the venue as early in the process as you can. It is beneficial to be in the actual location to have an intimate understanding of the space while you are in the development process. This also helps avoid any unexpected surprises about the actual venue before you arrive for tech week. Since this is not always possible, gain as much information about the performance venue as possible. Ask the production manager if any 3D models of the space exist (doubtful in small or older venues). Also, ask to see photos of the space and previous productions done in the venue. Make sure to obtain diagrams of the power layout in the space and also any grid, line set, ground plan, and sections of the space. Pay special attention to audience viewing angles and potential locations for projection equipment.
Ask about any information that can be shared regarding the technical booth and any existing computer/video networking infrastructure. The more you know about the actual space that the show will be mounted in, the better prepared you are to execute a design that incorporates the logistics of the building and the audience experience therein.
Design Meetings
Theatrical productions mean meetings, lots of meetings. Meetings between large groups, meetings between small groups, and meetings between only two individuals. Sometimes you are in the room for these meetings and other times you will video conference in.
![]() Tip 3.1 The Video Conference
Tip 3.1 The Video Conference
Being one of the only people not physically in the room for a design or production meeting is awkward. Even though you are telepresent, it is often difficult to see and hear everyone and to catch all the nuances and side conversations.
We recommend a video conference application that allows each party to share their desktop. This way if you or someone else is giving a presentation or needs to show a document, everyone is able to see the respective desktop of the other computer.
It takes a little extra effort on behalf of the people who are physically in the room, but if they are willing to go the extra mile, it makes your participation in the meeting much more meaningful. So, ask nicely for the following on their end:
- A dedicated camera with a wide-angle lens rather than a built-in laptop camera. The wider the angle of the lens, the more of the people in the room you are able to see.
- A dedicated microphone rather than the built-in laptop microphone. It is really hard to hear everyone from the tiny little mic of a laptop. If an omnidirectional microphone can be attached to the computer, you can hear everyone in the room much more clearly.
- A dedicated Bluetooth speaker. Laptop speakers are not made to fill a full room.
- Have a backup audio plan in place: if audio becomes an issue over the video chat due to network issues make sure to have a phone number and a phone that performs well in speaker mode or can easily connect to an external speaker/Bluetooth speaker device.
- A bit of thought to seating. In most meetings people just come in and sit wherever they want based on when they arrive and their whim that day. It is helpful to you if all the key people you have to receive information from are within sight of the camera.
- Request that a dedicated computer be used. Otherwise, if people need to use their computers or take notes, you end up seeing a close-up of them working on their computers and hearing them type.
On your end, it is helpful if you:
- Use earbuds or headphones with a built-in microphone that rests near your mouth.
- If possible, connect to an external monitor and use it for any digital note taking, so that your laptop is reserved solely for the video call.
- Do not attend the meeting in a coffee shop, library, or other place where external noises or pressures to be quiet intrude on your communication.
- Contact the person responsible for bringing you into the meeting beforehand to ensure you are on the same page in terms of what software and backup measures are in place.
- If you are traveling, test the Internet connection well before the meeting starts.
- If you are relying on your phone or some other wireless device to provide a connection, test that connection in the place you plan on being for the meeting.
Design meetings often happen early in the production phase. Some directors like to have design retreats that can range anywhere from eight hours to multiple days.
We highly recommend having as many initial design meetings as possible. Not every production or theatre company schedules them, but they are incredibly useful in the process in order to exchange and play with ideas before any hard decisions must be made. Take detailed notes during these meetings, so that you can refer to them at a later date. Don’t rely on memory to recall all the important bits of information and inspiration that were communicated in these early meetings. Be sure to jot down inspirations, keywords, things you want to research, your impressions, and so forth.
![]() Aside 3.1 Sample Notes
Aside 3.1 Sample Notes
Sample notes taken by digital media designer Daniel Fine in a design meeting for a devised production of Beneath: A Journey Within at Arizona State University, 2015.
Meeting 3/10/15
By May, Lance [the director] would like:
- Script complete
- Visual and sonic styles determined
Problems for designers to think about during the devising process:
- Needs to teach people
- Want people to learn about the earth
- Can’t just be art
Key things to think about:
- Leverage the power of the facility (make site-specific choices)
- Make the show: awesome, compelling, wondrous, an accessible experience
Some thoughts on style that came up:
- Quirkiness
- Metaphors: beneath, depth, what lies within (mystery, frightening)
- Cycles
- Spheres
Production Meetings
Did we mention there would be meetings? Production meetings are when both the artistic and production teams get together to discuss updates and talk about all the things related to mounting the production, from logistics to marketing, technical aspects of the production, and so forth. This is not the time to brainstorm about artistic ideas and possibilities or for designers to work out all the artistic elements of the production. Production meetings really should be about the logistics of putting together the show to ensure smooth coordination between departments.
The Script
Working with Scripts
Scripts sometimes include information about how the play, or scene within the play, is supposed to be staged. These are called stage directions. Establish with the director any idiosyncrasies in how the script is going to be used. The director is not obligated to adhere to anything in the stage directions or blocking that is written into a script, so be sure to have a conversation with the director on how she envisions adhering to the stage directions. Depending on the director’s approach, she may ignore some or all of the stage directions and blocking and come up with her own. Try to know these kinds of details as soon as possible to help avoid wasted work and missed expectations on how a scene or even the entire performance is going to be staged.
Often when working on plays that are long and would require a lengthy running time, as is frequently the case with Shakespeare, the director cuts the script from its original form to fit into a shorter running time. It is crucial to know what cuts are going to be made early on and that you have the actual version of the script that all the members of the team are using. Throughout the production process you will have multiple conversations about specific moments occurring on specific pages and lines of the script. Make sure that your script is the exact same as the directors and other designers. This goes a long way to mitigating confusion when trying to figure out exactly what moment in the play everyone is discussing.
Scripts provide the core knowledge and definition of a show’s intentions and the author’s vision for how it should be manifested. These of course may or may not be honored by the director and designers, but the answers to most of the questions that come up over the course of a production are guided by the script. The sooner you are familiar and intimate with its contents the better.
![]() Aside 3.2 The Order of Things
Aside 3.2 The Order of Things
We’ve said it at the beginning of this chapter and we’ve said it elsewhere, but it is good to say it again. Sometimes you will do things in a different order than we have listed. There is no correct way or singular approach. Remember that this is a suggested place to start. As you work on more and more shows, your own method will emerge. Sometimes things change on each production. Sometimes you’ll do everything listed in the third reading of the script in the first and second readings. Sometimes you’ll create a cue list before you begin the research. Other times, the cues may come in the email offering the job.
Reading the Script for the First Time
As a designer, reading a script for the first time is an important beginning to the journey. Pretend like you are watching the play unfold before you in the theatre. Let technical details fall aside and really focus on everything the script has to say about the story it is telling, the setting, the mood, and the characters. This introductory reading should allow your mind freedom to do its grandest of things: imagine. Try to free yourself to imagine without the bounds of reality, budgets, equipment, or restraint.
After you have seen the final moments of the performance play out in the theatre of your mind set the play aside and from memory do your best to run through these questions:
- Where and when in time does the play occur? Are these details necessary for the play or might they be changed?
- What is the basic story? Does the story play out chronologically? Is the convention of a blackout or curtain used to denote scene transitions? If not, does time progress over the course of the play or is it stagnant?
- Who are the primary protagonists and antagonists? Which characters go through the biggest changes between the first and last page of the play?
- Does the play easily fit within a particular genre or form, such as comedy, drama, horror, romantic tragicomedy, or space opera?
- What is the overall mood of the play and does this mood change in specific scenes or in the presence of particular characters?
- What are the conflicts in the play that produce the dramatic action driving the story forward? What are the ideas underlying these conflicts? Do they have some bias, moral code, or message inherent in them?
- Can any of the surface interpretations of the play be reconsidered and cast differently?
The clues for how, when, and where digital media might be included should begin to stand out to you. Come back for a second reading when you’ve had a day or two to process these things in the back of your mind. Let your subconscious go to work.
On the Second Reading
Now that you’ve read the script and begun to daydream, it’s time to read it again. In this second reading we still recommend avoiding the temptation of getting too specific and analytical. Your brain is going to want to start making choices. Listen to it, acknowledge it, take notes, or sketch, but try to give yourself the freedom of one more read to let the story, the characters, and the world of the play wash over you.
New things should begin to emerge as you’ve thought both consciously and subconsciously about the play since the first read. Pay attention to the specific colors, textures, and images that rise up in your imagination as you once again envision the story. Let your mind think about the scale of basic shapes and the human forms inhabiting them. If there is a bit of text defining an environment in the play, sketch out how that environment manifests itself in your imagination. Make a list of adjectives for each of the scenes describing the environments, moods, colors, and textures that come into your mind. Draw, doodle, and sketch. Free associate. This may be the last time in a long time you read the play with such freedom, before you start problem solving and designing cues.
On the Third Reading
Now that you have a strong context of the play it is time to be more analytical, critical, and focused. If you were to cut the play down to its spine, which three scenes or even three pages in the script define the story? Take specific notes about where you think digital media can be used to support this definition of the show, help tell the story, create a character(s), or help with script-based effects or special moments. Are there themes that digital media can help highlight or can it be used to underscore the subtext? Or are there possibilities for scenic elements or locations to be successfully created with digital media?
How do the characters speak? Is there a poetry to their way of talking? Is there something in the way one character or another uses dialect, wit, or vernacular? Focus on the sounds you hear in both the quality of voice and speech patterns. Does this lead you to think about how a character might be interpreted or staged using some sort of digital media? How do these ideas affect the world of the play? Do they help guide you in other directions than character?
If the play has specific and clear scenes marked with transitions you should break these down into moments. Consider each transitionary moment between scenes as its own specific beat within the play that requires your consideration. Because digital media can more easily jump in time and scale than the onstage physical world can, transitional moments or shifts in time can be some of the most mediated moments. Always check in with yourself: do these moments fit in the overall dramaturgy of the production?
A vision of how to approach the script with digital media should now begin to emerge. Nurture this vision as you focus on the language and the imagery that are both directly present in the words and actions of the characters, as well as visuals embedded by the playwright in the stage directions. But don’t get too married to a single vision yet. Stay open to new ideas and possibilities.
If you make it through these first readings as laid out here you are in a brilliant place to start engaging with the director’s and fellow designers’ visions and begin taking on their perceptions, expectations, and interpretations of the play.
A List of Lists
Take notes on each scene, using note cards, mind-mapping software, a piece of paper, or whatever works for you. Break things down into beats. This is sometimes called an action chart or ascene-by-scene breakdown and we often find it quite helpful to do this type of work within a spreadsheet. This helps identify key moments that may eventually become cues. At this point you might even begin considering where cues should be and start making an initial cue list. Or you may hold off and create the cue list after the research and conceptual stage.
Create a list of specific references made by the characters or playwright that you need to research, including time and place. This helps focus your design style and stay true to genre, period, and location when you arrive at the research phase.
Within each scene identify and list the following:
- Characters: Who are the characters in the play? This is a deceptively complicated question. There are the characters that are explicitly called for in the play because they have names and are listed in the character synopsis provided by the author. However, there are often many hidden characters or sources of dramatic action within a play. Sometimes props or set pieces are actually characters, such as the ring in the Lord of the Rings or the piano in The Piano Lesson. There are also many different modes in which characters exist within the story of a play—for example, Hamlet’s Ghost. Take note when characters seem to break the fourth wall or talk across time.
- The plot points: When is the exact moment that the story’s house of cards starts failing and then finally comes crashing down? Where is the moment that the core characters are changed forever? What is the dramatic action or purpose of each moment of the story?
- The locations: Make a chronological list of each of the different locations that are both staged and referenced in the play. Where and at what point in history does this play happen? Are there are any metaphorical or allegorical connections intended? There are the physical locations that the author points out, such as “the following happened in Paris.” There are also the metaphysical aspects of where plays are staged. Is the play really happening in Paris or is it happening within the heart or perhaps imagination of one of the characters? Perhaps certain parts of the play happen in one type of location and reality and other moments happen in different realities and locations altogether. For instance, in Next to Normal the reality of the shared family and the reality of the mother coexist onstage for long sections of the script, but need to be differentiated through design to ensure the intended story is understood by the audience.
- The time of day: Make note of any variations in the time of day per location, per scene.
- Season of the year: Should it be apparent? Does it change throughout the play?
- Time: Does the play take place in one day? One year? Many years? Flashbacks/forwards? Multiple times/locations at the same time? Does the play happen in linear time or does it jump times? How does time change over the course of the play? Are there particular times or moments of transition between things?
- Historical periods: Is there one? How does this detail inform the style and design of a location or interpretation of digital media? Are there different points in history when locations are represented in the story?
- Special effects: When do spectacular things happen in the story and action of the play? Examples: lightning and thunder, magical realism, storms, ghosts, and so forth.
- Objects and props: Identify any objects and/or props that characters interact with or refer to if you are thinking that any one of them might be represented using digital media.
- Hidden moments: Are there hidden moments that convey meaning or consist of events within the script that digital media can give body and presence to? Are there any special touches the director is contributing to the story that are not explicit in the script?
- Updates: Is the director taking an older work, such as The Visit, and updating its references to radio and newspapers with ones to television and mobile phones?
Devising
Traditional theatrical performances have a script. A playwright wrote a story and the rest of the team comes together to interpret that story and breathe stage life into it. However, more theatre artists are creating devised work with multiple creators. Devising is a collaborative process in which the entire team assembled, including writers, directors, producers, actors, designers, technicians, and managers, develops the show together, all involved in the creation process from idea to final product. Sometimes these new works have scripts associated with them, but often they do not. If the show you are designing does not have a script then you are going to be spending the bulk of your time working closely with whatever document does exist that lays out the performance (sometimes called a score or outline) and the cue list.
How to Be Productive in the Devising Process
- Since there often is not a static script that everyone starts with and refers back to, it is important to be able to navigate the process of devising new work. If the team is working with source material, use this as your foundational guide. If the work is about an idea or topic, you need to spend extra time researching the topic and all the various approaches.
- Set clear goals about what digital media represents. Too often it is easy for collaborators to say, “Digital media can handle that.” You need to keep asking questions. What does the presence of digital media mean? What does it represent? How can you better tell the story or explore themes with the use of technology that you couldn’t otherwise? How can the team use digital media to bring things to life in a meaningful way? If you keep reminding everyone of this and you stay open to new ideas and possibilities you will be more successful in the process.
- Don’t be precious about your ideas. Be ready to cut things that don’t work and try something new. Don’t invest a large amount of time or resources producing content before it has been confirmed for use in the final production.
- It is extremely helpful to work with the digital media in the creation process. Don’t just talk about it and what it can do. Figure out ways to integrate it into rehearsal and brainstorming sessions. This can open many new doors of possibilities, while also closing ones that aren’t right for the performance.
Constraints
When you are devising there can be endless possibilities. Constraints help you have a place to start and to focus. They provide a framework to work within, as it can be easy to get lost in all the options. When there are limitless possibilities, often there is no real place to start. Try to give yourself some restrictions, such as space, equipment, or a rep plot. Do this as early as possible. For instance, if the team decides that live cameras will be included as primary resources before the exact story details are pinned down, you can add a constraint by determining the specifics of how the cameras are to be used, even before knowing their exact dramaturgical functions. For example, decide that you will work with two wired cameras, a wireless cellphone camera, a projector, a live video mixer, and a specific media server. Bring as much of the system as possible into rehearsals. Now you are in a place to really explore how the system and design contribute to storytelling during the devising process. Another idea might be to restrain the team to a certain style of design. Applying these types of constraints helps you to shape the performance while also creating an embedded meaning for the role that the digital media is playing within the production.
Design Phase I: Research
Research is the gathering of inspirational materials and potential visual resources for the design approach. You will eventually share this visual research with the rest of the team, as other departments do. Visual research inspires and informs your design in many ways, such as your approach to specific moments within the play, period, style, color palette, historical events, or types of presentation formats (projections, LED panels).
A director usually presents his or her own research ideas to the design team at some point in the process. This may happen before or after you have begun your own research. You may find yourself weaving the director’s vision, the dramaturgical intentions of the script, and the other designers’ research into your own research.
Occasionally, there is a dramaturg working on the show you are designing. A dramaturge is a theatrical researcher and specialist in dramatic composition whose expertise is finding the cultural, linguistic, and other historical or academic references and meanings within a play. A dramaturg can be an invaluable ally when working on culturally complicated material or when you are working with subject matter that you yourself are not an expert in. When dealing with culturally significant design materials it is important that you understand the meaning of the elements you include in your designs.
Depending on the play, designing digital media often means that you become more than a visual researcher for the creation of art. Sometimes you may also become a bit of a historian, as you may need to represent or recreate historical images or events.
![]() Case Study 3.1The House of the Spirits Design Research
Case Study 3.1The House of the Spirits Design Research
by Alex Oliszewski
The House of the Spirits
By Caridad Svich, based on the novel by Isabel Allende Arizona State University Mainstage School of Film, Dance and Theatre 2012
- Digital Media Designer: Alex Oliszewski
- Director: Rachel Bowditch
- Lighting Design: Anthony Jannuzzi
- Scene Design: Brunella Provvidente
- Costume Design: Anastasia Schneider
- Sound Design: Jason M. Stahl
- Dramaturgy by Nestor Bravo Goldsmith
- Composed by Caridad Svich
- Additional composition provided by Andrea Silkey
When working on The House of the Spirits there was a section in the script addressing the disappeared and missing people—the people who had been kidnapped, murdered, and tortured by a military dictatorship. The script does not explicitly state where the dramatic action of the play is happening; however, through inference and research it became clear that the play takes place in Chile. This fact and other basic references within the script were easy to research and establish for myself. However, when I started doing image research to see examples of actual missing people and the disappeared, I needed the help of a skilled dramaturg to ensure that the images I was finding were accurate to the time period and usable for the production within the context of the story we were staging.
Unfortunately, when searching images and records with the term “disappeared” more than one atrocity came up. There are even online repositories that do not properly distinguish between the disappeared of Chile and other locations from this time period and other moments in time. Having a dramaturge help refine and sift through this research was invaluable.

Figure 3.3 The House of the Spirits disappeared scene production still
Source: Alex Oliszewski
To Research Previous Productions or Not?
There is not a universal consensus on whether to research previous productions. Allowing your own ideas to rise from the script before you are influenced by the designs of others may or may not be an important distinction to you. Learning early on too much about how other productions staged a show may contaminate your own concepts. By not researching other productions, it may allow you to legitimately take a stance that on your own you came to a similar idea that another designer had. This helps keep you artistically and intellectually honest about your design.
Yet, this is not to say that you should remain ignorant of other productions. After you’ve had the time to work through some of your own ideas it is helpful to see other design solutions. You might not want to come anywhere close to a similar design and the only way to know that is to research it.
Avoid starting your research process by steeping yourself in what has come before and wait until after you have some initial ideas of your own to see what others have done before you.
Finding Your Research
The Internet has made visual research a lot easier. You can search large collections of images and videos without having to leave your studio. But there may be times when it is important to actually look at images that are not digitized and placed online or to view the originals. For these types of research projects, you may need to visit a special archive or particular library. If it is important to your work and the production has the money to send you to a special archive, then we highly recommend you do so. The assistance of a staff member at a specialized repository of images can be invaluable. Seek out any relationships and foster them. You’ll be able to return again and again to certain resources over the years.
Organizing and Sharing Research
We suggest you break down and organize your research into the following categories:
- Style
- Genre
- Period
- Mood
- Color
- Shape
- Form
- Technology
- Movement/pacing
You may wish to do this for the entire play and also scene by scene. If you are downloading images or saving them to cloud storage, we recommend organizing your research in specifically titled folders. This helps you sort through the research.
Sometimes an image might strike the team and you want to go back and research more images from the same source. You need to know where you found the image, if you have hope of returning to it. Google makes things a bit easier with the reverse image search function, but you should not rely on this tool to find the original source of your research images and video. Here are some methods of organizing the research so you can find the original source:
- Create a spreadsheet with details of the original source for every image you download or find.
- For digital files downloaded from the web, paste the original source path into the name of the file.
When asking yourself how to organize your research you should also consider, “How will I communicate my research?” Since you will eventually share the research with the team, it is a good idea to think about this at the organization stage. How you share the research may help you determine how to organize it.
Some designers create a slide-show presentation. This is a time-consuming but nice solution because you can then share that presentation with the team for them to return to at their leisure. Another method might simply be to organize all your folders of research into one cloud-based research folder that you can flip through at a research presentation and then share with the team.
![]() Tip 3.2 Organizing and Sharing Research Via a Pinterest Board
Tip 3.2 Organizing and Sharing Research Via a Pinterest Board
A method that we have found useful in organizing research is to create a Pinterest board. If you are working on a production of Hamlet, create a Pinterest board called something like “Hamlet Digital Media Design Research.” You can then share that board with the director and other designers. Note: They have to be a member of Pinterest to join the board. Some benefits include:
- It is one central location for all your research. Since it is cloud-based, you won’t use local hard drive space for storing research.
- If you have the settings properly configured, pinning anything to a Pinterest board tracks the original Internet source of the image. This is tremendously helpful, because you won’t have to think about that bit of organization any longer and can just focus on the research, knowing that you have a system that tracks the source for you.
- You can notate each image. This allows you to highlight what each image or video represents. You can add a comment such as “Style: a nice example of an overall style for the show” or “Color: I love the shades of blue in this photo.”
- The director and fellow designers are also able to comment on each research image or video. This helps record and track conversations about images and also aids in continuing the discussion beyond the research presentation meeting. It’s also useful if other members of the team want to research something based on the source, since they will have access to where the research originated.
- Boards can be private or public.
Mood Boards
Often used in the costume design area and in corporate work, some digital media designers create mood boards. Think of this as a collage of inspirational visual items, such as texture, color, pattern, and style, that all work together to communicate a feeling and evoke place, character, approach, or period for the entire digital media design or an aspect therein. Mood boards are a creative conversation starter and method of translating ideas, not the actual design. They are a starting place for your synthesized research ideas that eventually might springboard to a full design concept.
Design Phase II: Conceptual Design
Now that you have done all the research, seen the director’s and other designers’ research, and had a few conversations with the director about the general approach, it is time to begin to put all these ideas and images into a concept. A conceptual design or design concept is a unified idea or vision for the design. Your responsibility for creating the design concept for the digital media is to base it upon the director’s vision and your research and interpretation of the script. Your purpose is to visually communicate to your collaborators how digital media creates character (if appropriate) and represent the play’s themes, locations, and other design needs. Be sure to cover style and color palette as a basis for creating harmony with all other design areas.
Conceptual Design Statement
A design concept statement is simply putting into words the visual ideas for your design. In addition to providing visual elements, some designers write a design concept statement. Other designers verbally say all the elements that would be included in the statement during their concept design presentation. Whichever approach you take, this is your opportunity to use words to articulate and justify all the choices you have made that make up your design. What about the director’s vision led you here? How does the design fit into the dramaturgical world of the play? Elaborate in detail how you will execute and accomplish the design.
Design Presentations

Figure 3.4 Sample mood boards for scene 34 of The House of the Spirits by Caridad Svich (Arizona State University Mainstage, 2012)
Source: Alex Oliszewski
You’ve met with the director and fellow designers to discuss research and possible paths forward. You’ve shown that research to the entire production team. Everyone has a sense of where you are going. Now you have arrived at the point where you need to synthesize and present your design concept, responsibilities, and requirements to the entire team. You should expect anywhere from ten to twenty minutes to present and discuss your area, as all other design departments also present in this meeting.
The director should know what to expect at the first design presentation meeting. It can be alarming for him or her to find out in this meeting that the design path you have set yourself on is different from what has been discussed from the research. In order not to have a surprise, share your materials with the director in advance of the design presentation to discuss where you are in the process. This way there are no surprises in the design presentation. You do not want to arrive at this presentation not knowing what the director thinks of your work.
Once your ideas are laid out for your colleagues, stop talking. Listen to their feedback and take notes. Don’t explain yourself unless they don’t understand something. Ask questions that help you understand what they see and don’t see. Give them permission to tell you what and how they would change things. Be ready for the director to tell you he or she wants to see something different. Take the note. Think about the note. Accept the note and offer a way of moving forward. At every level of the process it is our job to do what is best for the show.
After the design presentation, you typically have a short period of time when you receive feedback that may or may not require you to update your ideas, renderings, and expectations for the design. Rehearsals will begin, and in most cases, all the designers are invited to present their design concepts to the cast. Depending on the schedule, you may not have much time in-between these presentations to make changes based on the feedback you are given.
As you move forward in the process, if you are going to do something that is divergent from what you have already confirmed or discussed with the director or fellow designers, you should confirm with them that your new idea is going to work for all departments.
Design Phase III: From Script to Cue List
In theatrical terms, a cue is a trigger that initiates something at a specific moment in time. Cues are normally associated with specific moments, such as actions, transitions, or emotional changes, and can be triggered by a line of dialogue, staging, scenic changes, or a sound. In early readings of the script you probably have started noting places for cues. Some cues are easy to discover in the script, such as scene transitions and time-of-day shifts. Others may not be as evident. Your story and approach to using digital media determine the types and number of cues.
The cue list is one of the most important documents you create and guides you through all upcoming phases of the process. It tells you not only where cues are located in the script but also how they connect to previous cues. This gives you a holistic overview of how the cues relate to one another and how they are collectively working to tell a story, suggest a mood, or create a character.
The cues also give you an idea of how the content needs to be delivered and programmed in the media server. Planning how cues are to be executed aids the programming process. It is easy to join two cues with an auto-follow. As a rule of thumb, removing or joining cues is much easier than adding new cues.
Creating the Cue List: Scene-by-Scene Content Breakdown
The first step in creating the cue list is to translate the script into a workable list using the script breakdown where you created beats, which can now translate into individual moments that become cues. If you are using prerecorded video to create a character who speaks and each line of dialogue is an independent movie, then each time that character speaks is a new cue, even if it ends up as an auto-follow.
If instead the character is played by an actor in real time in front of a live camera, then it is possible to have as little as two cues for the scene. The first cue would be to fade in the live camera onto the video display and the second to fade out the live camera. Of course, a live camera feed could have any number of additional cues, such as effects, compositing, and sounds.
These two examples represent significantly different approaches in terms of meaning making, aesthetics, and technical execution. The use of one or both directly impacts the cues in terms of content and system design. In the first example, you have to create video content for all the cues and build in flexibility with the cueing to allow for finessing with performers in rehearsal. While in the second scenario, you have a more complex production system to set up, but not as much content to build and trigger in performance.

Elements of a Good Cue List
We suggest using a cloud-based spreadsheet to manage the cue list. This way you can share it with everyone on the team and multiple members of the digital media design department can be working on the same cue sheet at the same time. We suggest the cue list contain the following information per cue:
- Cue number
- Page number
- Auto-follow
- Cue description
- When cue called
- Scene number
- Description of dramatic action for the scene
- Time of day
- Season
- Priority for completion (high, medium low)
- Completion status (in progress, complete)
- Who is creating the cue
- How the cue is created
- Cue length
- Notes
One of the great things about using a spreadsheet for both the cue list and the to-do list is that you can add conditional formatting to the columns. We use conditional formatting to change the background colors of cells and also the color of a cell’s text. For example, for the “who is creating the cue” column in the cue list and for the “who is responsible for the task” column in the task list you can set up rules that automatically change the color of the text based on the name of the person who has to accomplish the cue or task.
The To-Do List
If you include all the foregoing items in the cue list, you are on your way to having a list of things to do. After all, all of these cues have to be designed and often require multiple steps to create them. This is where the to-do/task list comes in. It further breaks down what needs to be done per cue and who needs to do it. There are of course items that make it onto the task list that are systems-related or outside the immediate correlation to cues. It’s good to keep all the to-do items for the show in one place. Again, we recommend using a cloud-based spreadsheet, so multiple members of the team can view and edit the document at the same time. We simply use a new tab in our cue list spreadsheet for tasks. We further recommend that you incorporate tech notes right into the task list. We suggest the task list should contain the following:
- Priority for completion (high, medium low)
- Who is responsible for the task
- Task description
- Item/cue number
- Type (content/system)
- Target due date
- Notes
Reviewing the Cue List with the Director: Early and Often
Share the cue list with the director as early as possible. You won’t want to spend hours working on a cue only to find out that the director had something else in mind or expected more development on a different idea.
Cue Numbering
We tend to number cues by fives. This allows for ample room to insert new cues without having to add too many point cues that the stage manager needs to call. It also means that if you have forty cues, the last cue number is 200. We suggest not renumbering cues to try to have lower cue numbers. This only adds confusion. Simply cut cues when needed. It is okay if you have a cue number 217 and the next cue number is 236. It matters only that the cues are sequential. Ask the stage manager for any cueing conventions he or she uses or prefers.

Figure 3.6 Sample cue list for Everybody’s Talkin’: The Music of Harry Nilsson by Steve Gunderson and Javier Velasco (San Diego Rep, 2015)
Source: Daniel Fine

Figure 3.7 Sample task list for Count of Monte Cristo by Frank Wildhorn and Jack Murphy
(Brigham Young University Mainstage, 2015)
Source: Daniel Fine
![]() Aside 3.3 Where Is the Creativity?
Aside 3.3 Where Is the Creativity?
What we have provided here may seem like a laundry list of things to do that are mechanistic with many details to consider that seem endless. Where is the creativity?
The tasks and considerations listed here and throughout the book can serve you in any production regardless of the specifics. However, it is precisely the specifics that often inspire creativity and that creativity usually demands. It is specific stories, moments of action, flights of fancy, shapes of costumes, lines of dialogue, and so forth that allow us to drill down from generalities of practice into the dramaturgical creative guts of art making in digital media and projection design.
To unlock some of your creative juices as a digital media designer, try putting some of these practices of script reading, research, and cue-building skills we outline here into a script that you love and inspires you. Try creating some content for a moment in that script. If a play doesn’t come to mind, practice with one of these scripts:
- The House of the Spirits by Caridad Svich, based on the novel by Isabel Allende
- The Piano Lesson by August Wilson
- The Tempest by William Shakespeare
- King Gordogan by Radovan Ivsic, translated to English by Carla Stockton
- A Wrinkle in Time by John Glore, based on the novel by Madeleine L’Engle
- Marisol by José Rivera
- A Christmas Carol by Charles Dickens
- On the Verge or the Geography of Yearning by Eric Overmyer
- Cloud 9 by Carol Churchill
- Bombay Dreams by Meera Syal and Thomas Meehan
- Disgraced by Ayad Akhtar
- Good Kids by Naomi Iizuka
- Songs of the Dragon’s Flying to Heaven by Young Jean Lee
- Fun Home by adapted by Lisa Kron and Jeanine Tesori, from the graphic memoir by Alison Bechdel
- Nine Parts of Desire by Heather Raffo
Looking Ahead to Calling Cues
Stage managers call cues, so looking ahead to tech and the performance run, consider how the SM calls the show. The stage manager should not have to call cues based on other cues. She should call cues based only on action, text, or other production elements. So, if a cue needs to go based on another cue, you need to program it to auto-follow. The fewer cues a SM has to call, the better. Collaborate with sound and lighting to link up cues and figure out if they can trigger each other, again reducing the amount of cues an SM has to call and also allowing for more accurate timing of cues.
![]() Aside 3.4 The Origin of TAB
Aside 3.4 The Origin of TAB
As told by Wendall Harrington and Paul Vershbow
It is too wordy for an SM to call “Digital Media Cue 5 Go,” or “Projections Cue 5 Go.” There needs to be as few syllables as possible for the SM, since he or she is often calling so many cues at once. A one-syllable word is best, such as light or sound. An industry standard for projections and digital media is the word “tab.”
In the 1970s and 1980s, Audio Visual Laboratories (AVL) built a line of computerized multi-image slide-show computers that were more or less the standard machines (early media servers) used in both legitimate and industrial theatre at that time. Projection Designer Wendall Harrington used the original AVL slide programming system in her productions to coordinate the imagery. The computer had a “tab” button that could be used to demarcate cues, so Wendall’s team ran with it and used that word for calling the cues. Her rationale: “It’s short and sounds like nothing else, so we kept it.” She continued to train stage managers to use that word for calling projections cues and thus the TAB cue was born and lives on to this day.
Design Phase IV: Deciding on System and Technology
At this point in the process you need to focus on the system. You must decide what media server, equipment, and gear you need to make the design come to life.
How you choose the media server depends on what the theatre has in stock, the budget, and ultimately what you need to do to achieve your design goals.
One of the biggest considerations in choosing a media server is the relative ease of programming and creating/playing back cues. Not all media servers are designed for theatrical productions and some are less complex and faster to program than others. The media server you use dictates what you can or cannot quickly change in a rehearsal or technical situation. If you have a choice of which media server to use, you should factor in the speed and ease of programming, along with the specific needs of executing the design.
The design of the media server’s human-computer interface is one of the most defining features that contribute to the speed of programming. The most popular media servers are those that have had their interfaces specifically designed to expedite programming to work in a theatrical cue-based way, as is demanded by theatrical convention and the functional realities of producing a live performance. For example, theatrically friendly cueing does not exist in the user interface in TouchDesigner and requires you to establish your own method and approach to cueing using the tools provided by the server.
Each media server has its own methodology of compositing and playing back content. When creating content for the show it is important to understand how the media server works so you can properly build content. Will the content be rendered and played back mainly as is? Or are there many different assets that are composited together and manipulated live via the media server?
The simpler the design the simpler the media server can be. If you need to project only a couple of still images during the course of the show you can use PowerPoint or Keynote, not true media servers, but cheap or free presentation software that may suit your needs. If you need a system that is more robust, allowing for the blending of multiple projectors, compositing, complex geometry correction, and finer control of assets, you could use QLab, Watchout, or Pandoras Box. If you intend to include interactivity into the show, like real-time generated particles based on the location of actors on the stage, you need a media server that offers that level of support, like Isadora or TouchDesigner. Another option might be to build your own software. Holger Förtere’s approach to create the interactive projections for Cirque Du Soleil’s show KA was to program from scratch, using a low-level programming language, like C++.
There are two general thoughts on mastering media servers. One is to become a master user of a specific server and use it in all or in as much of your design work as possible. For a technician, this is one of the best routes, as it means you have a high skill level with a specific tool. As long as you choose one of the more complicated and industry standard servers to master, such as Watchout, D3, or Pandoras Box, you will be better assured work as a programmer in large cities and markets with established communities of performance venues. There are established designers who do not work with media servers directly and rely on budding designers to program the server. The larger the project the more likely a designer will use a programmer.
The other option, the one we have chosen as designers, is to be media server–agnostic. This means that we use whatever server is best for the specific job, or whatever server the theatre has available. If you choose this option, your knowledge tends to become more general and you may need a programmer or the time to learn when working with servers that you don’t know as well. We recommend that you become a proficient programmer in at least one cue stack and one timeline-based server.
When working at a high level of complexity you may find you need to use multiple media servers to deal with the different elements of the design that you are creating. For example, you may need one media server to deal with interactivity capabilities and another that focuses on straightforward video playback. Or perhaps you need to integrate a customized interactive projection solution for playback in the traditional theatrical media server.
![]() For More Info 3.2
For More Info 3.2
See “Media Servers” in Chapter 5.
System
The system includes the media server, any live cameras, video mixers, projectors, networking, and so forth. You need to think through all the equipment needed to accomplish the design and provide a system diagram showing how everything connects.

Figure 3.8 Sample system diagram for Count of Monte Cristo by Frank Wildhorn and Jack Murphy (Brigham Young University Mainstage, 2015)
Source: Daniel Fine
![]() Tip 3.3 Resources for System Diagram Creation
Tip 3.3 Resources for System Diagram Creation
You can create system diagrams in any number of ways, using programs like Illustrator, Photoshop, Vectorworks, a drafting table with pencil and paper, and so forth. We like to use mind-mapping software, as it is a graphical method to represent interrelated ideas. These types of software allow for quickly creating nodes and connecting them to other nodes to show various signal flow. Our current free software of choice is the Visual Understanding Environment (VUE), an open-source project based at Tufts University. OmniGraffle is also popular, but pricey.
Stock Equipment
If you are not given a budget large enough to purchase or rent the projection equipment needed then you will most likely be given access to some set of gear. Immediately identify what this equipment is and learn about its typical use within the venue. Most professional theatres have at least one projector, a media server, a dowser, and miscellaneous video signal cables. Inquire if the theatre owns actual projection screens, networking and routing equipment, and additional external monitors, keyboards, and mice for tech, and if there are video cameras for live capture. Before you are in the theatre using any stock equipment, download the manuals in case a problem arises.
Rental Equipment
If the stock equipment does not include gear you need to execute the design, you need to rent. You’ll want to let the production manager know right away that you may need a larger budget for rentals. Be sure to ask if there are already vendors that the theatre works with and if you or the PM should contact these vendors for price quotes. You may need to rent equipment for tests before load-in. Rental companies usually set up gear for you in their facilities to view side-by-side tests. When renting gear, be sure to allow days for delivery and pick-up that are outside of the load-in and strike days. This way if something goes wrong with a delivery a crew isn’t standing around waiting to install. Same thing for load-out—if you get behind in the schedule, you don’t want the rental company waiting on the loading dock for the gear to be packed and ready to go.
Purchasing Equipment
Sometimes it is more expensive to rent a certain piece of gear for a lengthy rehearsal process and/or performance run, even a short two- or three-week run, than it is to purchase the same item. Talk to the PM about the cost of rental vs. purchase. Even if it is a bit more expensive to purchase the item, it may be cost-effective for the theatre to own if it is something that they will use often. The cost of several rentals could very well pay for the purchase.
If there is no budget to rent or purchase the gear you need for design, how can you adapt your idea to what you have? Constraints are the mother of invention and design.
Projector Placement
If you are using projectors you need to decide if you will use front projection, rear, top-down, or in rare cases side projection. Your decision is a mixture of artistic and technical considerations. You may want to use rear projection, but you may not have enough distance, and so forth. In order to help you determine where to place the projectors, answer these questions:
- What is the overall artistic effect you are trying to create?
- What kinds of interactions do performers have with the projections?
- What will the lighting situation be when the projections are active?
- If you don’t already have a stock solution for how the projectors are going to be set up, or you need to rent projectors, what are the specifications of the projectors that you are going to need?
- Does the performer casting shadows on the projected image matter?
- Is it okay for there to be projections on the performer?
- Are there any restrictions to mounting locations for the projectors?
- Are they any obstructions that would be in the projections that cannot be moved?
- How big does the image need to be?
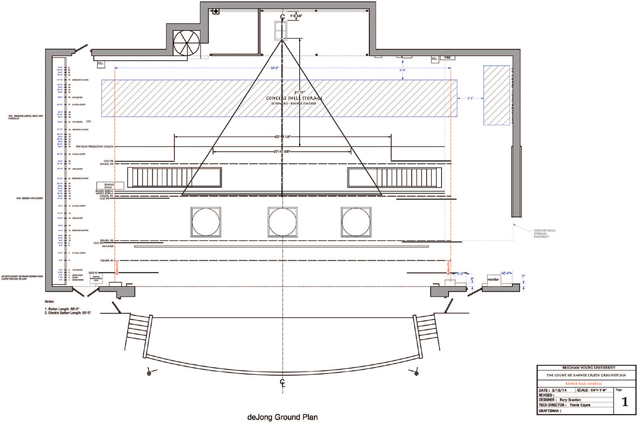
Figure 3.9 Sample projector placement ground plan for Count of Monte Cristo by Frank Wildhorn and Jack Murphy (Brigham Young University Mainstage, 2015)

Figure 3.10 Sample projector placement section for Count of Monte Cristo by Frank Wildhorn and Jack Murphy (Brigham Young University Mainstage, 2015)
This last question of image size is one of the most important issues that you have to address at this point. How big the projection size is determines the placement (distance from the screen) of the projector. Once you have figured out where the projectors are to be located in physical space, you need to provide a ground plan and a section specifying projector placement.
![]() For More Info 3.3
For More Info 3.3
See “Working with Projectors” in Chapter 5.
Design Phase V: Content Creation and Show Integration Workflow
This is the main creative praxis time in the process. Like anything in digital media design, there are no hard and fast rules. Typically, content creation happens in three phases that we have broken into the following categories:
- Initial: This phase includes your rough and first full drafts of content.
- Intermediate: This phase includes your second and final drafts of content. You add more details and include revisions as more details come together in terms of staging and other design areas.
- Onsite: This is the final version of the content that is completed in the theatre and that the audience sees.
Seek out notes from the director during all stages of the content creation workflow.
Initial Phase: Roughs
This is your first pass at content. It may be wireframes or animated storyboards. Roughs are meant to be a starting place. These are exactly what the name implies: rough. It is where you begin to translate your ideas and research into practical designs. Drafts of content need to be in the same aspect ratio and resolution as the final content is intended to be. Design is about precision and if your roughs are in a 4x3 aspect ratio and the final content is in a 16x9 ratio, compositions are going to look and feel different. So, begin with the final format in mind. To save time, you can render/export roughs in a lower resolution for review.
We often don’t want to share our roughs with anyone because we want things to be in a more polished state before we get notes. But it is good to share roughs with the director and other designers and receive their feedback. You don’t want to spend hours on something that isn’t going to work. Note, however, that you may need to do a lot of explaining about what you intend and what the final content will look like, so that the director and other collaborators are not judging the rough as the finished work, but only as the basis for what lies ahead. The more accurate you are in your descriptive language explaining exactly what will be different between roughs and finals, the easier the conversation.
Roughs are also great to use in rehearsals. It gives the directors and actors a chance to begin to visualize things. It also allows you to see how the visuals are working within the stage world. You may discover a lot about where the content needs to go by incorporating it early into the rehearsal process.

Figure 3.11 Sample rough content for The House of the Spirits by Caridad Svich. Found image from the public domain. Digital media design by Alex Oliszewski. (Arizona State University Mainstage, 2012)
Source: Alex Oliszewski

Figure 3.12 Sample firsts content for The House of the Spirits by Caridad Svich. Content has been filtered and prepared for projection. Digital media design by Alex Oliszewski. (Arizona State University Mainstage, 2012)
Source: Alex Oliszewski

Figure 3.13 Sample seconds content for The House of the Spirits by Caridad Svich projected onto 3D model. Digital media design by Alex Oliszewski. Lighting design: Anthony Jannuzzi. Scene design: Brunella Provvidente. (Arizona State University Mainstage, 2012)
Source: Alex Oliszewski

Figure 3.14 Sample final content before tech for The House of the Spirits by Caridad Svich.
Digital media design by Alex Oliszewski. (Arizona State University Mainstage, 2012)
Source: Alex Oliszewski
Initial Phase: Firsts
This is the first revision to the content. All revisions should include notes from the director and any designers whose work is impacted by your design. A revision may simply be modifying colors. It may also be starting from scratch. It’s okay if things don’t always work on the first pass. Keep yourself open to change, experimentation, and creative inspiration.
Make sure to have working versions of each phase of content creation. We recommend saving multiple, sequential versions of the content creation files as they are produced. This way you can always go back to a previous draft or avoid losing too much in a catastrophic failure of a working project file. For mission-critical content, back it up to the cloud and on a local drive that can be stored elsewhere from the main system.

Figure 3.15 Sample onsite content for The House of the Spirits by Caridad Svich. Digital media design by Alex Oliszewski. Lighting design: Anthony Jannuzzi. Scene design: Brunella Provvidente. Costume design: Anastasia Schneider. (Arizona State University Mainstage, 2012)
Source: Alex Oliszewski
Intermediate Phase: Seconds
Depending on how much time you have in the schedule, not all cues receive a second. Or you may just have nailed it on the first. Seconds are simply further refinements and enhancements to the content from the previous draft. These are often needed when working things out with the director and other creatives on the project.
Intermediate Phase: Finals
Once again, the final is exactly what it sounds like— final. It is the completed content. A lot of productions have a finals date in the master schedule. However, depending on the type of design, the look may come together more in the theatre than in finished assets delivered before tech. So, you need to know how you are creating content. Is the design mainly about creating and displaying prerecorded movies? If it is, firsts, seconds, and finals are more reasonable to produce. Unless you are working with long lead times or on a big Broadway show or a large touring production that requires significant sign-off from stake holders, you probably won’t produce a rough, a first, a second, and a final all before you are in the theatre for tech.
Onsite Phase: Finals in the Theatre
Maybe it’s just the word finals. It means, well, final, complete, and no more changes. But this is never the case. So, let’s redefine finals. Let’s think about finals as the assets you need to program the show for playback. If the digital media design mainly involves live compositing of elements, then seeing completed firsts, seconds, and finals probably will not happen. The director might see only a “final” of three parts of a sequence, but won’t see the final version until they are all composited together in the theatre. If this is the case, you need to make this expectation explicitly clear to everyone from the beginning.
It is extremely rare that a prerecorded movie is not tweaked somehow during tech. We can’t remember the last time we made content and it was in the final form without any changes after the finals due date before tech. In this instance, digital media is more like lighting. You won’t know what you have until it is composited together in the theatre on the actual set in conjunction with all the other elements.
The best-case scenario is to arrive in tech with all the content made. This way you aren’t creating any new content during tech week. On shorter deadlines, this is not always possible. Tech should be about finalizing the design by making modifications and refinements to the content. Of course, there may be instances where you discover that you got it wrong and have to start again, thus needing to make new content. A production is a living, breathing, and changing animal until it is locked down at the end of tech. Even when you have done your best planning, it is not always within your powers to be prepared for the decisions and realities that arise from tech.
Design Phase VI: Load-in and Tech Week
Load-in, which can take anywhere from two hours to multiple days, is when all the equipment arrives at the theatre and is set up. For the one to two weeks before a show opens there is often a period of time known as tech week. At this point the system is fully installed and running so that you can program the media server with all the assets in order to create cues for playback. It is at this point that rehearsals with the actors move into the theatre and all the design elements are incorporated into technical and dress rehearsals.
![]() Tip 3.4 Handy Tools for Tech
Tip 3.4 Handy Tools for Tech
- Pointer highlight app: Any app that you can install on the media server that highlights the cursor or places a circle around it. This helps you see where the mouse pointer is on the projected surface when creating masks and mapping.
- Laser pointer: This allows you to point to certain areas of the content onstage. It really is useful to be able to point to something rather than using words to try to describe something, like “that little purple dot on the left.” Instead just use the laser pointer. We recommend a green laser as it tends to be more visible at longer distances than the more common red ones.
- External monitor(s): Do not rely on only a laptop screen during tech. You need the extra space to maintain productivity.
- A fast read/write USB jump drive to move data quickly between computers.
- External keyboard and mouse: These come in handy for your laptop. Do not rely on the poor ergonomics of a miniaturized keyboard and track pad. Some quick key commands relied on in content creation software, like Adobe After Effects’ various rendering quick keys, are not accessible on a laptop keyboard.
- Goose neck–type run lights with a red filter option.
- Spill-proof water bottle.
- Crumb-free snacks to share.
- Work gloves.
- Multi-tool.
- Headlamp with red or blue light. Having a red or blue light is less harsh on the eyes for others in the theatre, while also allowing you to see as you move around a dark space.
- Something to provide back support and soft to sit on.
- Blanket, hoodie, and a small USB fan, so you are prepared for various climate conditions in the theatre.
- A limit to the amount of coffee you consume.
All the things that you and the team carefully considered and talked about now become realities. You finally see a nearly completed set with light and the actual placement of actors in relation to your assets. You may encounter issues with how the system is working (or not working). More often than not this requires you to spend additional time in the theatre fixing things and updating the content.
Everyone is under stress and feeling the pressure of time. The more organized and prepared you are the smoother tech goes. It is your responsibility to maintain clear communication with all departments about what you need in order to complete your design. Be as flexible as you can and stay open to last-minute changes and happy accidents.
Paperwork
By this time in the process you have significantly less time to do all the things that need to be accomplished. One of the important items that you cannot let slide off your plate is the upkeep and maintenance of the paperwork supporting your design. In the craze of tech, it is easy to stop compiling notes, updating cues, and generating a paper trail of where you are in the process. Ideally you have an assistant who is responsible for the upkeep of these materials so that you can focus on the artistry and execution of the design.
![]() Aside 3.5 The SM and Paper Tech
Aside 3.5 The SM and Paper Tech
A stage manager is often going to request a paper tech. If they don’t, you might consider requesting one with them. This is a meeting of the SM, director, and all the designers who have called cues. Generally, this meeting happens anywhere from a week to a day before tech week starts. It is an opportunity for the SM to rough in her script where all the cues go and for the team to agree on where important moments are happening so that cues can align with each other. Paper tech can last anywhere from four to sixteen hours depending on how complex the show is.
While it is vital for the SM to know, as exactly as possible, where to call each cue before going into tech, it can be disruptive in the crunch time before tech week to take hours away from content creation to dedicate to paper tech. We recommend that you keep an updated cue list in some form of online document or spreadsheet, such as Google Drive, and give your SM and design team the ability to view your cue sheet. Note where each cue is to be called on the cue sheet. If all departments did this, the SM would be able to rough the cues into the show book without the need for a long meeting. This would allow a shorter meeting with individual design departments or if need be the entire team to clarify specifics.
If you have taken our suggestions in preparing the cue list and task list from this chapter’s section “Design Phase III: From Script to Cue List,” you are well on your way to having paperwork that is easy to update. In the cue list, keep the completion column updated so that you can quickly glance through to see if a cue is in progress or completed. It’s also great to see who is creating the cue if you have a team of more than one.
You have to generate the paperwork needed for the board operator, run crew, and administration to ensure that your design can be performed night after night exactly as expected. You also need to develop a plan for system failure, human error, and maintenance of equipment.
![]() For More Info 3.4 Operator To-do List
For More Info 3.4 Operator To-do List
See “Training Operators” in Chapter 3.
Rendering
By this point you have rendered some or nearly all of the content for use in rehearsal or at the very least to show to the team in the form of firsts, seconds, and so forth. Now you need to render all of the content at full resolution so that you can program it into the media server and be ready for the first day of tech. You might be constantly working on the content throughout tech and dress rehearsals, so you could be rendering a lot. Figuring out a good working method for rendering is crucial to a successful tech. Rendering times always take longer than anticipated, so be sure to plan extra time.
![]() For More Info 3.5 Details on Rendering Content
For More Info 3.5 Details on Rendering Content
See “Rendering, Storage, and Playback” and “Render vs. Real-Time” in Chapter 4.
![]() Tip 3.5 Placeholder Cue Image
Tip 3.5 Placeholder Cue Image
During tech there are times when you don’t have content ready to display onstage for a particular cue. We find that if you do not have any content on the displays, members of the team can quickly forget that there is supposed to be something playing on the screen(s) and begin building light cues or other changes into their designs based on what they see at the time. This work may have to be redone later.You may also receive notes from the director wondering why you forgot the cue. To remind everyone that indeed there is supposed to be content at this given moment, we suggest using a cue placeholder image. Warn the SM/director you may be doing this at some point so they are not surprised when it appears. We tend to add a bit of levity in our placeholders, but always choose something that is appropriate for the environment you are working in.
The Order of Tech and Dark Time in the Theatre

Figure 3.16 Sample placeholder cue for Terra Tractus by Projects for a New Millennium. Digital media design by Daniel Fine and Matthew Ragan. Lighting by Jamie Burnett, 2014.
Source: Alex Oliszewski
Once the system is installed during load-in, you need to get it up and running so that you can begin programming cues. All this needs to happen before the first tech. There are a lot of different people competing for access to the theatre and performance area in the weeks just before a show opens. Sound designers need long periods of time working in the theatre with everyone around them being quiet enough that they can hear and focus on their sonic responsibilities. The lighting crew needs to hang and focus lights. Then the lighting designer needs to program light cues. The scenic department is still working on the set. With all these demands on the space, be sure to make a game plan for what you have to accomplish leading up to tech/dress.
It can be helpful to work at the same time as the sound designer, especially on those shows that require audio assets associated with videos to play through the theatre’s speakers. You may want to politely decline to work at the same time that sound is ringing out their system as it can be painfully ear-piercing. Since the sound designer is responsible for getting all audio to the speakers and for setting all audio levels, being in the theatre while they are working can be very valuable. It is a way to find moments when you can test audio levels and go over any details that are needed in ensuring the two systems are working together correctly and are ready for cuing and performance.
Writing cues at the same time that the lighting designer is programming can be helpful. There may be more than one occasion when you are working on the same moment in the play. It can help both departments see what the other is working on, especially in terms of levels and color. There may be specific moments when the lighting designer asks that you stay in a certain cue for a bit so that he or she can adjust the lighting. Or you may do so in reverse. Having a good relationship with the lighting designer and being flexible go a long way in preparing for tech. The times that the lighting department is the least flexible in needing work light is during hang. This is generally a good time to install your system. Depending on the LD and master electrician, you may be able to program cues using projectors during lighting focus, but they usually don’t like that and want dedicated dark time. Be sure to ask the PM and LD about these issues as you approach tech.
Digital media designs sometimes require that you actually have everything in place before you can finish producing all of the assets. For instance, if you are heavily projection mapping onto the set, you won’t really be able to complete the mapping process and deliver final assets for performance until the system and the set are completely in place. Make sure that you have ample time from load-in and setup of the equipment to the first day of tech so you can adequately complete all the tasks needed to be ready for the first tech rehearsal.
The following tasks are listed in the common order that you need to accomplish them. We have suggested a certain amount of dedicated dark time in the theatre to accomplish each task.
Load-In and System Setup
Load-in is the time when video signals are run, projectors are installed and focused, media servers are set up, LED walls installed, sensors configured, and computing networks routed for all the gear to be able to communicate. The more complex the system is the more time you need to set up. Load-in can be anywhere from a few hours to a few days, depending on the show and budget. On a medium-sized show, you should plan for ten to thirty-six hours of work-light/semi-dark time for system setup, depending on complexity and the number of crew. Leave at least one hour of dark time for projector focus.
You want to set the focus and placement of the projectors early in the process. When working with pixel or projection mapping you must make sure that any nightly maintenance the run crew is responsible for does not disrupt your system, such as bumping projectors. This means locking down and isolating the equipment from potential disruptions.
Alignment/Warping/Blending
Are there multiple projectors that are stacked to double the brightness of an image? Are there multiple projectors that are blended together to create one larger image? Is the set curved? If the answer is yes to any of these questions, then additional dark time is needed. This can’t happen until scenic has installed the projection surface(s), so make sure to plan accordingly.
- Time: Two to ten hours of dark time, maybe more, depending on complexity and the media server.
- Personnel: Designer and/or associate/assistant designer and/or a programmer.
- Additional gear needed: Wireless headphones, such as a Clear-Com system—so the person at the media server can talk to whoever is near the projection surface easily without yelling. This also allows others to work in the space.
Mapping/Masking
Is content going to be mapped onto a particular surface of the set? If so, you need to create masks and/or map surfaces. This also cannot be achieved until the scenic elements to be mapped are installed.
- Time: Two to twenty hours of dark time, depending on complexity of the set and the media server.
![]() For More Info 3.6 Warping and Blending
For More Info 3.6 Warping and Blending
See “Media Servers” and “Projectors” in Chapter 5.
![]() For More Info 3.7 Mapping and Masking
For More Info 3.7 Mapping and Masking
See “Media Servers” and “Projectors” in Chapter 5.
Programming/Cueing
Once all the foregoing work is done, you can now program the media server to create cues. Depending on the show, the server, and the complexity of the design, some of this work can be done before you enter the theatre, but the majority of it happens in the theatre.
- Time: Eight to thirty-plus hours of dark time (can be shared with lighting/sound time) before cueto-cue, depending on complexity and the media server. The less time you have to write cues before cue-to-cue and tech, the more waiting around everyone else has to do as you catch up.
![]() For More Info 3.8 Programing and Cueing
For More Info 3.8 Programing and Cueing
See “Media Servers” in Chapter 5.

Figure 3.17 Sample timeline for tech
Source: Graphics by Daniel Fine; photo by Jacques Descloitres, MODIS Rapid Response Team, NASA/GSFC
Tech Notes
At the end of every tech rehearsal there are tech notes. This is the time when the director gives notes to each department and for everyone to discuss issues. Sometimes you won’t always agree with a director’s note. Ask clarifying questions regarding why the note was given or what didn’t work about the moment. Often these discussions lead to changes that you might not have thought of previously. Or the solution might be solved by another department. Other times you may just still simply disagree. You need to determine what things are worth fighting for and what is not.
It is up to you to inform the director how long a note might take to execute. This helps the director and you determine the priority of the note. If it is something that might take four hours to change and then two hours to render, it may come at the expense of accomplishing ten other notes. You need to be able to determine the importance of notes, both from your perspective and the director’s.
At the end of tech notes the production manager and stage manager coordinate a schedule for the next day so all departments have access to the theatre to work on their respective notes. You most certainly need dark time to work on content, programming, or systems notes. Depending on what you need to work on, you may need audio playback or you may need to see the stage in a certain light cue to achieve your notes. Or you may need the set to be configured for a certain scene or scenes. You may need to work with actors to make the changes needed. Make sure to communicate your needs during tech notes, so that all crew members and cast who need to be there are called.
When working on notes it is often possible and helpful to work at the same time as sound and/or lighting. Depending on what scenic needs to accomplish they often might be able to work with little to no stage light. If a scenic painter is doing touchups painting, they might be able to do so with a headlamp. Or you might be able to program timing-only notes with stage worklights at half. Whenever possible let the team know that you can share the time and how much specific dark time you need.
Training Operators
Sometimes the media server operator may be an intern or another crew member who has little to no experience using a media server. Other times you may have a very experienced media server operator. Still other times, the light board or sound board may be triggering all the digital media cues, so there may not be a specific digital media server operator at all. Depending on the theatre, you may have to train the media server operator about not just the specifics of the show but also how to operate a media server and the associated equipment. If the media server operator is a different person than who is programming the cues, allow him or her to operate the media server during tech, so that he or she get practice working with the stage manager, who is calling cues.
You also need to train stagehands in the proper handling of any interactive digital media equipment, such as live video cameras. Be sure to train everyone involved to be able to problem solve common issues that may arise. You may need to work with the stage manager to help determine the proper call times for the run crew, so that they have enough time to set up and break down.
As mentioned previously in the “Paperwork” section, you need to create a detailed list of preshow and post-show tasks that need to be accomplished for the proper execution of the design and operation of all related digital media equipment.
Design Phase VII: Finalizing the Design
You finalize the design during final dress rehearsals and previews, if you have any. Unless the director or producer is asking for big changes based on how a preview audience is responding, you hopefully are making just minor tweaks, such as opacity, timing, and color, at this point in the process. We’ve certainly worked on content creation right up to the last minute, but the less you have to do so, the better. It is never a good idea to drop new content into the media server right before a performance without ample time to play back the content and make sure everything is correct and playing smoothly. While sometimes unavoidable, it is always best to lock in things that affect the actors or other departments a day or two before opening.
If you have previews make sure to talk to the director, producer, and PM about the theatre’s policy regarding previews and making live changes while an
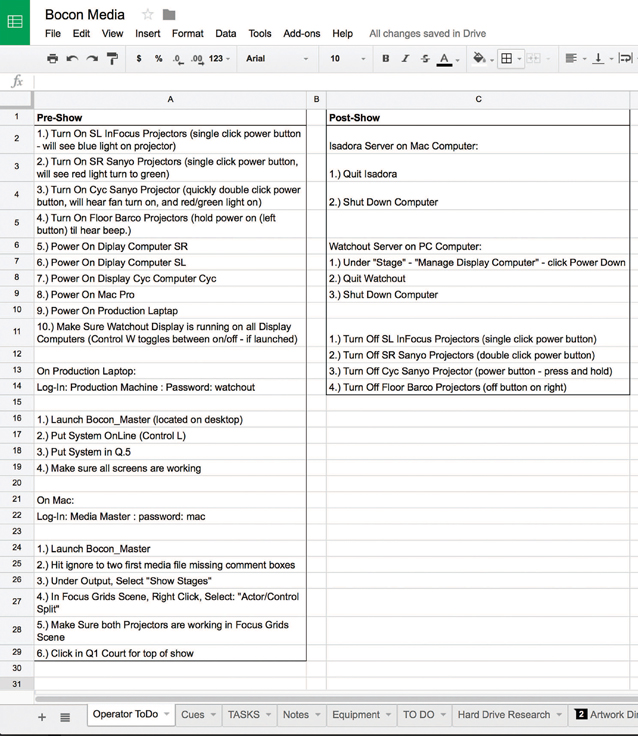
Figure 3.18 Sample operator instructions for ¡Bocón! by Lisa Loomer (Arizona State University Mainstage, 2013)
Source: Daniel Fine
audience is in the house. Inquire about when they expect you to move from the tech table to the booth. If possible, try to negotiate being able to remain in the back of the house to continue programming, if needed. Things look different from the booth than they do in the theatre and depending on the venue you may not have a direct line of sight to the stage.
Just as a director does, get out from behind the tech table and sit in various locations in the house. Do this as early and often as you can. It helps you determine how things are working from multiple points of view. A movie that seems to be playing at the right speed from the tech table may be perceived differently closer to the stage and needs to be slowed down. You can discover this only by moving around the house. It is good to view the stage without the glare of work monitors in front of you. No audience member views the stage with three monitors in front of them, so make sure that you get out in front of them. It changes your perception of brightness, color, and also motion, giving you the proper audience perspective.
Getting Final Sign-Off from the Director
We’ve worked with directors who have asked for changes right up to opening night and also with directors who stopped giving notes days before opening, allowing us to make tweaks as we see fit. Decide with the director when digital media for the show is locked—meaning there are no more changes.
It is customary that once opening night rolls around, the show is locked. Usually the director and the designers leave after opening night. But in smaller theatres and academic settings this is not always the case and the director may still request changes after opening night. You may be open to this or you may not. It is best to determine in advance if any changes can be expected beyond opening night.
Locking Down Equipment, Cables, and the Media Server
During load-in you should have properly secured and dressed any cables or gear that is in active work or playing areas or in walking paths. Sometimes details change or things don’t work exactly to plan, so it is good to hold off a bit in buttoning everything up, as gear may shift during tech. Once you know for sure that the gear is in the correct position and you don’t anticipate any changes, go ahead and lock everything down. Ensure the equipment is safe and cannot be accidentally shifted during the run of the show.
If the media server has a show run mode, activate it. You don’t want to leave the hood to the engine open, allowing for potential accidental changes to the cues. As soon as you have sign-off from the director or opening night is upon you, make sure the media server is in a run-only mode.
Show Reports
During the run of the show, the stage manager sends out nightly show reports. Like the daily rehearsal and tech reports, the show report chronicles everything that happened during the show with notes per department. The best thing ever in a show report looks like this: “Projections: No Notes.” If there are any notes they are usually any errors made by the media server operator, missed or late cues, and so forth. This is also the place where any actual problems are addressed, such as equipment failure or repeated media server errors. Unless this is a large touring show or long-running Broadway or regional show that has a dedicated crew for solving these problems, you most likely will get a call and need to work with the production manager and stage manager to resolve the technical issues.
Design Phase VIII: Documenting your Work
It is of great importance that you document your work. Good documentation leads to more jobs. While the greatest tools for continued work are reputation, networking, and referrals, we all know that pictures speak a thousand words and video even more so. Oftentimes the producers arrange for photographers to come to one or two of the final dress rehearsals to take photos. Sometimes there is a specific time called photocall especially put aside for the designers to take photos and video, depending on Equity contracts.
Having a photographer take photos during dress rehearsals is sometimes not ideal, as your work is still being tweaked and is evolving. Be sure to have a conversation with the photographer about key moments you would like to capture for your portfolio. Confirm they have a strategy for balancing any projections with the theatre lighting in their exposure settings. Offer to demonstrate what the content looks like on the set before the photocall begins so they can test settings before they start the shoot.
If the production has a photocall, the stage manager asks for a list of moments from the play that you want to photograph. Pick 5–10 key moments that you want to document that best represent your work. Be sure to rank them, so that if you don’t get all of them, you get the most important ones. Sometimes the producer may hire a professional photographer for this while other times it may just be up to the artistic team to take their own photos. Even if there is a photographer present, it is still a good idea for you to take your own photos.
It is in your best interest to purchase a decent DSLR camera with a fast low-light lens to document your own work. If you can take your own high-quality images and videos, you are always sure to have good documentation for your portfolio. This way you won’t need to rely on anyone else to take photos and video for you.
Some things to consider when taking stills and video:
- Take wide shots showing how your work fit into the larger design.
- Include the actors in the shots. This shows the scale of the work and also grounds it within the context of a live performance. When taking wide shots, try not to cut off the actor’s feet in the framing.
- What looks good to the naked eye in the theatre may not read for the camera. If you have the ability during a photocall, let the stage manager know that you may want to tweak the light levels or fudge the position of an actor slightly so the photo looks the best that it can. While it is okay to make slight adjustments for the camera, you don’t want to make drastic alterations. The photos should be as truthful to the actual live experience as possible.
- When shooting stills and especially video, you need to expose the camera for the light level of the video or the lighting on the actors. Oftentimes these two levels are different. This means that the video may be under- or overexposed. This is why it is very helpful to have a photocall so that you have time to set all the levels rather than trying to shoot video on the fly during the performance.
- When recording video, you may notice that there is a horizontal bar moving in the image of the video. This is because of different refresh and frame rates between the projections/displays and the camera. You need to set the camera to record video at the same frame of the video that is being projected/displayed. Even if the settings are accurate you may still experience this. Sometimes moving the angle slightly to the side can help eliminate these lines.
Design Phase IX: Archiving the Project
You never know when a producer might call with an invitation to remount the production. Or perhaps months or years after a show closes you may want to return to a particular component of your work, such as research images, a movie you made, or a composition in After Effects. You won’t be able to do so unless you properly have a full archive of all your work. You’ll also want to be kind to your future self. You won’t want to rely on memory about where your past self put things. So be sure to give all the files meaningful names and place them in properly labeled folders. Be as organized as you possibly can. This means creating a system for documents, files, to-do lists, cue sheets, content, assets, and so forth. While this helps during the creative process it is especially vital when it is time to archive the project. You should consider having multiple backups of all your files in case a hard drive fails.
![]() For More Info 3.9
For More Info 3.9
See “Organization of Assets” and “Backing Up Your Data” in Chapter 4.