CHAPTER SIX
3D FOR PRESENTATIONS AND CNC MILLING FOR ENLARGEMENTS
___________
“I rarely sketch my ideas on paper. I have been sculpting for so long that my brain automatically thinks in 3D. When I want to create a presentation for a client, I can work through the movement, action pose, and possibilities using 3D tools. The process is fast and enjoyable. In these digital presentations, we can “walk around” virtual models together and see the possibilities.”
Bridgette Mongeon

For centuries, artists have been creating miniature maquettes, a smaller version of a life-size or monumental sculpture. The maquettes portray the artist’s vision for the look of a life-size or monumental sculpture. Sculptors will also use these small maquettes in the hope of presenting them to a potential client and securing a commission. Once a sculptor has the approval to create a large sculpture, and they have secured their contract, the larger work begins. Before 3D scanning and CNC machining for enlarging, a traditional sculptor would use the painstaking process of “pointing up” to enlarge their creations. Chapter 3 covers the traditional pointing up process. Now, let’s see how fine artists are using digital technology for presentations and CNC machining for enlarging.
Presentations
Securing a commission from a client on a proposed project takes a tremendous amount of forethought and work. Often, an artist is bidding against other artists and may not have secured the job or might not have even received any money from a client when they are creating a presentation. The investment of time in creating a presentation is important; after all, a large commission can mean a year’s worth of work for the artist. However, spending a week or more creating a small maquette for a job that the sculptor may or may not get may not be the best investment of the artist’s time.
Unlike two-dimensional art, such as a painting or a sketch, the sculptor’s intent is for the viewer to see the sculpture from multiple directions. Therefore, it is important for the design to look good from all vantage points. Clients may even have specific directional views in mind. For example, on a college campus, the sculpture may face the entrance to the campus, but the client may want to know what it looks like from the student center or the window of the president’s office. It is difficult and time-consuming to portray this information in many two-dimensional sketches and just because a sculpture maquette is small does not mean it will take a minimal amount of time to create. Another option is that an artist can create a very rough “quick sketch” in clay for a presentation. This sketch may show the gesture but not the detail; however, clients are visual, and rarely will a “quick sketch” present the true intentions of the artist, in a way that a client can understand. If the client is only seeking work from one particular artist and they are considering no other artists for the commission, a “quick sketch” may be sufficient.
Most artists will spend hours sculpting a maquette in hopes of receiving a larger commission. This labor may not even transition into a commission. Creating designs using 3D programs can help with this. By using a variety of software programs, an artist can use digital presentations to help clients visualize potential jobs. They can present several poses and multiple views, and with the digital technology they can create these in less non-billable time. By working with architectural plans or photographs of the space, they can even place images of the proposed sculpture in its intended environment. Add photographs using photogrammetry to the design process and an artist can create a realistic presentation that just might make their design stand out above the other artists that a potential client is considering.
Sculptor Bridgette Mongeon used DAZ 3D models and Poser, along with Photoshop, to help the parents of Ellie envision her sculpture for Ellie’s gravesite. The digital model allows the artists to show the client how personal elements such as Ellie’s gift heart drawing, created for MD Anderson Cancer Center, and her stuffed bunny can be used in the design. The sculptor then proceeded to create the sculpture using traditional sculpting processes.
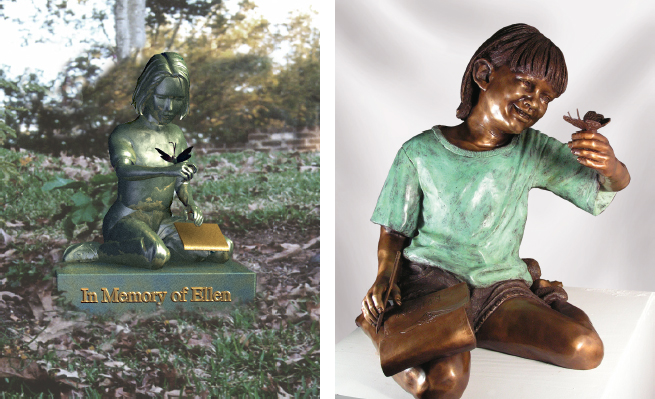
The 3D model helps the client to visualize. However, the digital model is just a representation of an idea. The final sculpture depicts the likeness, emotion, and the essence of the individual. Ellie by sculptor Bridgette Mongeon. Left -model and render by Mike de la Flor.

The digital models also help the artist and client to visualize the sculpture’s interaction with other elements, as in the case of Jenna Rose Mangini and her headstone. Using a Poser model and a DAZ dress similar to the dress of the client’s child, the artist can quickly move through the process of posing an infant in a variety of poses while using primitives to represent a headstone. The client decides on the design with a sign language hand gesture of “I love you,” and a butterfly.

Photographic reference, digital model, and clay sculpture. Jenna by Bridgette Mongeon.
The client for the sculpture Ultimate Frisbee approached sculptor Bridgette Mongeon about creating a sculpture of his son playing Ultimate Frisbee for his college team. The client desired a sculpture featuring a jump, with height. The artist used DAZ models and clothes, Poser, and ZBrush to create a presentation. The digital design provides the artists with a tool to incorporate two figures to present to the client—the main figure of his son jumping, and a fictitious player. Here is a case where physical laws, as well as the engineering laws of the medium, apply. In the computer, two figures can float in the air, but in the real world, the laws of physics take place. For a bronze sculpture, especially where one of the figures is in the air, the jumping sculpture should have at least two if not three points of contact. There also needs to be balance in the sculpture. The 3D model allows the artist to work through the design with the foundry to confirm the engineering of the sculpture, as well as to present to the client to be sure the artist does not interpret the action incorrectly and mistakenly portray a foul play. Once the design is approved, the artist creates the tabletop sculpture with the traditional sculpture process and wire armature.

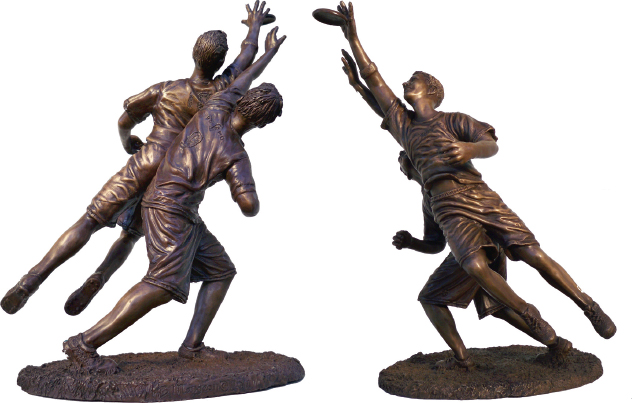
Ultimate Frisbee, bronze by sculptor Bridgette Mongeon.
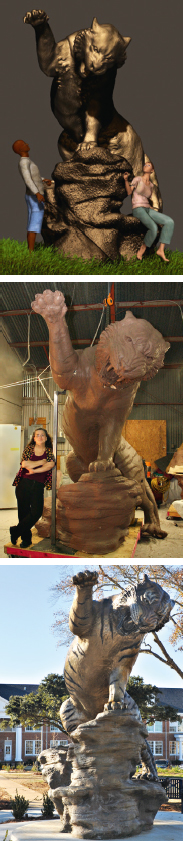
Grambling State University chose a design of a tiger climbing a rock. It is one of four digital design presentations created by sculptor Bridgette Mongeon. Having poseable 3D designs gives an artist more possibilities while using less time to create a presentation. The digital models not only helped the artist and client visualize the project, they also helped the foundry bid on the job, as well as the landscape architects and designers.
Depending too much on digital models can be an artist’s downfall. They need to be able to work from life. Even though they have started with digital presentations, they must now go back and begin their own research into the action and anatomy of a piece. To create the folds for Ultimate Frisbee, the artist hires a model to run back and forth and jump while she videotapes the action. She uses still photographs from the video as the reference for folds and action.
CNC Milling for Enlargements: Traditional Armatures
In traditional sculpture, before 3D scanning and CNC machining, once the artist secured the commission they began the long, arduous process of making the enlarged sculpture. First, they built an armature. The artist creates an armature from wood, welded metal, plumbing pipe, chicken wire, PVC pipe—just about anything that will support the clay and hold the weight of the sculpting medium. Armature building is a science and art in itself. It is not the most creative part of the project, but it is a vital part. There is nothing worse for an artist than being in the middle of creating a life-size or monumental sculpture and finding that the clay is sagging, falling off, or—God forbid—the armature breaks from the weight.
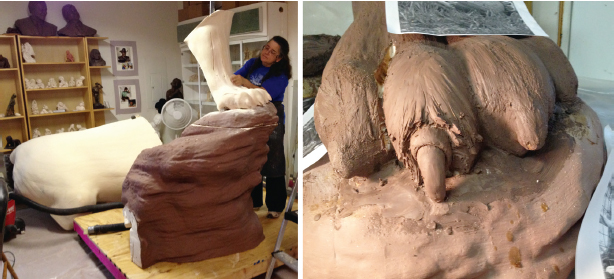
Sculptor Bridgette Mongeon created a traditional armature for a seated figure titled Richard Hathaway using welded pipe, pieces of urethane foam, and spray foam. Once the sculpture was roughed in with foam, the artist covered the foam with foundry wax and then finished the details in Classic Clay. When a sculpted design needs modification in this traditional armature-building process, the sculptor may take a sledgehammer to the armature to beat it into creative submission or she may have to cut through the rebar with a reciprocating saw and reposition appendages. Once sculpted, the sculpture will go through the traditional process of mold-making for bronze casting.
Now, instead of making difficult and time-consuming traditional armatures with a variety of materials, artists can combine 3D scanning and CNC machining to easily create an armature—at any size. Many artists embrace this new technology as an extension of their toolset. This process of enlargement may initially add additional cost to the project, but in the long run it saves time. An artist can save more than a quarter of their time on the total project using CNC machining for armature building. The time saved not only adds up to money, but gives the artists more time to create.

A traditional armature for Bridgette Mongeon’s sculpture Richard Hathaway using rebar, foam, and clay.
In the process of creating an armature using CNC milling, you will need a 3D computer model. A digital 3D model can be obtained in different ways. You can create a sculpture in the computer using a 3D sculpting program or you can make a small maquette in clay and then scan it. For more about scanning models refer to Chapter 3. Those who work in CNC machining that enlarge sculptures on a regular basis suggest a few pointers for artists creating maquettes for scanning.
• For a life-size or monumental sculpture, create a maquette that is at least 18 inches tall or larger. If the maquette is any smaller, it is hard to get good features that will translate when enlarged. An 18-inch sculpture enlarged into a 6-foot sculpture is a 400 percent enlargement. As a CNC machinist enlarges the sculpture, they also enlarge the artist’s errors. An error made at a quarter of an inch and enlarged 400 percent will be one inch.
• Take note of the head and the hands of your model when sculpting a maquette. CNC machinists find that some sculptors, when creating maquettes for scanning and then CNC machining, will create hands and heads that are not in proportion to the body. These hands and heads in a smaller sculpture may not look out of proportion but when enlarged they look too large.
Scanning
Refer to Chapter 3 of this book to be sure that you have prepared your maquette properly for scanning. Many CNC machining companies that specialize in enlargement can also provide the scanning process for the artist. You may also find a local scanning company through the Appendix of this book or you can scan with your own dependable scanner. Once you have a scan, it is easy to transport your artwork. An artist can send the scan files to the enlargement company at the push of a button.
There is a computer axiom that states, garbage in and garbage out (GIGO). The data you send limits what the CNC machinist has to work with. If the scanned model is of poor quality or has holes or missing information, then this will affect the outcome of the CNC milled sculpture. In some cases, a bad file will mean that the machinist may also not be able to mill it for you. Good communication with your vendor is essential. Some vendors will fix files; however, every artist should be aware of the possible problems and review how to fix files for 3D printing in Chapter 7. An artist will use the same process for fixing files for CNC milling as they do for 3D printing. There are many free programs that will help you fix your file. If you are sending your file to a service bureau that specializes in CNC machining of foam for sculpture reproductions then they may be able to fix your files for you; however, remember the more time they spend on the files, the more money it may cost.
Real-world Measurements
Software companies have initially created their software programs for computer graphic artists working in animation. When an artist or craftsman is using 3D computer programs to create art for the real world, real-world measurements are necessary. These measurements are often impossible to obtain in the virtual world of many 3D sculpting programs.
In the case of the Grambling State University tiger sculpture, artist Bridgette Mongeon began the sculpting of the Grambling State University tiger in the computer using 3D sculpting software. To obtain real-world precise measurements it was necessary for the artist to take the 3D model back and forth between the 3D sculpting program and a CAD program to work on the design.
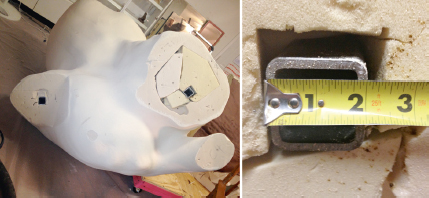
Another option to taking the sculpture into an expensive CAD program is to use the measuring tools in the free software—SketchUp. A measuring tape offers accurate measurements of two points. Perhaps, one day, the opportunity for real-world and precise measurements similar to a measuring tape in SketchUp will be part of 3D sculpting programs.
The artist needs measurements to be sure of the design’s overall height, width, and depth. However, there is a variety of reasons real-world measurements are important in 3D sculpting programs when creating art for a physical world. What size studio will the artist need? Can the CNC machining slice up the sculpture in the computer to enable the artist to sculpt in a smaller space? If not, what size warehouse will the artist need to accommodate the full height of the monumental sculpture?
How does the sculpture relate to any existing objects that it will surround? In many cases, an artist is placing work in a real-world environment next to objects or in places where other items interact with the sculpture. When creating bronze sculpture there are already variables that affect the outcome of the sculpture, such as shrinkage of the art through the bronze casting process. The artist needs real-world measurements to compare the digital art to the objects that already exist, while keeping in mind other variables, such as shrinkage.
Keeping the client’s wishes in mind, Bridgette Mongeon’s client expressed excitement that the shape of the rock looks like the state of Louisiana from one vantage point, so the artist was careful to change measurements without sacrificing this design element. The artist takes the work back and forth from sculpting program to CAD program to measure.
While creating, the artist will be thinking forward to the completion and preparation of the art for the delivery. While creating the design in the computer, nearly a year before delivering the monumental bronze, the artist checks with the shipping company to decide the most economical way for the sculpture to ship. Given exact measurements from the shipping company, the artist modifies the design to enable the sculpture to rest on its side in a semi truck upon its completion.
When creating the art in the computer, the artist will also be thinking about the installation. When creating artwork that will be installed and interact with the surroundings, it is necessary to be able to measure parts of the sculpture to accommodate these interactions.
The real-world measurements go beyond design, installation, and delivery. There are many other needs for real-world measurements. For example, the artist gives real-world exact measurements to foundries so they can bid for the job properly. The shipping company that will create the crate for the art will need these measurements to be able to accurately give quotes on shipping. The architects, crane operators, designers, landscapers, and insurance companies will also need these measurements to do their jobs. All of these vendors need measurements. The artist will need these measurements to obtain the appropriate cost estimates from these vendors and the vendors need these measurements for planning their part of the job.
Another form of measurement that is helpful with the 3D design process is the surface volume. This measurement, which will come from the CNC machinist’s CAD file, is a measurement that an artist can give a bronze foundry. Should you want to get this measurement on your own, Mesh Mixer from Autodesk is a free tool that will give you the measurements of surface volume. The foundry will use these measurements to bid on the job. When estimating the prices for bronze, providing the foundry with surface volume instead of just height, weight, and depth will ensure accurate pricing. The foundry will appreciate this added bonus of working with a fine artist who has digital tools at their disposal.
There are several CNC milling companies that CNC mill foam. Check the Appendix or this book’s accompanying website. Luckily, foam is light, and ships easily. The CNC milled foam does not come to the artist as one complete sculpture. It can come in boxes or crates. Be sure to budget the delivery of the foam in your total expenses on monumental or even life-size sculpture projects.

CNC milled foam ships to the artist in pieces.
The Sculpting Process
The sculptures that are CNC milled in foam are not complete. More often than not, artists will add something to the foam. For a bronze sculpture, the artist applies clay to the foam to add detail before preparing the sculpture to go through the mold-making process for bronze casting. Not all artists enlarge and CNC mill foam just for bronze casting. In other instances, for example, in interior or exterior scenery or a themed environment, a sculptor may decide to modify the foam, add more detail, and then coat the CNC foam with another material. There is a great number of materials that an artist can use on foam. If the reader has an interest in creating a themed environment, check this book’s accompanying website for providers of materials to coat foam.
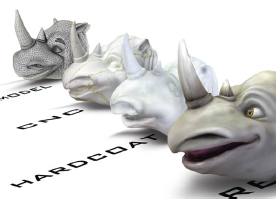
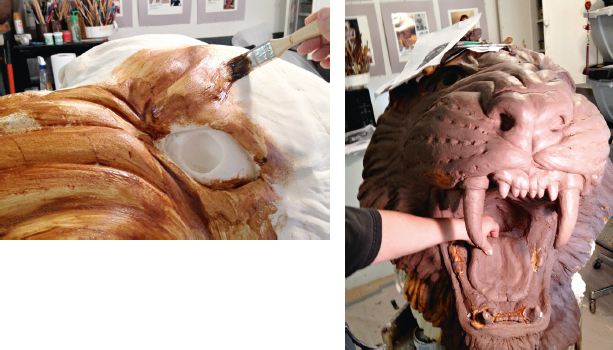
There are several different types of foam for CNC milling. The foam used for the Grambling State University tiger is urethane foam. Urethane foam is easy to carve and the artist can use traditional sculpting tools to shape the foam. The use of urethane foam should come with a warning—it is gritty. Some artists prefer working outside with a fan blowing away the grit. The alternative is to have a vacuum handy to vacuum the surface often—but be careful with the vacuum hose, as it can dent the surface of the foam if it accidentally scrapes it. Taping a large painter’s brush to the end of the hose helps to brush the surface without causing damage. When carving urethane foam we recommend using a facemask and goggles for safety. After sculpting on the CNC foam of the tiger, it was necessary to vacuum the surface before adding a coating of paint or foundry wax to seal the foam and keep pieces of urethane foam from entering the clay and leaving an unwanted texture. After a layer of foundry wax, the tiger received multiple layers of clay, some as thin as ¼ inch and others several inches thick, depending on how the artist modified the design.
Steven Ramirez of Smash Design in Houston, Texas, creates themed designs using digital sculpting, CNC foam, and a variety of materials over the CNC foam (www.smashthedesign.com).
If an artist is going to apply clay to CNC milled foam, as is the case with Bridgette Mongeon’s tiger sculpture, the clay will need to be a wax-based or oil-based clay such as Classic Clay, and not water-based clay. A water-based clay will dry, crack, and fall off. The artist will want to notify the CNC enlarging company prior to milling to ask them to provide a clay allowance. The milling company will then reduce the surface of the sculpture to allow room for the artist to add clay. It is important to note that, depending on the size of the clay allowance offset, some features may disappear. For example, a nose or ear will morph into a basic shape instead of carved detail. The lack of shape is not a problem for some, as many artists prefer to sculpt these details using the traditional process and only use the foam as a basic armature.

Across the Board Creations milled the foam for Bridgette Mongeon’s Tiger Project. (www.acrosstheboardcreations.com/)
Hand-carving the Foam
We have already learned about the limits of three-axis CNC machining. Unless the machinist uses a CNC machine with a robotic arm and gradually decreases the bits, which adds up to a considerable amount of costly machine time, the sculpted foam will not have the deep recesses that bring contrast. For a sculpture to have movement and to feel lifelike, it must have undercuts and deep crevices. Without it, CNC machined foam of a figure looks flat and lifeless. There is just no substitution for handwork. Sculptor Bridgette Mongeon continues the sculpting process by carving and sanding the foam. Before the artist applies clay to the foam, she first adds a thin layer of foundry wax.
An artist may also discover that some parts of a design do not translate well into an enlarged milled object. Seeing a 15-foot tiger and a virtual tiger are two totally different things. The ease of the process might lull an artist into a false sense of completion. Just because the artist spent hours on the computer looking at a reference, and comparing that to a digital design, the sculpture is not complete. Once the CNC milled foam arrives at the artist’s studio, the sculpting process begins all over again. They compare the reference material to the CNC foam at this machined size. The foam is easy to modify with clay tools. In some cases, taking into consideration weight and the structural engineering, an artist can cut sections apart and reposition them. A 2- or 3-pound foam will allow the artist to carve into it with sculpting tools, and the consistency will be like a gritty butter. Light sanding or even a washing of the foam is also possible.
Internal Armatures
High-density rigid urethane foam is pretty firm and often will stand on its own. From time to time, as in the example of a large mass on thin legs, the sculpture will need some additional support. The artist glues PVC or metal pipe into the foam with spray foam and secures the armature to a wooden base. However, in monumental armatures it is good to consult an engineer. Some CNC machining companies will put an internal armature within the sculpture. In the case of the foam for the Grambling State University tiger sculpture, the CNC machining company Across the Board Creations created an internal metal armature with nesting structural square tubing that bolted one inside the other. The torso pieces bolted together, as did the head to the torso. The process allowed the artist to sculpt each appendage separately prior to putting the tiger together. Upon completion, the artist then bolted the appendages to the main body. The milling company welded an eyebolt in the tiger’s back for raising the tiger onto the enormous rock. The artist raises the monumental sculpture and secures the pieces together with bolts to finish sculpting the entire tiger, and then she can lower it to take the sculpture apart for mold-making.
Across the Board Creations builds an internal armature in the tiger. Square tubes in the legs of the tiger nest inside a larger square tube in the torso. Bolts secure the pieces in place.
The artist could have chosen to hand-carve the rock base out of a large block of foam instead of having it milled. It was tempting, especially with the enormous cost of CNC milling of the rock. Milling companies estimate an additional $7,000 just for the milling of the rock. There are hundreds of pounds of clay on the foam torso and legs of the tiger. That means lifting a very large, very heavy tiger and placing it onto the carved rock. Having a milled rock with additional armature support, as provided by Across the Board Creations, the sculpture can be easily raised on top of the milled rock for final sculpting. It will not stay on top of the rock long, just long enough to obtain a client approval. Then the entire sculpture will be disassembled. It is important, for the safety of the art and all of the workers, to have a stable foundation. The milled rock with internal armature allowed the artist to raise the tiger so that it fit exactly in place. The mass of foam and clay did not have to hang and swing precariously or rest on something that might be unstable, even it if was only temporary.
The foam pieces can be worked on individually and later bolted onto the tiger’s torso.
Creating the design of the tiger climbing the rock in 3D also offers the artist other creative opportunities. The foam is designed at the perfect height as a stone shelf to accommodate the seating of a few students. The artist takes time to modify the design in the foam to be sure that there are no indents or large concave surfaces in the rock where water would pool. These areas will later cause rust in a monumental outdoor sculpture.
Putting Together the Foam
In other CNC milled artwork, there may be no internal armature. In these cases, the artist attaches the foam pieces, one to the other, with non-expansive spray insulation foam from the hardware store. Wooden dowels help to secure the pieces together.
A quick spritz of water on each piece after applying spray foam will assist in the curing of the spray foam. The artist takes care not to bring the spray foam to the edge where it will leak out. When carving and sanding on the foam, the spray foam has a different consistency than the milled foam. If it is close to the edge, it makes it difficult to use sculpting tools. The foam causes the tools to catch and drag instead of moving smoothly across the surface.
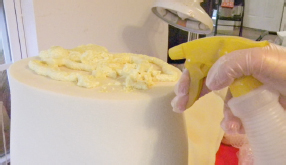
Spraying the foam with water will help to cure the foam.
Spray foam that leaks out between pieces of foam can cause havoc when trying to smoothly sculpt with sculpting tools. Sometimes it is better to carve these areas away and then fill them with clay.
Even if the artist does not plan on creating pieces that must glue together, the CNC milling and enlargement company may be gluing pieces together to obtain the size needed. The urethane foam, depending on the density, comes in sheets and not blocks. If an artist plans to do a lot of carving on the sculpture, he or she might ask their CNC milling company to glue their pieces together using this same process of staying away from the edges. Otherwise, the artist will have to cut out the foam in channels, leaving a visual disturbance. Then the artist must decide which is more important to them, the feel and ease as they move their tools over the surface or the visual disturbance of carved lines between sections of foam. If the artist chooses the smooth carving and sanding over the visual disturbance they can easily fill the crevices with clay after carving.
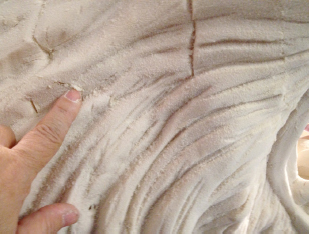
Carving on foam that the artist or CNC company have pieced together can be frustrating. The glued areas cause the tool to catch and drag over the surface.

To smoothly shape the tiger with sculpting tools, Mongeon carves out the glued channels. In the next step, she and her interns will fill these channels with wax and clay. The arrows in this picture are for her interns to understand the flow of the tiger’s hair. They will add the wax and clay following these directions.
CNC milling for sculpture enlargement offers more benefits in production. A clay sculpture that is created using CNC milling for bronze casting is much lighter than it would be if the artist created it in the traditional old fashioned way of rebar, chicken wire, wood, etc. That means if an artist needs to transport it to the foundry it is easier to do so. The CNC milled foam is also easier to section; this is necessary for the foundry production of the sculpture, which we will cover in Chapter 8. The use of 3D sculpting, modeling, and posing programs assist fine artists with their presentations. Incorporating digital tools to create presentations helps clients to begin to view the intended art from all angles. Digital presentations save the artist time and may just help to place their artwork above the presentations of their competition.
The use of scanning and/or sculpting combined with CNC milling can shave hours of time off of the production of life-size or monumental artwork created in a fine-art studio. Time saved means the artist has made room for more work, increasing their income and giving them more time for further creative exploration.
Once the clay sculpture is complete, the artist sends the sculpture to the foundry to be cast into bronze. Chapter 8 documents the tiger’s travel through the traditional foundry as we compare the steps of creating a bronze and how the digital technology is slowly infiltrating this process. Before we will be able to recognize these digital processes, we have one more place of investigation—3D printing.
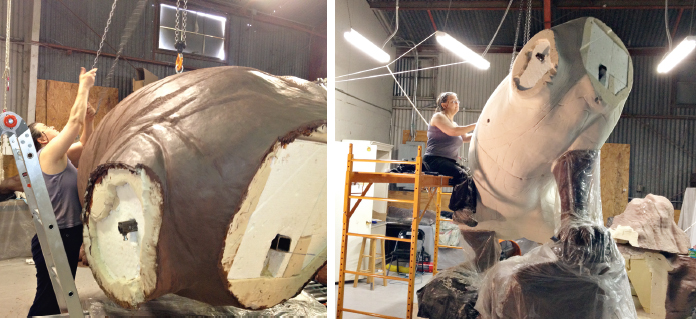
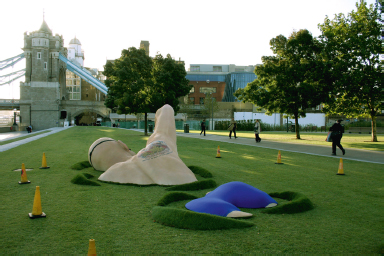
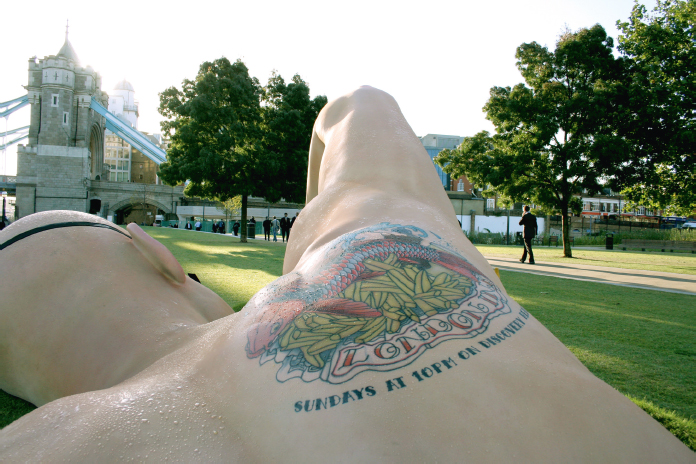
“LONDON INK”
The Discovery Channel London created two public pieces to initiate an interest in a show titled “London Ink.” The marketing team at Discovery combined forces with Asylum Models & Effects to fabricate these public installation pieces. The gigantic figures were CNC milled in foam, painted and then clothed. For more information on this process, listen to the online podcast interview at www.digitalsculpting.net.
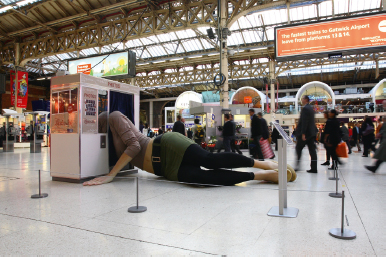

As an interesting marketing technique created by Mother UK in 2007, the Discovery Channel created Victoria with her head in a photo booth for the Victoria Station.
GARY STAAB
Gary Staab of Staab Studios combines science, history, art, and technology to reproduce some pretty incredible sculptures.
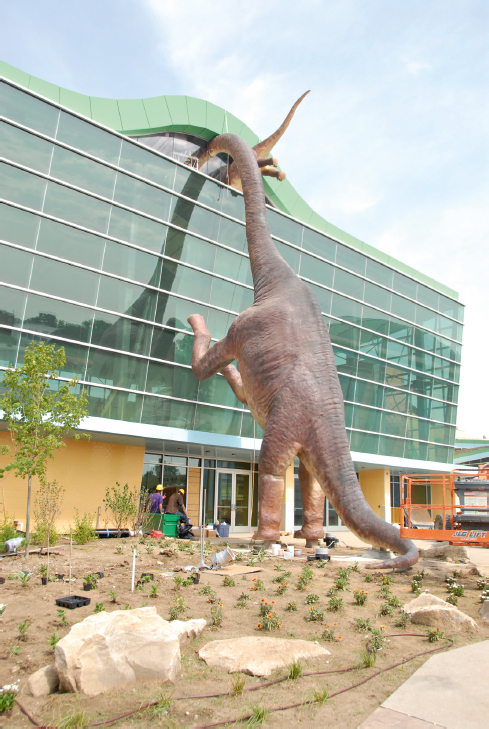
Brachiosaurus Mother and Baby by Gary Staab, Indianapolis Children’s Museum.

On the book’s website at www.digitalsculpting.net you will find:
* Links to further descriptions on the process of creating the artwork featured in the galleries.
* Podcasts with the artists.
* Videos featuring the artists at work.