
CHAPTER 5
Behind the Scenes
This chapter covers two main areas. First, we will explain some basic concepts about the technologies behind Plone, specifically, concepts that will help you better understand how your Plone site works "behind the scenes" and how you can customize it. Second, we'll give you some practical information about how to configure, search, and index new content types in the context of the important concepts of acquisition and the Template Attribute Language.
The first area of this chapter will introduce some technical concepts and other features inherited from the application server Zope. If you already are comfortable using the application server Zope that lies behind Plone, you may want to jump to other practical chapters, but if you are interested in discovering why Plone is so powerful and easily extensible, you should read this chapter in its entirety.
Understanding Object-Oriented Web Development
Plone, as you have started to see through the previous chapters, is a powerful CMS that gives you freedom and flexibility. It allows you to organize content through your browser just as you would in a file system directory. For example, you can create some main areas in the root of your web site and then create a hierarchy of subfolders to organize them. Each item you add in your site can be a different type of object (folder, document, image, link, and so on).
But what lies behind the scenes? And what is an object? Plone is built over Zope, an application server written in Python and widely based on object-oriented programming techniques. If you are unfamiliar with the concept of objects, don't worry, because there isn't much to know. An object is just a "thing" that encapsulates some behavior. Each different type of object has methods that you can call on the object. An example is a computer mouse. A computer mouse could have methods such as move, click, and right-click. In Plone, every document is an object of a particular type. This means that the document is not just a static bit of text. It is something a little more complicated and far more useful—it's a software object that possesses an object identity that can be accessed programmatically through Plone. So, to be more specific, objects are collections of code and data wrapped up together, and they are published by Zope's publishing engine. However, as you will see in this chapter, the Zope architecture adds another concept when it publishes your object: acquisition. What do we mean by acquisition? In a standard object-oriented environment, an object inherits its behavior from its parent. In Plone and Zope, an object also inherits behavior from its container, which is also an object. An object goes through a container hierarchy to figure out how to get its behavior. Since acquisition is a concept that comes from the Zope application server, for more information you can refer to the Zope Book, and we'll discuss acquisition in more depth in the "Object Publishing and Acquisition" section in this chapter.
Object-oriented programming is a common pattern to build modern applications. Its main goals are to be easy to understand and to provide well-known design patterns and the ability to reuse portions of code. Plone inherits these advantages and many others from Zope and the programming language Python. For starters, no code and templates are mixed together. Instead, the presentation, logic, and content (data) will always be separate. If you are a developer, you probably already understand the importance of this, and it will become even clearer as we move ahead. If you would like to know more about object-oriented development, you can visit http://www.zope.org/Documentation/Books/ZopeBook/2_6Edition/ObjectOrientation.stx.
Doing Through-the-Web Development: The ZMI
Developing "through the Web" simply means working through a browser. With Zope, you can develop new features for your Plone site, adding pieces of code directly from your browser through the Zope Management Interface (ZMI). The ZMI is the basic interface that gives you access to Plone's underlying Zope interface. You can add, edit, or delete objects in the ZMI hierarchy with just a few clicks.
How do you access the ZMI? There are two ways to access it:
- Adding
/manageto the URL of your site (this operation will lead you to the Zope Management Interface of the section you were in, so you should probably do it from the root) - Clicking the Site Setup link you find in the top-right corner of the Plone interface and then clicking the Zope Management Interface link
The ZMI for your Plone site should look like Figure 5-1.
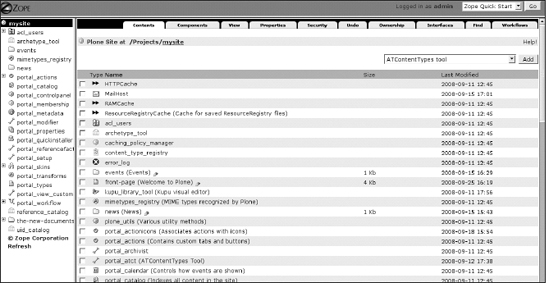
Figure 5-1. The ZMI of a typical Plone site (part of the screenshot has been cut to make the image more readable)
Once you are in the ZMI, you can click a particular object, and you will see several management tabs that will lead you to different configuration forms, as shown in Figure 5-2. Common tabs are View, Edit, and Security, but each type of object can have different tabs depending on how the object can be configured.
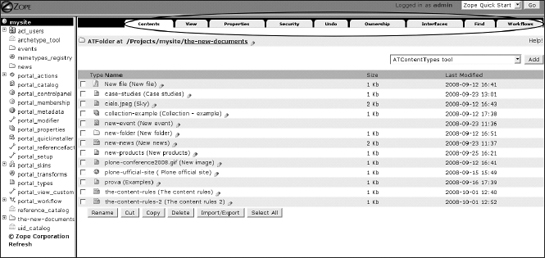
Figure 5-2. The different tabs you can click to access different configuration forms
As you can imagine, it is easy to use only a browser to develop new features through the ZMI, which allows you to dispense with the FTP deployment that other frameworks usually require. But working through the Web also has some disadvantages. For example, if you manually customize your site by adding a bunch of scripts and templates and you want to use them elsewhere, it may be difficult and annoying to apply your changes to other sites because you will need to apply changes manually. And, what happens if you miss some configuration? That is why in Plone developing through the file system can sometimes be the best way to operate.
File system development, in contrast to through-the-web development, means that all your behaviors are wrapped up in a Python package containing your code and templates, and if you want, you can keep all the features covered by several automatic tests. This is very important because if someone changes something in the code, you will be alerted. Last, but not least, it is easy to distribute your code. The installation process merely requires extracting the code and putting it in particular places of the Zope instance. We will talk about file system development in Chapter 9.
Understanding Object Publishing and Acquisition
Object publishing and acquisition are low-level concepts that Plone inherits from the application server Zope. If you are not a developer, you can probably jump to the later sections of this chapter. But if you are interested in better understanding how object publishing works, you should continue with this section (in fact, you can even deepen your knowledge by reading the sections of the Zope Book that tackle these topics).
Note Acquisition is a very important and nonintuitive aspect of Plone. To reiterate, in a standard object-oriented environment, an object inherits its behavior from its parent. In Plone and Zope, an object also inherits behavior from its container, which is the object that contains it. An object goes through a container hierarchy to figure out how to get its behavior. This inheritance process is called acquisition.
In Plone, you are actually publishing objects that are located in Zope; most of them are objects that are persisted in the object database. On these objects you can get services by directly calling the methods that expose them.
It sounds clear, but we have already told you that there is another concept adopted in the Zope publishing machinery: acquisition. Zope extends standard object-oriented programming techniques. In a standard object-oriented environment, an object inherits its behavior from its parent. In Plone and Zope, an object also inherits behavior from its container, that is, the object that contains it, as we mentioned at the beginning of this chapter.
In Zope, an object can inherit behaviors not only from itself and its parent classes but also from its container parents! Thus, you can apply a template or call a Python script in a particular context by acquisition. For example, when you request a Uniform Resource Locator (URL) from Plone, an object in the environment is called. Plone does this by translating the URL into a path. So, if the URL is /mysite/login_form, Plone breaks that URL down into a path and looks up each of those objects in the database. It finds the Plone object and then a login_form object inside the Plone object. Looking up this path is called traversal; essentially, Zope traverses across those objects and then calls the last one in the path.
When Zope calls the login_form object, the object is executed in its context. The term context is something you will hear a lot of in Plone. It is merely the current context of the object being executed. In this case, it is /mysite. The context changes a lot as you move through a Plone site. If you called the URL /mysite/Members/login_form in a browser, then the context would be /mysite/Members. The main idea is that you can put an object in the root of a Plone site, and any object can get to it through acquisition.
Just as with standard object-oriented programming, you can also override an object through acquisition, for example by putting an object with the same ID as another object in your Plone site into a different folder for the same site. This use case is very useful because it allows you to modify entire sections by adding only one object to the folder tree.
Let's imagine you are managing a web site of a company. All the pages of the web site display a particular banner (for example a red banner) on the top of the screen. Say you want to have a different banner in one particular section instead of the default one in the root of the portal.
Take the following hierarchy:
banner.jpg (background red)

      |_ Technologies

            |_ Wood technology

                  |_ ...

            | _ Plastic technology

                  |_ ...

            |_ ...
If you want to show a different banner in the "Wood technology" and "Plastic technology" sections, you just have to put a different banner.jpg into the respective folders, because the closest banner.jpg takes precedence. Look at the following example:
banner.jpg (background red)

      |_ Technologies

            |_ Wood technology

                  |_ banner.jpg (background brown)

                  |_ ...

            |_ Plastic technology

                  |_ banner.jpg (background blue)

                  |_ ...

            |_ ...
In this case, you have a common banner in the entire site, but for each technology section you will have a different banner without writing any Python code, without writing any templates, and without adding if statements. So, nontechnical users can easily override this image without writing any code and wasting time!
Although this probably makes sense right now, acquisition can get quite complicated, especially when looking through the context hierarchy (which can occur). If you want to learn more about it, you can read Zope lead developer Jim Fulton's excellent discussion of acquisition at http://www.zope.org/Members/jim/Info/IPC8/AcquisitionAlgebra/index.html.
Managing Content Types Through the ZMI
You saw in Chapter 3 all the content types you can add, by default, in a Plone site: pages, images, news items, and so on. But you can also create custom content types through the ZMI. Do you want a document object to have different tabs at the top? Do you want a document object to be manipulated differently, look differently, and even be called something completely different? No problem—you can change your instance of Plone through the Web.
The definition for creating a content type is usually dictated by the requirement that users need to add, edit, and control these objects. It can be tempting to start creating a content type for every type of object, but as with all development, you need to be careful. Would it be possible to use one content type instead of two, with only minor differences? Knowing how to figure this out will come from experience, but the next few chapters will certainly help.
Configuring Content Types
So, your Plone site contains content types, but how does the Plone site know how they are configured? The answer is that attributes, methods, security, and skins of any of the content types are defined on the file system in Python and associated code. This information is enough for Plone to understand how to use the product. The only exception to this, as you have seen, is the workflow, which is normally defined externally from the content type. Some products have their own workflow that is added to the content type for its behavior.
Each content type in Plone has a setting in the portal_types tool. Although each content type in the portal_types tool has only one setting, that type can have an unlimited number of objects in your database. The configuration is looked up when needed, so if you change the configuration, you will automatically update all the objects of that type in the database.
To access the registration information, go to the ZMI (in the root, which is www.mysite.com/manage), and click the portal_types tool. You will be presented with a list of all the content types registered in this Plone site, as shown in Figure 5-3. Most of these content types are recognizable as something you would add through the Plone interface with a few exceptions, such as Plone Site, TempFolder, and so on.
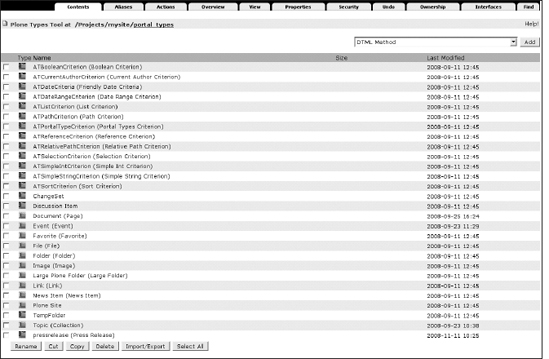
Figure 5-3. The portal_types tool shows all the content types registered in a Plone site.
Each of these objects is an instance of factory type information, which is the name for a particular type of configuration. Click any of these objects to access the type's information (see Figure 5-4 for an example); for example, when you click Event, you get the local copy of the information about the content type. You can alter this through the Web to change its configuration. The following are the values you will see if you open the configuration form for a content type:
- Title: This is a title for the content type.
- Description: This is the description that appears for this content type. This is used if you go to the folder contents and click Add without selecting a content type to add; a list of all the content types organized by descriptions will appear.
- i18n Domain: This is for internationalization and localization.
- Icon: This is the ID of the icon that's used for this content type.
- Product metatype: This is the metatype for this content type. This matches up the Plone content type with a Zope metatype.
- Product name: This is the product name where this metatype is defined.
- Product factory method: This is the method that's called by the product factory to create this piece of content.
- Initial view name: This isn't used in Plone.
- Implicitly addable: This indicates whether this content can be added to Plone. If this is selected, then it can be added, unless explicitly specified otherwise.
- Filter content types: If this content type is a folder, then enable this to filter the content types that can be added by users to this folder object.
- Allowed content types: If this content type can contain other items and "Filter content types" is enabled, only the types of content specified in this list will be allowed.
- Allow discussion: This indicates whether users can add comments to this content type.
- Default view method: This indicates the default template.
- Available view methods: This is the list of available view methods on the current type in the menu Display shown in the green bar of Plone.
- Fall back to default view: This option, if selected, implements a fallback to default view; that is, if a selected view (i.e., a template) does not exist, the system will return the default view instead of a NotFound error.
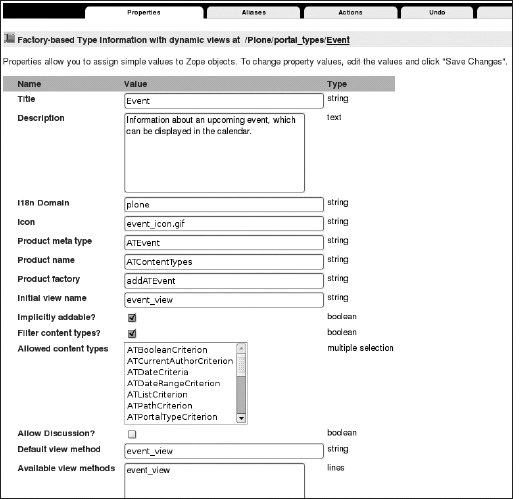
Figure 5-4. The type's information panel for the Event content type (the last part of the panel has been cut)
We will now cover some of the aspects of this registration information in a bit more detail, including showing some examples.
Changing Icons for a Content Type
To see just how simple it is to change the details of your content, let's look at a simple example: how do you change the icon for a content type? Say you don't like the icon that appears to identify a certain content type. It is a pretty simple matter to upload a new image and then make sure that the value for the icon is set in the form described previously.
Note Icons work best if they have a transparent background and they are 16 pixels wide and 16 pixels high.
To change the icon for a content type, you can follow these simple steps:
- Click
portal_skins, click "custom," and add a new image with an ID (for examplemynewsitem_icon.gif), as shown in Figure 5-5.
Figure 5-5. Adding a new image to change a content type icon
- Then in the
portal_typestool, click the content type you want to change the icon of, and set the value for the icon to be the same as the ID of the object uploaded (Figure 5-6 shows you the field you need to customize).

To test that the icon has changed, go to the Plone interface, and look for where the object may appear; for example, do a search or look at the Add New menu (see Figure 5-9 later in this chapter for an example).

Figure 5-6. Change the value for the Icon field of the content type.
Looking at Actions
Actions in Plone are activities that can be performed upon content items. When you are looking at the content type configuration in portal_types, you will see an Actions tab on each portal type. Figure 5-7 shows the actions that can be performed on each content type. What do actions look like? Figure 5-8 shows you some of the standard actions for a page.
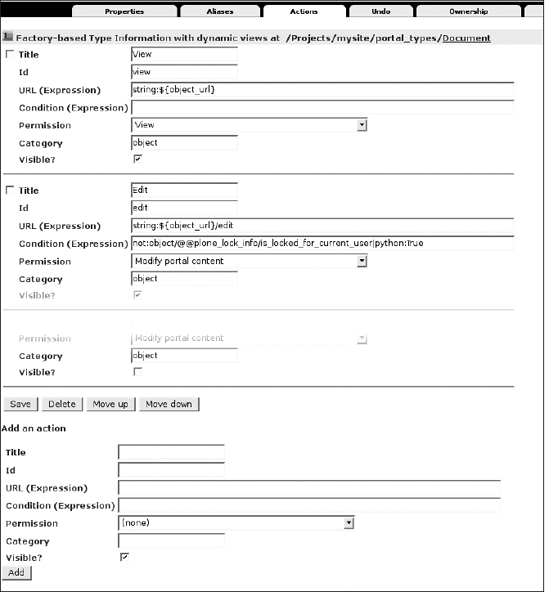
Figure 5-7. The ZMI panel that shows you the actions for the Page content type
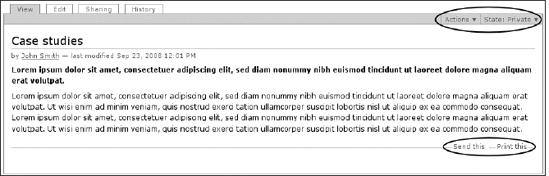
Figure 5-8. Some of the actions you can perform in the Page content type
As we mentioned earlier, actions are stored on tool objects. Many of the tools contain actions, but you really don't have a great way to search for the location of an action. If you want to change a particular action on your Plone site, you have to find the tool that stores it. The following tips help you find an action:
- If you are looking for an action such as viewing or editing a piece of content, then it is on the particular content type in the
portal_typestool. - If you are looking for an action for the site, then it is in the
portal_actionstool. - If you can't find the action so far, look in a related tool; for example, joining and logging in are in
portal_membership. - If you can't find the action you are looking for after trying the previous tips, go to
portal_actionsto see the list of tools and look through all the action providers.
Plone looks up the actions for content types in the following manner:
- For an object, all the actions are queried.
- For each action, conditions, permissions, and visible properties are checked; if they pass, then the action will be returned.
- Each action will be shown in the user interface, usually in the form of tabs at the top of the content or at the top of the site.
- The URL for this action is the URL of the object with the actual action appended to the end.
Once you have found the action, you can then customize it as much as you like. For instance, if you want to add a new action as a green tab for a document, you have to go and find the correct place (for actions that have to appear as a green tab for the content type, you would have to add the category object_tabs). Normally actions are used as tabs in Plone, but since they can be called programmatically, they could be used in any way.
Exporting Your Configuration
Great, with just a couple of clicks you were able to add a new action! But what happens if you make lots of customizations? Will you be able to quickly reproduce all of your modifications on another portal? The answer is yes. With Plone, if you edit the actions defined on the portal_actions tool or if you add another action, you can export all your changes using the portal_setup tool. You can export a configuration (better known as a profile), import it into another Plone site, back up your configuration when all works fine with just a couple of clicks, and create and compare different snapshots. Last but not least, you can also include the exported configuration in a file system package installable in your Plone site as a product, as we will see in next chapters. Cool, isn't it?
You just need to go to the portal_setup tool in the ZMI of your Plone site. Clicking the Export tab, you can export all the available steps or just those steps related to the tools involved in your customizations. Clicking the button, you will be asked to download a compressed file containing the XML files describing your configuration. Once you've saved the tar.gz file locally, you can go to another Plone portal and, through its portal_setup tool, import your configuration: to do so, click the Import tab, go to the end of the panel, use the Browse button to upload the saved tarball, and then click the Import uploaded tarball button. You should have correctly imported the changes.
Generally, you can export all of the "handmade" configurations on the ZMI using the portal_setup tool, not just portal_actions! So, if you change some settings in portal_skins, portal_properties, portal_workflows, and so on, no matter—with Plone, you can save, export, and reproduce your setup easily on another Plone site.
So, what does a profile look like? Here is the XML code representing the default Plone configuration for portal_actions:
<?xml version="1.0"?>

<object name="portal_actions" meta_type="Plone Actions Tool"

   xmlns:i18n="http://xml.zope.org/namespaces/i18n">

 <action-provider name="portal_workflow"/>

 <action-provider name="portal_types"/>

 <action-provider name="portal_actions" />

 ...

 <object name="object" meta_type="CMF Action Category">

  <property name="title"/>

  <object name="folderContents" meta_type="CMF Action" i18n:domain="plone">

   <property name="title" i18n:translate="">Contents</property>

   <property name="description" i18n:translate=""/>

   <property name="url_expr">

    string:${globals_view/getCurrentFolderUrl}/folder_contents

   </property>

   <property name="icon_expr"/>

   <property name="available_expr">object/displayContentsTab</property>

  <property name="permissions">

   <element value="List folder contents"/>

  </property>

  <property name="visible">True</property>

 </object>

...
Creating a New Content Type from an Existing Type
You may need to create a specific type of document in your web site for which none of the default content types in Plone suits you requirements. Maybe you need to add press releases to your site; previously, you usually just used a news item, but now you would like to apply a different workflow on it and have a different look, say adding a footer that shows up automatically when you create a new item. How can you do this easily?
The answer is that you can repurpose a content type. Repurposing is taking the information for an existing content type and creating multiple, slightly different copies of the same type. So, repurposing may be a quick and simple option to work in this case (or any similar cases)!
A big drawback of this approach is that you can't really change much beyond the actions, the skins, and some of content type settings. So, before you proceed down this path, please be aware that you are limited to these points; you can't add new fields or attributes, for example. If you want to do more, check out how to write content types in the next two chapters.
Say for now you want to make a press release type that is like a news item but does the following:
- It has the name Press Release in the drop-down list.
- It has a different icon.
- It has a different workflow from a news item.
- It has a different view.
- It keeps the same data structure as a news item.
- It retains the news item type.
For this example, we'll show how to take the factory-based type information for a news item, load it into the portal_types tool, and then call it Press Release. This will allow you to reuse all the existing code and information while giving you new options.
In the ZMI, access portal_types, and complete the following steps:
- The simple way to repurpose an existing type such as the default news is copying and pasting the default news item in
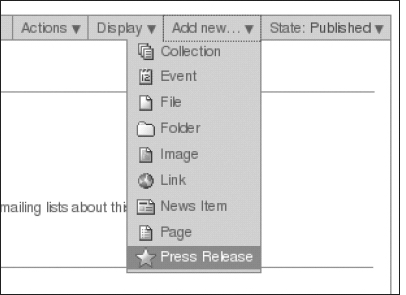
portal_types, then renaming the pasted item to Press Release, and finally configuring it properly. - How to change an icon was discussed earlier in this chapter; simply upload the image into your custom directory and then alter the Icon property in the
portal_typespage for the new Press Release content type. The result will be something similar to what you can see in Figure 5-9.
Figure 5-9. You can easily change the icon of a content type; the new icon will be shown, for example, in the Add New menu.
- If you go to
portal_workflow, you can see that each content type has its own workflow. Because this is now a new content type, you can now change the workflow for press releases only. Perhaps press releases require an extra stage of review, or they, when published, send e-mails to certain users. You can now make a new workflow, as you will learn in Chapter 7, and assign it to your press release. - Adding a new view means customizing the
newsitem_viewpage template and renaming it to something meaningful, such aspressrelease_view. You may want to alter that file to add some information about the company at the bottom of the page. For example:
<h2>About the Press area</h2>

<p>This news is made by our press area staff</p> - After you have saved your changes to your new page template, return to the settings for the press release in
portal_types, and go to the Actions page. Change the action for viewing a press release from pointing tonewsitem_viewto pointing topressrelease_view. Now whenever you view a press release, that view page will display, as shown in Figure 5-10.
In this case, we have added a Press Release object, and the footer about the press area staff is in the template so that users don't need to remember to type this in every time.
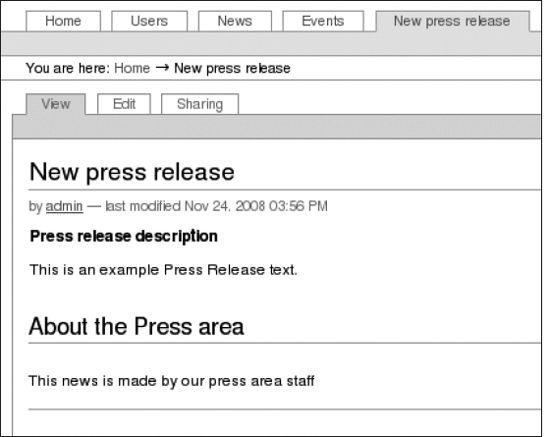
Figure 5-10. The view of our new Press Release content type: it shows the footer we added in the content type configuration. The user will not have to add this information each time, but it will be shown when the item is saved.
Understanding the Portal Catalog
You have seen how to search for content in Plone, but we will now go into detail and show how the underlying categorization and searching of content occurs. The portal_catalog tool stores all of this information, which is a slightly different and extended version of the underlying ZCatalog tool. You will find an excellent online reference for ZCatalog at http://zope.org/Documentation/Books/ZopeBook/2_6Edition/SearchingZCatalog.stx.
The catalog provides three key elements to a Plone site:
- It creates indexes of content.
- It holds metadata about the content in the index.
- It provides a search interface to quickly examine the content of your Plone site.
Between all of the different objects present in your Zope site, only the actual instances of your content types are cataloged. Zope objects, tools, and other objects aren't placed in the catalog. For this reason, the catalog tool is closely tied to the content types and their usage. You can access the catalog by accessing the portal_catalog tool in the ZMI.
Note When the catalog returns a result, it doesn't return to you the object; instead, it returns the metadata stored in the catalog. This metadata is a series of fields or columns for each value on the object.
Indexing Content
The first part of the catalog's job is to build indexes of the content. An index primarily provides a method for quickly and efficiently searching the content. For this reason, the content of the index isn't designed to be clear or to make sense; it is designed for fast and efficient searching instead. When you search in a Plone site, you search the indices, and the catalog will return matching result sets for that query.
An index queries a Plone object for a particular value, a method, or an attribute, and then it indexes whatever that object returns for that query. How it actually indexes the content depends upon the type of the index. The main types of indices are as follows:
- DateIndex: This is designed to index dates and lets you do searches based on DateIndex dates and times.
- DateIndexRange: This is a more efficient implementation of DateIndex for cases where you have two dates, such as start and end dates, and you want to perform lots of searches within those dates.
- KeywordIndex: This will return a result if any of the keywords in the index match the given query. This is ideal for searching subjects or keywords on objects.
- ZCTextIndex: This index provides full-text searching capabilities efficiently on pieces of text. It supports a large number of features, discussed in detail later.
You can see what indexes are defined in a catalog by clicking portal_catalog and selecting the Indexes tab. This will give you a list of all the indexes defined in your Plone site. The columns are the name of the index, the type, the number of hits, and when the index was last modified.
If you are ever unsure of the contents of an index, then you can see the contents of the indexes in the ZMI. Click portal_catalog, and select Catalog, and this will list every object cataloged at this time. Click an object, and a window will pop up with the contents of the index and the metadata. The metadata comes first, so scroll down to see the indices.
To add, remove, or alter the indices, return to the Indexes tab. Use the usual Add drop-down box to add a new index or remove an index. If you want to run a reindexing of a particular index, then select the indexes in the left, and click the Reindex button. If you add an index to the catalog, it isn't populated, meaning you then need to click the Reindex button to ensure that there is some content in your index.
Note If you have a large site, this indexing can be quite long and processor-intensive, so you should avoid doing this during peak load times.
How an Object Is Indexed
Content types are indexed automatically because they inherit from a class called PortalContent, which inherits from a mix-in class called CMFCatalogAware. The CMFCatalogAware class handles all the code to ensure that when you add, edit, cut, copy, delete, or rename an object, the catalog and workflow are kept up-to-date.
Essentially, the object is passed to the catalog, and the appropriate instruction for the catalog is called (index, remove from index, and so on). The catalog then runs through each index and for each index queries the object by looking for attributes or methods on the object. For most indices, the attribute or method looked up is the same name as the index. For example, for the index name Title, CMFCatalogAware would look for an attribute or method named Title and populate the index with the result and then repeat the process with each of the metadata columns.
Two exceptions to this process are the FieldIndex and TopicIndex types. When you add a FieldIndex, you can specify that the index examine a different value than the name of the index. For example, you could make an index with the ID getVersion, which looks at the value of version.
As you will see later, some indices have advantages over others, so it can be useful to have two different indices pointing to the same value.
TopicIndex is a different type of index in that it builds up a series of sets at the time the content is indexed. If you wanted to do a lot of searches for multiple conditions, then you cannot query with normal catalog searches. For example, if you want to search only for images that have a title with more than 30 characters, then you could add a search for o.portal_type == 'Image' and len(o.Title()) > 30. To do this, you need to create a TopicIndex and then click the index from the Indexes tab; you can even add multiple expressions to build up an index. At this time, TopicIndex indices aren't used anywhere in Plone.
Searching or walking through the directory tree waking up the objects from the ZODB is slow and inefficient. As you will see in this chapter, it is better to use the portal_catalog tool, querying one or more indices and retrieving a list of small objects named brains (see the "Using Search Results" section in this chapter).
How Do You Reindex All the Content on Your Plone Site?
The CMFCatalogAware mix-in class also provides two useful methods for reindexing a particular object: reindexObject and reindexObjectSecurity. With reindexObject, you can refresh all indices without any parameter or pass a list of indices that need to be refreshed. The method reindexObjectSecurity instead refreshes security-related indices for the given object.
If you have made a large number of code-level changes, put in a new product, or renamed or moved your root Plone object, then you may need to reindex all the content on your site. In the ZMI, click portal_catalog, click Advanced, and click Update Catalog. This will run the process of updating your catalog.
Caution This is an even more task-intensive than reindexing just one index, and it can take a very long time and use a lot of memory and processing power if you have a large database.
Searching the Catalog
Of course, the biggest question is how to search the catalog and use the results. The first of these tasks depends upon the indices, so we cover each of the indices and show how to search them. The second of these tasks involves manipulating the results, so we'll show you how to do this too.
All of the following examples are in Python because it is the best way to search a catalog. We also show a quick example of how to hook this into a page template. We strongly recommend using Python for manipulating the catalog because it really is the best way to do things; it allows you the greatest flexibility without having to worry about the syntax.
In general, you achieve searching by calling the method searchResults on the portal_catalog object and passing through a series of keyword parameters. A couple of reserved keywords exist, but the rest are mapped directly to the indices of the same name.
So if you wanted to search the SearchableText index, you would pass a keyword parameter for SearchableText through to the search method. The reserved keywords are as follows:
sort_on: This is the index to sort the results on, assuming that the index allows sorting (full-text indexes don't allow sorting).sort_order: This allows a reverse or descending sort on a certain parameter; if not specified, the default is ascending.sort_limit: This is an optimization hint to make sorting a little quicker, returning only the number of items that you want.
So, a general search for the first five published items ordered by date looks something like this:
context.portal_catalog.searchResults(

    review_state = "published",

    sort_order = "reverse",

    sort_limit = 5,

    sort_on="Date"


)
The search will return the intersection of the index results, so this will find the first five items that are published, in reverse date order. You can't do searches that are the union of results; you could do multiple results and then add the results together, but this is a rather unusual case.
If you perform a search with no values, then the entire contents of the catalog are returned. By default, all searches add values for effective and end dates, ensuring that you see content only between these times, unless the user calling the search has the "Access inactive portal content" permission.
Searching a Field or Date Index
To search a FieldIndex index, pass through the value of the field. Any hits that match will be returned; for example, to search for all the images in a site, use the following:
results = context.portal_catalog.searchResults(

     Type = "Image"

)
A field index can take a range of objects as well, and the index will attempt to find all the values in between by performing a comparison of the values. This range could be between two dates, two numbers, or two strings; it really depends upon the value of FieldIndex. You do this by passing a dictionary to the index, rather than just a string. The dictionary should contain two values: a list called query, which contains the values to be tested, and a range, which defines a range of the values. The range is a string of one of the following:
min: Anything larger than the smallest itemmax: Anything smaller than the largest itemminmax: Anything smaller than the largest and bigger than the smallest
For example, to find all events that have an end time greater than now (in other words, anything in the future), use the following:
from Products.CMFCore.utils import getToolByName

from DateTime import DateTime

portal_catalog = getToolByName(context, 'portal_catalog')

now = DateTime()

results = portal_catalog.searchResults(

         Type = "Event"

         end = { "query": [now,],

                     "range": "min" }

)
To search on a range, such as all news items in December, you would need to calculate the start and end dates for the month. From those dates, you can then construct the following query:
start = DateTime('2009/12/01')

end = DateTime('2009/12/31')

results = portal_catalog.searchResults(

         Type = "News Item",

         created = { "query": [start, end],

                              "range": "minmax" }

)
Date indices work in the same manner as field indices, and often you'll see dates placed inside field indices, which works just fine.
Searching a KeywordIndex
By default, a KeywordIndex returns all the values that match in the keyword index. Subject is the only KeywordIndex; this is the keyword that a user has assigned to an object through the Properties tab of the Plone interface. To search for all items with the keyword Africa, use this:
results = context.portal_catalog.searchResults(

          Subject = "Africa"

)
Similar to a FieldIndex, a KeywordIndex can be passed a more complicated query, with several objects and an and/or operator ("or" is the default). This allows you to find all objects that have almost any combination of keywords. To find all objects that have the subject Africa and sun, use the following:
results = context.portal_catalog.searchResults(

          Subject = { "query": ["Africa", "sun"],

                          "operator": "and" }

)
Searching a PathIndex
A path index allows you to search for all objects in a certain path. It will return every object below a current location, so if you ask for all objects in Members, it will return everything in everybody's home directories. For example, for all objects that have Members in their path, use this:
results = context.portal_catalog.searchResults(

          path = "/Plone/Members"

)
If you want to further restrict this, you can do so by passing through a level parameter that sets where you expect the value to be. The level is a number representing its position in the path, from the left when splitting it up by forward slashes. For example, in the previous code, Plone is level 0, Members is level 1, and so on. Similarly to KeywordIndex, you can pass through an and/or operator. To get all objects in the /Plone/Members/danae folder and the /Plone/testing/danae folder, use the following:
results = context.portal_catalog.searchResults(

        path = { "query": ["danae"],

                "level" : 2 }

)
Searching a ZCTextIndex
ZCTextIndex is the most complicated of all indexes and takes a whole host of options. Each one requires a lexicon; fortunately, Plone creates and configures all this out of the box.
If you click portal_catalog, select the Contents tab, and click plone_lexicon, you can see the default configuration of the lexicon. Clicking the Query tab will show you all the words that are in the lexicon built out of your Plone site content.
The ZCTextIndex is searched using the format we described in Chapter 3. It takes terms for searches like those you can use in Google or other search engines. At its most basic, you can search for any term (note that this is case insensitive), like so:
results = context.portal_catalog.searchResults(

          SearchableText = "space"

)
But you can also search for all of the following, as you already saw in Chapter 3:
- Globbing: You can use an asterisk to signify any letters. For example, entering Tues* matches Tuesday and Tuesdays. You can't use the asterisk at the beginning of a word, though.
- Single wildcards: You can use a question mark anywhere to signify one letter. For example, entering ro?e matches rope, rote, role, and so on. You can't use the question mark at the beginning of a word, though.
- And: You can use the word and to signify that both terms on either side of the and must exist. For example, entering Rome and Tuesday will return a result of when both those words are in the content.
- Or: You can use the word or to signify that either terms can exist. For example, entering Rome or Tuesday will return a result of when either of those words are in the content.
- Not: You can use the word not to return results where the word isn't present; a prefix of and is required. For example, entering welcome and not page would return matches for pages that contained welcome, but not page.
- Phrases: Phrases are grouped with double quotes (" ") and signify several words one after the other. For example, entering "welcome page" matches This welcome page is used to introduce you to the Plone Content Management System, but not any content that contains just Welcome.
- Not phrase: You can specify a phrase with a minus (-) prefix. For example, entering welcome - "welcome page" matches all pages with welcome in them, but not ones that match the phrase welcome page.
Using Search Results
So, you have some results, but now what do you do with them? The first thing a lot of people do is look at the results and assume that it is a list of the objects that were cataloged. Well, it isn't; rather, it's a series of catalog brains. These brains are actually lazy objects that contain the metadata columns defined earlier. You can access any of these columns as if they were attributes. For example, to print all the IDs of result objects, use the following:
results = context.portal_catalog.searchResults()

for result in results:

     print result.getId

return printed
In this example, getId is the name of a metadata column, so it will display the value for getId that the catalog had for that object.
If you try to access a value that doesn't exist as a metadata column, then you will get an AttributeError. The following are a few methods available from a catalog brain:
getPath: This returns the physical path for this object inside Zope.getURL: This returns the URL for this object with virtual hosting applied.getObject: This returns the actual object.getRID: This is a unique ID for the object in the catalog, and it changes each time the object is uncataloged. It is for internal purposes only.
So, if you wanted to get the object for each result, you can do so, as you will see in the following example. However, there is a reason the catalog doesn't do this: it's expensive (in terms of computation) because it involves waking up an object from the database (and all the objects in between) and making lots of security checks. If you can, try to make your metadata contain the right information, you will have a much faster application. Obviously, sometimes metadata can't contain everything, but it's worth considering in the design. To get each object, use the following:
results = context.portal_catalog.searchResults()

for result in results:

    object = result.getObject()

    print object

return printed
Since you have a Python list of these brains, it's now straightforward to manipulate the results in a manner that you see fit. To find out how many results were returned, you can just call the length function (in Python, len()) on the list, like so:
results = context.portal_catalog.searchResults()

print "Number of results", len(results)

return printed
To get just the first ten items, use a Python slice, like so:
results = context.portal_catalog.searchResults()

return results[:10]
To do further filtering, you could manually filter the whole list, like so:
results = context.portal_catalog.searchResults()

for result in results[:10]:

     # Title returns a string so we can use the find method of

     # a string to look for occurrence of a word

     if result.Title.find("Plone") > -1:

          print result.Title

return printed
To get a random object from the catalog, use the random module, like so:
import random

results = context.portal_catalog.searchResults()

r = random.choice(results)

object = r.getObject()

return object
Tying It All Together: Making a Search Form
In the previous discussion, we showed you how to get some results out of the catalog, and we used Script (Python) objects to demonstrate that. But you are probably asking yourself, how can I do this from a page template?
Now we will talk about the page templating system commonly used in Plone: Zope Page Templates (ZPT). It generates valid XML and allows you to create dynamic web pages for Zope web applications. Zope Page Templates use the Template Attribute Language (TAL), which consists of special tag attributes. But TAL is not the topic of this chapter; we will introduce it in Chapter 6; for details about ZPT, you can take a look at the Zope Book (http://www.zope.org/Documentation/Books/ZopeBook/2_6Edition/ZPT.stx).
We will assume you have the results from a catalog query and loop through them in a page template using tal:repeat. This is how a lot of portlets are put together; the published and events portlets just do both queries and then show the results.
Those portlets embed the query in a page template either by calling it directly:
<div tal:define="results python:![]()
here.portal_catalog.searchResults(portal_type="Event")">
or by calling a separate Script (Python) object that returns the results. For example, in the following, the script is called getCatalogResults:
##parameters=

kw = {}

# enter your query into the kw dictionary

return context.portal_catalog(**kw)
In a page template, you would get the results in the following manner:
<div tal:define="results here/getCatalogResults">
After doing this, you need to loop through the results using the standard tal:repeat syntax. So you can access each metadata column directly in the TAL by making a path expression to the column. You could get the title from the metadata by calling result/Title. The following code is an example page that loops through the contents of getCatalogResults and displays each item in a simple unordered list:
<html xmlns="http://www.w3.org/1999/xhtml" xml:lang="en-US"

        lang="en-US"

        metal:use-macro="here/main_template/macros/master"

        i18n:domain="plone">

<body>

<div metal:fill-slot="main">

<ul tal:define="results here/getCatalogResults">

      <li tal:repeat="result results">

           <a href=""

              tal:attributes="href result/getURL"

              tal:content="result/Title" />

           <span tal:replace="result/Description" />

      </li>

</ul>

</div>

</body>

</html>
One property of the searchResults method is that if you don't pass any parameters to the function, it will look them up from the incoming request. So if you wanted to allow a form to post parameters to your results, then all you have to do is change the previous results line to the following:
<ul tal:define="

   results python: here.portal_catalog.searchResults(REQUEST=request)

   ">
Now you can redo your query and append any index to the URL. For example, if you called this page template testResults and appended ?Type=Document to the end of the URL of your browser, only the documents in your site would appear. The following is a form to call your page template:
<html xmlns="http://www.w3.org/1999/xhtml" xml:lang="en-US"

        lang="en-US"

        metal:use-macro="here/main_template/macros/master"

        i18n:domain="plone">

<body>

<div metal:fill-slot="main">

   <p>Select a content type to search for</p>

   <form method="post" action="testResults">

     <select name="Type">

        <option

          tal:repeat="value

python:here.portal_catalog.uniqueValuesFor('portal_type')"

          tal:content="value" />

           </select>

           <br />

           <input type="submit" class="context">

     </form>

</div>

</body>

</html>
This script uses a method called uniqueValuesFor on the catalog, which will return all the unique values that exist for an index. This lets you perform a task such as populating a little drop-down box in a form, which is a pretty useful thing to have.
Note Since you can pass in almost any request values, you can set up a search form that would pass this information through to the search form. This is what the search and advanced search pages do. For instance, you will note that if you go to a Plone site and search for beer in the search box, your URL will now have Searchable-Text=Beer.
At this point, it becomes an exercise in HTML and page templates to make the pages as complicated as you would like. Of course, the best place to look for all this is in the actual templates of Plone, which give lines upon lines of great examples. All the portlets you are familiar with in Plone (such as the calendar, events, related, and so on) are all built using catalog queries to determine what to show.
Taking Advantage of the ZCA: Searching by Interfaces
As you will see in later chapters, Plone takes advantage from the Zope Component Architecture. One of the main concepts of the ZCA are interfaces. Interfaces are something like contracts; an interface can be used for marking objects (marker interface) or to tell you whether the object promises to have some behaviors described in the interface itself.
Objects may provide one or more interfaces, but . . . why are we talking about interfaces now? It's because this information is indexed by the portal_catalog tool into the object_provides keyword index. This way, we can gain flexibility by getting rid of portal_type catalog queries and with a more generic interface using the object_provides index (this will be clearer in the example we are about to describe).
Let's imagine a common use case. Many times catalog queries are made by portal_type, but what happens if you want to replace a component with a different one in order to get a better and faster implementation? Or if in your application you want to let both types of objects coexist? Normally, you would modify all catalog queries in your Python code; the resultant code would not be reusable and generic. But by using the ZCA instead, you will most likely not be required to modify any existing (and well-working) code at all!
For a more specific example, imagine a survey application for an e-learning web site. Users log in and fill out the survey. When the user submits his answers, the results are stored in a Result object type in the survey object itself. The objects of the Result type provides the IResult interface, and this object could be used for storing results, comparing different results for the same survey, compiling statistics, and so on. After a couple of months, the site will already have a lot of users and survey submissions, but you may need to have a new result object that is not a stand-alone object but instead is able to contain other objects, such as a folder (in Plone slang we call it a "folderish" object), for instance because you need to handle survey attachments with a particular workflow management and some extra features along with that workflow.
The solution in this case is quite simple. You only need to create a new folderish result type that will provide the same interface IResult; for instance, the ResultFolder type. So, ResultFolder promises to behave just as it's described in the IResult interface; other components of the application already know how to deal with this object because it has the same behavior of the old type Result. After writing a new factory component, newly created results will be of the ResultFolder type. You get all of this without making any change in the existing code, plus you can use and compare old and new type of objects!
And what about user portlets and search interfaces for result types based upon catalog queries? No changes are needed to your existing, tested, and well-working code!
How is it possible? Because all catalog queries are based on the object_provides index instead of the portal_type one, all catalog queries will search for objects that provide the IResult marker in its interface. It doesn't matter if the new type of result has a different portal_type.
Catalog queries made by interfaces are similar to the following:
from Products.CMFCore.utils import getToolByName

from Products.Quiz.interfaces import IResult

portal_catalog = getToolByName(context, 'portal_catalog')

results = portal_catalog.searchResults(object_provides=[IResult.__identifier__,])

return results
Basically, instead of searching for portal_type, we use interfaces that let you gain in flexibility. If the existing catalog queries are similar to the previous one, no changes are needed to your code!
The Python code of the previous example returns a list of all brains in the entire portal of objects, and every single brain in that list corresponds to an object that provides the IResult interface. As shown in this chapter, you probably want to filter the results by creator or review state.
Note If you try to use the previous code, it will not work. IResult cannot be imported because the Quiz package doesn't exist; it is only an example!
Finally, here's a real example taken from plone/portlet/collection/collection.py:
class ICollectionPortlet(IPortletDataProvider):
"""A portlet which renders the results of a collection object.
"""
...
target_collection = schema.Choice(title=_(u"Target collection"),![]()
description=_(u"Find the collection which provides![]()
the items to list"),required=True, source=SearchableTextSource![]()
Binder({'object_provides' : IATTopic.__identifier__},![]()
default_query='path:'))
...
The source of target_collection is built using an object_provides index query. So, if you create a new type that inherits from ATTopic and provides the same interface as IATTopic, this portlet will work fine also with your new type, without any changes.
Summary
In this chapter, you made a big leap forward: you went from the user side to the configuration side. You started to see what lies behind Plone and how to manage objects and features in a deeper layer of the system, the Zope Management Interface. We usually work on the ZMI only when we need to perform tasks we can't perform through the Plone user interface.
After you learned how to access the ZMI, you tackled some concepts that Plone inherits from the application server Zope, such as object publishing and acquisition, and you saw how to manage content types through the ZMI and how searching and indexing work in Zope and Plone.
You can now move on to customizing the look and feel of Plone, managing Plone skins, working with templates and CSS, and working with JavaScript and KSS. The next step is customizing your Plone site aesthetically—it's time to pretty up your site!