
CHAPTER 6
Customizing Plone's Look and Feel
It is now time to think about the look and feel of your site. If you want to manage your Plone site's visual appeal, you have to know first of all how the Plone user interface is put together. A Plone site's visual aspects are made up of a collection of page templates, style sheets, components, and configuration settings that together comprise a Plone theme.
In this chapter, we will cover all the key definitions and theme elements that comprise a site. We will define terms such as skins and layers. Then we will cover customizing the Plone user interface, concentrating on the power that Cascading Style Sheets (CSS) brings to the site developer. We will run through the key variables and show how you can change them.
We will then go on to briefly discuss the integration of JavaScript, a scripting language widely used for client-side web development, with Plone and then conclude with some techniques using KSS, a wonderful new technology for building dynamic, engaging web sites using JavaScript, Ajax, and other technologies, but without using JavaScript directly.
Changing the Entire Site's Look Quickly
If you don't know much about CSS or user interface design in general, don't worry—you can change your Plone site's look with just a few clicks using a ready-to-use Plone theme. There is only one skin available by default in a standard Plone installation—NuPlone—but there are many available on http://plone.org/products. You can choose your favorite by typing theme in the search box and taking a look at the results that appear. You will then have to download and install the package and then enable it in the Site Setup area, in the Add-On Products section.
We'll show what you need to do to change the entire site's look using a different prepackaged theme. For simplicity, we will apply the NuPlone theme, which, as just mentioned, is available by default in Plone. But this step will be the same for any other theme product, as long as you correctly download and install it in your Plone instance.
You just need to go to the Plone control panel, click Add-on Products, select the NuPlone product, and click the Install button, as shown in Figure 6-1.

Figure 6-1. Installing the NuPlone product in your Plone site will completely change its look.
That's it! You'll immediately notice that the visual aspects of your site have changed, as shown in Figure 6-2.
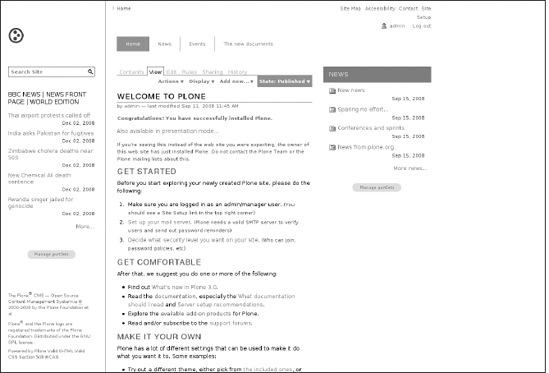
Figure 6-2. The standard Plone home page with NuPlone, a theme product available by default in your Plone installation
To change the theme of your site back to the default, go to the Plone control panel, click Themes, and change the default theme through the "Default theme" drop-down menu. Simply select "Plone default," and your site's look will go back to the original one.
Introducing Plone Skins
A skin determines exactly how any document is displayed to the user, including the images and styles surrounding the content. A skin groups many elements, including static items (such as images) and dynamic pieces (such as scripts), wraps each piece of content, and presents them in a certain manner. A skin is also the place where you will put style sheets and JavaScript.
Your Plone site must have at least one skin that will be used as the default, but it can have as many skins as the site developer wants. A user may optionally flip between skins, should the site developer want to allow the user to do so. The default Plone skin is the one you see on http://plone.org, with the familiar blue and green interface. But Plone doesn't have to look at all like this—its look is entirely up to you. For example, take a look at some of the sites listed at http://plone.net/sites, which offer many possible custom looks.
The templates and other elements that compose a skin are registered on a tool named portal_skins. One of the advantages of this structure is that Plone's templating system allows you to completely separate presentation, logic, and data, and to reuse code. In other words, if you want to modify the look and feel of your entire site, you don't have to modify each individual page. Usually, you'll have to modify just a couple of templates or CSS files.
When we say "reuse" code, we mean that you'll have to write it only once. For example, you can change the structure of all the pages of your portal by modifying just one base template. For instance, one of the most commonly used base templates is main_template. It provides the logical structure for all the pages of the portal, and it is invoked by all templates. If you customize main_template, all other templates will be affected.
Thus, if you want to change only the visual aspects of your pages (such as the size and color of certain titles), you need to modify only one CSS file. If you want to do structural modifications, you can simply customize main_template, and all the views of your portal will be affected.
Using Layers Within a Skin
A skin is divided into logical collections of templates and scripts called layers. Altering these individual collections allows a user to easily add components to a skin or remove them. The layers are represented in a skin by a hierarchical list of folders. Each layer matches the name of a folder, and each folder contains the skin elements.
The order of the layers in that list is the key factor to how Plone finds the elements. Remember the concept of acquisition from Chapter 5? This is a very important construct for Plone, so it is worth repeating: in a standard object-oriented environment, an object inherits its behavior from its parent. In Plone and Zope, an object also acquires properties and behaviors from its parents. So, when an element, such as logo.jpg, is requested from the skin, the skin looks through the layers to find the element. The skin starts by looking at the first layer assigned to that skin (by default, the first layer that is considered is custom). If the skin can't find the element in the first layer, it moves to the second layer. (To find out which is the second layer that will be considered, look at the Properties tab of the portal_skins tool, "Layers (in order of precedence)." We will talk about it in a moment.) It continues looking through the list of layers until it finds the element for which it's looking. If it can't find the element, then a 404 error is raised and returned to the browser.
By allowing higher layers to take precedence over lower layers, developers and administrators now have the ability to customize and manipulate their sites in a programmatic fashion through the layers. For instance, if you don't like a particular element of a Plone skin, you can customize the result by moving that element up a layer so that it will have precedence on the element you don't like.
You can sort your skins and layers in Plone with the portal_skins tool, shown in Figure 6-3. To access the portal_skins tool, go to the ZMI and click "portal_skins."
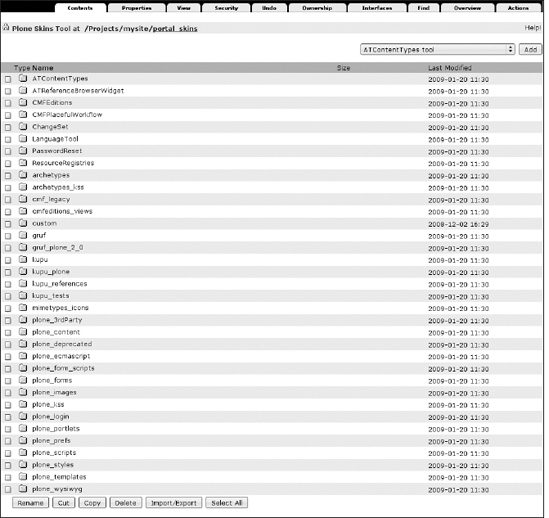
Figure 6-3. The portal_skins tool, which allows you to manage skin elements and customize the look of your site
Clicking the Properties tab at the top of the portal_skins tool brings up all the skins and layers that compose your site's look, as shown in Figure 6-4.
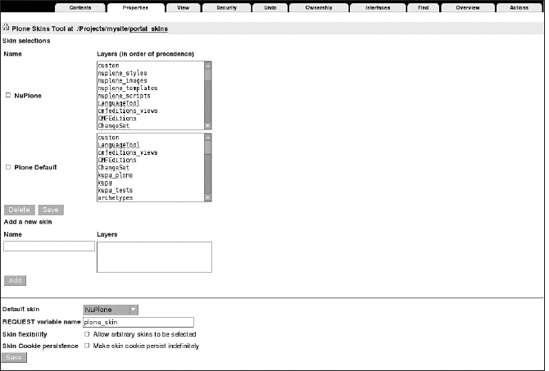
Figure 6-4. The Properties tab of the portal_skins tool
The list of these layers in the Properties section may seem intimidatingly long. However, this hefty number of layers gives you a large degree of flexibility and reuse.
Let's take a look at how these skins are displayed. Each skin displays on the left, with a text area to the right displaying all the layers within that skin. Each layer is the name of a folder or a File System Directory View (FSDV) from the Contents tab. An FSDV is a new object in Plone that allows you to directly access skin elements defined in the file system, instead of having to go through the Zope object database, as usual. FSDVs make development and customization easier. By reading objects directly from the file system, it's much easier for developers to write and edit the code that produces the site.
Your First Customization
Let's return to the Contents section of the portal_skins tool: most of the folders that you can see point to areas of the file system. If you click an element contained in one of the folders in the portal_skins tool, a Customize button will appear. Click it, and you will be able to change the code of the element; this operation will create a modified copy of that element in the custom layer, which by default is the layer on the very top, taking priority over all other layers.
Let's walk through a very simple example. Search for main_template in the portal_skins tool. On the Find tab in the portal_skins tool, type main_template in the "with ids" field, and click the Find button. Zope will show you a list of items that match your query search. The element highlighted with a red * means that it is the item on top of a given skin.
In our case, main_template is placed in portal_skins – plone_templates. Click the Customize button, which will create a copy of main_template in the custom layer. Now you can modify this template. For example, let's add a simple line of text before the closing </body> tag:
...

<div>

Powered by me

</div>

</body>

</html>

</metal:page>
In this example, you have added the text "Powered by me" at the bottom left of your site. Save the changes, and take a look at your site: you will see that all the pages of your portal show this text in the bottom area, as Figure 6-5 shows.
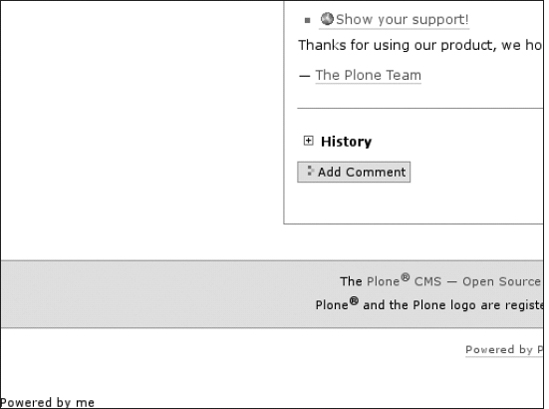
Figure 6-5. By customizing main_template, you can add items to all the pages in your portal.
Note If you delete the customized main_template version contained in the custom layer, all pages of your portal will go back to the default version provided by Plone in the plone_templates layer. So, don't worry if something goes wrong when you are customizing an element of Plone—if you want to revert it, simply delete the customized element in the Custom folder.
Templates and CSS: Customizing Your Plone Skin
To really customize the look and feel of your Plone site manually, you need to know how skins work. This will come with experience, but we'll try to give a quick overview. The main stars are templates, CSS, and Python scripts. Templates define the structure of the site's visual aspect; CSS defines the way that pages display those visual aspects (colors, font, and layout); and Python scripts give the logic.
There are two ways for templating Plone: ZPT and DTML. Document Template Markup Language (DTML) is commonly used by Plone to generate dynamic CSS and JavaScript files, while Zope Page Templates (ZPT) is the page generation tool commonly used in Plone. We will introduce those concepts, but if you want to create dynamic views with Plone, you will need to get used to working with the ZPT language template. DTML was widely used in legacy Zope applications, but nowadays it's used only for non-HTML text like JavaScript and CSS dynamic files. You'll see here how to edit CSS in Plone. By simply overriding Plone's existing styles, you can make consistent changes.
DTML and ZPT
In the portal_skins tool, there are a few DTML files. One of these is CMFPlone/skins/plone_styles/mobile.css.dtml:
...

body {

    font-family: <dtml-var fontFamily>;

    background-color: &dtml-backgroundColor;;

    color: &dtml-fontColor;;

    margin: 0;

    padding: 0;

}

table {

    font-size: 100%;

}

a {

    color: &dtml-linkColor;;

    background-color: transparent;

}

...
As you can see, settings like font-family for the body are defined dynamically. The DTML engine will replace <dtml-var fontFamily> with the correct value given dynamically from the fontFamily variable; it's the same for the shortened syntax &dtml-backgroundColor;;, and so on. (Don't be confused by the double semicolons; they exist just because the syntax &dtml-backgroundColor; will be replaced with the value that is "dynamically" appropriate. So, for example, if &dtml-backgroundColor; means white, then it will become white;.) The generated CSS code will look like this:
body {

    font-family: "Lucida Grande", Verdana, Lucida, Helvetica, Arial, sans-serif;

...
This example is quite simple, but it's useful for understanding how DTML works. DTML allows you to do many things, but since nowadays its usage is quite limited, it is easy to acquire the skills you need for working with it. If you want to gain a wider and more complete overview of DTML, visit http://zope.org/Documentation/Books/ZopeBook/2_6Edition/DTML.stx.
The actual style sheet that does most of the work, plone.css, has a number of variables in it that are populated using DTML. The DTML syntax for plone.css is actually pretty simple. How are values filled dynamically by the DTML? Each variable relates to a corresponding attribute in a property sheet, which you can customize. To access this property sheet, click the portal_skins tool in the ZMI, then click plone_styles, and finally click base_properties. In the base_properties object you will find the default values used by dynamic CSS files. DTML replaces the DTML variables with the proper values you indicated in base_properties.
You can customize this object by changing the values that are set by default. Customizing the base_properties object in this way will change all of the generated CSS. You can, for example, change fonts, font sizes, backgrounds, colors, and border settings.
Now try to add a basic customization for your portal. Customize the default base_properties object by changing the value for the fontColor property from Black to Red, and see what this looks like in your Plone interface.
Note If nothing changes, check your browser cache settings and purge the cache of Plone in the portal_css tool if needed. In order to do this, navigate to portal_css and click Save, or use debug/development mode to avoid saving every time you change something. Remember not to use debug/development mode when managing public web sites, since it will make everything much slower.
Like DTML, ZPT allows you to create dynamic pages for the Web, but with a different syntax. As you have just seen, DTML is not a valid HTML-like markup language.
ZPT works around the limitations of DTML. Using ZPT, you will be able to collaborate with designers without any problems, since ZPT can be rendered well by WYSIWYG tools. ZPT is indeed a valid HTML-like markup language. Using ZPT, designers can produce an HTML template using their favorite WYSIWYG editor, and programmers can easily create a dynamic model using the same template. For these reasons, ZPT is the preferred tool for writing HTML views, because they are similar to HTML and make possible a better separation of logic, presentation, and data.
Let's play with ZPT in a couple of simple examples. Go to the Custom folder in the portal_skins tool, and add a page template from the Add menu of the ZMI. Type home_view as the ID, and click the Add and Edit button. Zope will prompt for you a default ZPT code; keep it like it is and save it.
Now try to apply this view to the objects contained in your portal. It is as simple as appending the /home_view string to the end of the URL in your browser. You will see a simple page that shows you the title of the current object and the identifier of the page template (home_view).
If you apply this page template to different objects, what is displayed on your screen will change depending on the context: the result changes, properly showing the correct title.
If you take a look now at the ZPT code you just added, you should see something like this:
...

    <h2><span tal:replace="here/title_or_id">content title or id</span>

        <span tal:condition="template/title"

              tal:replace="template/title">optional template title</span></h2>

...
This ZPT code will be replaced with dynamic HTML like this:
...

    <h2>Site

    </h2>

...
The replace statement means that the dynamic statement here/title_or_id will replace the element. So, if you have
<span tal:replace="here/title_or_id">content title or id</span>
you get as a result
Site
The content statement is slightly different. A content statement will not replace the entire HTML element, but rather only its content:
<span tal:content="here/title_or_id">content title or id</span>
The rendered HTML result of the preceding code will be
<span>Site</span>
You can also use conditions, use loops on items, define variables, and so on, for creating dynamic pages; for more details about basics features of Zope Page Templates, see the Zope Book chapters about ZPT, where you can find more instructions about condition elements and about how to change attributes: http://www.zope.org/Documentation/Books/ZopeBook/2_6Edition/ZPT.stx.
You can also define and call macros from other templates in order to reuse templates. In fact, main_template comprises the skeleton of the Plone page and defines a lot of macros that are reusable by other templates.
Managing Viewlets
As mentioned, Plone is geared toward object-oriented and Zope 3 programming techniques, and this is true also for presentation components such as views and forms. Views in Plone are not only simple dynamic HTML but also instances of Python classes.
Common presentation components used in Plone are views, forms, portlets, and viewlets. We will talk about views and forms in the following chapters; here, we will introduce the concept of viewlets. A viewlet is responsible for rendering a section of a page. All viewlets are registered in a viewlet manager, which is a container of viewlets that you can hide or display. You can change the display order of registered viewlets in the viewlet managers or plug new custom viewlets without having to modify any existing template, as you will see later.
You may wonder why things get so complicated. Wouldn't it be better to keep things simple with ZPT templates and procedural Python scripts? There's a couple of good reasons not to. First of all, by using viewlets, you can take advantage of object-oriented programming techniques, thus writing better and more reusable code. Second, with Python code in viewlets, you can write Ajax components with KSS, which can do a lot of cool things. You can create a complex assignment system of portlets or viewlets, build a set of configurable and reorderable portlets or viewlets to manage your site, or, maybe in the near future, support dragging and dropping of visual components.
You have seen that the main_template used by Plone to render all pages provides a set of slots to fill in. But main_template also calls some viewlet managers that manage the rendering of their registered viewlets. Viewlet managers are something like containers of registered viewlets.
For example, the default page of Plone is split into different sections: the top area is rendered by a viewlet manager that calls the other viewlets.
How are viewlet managers called by main_template, and which viewlets and viewlet managers are available? If you take a look at the main_template code, you will find a lot of lines like this:
<div tal:replace="structure provider:plone.portaltop" />
This corresponds to a call to a viewlet manager. In this case, the div will be replaced with the HTML code rendered by the plone.portaltop viewlet manager. On this viewlet manager are registered a lot of viewlets that render the top area of our pages (logo, search form, etc.).
To get a deeper look at how viewlets are organized on the viewlet manager interface, take a look at http://localhost/mysite/@@manage-viewlets (see Figure 6-6).
Notice that within plone.portaltop, a lot of viewlets and viewlet managers are registered. You can hide some viewlets or viewlets managers, change the display order, and so on.
Note that you can do all this without customizing the main_template. One of the main problems encountered when customizing templates in portal_skins is that they sometimes cause conflicts with other add-on products. If we make some customizations to main_template and then install another product that provides a custom main_template, Plone can become broken as a result. Using viewlets instead, you can do basic configurations through a simple web interface, simply reordering or hiding elements, without customizing main_template.
You can now practice with this viewlet management interface and take a look at what happens after your updates.
Notice that all of your updates can be exported using the plone_setup tool. So, you can save your configuration, export it to an XML file, compare different snapshots, and then import the exported file into another Plone site. If you are a programmer, you will be able to include the exported XML file in your file system product—when your add-on product is installed, all your updates to viewlets will be automatically applied.
Try it: go to the portal_setup tool, click the Export tab at the top of the page, and then check the Viewlet Settings check box to export your viewlet settings. Finally, click the "Export selected steps" button to confirm and download the generated tarball containing your customizations.
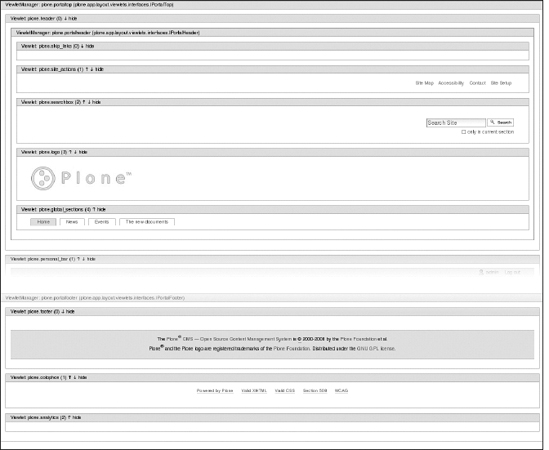
Figure 6-6. The viewlet structure of a Plone page allows you to manage viewlets.
Extracting the downloaded tarball, you will find a viewlets.xml file containing your updates. In this example, we've exported an XML file that hides the plone.searchbox for the Plone Default skin. This way, Plone will not show the search box in the top-right corner.
<?xml version="1.0"?>

<object>

 ...

 <order manager="plone.portalheader" skinname="Plone Default">

  <viewlet name="plone.skip_links"/>

  <viewlet name="plone.site_actions"/>

  <viewlet name="plone.searchbox"/>

  <viewlet name="plone.logo"/>

  <viewlet name="plone.global_sections"/>

 </order>

 ...

 <hidden manager="plone.portalheader" skinname="Plone Default">

  <viewlet name="plone.searchbox"/>

 </hidden>

</object>
If you want, you can make other customizations and try to reimport your profile into another Plone site. It is as easy as clicking the Import tab of the portal_setup tool of another Plone site and uploading your compressed tarball. Note that there are other add-on products that provide a friendlier interface to manage viewlet. For example, take a look at the GloWorm add-on product (http://plone.org/products/gloworm).
Editing CSS
As already explained, in Plone, logic, layout, and data are always separated. It is always a bad idea to put style directly into templates, like in this example:
<table border="1">

...

</table>
or this:
<span style="color: Red;"> Text here </span>
In these examples, you get as a result a table with borders and a span with red text. Imagine spreading code like this throughout your pages: what will happen if you want to change the layout of all the tables or the color of all the titles? You will have to edit all the HTML pages of your site.
Alternatively, you should use CSS instead of styling pages directly in your HTML templates. CSS helps display basic HTML code. For example, if you want to change the color of a link or create a new style for all the pages in a site, you just need to edit a single CSS file.
Plone itself is widely based on CSS files, so you can style your site without editing HTML templates. Perhaps the easiest way to see exactly what the CSS does for a Plone site is to turn off style sheets in your browser. The difference is striking to say the least.
CSS files in Plone are registered on the portal_css tool. There are a lot of registered CSS sheets, and you can enable or disable those registered elements or add new CSS sheets. On each of these registered items, you can configure several options:
- Title: This allows you to set a title for your CSS sheet.
- Condition: This is useful, for example, if you need to enable a particular CSS sheet only under certain conditions.
- Merging allowed: This merges your item with other CSS sheets.
- Caching allowed: This makes your CSS sheet cacheable.
- CSS Media: This allows you to set the target media of your CSS sheet. The
alloption is used for all media type devices, thescreenoption is used for computer screens, theprintoption is used for printers, and so on (for more details, visit www.w3schools.com/css/css_mediatypes.asp). - rel: This is filled with the value
stylesheetby default, since it refers to the relationship between the document and the resource used for displaying page elements. - Render type: This makes it possible for you to choose from three types of rendering for your CSS. This option affects how your CSS will be included in your pages; the default value is
import. - Compression type: This sets compression for your CSS (
safe/full/none); compressing the CSS allows you to speed up the loading time of loads.
So, with the portal_css tool, you can register new CSS files and choose whether they will be merged altogether, whether they are cacheable, their media type, the method of rendering, the compression, and a condition. You can also reorder the items, overriding existing settings.
Conditions are particularly useful, for example, to force a certain CSS sheet to apply only when the context is an image (python:here.portal_type == 'Image'), or to switch your portal to RTL mode, which means right to left, for languages such as Hebrew and Arabic (using python:portal.restrictedTraverse('@@plone_portal_state').is_rtl()).
Examining Example Customization Snippets
So, what is the best way to customize the look and feel of your portal? This section will show some examples that demonstrate simple customizations you can make to your Plone site.
Note When working with CSS, you can use the debug mode option of the portal_css tool, but remember to avoid using it on web sites, since it slows down the interface of the whole portal.
As you may have already noticed, there are a lot of items registered in the portal_css tool. One of the items that is added by default is the ploneCustom.css item. This is the file where you can put your CSS changes. You should use this and override the relevant properties you want to change here, instead of customizing other registered CSS files like plone.css to avoid problems when upgrading Plone to newer versions. Writing your own plone.css makes sense only for very heavy customizations.
The ploneCustom.css file is reachable through the portal_skins tool (portal_skins/plone_styles); it is shown in Figure 6-7. As you can see, it contains not only CSS code but also DTML code. This allows you to obtain dynamic CSS code, which is useful because it provides some parameters from other tools like the base_properties tool (portal_skins/plone_styles/base_properties). In the ploneCustom.css file, you can change, for example, font types, font and background colors, and so on.
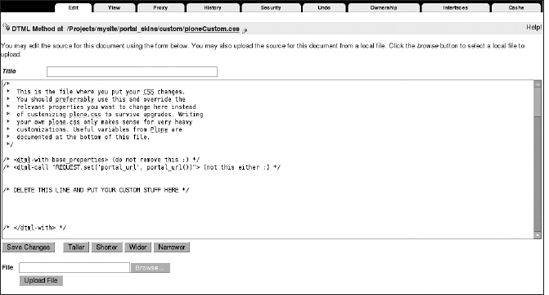
Figure 6-7. Customizing the ploneCustom.css file
All the settings in base_properties are dynamically looked up in ploneCustom.css. Of course, as you already know, you can customize the base_properties object by clicking the Customize button, and the new values will override the default ones.
Let's now practice customizing. You can customize the portal logo by providing a different image. To do so, go to the plone_images layer in portal_skins (portal_skins/plone_images) and customize the logo.jpg item. You can also customize other elements in this layer (e.g., arrows, object and action icons, etc.).
base_properties provides a set of basic graphical customizations. If you want to include more advanced graphics, you can customize ploneCustom.css, adding more advanced rules. For example, you can improve the readability of the pages of the portal by increasing the base font size of all text in base_properties. In order to achieve this, add these lines:
...

p {

    line-height:1.8em;

}

dd {

    line-height:1.8em;

}

ul {

    line-height:1.8em;

}

a:hover {

   background-color: Black;

   color: White;

   font-weight: bold;

}

...
Here we have increased the space between lines to 1.8 em. We have also changed the background color and the color of links when a hover event occurs. This way, people with visual impairments will have an easier time seeing the links.
Working with JavaScript
As with CSS, Plone also provides a registry tool for JavaScript: portal_javascripts. This tool is very similar to portal_css. Many of the options, such as debug/development mode, are basically the same.
Take a look at the portal_javascripts tool, and notice that all the JavaScript is registered by default. On each JavaScript script, you have the same options as with the CSS tool (e.g., "Inline rendering" and "Condition") You can put Python or TAL conditions here (TAL stands for Tag Attribute Language and is the standard attribute language used to create dynamic templates). A common use case is to include a JavaScript library for image content types in order to create special effects on single images (e.g., an image that enlarges when the mouse moves over it) or on photo galleries. What you would do is similar to that shown for portal_css. You just need to upload a JavaScript file in the custom layer of the portal_skins tool and register it in the portal_javascripts tool.
We will not go deeper into explaining how to work with JavaScript. The important thing to know is that if you want to add some JavaScript effects in Plone, you will have to register them in the portal_javascripts tool, and then you can customize the tools where you want to apply them.
KSS: Ajax Made Easy
Ajax stands for "Asynchronous JavaScript and XML." With Ajax techniques, you can create more interactive user interfaces for your web applications using asynchronous background calls to server procedures. As you've already seen, Plone has some useful Ajax features. These features are made with the Ajax framework Kinetic Style Sheets (KSS). KSS allows user interface development without writing any JavaScript or entirely rewriting a preexisting user interface.
KSS provides a set of commands from its own DOM-like inspector, which you can use if you want to write KSS plug-ins, and has both a client-side JavaScript library and server-side support. The main goals of KSS are
- Staying low-impact. If you have an old browser or JavaScript disabled, you can still work with Plone.
- Working easily with Ajax. You can write your Ajax components without knowing any JavaScript.
- Being widely based on object-oriented programming and built with Zope 3 technologies.
- Wide test coverage (which is intrinsically synonymous with quality; if developers change something in the KSS code, automatic tests can detect whether something goes wrong).
Many user interface components are sensitive to the KSS technology in Plone. Common use cases for KSS, for example, are the inline editing of Plone contents and orderable listings for folder contents.
But how does it work? Well, KSS is based on CSS selectors that describe dynamic behaviors and server actions. In other words, you declare a set of rules and events in a KSS file with a CSS-like syntax, like this:
#css_selector_id:click {

    evt-click-preventdefault: True;

    action-server: your_server_action;

    action-client: alert;

}
So, when a user clicks a "KSSified" element identified by a CSS-like selector, an asynchronous server action will be performed. The server action gets the element to be updated using a CSS selector, computes the HTML code on the server side, and then sends the resulting code back to the page that needs to be updated. These KSS files are registered on the portal_kss tool. With this tool, you can add your own new KSS style sheets. Let's look at how to implement two very popular features: inline editing and sortable folder lists.
When you use the inline editing feature in Plone by clicking a "KSSified" element (e.g., the Title field of a document), a server action replaces this element with a small edit form that lets you change the title without a page reload. This is very useful when you want to edit just one field of your object without loading the whole standard edit form.
Another more complex "KSSified" component of Plone is the folder contents view: if you click one of the headers of the folder contents table, the order of elements will change. How is this possible? Let's look at the details. Look at the foldercontents ZPT code to see how to make your list of items sortable depending on their workflow status. As shown in plone/app/content/browser/table.pt, the header of the State column is marked with the ID foldercontents-status-column since its items are sortable depending on their workflow status:
<th class="nosort column"
id="foldercontents-status-column"><nbsp;![]()
<tal:state i18n:translate="listingheader_status"
>State</tal:state> </th>
In CMFPlone/skins/plone_kss/plone.kss, we register the click event on the State column for the server action foldercontents_update_table, as shown here:
#foldercontents-status-column:click {

    action-server: foldercontents_update_table;

    evt-click-preventdefault: True;

    foldercontents_update_table-pagenumber: currentFormVar('pagenumber'),

    foldercontents_update_table-sort_on: "review_state";

}
Here, we render foldercontents_update_table passing two arguments: pagenumber and sort_on. foldercontents_update_table is registered in plone/app/content/browser/configure.zcml, as follows:
<browser:page

     for="*"

     class=".foldercontents.FolderContentsKSSView"

     attribute="update_table"

     name="foldercontents_update_table"

     permission="cmf.ListFolderContents" />
Also, it is handled by the update_table method, available on the Python class FolderContentsKSSView, which is defined in plone/app/content/browser/foldercontents.py. Let's now find this method and take a look at the FolderContentsKSSView class:
class FolderContentsKSSView(TableKSSView):

    table = FolderContentsTable
The update_table method is inherited by the Python class TableKSSView defined in plone/app/content/browser/tableview.py:
class TableKSSView(KSSView):

    '''Base class that can be used from a KSS view

    Subclasses only need to set the table property to a different

    class.'''

    table = None

    def update_table(self, pagenumber='1',

                 sort_on='getObjPositionInParent', show_all=False):

        self.request.set('sort_on', sort_on)

        self.request.set('pagenumber', pagenumber)

        table = self.table(self.context, self.request,

                                    contentFilter={'sort_on':sort_on})

        core = self.getCommandSet('core')

        core.replaceHTML('#folderlisting-main-table', table.render())

        return self.render()
Here we can take a closer look at the method that takes care of updating the code. update_table gets the HTML code of the ordered table, sets the KSS command, and then replaces the folder contents table area with the computed HTML.
Finally, update_table calls the render method that lets KSS return the results of the actions performed on the command set.
Though quite complex, this example shows something interesting: you have built, with Plone, a complex Ajax user interface without writing a single line of ugly JavaScript code. This is a good thing because JavaScript is difficult to maintain and your code reusability is improved.
What Can You Do with KSS?
Plone 3 is shipped by default with KSS included, and it introduces more dynamic behavior that lets users improve their experience with Plone. Two of the most important KSS-powered features are inline editing and sortable folder contents views, as mentioned.
Note If you use an old browser that doesn't support KSS, you can still use Plone, because it is designed to have an alternative interface for these kind of cases.
These are standard Plone features, but with KSS you can also build complex user interfaces based on drag-and-drop.
Let's see a practical use case. You'll integrate the KSS-aware add-on Image Editor (http://plone.org/products/imageeditor) into your Plone site. This add-on provides an embedded image editor that lets you edit your previously uploaded images just using your browser. Thanks to this, you will be able to resize, cut, and manipulate images without having to download and edit them with an application before reuploading them to Plone. Download and install Image Editor to your Plone site. On all image content types, a Visual Transforms tab will appear that will allow you to edit images directly in your browser. Figure 6-8 shows you an example.
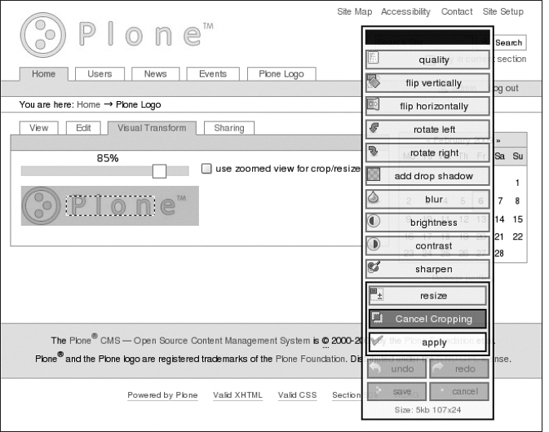
Figure 6-8. Thanks to the embedded image editor, you can edit and transform images directly through the Plone user interface.
How to Disable KSS in Plone
KSS is enabled by default for authenticated users. If for some reasons you want to disable it, go to the portal_kss tool, deselect all enabled KSS registered files, and then confirm by clicking the Save button.
If you want to disable only the inline editing feature and you have a Plone version higher than 3.1, you can go to the portal_properties/site_properties configuration tool and deselect the enable_inline_editing property, or you can use the Plone control panel to select Site Setup ![]() Site and uncheck the "Enable inline editing" option.
Site and uncheck the "Enable inline editing" option.
Summary
You will see throughout the book that the flexibility of Plone concerns the management of content, workflow and security, and users and groups; the creation of content rules; and the integration of extensions, databases, and other services. In this chapter, you started to see that you are free to design your interface's visual aspect as you want.
You have seen how to apply a ready-to-use Plone theme and that you can change your site's aspects very quickly without a lot of background knowledge. You were introduced to Plone skins and their functioning, and you began your first manual customizations. You then explored Plone templating, including working with DTML and CSS. Finally, you got an introduction to JavaScript and KSS.
In the next chapter, we will start talking about Zope security architecture, which is inherited by Plone. You will learn how to add new users and roles in Zope, how to set up existing workflows and create new ones, and how to implement and configure workflow policies. We will then dedicate one more chapter to security, dealing with advanced user management.