
The Spring Framework has its origins in the companion code for Rod Johnson's book, Expert One-on-One J2EE Design and Development (Wrox, 2002). The book developed a strong following of developers, who used the Wrox forums to discuss both the book and the corresponding code. Two of those developers, Juergen Hoeller and Yann Caroff, persuaded Rod to turn the code into an open source project. The book referred to the framework as the Interface21 framework, because Rod felt that it represented the future of enterprise Java development—a framework for the twenty-first century. However, when the open source project was formed, they felt they needed a name that could better inspire a community. Yann suggested Spring because of the association with nature, as well as the fact that Spring represented a fresh start after the "winter" of traditional J2EE development. The project went public in 2003, and version 1.0 of the Spring Framework was released in 2004.
Since then, Spring has been widely adopted because it delivers on the promise of simpler development while also tackling some very intricate problems. Another key to Spring's rise to prominence is its exceptional documentation. Many open source projects have faded into oblivion because of the lack of sound documentation. Spring's documentation has been very mature since the very early days of the project.
Despite what some may claim, the Spring Framework is not currently a standard. Standard technologies are great, and Sun deserves a lot of credit for pushing standards-based Java technologies into the mainstream. Standards allow you to do things like develop your web application on Tomcat and then drop it into WebSphere, with little adjustment required (at least theoretically). But even though the Spring Framework is unbelievably popular today, it does not represent a true standard.
Some consider Spring a de facto standard, due to the sheer volume of applications that rely on it. Spring provides a means for integrating the various components of your application in a consistent way, and it is deployed far and wide across a variety of application ecosystems. Sometimes, this type of standard implementation is a far more valuable proposition than a standard specification.
Despite the naysayers that balk at the idea of using any technology that wasn't designed by a giant committee of corporate volunteers, using Spring in your application poses little risk. In fact, the more you utilize Spring for integrating components into your application, the more consistent your integration strategy will be, making maintenance and development easier. That's right—reliance on Spring will often lead to better, cleaner, decoupled code.
Because Spring is such a large framework, and because the documentation is so good, we have no intention of covering it all. Instead, this chapter will serve as a quick overview of the most important concepts that we build on in the rest of this book.
Spring is composed of a series of modules. The beauty of this design is that you can pick and choose the components that you would like to use. There's no monolithic JAR file. Instead, you explicitly add the components that you want to your project dependencies.
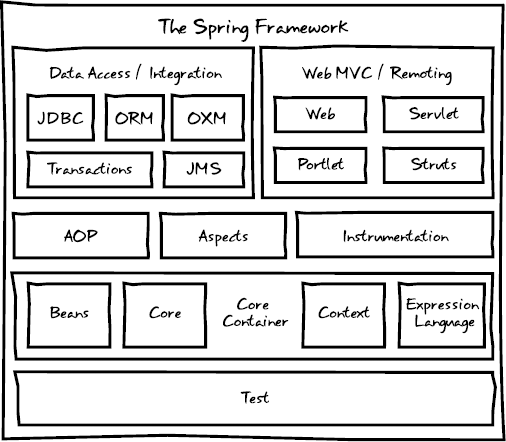
As they say, a picture is worth a thousand words. Figure 2-1 is a depiction of the Spring components. The three primary groupings are the core, web, and data access modules.
We'll be tackling many of these modules in this book. This chapter will take you through the core container and AOP.
Spring's job is to parse your configuration files and then instantiate your managed classes, resolving their interdependencies. Spring is often called a container, since it is designed to create and manage all the dependencies within your application, serving as a foundation and context through which beans may also be looked up. This core engine is represented by a base interface called BeanFactory.
The BeanFactory interface defines the core Spring engine that conglomerates your beans and wires the collaborating dependencies together. But the Spring container is capable of much more than just dependency injection. It can also be used to publish events, provide AOP functionality, support a resource-loading abstraction, facilitate internationalization, and so on. For many of these advanced capabilities, you will need to use an ApplicationContext instance.
The ApplicationContext extends the BeanFactory interface, providing a set of more robust features. The separation can come in handy if you are building a very lightweight application and don't need some of these more advanced features. But for most applications (especially server-side software), you will want to use an ApplicationContext implementation. In the case of web applications, you will use a WebApplicationContext. Spring ships with a listener that you can throw into your web.xml file to automatically bootstrap the Spring ApplicationContext and load your configuration file. It's as easy as adding the following lines into your web.xml:
<listener>
    <listener-class>
        org.springframework.web.context.request.RequestContextListener
    </listener-class>
</listener>
These lines will ensure that Spring is loaded when your application first starts up and will parse the configuration file located at WEB-INF/applicationcontext.xml.
If you're not building a web application, it's just as easy to load the Spring container. In this case, we recommend going with the ClassPathXmlApplicationContext implementation, which is designed to load the Spring configuration files from the classpath. It is invoked in the following way:
ApplicationContext context =
    new ClassPathXmlApplicationContext(new String[]{"configfile1.xml", "configfile2.xml"});
You can see just how easy it is to get a Spring container instantiated. Once you have a reference to the ApplicationContext, you can use it however you wish. The reference that is returned to you is the loaded ApplicationContext, with all the beans that you defined instantiated and dependencies resolved.
If you felt so inclined, you could access a bean by name, simply by invoking the following:
UsefulClass usefulClass = (UsefulClass) context.getBean("myBeanName");Assuming that your bean is defined somewhere in your Spring configuration files (referenced by the ID or name attribute), Spring will hand you your class instance, ready to go (meaning all of its dependencies will have been injected). However, we strongly recommend that you try to avoid issuing calls to getBean().
The whole point of Spring is automatic dependency injection, which means not looking up your beans when you need them. That's dependency lookup, which is so 1995. While this approach does decouple and defer your class dependencies, it still requires an explicit lookup step. As a rule of thumb, if you need a reference to a particular dependency, specify these details in the configuration, not in your code.
Some developers will rely on getBean() only in circumstances in which they always need a new instance of their class (each time they make the call). A better solution to this problem is using the lookup-method property in your XML configuration. This property coerces Spring to override or implement the specified method with code that will always return a new instance of a designated bean.
An alternate strategy for accessing beans from the ApplicationContext is to implement the ApplicationContextAware interface. This interface has the following method:
void setApplicationContext(ApplicationContext context);
With access to Spring's ApplicationContext, your class has the flexibility to look up beans by name or type, without you needing to write code to acquire an ApplicationContext from the classpath directly. In practice, there shouldn't be many cases where you need to integrate Spring's API so deeply into your code. The more common approach is to let Spring manage the relationships between beans dynamically through dependency injection.
A big part of the secret sauce for the Spring Framework is the use of Plain Old Java Objects, or POJOs. Martin Fowler, Rebecca Persons, and Josh MacKenzie originally coined the term POJO in 2000. POJOs are objects that have no contracts imposed on them; that is, they don't implement interfaces or extend specified classes.
There is often quite a bit of confusion about the differences between JavaBeans and POJOs. The terms tend to be used interchangeably, but that's not always accurate. JavaBeans are best characterized as a special kind of POJO. Put simply, a JavaBean is a POJO that follows three simple conventions:
It is serializable.
It has a public, default, and nullary constructor.
It contains public getters and setters for each property that is to be read or written, respectively (write permissions can be obscured simply by defining a getter, without defining a setter).
An object in Java may be a POJO but not a JavaBean. For instance, it may implement an interface or extend specified classes, but because it refers to objects that are stateful and/or exist outside the scope of the Java Virtual Machine (JVM)—for example, HTTP or database connections—it cannot reasonably be serialized to disk and then restored.
The concept of JavaBeans was originally devised for Swing to facilitate the development of stand-alone GUI components, but the pattern has been repurposed for the land of Spring beans and back-end persistence with Hibernate.
Spring not only instantiates objects and wires up dependencies, but it also handles each managed object's life cycle.
For example, what if you need to do some initialization in your class, after the Spring-injected properties have been set? One way to accomplish this is through constructor injection (so that you can capture the moment all of a bean's properties are injected). But a cleaner approach is to use the init-method feature. By defining an init-method attribute on your bean, you can specify an arbitrary method that will be called after all of the Spring properties have been set (that is, after all of your setters have been invoked). Here is an example of using the init-method feature of Spring:
<bean id="initTest" class="com.prospringhibernate.gallery.InitTest" init-method="init">
    <property name="testString"  value="Let me out of this computer!"/>
</bean>
Simple, right? Next, we need to define a class with the init-method we specified in the preceding configuration:
package com.prospringhibernate.gallery;

import org.springframework.util.Assert;

class InitTest {

    private String testString;

    public void init() {
        // let's do some initialization stuff!
        Assert.notNull(this.testString,
                                       "You forgot to set the testString property! What were you thinking???");
    }

    public Foo doBizLogic() {
        ...
    }

    public void setTestString(String testString) {
        this.testString = testString;
    }

    public String getTestString() {
        return this.testString;
    }
}
If you're using Java 5 or later, you can also tap into Spring's annotation support for initialization events. Using this approach, you simply annotate a class's methods with the @postConstruct annotation, without needing to specify initialization hints in the Spring configuration. For example, we could refactor our earlier example as follows:
package com.prospringhibernate.gallery;

import org.springframework.util.Assert;

class InitTest {

    private String testString;

    @PostConstruct()
    public void init() {
        // let's do some initialization stuff!
        Assert.notNull(this.testString,
                                       "You forgot to set the testString property! What were you thinking???");
  }

 }
As with everything in Spring, there's actually more than one way to skin a cat. Instead of specifying init-method in the configuration or using the @postConstruct annotation, you could have your class implement the InitializingBean interface. To a certain extent, using this interface makes things a bit easier, since you don't even need to change your configuration. The interface just requires you to implement an afterPropertiesSet() method, which will automatically be detected and called for you once Spring has finished setting all the configured properties. The downside with this approach is that you sacrifice your simple POJOs and tightly couple your beans to Spring. While coupling to Spring isn't terrible, the cleaner approach is to keep initialization details entirely within configuration and out of the code. So let this be your mantra: keep it in the configuration.
Similar to acting on bean creation, you may also trigger custom logic when beans are destroyed. You can accomplish this in several ways:
By implementing the
DisposableBeaninterface, which is essentially the inverse ofInitializingBeanBy applying a
@preDestroyannotation to the method in questionBy configuring the
destroy-methodparameter in your Spring XML configuration, which is what we recommend to minimize tight coupling
Now that you know how to tap into the creation and destruction life-cycle events in Spring, there's another aspect of bean management that's crucial to understand when building enterprise applications: bean scoping.
By default, beans defined in Spring are all scoped as singletons. A singleton is a class that is guaranteed to have only a single instance in the JVM. Singletons are great for storing application state, or for any case where you want to be assured that there is only ever one reference in your application. Normally, you would need to write code to achieve this assurance.
The typical singleton meets the following criteria:
Has a static method to return the single instance of the class (stored as a static reference within the class)
Has a private constructor, ensuring that only the singleton itself can ever create a new instance (which is your assurance that you won't accidentally create more than once instance simply by invoking
new Singleton())
A singleton in your application might look like this:
public class Singleton {
    private static final Singleton INSTANCE = new Singleton();
    private Singleton() {
    }

    public static Singleton getInstance() {
        return INSTANCE;
    }
}
Although the preceding sample illustrates a useful design pattern, Spring obviates the need to write this boilerplate code, once again allowing you to move these details into the configuration. By default, all Spring beans are singletons. If this is not your intention, you need to specify a different scope for your bean.
In Spring 1.x, beans were either prototype beans or singletons. Prototype means that each new call to getBean() will return a brand-new instance of your bean. Singleton beans guarantee that there can only ever be a single instance of your class in the entire Spring ApplicationContext. Spring 2.x introduced several new standard scopes, as well as the ability to define custom scopes. Spring 3.x added a thread scope, though it's not registered by default. Table 2-1 lists the bean scopes that are provided by Spring out of the box.
Table 2.1. Spring Bean Scopes
Scope | Description |
|---|---|
Singleton | Scopes a single bean definition to a single object instance per Spring IoC container. This is the default scope. |
Prototype | Scopes a single bean definition to any number of object instances. |
Request | Scopes a single bean definition to the life cycle of a single HTTP request; that is, each HTTP request has its own instance of a bean created off the back of a single bean definition. This scope is valid only in the context of a web-aware Spring |
Session | Scopes a single bean definition to the life cycle of an HTTP session. This scope is valid only in the context of a web-aware Spring |
Global session | Scopes a single bean definition to the life cycle of a global HTTP session. This scope is valid only in the context of a web-aware Spring |
Simple thread | If for some reason, the request, session, or global session scopes don't satisfy your needs, you may enable the simple thread scope to bind a bean definition to an instance of |
So now you know how to create beans in the Spring ApplicationContext and manage their scope and life cycle. The next piece of the puzzle is how to retrieve those beans from the Spring container within your application.
Enterprise applications are composed of many objects that provide behavior to emulate business processes. Two very important design patterns have emerged to manage the relationships between objects in an object-oriented application:
- Dependency injection (DI):
Classes that employ dependency injection specify the objects that they interact with through constructor arguments, factory method parameters, or public mutators (aka setters). With a dependency-injection container or framework like Spring, the ability to externalize simple class properties is just the beginning. Developers can create a complex tree of dependencies, leaving the work of figuring out how each dependency is created and set (also called injected or wired) to the Spring lightweight container.
- Inversion of Control (IoC):
When object location or instantiation is removed as a responsibility for a given bean and instead left to the framework, control has been inverted. This inversion of control is a very powerful concept and represents the foundation on which the Spring Framework is based.
Dependency injection and IoC lead you down a path toward clean code that embodies high cohesion and loose coupling.
Although frighteningly simple, Spring's use of POJOs as a means of configuration and integration is quite powerful. Consider the example of a fictitious User bean, which could be used in an application to specify user credential information:
<?xml version="1.0" encoding="UTF-8"?>
<beans xmlns=http://www.springframework.org/schema/beans
       xmlns:xsi=http://www.w3.org/2001/XMLSchema-instance
       xsi:schemaLocation="http://www.springframework.org/schema/beans
            http://www.springframework.org/schema/beans/spring-beans-3.0.xsd">

    <bean id="userBean" class="com.prospringhibernate.gallery.User">
        <property name="username" value="admin" />
        <property name="password" value="password" />
    </bean>

</beans>
You can take away several things from the preceding example. The first is that we use horribly insecure passwords. But it does demonstrate how a simple Spring bean is configured via XML.
To make this work on the Java side, we need a valid JavaBean class that looks like the following:
package com.prospringhibernate.gallery;

public class User implements Serializable {

    private String username;
    private String password;

    public User() {
    }

    public String getUsername() {
        return this.username;
    }

    public void setUsername(String name) {
        this.username = name;
    }

    public String getPassword() {
        return this.password;
    }

    public void setPassword(password) {
        this.password = password;
    }

}
Notice that, for each property entity in the Spring XML configuration, we have a corresponding getter and setter defined in the Java class. In Spring terms, this is called setter injection, since the property values are configured by invoking the JavaBean's setter methods.
An alternate approach is to use constructor injection, which allows the property values to be injected via the constructor of the class. To use constructor injection, we refactor our code and Spring configuration as follows:
<?xml version="1.0" encoding="UTF-8"?>
<beans xmlns=http://www.springframework.org/schema/beans
       xmlns:xsi=http://www.w3.org/2001/XMLSchema-instance
       xsi:schemaLocation="http://www.springframework.org/schema/beans
            http://www.springframework.org/schema/beans/spring-beans-3.0.xsd">

    <bean id="userBean" class="com.prospringhibernate.gallery.User">
        <constructor-arg index="0" value="admin" />
        <constructor-arg index="1" value="password" />
    </bean>

</beans>
And here's the corresponding code for the updated User bean:
package com.prospringhibernate.gallery;

public class User implements Serializable {

    private String username;
    private String password;

    public User(String username, String password) {
        this.username = username;
        this.password = password;
    }

    public String getUsername() {
        return this.username;
    }

    public String getPassword() {
        return this.password;
    }

}
Although either approach is valid, we recommend the setter-based approach, as this better conforms to the conventions of JavaBeans and makes your code easier to test later.
In the preceding examples, we injected two string values, which are specified directly within the configuration file. This is a useful shortcut to abstract basic configuration details away from your code and into a more readily changeable file. However, the same concept can be taken a step further for satisfying dependencies between collaborating instances within your application.
For example, let's assume that authentication was implemented in a separate class. In our Spring configuration file, we might have the following:
<?xml version="1.0" encoding="UTF-8"?>
<beans xmlns=http://www.springframework.org/schema/beans
       xmlns:xsi=http://www.w3.org/2001/XMLSchema-instance
       xsi:schemaLocation="http://www.springframework.org/schema/beans
            http://www.springframework.org/schema/beans/spring-beans-3.0.xsd">

    <bean id="userBean" class="com.prospringhibernate.gallery.User">
        <property name="authHandler" ref="authService" />
    </bean>

    <bean id="authService" class="com.prospringhibernate.gallery.AuthService"/>

</beans>
And here's the corresponding code for the updated User bean:
package com.prospringhibernate.gallery;

public class User implements Serializable {

    private AuthenticationService authHandler;

    public User() {
    }

    public AuthenticationService getAuthHandler() {
        return this.authHandler;
    }

    public void setAuthHandler(AuthenticationService authHandler) {
        this.authHandler = authHandler;
    }

}
Simple, isn't it? We just wired up critical parts of our application with a few configuration lines. It's easy to imagine defining code for an alternate authentication service and then simply modifying the bean reference in your Spring configuration to manipulate the behavior of your application.
Earlier, we mentioned that Spring has the tendency to lead developers to write better, cleaner, and more loosely coupled code. You might be starting to pick up on why this is the case. Not only are your classes free of application wiring code, but you'll also find that applications based on Spring are usually more interface-based, meaning that your code is dependent on interfaces rather than specific implementations. This strategy is often called coding to interfaces, and it allows you to easily swap out one implementation for another, simply by altering the class attribute within a Spring bean. As long as your code is written to rely on an interface, and the interface isn't changing, no changes to your class files will be necessary.
For instance, notice that in the preceding example, the User bean depends on an AuthenticationService bean. In your code, a good practice is to define an AuthenticationService interface that specifies core methods related to user access and security. Your code would then reference the AuthenticationService interface, and your Spring configuration would map the concrete implementation class to your User object.
As an oversimplified example, our AuthenticationService interface might look like the following:
package com.prospringhibernate.gallery;

public interface AuthenticationService {
    public User authenticateUser(String username, String password)
      throws AuthenticationException;
}
And our concrete implementation would be something like this:
package com.prospringhibernate.gallery;

public class AuthenticationServiceImpl implements AuthenticationService {

    public User authenticateUser(String username, String password)
      throws AuthenticationException {
        // authentication logic goes here
    }
}
Finally, bringing everything together in our Spring configuration, the userBean then points to a particular implementation of the AuthenticationService interface by using the ref property.
<?xml version="1.0" encoding="UTF-8"?>
<beans xmlns=http://www.springframework.org/schema/beans
       xmlns:xsi=http://www.w3.org/2001/XMLSchema-instance
       xsi:schemaLocation="http://www.springframework.org/schema/beans
            http://www.springframework.org/schema/beans/spring-beans-3.0.xsd">

    <bean id="userBean" class="com.prospringhibernate.gallery.User">
        <property name="authHandler" ref="authService" />
    </bean>

    <bean id="authService" class="com.prospringhibernate.gallery.AuthServiceImpl"/>

</beans>
The key point here is that the User class does not depend directly on the AuthenticationServiceImpl implementation, but rather on the AuthenticationService interface. Although the difference may appear subtle, expressing dependencies on interfaces is an effective means of ensuring your application is loosely coupled. If your code doesn't express any direct coupling to a particular implementation, you will gain the flexibility of defining these details in the Spring configuration, and only in that configuration. In this way, you can easily swap implementations without needing to refactor your code.
No matter what type of library, class, or framework you need to integrate into your application, Spring will allow you to work with these internal and external components cleanly and with a shallow learning curve. This integration without direct coupling is the greatest benefit of IoC. Essentially, the hooks into third-party libraries (or even in-house frameworks and classes) are moved outside the source code and into configuration files (or annotation-based metadata within your classes). This type of configuration lets developers worry less about how the various components of code fit together and focus more on coding the core functionality itself.
Another type of injection is what Spring calls autowiring. This method allows you to simply define getters and setters of a particular type or name, putting on the Spring container the onus of figuring out which class to inject. This very powerful feature comes with some risk as well: should there be some ambiguity as to which instance to inject, you may run into problems. For instance, if you have a class that depends on the AuthenticationService interface and you have a BasicAuthenticationServiceImpl and a RemoteAuthenticationServiceImpl defined in your application (both of which implement the AuthenticationService interface), Spring may get confused as to which implementation you intend to inject.
Up to this point, we've shown how to specify how objects depend on one another in XML configuration files. Over time, XML configurations for enterprise applications grew massive and unwieldy. Beginning with Spring 2.5 and JDK 1.5, another configuration strategy was introduced. Utilizing annotation-based metadata, you can now specify dependency wiring directly within your classes. The advantage of this approach is that a class's dependencies can be expressed directly within the code. The downside is that you don't benefit from having a centralized collection of configuration files that illustrate and document how your application's components are wired.
Which path you take is up to you. Certainly, using annotations does simplify the configuration process. Furthermore, you can mix and match both XML configuration and annotations, allowing some dependencies to be configured within the Spring XML, while other dependencies are detected via annotations.
Here's our User object, revised to use an annotation-based approach.
package com.prospringhibernate.gallery;

import org.springframework.beans.factory.annotation.Autowired;

public class User implements Serializable {

    @Autowired
    private AuthenticationService authHandler;

    public User() {
    }

    public AuthenticationService getAuthHandler() {
        return this.authHandler;
    }

    public void setAuthHandler(AuthenticationService authHandler) {
        this.authHandler = authHandler;
    }

}
Notice the @Autowired annotation above the authHandler member variable. This tells Spring to inject (using the autowiring strategy we discussed earlier) an implementation of the AuthenticationService interface.
In cases where ambiguity could be an issue, Spring provides a means for providing clues to the container by using qualifiers. Qualifiers can be inserted as a separate annotation on an @Autowired field, or within an XML configuration to provide specific hints to the Spring container in order to help disambiguate a situation in which multiple instances of a particular type or interface are present. For instance, we might indicate which AuthenticationService was needed by adding the following annotation:
@Autowired
@Qualifier("basicAuthHandler")
public void setAuthHandler(AuthenticationService authHandler) {
    this.authHandler = authHandler;
}
Now that we have disambiguated which implementation of our AuthenticationService should be injected into the setAuthHandler method listed above, we need to "tag" this dependency so that Spring is able to select the correct instance. In Spring XML, we can provide this hint by including the qualifier element:
<bean id="authHandler" class="com.prospringhibernate.gallery.BasicAuthServiceImpl"/>
    <qualifier value="basicAuthHandler"/>
</bean>
It is also possible to provide disambiguating hints on dependencies by applying the @Qualifier annotation to a class annotated for Spring's component-scanning capability. We will demonstrate these features later in this book. The @Autowired annotation may be applied to more than just member variables. It can also be applied to methods and constructors. Furthermore, the @Qualifier annotation may be applied directly tomethod parameters to target qualification to a specific parameter or to apply different qualifying hints to different parameters within a method or constructor.
All this externalization doesn't seem like a big deal at first, but it really is, and you'll notice that when you begin development. You can simply focus on the implementation without worrying about howa reference from one class can get to another. You learn to simply define setters and getters for the dependencies each class requires, and then leave the wiring to Spring. Imagine some of the alternatives.
Many applications rely on singletons to centralize and hand out references to needed dependencies. This type of strategy will certainly work, but inevitably, your code becomes more about wiring classes together than about your application's core functionality.
Spring and IOC allow you to focus on the application design and business logic, and forget about the wiring. Ron "Ronco" Popeil used the tagline "Set it, and forget it!" in some infomercial. You may find this slogan floating through your head each time you start developing with Spring.
Slick configuration and life-cycle management are really only a small portion of the overall Spring package. Spring also provides powerful integration points to most major frameworks in the Java ecosystem, including many persistence frameworks. This greatly simplifies integrating these frameworks into an application and makes maintenance and development easier overall. Beyond these integration points, Spring also provides a powerful set of AOP and proxying features, which are instrumental for configuring declarative transactions, logging, and remoting. These capabilities make Spring a viable replacement for the enterprise-level features offered by EJB and Java EE application servers.
AOP is often a hard pill for developers to swallow. In truth, it can be a somewhat confusing topic, as it is a fairly new development paradigm. For those experienced in object-oriented methodologies, AOP can seem a bit unconventional.
AOP is a strategy that allows behavior to be injected into code in places across an application. In much the same way that Spring provides a means to inject values and instance references into a bean, AOP allows developers to weave code from one class directly into another. Why on Earth would you ever want to do this? Well, sometimes, you want to apply functionality across a whole slew of classes, but extending from a base class to accomplish this goal doesn't make sense, as the functionality you wish to inject may be orthogonal to the destination class. This notion is often called cross-cutting concerns, because the intention with AOP is to apply functionality across a series of classes that has little to do with the main purposes of those classes.
For example, say you have a few classes that are designed to store and retrieve data to and from a relational database. As part of this implementation, you may wish to do some auditing (for example, to track details of each successive write operation). Extending from a base auditing class isn't a viable or proper way to accomplish this task. If you extend from any class at all, you probably want to inherit behavior that relates more to manipulating your domain model and saving data (you don't want to inherit auditing behavior). In this example, we might say that auditing functionality is orthogonal to the core persistence functionality (that is, completely independent of it). Furthermore, the auditing aspects of the code can be applied in a reasonably similar and standard fashion across all the application code. This is the perfect scenario for AOP. You can apply aspects of the unrelated auditing functionality across all of the classes that aim to handle image gallery logic.
The way AOP works in practice is fairly simple: a class's methods can be altered so that new functionality can be injected before, after, or around (essentially, before and after) a method is called. So, in the case of an auditing aspect, you could inject a block of code that writes a row in a database (constituting a piece of an overall auditing trail) each time a method within a category of methods is called.
A similar scenario concerns security. A security check can be inserted into your core data-access code to ensure appropriate permissions or roles are verified each time certain methods are called. The interesting part of this approach is that you can keep the security code entirely separate from your core implementation (which no longer needs to worry about the implementation details of security). This leads to cleaner code, as your core application need not get bogged down with details of your security implementation.
Furthermore, it is often useful to have distinct teams manage features that are disparate. AOP makes this feasible, as security-related code can be crafted by experts in this domain, while the application business logic is developed and maintained by a different team. By ensuring these two facets don't intermingle (from a code standpoint), specialization becomes more attainable. These two distinct pieces of functionality can be developed and maintained entirely separately, leading to cleaner and more loosely coupled code.
This ability to intercept method calls and introduce, or inject, new functionality is the secret sauce behind Spring's support for declarative transactions. Using Spring's declarative transaction support, you can advise your persistence facade layer with transactional semantics. We'll cover transactions in detail in Chapter 7, but to illustrate the separation of concerns offered by AOP, we'll leave you with this snippet of code as a teaser:
public class ServiceFacadeImpl implements ServiceFacade {

    @Transactional(readOnly = false, propagation = Propagation.REQUIRES_NEW)
    public void save(Map map) {
        // business logic goes here
    }

}
By simply annotating this method as @Transactional, Spring can enforce the transaction semantics specified, without requiring that you write any code to start and complete a transaction in the body of the save method. Don't worry about the details associated with the annotation for now. Just know that externalizing this logic via AOP enables modifications to the transaction implementation without requiring you to refactor all the portions of the code base that depend on it. Similarly, you can be confident that changes to the core business logic won't break the transaction semantics.
In this chapter, you've learned about the fundamental concepts that power the Spring Framework. You saw how to bootstrap a Spring ApplicationContext, learned the basics of configuring bean dependencies in Spring XML configuration files, and developed an understanding of bean scopes and life cycles. The benefits of dependency injection are now clear. You can effectively delegate to the Spring container to manage and resolve your application dependencies, and doing so can help keep your application's dependencies loosely coupled. Finally, you were given a glimpse into the power of managing orthogonal coding concerns with AOP.
Throughout the rest of this book, we will build on the Spring concepts introduced in this chapter to define and implement an art gallery application.