
Most of the SportsStore application is now complete. Here's a recap of the progress you've made with it:
In Chapter 4, you created a simple domain model, including the
Productclass and its database-backed repository, and installed other core infrastructure pieces such as the DI container.In Chapter 5, you went on to implement the classic UI pieces of an e-commerce application: navigation, a shopping cart, and a checkout process.
For this final SportsStore chapter, your key goal will be to give site administrators a way of updating their product catalog. In this chapter, you'll learn the following:
How to let users edit a collection of items (creating, reading, updating, and deleting items in your domain model), validating each submission
How to use Forms Authentication and filters to secure controllers and action methods, presenting suitable login prompts when needed
How to receive file uploads
How to display images that are stored in your SQL database
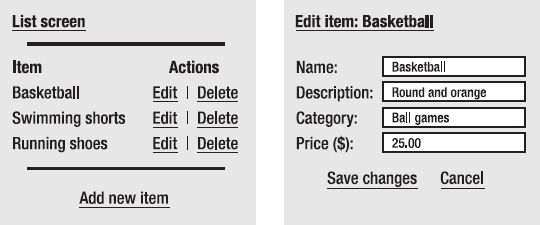
The usual software convention for managing collections of items is to present the user with two types of screens: list and edit (Figure 6-1). Together, these allow a user to create, read, update, and delete items in that collection. (Collectively, these features are known by the acronym CRUD.)
CRUD is one of those features that web developers have to implement frequently—so frequently, in fact, that Visual Studio tries to help by offering to automatically generate CRUD-related controllers and view templates for your custom model objects.
Note
In this chapter, we'll use Visual Studio's built-in templates occasionally. However, in most cases we'll edit, trim back, or entirely replace the automatically generated CRUD code, because we can make it much more concise and better suited to our task. After all, SportsStore is supposed to be a fairly realistic application, not just demoware specially crafted to make ASP.NET MVC look good.
Let's implement a simple CRUD UI for SportsStore's product catalog. Rather than overburdening ProductsController, create a new controller class called AdminController (right-click the /Controllers folder and choose Add
Note
I made the choice to create a new controller here, rather than simply extend ProductsController, as a matter of personal preference. There's actually no limit to the number of action methods you can put on a single controller. As with all object-oriented programming, you're free to arrange methods and responsibilities any way you like. Of course, it's preferable to keep things organized, so think about the single responsibility principle and break out a new controller when you're switching to a different segment of the application.
If you're interested in seeing the CRUD code that Visual Studio generates, check "Add action methods for Create, Update, and Details scenarios" before clicking Add. It will generate a class that looks like the following:[40]
public class AdminController : Controller
{
    public ActionResult Index() { return View(); }

    public ActionResult Details(int id) { return View(); }

    public ActionResult Create() { return View(); }

    [HttpPost]
    public ActionResult Create(FormCollection collection)
    {
        try {
            // To do: Add insert logic here
            return RedirectToAction("Index");
        }
        catch {
            return View();
        }
    }

    public ActionResult Delete(int id) { return View(); }

    [HttpPost]
    public ActionResult Delete(int id, FormCollection collection)
    {
        try {
            // To do: Add delete logic here
            return RedirectToAction("Index");
        }
        catch {
            return View();
}
}
public ActionResult Edit(int id) { return View(); }
[HttpPost]
public ActionResult Edit(int id, FormCollection collection)
{
try {
// To do: Add update logic here
return RedirectToAction("Index");
}
catch {
return View();
}
}
}The automatically generated code isn't ideal for SportsStore. Why?
It's not yet clear that we're actually going to need all of those methods. Do we really want a
Detailsaction?Instead of receiving
FormCollectionobjects that just hold a set of name/value pairs, it would be tidier for our action methods to use model binding to receive editedProductinstances as parameters.We definitely don't want to catch and swallow all possible exceptions, as
Create(), Edit(), andDelete()all do by default, as that would ignore and discard important information such as errors thrown by the database when trying to save records.
Don't misunderstand: I'm not saying that using Visual Studio's code generation is always wrong. In fact, the whole system of controller and view code generation can be customized using the powerful T4 templating engine. It's possible to create and share code templates that are ideally suited to your own application's conventions and design guidelines. It could be a fantastic way to get new developers quickly up to speed with your coding practices. However, in this case we'll write code manually, because it isn't difficult and it will give you a better understanding of how ASP.NET MVC works.
So, rip out all the automatically generated action methods from AdminController, and then add a constructor parameter dependency on the products repository, as follows:
public class AdminController : Controller
{
    private IProductsRepository productsRepository;
    public AdminController (IProductsRepository productsRepository)
    {
        this.productsRepository = productsRepository;
    }
}To support the list screen (shown in Figure 6-1), you'll need to add an action method that displays all products. Following ASP.NET MVC conventions, let's call it Index. Add a new action method to AdminController:
public ViewResult Index()
{
    return View(productsRepository.Products.ToList());
}
(Of course, you can specify this through a unit test if you wish.) You now just need to create a suitable view that renders those products into a grid, and then the CRUD list screen will be complete.
Actually, before we add a new view to act as the view for this action, let's create a new master page for the whole administrative section. In Solution Explorer, right-click the /Views/Shared folder, choose Add
<%@ Master Language="C#" Inherits="System.Web.Mvc.ViewMasterPage" %>
<!DOCTYPE html PUBLIC "-//W3C//DTD XHTML 1.0 Transitional//EN"
          "http://www.w3.org/TR/xhtml1/DTD/xhtml1-transitional.dtd">
<html xmlns="http://www.w3.org/1999/xhtml">
    <head runat="server">
        <link rel="Stylesheet" href="~/Content/adminstyles.css" />
        <title><asp:ContentPlaceHolder ID="TitleContent" runat="server" /></title>
    </head>
    <body>
        <asp:ContentPlaceHolder ID="MainContent" runat="server" />
    </body>
</html>
This master page references a CSS file, so create one called adminstyles.css in the /Content folder, containing the following:
BODY, TD { font-family: Segoe UI, Verdana }
H1 { padding: .5em; padding-top: 0; font-weight: bold;
     font-size: 1.5em; border-bottom: 2px solid gray; }
DIV#content { padding: .9em; }
TABLE.Grid TD, TABLE.Grid TH { border-bottom: 1px dotted gray; text-align:left; }
TABLE.Grid { border-collapse: collapse; width:100%; }
TABLE.Grid TH.NumericCol, Table.Grid TD.NumericCol {
    text-align: right; padding-right: 1em; }
DIV.Message { background: gray; color:White; padding: .2em; margin-top:.25em; }

.field-validation-error { color: red; display: block; }
.field-validation-valid { display: none; }
.input-validation-error { border: 1px solid red; background-color: #ffeeee; }
.validation-summary-errors { font-weight: bold; color: red; }
.validation-summary-valid { display: none; }
Now that you've created the master page, you can add a view for AdminController's Index action. Right-click inside the action method and choose Add View, and then configure the new view, as shown in Figure 6-2. Notice that the master page is set to Admin.Master (not the usual Site.Master). Also, on this occasion we're asking Visual Studio to prepopulate the new view with markup to render a list of Product instances.
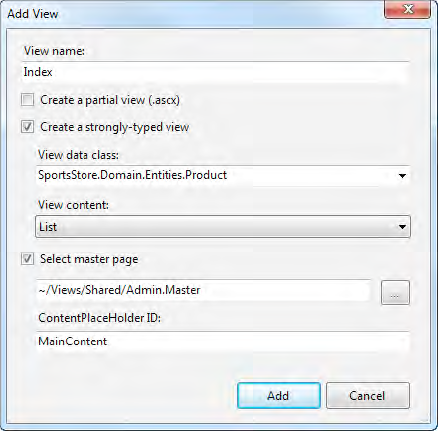
Note
When you set "View content" to List, Visual Studio implicitly assumes that the view data class should be IEnumerable<yourclass>. This means you don't need to type in IEnumerable<...> manually.
When you click Add, Visual Studio will inspect your Product class definition, and will then generate markup for rendering a grid of Product instances (with a column for each property on the class). The default markup is a bit verbose and needs some tweaking to match our CSS rules. Edit it to form the following:
<%@ Page Language="C#" MasterPageFile="~/Views/Shared/Admin.Master"
         Inherits="ViewPage<IEnumerable<SportsStore.Domain.Entities.Product>>" %>
<asp:Content ContentPlaceHolderID="TitleContent" runat="server">
        Admin : All Products
</asp:Content>
<asp:Content ContentPlaceHolderID="MainContent" runat="server">
   <h1>All Products</h1>
   <table class="Grid">
       <tr>
           <th>ID</th>
           <th>Name</th>
           <th class="NumericCol">Price</th>
<th>Actions</th>
</tr>
<% foreach (var item in Model) { %>
<tr>
<td><%: item.ProductID %></td>
<td><%: Html.ActionLink(item.Name,"Edit",new {item.ProductID})%></td>
<td class="NumericCol"><%: item.Price.ToString("c") %></td>
<td>
<% using (Html.BeginForm("Delete", "Admin")) { %>
<%: Html.Hidden("ProductID", item.ProductID) %>
<button type="submit">Delete</button>
<% } %>
</td>
</tr>
<% } %>
</table>
<p><%: Html.ActionLink("Add a new product", "Create") %></p>
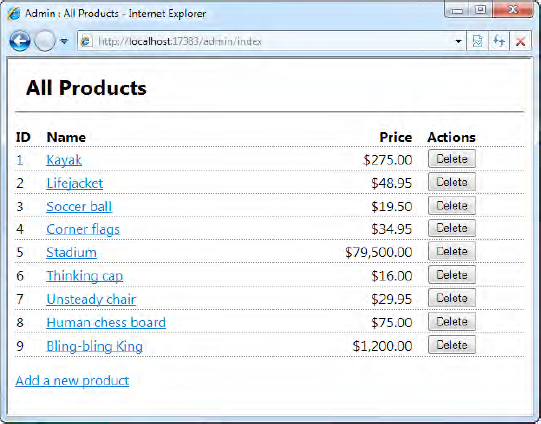
</asp:Content>You can check this out by launching the application in Debug mode (press F5), and then pointing your browser at http://localhost:port/Admin/Index, as shown in Figure 6-3.
The list screen is now done. None of its links or buttons work yet, however, because they point to action methods that you haven't yet created. So let's add them next.
To provide "create" and "update" features, we'll now add a product-editing screen along the lines of Figure 6-1. There are two halves to its job: first, displaying the edit screen, and second, handling the user's submissions.
As in previous examples, we'll create one method that responds to GET requests and renders the initial form, and a second method that responds to POST requests and handles form submissions. The second method should write the incoming data to the repository and redirect the user back to the Index action.
All Edit() needs to do is retrieve the requested product and pass it as Model to some view. Here's the code you need to add to the AdminController class:
public ViewResult Edit(int productId)
{
    var product = productsRepository.Products.First(x => x.ProductID == productId);
    return View(product);
}Of course, you'll need to add a view for this. Add a new view for the Edit action, specifying Admin.Master as its master page, and making it strongly typed for the Product class.
If you like, you can set the "View content" option to Edit, which will cause Visual Studio to generate a basic Product-editing view. However, the resulting markup is again somewhat verbose and much of it is not required. Either set "View content" to Empty, or at least edit the generated markup to form the following:
<%@ Page Language="C#" MasterPageFile="~/Views/Shared/Admin.Master"
         Inherits="System.Web.Mvc.ViewPage<SportsStore.Domain.Entities.Product>" %>

<asp:Content ContentPlaceHolderID="TitleContent" runat="server">
        Admin : Edit <%: Model.Name %>
</asp:Content>
<asp:Content ContentPlaceHolderID="MainContent" runat="server">
<h1>Edit <%: Model.Name %></h1>
<% using(Html.BeginForm()) { %>
<%: Html.EditorForModel() %>
<input type="submit" value="Save" />
<%: Html.ActionLink("Cancel and return to List", "Index") %>
<% } %>
</asp:Content>Instead of writing out markup for each of the labels and text boxes by hand, in this view we're using Html.EditorForModel() to construct the whole UI by convention. At runtime, ASP.NET MVC will inspect the Product model type and work out what UI elements will be needed to edit a model of that type. The result won't necessarily meet your requirements in all situations, but it will be perfectly adequate for our current task. You'll learn much more about these templated view helpers—the pros and cons of the approach, and multiple ways to customize the results—in Chapter 12.
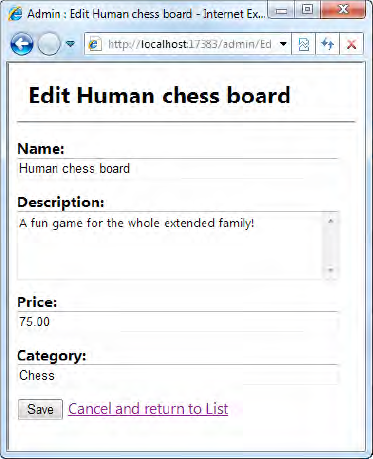
When you first visit the product-editing screen (by browsing to /Admin/Index and then clicking any of the product names), you'll see the page shown in Figure 6-4.
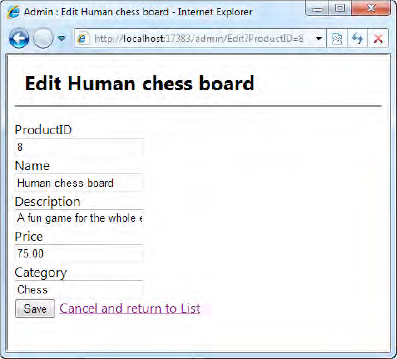
Let's be honest—you're not going to get a job at Apple by creating user interfaces like that. First, it doesn't make sense for a user to edit ProductID, and second, the Description text box is way too small. We can fix those issues using model metadata. By applying attributes to our model class, we can influence the output of Html.EditorForModel().
Add the following two metadata attributes to the Product class:
[Table(Name = "Products")]
public class Product
{
    [HiddenInput(DisplayValue = false)] // See the following note
    [Column(IsPrimaryKey = true, IsDbGenerated = true, AutoSync=AutoSync.OnInsert)]
    public int ProductID { get; set; }

    [Column] public string Name { get; set; }

    [DataType(DataType.MultilineText)]
    [Column] public string Description { get; set; }

    [Column] public decimal Price { get; set; }
    [Column] public string Category { get; set; }
}
Note
An unfortunate quirk of the Data Annotations metadata attributes is that they don't have any way to say that a property should be rendered as a hidden field. The ASP.NET MVC team plugged this gap by creating their own extra metadata attribute, [HiddenInput], which you can see in the preceding code listing. The drawback is that HiddenInputAttribute lives in the System.Web.Mvc.dll assembly, so you'll now have to reference that assembly from your SportsStore.Domain project before you can compile this code.
If you really don't want to let your domain project know about ASP.NET MVC, you could instead replace the [HiddenInput] attribute with [ScaffoldColumn(false)] (which is in the Data Annotations namespace) so that the view template wouldn't generate any markup for the ProductID property. Then, to avoid losing the information about which product the user was editing, you'd also need to add <%: Html.HiddenFor(x => x.ProductID) %> anywhere inside the product editor form. You'll find more details about all these metadata attributes and templated view helpers in Chapter 12.
As you can probably guess (and will see in more detail in Chapter 12), [HiddenInput] tells the UI template to produce a hidden input control rather than a visible text box, and [DataType] lets you influence how values are presented and edited. Also, since ASP.NET MVC's built-in default editor templates apply a range of CSS classes to the elements they render (look at your page's HTML source to see which CSS classes), you can influence their appearance further by adding the following rules to /Content/adminstyles.css:
.editor-field { margin-bottom: .8em; }
.editor-label { font-weight: bold; }
.editor-label:after { content: ":" }
.text-box { width: 25em; }
.multi-line { height: 5em; font-family: Segoe UI, Verdana; }
With all these changes in place, the product editor screen should now appear as shown in Figure 6-5.
That's still fairly basic, but much more usable. Let's now move on to complete the editing functionality.
If you submit this product editor form, the same form will just reappear, having lost any changes you made to the input fields. That's because the form issues a POST request to the same URL from which it was generated, and that URL invokes the Edit action, and that in turn just renders that same product editor form again.
What we must add now is another Edit action, but this time one that specifically catches POST requests and does something more useful with them.
You can't get very far with saving an updated Product to the repository until IProductsRepository offers some kind of save method (and if you're following in TDD style, your last test will be causing compiler errors for want of a SaveProduct() method). Update IProductsRepository:
public interface IProductsRepository
{
    IQueryable<Product> Products { get; }
    void SaveProduct(Product product);
}
You'll now get more compiler errors because neither of your two concrete implementations, FakeProductsRepository and SqlProductsRepository, expose a SaveProduct() method. It's always party time with the C# compiler! To FakeProductsRepository, you can simply add a stub that throws a NotImplementedException, but for SqlProductsRepository, add a real implementation:
public void SaveProduct(Product product)
{
    // If it's a new product, just attach it to the DataContext
    if (product.ProductID == 0)
productsTable.InsertOnSubmit(product);
else if (productsTable.GetOriginalEntityState(product) == null)
{
// We're updating an existing product, but it's not attached to
// this data context, so attach it and detect the changes
productsTable.Attach(product);
productsTable.Context.Refresh(RefreshMode.KeepCurrentValues, product);
}
productsTable.Context.SubmitChanges();
}At this point, you're ready to implement a POST-handling overload of the Edit() action method on AdminController. The view at /Views/Admin/Edit.aspx generates input controls with names corresponding to the properties on Product, so when the form posts to an action method, you can use model binding to receive a Product instance as an action method parameter. All you have to do then is save it to the repository. Here goes:
[HttpPost]
public ActionResult Edit(Product product)
{
if (ModelState.IsValid) {
productsRepository.SaveProduct(product);
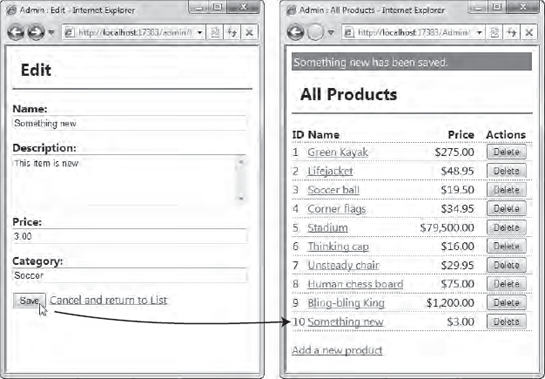
TempData["message"] = product.Name + " has been saved.";
return RedirectToAction("Index");
}
else // Validation error, so redisplay same view
return View(product);
}Notice that after the data gets saved, this action adds a confirmation message to the TempData collection. So, what's TempData? ASP.NET Web Forms has nothing corresponding to TempData, although other web application platforms do. It's like the Session collection, except that its values survive only until the end of the next HTTP request in which you read them back, and then they're ejected. In this way, TempData tidies up after itself automatically, making it easy to preserve data (e.g., status messages) across HTTP redirections, but for no longer.
Since the value in TempData["message"] will be preserved until we read it back, you can display it after the HTTP 302 redirection by adding code to the /Views/Shared/Admin.Master master page file:
...
<body>
    <% if(TempData["message"] != null) { %>
        <div class="Message"><%: TempData["message"] %></div>
    <% } %>
    <asp:ContentPlaceHolder ID="MainContent" runat="server" />
</body>
...
Give it a whirl in your browser. You can now update Product records, and get a cute confirmation message each time you do! (See Figure 6-6.)

If you reload the product list screen (either by pressing F5, or by navigating elsewhere and then coming back), the confirmation message will have vanished, because the act of reading it back flags it for deletion at the end of the HTTP request. That's very convenient; we don't want old messages sticking around. You'll find more details about TempData in Chapter 9.
As always, you'd better not forget about validation. Right now, somebody could come along and put in blank product names or negative prices. The horror! We'll handle that in the same way that we handled validation on ShippingDetails in Chapter 5.
Add some Data Annotations validation attributes to the Product class as follows:
[Table(Name = "Products")]
public class Product
{
    [ScaffoldColumn(false)]
    [Column(IsPrimaryKey = true, IsDbGenerated = true, AutoSync=AutoSync.OnInsert)]
    public int ProductID { get; set; }

    [Required(ErrorMessage = "Please enter a product name")]
    [Column] public string Name { get; set; }

    [Required(ErrorMessage = "Please enter a description")]
    [DataType(DataType.MultilineText)]
[Column] public string Description { get; set; }
[Required]
[Range(0.01, double.MaxValue, ErrorMessage = "Please enter a positive price")]
[Column] public decimal Price { get; set; }
[Required(ErrorMessage = "Please specify a category")]
[Column] public string Category { get; set; }
}Tip
If you feel that having all these attributes is starting to crowd out the domain model's properties themselves, you can actually move the attributes to a different class and tell ASP.NET MVC where to find them. For details, see the section "Using [MetadataType] to Define Metadata on a Buddy Class" in Chapter 12.
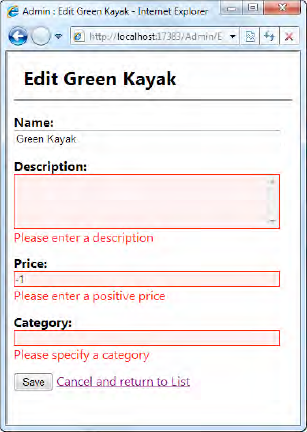
These rules will be detected and used by ASP.NET MVC's model binding system. Since the Html.EditorForModel() helper automatically displays any validation error messages associated with each property, you can now try to submit an invalid form and you'll get feedback, as shown in Figure 6-7.
Currently, your validation rules apply only after the user submits the form to the server. Most web users expect to be given immediate feedback about the validity of their data entry, which is why web developers often want to run their validation rules in the browser (i.e., on the client side) as well as on the server. Fortunately, that's easy when you're using ASP.NET MVC 2 with validation rules expressed as Data Annotations attributes (or if you express your rules using another suitable validation provider).
Your SportsStore.WebUI project's Scripts folder already contains the necessary JavaScript libraries. You just need to reference them from your master page. Update Admin.Master by adding <script> tags to the bottom of the <body> element as follows:[41]
<body>
    ... leave everything else as is ...

    <script src="<%: Url.Content("~/Scripts/MicrosoftAjax.js")%>"
            type="text/javascript"></script>
    <script src="<%: Url.Content("~/Scripts/MicrosoftMvcValidation.js")%>"
            type="text/javascript"></script>
</body>
Now, all you have to do to activate client-side validation for any given form is to write <% Html.EnableClientValidation(); %> immediately above it. So, update Edit.aspx as follows:
<% Html.EnableClientValidation(); %>
<% using(Html.BeginForm()) { %>
    ... leave the rest as before ...
When a form is rendered after Html.EnableClientValidation(), the form keeps track of which model properties might have validation messages to display, and then it emits a JavaScript Object Notation (JSON) description of the rules associated with these properties. Then, MicrosoftMvcValidation.js finds and enforces these rules, so now the validation messages appear and disappear dynamically as the user fills out the form.
You'll learn more about client-side validation in Chapter 12, including how to implement custom client-side validation logic.
I'm not sure whether you've noticed, but the administrative list screen currently has an "Add a new product" link. It goes to a 404 Not Found error, because it points to an action method called Create, which doesn't yet exist.
You need to create a new action method, Create(), that deals with adding new Product objects. That's easy: all you have to do is render a blank new Product object in the existing edit screen. When the user clicks Save, the existing code should save their submission as a new Product object. So, to render a blank Product into the existing /Views/Admin/Edit.aspx view, add the following to AdminController:
public ViewResult Create()
{
    return View("Edit", new Product ());
}
The Create() method does not render its default view, but instead chooses to render the existing /Views/Admin/Edit.aspx view. This illustrates that it's perfectly OK for an action method to render a view that's normally associated with a different action method, but if you actually run the application, you'll find that it also illustrates a problem that can happen when you do this.
Typically, you expect the /Views/Admin/Edit.aspx view to render an HTML form that posts to the Edit action on AdminController. However, /Views/Admin/Edit.aspx renders its HTML form by calling Html.BeginForm() and passing no parameters, which actually means that the form should post to whatever URL the user is currently visiting. In other words, when you render the Edit view from the Create action, the HTML form will post to the Create action, not to the Edit action.
In this case, we always want the form to post to the Edit action, because that's where we've put the logic for saving Product instances to the repository. So, edit /Views/Admin/Edit.aspx, specifying explicitly that the form should post to the Edit action:
<% using (Html.BeginForm("Edit", "Admin")) { %>Now the Create functionality will work properly, as shown in Figure 6-8. Validation will happen out of the box, because you've already coded that into the Edit action.
Deletion is similarly trivial. Your product list screen already renders, for each product, a button that triggers a POST request to an as-yet-unimplemented action called Delete.
To get this working, you'll first need to add a delete method to IProductsRepository:
public interface IProductsRepository
{
    IQueryable<Product> Products { get; }
    void SaveProduct(Product product);
    void DeleteProduct(Product product);
}
Here's an implementation for SqlProductsRepository (you can just throw a NotImplementedException in FakeProductsRepository):
public void DeleteProduct(Product product)
{
    productsTable.DeleteOnSubmit(product);
    productsTable.Context.SubmitChanges();
}
Next, add a Delete action to AdminController. This should respond only to POST requests, because deletion is a write operation. As I'll discuss more in Chapter 8, the HTTP specification says that you shouldn't use GET requests for write operations because browsers and caching devices should be free to perform GET requests automatically without being asked by a user.
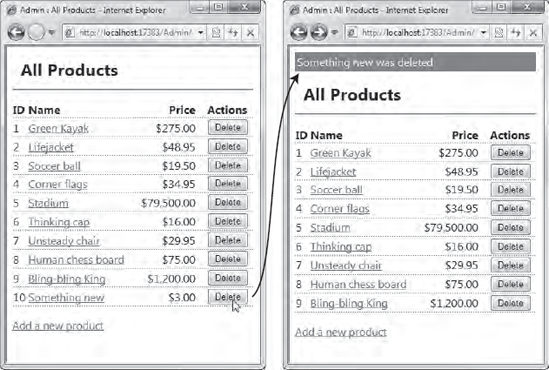
Here's the Delete() action method for AdminController. This results in the functionality shown in Figure 6-9.
public RedirectToRouteResult Delete(int productId)
{
    var product = productsRepository.Products.First(x => x.ProductID == productId);
    productsRepository.DeleteProduct(product);
    TempData["message"] = product.Name + " was deleted";
    return RedirectToAction("Index");
}
And that's it for catalog management CRUD: you can now create, read, update, and delete Product records.
Hopefully it hasn't escaped your attention that if you deployed this application right now, anybody could visit http://yourserver/Admin/Index and play havoc with your product catalog. You need to stop this by password-protecting the entire AdminController.
ASP.NET MVC is built on the core ASP.NET platform, so you automatically have access to ASP.NET's Forms Authentication facility, which is a general purpose system for keeping track of who's logged in. It can be connected to a range of login UIs and credential stores, including custom ones. You'll learn about Forms Authentication in more detail in Chapter 17, but for now, let's set it up in a simple way.
Open up your Web.config file and find the <authentication> node:
<authentication mode="Forms">
    <forms loginUrl="~/Account/LogOn" timeout="2880"/>
</authentication>
As you can see, brand new ASP.NET MVC applications are already set up to use Forms Authentication by default. The loginUrl setting tells Forms Authentication that when it's time for a visitor to log in, it should redirect them to /Account/LogOn (which should produce an appropriate login page).
Note
The other main authentication mode is Windows Authentication, which means that the web server (IIS) is responsible for determining each HTTP request's security context. That's great if you're building an intranet application in which the server and all client machines are part of the same Windows domain. Your application will be able to recognize visitors by their Windows domain logins and Active Directory roles.
However, Windows Authentication isn't so great for applications hosted on the public Internet, because no such security context exists there. That's why you have another option, Forms Authentication, which relies on you providing some other means of authentication (e.g., your own database of login names and passwords). Then Forms Authentication remembers that the visitor is logged in by using browser cookies. That's basically what you want for SportsStore.
Since we started this whole project using the ASP.NET MVC 2 Empty Web Application template, we don't currently have any AccountController. If instead we had chosen the nonempty project template, we'd have been given a suggested implementation of AccountController and its LogOn action, which uses the core ASP.NET membership facility to manage user accounts and passwords. You'll learn more about membership and how you can use it with ASP.NET MVC in Chapter 17. For this chapter's application, however, such a heavyweight system would have been overkill.
You'll learn more by implementing your own login system. It can be quite simple. Start by updating the <authentication> node in your Web.config file:
<authentication mode="Forms">
  <forms loginUrl="~/Account/LogOn" timeout="2880">
    <credentials passwordFormat="SHA1">
      <user name="admin" password="e9fe51f94eadabf54dbf2fbbd57188b9abee436e" />
    </credentials>
  </forms>
</authentication>
Although most applications using Forms Authentication store credentials in a database, here you're keeping things very basic by configuring a hard-coded list of usernames and passwords. Presently, this credentials list includes only one login name, admin, with the password mysecret (e9fe51f... is the SHA1 hash of mysecret).
Tip
Is there any benefit in storing a hashed password rather than a plain text one? Yes, a little. It makes it harder for someone who reads your Web.config file to use any login credentials they find (they'd have to invert the hash, which is hard or impossible depending on the strength of the password you've hashed). If you're not worried about someone reading your Web.config file (e.g., because you don't think anyone else has access to your server), you can configure passwords in plain text by setting passwordFormat="Clear". Of course, in most applications, this is irrelevant because you won't store credentials in Web.config at all; credentials will usually be stored (suitably hashed and salted) in a database. See Chapter 17 for more details.
So far, so good—you've configured Forms Authentication, but as yet it doesn't make any difference. The application still doesn't require anyone to log in. You could enforce authentication by putting code like this at the top of each action method you want to secure:
if (!Request.IsAuthenticated)
    FormsAuthentication.RedirectToLoginPage();
That would work, but it gets tiresome to keep sprinkling these same two lines of code onto every administrative action method you write. And what if you forget one?
ASP.NET MVC has a powerful facility called filters. These are .NET attributes that you can "tag" onto any action method or controller, plugging some extra logic into the request handling pipeline. There are different types of filters—action filters, error handling filters, authorization filters—that run at different stages in the pipeline, and the framework ships with default implementations of each type. You'll learn more about using each type of filter and creating your own custom ones in Chapter 10.
Right now, you can use the default authorization filter,[42] [Authorize]. Simply decorate the AdminController class with [Authorize]:
[Authorize]
public class AdminController : Controller
{
    // ... etc
}
Tip
You can attach filters to individual action methods, but attaching them to the controller itself (as in this example) makes them apply to all action methods on that controller.
So, what effect does this have? Try it out. If you try to visit /Admin/Index now (or access any action method on AdminController), you'll get the error shown in Figure 6-10.
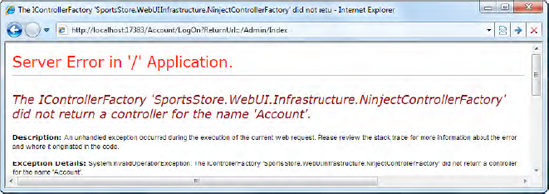
Figure 6-10. An unauthenticated visitor gets redirected to /Account/LogOn, where there is no matching controller.
Notice the address bar. It reads as follows:
/Account/LogOn?ReturnUrl=/Admin/Index
This shows that Forms Authentication has kicked in and redirected the visitor to the URL you configured in Web.config (helpfully keeping a record of the original URL they requested in a query string parameter called ReturnUrl). However, there isn't yet any controller to match the URL; hence the error.
Your next step is to handle these requests for /Account/LogOn, by adding a controller called AccountController with an action called LogOn.
There will be a method called
LogOn()that renders a view for a login prompt.There will be another overload of
LogOn()that handles POST requests specifically. This overload will ask Forms Authentication to validate the name/password pair.If the credentials are valid, it will tell Forms Authentication to consider the visitor logged in, and will redirect the visitor back to whatever URL originally triggered the
[Authorize]filter.If the credentials are invalid, it will simply redisplay the login prompt (with a suitable validation error message).
To achieve all this, let's first create a simple view model class to describe the data we're working with. It may seem trivial in this case, but being in the habit of keeping your data strongly typed makes controllers and views consistent and simpler in the long run. Plus, it means we can use templated view helpers and model binding more easily. Add the following to your Models folder:
public class LogOnViewModel
{
    [Required] public string UserName { get; set; }
    [Required] [DataType(DataType.Password)] public string Password { get; set; }
}
Next, create a new controller called AccountController, adding the following action methods:
public class AccountController : Controller
{
   public ViewResult LogOn()
   {
       return View();
   }

   [HttpPost]
   public ActionResult LogOn(LogOnViewModel model, string returnUrl)
   {
       if (ModelState.IsValid) // No point trying authentication if model is invalid
           if (!FormsAuthentication.Authenticate(model.UserName, model.Password))
               ModelState.AddModelError("", "Incorrect username or password");

       if (ModelState.IsValid)
       {
           // Grant cookie and redirect (to admin home if not otherwise specified)
           FormsAuthentication.SetAuthCookie(model.UserName, false);
           return Redirect(returnUrl ?? Url.Action("Index", "Admin"));
       } else
           return View();
   }
}
You'll also need a suitable view for these LogOn() action methods. Add one by right-clicking inside one of the LogOn() methods and choosing Add View. Ensure "Create a strongly typed view" is checked, and choose SportsStore.WebUI.Models.LogOnViewModel as the view data class.[43] For "Master page," specify ~/Views/Shared/Admin.Master.
Here's the markup needed to render a simple login form:
<%@ Page Language="C#" MasterPageFile="~/Views/Shared/Admin.Master"
         Inherits="ViewPage<SportsStore.WebUI.Models.LogOnViewModel>" %>
<asp:Content ContentPlaceHolderID="TitleContent" runat="server">
        Admin : Log In
</asp:Content>
<asp:Content ContentPlaceHolderID="MainContent" runat="server">
    <h1>Log In</h1>

    <p>Please log in to access the administrative area:</p>
    <% Html.EnableClientValidation(); %>
    <% using(Html.BeginForm()) { %>
        <%: Html.ValidationSummary(true) %>
        <%: Html.EditorForModel() %>
        <p><input type="submit" value="Log in" /></p>
    <% } %>
</asp:Content>
The [Required] rules on UserName and Password will be enforced on both the client and the server, and the actual authentication (i.e., calling FormsAuthentication.Authenticate()) will be enforced only on the server. You can see how the view will look in Figure 6-11.
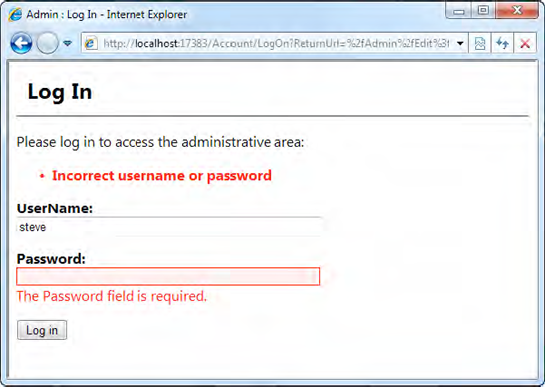
Note
When AccountController detects an authorization failure (e.g., because the user entered an incorrect password), it registers a validation error in ModelState using an empty string as the key parameter. That makes it a model-level error rather than a property-level error, because it's not associated with any single property. Our view then displays model-level errors using a validation summary list by calling Html.ValidationSummary(true). The parameter, true, tells the validation summary to exclude property-level errors and display only model-level errors. Without this parameter, you'd find that property-specific errors would appear both in the validation summary and next to the property's input control.
This takes care of handling login attempts. Only after supplying valid credentials (i.e., admin/mysecret) will visitors be granted an authentication cookie and thus be allowed to access any of the action methods on AdminController.
Warning
When you're sending login details from browser to server, it's best to encrypt the transmission with SSL (i.e., over HTTPS). To do this, you need to set up SSL on your web server, which is beyond the scope of this chapter—Visual Studio's built-in web server doesn't support it. See the IIS documentation for details on how to configure SSL.
Let's finish the whole SportsStore application by implementing something slightly more sophisticated: the ability for administrators to upload product images, store them in the database, and display them on product list screens.
To get started, add two extra fields to the Product class, which will hold the image's binary data and its MIME type (to specify whether it's a JPEG, GIF, PNG, or other type of file):
[Table(Name = "Products")]
public class Product
{
    // Rest of class unchanged

[Column] public byte[] ImageData { get; set; }[ScaffoldColumn(false)][Column] public string ImageMimeType { get; set; }}
We don't want either of these properties to be directly visible in the product-editing UI. We can use [ScaffoldColumn(false)] to exclude ImageMimeType from the automatically generated UI. We don't need to give any hints about ImageData because ASP.NET MVC's built-in object editor template won't scaffold byte[] properties anyway—it only scaffolds properties of "simple" types like string, int, and DateTime.[44]
Next, use Server Explorer (or SQL Server Management Studio) to add corresponding columns to the Products table in your database (Figure 6-12).

Save the updated table definition by pressing Ctrl+S.
Next, add a file upload UI to /Views/Admin/Edit.aspx:
<h1>Edit <%: Model.Name %></h1>

<% Html.EnableClientValidation(); %>
<% using(Html.BeginForm("Edit", "Admin")) { %>
    <%: Html.EditorForModel() %>
<div class="editor-label">Image</div><div class="editor-field"><% if (Model.ImageData == null) { %>None<% } else { %><img src="<%: Url.Action("GetImage", "Products",new { Model.ProductID }) %>" /><% } %><div>Upload new image: <input type="file" name="Image" /></div></div><input type="submit" value="Save" /> <%: Html.ActionLink("Cancel and return to List", "Index") %> <% } %>
Notice that if the Product being displayed already has a non-null value for ImageData, the view attempts to display that image by rendering an <img> tag referencing a not-yet-implemented action on ProductsController called GetImage. We'll come back to that in a moment.
In case you weren't aware, web browsers will only upload files properly when the <form> tag defines an enctype value of multipart/form-data. In other words, for a successful upload, the rendered <form> tag must look like this:
<form enctype="multipart/form-data">...</form>Without that enctype attribute, the browser will transmit only the name of the file—not its contents—which is no use to us! Force the enctype attribute to appear by updating Edit.aspx's call to Html.BeginForm():
<% using (Html.BeginForm("Edit", "Admin", FormMethod.Post,
                          new { enctype = "multipart/form-data" })) { %>
Ugh—the end of that line is now a bit of a punctuation trainwreck! I thought I'd left that sort of thing behind when I vowed never again to program in Perl. Anyway, let's move swiftly on.
OK, so your domain model can store images, and you've got a view that can upload them, so you now need to update AdminController's POST-handling Edit() action method to receive and store that uploaded image data. That's pretty easy: just accept the upload as an HttpPostedFileBase method parameter, and copy its data to the product object:
[HttpPost] public ActionResult Edit(Product product,HttpPostedFileBase image) { if (ModelState.IsValid) {if (image != null) {product.ImageMimeType = image.ContentType;product.ImageData = new byte[image.ContentLength];
image.InputStream.Read(product.ImageData, 0, image.ContentLength);}productsRepository.SaveProduct(product); ...
Of course, you'll need to update any unit tests that call Edit() to supply some value (such as null) for the image parameter; otherwise, you'll get a compiler error.
Right now there's a slight problem: when you edit a product without uploading a new image, you'll lose any existing image previously uploaded for that product. This is because Edit.aspx posts a form that doesn't include any values called ImageData or ImageMimeType, so when the model binder constructs a Product instance to pass to the POST-handling Edit() action method, those model properties will be left set to null. Those nulls will then be saved to the database, overwriting and losing any existing image data.
It would be better if we could retain the old image unless a new one has been uploaded. The natural way to do this is to update the POST-handling Edit() method so that instead of constructing a brand new Product model instance, it loads the existing model instance from the repository, updates only the properties specified by the form (leaving ImageMimeType and ImageData intact unless a new image was uploaded), and then saves the updated model instance back to the repository.
To do this, change the POST-handling Edit() method as follows:
[HttpPost] public ActionResult Edit(int productId,HttpPostedFileBase image) {Product product = productId == 0? new Product(): productsRepository.Products.First(x => x.ProductID == productId);TryUpdateModel(product);... rest of method as before ...}
Notice how the method parameters have changed. We're no longer asking the model binder to supply a complete model instance as a method parameter; instead, we're just asking for a product ID as an int. The action uses this ID to load the existing model instance from the repository, and then it calls TryUpdateModel() to apply incoming data to that model instance's properties and run our validation rules against it. Since the incoming form has no values called ImageMimeType or ImageData, those properties will be left untouched by the model binder.
This demonstrates that model binding isn't limited to supplying action method parameter values. You can use arbitrary custom logic to construct or load a model object, and then use model binding against that object by calling TryUpdateModel(yourObject) later.
As a point of interest, there's a totally different way you could preserve the image data so it isn't lost when users edit products. You can serialize the image data into hidden form fields, so the model binder can later supply complete Product instances (including product image data) rather than updating instances you've loaded from your repository.
It's remarkably easy to do. You can add hidden fields to Edit.aspx as follows:
<% using (Html.BeginForm("Edit", "Admin", FormMethod.Post,
                          new { enctype = "multipart/form-data" })) { %>

    <%: Html.HiddenFor(x => x.ImageMimeType) %>
    <%: Html.HiddenFor(x => x.ImageData) %>
    ... all else as before ...
<% } %>
Html.HiddenFor() (along with ASP.NET MVC's other hidden field helpers) is smart enough to notice that ImageData is of type byte[], so it will automatically base64-encode the binary data into the hidden field. Also, when the form is posted back, the model binder will automatically decode the base64 value into the model's byte[] property. So it's easy to send arbitrary binary data down to the client and then later get it back.
If you follow this approach, you don't need to change the POST-handling Edit() action method to receive a productId parameter (you can simply receive a complete Product instance just as before), you don't need to use TryUpdateModel(), and you don't need to change the Can_Save_Edited_Product() unit test to simulate incoming HTTP form post data. However, I still think the TryUpdateModel() approach is better, because it avoids the bandwidth issues involved in sending the binary data to and from the client every time they open the editor form. It might not make much difference with these small product images, but if you often store large blocks of data in hidden form fields, end users will think your application is slow.
You've implemented everything needed to accept image uploads and store them in the database, but you still don't have the GetImage action that's expected to return image data for display. Add this to ProductsController:
public FileContentResult GetImage(int productId)
{
    var product = productsRepository.Products.First(x => x.ProductID == productId);
    return File(product.ImageData, product.ImageMimeType);
}
This action method demonstrates the File() method, which lets you return binary content directly to the browser. It can send a raw byte array (as we're doing here to send the image data to the browser), or it can transmit a file from disk, or it can spool the contents of a System.IO.Stream along the HTTP response. The File() method is unit testable, too: rather than directly accessing the response stream to transmit the binary data (which would force you to simulate an HTTP context in your unit tests), it actually just returns some subclass of the FileResult type, whose properties you can inspect in a unit test.
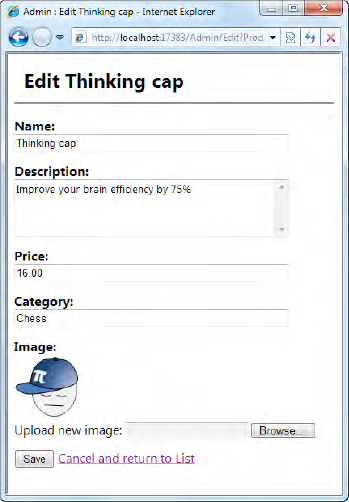
That does it! You can now upload product images, and they'll be displayed when you reopen the product in the editor, as shown in Figure 6-13.
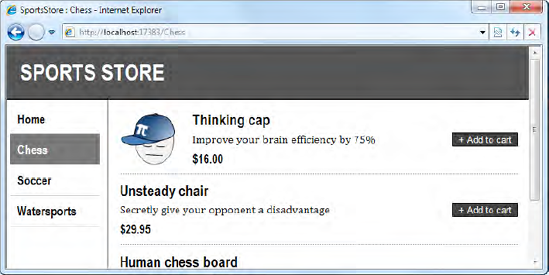
Of course, the real goal is to display product images to the public, so update /Views/Shared/ProductSummary.ascx:
<div class="item">
    <% if(Model.ImageData != null) { %>
        <div style="float:left; margin-right:20px">
            <img src="<%: Url.Action("GetImage", "Products",
                          new { Model.ProductID }) %>" />
        </div>
    <% } %>
    <h3><%: Model.Name %></h3>
    ... rest unchanged ...
</div>
As Figure 6-14 shows, sales will now inevitably skyrocket.
You've now seen how ASP.NET MVC can be used to create a realistic e-commerce application. This extended example demonstrated many of the framework's features (controllers, actions, routing, views and partials, model binding, metadata, validation, master pages, and Forms Authentication) and related technologies (LINQ to SQL, Ninject for DI, and NUnit and Moq for unit testing). You've made use of clean, component-oriented architecture to separate out the application's concerns, keeping it simple to understand and maintain.
The second part of this book digs deep into each MVC Framework component to give you a complete guide to its capabilities.
[40] I've removed some comments and line breaks because otherwise the code listing would be very long.
[41] If you prefer, you can reference these scripts from your master page's <head> element instead. In this case it won't make any difference, but in Chapter 14 I'll explain why I generally prefer to reference external JavaScript files from the bottom of the page where possible.
[42] Remember that authentication means "identifying a user," while authorization means "deciding what a named user is allowed to do." In this simple example, we're treating them as a single concept, saying that a visitor is authorized to use AdminController as long as they're authenticated (i.e., logged in).
[43] The LogOnViewModel class will only appear in the drop-down list if you've compiled your project since you added that class.
[44] ASP.NET MVC 2 defines a simple type as any type that can be converted from a string using TypeDescriptor.GetConverter().