
C H A P T E R 6
![]()
Digital Imaging Projects
In This Chapter
- Adding text to images
- Adding multiple images using layers
- Working on part of an image
- Cloning or copying parts of an image
- Applying GIMP’s filters to change the look of your images
The exercises in this chapter will greatly increase your digital editing skills and expand your creative options. You can create images that in the past needed expensive professional equipment. You will learn to use layers to combine two or more images together. You will discover how to select and work on a part of an image using selections. You will see how to copy or clone parts of an image. Finally, we introduce you to GIMP’s filters. Filters can radically change the way your image looks.
How Difficult Is This Chapter?
If you have completed some of the earlier exercises in this book, you should have no problems learning about selections and layers. Selections use tools from the Toolbox and Layers makes use of some menu items and GIMP’s right hand panel.
The filters at the end of the chapter are easy to use. You open an image, select a filter from the Filter menu, and click OK. Some filters contain additional options that you can try out. The main danger with filters for beginners is the tendency to use them all the time.
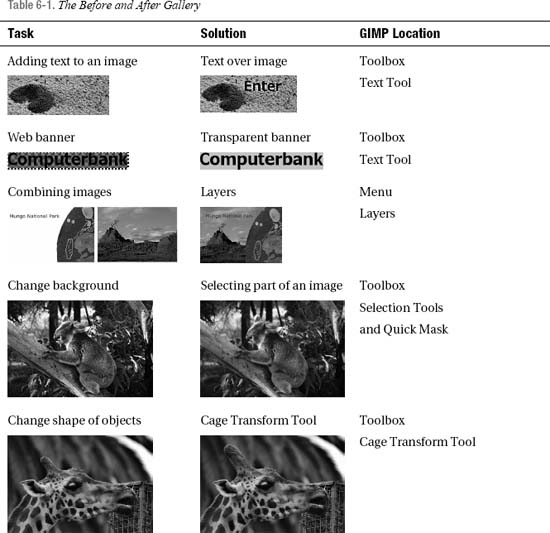
Before and After Gallery
The gallery in this chapter has before and after photos to demonstrate the changes you can make to your images using the methods in this chapter. Look through the gallery and choose a few techniques to try on your digital projects. One of the most enjoyable parts of digital image editing is that you can try out ideas without destroying the original.
The Digital Project Gallery
Table 6-1 shows the projects covered in this chapter, featuring the before and after photos as well as the GIMP location for the tools. Each task is explained in detail in this chapter.
Adding Text to an Image
It is possible to add text to any image you open in GIMP. Figure 6-1 is an image of an ant’s nest with the word Enter typed next to it.
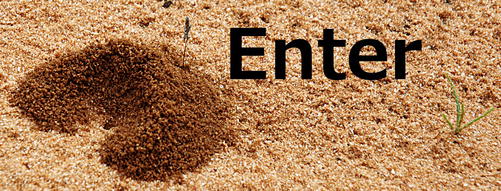
Figure 6-1. The word Enter was added to the photo using the Text Tool.
To add text to an image:
- Open an image in GIMP.
- Select the Text Tool in the Toolbox. See Figure 6-2 below.
- Click on the area of the image where you want to put the text. A dialog box will appear.
- Choose the color and size of the text in the text dialog box located below your Toolbox.
- Type the text in the box (see Figure 6-2).
- If you can’t see what you typed, check to see if the text is very small or if the color of the text is the same color as the background.
Change the Color of the Text
To change the color of the text, highlight the text. In the text box options, select a color (see Figure 6-2).
Change the Size of the Text
Change the size of the text by dragging your mouse over the text and selecting a size from the Text Tool options.
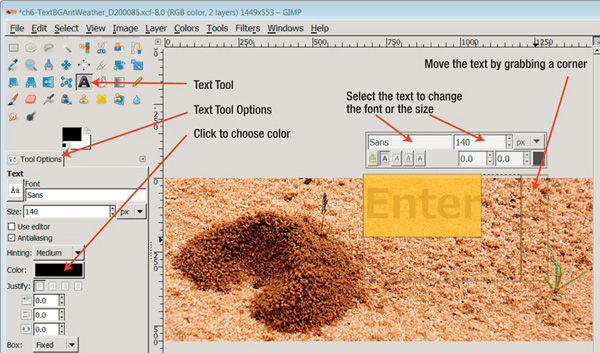
Figure 6-2. When you click the Text Tool, a text box appears over your image. Grab a corner to move the box to the correct position, then type your text. Highlight the text if you want to make changes
Change the Font
Change the font face by choosing a font from the text box options.
Move Text
To move the text, make sure the text is selected. Select the Move Tool in the Toolbox, click the text, and move it into position.
Deselect Text
To deselect the Text Tool, select another tool in the Toolbox.
Effects on Text
Effects or filters can be applied to text.
A popular filter for text is the Beville Filter found at Filters![]() Artistic
Artistic![]() Bevel. Select your text and then apply the filter. Another filter useful for text is the Drop Shadow Filter is located at Filters
Bevel. Select your text and then apply the filter. Another filter useful for text is the Drop Shadow Filter is located at Filters![]() Light and Shadow
Light and Shadow![]() Drop Shadow....
Drop Shadow....
Once an effect is applied to the text, the text can’t be edited.
Curved Text
If you want the text to curve and change shape, see the paths examples in Chapter 9.
Text on a Transparent Background
Text on a transparent background can be useful for web site design or for placing text over any image.
- The text on a transparent background will show the background color of the website or image. The text will blend into the look of the web site.
- The transparent text can be a small PNG or GIF file; this will help the page load faster.
To make text on a transparent background:
- Go to File
New (see Figure 6-3).
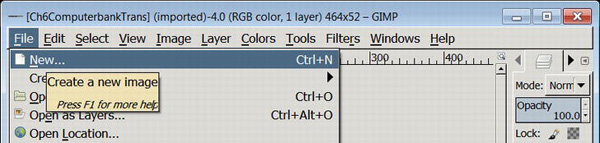
Figure 6-3. Create a new image by going to File
New.
- In the pop-up Create New Image window, click Advanced Options (see Figure 6-4).
- In Advanced Options, click Transparency (see Figure 6-4).
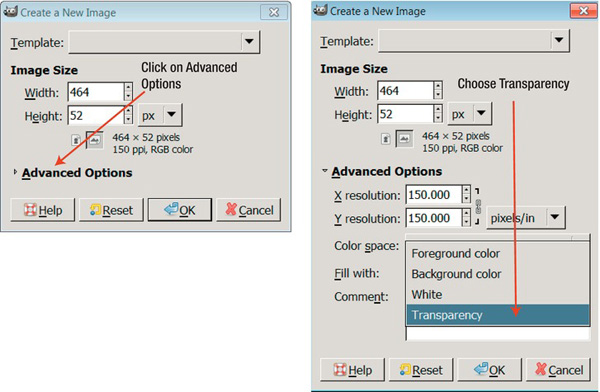
Figure 6-4. To create a new image with a transparent background, open Advanced Options and choose Transparency.
- Click on the Text Tool in the Toolbox (look back at Figure 6-2 if you are unsure).
- Click your mouse inside the blank image
- Type your text. You will be typing over a checkered background. This checkered background lets your know your image background is transparent. (See Figure 6-5).

Figure 6-5. The word Computerbank is over a transparent background.
- To crop the banner to fit your text, go to Image
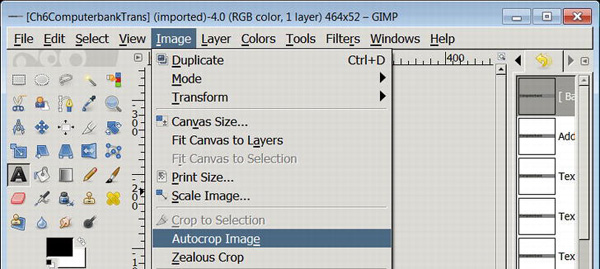
Figure 6-6. The web banner is cropped to size by going to Image

Figure 6-7. The cropped web banner
- Go to File

Figure 6-8. The transparent banner over a colored background
Layers
You can add two or more images together in GIMP using layers. Using layers opens a world of creativity for the artistically minded.
Layers are separate images stacked on top of each other to make one picture. Usually there is a background image with one or more images placed on separate layers on top of this background layer. Placing images on different layers allows you to work on each layer separately.
Adding Two or More Images Together
In the pre-digital imaging days, it was possible to add images together by cutting and pasting. When you wanted to make up an image from parts of other images, you cut out the images and then pasted the images on a sheet of paper. Using this cut-and-paste method, you could control where each part was placed, but you couldn’t change the size of any part or its transparency. If you made a mistake, you had to find more copies of the images and reassemble them.
The Layers area in GIMP allows you to
- Add two or more images together using layers.
- Change the transparency of any layer.
- Edit each layer separately using GIMP’s tools or filters.
- Join layers together and edit them together.
- Change the order of the layers.
- Change which layers are visible.
- Save your layers in a XCF file to work on later.
- Export the finished image as a TIF, PSD, JPG, etc.
What Sorts of Images Can Layers Produce?
The following are some examples of images made with GIMP’s layers.
In Figure 6-9, there are three separate photo layers: the text (Mungo National Park), a photo of a rock carving, and a photo of sand and rock formations.

Figure 6-9. Three separate images: the text, the carved rock, and the landscape can be put on separate layers.
These three picture elements were put on separate layers in GIMP. In Figure 6-10, the composite image shows the modern Aboriginal rock carving with an overview of the Lake Mungo dry lake system and the text naming the area.
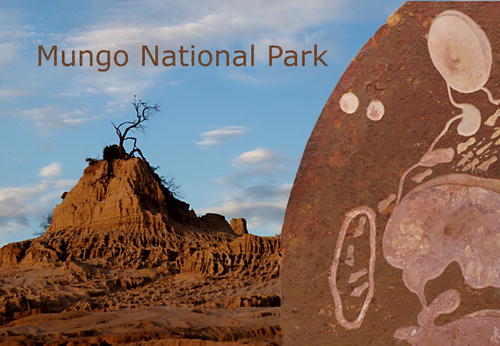
Figure 6-10. In this example of a layered image, the landscape is the background image, the rock image was placed above the background layer, and the text layer was added as the top layer.
The second example in Figure 6-11 shows two BMX riders.
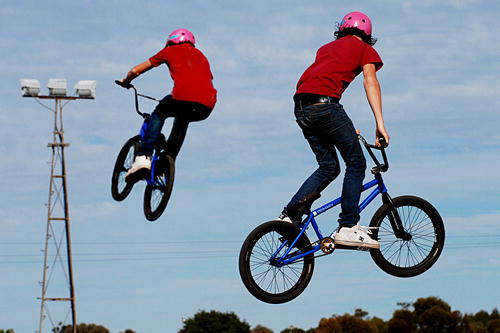
Figure 6-11. Two photos are on separate layers in this image.
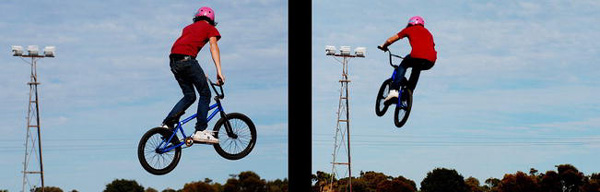
Figure 6-12. Two separate photos of a BMX bike rider jumping off a ramp
Creating a New Blank Layer
To add a blank layer to your open image, follow these steps:
- In the Layer menu, click on New Layer (see Figure 6-13). By default, a layer is created the same size as your open image; it also creates the layer as a transparency.
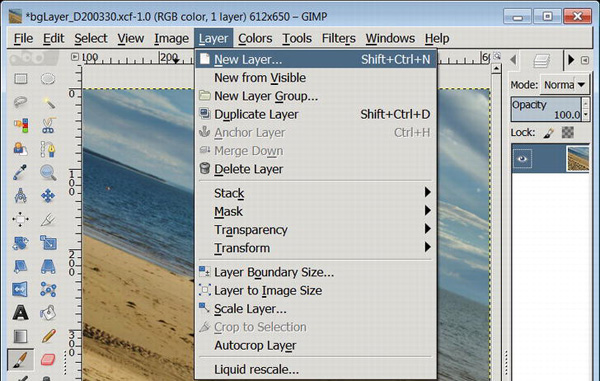
Figure 6-13. The Layer menu
- The pop-up Create a New Layer dialog window gives the choice of changing the size of the layer and of choosing a foreground color, background color, white, or transparency (see Figure 6-14). (Beginners can leave the default settings and click OK).

- Here is the important part. When the new layer is created, the layer is added to the Layers dialog located on the right of your screen, see Figure 6-15. If you can’t see the Layers dialog, click on the Layers icon shown in Figure 6-15. This figure also shows two layers, the original layer and above that the new transparent layer.
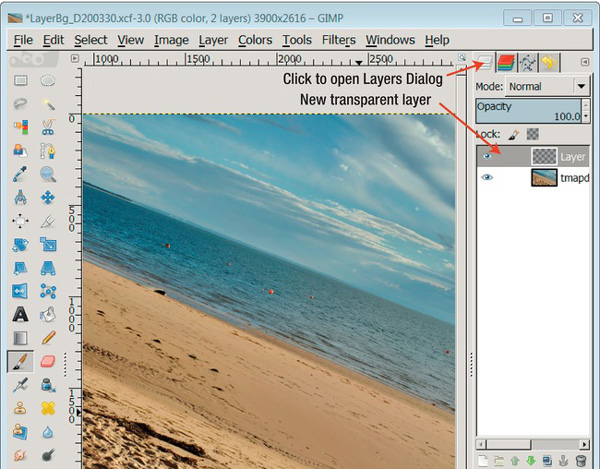
Figure 6-15. The Layers dialog shows the new transparent layer.
Adding a Layer with Images Open in GIMP
This example shows how to add a layer from images already open in GIMP.
- Open two images in GIMP’s single-window mode. The images appear as thumbnails photos near the top of the window, as you can see in Figure 6-16. (See Chapter 2 for further information about single-window mode.)
- Drag the thumbnail of an image across to the second image and then keep dragging the image down on the opened image (see Figure 6-16).
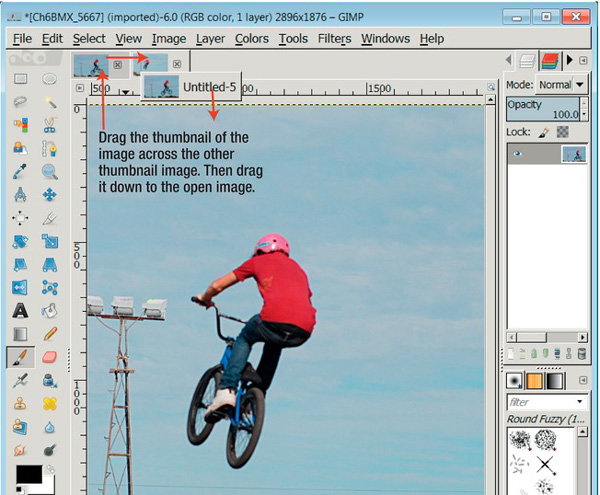
Figure 6-16. Add a layer by dragging the thumbnail of an open image onto another opened image.
- This second photo is added as a layer to the first image. Look at the Layers dialog panel on the right of the screen to see both images displayed as layers (see Figure 6-17).
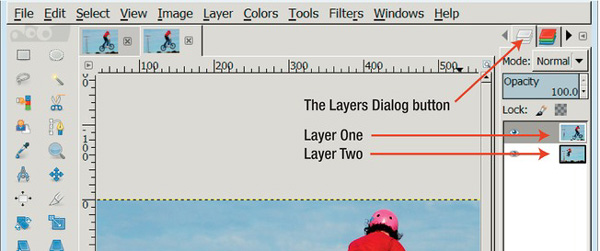
Figure 6-17. New layers always appear at the top of the Layers dialog.
At this point, there are two layers both with an image of a bike rider. You can use the eye icon to turn each layer on and off (see Figure 6-17). However, with both layers turned on you can only see the top layer. This is because the top layer has no transparent areas. Unless we make a transparent area on the top layer we will not be able to see the layer below.
In Figure 6-18, the eraser was used to remove part of the top layer. We can see part of the bike rider on the layer below.
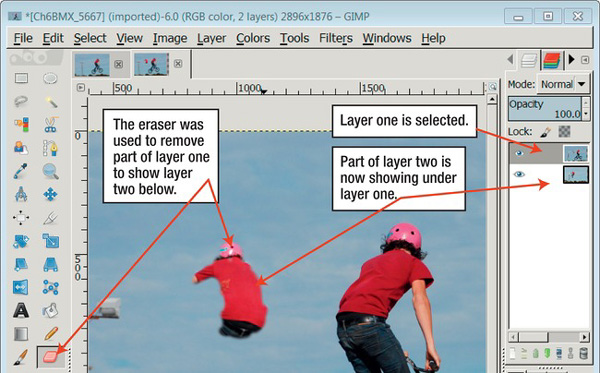
Figure 6-18. Two layers open with part of the top layer erased
When you click the eye icon on a layer, it turns the layer on or off (see Figure 6-19).
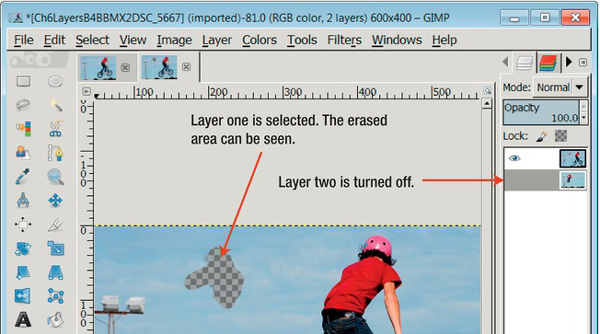
Figure 6-19. Click the eye icon to turn a layer on or off. Layer one shows its newly erased area. Layer two is turned off.
Opening a Layer - alternate
Another way to add a layer is go to the File menu, scroll down, and use the Open Image as Layers option.
Duplicating a Layer
In the top menu, click Layer, scroll down, and click Duplicate Layer. Look at the Layer dialog on the right side of your screen in single-window mode and you will see two identical layers.
Viewing or Hiding a Layer
The Layers panel is located on the right of your screen. Click the eye icon to turn a layer on. You can press Shift + Click on the eye icon to show the visibility of just that layer.
Click the eye icon to turn a layer off. Turning off a layer means it is not visible on the workspace. It hasn’t been erased—it’s just not visible.
Working on a Layer
You can only work on one layer at a time. This means the changes you make to a layer only affect that layer and not any other layers you may have.
To work on a layer, in the Layers panel on the right, click the layer you wish to work on. The highlighted layer is the active layer and is the only layer available to work on.
Linking or Grouping Layers Together
It can be useful to link related layers together to group, tone, rotate, move, or scale them. To link layers together, go to the Layers panel, select a layer, and click the blank area next to the eye icon (see Figure 6-20). A chain icon appears. Select another layer and click the area next to the eye icon to activate the link to the first selected layer. More layers can be linked by repeating this process.
Rearranging the Order of Your Layers
In the Layers dialog, drag the layer up or down to put the layers in a different order. (See Figure 6-20.)
Deleting a Layer
In the Layers dialog, select the layer you wish to delete and click the trash can button located at the bottom of the layer (see Figure 6-20).
Changing the Transparency of a Layer
In the Layers dialog, select the layer you wish to change and then change the amount of transparency using the arrows in the Opacity area (see Figure 6-20). If you need to position two layers exactly, try reducing the transparency of the top layer to see through to the layer below.
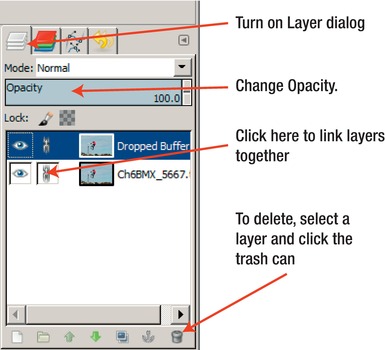
Figure 6-20. The Layers dialog
Erasing Part of a Layer
To erase part of a layer, in the Layer dialog, select the layer in question. Then, in the top Layer menu scroll down to Transparency ![]() Add Alpha Channel. You can now erase parts of the selected layer. The areas of the layer you erase will reveal the layer below. The checkered area shows the erased parts of the layer. A non-destructive way to erase part of a layer is by using a Layer Mask, we discuss this later in the chapter.
Add Alpha Channel. You can now erase parts of the selected layer. The areas of the layer you erase will reveal the layer below. The checkered area shows the erased parts of the layer. A non-destructive way to erase part of a layer is by using a Layer Mask, we discuss this later in the chapter.
Merging Layers
You can merge all your layers together and remove any alpha channel by going to the Layer menu and choosing Flatten Image. Just remember this action is permanent. It is useful to do this if you are saving the image as a JPG.
Saving Layers
To save an image with its layers intact in GIMP, you can save using GIMP’s XCF file format or use the Export menu to export the image as a PSD file. The PSD file will open in Photoshop or GIMP.
![]() Note If GIMP is running slowly, it is possible to allocate more RAM for your work. Go to Edit
Note If GIMP is running slowly, it is possible to allocate more RAM for your work. Go to Edit ![]() Preferences
Preferences ![]() Environment and increase the size of the file cache and the size of the Undo Memory. How much you increase the RAM depends on the RAM in your computer. If you have 2GB or more of RAM on your machine, definitely increase the RAM allocation in the Environment area to improve GIMP’s performance.
Environment and increase the size of the file cache and the size of the Undo Memory. How much you increase the RAM depends on the RAM in your computer. If you have 2GB or more of RAM on your machine, definitely increase the RAM allocation in the Environment area to improve GIMP’s performance.
Layer Masks (Non-Destructive Editing)
The Layer Mask is an advanced feature that is used to create complex layer compositions without any destructive editing. A Layer Mask offers the following benefits:
- Lets you hide or show parts of that layer.
- You control how much of a layer shows through and how much of a layer is hidden by painting on the mask.
- Painting with black on the mask makes those parts of the layer transparent. Painting with shades of gray over parts of a layer makes those parts semi-transparent. The darker the gray, the more transparent the layer; the lighter the gray, the less transparent the layer.
- Black equals full transparency; white removes any masking strokes.
- There are 256 gradations in the mask from black to white, giving a lot of control over the amount of transparency.
To add a layer mask to a layer, go to Layer ![]() Mask
Mask ![]() Add Layer Mask (see Figure 6-21).
Add Layer Mask (see Figure 6-21).
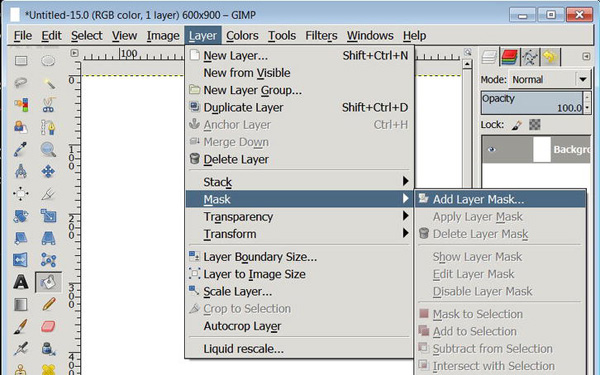
Figure 6-21. Add a Layer Mask to hide or show part of a layer.
When the layer mask is added to a layer, a thumbnail of the mask appears in the Layers dialog. The image in Figure 6-22 has a Layer Mask on layer one. A mask was painted on part of layer one to make it transparent. Parts of layer two below are revealed. The Layer dialog area shows the thumbnails of the layers: layer one is an image of countryside, layer two is shades of blue.
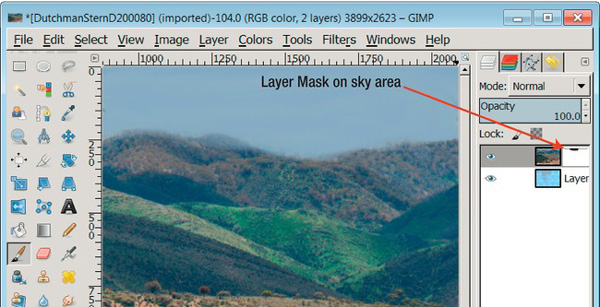
Figure 6-22. A Layer Mask on the top layer reveals false sky on the layer below.
In Figure 6-23 the Layer Mask has been turned off. In the Layers dialog, the Layer Mask has a red border to show it has been disabled.
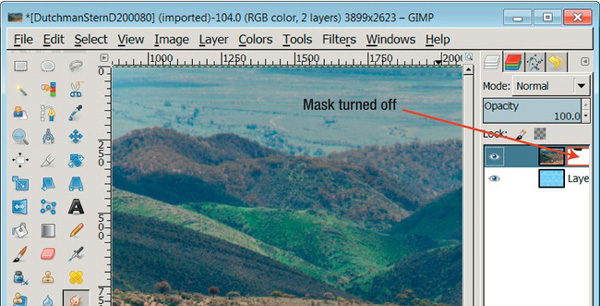
Figure 6-23. Layer Mask turned off. The top layer of open countryside can be seen instead of the sky on layer two.
The options for Layer Mask available at Layer ![]() Mask are shown in Figure 6-24.
Mask are shown in Figure 6-24.
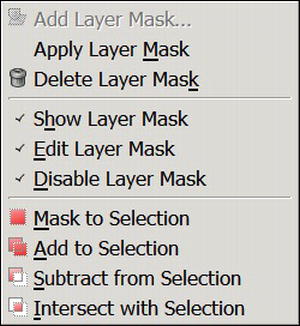
Figure 6-24. Layer Mask options are found in the top menu area at Layer ![]() Mask.
Mask.
Working on Part of an Image (Selections)
This is a very useful section for beginners.
There are times when it is necessary to work on part of an image. The ability to work on part of an image without making changes to the whole image opens a range of editing possibilities. GIMP has a number of tools available to select parts of an image. Selections are useful for the following tasks:
Choosing a Selection
Sometimes parts of an image will be easy to select, like a white ball on a black background. However, if the area you want to select is very close in color and tone to the surrounding areas, the selection will take more time to complete. In cases where the colors and tones are similar, work on the contrast of the image before making the selection. (You could work on the contrast using Colors ![]() Curves .)
Curves .)
Figure 6-25 is an example of an easy one-click selection. One click of the Fuzzy Select Tool in the blank window space and the area was selected. The cream color was selected easily because it is in strong contrast to the dark brown window surround.
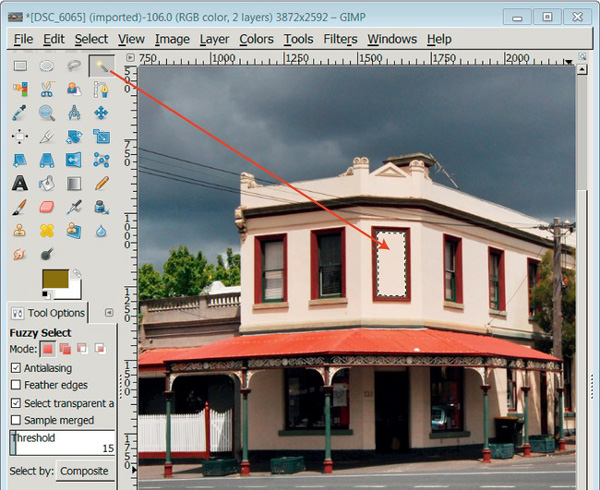
Figure 6-25. The Fuzzy Select Tool is good for selecting areas contrasting to its surrounding areas.
Once the window area is selected, it is possible to perform any editing task using GIMP’s tools and menus. These edits will only affect the contents inside the selection.
For example, we can change the selection’s color with the paintbrush from the toolbox (see Figure 6-26). The only part of the image that is active is inside the selected area. You can run a paintbrush over the entire canvas but it will only paint inside the selected area.
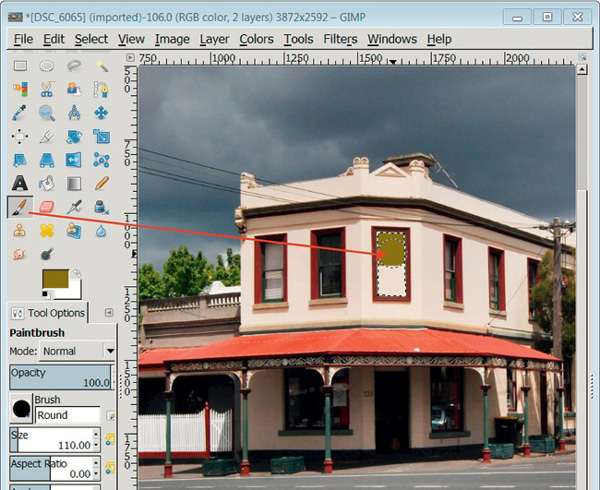
Figure 6-26. The paintbrush is selected and can only paint within the selected area.
Tools to Select Part of an Image
GIMP has the following selection tools in the Toolbox:
- Rectangle Select is useful for selecting squares or rectangles. Options to this selection include feather edges, rounded corners, expand from center, selection by aspect ratio, width, height, or size. (see Figure 6-27).
- Ellipse Select can select circular shapes within an image. Options are the same as Rectangle Select (feather edges, rounded corners, expand from center, selection by aspect ratio, width, height, or size).
- Lasso or Free Select selects areas by allowing clicking around the edge of the required selection, no matter what the shape. If you make a mistake selecting, unselect by clicking on another tool in the Toolbox and then select the Tool again. Options are antialiasing and feather edges.
- Color Select is useful if you have a plain background made up of one color. Sometimes it’s easier to select a background rather than the object you want to select, which may have a range of tones and colors. Options include feather edges, select transparent areas, and threshold (which controls amount of tonal range of the color selected).
- Fuzzy Select or Magic Wand only selects the area the Magic Wand touches. If you click an adjoining area, the wand will select this instead. Shift click will add an area you touch. Options include feather edges, select transparent areas, and threshold (which controls the range of tones the selection).
- Scissors Select (Intelligent Scissors) is a great tool. Click around the edges of an object and the scissors will seek the edges. The selection must be completed by clicking on your selection starting point. If you make a mistake selecting, unselect by clicking on another tool in the Toolbox and then select the Scissors Tool again. Options include feather edges and interactive boundary. With interactive boundary selected, adjust the selected areas with your mouse. This means you can freely move the selection around.
- Foreground Select is used to select foreground objects. The tool has two actions; after selecting the tool, click roughly around the item you wish to select. A blue mask will appear, masking out all things excluded from the selection. Next, use your mouse to stroke across the parts of the selected area you wish to keep; each stroke helps to refine the selection. A lot of people find this tool useful.
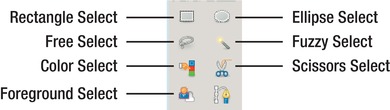
Figure 6-27. Selection tools in the Toolbox
Tips for Controlling Selections
Many beginners miss these very useful selection options. The Selection menu located in the top menu area is there to help you control your selections (see Figure 6-28). The Section menu contains the following options:
- All: You can select the whole image.
- None: The selection is cancelled.
- Invert: Rather than the inside of the selection being active, Invert makes the outside of the selection active and the inside of the selection inactive. Pressing Invert again makes the inside of the selection active again.
- Feather: Using Feather can make a selection look more realistic by softening the edges. Feather gives the option of feathering the edges. You control feathering by choosing the number of pixels for feathering the selection. Zoom to 100% and test with 5, 10, or 20 pixels to see what looks the most realistic.
- Shrink: Reduces the size of the selection.
- Grow: Increases the size of the selection.
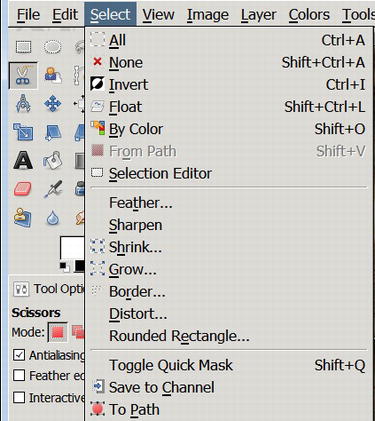
Figure 6-28. The Select menu contains useful options to manipulate your selections.
Selecting Tricky Areas Using Quick Mask
Selecting tricky areas usually involves selecting a part of an image that is similar in tone to its surrounding pixels. Before making any attempt at selecting, work on the contrast of the image first. You could try using Colors![]() Curves.
Curves.
One of the advantages of using Quick Mask is that you can see the selected areas clearly. This exercise uses the Scissors Select Tool and the Quick Mask.
- Open your image in GIMP.
- Zoom into the subject to be selected. Try zooming 100% by typing 1 on the keyboard or 2 for 200%. This will help you see more accurately where your selection should be.
- Click around the subject with the Scissors Select Tool (see Figure 6-29). Close the loop by clicking at your starting point.
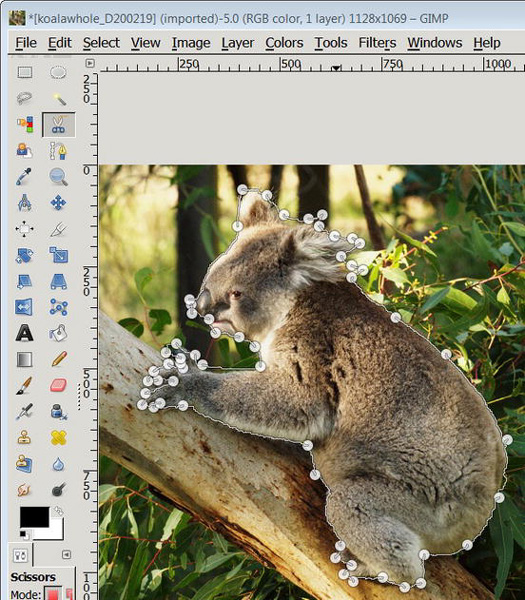
- Hit return. You will see an outline of the selected area.
- To include the missed areas, select Quick Mask by clicking on the square in the lower left of the workspace (see Figure 6-30).
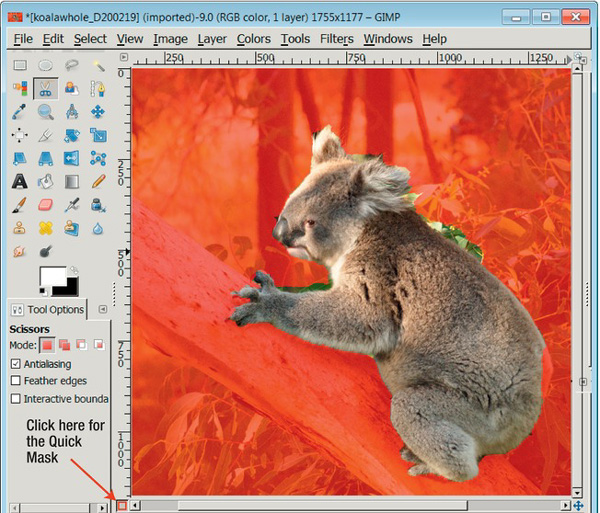
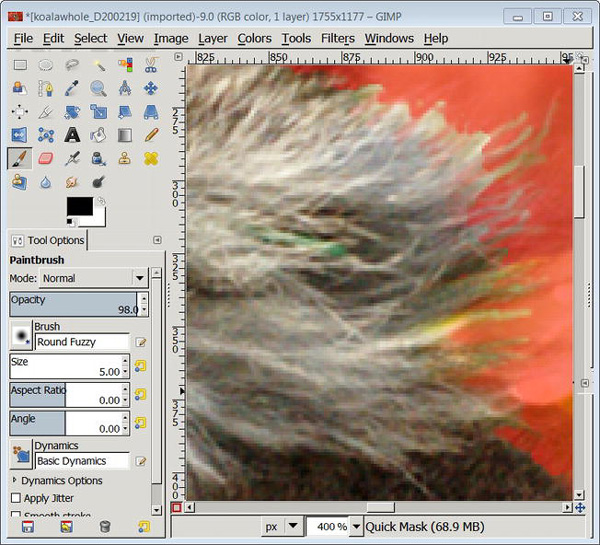
- Use paintbrush to paint in missed areas. Zoom in to make the paint strokes easier to control. Black brush strokes add to the selection; white strokes remove parts of the selection (see Figure 6-31).
- To remove the Quick Mask, click back on the Quick Mask button in the lower left of the workspace.
- To make the selection more natural, feather your selection; try 5 pixels.
- When the selection is complete, click on Select
- In Figure 6-32, the background was changed to black-and-white by going to Colors
- Finally, choose Select
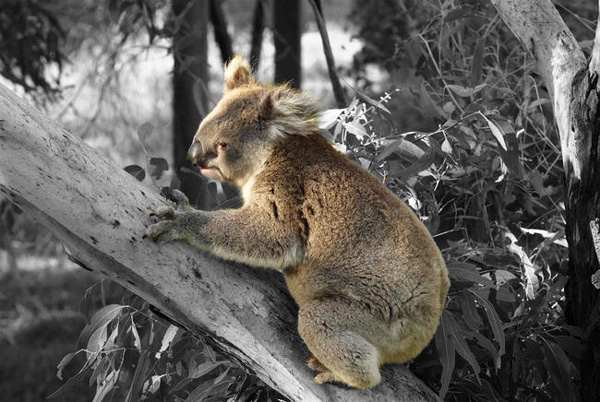
Figure 6-32. After careful selection of the Koala, the background was desaturated.
Cage Transform Tool
The Cage Transform Tool is a new feature in GIMP 2.8. This tool allows selected objects to be stretched or squashed in a natural looking way. The changes are made directly on the canvas. To transform an image:
- Click on the Cage Transform Tool in the Toolbox, see Figure 6-33
- Select the checkbox under the Toolbox labeled “Create or adjust the cage”. See Figure 6-33. Place your selection around the object you want to stretch or squash. The more accurate your selection, the more natural looking the transformation should be.
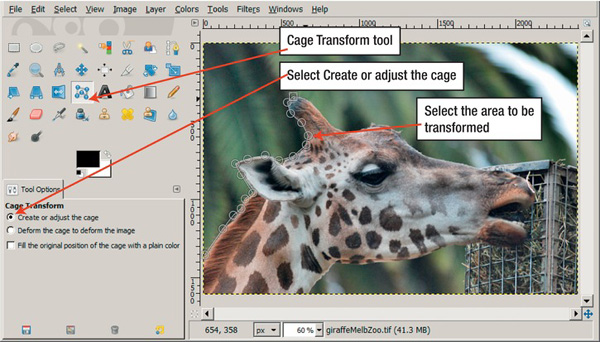
Figure 6-33. The Cage Transform tool is selected in the Toolbox.
- When you have selected the object, click on the checkbox labeled “Deform the cage to deform the image”. Move some of the selection points to stretch or squash part of your image. Figure 6-34 shows the Cage Transform Tool starting to work.
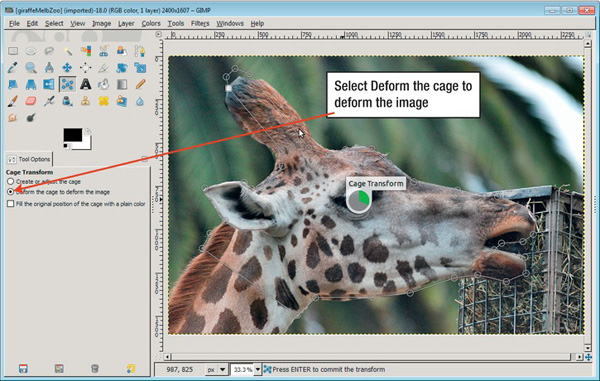
Figure 6-34. The selection points have been moved near the horn and the Cage Transformation Tool starts stretching the horn.
See Figure 6-35 to see the giraffe after the transformation. The extended horn looks realistic thanks to the Cage Transformation Tool.
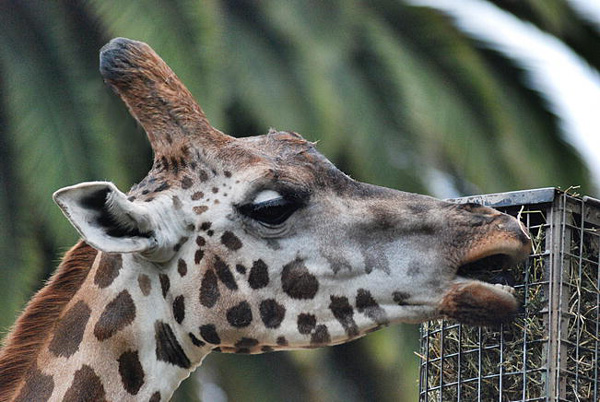
Figure 6-35. After the transformation process, the horn is longer.
Cloning or Copying Parts of an Image
If you need to copy or clone part of an image, the Clone Tool located in the Toolbox is the best tool for the job. You may need to clone part of an image to repair some damage or to cover something that is distracting in a photo. You can see an example of cloning in Figure 6-36. The middle figure in the white shirt on the left image is not wearing a scarf; however, in the image on the right, he is wearing a scarf. The scarf was cloned or copied from the person next to him.
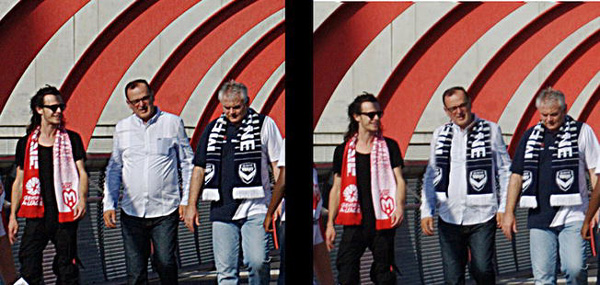
Figure 6-36. A blue and white scarf was added to the person in the middle of the picture on the right using the Clone Tool.
Cloning an Item in an Image
In Figure 6-36 a scarf is added to the person wearing a white shirt. To use the Clone Tool, follow these steps:
- Open your image in GIMP.
- Zoom into your image, try clicking 2 or 3 on your keyboard.
- Choose the Clone Tool from your Toolbox. See Figure 6-37.
- This is the most important step: the Clone Tool will not work until you activate it. Find the area of your image you wish to copy or clone. Control+Click on that spot with your mouse to select that area as the cloning source. The Clone tool will copy details from that area.
- Now move the cloning brush to the area where you wish to add the clone information and start making some strokes. You can click Control+Z if you need to undo a step.
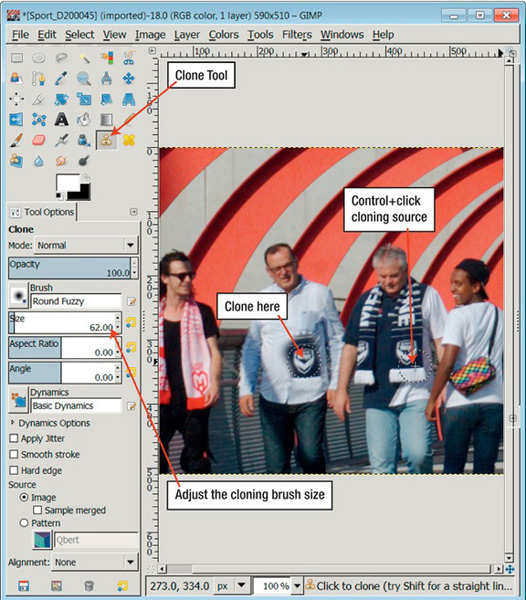
Figure 6-37. Choose the Clone Tool from the Toolbox, Control+Click on the area you wish to clone, then brush on the area you wish to add the clone.
- Adjust the size of your Cloning Brush by using the slider located in the Tool Options below the Toolbox. If you can’t see these options, drag on the vertical inside wall to make your Toolbox wider.
Every cloning job is different, but to give you some idea, here are the settings used for Figure 6-38:
- Removing the Red and White Scarf in Figure 6-38: The Clone Tool options used were Brush Round Fuzzy. Alignment was Fixed for most of the scarf removal because it was using one spot on the black jumper as the cloning source. For the skin tones. a mixture of Fixed and Aligned were used.
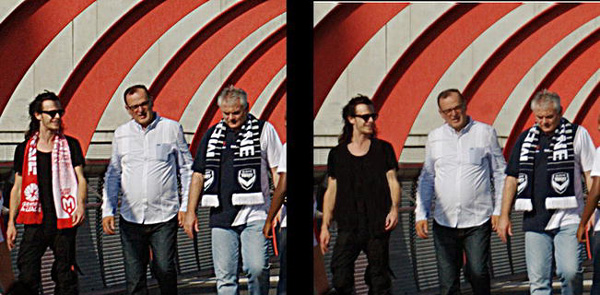
Figure 6-38. The photo on the left is the original. The red and white scarf has been removed from the person in black in the photo on the right.
Color to Black-and-White
There are a number of ways to change a color photo to a black-and-white photo in GIMP (see Figure 6-39).
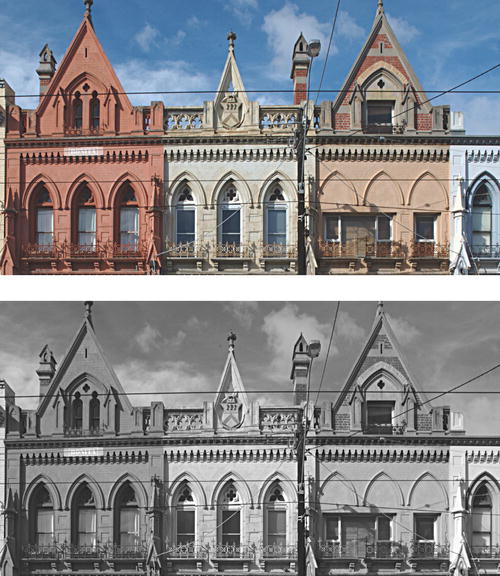
Figure 6-39. The top image is the original color image; the bottom image has been changed to black-and-white in GIMP.
You can change a color image to black-and-white using one of the following methods:
- Go to Image
- Go to Colors
- Go to Colors
- Experiment to see which black-and-white effect you prefer.
Changing the Look of Your Images with Filters
Filters change the look of your images. If you’re a beginner, you may be pleased to hear that filters are easy to use. To use most filters, you simply open an image and click on a filter from the Filter menu to apply the effect.
GIMP has over 100 filters. It is not possible in the space available here to go through every filter and variation of a filter available in GIMP. Figure 6-40 shows an overview the filters types in GIMP’s filter menu. Under each heading is a further list of filters for that category.
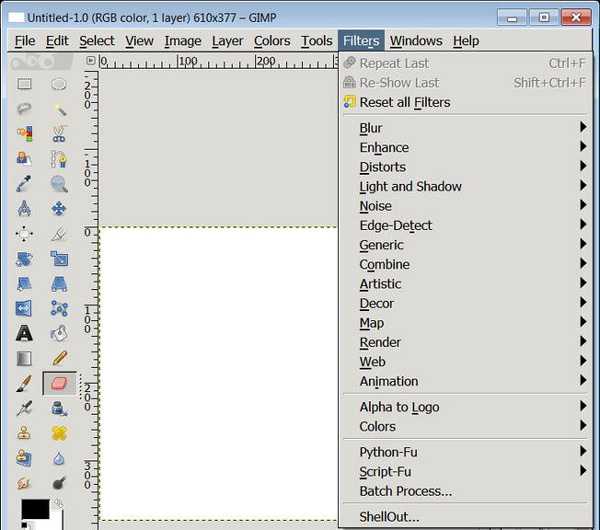
Figure 6-40. GIMP’s filters are located in the Filters menu and each listing has a submenu.
![]() Note Filters are very easy to use. In most cases, you simply open an image and click on a filter to apply its effects. Have fun using filters but beware! It’s very easy to start using filters on nearly everything.
Note Filters are very easy to use. In most cases, you simply open an image and click on a filter to apply its effects. Have fun using filters but beware! It’s very easy to start using filters on nearly everything.
Old Fashioned Sepia Toning
It is easy to change a color image and give it an old fashioned look in GIMP, like the bottom image in Figure 6-41.
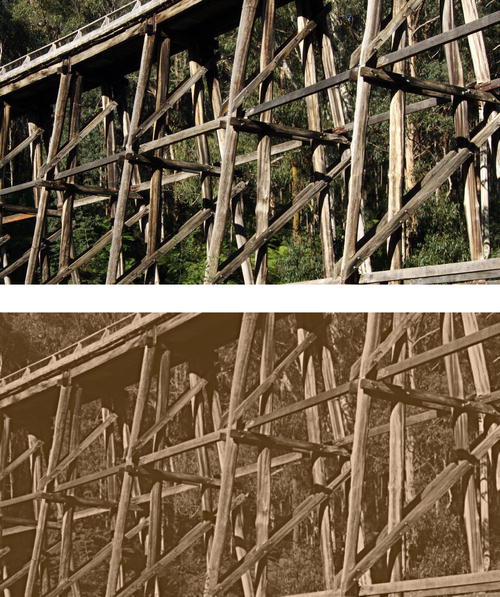
Figure 6-41. The top image is the original; the bottom image has had the Old Photo filter applied to it.
To change a color or black-and-white photo to old fashioned brown/sepia toning, open your image. In the top menu go to Filters ![]() Décor
Décor ![]() Old Photo (see Figure 6-42).
Old Photo (see Figure 6-42).
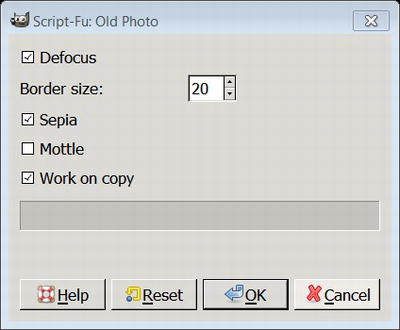
Figure 6-42. The Old Photo Filter is located at Filters ![]() Décor
Décor ![]() Old Photo.
Old Photo.
The pop-up screen gives a number of options. Here’s a suggestion to get you started: leave Defocus unselected, try Border 0 (unless you want a border), select Sepia, and select Work on Copy. Click OK. GIMP will make a new copy of your image and make it look old fashioned.
Warping an Image
Figure 6-43 shows an image before the IWarp filter was applied and Figure 6-44 shows the image after the iWarp filter was applied. IWarp is found at Filters ![]() Distorts
Distorts ![]() IWarp.
IWarp.
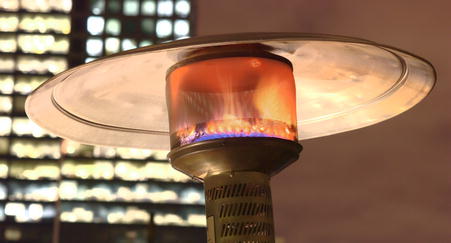
Figure 6-43. Photo of a gas heater
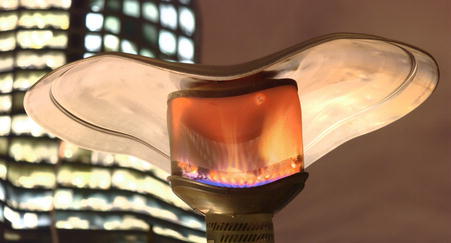
Figure 6-44. The gas heater after the iWarp filter was applied
Using a Filter to Convert a Photo a Background for a Drawing
Filters can be useful for artists. The Figure 6-45 shows a photo before a filter was applied. Figure 6-46 shows the photo after using the Oilify filter. Oilify is found at Filters ![]() Artistic
Artistic ![]() Oilify. A new transparent layer was added to the photo and a dragonfly was drawn on it using the Paintbrush in the Toolbox, see Figures 6-46.
Oilify. A new transparent layer was added to the photo and a dragonfly was drawn on it using the Paintbrush in the Toolbox, see Figures 6-46.
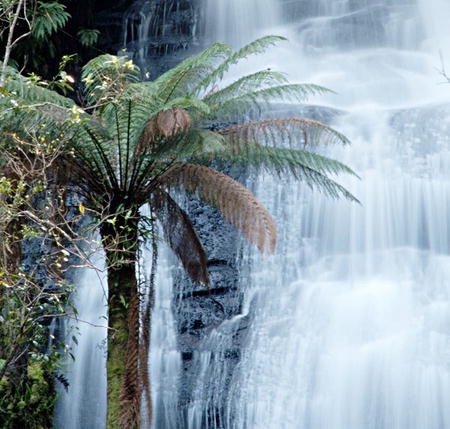
Figure 6-45. Photo of waterfall used as the background for Figure 6-46
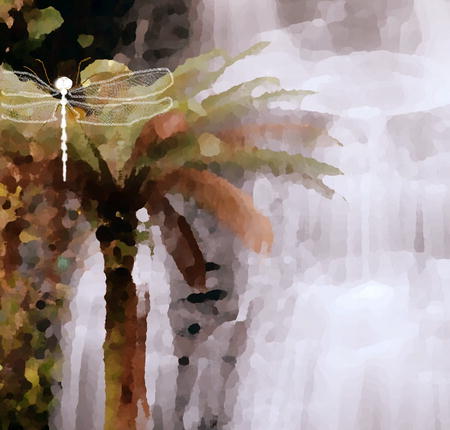
Figure 6-46. The photo after the Oilify Filter was applied and a new layer with a dragonfly was added
Summary
There are countless ways to use GIMP. The gallery at the start of this chapter gives before and after views of the exercises in this chapter. Two new important steps for beginners are in this chapter, they are layers and selections. We showed you how to add images together using layers and how to select and work on part of an image using selections. We show you how to clone or copy part of an image and we gave you a taste of GIMP’s many filters. Thanks to a small number of voluntary computer scientists dotted around the world, GIMP has evolved into a serious digital image-editing platform.
The next chapters look at the GIMP tools for drawing and painting.