

responding to mouse events
calculation of collision between circles and lines
responding to the arrow keys
form input
encoding, saving, decoding, and restoring information from local storage using
tryandcatchfor testing if coding is recognizedusing
joinandsplitto encode and decode informationusing
javascript:in a button to invoke functionsradio buttons
In this chapter, we'll continue our exploration of programming techniques and HTML5 and JavaScript features, this time using programs that build and traverse mazes. Players will have the ability to draw a set of walls to make up a maze. They will be able to save and load their mazes, and to traverse them using collision detection to make sure they don't cross any walls.
The general programming techniques include using arrays for everything that needs to be drawn on the canvas as well as a separate array for the set of walls in the maze. The number of walls is not known before play starts, so a flexible approach is required. Once the maze is constructed, we'll see how to respond to presses of the arrow keys and how to detect collisions between the playing piece—a pentagon-shaped token—and the walls. With HTML5, we can handle mouse events so the player can press the mouse button down and then drag and release the button to define each wall of a maze; respond to the arrow keys to move the token; and save and retrieve the layout of walls on the local computer. As usual, we'll build more than one version of the application. In the first, everything is contained in one HTML file. That is, the player builds a maze, can travel through it, and can optionally save it to the local computer or restore a set of walls saved earlier. In the second version, there's one program to create the mazes and a second file that offers the player a choice of specific mazes to traverse, using radio buttons. Perhaps one person might build the mazes on a given computer and then ask a friend to try traversing them.
HTML5's local storage facility accepts only strings of characters, and so we'll look at how we can use JavaScript to encode the maze information into a character string and then decode it back to rebuild the walls of the maze. The saved information will remain on the computer even after it is turned off.
The individual capabilities we'll discuss in this chapter: building structures, using the arrow keys to move a game piece, checking for collisions, and encoding, saving, and restoring data on the user's computer, can all be reused in a variety of games and design applications.
Note
HTML files are generally called scripts, while the term program is typically reserved for languages such as Java or C. This is because JavaScript is an interpreted language: the statements are translated one at a time at execution time. In contrast, Java and C programs are compiled, that is, completely translated all at once, with the result stored for later use. Some of us are not so strict and use the terms script, program, application, or, simply, file for HTML documents with JavaScript.
Figure 7-1 shows the opening screen for both the all-in-one program and the first script of the second program.
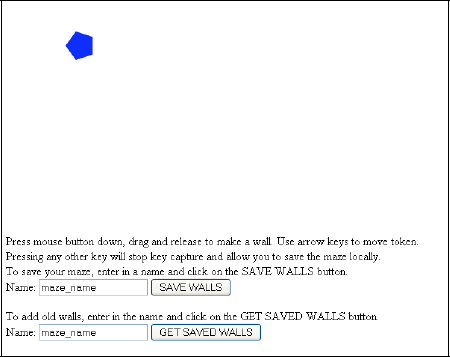
Figure 7-2 shows the screen after some fairly sloppy walls have been placed on the canvas.

Figure 7-3 shows the screen after the player has used the arrow keys to move the token into the maze.
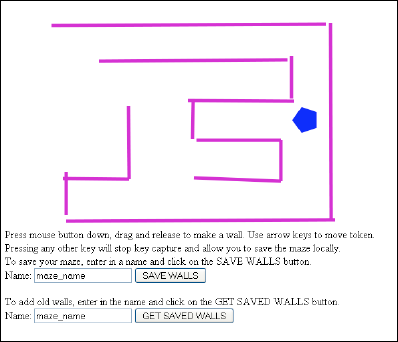
If the player wants to save a set of walls, he or she types in a name and clicks on the button. To retrieve the walls, which are added to whatever is currently on the canvas, the player types in a name and presses the GET SAVED WALLS button. If there's nothing saved under that name, nothing happens.
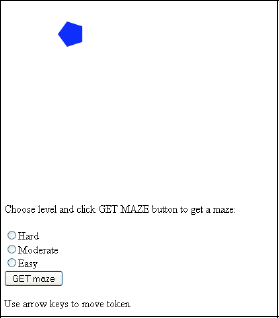
The two-script application has the second script present the player with a choice. Figure 7-4 shows the opening screen.
The two-script application assumes that someone has used the first script to create and save three mazes with the specific names used in the second script. Furthermore, the same browser must be used for creating a maze and for the travel maze activities. I do this to demonstrate the local storage facility of HTML5, which is similar to cookies—a way for Web application developers to store information about users.
Note
Cookies, and now HTML5 localStorage, are the basis of what is termed behavioral marketing. They bring convenience to us—we don't have to remember certain items of information such as passwords—but they are also a way to be tracked and the target of sales. I am not taking a position here, just noting the facility.
Figure 7-5 shows an easy maze.
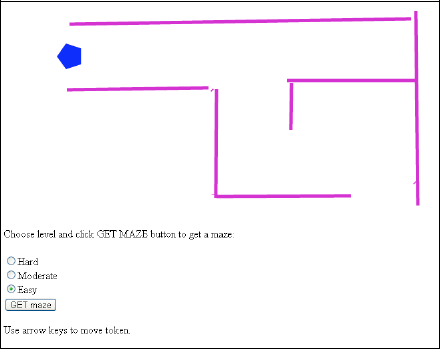
Figure 7-6 shows a slightly more difficult maze.
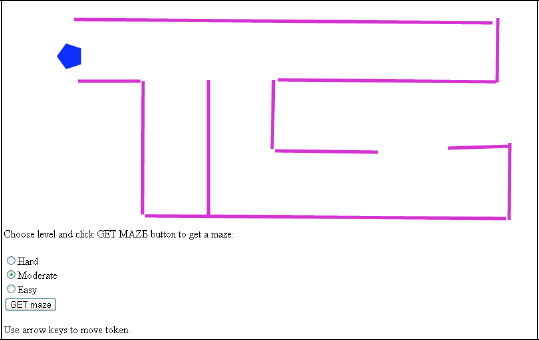
Figure 7-7 shows a more difficult maze, more difficult mainly because the player needs to move away from the first entry point toward the bottom of the maze to make it through. Of course, it is up to the player/creator to design the mazes.

One important feature is that in the two-script application, clicking the GET maze button forces the current maze to be erased and the newly selected maze to be drawn. This is different from what happens in either the all-in-one program or the creation part of the second version, when old walls are added to what is present. As has been the case for the other examples, these are just stubs of programs, created to demonstrate HTML5 features and programming techniques. There is much opportunity for improvement to make the projects your own.
The maze application requires the display of a constantly updated game board, as new walls are erected and the token is moved.
The maze-building task requires responding to mouse events to collect the information needed to build a wall. The application displays the wall being built.
The maze-traveling task requires responding to the arrow keys to move the token. The game must not allow the token to cross any wall.
The save and retrieve operations require the program to encode the wall information, save it on the local computer, and then retrieve it and use it to create and display the saved walls. Mazes are moderately complex structures: a set of some number of walls, with each wall defined by starting and ending coordinates, that is, pairs of numbers representing x,y positions on the canvas. For the local storage facility to be used, this information has to be turned into a single string of characters.
The two-document version makes use of radio buttons to select a maze.
Now let's take a look at the specific features of HTML5 and JavaScript that provide what we need to implement the maze application. This builds on material covered in previous chapters: the general structure of an HTML document; using programmer-defined functions, including programmer-defined objects; drawing paths made up of line segments on a canvas element; programmer objects; and arrays. Previous chapters have addressed mouse events on the canvas (the cannonball and slingshot games in Chapter 4 and the memory game in Chapter 5) and mouse events on HTML elements (the quiz games in Chapter 6). New features we'll be covering include a different type of event: getting input from a player pressing on the arrow keys, called keystroke capture; and using local storage to save information on the local computer, even after the browser has been closed and the computer turned off. Remember, you can skip ahead to the "Building the Application" section to see all the code with comments and return to this section to read explanations of individual features and techniques.
To start, we'll define a function, Wall, to define a wall object, and another function, Token, to define a token object. We'll define these functions in a more general manner than required by this application, but I believe this is okay: the generality does not affect much, if anything, in terms of performance, while giving us the freedom to use the code for other applications, such as a game with different playing pieces. I chose the pentagon shape because I liked it, and use mypent as the variable name for the playing piece.
The properties defined for a wall consist of the start and finish points specified by the mouse actions. I name these sx, sy, fx, and fy. The wall also has a width and a strokestyle string, and a draw method is specified as drawAline. The reason this is more general than necessary is because all walls will have the same width and style string, and all will use the drawAline function. When it comes time to save the walls to local storage, I save only the sx, sy, fx, and fy values. You can use the same techniques to encode more information if and when you write other programs and need to store values.
The token that moves around the maze is defined by a call to the Token function. This function is similar to the Polygon function defined for the polygon memory game. The Token function stores the center of the token, sx and sy, along with a radius (rad), number of sides (n), a fillstyle, and it links to the drawtoken function for the draw method and the movetoken function for the moveit method. In addition, a property named angle is computed immediately as (2*Math.PI)/n. Recall that in the radian system for measuring angles, 2*Math.PI represents a full circle, so this number divided by the number of sides will be the angle from the center to the ends of each side.
As was the case with previous applications (see Chapter 4), after an object is created, the code adds it to the everything array. I also add all walls to the walls array. It is this array that is used to save the wall information to local storage.
Recall that in previous chapters we used HTML5 and JavaScript to define an event and specify an event handler. The init function contains code that sets up event handling for the player pressing the main mouse button, moving the mouse, and releasing the button.
canvas1 = document.getElementById('canvas'),
canvas1.addEventListener('mousedown',startwall,false);
canvas1.addEventListener('mousemove',stretchwall,false);
canvas1.addEventListener('mouseup',finish,false);We'll also use a variable called inmotion to keep track of whether or not the mouse button is down. The startwall function determines the mouse coordinates (see Chapters 4 and 5 for accessing the mouse coordinates after an event), creates a new Wall object with a reference stored in the global variable curwall, adds the wall to the everything array, draws all the items in everything, and sets inmotion to be true. If inmotion is not true, then the stretchwall function returns immediately without doing anything. If inmotion is true, the code gets the mouse coordinates and uses them to set the fx and fy values of curwall. This happens over and over as the player moves the mouse with the button pressed down. When the button is released, the function finish is called. This function sets inmotion back to false and adds the curwall to an array called walls.
Detecting that a key on the keyboard has been pressed and determining which one is called capturing a key stroke. This is another type of event that HTML5 and JavaScript can handle. We need to set up a response to a key event, which is analogous to setting up a response to a mouse event. The coding starts with invoking the addEventListener method, this time for the window:
window.addEventListener('keydown',getkeyAndMove,false);The window is the object that holds the document defined by the HTML file. The third parameter, which could be omitted because false is the default, relates to the order of responding to the event by other objects. It isn't an issue for this application.
This means the getkeyAndMove function will be invoked if and when a key is pressed.
Tip
Event handling is a big part of programming. Event-based programming is often more complex than demonstrated in this book. For example, you may need to consider if a contained object or a containing object also should respond to the event, or what to do if the user has multiple windows open. Devices such as cell phones can detect events such as tilting or shaking or using your fingers to stroke the screen. Incorporating video may involve invoking certain actions when the video is complete. HTML5 JavaScript is not totally consistent in handling events (setting up a time out or a time interval does not use addEventListener), but at this point, you know enough to do research to identify the event you want, try multiple possibilities to figure out what the event needs to be associated with (e.g., the window or a canvas element or some other object), and then write the function to be the event handler.
Now, as you may expect at this point, the coding to get the information for which key was pressed involves different code for different browsers. The following code, with two ways to get the number corresponding to the key, works in all current browsers recognizing other new features in HTML5:
if(event == null)
  {
    keyCode = window.event.keyCode;
        window.event.preventDefault();
  }
  else
{
keyCode = event.keyCode;
event.preventDefault();
}The preventDefault method does what it sounds like: prevents any default action, such as a special shortcut action that is associated with the particular key in the particular browser. The only keys of interest in this application are the arrow keys. The following switch statement moves the Token referenced by the variable mypent; that is, the location information is changed so that the next time everything is drawn, the token will move. (This isn't quite true. The moveit function contains a collision check to make sure we don't hit any walls first, but that will be described later.)
switch(keyCode)
  {
   case 37:  //left arrow
     mypent.moveit(-unit,0);
     break;
   case 38:  //up arrow
     mypent.moveit(0,-unit);
      break;
    case 39: //right arrow
   mypent.moveit(unit,0);
      break;
    case 40:  //down arrow
      mypent.moveit(0,unit);
      break;
    default:
      window.removeEventListener('keydown',getkeyAndMove,false);
}
Tip
Do put comments in your code as demonstrated by the comments indicating the keyCode for the different arrow keys. The examples in this book don't have comments because I've supplied an explanation for every line of code in the relevant tables, so this is a case of do as I say, not as I (mostly) do. Comments are critical for team projects and for reminding you of what's going on when you return to old work. In JavaScript, you can use the // to indicate that the rest of the line is a comment or surround multiple lines with /* and */. Comments are ignored by the JavaScript interpreter.
How did I know that the keycode for the left arrow was 37? You can look up keycodes on the Web (for example, www.w3.org/2002/09/tests/keys.html) or you can write code that issues an alert statement:
alert(" You just pressed keycode "+keyCode);The default action for our maze application, which occurs when the key is not one of the four arrow keys, stops event handling on key strokes. The assumption here is that the player wants to type in a name to save or retrieve wall information to or from local storage. In many applications, the appropriate action to take would be a message, possibly using alert, to let the user know what the expected keys are.
To traverse a maze, the player must not move the token across any wall. We will enforce this restriction by writing a function, intersect, that returns true if a circle with given center and radius intersects a line segment. For this task, we need to be exacting in our language: a line segment is part of a line, going from sx, sy to fx, fy. Each wall corresponds to a finite line segment. The line itself is infinite. The intersect function is called for each wall in the array walls.
Tip
My explanation of the mathematics in the intersection calculation is fairly brief, but may be daunting if you haven't done any math in a while. Feel free to skip over it and accept the coding as is if you don't want to work through it.
The intersect function is based on the idea of a parameterized line. Specifically, the parameterized form of a line is (writing mathematical formula, as opposed to code)
Equation a:        x = sx + t*(fx-sx);
Equation b:        y = sy + t*(fy-sy);
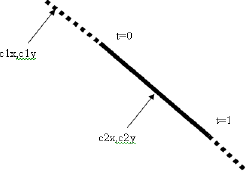
As parameter t goes from 0 to 1, the x and y take on the corresponding values of x, y on the line segment. The goal is to determine if a circle with center cx,cy and radius rad overlaps the line segment. One way to do this is to determine the closest point on the line to cx,cy and see if the distance from that point is less than rad. In Figure 7-8, you see a sketch of part of a line with the line segment depicted with a solid line and the rest of what is shown of the line indicated by dots. The value of t at one end is 0 and the other end is 1.There are two points c1x,c1y and c2x, c2y. The c1x,c1y point is closest to the line outside the critical line segment. The point c2x,c2y is closest somewhere in the middle of the line segment. The value of t would be between 0 and 1.
The formula for the distance between the two points (x,y) and (cx,cy) is
distance = ((cx-x)*(cx-x)+(cy-y)*(cy-y)).5
Substituting for x and for y using equations a and b, we get a formula for distance.
Equation c: distance = ((cx-sx+t*(fx-sx))*(cx- sx + t*(fx-sx))+(cy- sy + t*(fy-sy))*(cy- sy + t*(fy-sy))).5
For our purposes, we want to determine the value of t when distance is at a minimum. Lessons from calculus and reasoning about minimum versus maximum in this situation tell us first that we can use the distance squared in place of the distance and so avoid taking square roots. Moreover, the value is at a minimum when the derivative (with respect to t) is zero. Taking the derivative and setting that expression to zero, produces the value of t at which the cx,cy is closest to the line. In the code, we define two extra variables, dx and dy, to make the expressions simpler.
dx = fx-sx
        dy = fy-sy;
              t= 0.0 –((sx-cx)*dx+(xy-cy)*dy)/((dx*dx)+(dy*dy))
This will produce a value for t. The 0.0 is used to force the calculations to be done as floating point numbers (numbers with fractional parts, not restricted to whole numbers).
We use equations a and b to get the x,y point corresponding to the value of t. This is the x,y closest to cx,cy. If the value of t is less than 0, we check the value for t = 0, and if it is more than 1, we check the value for t = 1. This means that the closest point was not a point on the line segment, so we will check the appropriate end of the line segment closest to that point.
Is the distance from cx,cy to the closest point close enough to be called a collision? We again use distance squared and not distance. We evaluate the distance squared from cx, cy to the computed x,y. If it is less than the radius squared, there is an intersection of the circle with the line segment. If not, there is no intersection. Using the distance squared does not make a difference: if there is a minimum for the value squared, then there is a minimum for the value.
Now the very good news here is that most of the equations are not part of the coding. I did the work beforehand of determining the expression for the derivative. The intersect function follows, with comments:
function intersect(sx,sy,fx,fy,cx,cy,rad) {
   var dx;
   var dy;
   var t;
   var rt;
   dx = fx-sx;
  dy = fy-sy;
  t =0.0-((sx-cx)*dx+(sy-cy)*dy)/((dx*dx)+(dy*dy));  //closest t
  if (t<0.0) { //closest beyond the line segment at the start
    t=0.0; }
  else if (t>1.0) {  //closest beyond the line segment at the end
    t = 1.0;
  }

  dx = (sx+t*(fx-sx))-cx; // use t to define an x coordinate
  dy = (sy +t*(fy-sy))-cy; // use t to define a y coordinate
  rt = (dx*dx) +(dy*dy);  //distance squared
  if (rt<(rad*rad)) {  // closer than radius squared?
      return true; }   // intersect
else {
return false;} // does not intersect }
In our application, the player presses an arrow key and, based on that key, the next position of the token is calculated. We call the intersect function to see if there would be an intersection of the token (approximated as a circle) and a wall. If intersect returns true, the token is not moved. The checking stops as soon as there is an intersection. This is a common technique for collision checking.
The Web was originally designed for files being downloaded from the server to the local, so-called client computer for viewing, but with no permanent storage on the local computer. Over time, people and organizations building web sites decided that some sort of local storage would be advantageous. So, someone came up with the idea of using small files called cookies to keep track of things, such as user IDs stored for the convenience of the user as well as the web site owner. The use of cookies, Flash's shared objects, and now HTML5 local storage has grown considerably with the commercial Web. Unlike the situation for the applications shown here, the user often does not know that information is being stored and by whom, and for what purpose the information is accessed.
The localStorage facility of HTML5 is browser-specific. That is, a maze saved using Chrome is not available to someone using FireFox.
Let's take a closer look at using local storage by examining a small application that saves date and time information. Local storage and the Date function, introduced in Chapter 1, provide a way to store date/time information. Think of local storage as a database in which strings of characters are stored, each under a specific name. The name is called the key, the string itself is the value, and the system is called key/value pairs. The fact that local storage just stores strings is a restriction, but the next section shows how to work around it.
Figure 7-9 shows a screen shot from the opening screen of a simple date saving application.
The user has three options: store information on the current date and time, retrieve the last information saved, and remove the date information. Figure 7-10 shows what happens when clicking "Retrieve date info" the very first time using this application (or after the date has been removed).
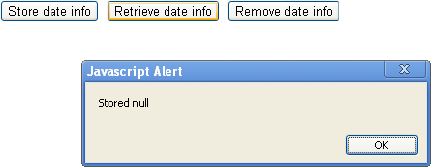
Our application uses a JavaScript alert box to show a message. The user needs to click the OK button to remove the alert box from the screen.
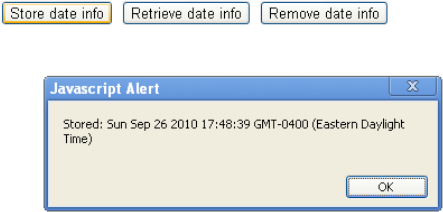
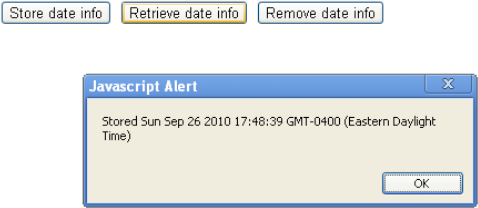
Figure 7-11 shows the message after a user clicks the Store date info button.
If the user later clicks on the Retrieve date info button, he'll see a message similar to Figure 7-12.
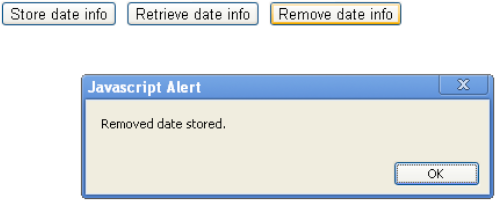
You can give your players a way to remove the stored information using a Remove date info button. Figure 7-13 shows the result.
HTML5 lets you save, fetch, and remove a key/value pair, using methods for the built-in object localStorage.
The command localStorage.setItem("lastdate",olddate) sets up a new key/value pair or replaces any previous one with the key equal to lastdate. The statement
last = localStorage.getItem("lastdate");assigns the fetched value to the variable last. In the code for our simple example, we just display the results. You can also check for something being null and provide a friendlier message.
The command localStorage.removeItem("lastdate") removes the key/value pair with lastdate as the key.
For our simple date application, we set the onClick attribute of each button object to be some JavaScript code. For example:
<button onClick="javascript:store();">Store date info. </button>
causes store() to be invoked when the button is clicked.
You may be wondering if anyone can read any of the saved information in local storage. The answer is that access to each key/value pair in localStorage (and in other types of cookies) is restricted to the Web site that stored the information. This is a security feature.
The Chrome browser allows testing of local storage with HTML5 scripts stored on the local computer. Firefox does not. This means that to test these applications in Firefox, you'll need to upload the file to a server.
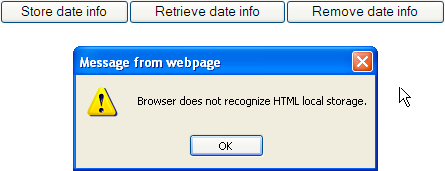
Because browsers may not support local storage or there may be other problems such as exceeding limits set by the user for local storage and cookies, it is a good practice to include some error checking. You can use the JavaScript function typeof to check if localStorage is accepted by the browser:
if (typeof(localStorage)=="undefined")
Figure 7-14 shows the result of loading the date application and clicking on the Store date info button in an old version of Internet Explorer. (By the time you read this book, the latest version of IE may be out and this will not be a problem.)
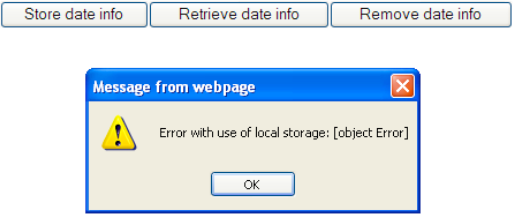
JavaScript also provides a general mechanism for avoiding the display of errors. The compound statement try and catch will try to execute some code and if it doesn't work, go to the catch clause.
try {
        olddate = new Date();
        localStorage.setItem("lastdate",olddate);
alert("Stored: "+olddate);
}
catch(e) {
alert("Error with use of local storage: "+e);}
}If you removed the if (typeof(localStorage) test and tried the code in the old IE, you'd see the message shown in Figure 7-15.
The Table 7-1 shows the complete date application. Remember: you may need to upload this to a server to test it.
Table 7.1. Complete Code for the Date Application
Code | Explanation |
|---|---|
<html> | Opening |
<head> | Opening |
<title>Local Storage test</title> | Complete |
<script> | Opening |
function store() {
| Store function header |
if (typeof(localStorage) == "undefined") {
| Check if localStorage recognized |
alert("Browser does not recognize HTML local storage.");
| Display alert message |
} | Close |
else {
| Else |
try {
| Set up |
olddate = new Date(); | Define new |
localStorage.setItem("lastdate",olddate);
| Store in local storage using the key |
alert("Stored: "+olddate);
| Display message to show what was stored |
} | Close |
Catch(e) {
| Start |
alert("Error with use of local storage: "+e);}
| Display message |
} | Close |
Return false; | Return |
} | Close function |
function remove() {
| Remove function header |
if (typeof(localStorage) == "undefined") {
| Check if |
alert("Browser does not recognize HTML local storage.");
| Display |
} | Close |
else {
| Else |
localStorage.removeItem('lastdate'),
| Remove the item stored using the key |
alert("Removed date stored.");
| Display message indicating what was done |
} | Close clause |
return false; | Return |
} | Close function |
function fetch() {
| Fetch function header |
if (typeof(localStorage) == "undefined") {
| Check if |
alert("Browser does not recognize HTML local storage.");
| Display |
} | Close |
else {
| Else |
                             alert("Stored
"+localStorage.getItem('lastdate'));
| Fetch the item stored under the key |
} | Close clause |
return false; | Return |
} | Close function |
</script> | Close |
</head> | Close |
<body> | Opening |
<button onClick="javascript:store();">Store date info </button> | Button for storing |
<button onClick="javascript:fetch();">Retrieve date info </button> | Button for retrieving, that is, fetching the stored data. |
<button onClick="javascript:remove();">Remove date info </button> | Button for removing |
</body> | |
</html> | Closing |
Combining the Date function with localStorage lets you do many things. For example, you can calculate the elapsed time between a player's current and last use of the application or, perhaps, the player winning two games. In Chapter 5, we used Date to compute the elapsed time using the getTime method. Recall that getTime stores the number of milliseconds from January 1, 1970. You can convert that value to a string, store it, and then when you fetch it back, do arithmetic to calculate elapsed time.
The localStorage key/value pairs last until they are removed, unlike JavaScript cookies, for which you can set a duration.
For simplicity's sake, the first application consists of just one HTML document. You can use this version to create mazes, store and retrieve them, and move the token through the maze. The second version of the application involves two HTML documents. One script is the same as the first application and can be used for building, traversing, and saving mazes as well as traveling each maze. The second script is just for traveling one of a fixed list of saved mazes. A set of radio buttons allows the player to pick from easy, moderate, and hard options, assuming someone has created and saved mazes with the names easymaze, moderatemaze, and hardmaze. These names can be anything you want and as many as you want. You just need to be consistent between what you create in one program and what you reference in the second program.
Now let's address the issue that localStorage just stores character strings. The applications described here must store enough information about the walls so that these walls can be added to the canvas. In the one-document version, the old walls are actually added to whatever is on the canvas. The two-document version erases any old maze and loads the requested one. I use two forms, each with an input field for the name and a submit button. The player chooses the name for saving a maze and must remember it for retrieving.
The data to be stored is a character string, that is, a piece of text. We will create the text holding the information for a set of walls by doing the following for each wall:
Combine the
sx, sy, fx, fyinto an array calledwfor a single wall.Using the
joinmethod, use thewarray to generate a string separated by+signs.Add each of these strings to an array called
allw, for all the walls.Using the
joinmethod again, use theallwarray to produce a string calledsw.
The sw string variable will hold all the coordinates (four numbers for each wall) for all the walls. The next step is to use the localStorage.setItem method to store sw under the name given by the player. We do this using the try and catch construction explained in the last section.
try {
   localStorage.setItem(lsname,sw);
}
catch (e) {
alert("data not saved, error given: "+e);
}This is a general technique that will try something, suppress any error message, and if there is an error, it will invoke the code in the catch block.
Note
This may not always work as you intend. For example, when executing this application on Firefox directly on a computer, as opposed to a file downloaded from a server, the localStorage statement does not cause an error, but nothing is stored. This code does work when the HTML file is downloaded from a server using Firefox and the creation script works both as a local file and when downloaded using Chrome. The two-script version must be tested using a server for each of the browsers.
Retrieving the information works in a corresponding way. The code extracts the name given by the player to set the variable lsname and then uses
swalls = localStorage.getItem(lsname);
to set the variable swalls. If this is not null, we use the string method split to do the opposite of join: split the string on the symbol given (we split at every semicolon) and assign the values to the successive elements of an array. The relevant lines are
wallstgs = swalls.split(";");and
sw = wallstgs.split("+");Next, the code uses the information just retrieved and the fixed information for wall width and wall style to create a new Wall object:
curwall = new Wall(sx,sy,fx,fy,wallwidth,wallstyle);
Finally, there is code to add curwall to both the everything array and the walls array.
Radio buttons are sets of buttons in which only one member of the set can be selected. If the player makes a new choice, the old choice is deselected. They are an appropriate choice for the hard/moderate/easy selection for this application. Here's the HTML markup in the <body> section:
<form name="gf" onSubmit="return getwalls()" >
<br/>
<input type="radio" value="hard" name="level" />Hard <br/>
<input type="radio" value="moderate" name="level" />Moderate <br/>
<input type="radio" value="easy" name="level" />Easy<br/>
<input type="submit" value="GET maze"/><br/>
</form>
Notice that all three input elements have the same name. This is what defines the group of buttons of which only one may be selected. In this case, the markup creates an array called level. The getwalls function will be shown in full in the next section. It is similar to the function in the all-in-one script. However, in this case, the name of the localStorage item is determined from the radio buttons. The code is
for (i=0;i<document.gf.level.length;i++) {
 if (document.gf.level[i].checked) {
     lsname= document.gf.level[i].value+"maze";
        break;
   }
}
The for loop iterates over all the input items. The if test is based on the checked attribute. When it detects a true condition, the variable lsname is constructed from the value attribute of that item, and the break; statement causes execution to leave the for loop. If you want your radio buttons to start with one of the items checked, use code like this:
<input type="radio" value="easy" name="level" checked />
or
<input type="radio" value="easy" name="level" checked="true" />
Now let's take a look at the coding for the maze applications, first the all-in-one script and then the second script of the two-script version.
Table 7-2 shows the functions in the script for creating, saving, and retrieving, and traveling the maze. Notice that much of the invoking of functions is done through event handling: onLoad, onSubmit, addEventListener calls. These do not invoke the functions directly or immediately, but set up the call to be made when the indicated event occurs.
Table 7.2. Functions in the Maze Application
Function | Invoked By / Called By | Calls |
|---|---|---|
| Invoked by action of |
|
|
|
|
|
| |
|
| |
| ||
|
|
|
|
| |
| Invoked by action of an |
|
| Invoked by action of an |
|
| Invoked by action of an | |
| Invoked by action of an |
|
| Invoked by action of | |
| Invoked by action of |
|
Table 7-3 shows the complete code for the maze application, with comments.
Table 7.3. Complete Code for the All-in-one Maze Application
Code | Explanation |
|---|---|
<html> | Opening |
<head> | Opening |
<title>Build maze & travel maze</title> | Complete |
<script type="text/javascript"> | Opening |
var cwidth = 900; | To clear canvas |
var cheight = 350; | To clear canvas |
var ctx; | To hold canvas context |
var everything = []; | To hold everything |
var curwall; | For wall in progress |
var wallwidth = 5; | Fixed wall width |
var wallstyle = "rgb(200,0,200)"; | Fixed wall color |
var walls = []; | Hold all walls |
var inmotion = false; | Flag while wall being built by dragging |
var unit = 10; | Unit of movement for token |
function Token(sx,sy,rad,stylestring,n) {
| Function header to build token |
this.sx = sx; | Set |
this.sy = sy; | ... |
this.rad = rad; | ... |
this.draw = drawtoken; | Set the |
this.n = n; | ... |
this.angle = (2*Math.PI)/n | Compute and set angle |
this.moveit = movetoken; | Set |
this.fillstyle = stylestring; | Set color |
} | Close function |
function drawtoken() {
| Function header drawtoken |
ctx.fillStyle=this.fillstyle; | Set color |
var i; | Index |
var rad = this.rad; | Set |
ctx.beginPath(); | Begin path |
ctx.moveTo(this.sx+rad*Math.cos | Move to first vertex of the token polygon (which is a pentagon) |
for (i=1;i<this.n;i++) {
|
|
ctx.lineTo(this.sx+rad*Math.cos | Specify line to next vertex, setting up the drawing of a side of the pentagon |
} | Close |
ctx.fill(); | Draw token |
} | Close function |
function movetoken(dx,dy) {
| Function header |
this.sx +=dx; | Increment |
this.sy +=dy; | Increment |
var i; | Index |
var wall; | Used for each wall |
for(i=0;i<walls.length;i++) {
| Loop over all walls |
wall = walls[i]; | Extract ith wall |
if (intersect(wall.sx, | Check for intersect. If there is an intersection between the new position of the token and this specific wall |
this.sx -=dx; | ... change |
this.sy -=dy; | ... change |
break; | Leave |
} | Close if true clause |
} | Close |
} | Close function |
function Wall(sx,sy,fx,fy,width,stylestring) {
| Function header to make |
this.sx = sx; | Set up |
this.sy = sy; | ... |
this.fx = fx; | ... |
this.fy = fy; | ... |
this.width = width; | ... |
this.draw = drawAline; | Set |
this.strokestyle = stylestring; | ... |
} | Close function |
function drawAline() {
| Function header |
ctx.lineWidth = this.width; | Set the line width |
ctx.strokeStyle = this.strokestyle; | Set the |
ctx.beginPath(); | Begin path |
ctx.moveTo(this.sx,this.sy); | Move to start of line |
ctx.lineTo(this.fx,this.fy); | Set line to finish |
ctx.stroke(); | Draw the line |
} | Close function |
var mypent = new Token(100,100,20,"rgb(0,0,250)",5); | Set up |
everything.push(mypent); | Add to |
function init(){
| Function header init |
ctx = document.getElementById | Define the |
canvas1 = document.getElementById('canvas'),
| Define |
canvas1.addEventListener('mousedown',
| Set up handling for |
canvas1.addEventListener('mousemove',
| Set up handling for |
canvas1.addEventListener('mouseup',finish,
| Set up handling for |
window.addEventListener('keydown',
| Set up handling for use of the arrow keys |
drawall(); | Draw everything |
} | Close function |
function startwall(ev) {
| Function header |
var mx; | Hold mouse |
var my; | Hold mouse |
if ( ev.layerX || ev.layerX == 0) {
| Can we use |
mx= ev.layerX; | Set |
my = ev.layerY; | Set |
} else if (ev.offsetX | Else can we use |
mx = ev.offsetX; | Set |
my = ev.offsetY; | Set |
} | Close clause |
curwall = new Wall(mx,my,mx+1,my+1,wallwidth,wallstyle); | Create new wall. It is small at this point. |
inmotion = true; | Set |
everything.push(curwall); | Add |
drawall(); | Draw everything |
} | Close function |
function stretchwall(ev) {
| Function header |
if (inmotion) {
| Check if |
var mx; | Hold mouse |
var my; | Hold mouse |
if ( ev.layerX || ev.layerX == 0) {
| Can we use |
mx= ev.layerX; | Set |
my = ev.layerY; | Set |
} else if (ev.offsetX | Else can we use |
mx = ev.offsetX; | Set |
my = ev.offsetY; | Set |
} | Close clause |
curwall.fx = mx; | Change |
curwall.fy = my; | Change |
drawall(); | Draw everything (will show growing wall) |
} | Close if |
} | Close function |
function finish(ev) {
| Function header |
inmotion = false; | Set |
walls.push(curwall); | Add |
} | Close function |
function drawall() {
| Function header |
ctx.clearRect(0,0,cwidth,cheight); | Erase whole canvas |
var i; | Index |
for (i=0;i<everything.length;i++) {
| Loop through everything |
everything[i].draw(); | Draw |
} | Close loop |
} | Close function |
function getkeyAndMove(event) {
| Function header |
var keyCode; | Hold |
if(event == null) {
| If event |
keyCode = window.event.keyCode; | Get |
Window.event.preventDefault(); | Stop default action |
} | Close clause |
else {
| Else |
keyCode = event.keyCode; | Get |
event.preventDefault(); | Stop default action |
} | Close clause |
switch(keyCode) {
| Switch on |
case 37: | If left arrow |
mypent.moveit(-unit,0); | Move back horizontally |
break; | Leave switch |
case 38: | If up arrow |
mypent.moveit(0,-unit); | Move up screen |
break; | Leave switch |
case 39: | If right arrow |
mypent.moveit(unit,0); | Move left |
break; | Leave switch |
case 40: | If down arrow |
mypent.moveit(0,unit); | Move down screen |
break; | Leave switch |
Default: | Anything else |
window.removeEventListener('keydown',
| Stop listening for keys. Assume player trying to save to local storage or retrieve from local storage. |
} | Close switch |
Drawall(); | Draw everything |
} | Close function |
Function intersect(sx,sy,fx,fy,cx,cy,rad) {
| Function header intersect |
var dx; | For intermediate value |
var dy; | For intermediate value |
var t; | For expression in |
var rt; | For holding distance squared |
dx = fx-sx; | Set |
dy = fy-sy; | Set y difference |
t =0.0-((sx-cx)*dx+(sy-cy)*dy)/ | Taking the formula for the distance squared from each point to |
if (t<0.0) {
| If closest is at |
t=0.0; } | Check at 0 (this will be further) |
else if (t>1.0) {
| If closest is at |
t = 1.0; | Check at 1 (this will be further) |
} | Close clause |
dx = (sx+t*(fx-sx))-cx; | Compute difference at this value of |
dy = (sy +t*(fy-sy))-cy; | Compute difference at this value of |
rt = (dx*dx) +(dy*dy); | Compute distance squared |
if (rt<(rad*rad)) {
| Compare to |
Return true; } | Return true |
else {
| Else |
Return false;} | Return false |
} | Close function |
function savewalls() {
| Function |
var w = []; | Temporary array |
var allw=[]; | Temporary array |
var sw; | Hold final string |
var onewall; | Hold intermediate string |
var i; | Index |
var lsname = document.sf.slname.value; | Extract player's name for the local storage |
for (i=0;i<walls.length;i++) {
| Loop over all walls |
w.push(walls[i].sx); | Add |
w.push(walls[i].sy); | Add |
w.push(walls[i].fx); | Add |
w.push(walls[i].fy); | Add |
onewall = w.join("+");
| Make a string |
allw.push(onewall); | Add to |
w = []; | Reset |
} | Close loop |
sw = allw.join(";");
| Now make |
try {
| Try |
localStorage.setItem(lsname,sw); | Save |
} | End try |
catch (e) {
| If a catchable error |
alert("data not saved,
| Display message |
} | End catch clause |
return false; | Return false to avoid refresh |
} | Close function |
function getwalls() {
| Function header getwalls |
var swalls; | Temporary storage |
var sw; | Temporary storage |
var i; | Index |
var sx; | Hold the |
var sy; | Hold the |
var fx; | Hold the |
var fy; | Hold the |
var curwall; | Hold walls being created |
var lsname = document.gf.glname.value; | Extract player's name for storage to be retrieved |
swalls=localStorage.getItem(lsname); | Get the storage |
if (swalls!=null) {
| If something was fetched |
wallstgs = swalls.split(";");
| Split to make an array |
for (i=0;i<wallstgs.length;i++) {
| Loop through this array |
sw = wallstgs[i].split("+");
| Split individual item |
sx = Number(sw[0]); | Extract 0th value and convert to number |
sy = Number(sw[1]); | ...1st |
fx = Number(sw[2]); | ...2nd |
fy = Number(sw[3]); | ...3rd |
curwall = new Wall(sx,sy,fx,fy,wallwidth,wallstyle); | Create new |
walls.push(curwall); | Add to |
everything.push(curwall); | Add to |
} | Close loop |
drawall(); | Draw everything |
} | Close if not null |
Else {
| Was null |
alert("No data retrieved.");
| No data |
} | Close clause |
window.addEventListener('keydown',
| Set up |
return false; | Return false to prevent refresh |
} | Close function |
</head> | End |
<body onLoad="init();" > | Start |
<canvas id="canvas" width="900" height="350"> |
|
Your browser doesn't support the HTML5 element canvas. | Warning for certain browser. |
</canvas> | Close |
<br/> | Line break |
Press mouse button down, drag | Instructions |
Use arrow keys to move token. <br/> | Instructions and line break |
Pressing any other key will stop key | Instructions |
<form name="sf" onSubmit="return savewalls()" > | Form tag, set up call to savewalls |
To save your maze, enter in a name and | Instructions |
Name: <input name="slname" value="maze_name" type="text"> | Label and input field |
<input type="submit" value="SAVE WALLS"/> |
|
</form> | Close |
<form name="gf" onSubmit="return | Form tag, set up call to getwalls |
To add old walls, enter in the name and | Instructions |
Name: <input name="glname" value="maze_name" type="text"> | Label and input field |
<input type="submit" value="GET |
|
</form> | Close |
</body> | Close |
</html> | Close html |
The localStorage data can be accessed by a different application from the one that created the data, as long as it is on the same server. This is a security feature, as mentioned previously, restricting readers of local storage to scripts on the same server.
The second script is based on this feature. Table 7-4 shows the functions calling or being called; it is a subset of the previous one.
Table 7.4. Functions in the Travel Maze Script
Function | Invoked By / Called By | Calls |
|---|---|---|
| Invoked by action of |
|
|
|
|
|
| |
|
| |
|
| |
|
|
|
|
| |
| Invoked by action of an |
|
| Invoked by action of |
|
The functions are exactly the same as in the all-in-one script with one exception, the getwalls function, so I've only commented the new or changed code. This application also has radio buttons in place of the form input fields. Table 7-5 shows the complete code for the travelmaze application.
Table 7.5. Complete Code for the Travel Maze Script
Code | Explanation |
|---|---|
<html> | |
<head> | |
<title>Travel maze</title> | Travel maze |
<script type="text/javascript"> | |
var cwidth = 900; | |
var cheight = 350; | |
var ctx; | |
var everything = []; | |
var curwall; | |
var wallwidth = 5; | |
var wallstyle = "rgb(200,0,200)"; | |
var walls = []; | |
var inmotion = false; | |
var unit = 10; | |
function Token(sx,sy,rad,stylestring,n) {
| |
this.sx = sx; | |
this.sy = sy; | |
this.rad = rad; | |
this.draw = drawtoken; | |
this.n = n; | |
this.angle = (2*Math.PI)/n | |
this.moveit = movetoken; | |
this.fillstyle = stylestring; | |
} | |
function drawtoken() {
| |
ctx.fillStyle=this.fillstyle; | |
ctx.beginPath(); | |
var i; | |
var rad = this.rad; | |
ctx.beginPath(); | |
ctx.moveTo(this.sx+rad*Math.cos | |
for (i=1;i<this.n;i++) {
| |
ctx.lineTo(this.sx+rad*Math.cos | |
} | |
ctx.fill(); | |
} | |
function movetoken(dx,dy) {
| |
this.sx +=dx; | |
this.sy +=dy; | |
var i; | |
var wall; | |
for(i=0;i<walls.length;i++) {
| |
wall = walls[i]; | |
if (intersect(wall.sx,wall.sy, | |
this.sx -=dx; | |
this.sy -=dy; | |
break; | |
} | |
} | |
} | |
function Wall(sx,sy,fx,fy,width,stylestring) {
| |
this.sx = sx; | |
this.sy = sy; | |
this.fx = fx; | |
this.fy = fy; | |
this.width = width; | |
this.draw = drawAline; | |
this.strokestyle = stylestring; | |
} | |
function drawAline() {
| |
ctx.lineWidth = this.width; | |
ctx.strokeStyle = this.strokestyle; | |
ctx.beginPath(); | |
ctx.moveTo(this.sx,this.sy); | |
ctx.lineTo(this.fx,this.fy); | |
ctx.stroke(); | |
} | |
var mypent = new Token(100,100,20,"rgb(0,0,250)",5); | |
everything.push(mypent); | |
function init(){
| |
ctx = document.getElementById('canvas')
| |
window.addEventListener('keydown',
| |
drawall(); | |
} | |
function drawall() {
| |
ctx.clearRect(0,0,cwidth,cheight); | |
var i; | |
for (i=0;i<everything.length;i++) {
| |
everything[i].draw(); | |
} | |
} | |
function getkeyAndMove(event) {
| |
var keyCode; | |
if(event == null) | |
{
| |
keyCode = window.event.keyCode; | |
window.event.preventDefault(); | |
} | |
else | |
{
| |
keyCode = event.keyCode; | |
event.preventDefault(); | |
} | |
switch(keyCode) | |
{
| |
case 37: //left arrow | |
mypent.moveit(-unit,0); | |
break; | |
case 38: //up arrow | |
mypent.moveit(0,-unit); | |
break; | |
case 39: //right arrow | |
mypent.moveit(unit,0); | |
break; | |
case 40: //down arrow | |
mypent.moveit(0,unit); | |
break; | |
default: | |
window.removeEventListener | |
} | |
drawall(); | |
} | |
function intersect(sx,sy,fx,fy,cx,cy,rad) {
| |
var dx; | |
var dy; | |
var t; | |
var rt; | |
dx = fx-sx; | |
dy = fy-sy; | |
t =0.0-((sx-cx)*dx+(sy-cy)*dy)/((dx*dx)+(dy*dy)); | |
if (t<0.0) {
| |
t=0.0; } | |
else if (t>1.0) {
| |
t = 1.0; | |
} | |
dx = (sx+t*(fx-sx))-cx; | |
dy = (sy +t*(fy-sy))-cy; | |
rt = (dx*dx) +(dy*dy); | |
if (rt<(rad*rad)) {
| |
return true; } | |
else {
| |
return false;} | |
} | |
function getwalls() {
| |
var swalls; | |
var sw; | |
var i; | |
var sx; | |
var sy; | |
var fx; | |
var fy; | |
var curwall; | |
var lsname; | |
for
(i=0;i<document.gf.level.length;i++) {
| Iterate through the radio buttons in the gf form, level group |
if (document.gf.level[i].checked) {
| Is this radio button checked? |
lsname= document.gf.level[i].value+"maze"; | If so, construct the local storage name using the value attribute of the radio button element |
break; | Leave the |
} | Close if |
} | Close for |
swalls=localStorage.getItem(lsname); | Fetch this item from local storage |
if (swalls!=null) {
| If it is not null, it is good data |
wallstgs = swalls.split(";");
| Extract the string for each wall |
walls = []; | Removes any old walls from walls array |
everything = []; | Removes any old walls from |
everything.push(mypent); | Do add the pentagon-shaped token called |
for (i=0;i<wallstgs.length;i++) {
| Proceed to decode each wall. The remaining code is the same as the all-in-one application. |
sw = wallstgs[i].split("+");
| |
sx = Number(sw[0]); | |
sy = Number(sw[1]); | |
fx = Number(sw[2]); | |
fy = Number(sw[3]); | |
curwall = new Wall(sx,sy,fx,fy,wallwidth,wallstyle); | |
walls.push(curwall); | |
everything.push(curwall); | |
} | |
drawall(); | |
} | |
else {
| |
alert("No data retrieved.");
| |
} | |
window.addEventListener('keydown',
| |
return false; | |
} | |
</script> | |
</head> | |
<body onLoad="init();" > | |
<canvas id="canvas" width="900" height="350"> | |
Your browser doesn't support the HTML5 element canvas. | |
</canvas> | |
<br/> | |
Choose level and click GET MAZE button to | |
<form name="gf" onSubmit="return getwalls()" > | |
<br/> | |
<input type="radio" value="hard" name="level" | Set up radio button, common level, value hard |
<input type="radio" value="moderate" name="level" | Set up radio button, common level, value moderate |
<input type="radio" value="easy" name="level" | Set up radio button, common level, value easy |
<input type="submit" value="GET maze"/><br/> | |
</form> | |
<p> | |
Use arrow keys to move token. | |
</p> | |
</body> | |
</html> |
There are a number of ways you can make this application your own.
Some applications in which the user places objects on the screen by dragging limit the possibilities by doing what is termed snapping the end points to grid points, perhaps even limiting the walls for a maze to be strictly horizontal or vertical.
The second application has two levels of user: the creator of the mazes and the player who attempts to traverse the mazes. You may want to design very intricate mazes, and for that you would want an editing facility. Another great addition would be a timing feature. Look back at the timing for the memory game in Chapter 5 for ways to calculate elapsed time.
Just as we added a video treat for the quiz show in Chapter 6, you could play a video when someone completes a maze.
The ability to save to local storage is a powerful feature. For this, and any game or activity that takes a fair amount of time, you may want to add the ability to save the current state. Another common use for local storage is to save the best scores.
Do understand that I wanted to demonstrate the use of local storage for intricate data, and these applications did do that. However, you may want to develop maze programs using something other than local storage. To build on this application, you need to define the sequence of starting and stopping points, four numbers in all, for each wall, and define walls accordingly. Look ahead to the word list implemented as an external script file in the Hangman game in Chapter 9.
This chapter and the previous one demonstrated events and event handling for mouse, keys, and timing. New devices provide new events, such as shaking a phone or using multiple touches on a screen. With the knowledge and experience you've acquired here, you'll be able to put together many different interactive applications.
The first application is complete in one HTML document, buildmazesavelocally.html. The second application uses two files, buildmazes.html and travelmaze.html. The buildmazesavelocally.html and buildmaze.html are identical, except for the titles. All three files are available on the friends of ED site. Please note that travelmaze.html will not work until you create mazes and save them using local storage on your own computer.
To test the save and restore feature, you need to load the file to a server for it to work using Firefox and, perhaps, other browsers. It works locally using Chrome. The two HTML documents for the two-script version must both be uploaded to a server to be tested.
Some people may limit the use of local storage and cookies. There are differences between these constructs. To use any of this in a production application requires considerable work. The ultimate fall-back is to store information on the server using a language such as php.
In this chapter, you learned how to implement a program to support the building of a maze of walls and to store it on the local computer. You also learned how to create a maze travel game. We used the following programming techniques and HTML5 features:
programmer-defined objects
capturing key strokes; that is, setting up event handling for key presses, and deciphering which key was pressed
localStoragefor saving the layout of the walls of the maze on the player's computertryandcatchto check if certain coding is acceptablethe
joinmethod for arrays and thesplitmethod for stringsmouse events
mathematical calculations for determining collisions between the token and the walls of the maze
radio buttons to present a choice to the player.
The use of local storage was fairly intricate for this application, requiring the encoding and decoding of the maze information. A simpler use might be for storing the highest score or the current score on any game. You can go back to previous chapters and see if you can incorporate this feature. Remember that localStorage is tied to the browser. In the next chapter, you will learn how to implement the rock-paper-scissors game, and how to incorporate audio in your application.