C H A P T E R 3
Using SharePoint to Store Data
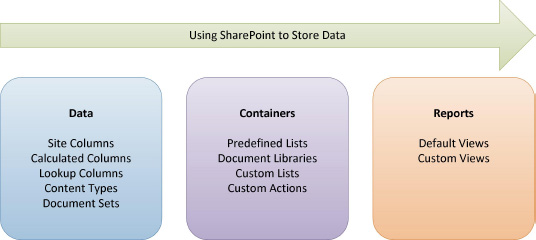
SharePoint provides containers called lists to store information. Microsoft provides many predefined list templates that you can use to build powerful applications in SharePoint. SharePoint also has a generic list that can be customized to fit specific requirements. Libraries are special kinds of lists in which each list item refers to a file. Data in SharePoint is organized by creating different types of content that consists of columns or data. Once the data is stored in SharePoint, custom views of the data can be created.
This chapter covers the different types of lists and will take you through exercises in creating and customizing these. Mastering how to use lists to organize and store data will enable you to build robust web applications.
You will learn about the following topics in this chapter:
- Customizing lists and libraries
- Creating site columns and content types
- Adding custom actions
- Creating and modifying views
- Saving lists as templates
- Using Lists and Libraries
When you want to store data in SharePoint, you create a list. You can use one of the predefined lists or create one of your own. Lists contain columns (called site columns) of data. In database terms, each list (table) contains list items (rows) with one or more columns (fields). Libraries are a special type of list. Whereas a list contains list items, libraries contain files. A field in a list is more commonly referred to as metadata in a document library because it is used to describe the associated file. Although you can attach files to list items, the file is not the main point of the list item. It is just another piece of information associated with that list item. In a library, the file itself is the main piece of data in the library.
![]() Note Metadata is data that describes other data. In a list, each column is considered a part of the data. In a document library, the file is the data, and the other properties (such as Title, Created By, and Modified Date) are the metadata that describes the data.
Note Metadata is data that describes other data. In a list, each column is considered a part of the data. In a document library, the file is the data, and the other properties (such as Title, Created By, and Modified Date) are the metadata that describes the data.
You can create most lists and libraries either in the browser or in SharePoint Designer 2010, but you have much more control of your list creations with SharePoint Designer. This chapter will help you determine when to use the browser and when to use SharePoint Designer.
List Templates
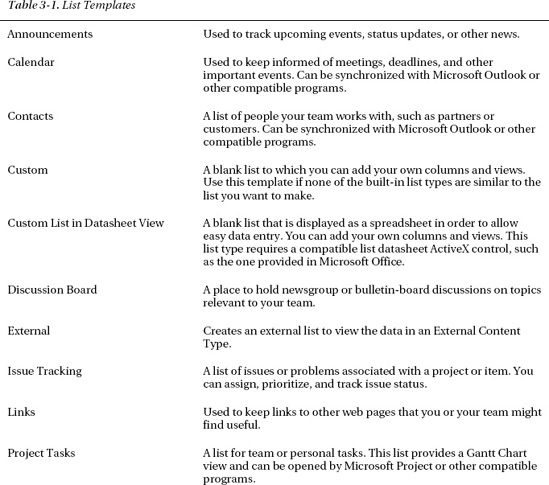
You create lists by using templates. Microsoft provides several templates that have common business or collaborative functionality. If a premade template does not fit what you need to do, you can use SharePoint’s generic template, which allows you to build a list to your specifications. Once you create your own custom lists, you can save them as your own list templates, as you’ll see later in this chapter.
Table 3-1 lists some of the supplied list templates and their uses.

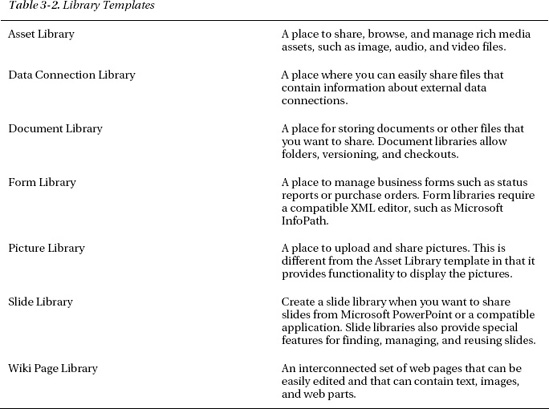
Library Templates
As mentioned, a library is different from a list in that its focus is on the file contained in the library. Table 3-2 is a list of provided library templates.
![]() Note Microsoft also provides several lists and libraries with predefined functionality—but only if you first create a site from a specific site template. For example, if you create a Group Work Site, you will see Circulations, Holidays, Time Card, Phone Call Memo, and Whereabouts lists created for you. One of the reasons these are not supplied as templates is because of the dependencies between the different lists in the template. A Visio Process Repository site is another site template that contains a unique document library with the following six content types attached: Basic Flowchart (Metric), Basic Flowchart (US units), BPMN Diagram (Metric), BPMN Diagram (US units), Cross Functional Flowchart (Metric), and Cross Functional Flowchart (US units).
Note Microsoft also provides several lists and libraries with predefined functionality—but only if you first create a site from a specific site template. For example, if you create a Group Work Site, you will see Circulations, Holidays, Time Card, Phone Call Memo, and Whereabouts lists created for you. One of the reasons these are not supplied as templates is because of the dependencies between the different lists in the template. A Visio Process Repository site is another site template that contains a unique document library with the following six content types attached: Basic Flowchart (Metric), Basic Flowchart (US units), BPMN Diagram (Metric), BPMN Diagram (US units), Cross Functional Flowchart (Metric), and Cross Functional Flowchart (US units).
Creating Lists
As mentioned earlier in the chapter, you can create lists either in the browser or by using SharePoint Designer. After a list is created, you can do the following:
- Add, modify, or delete columns
- Modify list- or item-level permissions
- Add, modify, or delete content types
- Create custom views of the list data
- Create a list template from the customized list
EXERCISE 3-1. CREATE A LIST IN THE BROWSER
In this exercise, you will create a new list in the browser, add site columns and content types, and then view the list in SharePoint Designer. Make sure you have a fresh, blank site to begin with. If you need to create a new site, make sure you create it by using the Blank Site template. If you plan on completing the other exercises in this chapter, don’t delete the list, because you will build on it as you progress through the chapter.
Follow these steps to create a list in the browser:
- Open your site in the browser.
- Click Site Actions
 More Options.
 - When you are prompted by the Create dialog box, click the Custom List icon.
- In the Name field to the right of the icons, type Purchases and then click the Create button.
- Once your new list is created, you will be automatically redirected to the All Items View page of your list. You will also notice the List Tools menu appear on the Ribbon. Click the List Settings button. In the Columns area, click the Create Column.
- Complete the form with the following values:
- Column Name: Purchase Date
- Type: Date and Time
- Require That This Column Has Information: No
- Enforce Unique Values: No
- Date and Time Format: Date Only
- Default Value: Today’s Date
- Add to Default View: Selected
- Click OK.
- Create a number column with all of the defaults:
- Column Name: Quantity
- Type: Number
- Create a currency column with the name Price and keep all of the defaults:
- Column Name: Price
- Type: Currency
- Click the Purchases List link in the left navigation pane. You will now see the default All Items view with all of the columns you defined.
EXERCISE 3-2. CREATE A LIST BY USING SHAREPOINT DESIGNER 2010
Using the same blank site that you started with in the preceding exercise, you will create a Contacts list to keep track of your contacts:
- Open your site in SharePoint Designer.
- From the Ribbon’s Site menu, choose SharePoint List Contacts.
- Type Contacts in the Name field.
- Type A list to store our contacts’ addresses in the Description field.
- Click OK. The List Properties pane appears.
Configuring List Properties
After you create your list, you can configure and customize it. From permission settings to versioning, lists and document libraries are very flexible containers for storing information. With SharePoint Designer 2010, it is even easier than before to rapidly develop business applications without code.
As soon as you create a list in SharePoint Designer, you are presented with its settings page. As you can see in Figure 3-1, the page is divided into the following sections, which you can customize:
- List Information
- Customization
- Settings
- Content Types
- Views
- Forms
- Workflows
- Custom Actions
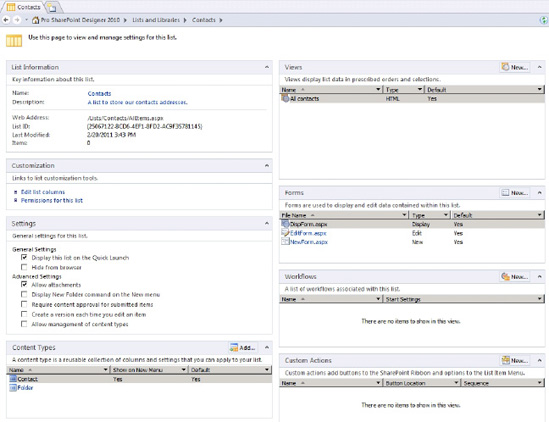
Figure 3-1. Contacts settings page in SharePoint Designer 2010
List Information:
The List Information area contains the name and description you gave the list when you created it. These can be edited by clicking the Name and Description links. This area also contains the following settings:
- Web Address: The site - relative URL of the default view (which is typically the All Items view)
- List ID: A number that uniquely identifies the list
- Last Modified: The date that an item or setting was last modified
- Items: A count of all items in the list, including folders
Customization
In this area, you can edit the fields (list columns) in the list and set the list’s permissions. When you click the Permissions for This List link, a browser window will open to the List Permissions Settings window. Permissions can be set only in the browser.
Settings
The Settings pane, shown in Figure 3-2, provides a place to set general and advanced settings for the list. Although most of these settings can also be set in the browser, there is one setting unique to SharePoint Designer: Hide from Browser.
Suppose you want to store Form templates in a document library and access those through web parts on your site, but you don’t want users directly interacting with the list. SharePoint Designer allows you to hide a list from the browser with just one click. You can still access content in the list, but it is hidden from the navigational controls on the site.
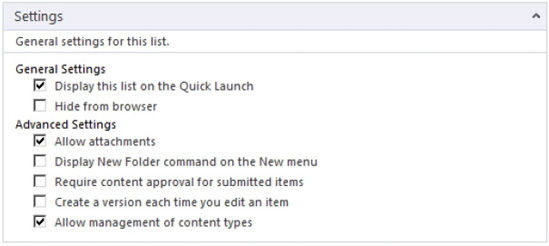
Figure 3-2. Settings pane.
Browser Settings
Although you can set various advanced settings in SharePoint Designer, such as versioning or content type management, there are some that you can set only in the browser (for instance, audience targeting). SharePoint Designer provides an Administration Web Page button on its Ribbon menu to take you directly to the list’s web settings page.
Managing Data
Because this chapter is about using SharePoint to store data, you will use the same scenario throughout this chapter, building on it as you move through the different features available to you in SharePoint to manage data through lists.
![]() Scenario The building maintenance department of the Black Box Company has decided to set up a SharePoint site to help manage the department’s daily work orders and to provide the rest of the company information on the building maintenance services available to the company.
Scenario The building maintenance department of the Black Box Company has decided to set up a SharePoint site to help manage the department’s daily work orders and to provide the rest of the company information on the building maintenance services available to the company.
Using Content Types
Whenever you create a new Microsoft Word document, it contains various properties. These properties (for example, author, title, subject, keywords, and comments) are used to describe the Word document. These fields and more are present in every Word document. They are index fields that can be used for searching. In other words, they are the key fields to help locate the document during a search. Furthermore, these same fields also appear in every other Microsoft Office application document. Each application’s document contains these same key fields. So, if you wanted to organize all of these documents that contain the same metadata but were each a different type of data, you could say that you have Word document types, Excel document types, and PowerPoint document types.
In SharePoint, a set of metadata about a piece of information is called a content type. Content types enable you to quickly replicate a set of site columns in a list or describe the properties of a document. By using content types, you can keep your data organized and structured. Content types, by definition, define the data they are associated with.
Microsoft defines a SharePoint content type as the attributes of a list item, a document, or a folder. Each content type can specify the following:
- Properties
- Metadata
- Workflows
- Information management policies
- Document templates
- Document conversions to make available
- Other custom features.
In our scenario, the Black Box Company’s maintenance department wants to create a library to store all of their departmental documents. These include maintenance documents, repair instructions, schedules, and service contracts. Each type of document will contain the following common departmental key fields that will enable a search to find them faster:
- Author
- Publish Date
- Subject
- Category (for example, electrical or plumbing)
- Keywords
Even though all of the documents share these common fields, they also need other fields specific to their document type. For example, a repair instruction would need the name of the piece of equipment to repair, and a service contract would have a start and end date. How can we manage each type of information in the same library?
SharePoint allows us to create individual content types, which inherit from a parent content type. So in our example, you could create a Department Document content type that contained all of the specific site columns, and then create individual content types for each type of content stored in the library, that would inherit its base fields from the Department Document content type. So, if youwere to create a Service Contract content type, youwould set its parent as the Department Document and then add any additional site columns, such as Start Date and End Date, to make up a Service Contract content type.
Once you have created all of the content types, you can then assign them to a list. You can choose whether the content type will appear in the New menu in the list or library.
You can do many things with content types, including these:
- You can create special views of the list, filtering on content type.
- You can associate document templates with a content type.
- You can define a content type at a site collection level, and all subsites can inherit from that content type.
- You can set the content type as read-only so it can’t be changed.
Adding and Modifying Content Types
SharePoint provides an easy way to add predefined content types to lists by including a Content Type Picker. To use the quick Content Type Picker, click the Add button on the Content Types pane in the settings window.
EXERCISE 3-4. CREATE NEW SITE COLUMNS.
For this exercise, you need to create a department list. To begin, you will create new departmental site columns and a content type called Department. For the Department content type, you want the following fields:
- Department Name
- Department Location
- Manager Name and Contact Information
- Mail Routing Code
- Comments
You can use some existing site columns, but there isn’t an existing column for the mail routing code or manager name. So you will create new site columns to be used in the Department content type:
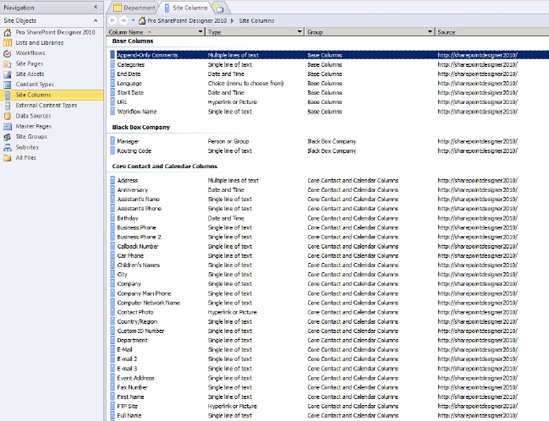
In the Navigation pane, click Site Columns.
- Click New Column and then select Single Line of Text from the drop-down menu. The Create a Site Column dialog box opens, as shown in Figure 3-4.
- Type RoutingCode (no space between words) in the Name field.
- Type The Black Box Company mail routing code. in the Description box.
- Because this is the first site column you have created, you will create a new site column group. Click the New Group radio button and then type Black Box Company in the text box.
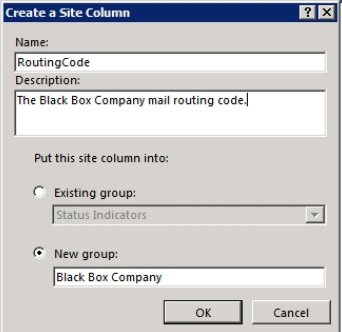
- Click OK to save your new site column.
- You should now see the new site column created with its name highlighted. If the name is not highlighted, click once on the name, and then click Rename from the Ribbon menu or press F2.
- Add the space now between the words Routing and Code for display purposes.
- Click anywhere outside the Column Name field to quit editing.
- Click the Push Changes to List button on the Ribbon menu.
- Click New Column and pick Person or Group.
- Type Manager for the name.
- Type Black Box Co. Department Manager in the Description box.
- Because you have already created the new group, select Black Box Company from the Existing Group drop-down list.
- Click OK to save.
- Now that you have the Manager column created, you need to configure it to provide the functionality you need. Make sure the Manager field is selected and then press the Column Settings button on the Ribbon menu. The Column Editor dialog box opens, as shown in Figure 3-5.
- Because you want this field to contain only manager contact information, change the Allow Selection Of option to People Only.
- In the Choose From section, click All Users.

Figure 3-5. Column Editor dialog box
- You want to allow blank values just in case you don’t know who the manager is when you are setting up a new department, so select the Allow Blank Values check box.
- Click OK to save.
- Click the button labeled Push Changes to List to save your new site column.
Now that you have created the site column, you will create the new content type.
EXERCISE 3-5. CREATE THE NEW CONTENT TYPE
In this exercise, you will create a new department Content Type for the Black Box Company.
- In the Navigation pane, click Content Types.
- Click Content Type on the New section of the Ribbon Menu.
- In the Create a Content Type dialog box that opens, type Department in the Name field.
- Type Black Box Company department content type. in the Description box.
- The parent content type is important because all content types inherit columns from their parents. Because this is a custom list, choose List Content Types from the first drop-down list, labeled Select Parent Content Type From. Choose the Item option from the second drop-down list, labeled Select Parent Content Type.

Figure 3-6. Create a Content Type dialog box
- Because you are creating your own custom content types, you want to organize them into your own group. Click the New Group radio button and type Black Box Company in the box provided.
- Press OK to save.
- You should now see your content type under the Black Box group. Click the Department content type.
- In the Customization pane, click Edit content type columns.
SharePoint Designer can’t configure everything about a content type. Because of the architecture of SharePoint, some features are available only in the browser. If you select the Administration Web Page button on the Ribbon menu, you will see other features that are available to content types such as workflow settings and information management policy settings.
By being able to associate a workflow with a content type, you can ensure that business processes are initiated every time an item or document of that particular type is created. For example, you could require approval every time a new department is created. Associating an approval workflow with this content type would ensure that the requirement is met.
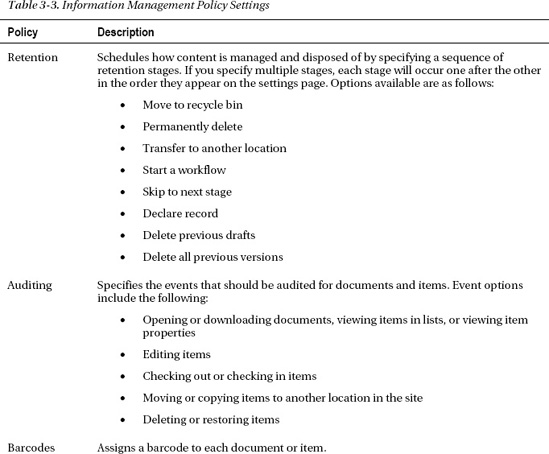
Other options available in the browser are the Information management policy settings. These settings can help you manage the information you store in SharePoint. Table 3-3 lists the settings available.
Now that you have created the content type, you need to add the columns that will make up the content type. You will use existing site columns and the ones you just created.
EXERCISE 3-6. ADD SITE COLUMNS TO THE CONTENT TYPE.
In this exercise, you will add Site Columns to the Department Content Type that you created previously.
- In the Navigation pane, click Content Types.
- Click the Department content type under the Black Box Company group heading.
- In the Customization pane, click Edit Content Type Columns. You will use the Title field as the Department name and change the Display name later.
- From the Ribbon menu, click Add Existing Site Column. The Site Columns Picker opens, as shown in Figure 3-7.
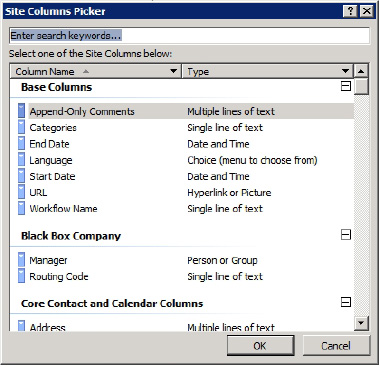
Figure 3-7. Sites Column Picker.
- For this content type, you will use some fields from the Core Contact and Calendar Columns group. Click Location under the Core Contact and Calendar Columns section and then click OK to add the Location column.
- For the manager’s name, you will use your Manager site column. Find the Manager column under the Black Box Co. group, select the column, and click OK.
- Click Add Existing Site Column.
- Do the same thing with the Routing Code column.
- For the comments section, use the Comments field from the Core Document columns. Hint: Type Comments in the search box to help you find the correct one.
- After you have added all the columns to the content type, click the Push Changes to Sites and Lists button.
Now that you have your content type created, it is time to create the Department list.
EXERCISE 3-7. CREATE A CUSTOM LIST.
For this exercise, you will create a new Department list based on the Department Content Type that you created.
- In the Navigation pane, click Lists and Libraries.
- Click Custom List from the Ribbon menu.
- In the “Create list or document library” dialog box that opens, name the list Department and type Black Box Company department list in the Description box.
- Click OK to save.
- If the settings window does not automatically open, click the name of the new list to open it. After the settings window comes up for your new Department list, you can begin to configure it.
- You don’t want folders in the list, so suppress displaying the new folder in the menu. Make sure the Display New Folder Command on the New Menu check box is deselected in the Advanced Settings section.
- Under Advanced Settings, also deselect the Allow Attachments check box.
- Now that you have created the list, you can add your custom content type.
- In the Advanced Settings section, select the Allow Management of Content Types check box.
- In the Content Types pane of the settings window, click the Add button.
- Select Department and then press OK to add the Department content type to the list.
- Now you have three content types in this list. You need only one. Highlight the Folder content type and click the Delete button on the Ribbon menu. Highlight the Item content type and click the Delete button again. (Remember, your Department content type is based on the Item content type.)
- Press Ctrl+S to save your changes.
- You have one more minor change to the list columns. Remember that you used the Title field as the Department name in your Department site collection. Now that you have created a list, you can modify the column name to make it more descriptive.
- In the Customization pane, click the Edit List Columns link.
- Click the Title column name. It should go into Edit mode.
- Type Department Name in the Column Name field..
- Click outside the field to exit Edit mode.
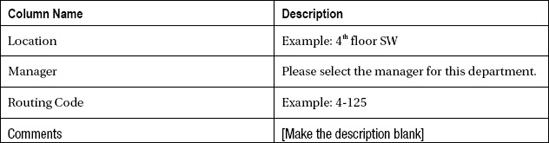
- Edit the following column descriptions by highlighting the field name and clicking the Column Settings button.
- Press Ctrl+S to save your changes. Your Department list is now ready to use.
![]() Note Every list or document library has key identity and administrative fields that cannot be removed, such as Title, ID, Created By, and Modified By. In a document library, the Name field is created and refers to the name of the file. The Title field is special in that it contains a drop-down context menu that you can use to work with individual list items.
Note Every list or document library has key identity and administrative fields that cannot be removed, such as Title, ID, Created By, and Modified By. In a document library, the Name field is created and refers to the name of the file. The Title field is special in that it contains a drop-down context menu that you can use to work with individual list items.
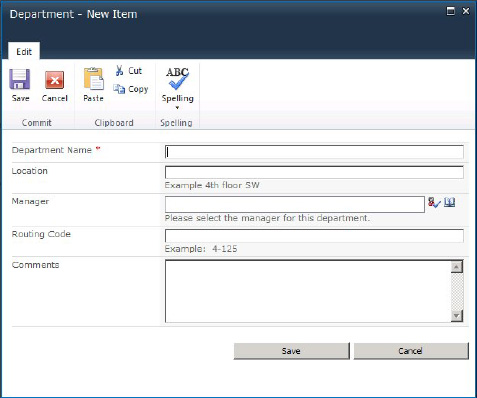
Browse to your site and look at the Department list. Open a New Item form and notice the fields and their descriptions, as shown in Figure 3-8. Go ahead and create a department list item and save it.
Using Special Site Columns
SharePoint provides a couple of Site Column types that have special functionality: the calculated column and the lookup column.
Calculated Columns
The calculated column is able to display data that is calculated from data already included in the list. It uses formulas similar to Excel and Access. Calculated columns can contain functions, column references, operators, and constants, as well as IF statements.
EXERCISE 3-8. CREATE A CALCULATED COLUMN
In this exercise, you will create a Calculated Column in the Purchases list to see how you can create dynamic data in your lists.
- In SharePoint Designer, click Lists and Libraries in the Navigation pane.
- Click the Purchases option.
- In the Customization pane, click Edit List Columns.
- On the Ribbon menu, make sure the Add to Default View button is highlighted.
- You now want to create a currency column that will automatically calculate the total spent. Add a new Calculated column by clicking the Add New Column button and selecting Calculated (Calculation Based on Other Columns).
- In the Column Editor that pops up, find the Quantity column name and select it.
- Click the Add to Formula button.
- In the Formula field, click after the field name and type *.
- Click the Price column and click Add to Formula. Your formula should look like Figure 3-9.
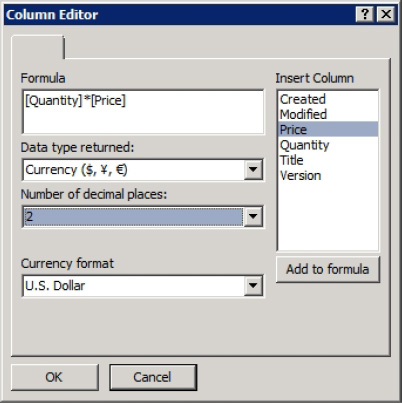
Figure 3-9. Calculated column
- Change the Data Type Returned drop-down list to Currency.
- Change the Number of Decimal Places drop-down list to 2.
- Set the Currency Format drop-down list to U.S. Dollar.
- Click the OK button.
- Click the Column Name and change it to Total Price.
- Press Ctrl+S to save your changes.
- Close the list settings page and click the Preview in Browser button.
- Click the Purchases link on the left Navigation and add a new purchase.
- After you have added a few purchases, look at the All Items view of your Purchases list. Notice that the total has been calculated automatically.
- Now, edit one of the list items. Change the price to something different.
- Click Save. The total price for that item updates..
Lookup Columns
A lookup column is a Choice Column type that gets its values from another list. This makes lists more relational and allows you to use the same data in multiple lists without having to synchronize data manually. A lookup column stores a reference to its parent list item and not the actual data.
EXERCISE 3-9. CREATE AND USE A LOOKUP COLUMN
In this exercise, you will create a list that will track repair requests that the maintenance department receives. You will use the standard Issues list and then add a lookup column to the Department list.
- In SharePoint Designer, click Lists and Libraries in the Navigation pane.
- Click the SharePoint List button and then Issue Tracking from the drop-down menu.
- Name the list Repair Requests and click OK.
- Click the Repair Requests list link.
- Click the Edit List Columns link in the Customization pane.
- Click Add New Site Column and then Lookup (Information Already on This Site).
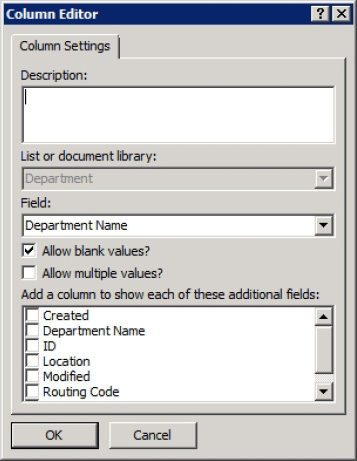
- When the Column Editor opens, select the Department list from the List or Document Library drop-down (see Figure 3-10).
Figure 3-10. Column Editor
- Select Department Name from the Field drop-down list..
- Click OK.
- Change the name to Department.
- Click the Category.
- Make the choices the following values:
- (1) General
- (2) Electrical
- (3) Plumbing
- (4) Maintenance
- (5) Preventive
- Make (1) General the default.
- Click OK.
- Press Ctrl+S to save your changes.
- Close the Repair Requests edit window and click Preview in Browser.
- Navigate to the Department list and add some departments to your list. (You only need the Department name.)
- Once you have finished adding departments, navigate to the Repair Requests list.
- Click the List Settings menu item.
- In the Columns section, click Column Ordering.
- Move the Department column to the second position.
- Click OK to save your changes.
- Go back to view your list and click Add New Item. The Department drop-down list is populated with the values from the Department list.
- Add a repair request and click Save.
- Look at the view of the item you just added. The Department is a hyperlink. Click the Department link. You can see the details of the Department..
Using Document Sets
Document sets are new in SharePoint Server 2010 and enable management of a single deliverable, which can include multiple documents or files. A document set is a special type of folder that contains the unique attributes of the document set and the attributes and behavior of folders and documents. It has its own specific object model elements, metadata, and user interface. A common scenario for a document set would be a request for proposal (RFP) or a real estate contract.
An organization could create a special Document Set content type for each type of project they create. That content type would then define the approved content types for the project, common attributes, default items, workflows, information management policies, and so forth.
The following are some common considerations when deciding whether to use document sets:
- There is no limit on the number of documents that can exist in a document set. Knowing that, if you use the Send To feature with a Document Set, the sum for all documents in a document set cannot be larger than 50 MB. Even though there are no limits, page load times are greatly affected at a number 5,000 and over. Great care is needed to design sites in full knowledge of these limitations.
- There is no limit on the number of document sets that can exist in a document library, but the display of document sets is limited by the display threshold of about 5,000 items.
- If you use routing, document sets that are sent to a content organizer will remain in a drop-off library and be moved to the appropriate location by the content organizer’s processing timer job.
To use document sets, you must have the Document Set feature activated. The Document Set feature is a site collection feature.
![]() Note To enable the Document Set feature, go to the settings page and under Site Collection Administration, click Site Collection Features. Once the features page opens, find the Document Sets feature and click Activate.
Note To enable the Document Set feature, go to the settings page and under Site Collection Administration, click Site Collection Features. Once the features page opens, find the Document Sets feature and click Activate.
Working with Views
Views are ways to look at the data stored in a list. When you create a list, a default view called All Items is created. This enables you to see all the items in your list. You may want to create different views of your data depending on your use for it or your audience.
Although you can create different public views in the browser, SharePoint Designer gives you more control over creating views of your SharePoint list data. In this section, you will learn about creating, sorting, filtering, and grouping data.
Creating Views
You can see the views that a list has by looking at its settings page in the Views pane. All lists come with a default view called All Items. You can create your own views by clicking the New button. A dialog box then appears, prompting you for the name of the view and asking whether you want it to become the default view. After naming your view, click the filename of the newly created view to customize the view in the View Editor.
When you are in the View Editor, you can add or remove columns from your view by selecting Add/Remove Columns from the Ribbon menu. In the Displayed Fields dialog box that opens, you can select the columns to display, as shown in Figure 3-11. The view in the Page Editor will then reflect your changes. You can also set limits on the number of rows displayed, in case your list is long.

Figure 3-11. Adding and removing display fields
Sorting, Grouping, and Filtering
You can set the order that a list is displayed in your view by clicking the Sort & Group button on the Ribbon menu to access the Sort and Group dialog box, shown in Figure 3-12. Here you can sort a list based on any field that is available and can sort in ascending or descending order. You can also specify that you want the data displayed in groupings based on the sort order.
To filter your data, click the Filter button on the Ribbon menu. A dialog box assists you in creating filters. You can select a field to filter on and the criteria. You can combine fields by using And and Or.
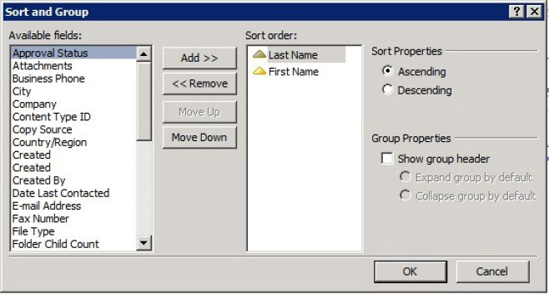
Figure 3-12. Sorting and grouping
EXERCISE 3-10. CREATE A CUSTOM VIEW
In this exercise, you will create a Custom View of the Purchases list called, Purchases by Month.
- In SharePoint Designer, click the Purchases List in the Navigation pane.
- In the settings page, find the Views pane and click New.
- Name the view Purchases by Month.
- Click the name of your newly created view to show the ASPX page in the View Editor.
- If you are not in Design view, click Design View so you can see the changes as you go.
- Click the main web part area so that the List View Tools menu becomes active.
- Click the Add/Remove Columns button.
- Make sure that the following fields are selected to display in the following order:
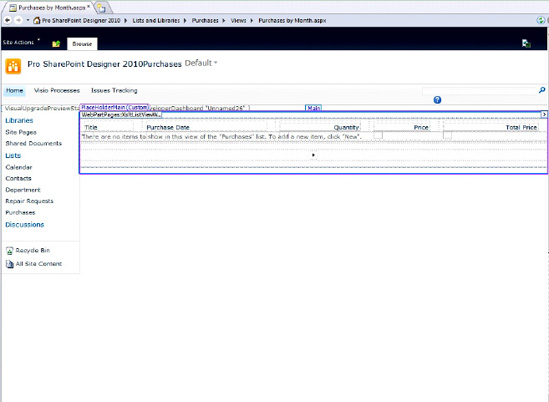
Figure 3-13. Creating a custom view
- Click OK.
- Click Sort & Group.
- Select Purchase Date to Sort By.
- Select Ascending.
- Click Show Group Header and Expand Group by Default.
- Click OK.
- Press Ctrl+S to save your changes.
- Open the browser and navigate to the purchases list.
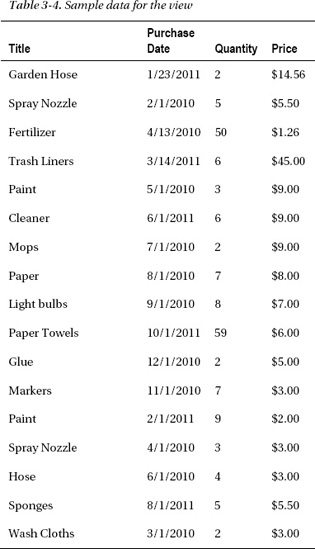
- Add some data, varying the month of purchase. Table 3-4 provides an example of some data.
- In the Ribbon menu, switch to the Purchases by Month view. Notice that the display is grouped by purchase date but not month.
- You need to calculate the month so you can group only based on the month. Close the browser and go back to SharePoint Designer.
- Click the Purchases list and then click Edit List Columns in the Customization pane.
- You are going to create a new calculated field so you can sort on it. Click the Add New Column item on the Ribbon and then select Calculated. When the Column Editor dialog box opens, add the formula shown in Figure 3-14. In the Data Type Returned drop-down list, make sure you select Single Line of Text. Then click OK to close the dialog box.
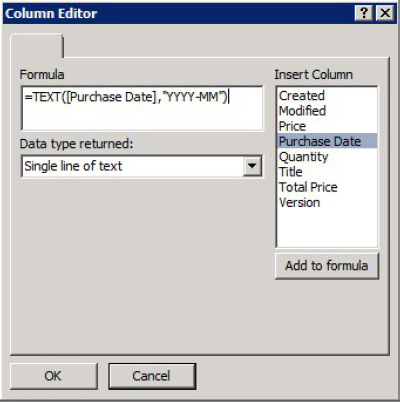
Figure 3-14. Adding a formula in the Column Editor
- Click the name of the field you just created (usually NewColumn1). It should go into renaming mode. If not, right-click the filename and select Rename from the context menu. Name the field PurchaseYearMonth.
- Press Ctrl+S to save the new column to the List.
- In the breadcrumb navigation, click Purchases, as shown in Figure 3-15 to get back to the list settings screen. Then click the Purchases By Month View to open the View Editor.

Figure 3-15. Breadcrumb navigation
- After the View Editor opens, select Sort & Group from the Ribbon menu.
- Remove the Purchase Date sorting choice.
- Add PurchaseYearMonth as the Sorting field and then choose Ascending, Show Group Header, and Expand Group by Default, as shown in Figure 3-16.
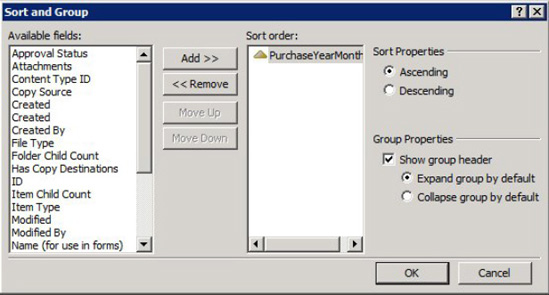
Figure 3-16. Grouping by PurchaseYearMonth
- Click OK to save your grouping settings and then press Ctrl+S to save the changes to the view.
- Go back to the browser and navigate to the Purchases by Month view, as shown in Figure 3-17. If you need to press F5 to refresh the page, do so. Notice how the purchases are grouped.
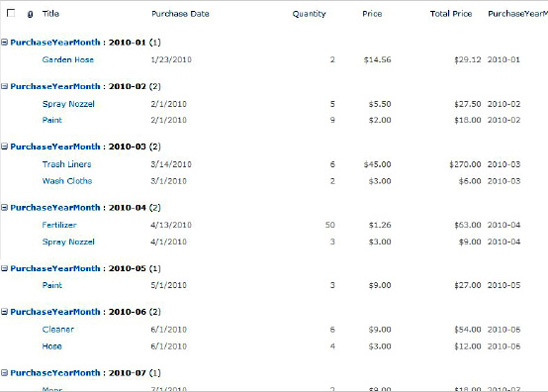
Figure 3-17. Final view with grouping
You will learn about more-advanced view creation in Chapter 5. This exercise is a simple one meant to illustrate simple sorting and grouping.
Adding Custom Actions
The ability to add custom actions without the need for a developer is new in SharePoint 2010. It refers to the ability to add new actions to the list item menu and the Ribbon list view menu.
Custom actions are used to provide quick access to additional tasks related to the list it is attached to. For example, if you need to add additional values to a lookup list, a custom action linking to the New Item form for the lookup list would enable that to be accomplished more easily.
Custom actions have the following properties:
- Sequence number: The sequence number determines the order in which the new custom action appears. Every menu item has a sequence number, and with a little experimentation, you will be able to determine what value to assign to your new custom action.
- Rights mask: You can use the empty mask or you can specify a rights mask that defines which users can see the custom action. The rights mask can contain any of the special base permissions from the SPBasePermission member names found at
http://msdn.microsoft.com/en-us/library/microsoft.sharepoint.spbasepermissions.aspx.
EXERCISE 3-11. CREATE A CUSTOM ACTION
In this exercise, you will create a Custom Action on the ribbon menu of a New Form dialog.
- Click Lists and Libraries in the Navigation pane.
- Click the Repair Requests list created in Exercise 3-9, “Create and Use a Lookup Column.”
- In the settings page, click inside the Custom Actions area.
- On the Ribbon menu, choose Custom Action -> New Form Ribbon.
- In the Create Custom Action dialog box that opens, type New Department in the Name field.
- In the area labeled Select the Type of Action, click the Navigate to URL radio button.
- Click the Browse button and then in the Insert Hyperlink dialog box, browse to the
NewForm.aspxpage in the Department list, as shown in Figure 3-18.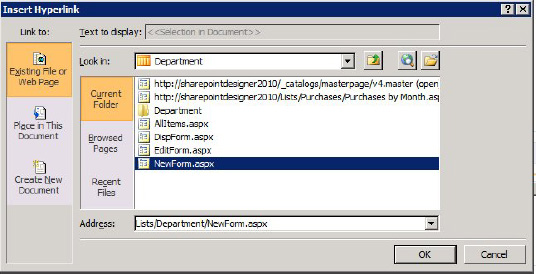
Figure 3-18. Selecting a new form in the Department list
- In the Advanced Custom Action Options section of the Create Custom Action dialog box, enter the following paths for the icon, as shown in Figure 3-19:
- In the Rights Mask text box, type EmptyMask.
- In Sequence Number text box, type 150.
- Click OK.

Figure 3-19. Create Custom Action dialog box
- Press Ctrl+S to save your changes.
- Now open the browser to the Repair Requests list.
- Click the +Add New Item link.
- When the New Form opens, notice the new button on the Ribbon menu to add a new department.
- Click the New Department button.
- The Add New Department form opens. Create a new department and save.
- Click the +Add New Item link in the Repair Requests list again.
- When the Add New form opens, notice that the department that you just created is now available in the drop-down list on the form.
Creating Your Own Template
SharePoint provides an easy way to replicate a customized list or library. Once you have finished customizing your list, you can save it as a template to use again on your site or on other sites.
You save the list as a template in the browser. SharePoint Designer provides a quick link on the Ribbon menu to the Save as Template page in the browser. Once you open the page, give your list template a filename, a descriptive template name, and a description. It is good practice to add detail in the Description field indicating the function of the list and any unique features. That way, when you create new lists in the future, you won’t mistakenly duplicate your efforts.
You can also choose to include content in your template. This is helpful if you want to seed the list with sample values, form templates, or lookup values. It is important to remember that item security is not maintained in the template, so if you have any private information in the list, saving it as a template is not recommended. Once saved, the list template is a file stored in the list template gallery, accessed from Site Settings. From there, you can export the template to use on other sites.
EXERCISE 3-12. SAVE A LIST AS A TEMPLATE
Summary
This chapter explained the differences between a list and a library. The chapter used a scenario to illustrate key concepts of using these lists and libraries to store data in SharePoint. Some of the key points to remember are as follows:
- SharePoint stores data in a list or library.
- Metadata is data that describes other data.
- Site columns are specific types of data, such as date, number, or text.
- Content types are made up of site columns, workflows, document templates, and information management policies.
- More than one content type can be associated with a list or library.
- In SharePoint Designer, you can now add custom actions to the list item and Ribbon menu.
- Once you are finished creating a customized list, you can save it as a template, including its content.