
Chapter 9
HTML5 Location-Based Applications
One of the biggest opportunities presented to mobile developers is the wealth of options opened up by the very nature of Android devices like phones and tablets: They are mobile! While the location of a user of a traditional desktop application can be interesting, it's rare for someone to pick up a desktop machine and move about with it all day. But mobile devices move, and their location (and, by implication, the location of the device user) can influence everything from games, to searching for products and information, to nuances and options for things as diverse as language settings and device behavior.
In this chapter, we'll explore geolocation in HTML5, CSS, and JavaScript for Android devices. We'll explore a simple location-enabled app, and see how the features and functions of HTML5 can be leveraged. So, let's get moving!
The Mechanics of Geolocation
In order to make your geolocation ideas a reality, it's important to understand the capabilities of all the moving parts (sorry, we couldn't resist that joke).In any Android-targeted geolocation web application, two sets of capabilities are important. First, what capabilities does a given Android device present to any web-based location-focused application? Second, what features of HTML5 (and to a lesser extent, CSS3 and JavaScript) provide location capabilities? Ultimately, the combination of what a device can say about its location, and what a web application can do with that information, will set the boundaries for what you can achieve. Let's look at the background for both.
Understanding Device Capabilities
No matter what kind of device you have, it can rely on a surprising range of technologies to provide location-based data. Even for devices that lack dedicated hardware, options exist. The devices you work with (and the examples we'll use) typically have access to one or more of the following capabilities:
- Global Positioning System (GPS)—hardware in the device that receives and decodes GPS satellite signals (or similar competing services like Galileo or Glonass).Accuracy can be as fine-grained as 1 meter, although this can degrade with caching and other effects.
- WiFi triangulation—your device uses WiFi for network connectivity, but it can also use a combination of known SSID names for WiFi networks, together with signal strength in dBm, to triangulate location. This tends to be cruder than GPS, and suffers in less built-up areas or areas with many transient hot-spots. Note that your users may disable WiFi for power consumption or conservation reasons.
- Cell Tower triangulation—similar to the WiFi technique, your device knows with which cell it has registered at any given time, and also knows what other cells are detectable (along with signal strengths and related timing information).Even with only one cell tower nearby, your device's location can still be known to the coarse level of that tower's service area.
- IP Address allocation—While your device most likely receives a dynamic IP address when connecting to WiFi or mobile networks, your provider usually has a known set of IP address blocks, and known patterns of distribution in various geographic areas. While this won't locate your device to the nearest meter, it can do a pretty good job of determining whether you’re in Kansas or Kathmandu.
As you can see, multiple methods are available that support the actual mechanics of determining your device's location. Regardless of the methods supported by the device, you don't have to concern yourself with selecting a given mechanism when writing your web applications. What you do have to consider are the other two governing constraints on your geolocation application.
The first such constraint is the user's choice of settings for device-wide location features. Quite literally, has the user enabled or disabled use of GPS, and for that matter, have they allowed or prohibited other location-determining mechanisms from pinpointing the device? Figure 9–1 shows the normal settings over which the user has control
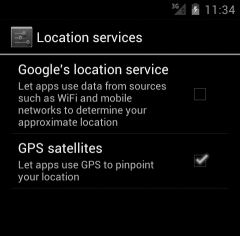
Figure 9–1. Android Device location services settings in Android 4.0
These settings are pretty obvious in their function. Turn off GPS satellites, and it won’t be available to any service, including the location-related features of browsers. This is where our second constraint comes in. Just because the HTML5 specification outlines the API for geolocation, it doesn’t mean the user’s browser has implemented all (or any!) of the features.
Understanding HTML5 Capabilities
It’s all fine and dandy for a given device to have a range of location capabilities, but how do these tie in to your actual web application? The answer comes from the changes made to the Document Object Model (DOM) with HTML5, which now incorporates an API to support a range of DOM events specifically for location-related activities. This is a fairly important subtlety. HTML5 does not implement the location-aware features, per se. Rather, it incorporates an API specification for how a web browser and a web server or application can work with location data. This affects you as a developer, as you need to consider not only what the HTML5 specification says should happen for geolocation activities, but how each browser has been implemented to actually support these features. Without getting too far ahead of ourselves, an example would be to understand what third-party geolocation services a given browser might use if a web application asks for location.
Detecting Browser Geolocation Support
The basis for pretty much all geolocation activity within a browser is the navigator.geolocation object. We can use this foundation as a neat shorthand to determine if the browser has implemented at least the basics of the HTML5 geolocation specification. Listing 9–1 shows our first code example: a bare-bones HTML and JavaScript example that determines if a given browser understands a navigator.geolocation object.
Listing 9–1. Simple geolocation support check
<html>

    <head>

        <title>Android Web Application Development–Geolocation example 1</title>

    </head>

    <body>

        <script type="text/javascript">

            if (navigator.geolocation) {

                alert("Congratulations, your browser supports geolocation");

            } else {

                alert('Sorry, your browser does not support geolocation'),

            }

        </script>

    </body>

</html>
You can find this code in the file ch09–example01.html. Simply place this under the control of the web server of your choice, and then point your browser (desktop or mobile) to it to see the results.
![]() NOTE: This example, and the others in this chapter, typically should be run from a web server, rather than opened as a file straight from a desktop or mobile browser. This is because most contemporary browsers prevent any
NOTE: This example, and the others in this chapter, typically should be run from a web server, rather than opened as a file straight from a desktop or mobile browser. This is because most contemporary browsers prevent any file:// based URL from accessing the geolocation API. Put simply, any attempt to access a navigator.geolocation object, its methods, or data members will silently fail. This is due principally to security concerns, which could fill a chapter on their own. Choose a web server with which you are comfortable, such as Apache or Nginx, and you won’t see any issues.
Figures 9–2 and 9–3 show the results you should see when running our first example in a desktop browser and mobile browser, respectively.
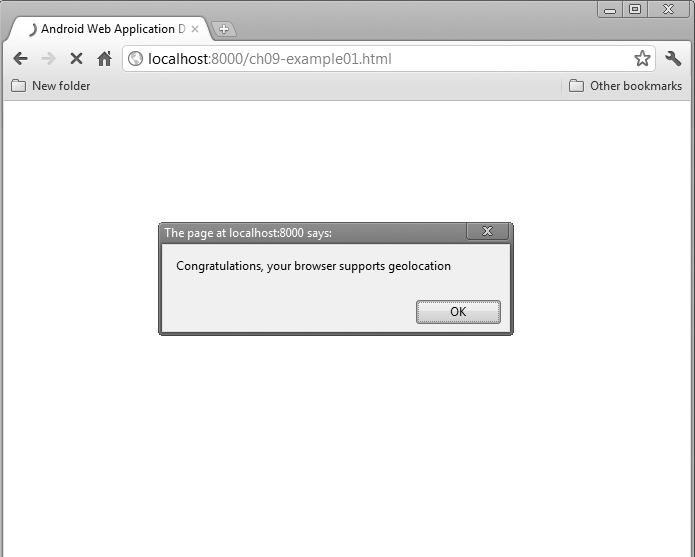
Figure 9–2. Results of our simple desktop browser test for geolocation support
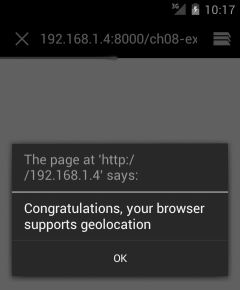
Figure 9–3. Results of our simple mobile browser test for geolocation support
There are two things to note about our first piece of code that tests for geolocation support. First, it really is that simple to determine a given browser’s support (although see the section “What Could Possibly Go Wrong?” later in this chapter for some more nuanced analysis of when a device with support for geolocation does not actually cooperate). The second is that using the JavaScript alert function is annoying most of the time in desktop applications, and it gets even more annoying on a small-screen mobile device. The experienced general web developers among you will know this, while for the novices, this is a good time to consider pushing your working code into a function that you can easily reuse without annoying your good users. Listing 9–2 re-factors our detection example to create a separate geoSupport() function that we can re-use as we see fit.
Listing 9–2. Simple geolocation support check revised
<html>

    <head>

        <title>Android Web Application Development–Geolocation example 2</title>

        <script type="text/javascript">

            function supportsGeo () {

                var geosupport = "Sorry, your browser does not support geolocation";

                if (navigator.geolocation) {

                    geosupport = "Congratulations, your browser supports geolocation";

                }

                return geosupport;

            }

        </script>

    </head>

    <body>

        <script type="text/javascript">

            document.write(supportsGeo());

        </script>

    </body>

</html>
You could, of course, take this further and push this function into a separately loaded JavaScript source file. You’re free to do that and adapt the later code in this chapter, if you wish.
Exploring Our Sample Application
It’s time to introduce our sample application. Unless you’ve been living under a rock, you’re likely aware of the range of popular “check in” style applications that have flourished along with the explosion of mobile devices. Whether it’s Foursquare, Latitude, TripIt, or other similar apps, these all allow you to announce your position to the wide world—presumably so your fans and the paparazzi can track your famous movements. Many of these applications are implemented as native applications for a given device, but there’s nothing that stops us from developing the same style of application as a web application available within the browser of any device.
Our application is fully self-contained in ch09–example03.html, which you can run from your chosen web browser. Let’s take a look from the users’ perspective first, to see what it (apparently) does. Pointing our browser to the page brings up the very simple, but functional, home page of our new location-based check-in style application, which you can see in Figure 9–4.
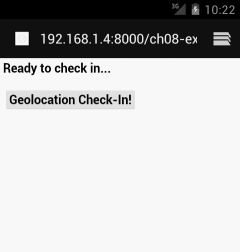
Figure 9–4. Our example application prior to invoking geolocation
At the moment, it’s not exactly a graphic design tour-de-force, but we’ll get to that. For now, let’s see what happens when we click the “Geolocation Check-In!” button. Figure 9–5 shows our page dynamically updated with what looks like a set of latitude and longitude coordinates. It looks like that because that is exactly what it is—and they are from the very location this test was run.
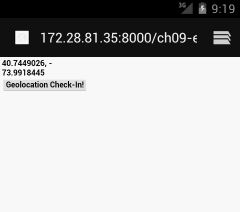
Figure 9–5. Our location revealed thanks to our sample application.
Building Our Basic Geolocation Application
At this point, you might be wondering exactly how much logic and code was required to get this apparently simple application working. Let’s take a look at Listing 9–3, where we’ll see the entire set of code for the ch09–example03.html file.
Listing 9–3. Geolocation checkin example
<html>

    <head>

        <title>Android Web Application Development–Geolocation example 3</title>

        <script type="text/javascript">

            function supportsGeo () {

                if (navigator.geolocation) {

                    return true;

                } else {

                    return false;

                }

            }


            function changeDiv (name, data) {

                var div = document.getElementById(name);

                if(div)

                {

                div.innerHTML = data;

                }

            }


            function checkIn () {

                var geoData = "";

                if (supportsGeo()) {

                    navigator.geolocation.getCurrentPosition(function(position) {

        geoData = position.coords.latitude + ", " +

                        position.coords.longitude;

                    });

                    <!-- alert("Confirm geolocation access before clicking OK"); -->

                } else {

                    geoData = "Your browser does not support HTML5 geolocation";

                }

                changeDiv ("myCheckIn",geoData);

            }

        </script>

    </head>

    <body>

    <h1>

        <div id="myCheckIn">

            <!-- This is where your check-in will display -->

            <p>Ready to check in...</p>

        </div>


        <form name="checkInFrm">

            <input type="button" name="checkInBtn" value="Geolocation Check-In!"

             onClick="checkIn()">

    </h1>

    </body>

</html>
Let’s break this down into four parts, so you can digest what’s happening, and also tinker and change the code yourself so you can explore possibilities as we go.
Testing for Geolocation Support, Redux
The supportsGeo() function we introduced earlier in the chapter has been tweaked to return a Boolean value, so we can use its result in-line in other expressions:
function supportsGeo () {

    if (navigator.geolocation) {

        return true;

    } else {

        return false;

    }

}
This provides a little more utility than the previous version that returned a string value.
Creating a Utility Function for Dynamic Page Changes
Next, we’ve introduced a simple utility function to control dynamic HTML behavior for <div> elements anywhere in our code. The changeDiv() function takes the name of a <div> element, and the desired textual change, and performs the necessary changes:
function changeDiv (name, data) {

    var div = document.getElementById(name);

    if(div)

    {

        div.innerHTML = data;

    }

}
This isn’t strictly related to geolocation, but we think you’ll agree this will make the rest of our code examples clearer, by removing the mechanics of these changes from the main logic.
Reviewing the Basic HTML
Our HTML code is almost the innocent bystander in our example. It provides a named <div> element, myCheckIn, on which our functions will work their geolocation magic.
<h1>

    <div id="myCheckIn">

        <!-- This is where your check-in will display -->

        <p>Ready to check in...</p>

    </div>


    <form name="checkInFrm">

        <input type="button" name="checkInBtn" value="Geolocation Check-In!"

         onClick="checkIn()">

</h1>
The form and input button invokes our central function, checkIn(), that will perform the actual geolocation work.
Delving into the Coordinates
OK, enough dancing around the edges! The checkIn() function performs the key tasks in our little example.
function checkIn () {

    var geoData = "";

    if (supportsGeo()) {

        navigator.geolocation.getCurrentPosition(function(position) {

            geoData = position.coords.latitude + ", " + position.coords.longitude;

        });

        <!-- alert("Confirm geolocation access before clicking OK"); -->

    } else {

        geoData = "Your browser does not support HTML5 geolocation";

    }

    changeDiv ("myCheckIn",geoData);

}
The geoData variable eventually holds our resulting latitude and longitude. We invoke our supportsGeo() function to ensure our browser can support our intentions. Then we get down to business by calling the navigator.geolocation.getCurrentPosition() function. This is one of the core HTML geolocation functions, and has pages and pages of overloaded definitions at http:// http://dev.w3.org/geo/api/spec-source.html.
For now, what you need to know is that navigator.geolocation.getCurrentPosition() is an asynchronous function, which in the form used here passes a call-back function to be invoked once the browser and underlying hardware have responded to the request for the caller’s current location. Our position call-back assigns our geoData variable with two data members: the position.coords.latitude and position.coords.longitude values, which equate to the caller’s latitude and longitude.
All that remains is for us to call the utility changeDiv() function to update our HTML page, and voila! Of course, we also ensure that browsers that don’t support geolocation are targeted with the appropriate message indicating no support for our geolocation work.
![]() NOTE: You might observe that we have a commented-out call to an
NOTE: You might observe that we have a commented-out call to an alert(), asking the user to confirm geolocation access before continuing. If you haven’t allowed web pages to freely ask for your location (and there’s no reason you should), then you’ll need to confirm access when asked by your browser. But even the fastest human will not be able to do this before the call to navigator.geolocation.getCurrentPosition() returns, even though it’s asynchronous. At this point, the call-back will return an error that our code currently doesn’t catch (but see the section “What Could Possibly Go Wrong” later in this chapter), and our example will silently fail. Uncomment this alert in your testing to give yourself better control over the asynchronous behavior of navigator.geolocation.getCurrentPosition().
Dealing with the Four Corners of Android’s Geolocation World
Our initial sample application introduces some of the key building blocks of almost all web applications that utilize geolocation. To round out the world of geolocation, we need to address the four questions of Where am I?, What am I?, What could possibly go wrong?, and Where am I going?
Where Am I?
We’ve already touched on the fundamentals of determining where a device happens to be, with our use of the position.coords.latitude and position.coords.longitude data members in our earlier example. You might be thinking that there’s not much more to determining location than that, but there are a few additional data points you should consider.
While latitude and longitude can tell you if you’re in Hawaii or The Himalayas, you’ll probably agree that there’s another dimension you care about in both of those locations: altitude! The HTML5 specification includes a position.coords.altitude data member to provide an elevation above notional sea level. Note that support for this is quite patchy, such that even the Android emulator and its browser fail to support it in many releases of the Android Development Tools (ADT).
Along with latitude, longitude, and altitude, you might be concerned with how accurate a reading you’ve been given. We introduced four possible location mechanisms at the start of the chapter, and each of these has varying levels of accuracy. Two additional data members are available, position.coords.accuracy and position.coords.altitudeAccuracy, to provide the margin of error for any geolocation data provided.
Interestingly, there’s no direct method by which you can determine which location mechanism was used to provide your coordinates. You can infer that it was GPS if you interrogate another data value, position.coords.satellites, which, if supported by your browser and device, will return the number of satellites used to provide a GPS fix. The only problem with this is that if your device lacks GPS support, or fails to get a GPS fix, both situations will return NULL. So you’ll be left in an ambiguous state as to what determined the lack of satellite count.
What Am I?
We’ve already largely dealt with the best way of answering the What am I? question. The HTML5 geolocation specification doesn’t provide exhaustive ways of determining what particular hardware exists on a device. The best way to approach the question is using the supportsGeo() function, or one like it, that we introduced in the preceding section. This turns our question into one of: What am I? A device and browser combination that supports geolocation or not?
What Could Possibly Go Wrong?
Imagine you write your great check-in application, to take on the likes of Foursquare and company. Your users are happy, and all is good with the world. Nothing could possibly go wrong, right? Well, perhaps we spoke to soon.
On any device, at any time, you can find yourself having to deal with a range of issues that prevent your geolocation code from returning an accurate value, or even any value at all. It could be the weather, the alignment of the sun and the planets (actually, that’s less of a joke than you might think), or even user intervention. Whatever the cause, there are well-defined error states that you should handle in your code.
The four main error conditions that can exhibit under the HTML5 specification are:
- TIMEOUT: No location mechanism responded within the allowed time with location data.
- POSITION_UNAVAILABLE: Your device has one or more valid location mechanisms (such as GPSor WiFi), but none of them could provide valid location data.
- PERMISSION_DENIED: The browser was prevented from accessing the HTML5 geolocation API by reason of permissions. Either the user blocked access when prompted, or the browser is configured explicitly to block access.
- UNKNOWN_ERROR: For reasons unknown, location data was not available.
It’s all well and good to know what the error conditions are, but how does one make use of them? You’ll remember we said the getCurrentPosition() function had a myriad of overloaded versions. A significant subset of these include a common pattern of accepting a callback function for reporting position as the first parameter, and a callback function for error handling as the second parameter. Take a look at the next iteration of our sample application, in the file ch09–example03.html. The key change is to our checkIn() JavaScript function, which now looks like this.
function checkIn () {

    var geoData = "";

    if (supportsGeo()) {

        navigator.geolocation.getCurrentPosition(

            function(position) {

                geoData = position.coords.latitude + ", " + position.coords.longitude;

              },

            function(error) {

                switch(error.code) {

                    case error.TIMEOUT:

                        alert ('Geolocation returned a timeout error'),

                        break;

                    case error.POSITION_UNAVAILABLE:

                        alert ('Geolocation returned a position unavailable error'),

                        break;
                    case error.PERMISSION_DENIED:

                        alert ('Geolocation returned permission denied (did you deny access?)'),

                        break;

                    case error.UNKNOWN_ERROR:

                        alert ('Geolocation encountered an unknown error'),

                        break;

                }

            }

        );

        <! -- alert("Confirm geolocation access before clicking OK"); -->

    } else {

        geoData = "Your browser does not support HTML5 geolocation";

    }

    changeDiv ("myCheckIn",geoData);

}
In the bolded text, you’ll see we’ve changed the method signature (overloaded version) of the getCurrentPosition() function to register our error callback, and alert the user should any error condition be returned. We’re in the fortunate position (OK, we’re being sarcastic here) that the Android emulator is notoriously slow and temperamental when it comes to responding to geolocation requests. For this reason, it’s always good practice to test your code on real devices, as well as the emulator. The authors managed to trigger a POSITION_UNAVAILABLE error without really trying, on our first attempt. You can see the results in Figure 9–6.
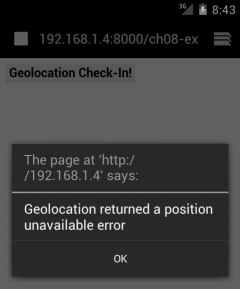
Figure 9–6. A geolocation attempt returns a POSITION_UNAVAILABLE error
As we did with our supportsGeo() function, you should turn this style of error checking into a utility function for use throughout your code, rather than bombard the user with alert-style errors—although, in this case, it might be warranted.
Where Am I Going?
To round out the capabilities we’re exploring, we can ask ourselves—or more accurately the device—Where am I going? There are two approaches that are worth covering. First, our trusty geolocation data members include two more useful values, position.coords.speed and position.coords.heading. These indicate the last known speed of the device, and the last known directional heading. These values sound great for tasks like plotting movement on a map, and, in theory, that’s exactly what they’re designed to provide. In practice, however, a disturbingly large number of devices either don’t report data for these values, or use such simplistic GPS chipsets as to not support collecting it in the first place.
This brings us to an alternative approach. To date, we’ve been showing off the getCurrentPosition() method of navigator.geolocation. This method has a peer method that is a little more sophisticated and useful when it comes to determining location over time, and the movement that goes with it. This is the watchPosition() method.
The watchPosition() method, in its various overloaded forms, has fairly similar behavior to our getCurrentPosition() method. It registers a callback function to use for normal positioning, and another callback function for error handling, but it also accepts a range of options, including a timer option for how frequently it should sleep and wake itself and keep calling your callbacks. The watchPosition() will continue to operate until halted by a call to clearWatch(), or its parent process terminates. Listing 9–4 shows the next iteration of our ongoing example application, from ch09–example05.html.
Listing 9–4. Geolocation tracking over time(and movement!)
<html>

    <head>

        <title>Android Web Application Development–Geolocation example 5</title>

        <script type="text/javascript">

            function supportsGeo () {

                if (navigator.geolocation) {

                    return true;

                } else {

                    return false;

                }

            }


            function changeDiv (name, data) {

                var div = document.getElementById(name);

                if(div)

                {

                    div.innerHTML = data;

                }

            }


            function startWatch () {

                var geoData = "";

                var watchOptions = { frequency: 5000 };

                if (supportsGeo()) {
                    geoData = navigator.geolocation.watchPosition(onWatchSuccess,

                                   onWatchError, watchOptions);

                } else {

                                   geoData = "Your browser does not support HTML5 geolocation";

                    changeDiv ("myCheckIn",geoData);

                }

            }


            function onWatchSuccess(position) {

                var currentLocation = "";

                currentLocation = 'Latitude: ' + position.coords.latitude + ', Longitude: ' +

                                     position.coords.longitude;

                changeDiv("myLocationWatch",currentLocation);

            }


            function onWatchError(error) {

                var currentError = "";

                currentError = 'Error code: ' + error.code + ', Error message: ' + error.message;

                changeDiv("myLocationWatch",currentError);

            }

        </script>

    </head>

    <body>

    <h1>

        <div id="myLocationWatch">

            <!-- This is where your check-in will display -->

            <p>Ready to check in...</p>

        </div>


        <form name="watchFrm">

            <input type="button" name="watchBtn" value="Start Watching"

             onClick="startWatch()">

    </h1>

    </body>

</html>
Our utility functions supportsGeo() and changeDiv() are the same, and the HTML layout is only cosmetically changed. The key is that the button now calls our startWatch() function, which itself ultimately calls watchPosition(). We pass it to our regular and error callbacks- onWatchSuccess() and onWatchError()—and an options construct. In this case, our options look like this
var watchOptions = { frequency: 5000 };
This effectively is used to pass a 5 second refresh frequency to the watchPosition() function. If you run the code yourself, and choose the Start Watching button you see, your browser should update approximately every five seconds with your location. This is a little hard to show in static screen shots, so you’ll have to try it for yourself. Don’t worry if you aren’t actually moving around: you should still see updates to the coordinates, because the accuracy of each reading will be slightly different depending on number of GPS satellites used for the fix, varying local interference, etc. You should see small changes to the least significant digits even if you are relaxing on your sofa!
Expanding Your Horizons with Maps
By now you will almost certainly agree that our example application is not exactly a work of art. So let’s add a bit of pizzazz, and introduce the near-ubiquitous accompaniment to geolocation: maps!
Adding a Map to Our Application
Our latest example is from file ch09–example06.html, which uses Google Maps to take our earlier check-in example to the next level. Instead of just reporting numeric co-ordinates, it uses them with the Google Maps APIhosted at http://maps.googleapis.com/ to load a map, and place a marker on it highlighting your location. Listing 9–5 is our modified JavaScript, CSS and HTML5.
Listing 9–5. Geolocation and Maps working together
<html>

    <head>

        <title>Android Web Application Development–Geolocation example 6</title>

        <meta name="viewport" content="initial-scale=1.0, user-scalable=no" />

        <style type="text/css">

            html { height: 100% }

            body { height: 100%; margin: 0; padding: 0 }

            #mapContainer { height: 100% }

        </style>

        <script type="text/javascript" src="http://maps.googleapis.com/maps/api/js?key=AIzaSyBpoxnQbCGPTIcpIJ8YPO3pTNcJX3zbc4c&sensor=false">

        </script>

        <script type="text/javascript">

            function supportsGeo () {

                if (navigator.geolocation) {

                    return true;

                } else {

                    return false;

                }

            }


            function changeDiv (name, data) {

                var div = document.getElementById(name);

                if(div)

                {

                    div.innerHTML = data;

                }

            }


            function mapMe(thisLat, thisLong) {

                var myLatlong = new google.maps.LatLng(thisLat, thisLong);

                var myOptions = {

                    center: new google.maps.LatLng(thisLat, thisLong),
                    zoom: 12,

                    mapTypeId: google.maps.MapTypeId.ROADMAP

                };

                var map = new google.maps.Map(document.getElementById("mapContainer"),

                                               myOptions);

                var marker = new google.maps.Marker({

                             position: myLatlong,

                             map: map,

                             title:"Hello World!"

                });

            }


            function initialize() {

                if (supportsGeo()) {

                    myLatitude = "";

                    myLongitude = "";

                    navigator.geolocation.getCurrentPosition(

                        function(position) {

                            myLatitude = position.coords.latitude;

                            myLongitude = position.coords.longitude;

                        },

                        function(error) {

                            switch(error.code) {

                                case error.TIMEOUT:

                                    alert ('Geolocation returned a timeout error'),

                                    break;

                                case error.POSITION_UNAVAILABLE:

                                    alert ('Geolocation returned a position unavailable

                                           error'),

                                    break;

                                case error.PERMISSION_DENIED:

                                    alert ('Geolocation returned permission denied (did

                                           you deny access?)'),

                                    break;

                                case error.UNKNOWN_ERROR:

                                    alert ('Geolocation encountered an unknown error'),

                                    break;

                            }

                        }

                    );

                    alert("Confirm geolocation access before clicking OK");

                }

                mapMe(myLatitude, myLongitude);

            }

        </script>

    </head>

    <body>

    <h1>

    <body onload="initialize()">

        <div id="mapContainer" style="width:100%; height:100%">

            <!-- Your map goes here! -->

        </div>

    </body>

</html>
You’ll note that our code starts with some CSS, and ends with very simple HTML that invokes our new initialize() method as soon as the page loads. The CSS is boilerplate stuff from Google to allow a div to act as a container for map objects. Following this, you’ll see the JavaScript reference to the Google Maps API (the following line has the formatting massaged to better fit this page):
<script type="text/javascript"

  src="http://maps.googleapis.com/maps/api/js?

    key=AIzaSyBpoxnQbCGPTIcpIJ8YPO3pTNcJX3zbc4c&sensor=false">

</script>
This invokes the Maps API with a particular API key. This is Google’s technique for uniquely identifying users of its API, and also rate-limiting how many calls to various APIs can be made. You should definitely sign up for your own API key so that you can control your own API access, monitor usage, etc.
![]() TIP: At the time of printing, the free Google Maps API is throttled to 25000 invocations per day. To get your own Maps API key, visit http://developer.google.com/ and follow the instructions.
TIP: At the time of printing, the free Google Maps API is throttled to 25000 invocations per day. To get your own Maps API key, visit http://developer.google.com/ and follow the instructions.
Our initialize() function is very similar to our old checkIn() function, so we won’t rehash that here. The key differences are it populates two local variables for latitude and longitude, and then calls our new function, mapMe(), to do all the hard mapping work.
function mapMe(thisLat, thisLong) {

    var myLatlong = new google.maps.LatLng(thisLat, thisLong);

    var myOptions = {

        center: new google.maps.LatLng(thisLat, thisLong),

        zoom: 12,

        mapTypeId: google.maps.MapTypeId.ROADMAP

    };

    var map = new google.maps.Map(document.getElementById("mapContainer"), myOptions);

    var marker = new google.maps.Marker({

                    position: myLatlong,

                    map: map,

                    title:"Hello World!"

    });

}
Within mapMe(), we complete four main actions to present our map and location marker. First, we create a google.maps.LatLng object using the latitude and longitude we received from our HTML5 geolocation calls. Next, we construct an options object named myOptions, which consists of a center object which will be used to choose the center of the map presented in the browser. The zoom value dictates the starting zoom setting in the map—this is very important on mobile devices, as the default zoom is at far too high a scale, leaving the user to zoom in several times with imprecise pinch and zoom techniques.
We then get to the meat of our mapping. We create a new google.maps.Map object, and pass the element that will hold the map (“mapContainer” is the ID of our <div> in our HTML), and the options object we constructed. This actually creates and displays the map in the user’s browser. Following its creation, we create a google.maps.Marker object at the same coordinates on our map, and give it a meaningful label. The results in Figure 9–7 speak for themselves.
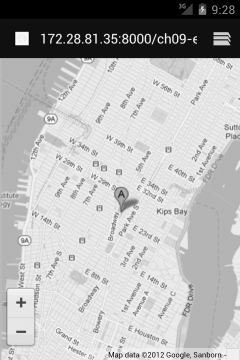
Figure 9–7. Our HTML geolocation application adapted to use Google Maps
Other Location-based Services
We’ve looked at one of the popular mapping services, but it’s worth considering broadening your horizons to other providers of both basic geolocation services, as well as providers of things like map tiles (the graphic “tiles” that actually display).
There are a handful of reasons you might consider hedging your bets, and at least ensuring you can perform equivalent actions with other services:
- Free services, scaling and cost: Many services, like Google, Yahoo, Bing, MapQuest, Nokia/Ovi etc. offer some level of free service. The usual terms dictate that you and your users can consume a set number of map impressions per day before being throttled, and/or asked to pay.
- Different strengths and weaknesses: Some services, like Google, offer useful things like directions in some locations, details of public transport, etc. But in other places, services like Open Street Map provide significantly more detail, more recent data, and for some services like OpenCycleMap, the entire map rendering and data is focused on specialist uses: in this case, cyclists.
- Separation of duties: While it’s convenient to use a single service to do everything, you may find that you want to separate the aspects of retrieving raw map data around a given location, and the rendering of a relevant image (map tile) for that location. Abstracting your mapping means you can mix and match to suit your needs.
Possibly the most important reason to abstract your map data and image provider(s) is that the field is rapidly evolving and changing, and good software engineering should lead you to isolate all of your other code from such volatile dependencies where you are able. This volatility can also be the result of version upgrades and changes by the providers themselves.
Here are some useful data providers, map tile providers, all-in-one services, and even ready-made mapping abstraction JavaScript libraries, that you might also like to consider along with the usual suspects:
- Open Street Map (openstreetmap.org)—one of the original open data providers, now also providing other services on top of the crowd-sourced base geolocation data
- CloudMade (cloudmade.com)—a map tile provider for use with Open Street Map data. Also the providers of Leaflet, an open source tile set service.
- Mapnik (mapnik.org)—a map renderer that is often found in other tools (including some of the others listed here).
- CartoDB (cartodb.com)—a cloud based geospatial database
- Mapstraction (mapstraction.com)—a ready-to-use JavaScript library that provides abstraction of mapping services and data providers.
- Wax (mapbox.com/wax)—another ready-to-use abstraction layer. And from the same company, TileMill for tile generation.
This list could fill pages, but you get the idea. Even more exciting is the realization that dozens of such companies and service providers are cropping up every week.
Gaming Your Location
Even though you’re developing a mobile app, don’t forget the tools available to you to help test and refine your geolocation code. For instance, DDMS in the Android Developer Tools plug-in for Eclipse provides you with the ability to set arbitrary coordinates/location data for your emulator device. With a running project in your emulator, you can switch to DDMS mode, and open the Emulator Console tab. You’ll see the ability to set raw coordinates, or provide GMX or KML data directly, as shown in Figure 9–8, which your emulator browser can then use.
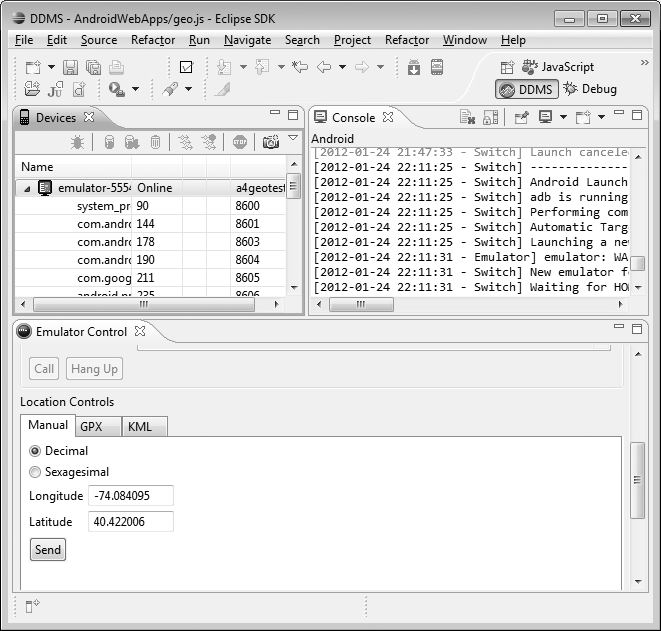
Figure 9–8. Using ADT and Eclipse to set coordinates in the Android emulator
If running Eclipse is not your preferred way of development, you can also use Android’s adb tool to issue the geo fix command to provide latitude, longitude, and altitude. Finally, if you’re debugging an application on a device that’s not attached to your computer, you can use the free application Fake GPS location (https://market.android.com/details?id=com.lexa.fakegps) to set your location.
Gaming Your Location–for Fun!
One of the great ways to explore web application geolocation capabilities is to make a game out of it—literally! Using the simple building blocks from the preceding section, you can build games and activities including treasure hunts, orienteering events, and even driving, racing, and sailing games. You should find it very straightforward to combine our startWatch() example with our Google Maps example, to create a “Map Tracks” style application that plots your movements in real-time on a map, and depending on the game or competition, could also show the movements and locations of other players, and even where entire other games are taking place.
An interesting use of geolocation features, such as the ones we’ve shown here, can be found in the popular “geocaching” movement. Do a search through your preferred search engine for more details, or carry on to Chapter 10 and use your own search interface to do the searching!
The sky really is the limit (and, in fact, your geolocation data should happily work from your favorite hot-air balloon too!).
Summary
In this chapter, we’ve explored the location based features available to you as a mobile web developer. Our sample application has demonstrated how to use many of the core geolocation features at your disposal, including where you are, what capabilities your users' devices might have, and how to deal with constant location changes. We’ll explore more on geolocation application development, and also cover other online services and APIs, in Chapter 10.