C H A P T E R 4
SQL Server Development
There is no standard job description for the DBA; it varies depending on their employer. Some DBAs tend to monitor their environments and maintain the maintenance jobs. In other companies, DBAs may perform more developer-oriented tasks, such as creating stored procedures and metadata within databases. While the focus of this book is on database administration, understanding the tools available for developers (and yourself) to use with SQL Server is also important. After reading through this chapter, you may find yourself secretly writing some code once you’ve seen what great tools Microsoft has provided for the development community.
Touring SSMS Through the Eyes of a Developer
SQL Server Management Studio (SSMS) is the main GUI tool used by most DBAs to administer their database environments. Throughout the releases of SQL Server, this tool (known as Enterprise Manager previous to SQL Server 2005) has provided increasing amounts of functionality around database development. Although SSMS is not a database development tool, it’s important to know what kind of development-related tasks it can handle.
IntelliSense
One of the first features you notice when using the Query Editor in SSMS is IntelliSense. IntelliSense makes it very easy for the user to know what objects or statements are valid and allows for easy auto-completion of statements. For example, we have a copy of the AdventureWorks database installed on SQL Server, and IntelliSense lets us navigate and explore that database, as we’ll show next.
![]() Note AdventureWorks database can be downloaded from the CodePlex web site at
Note AdventureWorks database can be downloaded from the CodePlex web site at http://msftdbprodsamples.codeplex.com.
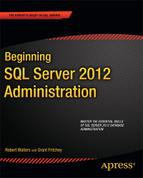
To use IntelliSense, simply navigate to a database—in our example, AdventureWorks—right click the node, and select, New Query. Begin typing the query shown in Figure 4-1. After you type the period in the statement “SELECT * FROM Sales.” a context menu will appear, as shown in Figure 4-1.
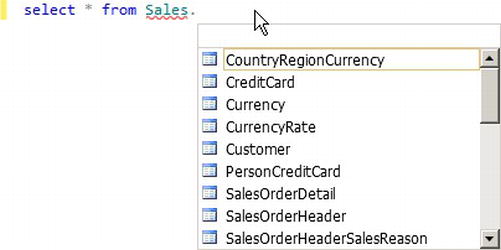
Figure 4-1. IntelliSense content menu in the SSMS Query Editor
Notice that the context menu lists the applicable objects that you can use to finish this part of the query. If you scroll down to CreditCard and press the Tab key, SSMS will auto-complete the input of that object name in the Query Editor window. IntelliSense is useful in many situations—when you can’t remember the object name you are looking for or the acceptable parameters of a stored procedure, to name a few.
Query Designer
In addition to IntelliSense, another richer feature can help users write queries—the Query Designer. If you have used Microsoft Access, you may recognize some similarities with the Query Designer tool that is available in both SSMS and Visual Studio. The Query Designer helps users build queries by allowing them to graphically adding tables and views together and simply click the desired columns. To launch the Query Designer, click the New Query button to get a clean Query Editor window, and select Design Query in Editor from the Query menu on the SSMS toolbar. This will launch the Query Designer, as shown in Figure 4-2.
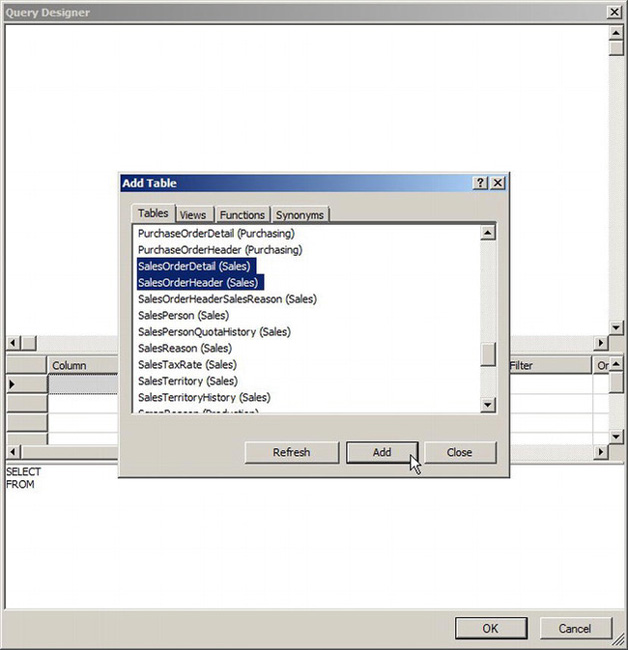
Figure 4-2. Query Designer showing the Add Table dialog
Let’s add both the SalesOrderDetail and SalesOrderHeader tables to the Query Designer. Click each table’s name, and click the Add button. When you have finished adding the tables or views, click the Close button. The Query Designer knows that these two tables share a relationship and has visually marked this in the UI. From here, you can go ahead and add the search criteria information to the query by checking the desired columns and typing any “group by” or “sort” information related to the desired query. For this example, we are interested in the sum of orders for each day, so we have configured the Query Designer as shown in Figure 4-3.

Figure 4-3. Sales order summary query configured in Query Designer
When you click the OK button, the Query Designer yields the following T-SQL text based on the settings in Figure 4-3:
SELECT     SUM(Sales.SalesOrderDetail.OrderQty) AS TotalQuantity,

Sales.SalesOrderHeader.OrderDate


FROM         Sales.SalesOrderDetail INNER JOIN


                      Sales.SalesOrderHeader ON Sales.SalesOrderDetail.SalesOrderID =

Sales.SalesOrderHeader.SalesOrderID


GROUP BY Sales.SalesOrderHeader.OrderDate


ORDER BY Sales.SalesOrderHeader.OrderDate
Even through the Query Designer brought us to back to the Query Editor window, you can always go back to the designer for help with the query by highlighting the query and selecting Design Query in Editor from the context menu of the highlighted query.
Templates
SSMS comes with a plethora of templates to use to create database objects. These are especially handy when you want to create a stored procedure and cannot remember the exact syntax. To see a complete list of templates, select Template Explorer from the View menu in the SSMS toolbar. This will launch the Template Explorer shown in Figure 4-4.
Figure 4-4. Template Explorer
To create a new stored procedure using a template expand the Stored Procedures node, and double-click Create Stored Procedure (New Menu). This will populate a new query editor window with the following template script:
-- ================================================

-- Template generated from Template Explorer using:

-- Create Procedure (New Menu).SQL

--

-- Use the Specify Values for Template Parameters

-- command (Ctrl-Shift-M) to fill in the parameter

-- values below.

--

-- This block of comments will not be included in

-- the definition of the procedure.

-- ================================================

SET ANSI_NULLS ON

GO

SET QUOTED_IDENTIFIER ON

GO

-- =============================================

-- Author:      <Author,,Name>

-- Create date: <Create Date,,>

-- Description: <Description,,>

-- =============================================

CREATE PROCEDURE <Procedure_Name, sysname, ProcedureName>

        -- Add the parameters for the stored procedure here

        <@Param1, sysname, @p1> <Datatype_For_Param1, , int> = <Default_Value_For_Param1, ,

 0>,

        <@Param2, sysname, @p2> <Datatype_For_Param2, , int> = <Default_Value_For_Param2, , 0>

AS

BEGIN

        -- SET NOCOUNT ON added to prevent extra result sets from

        -- interfering with SELECT statements.

        SET NOCOUNT ON;


    -- Insert statements for procedure here

        SELECT <@Param1, sysname, @p1>, <@Param2, sysname, @p2>

END

GO
In this script, you replace all the stub values like @Param1 and Datatype_For_Param1 individually, or you can use the Specify Values for Template Parameters dialog box, shown in Figure 4-5. To launch this dialog box, press Control, Shift, and the letter “M” together, or select Specify Values for Template Parameters from the Query menu in the SSMS toolbar.
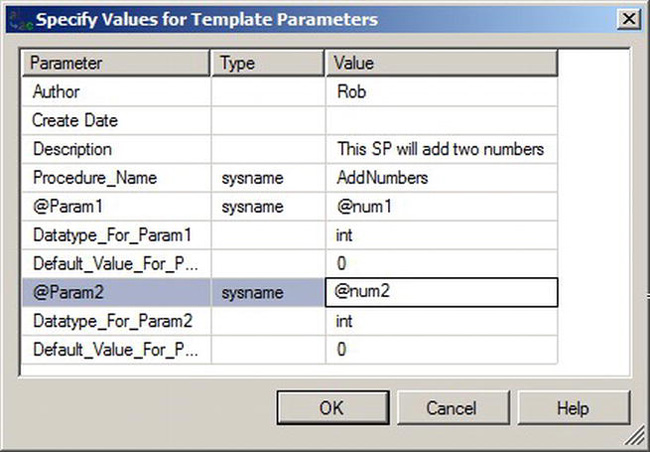
Figure 4-5. The Specify Values for Template Parameters dialog box
Let’s begin with the preceding template and create a simple stored procedure that adds two numbers. In the template parameters dialog, type AddNumbers for the Procedure Name; type @num1 for the @Param1 value and @num2 for @Param2. Click the OK button, and the Query Editor window will be updated with a script that contains the values that you entered in the dialog box. From here, you can further modify this script as needed. To make our AddNumbers procedure meaningful, we will have to add an output parameter @result and perform the addition by appending SELECT @result=@num1 +@num2 to the body of the stored procedure. The updated stored procedure follows, with changes in bold:
CREATE PROCEDURE AddNumbers

        -- Add the parameters for the stored procedure here

        @num1 int = 0,

        @num2 int = 0,

        @result int OUTPUT

AS

BEGIN

        -- SET NOCOUNT ON added to prevent extra result sets from

        -- interfering with SELECT statements.

        SET NOCOUNT ON;


    -- Insert statements for procedure here

        SELECT @result=@num1 +@num2

END

GO
To test this procedure, you can run the following code:
DECLARE @i INT

EXECUTE AddNumbers 1,4,@i OUTPUT

SELECT @i
The result will be 5. This stored procedure is very simple, but stored procedures used in regular applications can be very complex. Troubleshooting stored procedures has, until recently, been very difficult, so developers had many tactics to debug one that misbehaved—injecting code within the stored procedure to track values and adding code to force the values to name a few. If a problematic procedure was written in C# or VB.NET, developers could easily set up break points in the code, so that when the program hit that break point, the execution would stop and control would be given to the develop to step through the code line by line. It’s this advanced debugging capability that is also part of SSMS for both T-SQL code and CLR code within T-SQL stored procedures and user-defined functions.
Debugging in T-SQL
In the previous section, we created a stored procedure called AddNumbers. Suppose we want to troubleshoot this procedure within SSMS. To do so, we can add a breakpoint by clicking to the left of the statement where we want SQL Server to pause or moving the cursor to the statement and pressing the F9 key. The red circle added to the line indicate a breakpoint; see Figure 4-6.
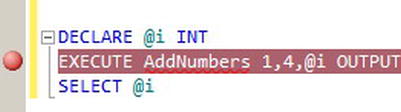
Figure 4-6. Breakpoint set on a T-SQL statement
To start debugging, click the debug button on the toolbar or press Alt+F5. The first statement will execute, and then the application will pause. A yellow arrow will show you the next statement to be executed, which, in our example, is the EXECUTE stored procedure statement. If you wanted SQL Server to execute the stored procedure in its entirety without stepping into the procedure and through each and every statement in it, you would click the Step Over button or press F10.
Since we want to peek inside the stored procedure and evaluate every line, click Step Into, or hit F11. Once you click Step Into, you can see the source of the stored procedure and the yellow arrow indicating the line to be executed next. Notice the Locals pane on the bottom of the screen. The Locals window shows variables and values in the given context. If you want to test a certain code path, you can simply overwrite the value here and see how the stored procedure behaves. Let’s change the value of @num2 to 5 instead of 4. Make sure that the “5” is colored red in the Locals window by pressing the Enter key after you change the value. Press F11 repeatedly to step through the code, and you will see the result come back as 6 (so one plus four really equals six). Being able to set breakpoints and step through code is just one small example of the power of debugging within SSMS. If you don’t want a breakpoint at every iteration of the stored procedure, you can specify one of many breakpoint conditions. For example, you can choose to only break only when the value of a number is greater than 10. Then too, you could set a breakpoint filter to break only on specific computers, processes, or threads. Breakpoints can also be exported via an XML file so that you can share them with others.
![]() Note In this chapter, we only touch on the debugging capabilities within SSMS. Visual Studio and the new SQL Server Developer Tools also perform debugging of code. Servers running SQL Server 2005 Service Pack 2 and above can be debugged using Visual Studio.
Note In this chapter, we only touch on the debugging capabilities within SSMS. Visual Studio and the new SQL Server Developer Tools also perform debugging of code. Servers running SQL Server 2005 Service Pack 2 and above can be debugged using Visual Studio.
Data-Tier Applications
Politics, project plans, and budgets—these are some of the major tension areas within many IT departments. DBAs and developers, in particular, seem to clash often, because they generally have different priorities. Consider the DBA who is concerned with maintaining a specific service level agreement (SLA) and the developer who needs to update an application to support integration of a new widget. A DBA hears not the need for the update but that the developer wants to take the application off line, which would violate the SLA.
Software can’t solve the politics of IT, but it can mitigate some of the conflicts by providing features and functionality that help developers focus on developing code and DBAs focus on maintaining databases and ensuring compliance with the SLAs they are given. This scenario applies often to data-tier applications.
Defining a Data-Tier Application
A data-tier application contains all of the database and instance objects used by an application. This entity is in reality is a ZIP file known as a dacpac file because of its .dacpac file extension. Theoretically, the developer creates this dacpac file and gives it to the DBA. The DBA then deploys this application to one or more instances of SQL Server, on premise or in the cloud via SQL Azure. The DBA’s job is not so much about micromanaging that specific application but rather managing all the applications as they relate to core performance factors like CPU, memory, and disk utilization. This division of labor is similar to what has happened with system administrators and the operating system. Given the recent industry push for virtualization of operating systems, system administrators do not spend their time managing a specific instance of an operating system; rather, they look more at the big picture (in their case, at the virtual host machine) and ensure its health and performance.
You can create a dacpac file out of an existing database via SSMS. To illustrate the data-tier application, let’s create a new database for a used car company. To start, open SSMS, and connect to your test database server. Next, open a New Query window, and type the following code:
USE MASTER

GO

CREATE LOGIN BobLogin WITH PASSWORD='pass@word1'

GO

CREATE DATABASE UsedCars

GO
USE UsedCars

GO

CREATE USER Bob FOR LOGIN BobLogin

GO

CREATE SCHEMA Sales

AUTHORIZATION Bob

GO

CREATE SCHEMA Product

AUTHORIZATION Bob

GO

CREATE TABLE Product.Inventory

(car_id INT NOT NULL PRIMARY KEY,

car_make VARCHAR(50) NOT NULL,

car_model VARCHAR(50) NOT NULL,

car_year SMALLINT NOT NULL)

GO

CREATE TABLE Sales.Orders

(order_id INT NOT NULL PRIMARY KEY,

order_date DATETIME NOT NULL,

order_carsold INT REFERENCES Product.Inventory(car_id),

order_saleprice SMALLMONEY NOT NULL)

GO

INSERT INTO Product.Inventory VALUES (1,'Saab',

'9-3',1999),(2,'Ford','Mustang',2003),(3,'Nissan','Pathfinder',2005)

GO
At this point, we have a very crude design with two simple tables. The Product.Inventory table contains a list of all cars available for sale. The Sales.Orders table lists when the car was sold. (This schema has some inherent problems that we will address later in this chapter. For now, assume this is the backend to our used car application.)
We can create a data-tier application out of an existing database by simply right-clicking the UsedCars database in SSMS object explorer and selecting Tasks and then “Extract Data-tier application”. This will launch a wizard that will help us create the dacpac file. The first page where we can enter input is the Set Properties page shown in Figure 4-7.
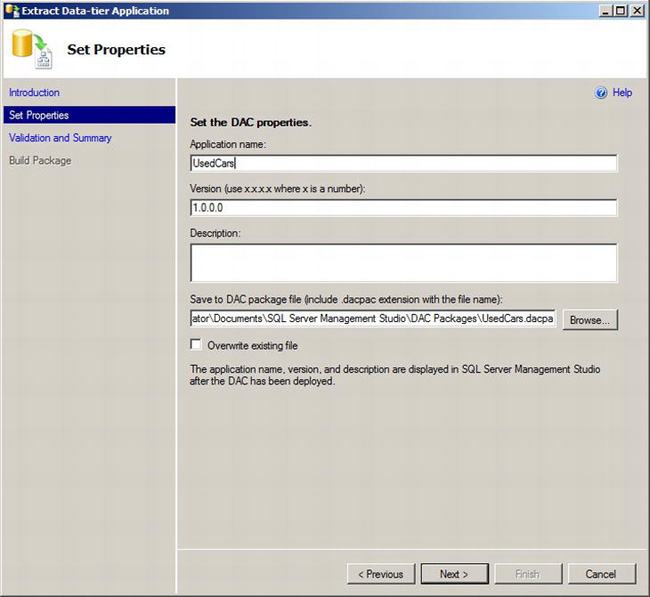
Figure 4-7. The Set Properties page in Extract Data-tier Application wizard
On this page, we can give the application a formal name and provide a description and a version number. The default location of our dacpac file will be in a subdirectory within the Documents path. In this example the default path is C:UsersAdministratorDocumentsSQL Server Management StudioDAC Packages.
The next page in the wizard performs a check to see if the objects within the database can be exported into a data-tier application. After these checks are performed, the wizard gives you a summary of the findings, as shown in Figure 4-8.
Not all objects within a database can be used in a data-tier application; this is one of the limitations of using data-tier applications. SQL Server Books Online contains a list of the objects that are supported at http://msdn.microsoft.com/en-us/library/ee210549(v=SQL.110).aspx. On this web page, flip between the SQL Server 2008 R2 and SQL Server 2012 documentation, and you will see that in SQL Server 2012, more objects are supported. It’s a good bet that as future editions of SQL Server come out that this list gets even longer.

Figure 4-8. The Validation and Summary page of the Extract Data-tier Application wizard
After you’ve completed the wizard’s steps, the dacpac file will be created. If you navigate to the folder where the dacpac file was created, you can see a single file called UsedCars.dacpac.
![]() Note If you are curious about the contents of the dacpac file, simply rename it to have a
Note If you are curious about the contents of the dacpac file, simply rename it to have a .zip extension and unzip its contents. In our UsedCar application example, the dacpac contained four XML files: [Content_Types], DacMetadata, LogicalObjectStream, and PhysicalObjectStream. If you load one of these XML files, you’ll see that its contents do not include the actual data of the database, just the database shell. If you are interested in learning more about the schema of the files, go to http://go.microsoft.com/fwlink/?LinkId=158286 to view the Data-Tier Application Schema File Format Structure Specification.
This data-tier application packages now contains all the objects needed for the UsedCars application. If you wanted to deploy the UsedCar application, simply connect to another SQL Server instance and deploy it.
Deploying a Data-Tier Application
Now that we have created the dacpac file for our UsedCars application, let’s connect to another instance of SQL Server and deploy it. To start, connect to another SQL Server instance using SSMS. Navigate to the Management and then Data-Tier Applications nodes in Object Explorer. Right-click the Data-Tier Applications node, and select “Deploy Data-tier application” to launch a wizard that asks you which dacpac file to deploy. This wizard is shown in Figure 4-9.
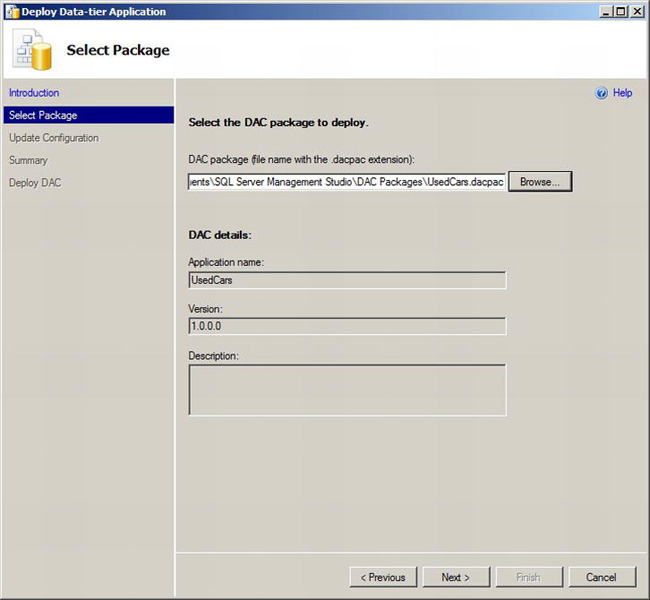
Figure 4-9. The Select Package page of the Deploy Data-tier Application wizard
After the wizard inspects the package, it asks you for the name of the new database and location to store the database files (see Figure 4-10).
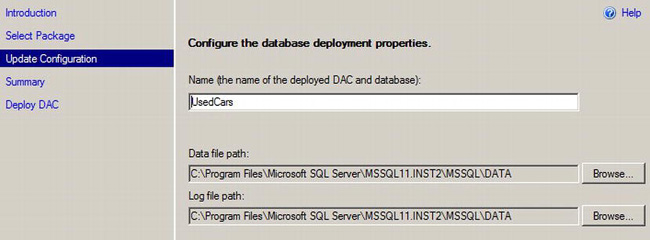
Figure 4-10. The Update Configuration page of the Deploy Data-tier Application wizard
Next, the wizard will provide you with a summary page and deploy your application. When the wizard completes, you will have a new node under “Data-tier applications” called UsedCars. Notice that you also have the UsedCars database created in this instance. At this point, our UsedCar application is deployed to the new server.
Registering an Existing Database as a Data-Tier Application
In the original SQL Server instance, we ran the Extract Data-tier Application wizard to create the dacpac file. If all you want to do is take an existing database and make a data-tier application on the same server, you can run the Register as Data-tier Application wizard. To help showcase the monitoring piece of data-tier applications, let’s register the UsedCar database on the original SQL Server instance we used to create the dacpac file. To do this, connect to the original instance of SQL Server, and navigate to the UsedCar database in Object Explorer. Next, right-click the database, and select Tasks and then “Register as Data-tier Application”. This will launch a wizard. The first page of this wizard will ask you to set the properties of the application. Much like we did in the wizard shown in Figure 4-7, we can enter a name, version number, and description. Once this wizard completes, our UsedCar application will appear in the Data-tier Application node of the Management node in Object Explorer for this instance of SQL Server as well.
Monitoring a Data-Tier Application Using the SQL Server Utility
Today, more applications in our datacenters need to be managed than in previous years. Not all of these are Tier 1, mission-critical applications. On the contrary, many are departmental Tier 2 and Tier 3 applications that support a subset of an organization. Data-tier applications allow the database administrator to focus on management at scale as opposed to micromanaging each individual application. In the example in this section, we have two instances of SQL Server: the default instance and an instance with a name of INST2. Since these applications are deployed, we can easily manage them through the SQL Server Utility.
In SQL Server 2008, the Performance Data Collector feature was introduced. This feature allowed DBAs to periodically poll a SQL instance for disk usage, query statistics, and server health information. Data from these queries would automatically be pushed into a database called the management data warehouse. This powerful tool gave DBAs a quick view of the health of a particular SQL Server instance. In SQL Server 2008 R2, this feature was expanded to include a concept called the utility control point (UCP). The UCP is a SQL Server instance designated as the central place to store and report on performance information. To create a UCP in SSMS, select the Utility Explorer menu item from the View menu in the SSMS toolbar. This will display a Getting Started document window containing a hyperlink to Create a Utility Control Point. Clicking this link will launch the Create Utility Control Point wizard. The first input screen is shown in Figure 4-11; it asks for a SQL Server instance to be used to create the UCP.
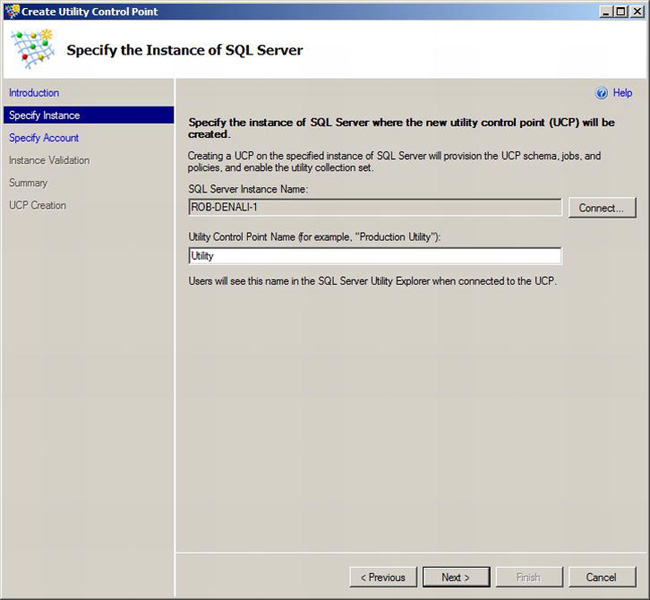
Figure 4-11. Specifying the SQL Server instance for the Create Utility Control Point wizard
The next page, shown in Figure 4-12, asks you for the Windows account that will be used to run the utility collect sets. Note that SQL Server Agent needs to be started on the instance you select to be the UCP. If you forget to start SQL Agent, the validation page will tell you and won’t allow you to proceed until you start the service. Once the wizard has passed the validation checks, the next page will create the UCP, as shown in Figure 4-12.
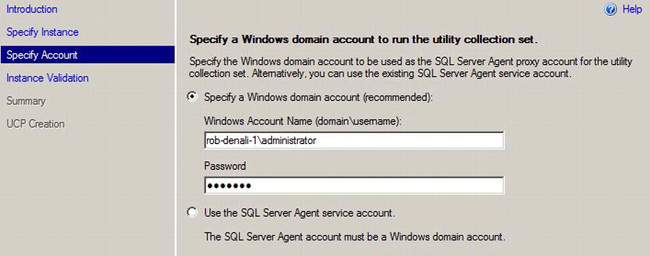
Figure 4-12. The Specify Account page of the Create Utility Control Point wizard
When the wizard has finished, it will bring you to the Utility Explorer Content document window. This window gives you a view of the overall health of all the managed instances and data-tier application components that the UCP is monitoring. Let’s go ahead and add a second instance of SQL Server to be monitored. Remember that the SQL Server Agent service must be started on any SQL Server instance that we want to monitor. To enroll a SQL Server instance, in the Utility Explorer Utility node, right-click the Managed Instances container node, and select Enroll Instance from the context menu. This will launch a wizard for which the first input is the name of the SQL Server instance to enroll. This page is shown in Figure 4-13.
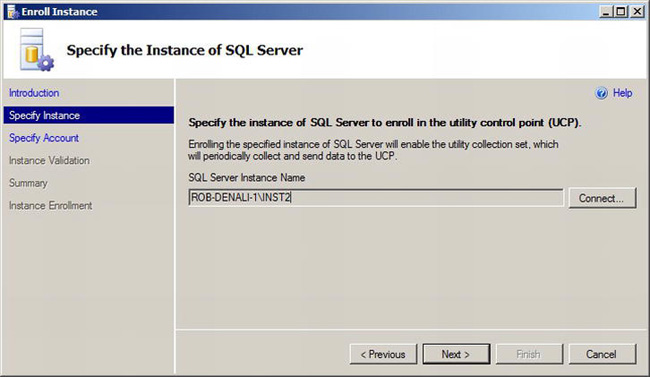
Figure 4-13. Specifying the instance of SQL Server in the Enroll Instance wizard
Next, we specify the Windows credentials for the account that will be obtaining the data on that instance of SQL Server; this page is similar to Figure 4-12. The wizard will then perform checks, and if these are passed, it will enroll the instance.
The UCP will be updated periodically from all the managed instances. At first, the new managed instance will be shown, but since no data has been collected, the display will show a gray circle as opposed to a green or red circle. This initial state for the second instance, ROB-DENALI-1INST2, is shown in Figure 4-14.
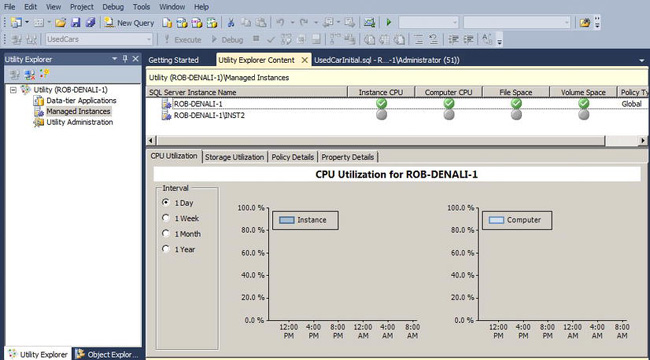
Figure 4-14. Managed instances
After a few minutes, both managed instances will report data to populate the Utility Explorer Content page. The real power of the UCP comes not only in its ability to get a snapshot of a server instance with respect to disk volume size and CPU trends over the past few days but in its ability to define a policy based on these statistics. For example, we can create a policy that says to mark a SQL Server instance as being overutilized if it’s CPU usage is over 70 percent when sampled four times an hour. These policies are flexible and can be managed by clicking the Utility Administration node in the Utility Explorer. If a policy has been violated, the green circle shown in Figure 4-14 would be red.
Up until now, we have been discussing using UCPs to manage instances of SQL Server. UCPs can also manage data-tier applications. Once you’ve enrolled a SQL Server instance into a UCP, any data-tier applications that were defined within that instance will show up in the Data-Tier Applications node in the Utility Explorer. Since we have registered the UsedCars application on both of our SQL Server instances, we can see the performance of this application by clicking the Data-Tier Application node. This node is shown in 4-15.
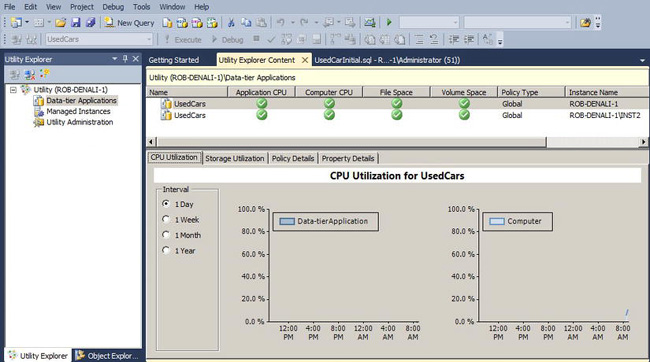
Figure 4-15. Data-tier Applications
We can now define policies like CPU and disk space limits to the application, just as we could for the instance.
Once we have all our managed instances enrolled, we can get a good, quick view of the health of our environment by clicking the Utility root node in the Utility Explorer. The resulting report is shown in Figure 4-16.
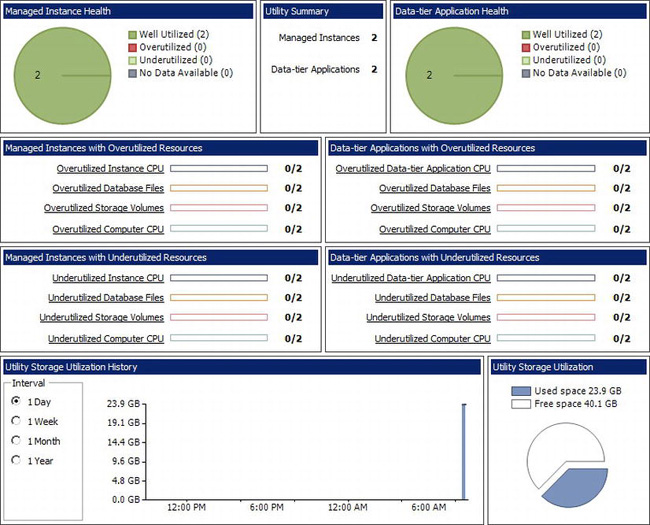
Figure 4-16. A utility node report
Since we only have two instances and not a lot of time has elapsed for data to be collected, this report looks fairly blank, but you can see the kind of content that you will be able to obtain from a real production environment.
SQL Server Utility is a great feature that allows DBAs to easily monitor their ever-expanding environments. For more information on SQL Server Utility, check out the “SQL Server Utility Features and Tasks” article located at http://msdn.microsoft.com/en-us/library/ee210548(v=SQL.110).aspx.
SQL Server Developer Tools
SQL Server is not just a relational database; it contains many other components including SQL Server Reporting Services, SQL Server Analysis Services, and SQL Server Integration Services. Each one of these components solves completely different problems, and for the most part, each is managed and developed differently than SQL Server itself. In earlier versions of SQL Server, developers who wish to develop reports for Report Server, cubes for Analysis Services, or packages for Integration Services used a tool called the Business Intelligence Development Studio. This tool was essentially a Visual Studio shell with snap-ins to provide the development experience. The experience is the same as having Visual C# or Visual Basic.NET within a Visual Studio shell. SQL Server developers could use Visual Studio itself, and depending on the version Visual Studio, would have advanced database tools to perform tasks like comparing schemas and data. Starting in SQL Server 2012, a new feature called SQL Server Development Tools (SSDT) attempts to bind Business Intelligence Studio and the database development capabilities within a traditional Visual Studio environment. At the time of this writing, the tool is in the Community Technology Preview 3 (CTP3) stage of development and can be downloaded from http://msdn.microsoft.com/en-us/data/gg427686.
The focus of SSDT is to accelerate the development of data-based applications against SQL Server and SQL Azure. SSDT supports development in the following platforms: SQL Server 2005, SQL Server 2008, SQL Server 2008 R2, SQL Server 2012, and SQL Azure.
Until now, we have been discussing development of SQL Server via SSMS. SSMS makes an active connection to SQL Server to obtain the necessary information to populate the IntelliSense context menus and to function usefully in general. If you’re wearing your development hat, you want a source-code–driven development model as opposed to a database-driven model. With SSDT, this is possible, since SSDT supports a robust, offline set of development features. Before we get into the offline experience, let’s look at SSDT in connected mode.
Working with SSDT in Connected Mode
Once you install SSDT, launch it from the Start Menu. To create a new project, click File, followed by New, and then Project from the main menu bar. Select SQL Server Database Project, and name it UsedCar Application. To connect to a SQL Server instance, click the View menu in the toolbar, and select Server Explorer. This will launch the Server Explorer (note that you may see a connection to a database called LocalDB; we will explain this later in this chapter). For now, click the Add Server button in the Server Explorer toolbar, and connect to the local SQL Server instance. The Server Explorer window will populate just like Object Explorer, as shown in Figure 4-17.
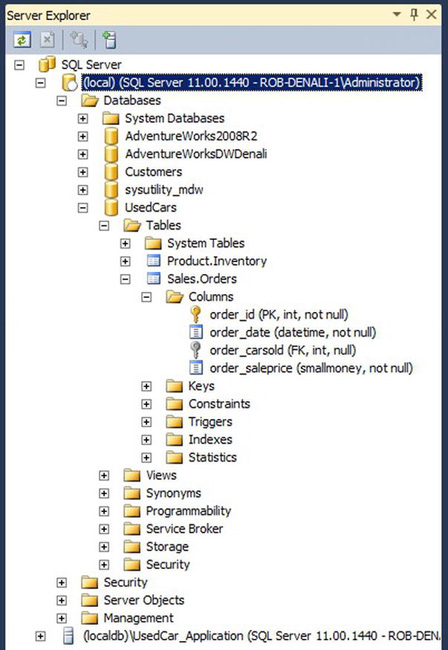
Right-click the server node, and select New Query. On this sample server, we have the UsedCar database and data-tier application installed. In connected mode, we have IntelliSense, just as we had with SSMS. For example, if you type SELECT * FROM SALES., you will get a drop-down list of available objects. If you select the Orders table and use your mouse to hover over the asterisk, you see additional information, such as all the columns that would be returned and their respective data types, as shown in Figure 4-18.
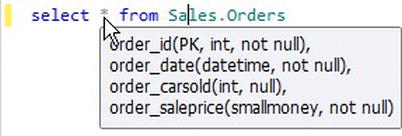
Figure 4-18. Table definition within the query
What if you wanted to delete or change an object but were not clear of its impact? One very useful feature of the tool is that it will tell you exactly what must happen to delete that object. Since our UsedCar schema is relatively small, to help illustrate this, we went to the AdventureWorks database and tried to delete the Product.Products table. Figure 4-19 shows the dialog that popped up when we tried to delete this object.
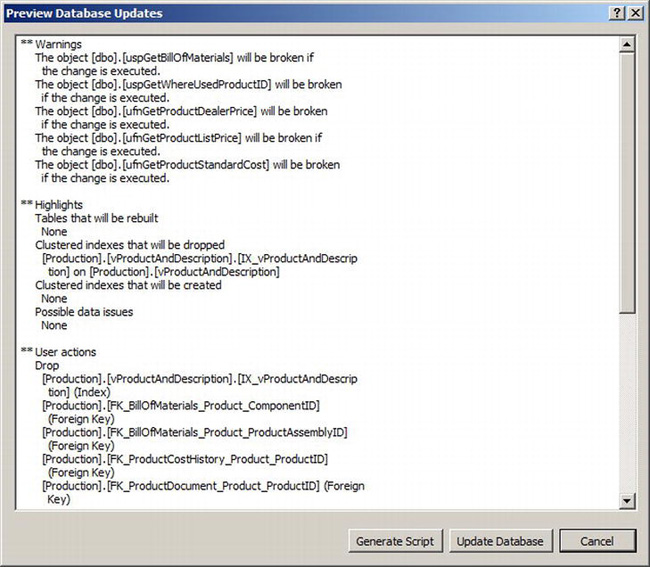
Figure 4-19. The Preview Database Updates dialog
In the dialog shown in Figure 4-19, you can see which functions would be broken, which indexes would be dropped and lots of other helpful information.
Working with SSDT in Offline Mode
A lot of power from SSDT comes in the offline mode. This is where developers can create projects that are source-code driven as opposed to database driven. To start, let’s create a project based on our UsedCar database. Right-click the UsedCar database node in the Server Explorer, and select, New Project to launch the Import Database dialog shown in Figure 4-20.
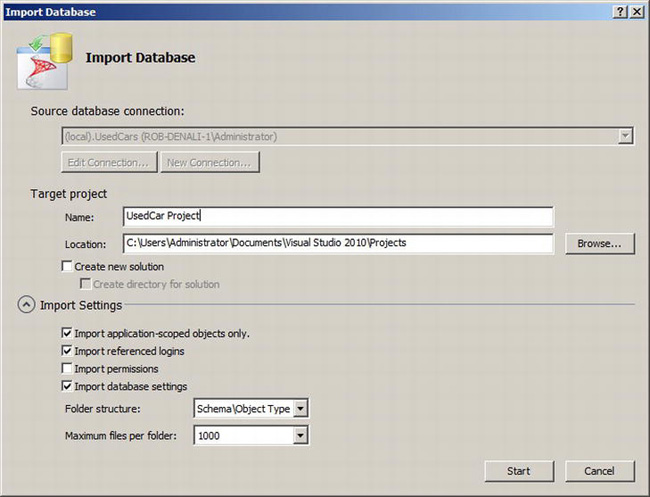
Figure 4-20. Import Database dialog
Type UsedCar Project for the name, and click the Start button. The dialog will go away for a minute and come back with a summary pane of the objects it created. When you click Finish, you can see that the Solution Explorer on the right-hand side of the screen has the schema that defines our database. In fact, it has .sql script files for all the objects including Bob and Bob User, our SQL login and database users, respectively.
Suppose we now want to add a column to the Inventory table to identify the asking price for the vehicle. To launch the table designer shown in Figure 4-21, you can double-click Inventory.sql in the Solution Explorer.
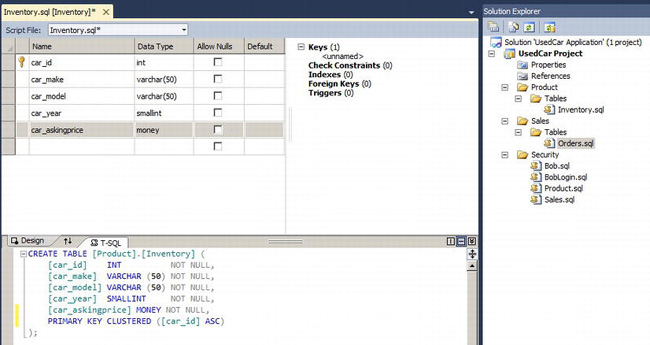
The designer is interactive: to add a new column, click an empty cell below car_year, and define the column name and data type, for example, type car_askingprice and money, respectively. The TSQL that makes up the object is updated in real time with what is in the grid. You can also update the table the other way around: for example, change the TSQL statement in the bottom window from “car_askingprice MONEY” to “car_askingprice SMALLMONEY”. Notice the grid value changed as well.
Click the Save button to save changes to the Inventory.sql file.
Suppose the developers made a lot of changes to the schema and had no idea if the tables on production server were the same as on their development server. One way they could check is to compare schemas. To do so, right-click the UsedCar Project node in Solution Explorer, and select Schema Compare. This will launch a dialog asking you for the source and destination. For the source, leave it pointed to the current project. For the destination, make a connection to the local SQL Server instance and UsedCar database. When you click OK, the comparison will be performed, and you will see our change in the UI shown in Figure 4-22.
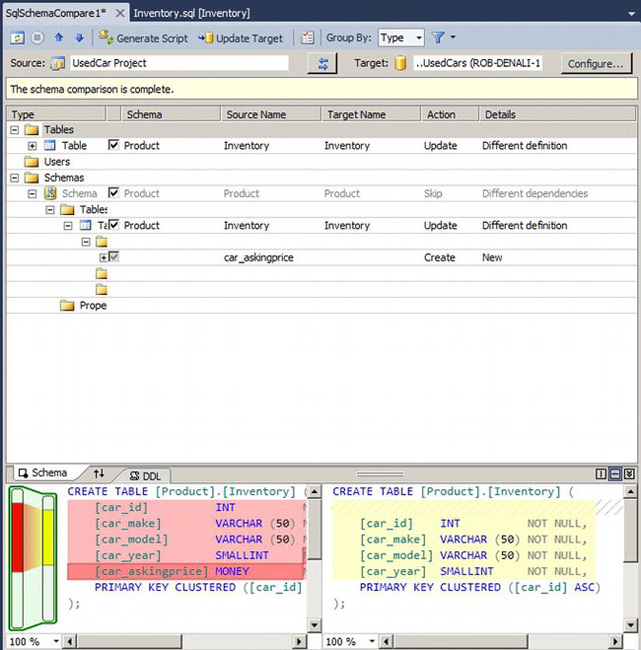
Figure 4-22. Schema Compare document window
From this UI, we can generate the T-SQL Script to make an update or issue the update immediately to sync both servers.
SSDT also supports refactoring. For example, if you want to change the name of a column of a table from CustomerID to Customer_ID, it will look through every object in the application and tell you what will be affected. It will then provide the update script needed to make those corrections.
Application Versioning
If we dive a bit deeper into the pain points of developing a database application, we can see that a database is challenging to code and master. Developers have to maintain script libraries for the application. These scripts do things like initialize database objects, update schemas, and other things to mitigate the fact that a database is stateful. Think of the scenario where a developer updates an application. The database targeted by the application is still the same database that existed before the update, so it now needs to be updated to accommodate the changes to the application. Since there is no versioning within SQL Server, it’s hard to tell for which version of the application the database is configured. The update scripts the developer writes are complex and critical to the success of the application, so once the new application is deployed, the DBA has to inspect these scripts to ensure they conform to the server instance that the application is deployed to. As you can see from this example, there are a lot of moving parts and issues to consider when developing a database application.
With SSDT, you can build a dacpac file out of the project to help with versioning. For our example, let’s build a dacpac file of the UsedCar project and deploy to our server. To start, right-click the UsedCar Project, and select Properties. In the “Output types” group box, check the “Data-tier application” check box, and click Build. This will create the dacpac file in the output directory of your solution. At this point, you could go to SSMS and import the data-tier application.
Assume that we did connect to a SQL Server instance and deploy this dacpac package. If we made any updates to the solution, we can set a new version of the dacpac and deploy it again on the same instance of SQL Server. The existing database that is a part of the dacpac on the SQL Server would be upgraded to the new version.
SQL Server LocalDB
SQL Server Express edition is a free version of SQL Server that is basically a throttled-down version of the full SQL Server engine. Despite hard limits on CPU and memory consumption, it is almost the same as Standard edition from a relational engine perspective. For SQL Server development, the idea was to include this free version for developers to use and learn with. In fact, Visual Studio includes SQL Server Express as an option to install. One of the problems SQL Server Express is that it is a heavyweight in a fight requiring a featherweight. SQL Server Express is a Windows service, which requires network configuration and attention. For developers, there is something better in SQL Server 2012 called LocalDB. LocalDB is a version of SQL Server that installs faster, has fewer prerequisites, and doesn’t require management of a database instance. Unlike SQL Server Compact edition, LocalDB is not an in process DLL that you bind to; rather, it’s an application that runs in the user mode as a separate process. LocalDB is not appropriate for server-based or multiuser environments because its opens the database files for exclusive use. It is, however, ideal for development environments because it fully supports T-SQL.
When we created a project in SSDT and navigated to the Server Explorer, you may have noticed that LocalDB was attached. This is the default deployment database for SSDT solutions.
![]() Note If you want to read more about LocalDB, check out the following blog:
Note If you want to read more about LocalDB, check out the following blog: http://blogs.msdn.com/b/sqlexpress/archive/2011/07/12/introducing-localdb-a-better-sql-express.aspx.
Summary
SQL Server Management Studio is a tool that has been used historically by just the DBA community. Throughout the iterations of SSMS, additional functionality has been placed in the application that makes development easier. Although not classified as a development tool, SSMS gives you the ability to perform development-related tasks like debugging Common Language Runtime (CLR) and T-SQL stored procedures. A fairly new deployment paradigm called data-tier applications are used to package database application code and objects for easy deployment, management, and updates. For developers, a new tool called the SQL Server Developer Tools was introduced in SQL Server 2012 as a Visual Studio experience that makes it easy to develop data applications and deploy them to SQL Server or to SQL Azure.