C H A P T E R 6
Transact-SQL
Transact-SQL (T-SQL) is the dialect of the Structured Query Language (SQL) adopted by Microsoft’s SQL Server database engine. T-SQL has been around since the early days of the Sybase code in the early 1990s. It has evolved throughout the years and today is a robust programming language based on the ANSI SQL: 2008 standard. In this chapter, you will learn how to access data using T-SQL statements as well as how to use many of the programming capabilities within the database engine, including stored procedures and functions.
The VetClinic Sample Database Revisited
Before diving in, let’s revisit the VetClinic database that you created in the previous chapter. You’ll use that database for all of the examples in this chapter. If you haven’t already created that database, you can create it now by executing the following code:
USE [master]

GO


CREATE DATABASE [VetClinic]

GO


USE [master]

GO


ALTER DATABASE VetClinic

SET RECOVERY FULL

GO


USE [VetClinic]

GO


CREATE TABLE [Pets]

(pet_id         INT                       PRIMARY KEY,

pet_name    VARCHAR(50)    NOT NULL,

pet_weight  INT                       NULL)

GO
ALTER TABLE [Pets]

ADD [MicroChipID] VARCHAR(100) NOT NULL

CONSTRAINT [MicroChip_Unique] UNIQUE

GO


USE [VetClinic]

GO


INSERT INTO Pets

VALUES(1,'Zeus',185,'398BF49'),

(2,'Lady',155,'191ABBC'),

(3,'Deno',50,'790AG441'),

(4,'Rex',44,'CDD81322'),

(5,'Rover',15,'A8719841')

GO


CREATE TABLE [Owners]

(owner_id         INT                     PRIMARY KEY,

pet_id                INT                     REFERENCES Pets(pet_id),

owner_name    VARCHAR(50)   NOT NULL)

GO


INSERT INTO Owners VALUES(1,2,'Bryan'),

(2,3,'Rob'),

(3,1,'Rob')


CREATE TABLE MicroChips

(MicroChipID VARCHAR(100) UNIQUE)

GO


INSERT INTO MicroChips VALUES('34BA123')

GO
Data Types
By now, you should be familiar with some of the data types available. The common ones that are used throughout this book are INT and VARCHAR. SQL Server Books Online has a complete list of all the data types that are supported within SQL Server. You can find the “Data Types (Transact-SQL)” article at http://msdn.microsoft.com/en-us/library/ms187752(v=SQL.110).aspx. Data types are used in many places within SQL Server, including as column definitions, as parameters to functions and stored procedures, and as variables. Table 6-1 describes a few of the common data types you may use in everyday tasks.
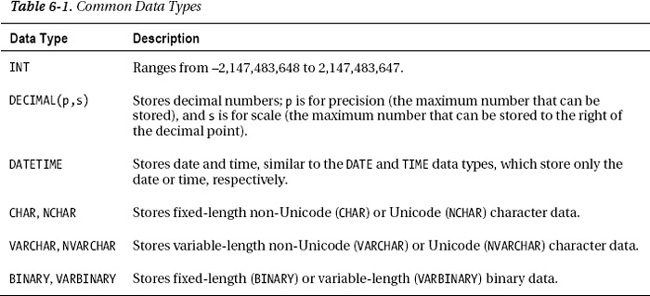
Each data type has different characteristics, including how much space on disk each value takes up. A VARCHAR data type can be defined for 20 characters but takes up only a few bytes on disk. A quick way to determine how many bytes are used is to use the DATALENGTH function. In the following example, the @name variable has the text Rob:
DECLARE @name VARCHAR(20)

SET @name='Rob'

SELECT DATALENGTH(@name)
When this script is run, the size of @name is 3 bytes. If you were to change it to SET @name='Robert' and rerun the query, the size would be 6 bytes.
Fixed data types, such as integers and money, always take the same storage space regardless of the value. Taking up more storage space than is needed not only wastes disk space but also decreases query performance because there will be more disk I/O as a result. SQL Server 2008 provides native data compression technologies that compress at the row and page levels, which helps to mitigate the performance and storage issues. Regardless of whether or not you decide to compress your data, it’s a good idea to analyze your database to determine whether the data types are defined appropriately for the given data.
Unicode vs. ANSI
If you are new to the database world and haven’t had a lot of experience programming, you may be curious about Unicode character strings versus ANSI character strings. To truly understand this, you must look to the origins of computers. The American National Standards Institute (ANSI) came out with a standard known as American Standard Code for Information Interchange (ASCII). This standard defines letters, numbers, and symbols that are referred to as a character set. The ASCII character set handles 256 different characters generally stored as 1 byte each within a computer. With only 26 letters in the English language, you may be wondering why anyone would need more than 256 characters. If the world spoke only English, no one would, but our friends in China struggled to figure out how to represent their thousands of characters within this 256-character limit. Unicode, however, allows the storage of 2 bytes per character. These 2 bytes allow for more than 65,000 different characters. All modern operating systems use Unicode, and SQL Server supports both the Unicode and ANSI character sets.
Living with NULL
NULL is not your annoying cousin; it identifies that a value does not exist in the database. Take the Pets table definition, for example:
CREATE TABLE [Pets]

(pet_id         INT                         PRIMARY KEY,

pet_name    VARCHAR(50)      NOT NULL,

pet_weight  INT                         NULL)

GO
In this scenario, it’s OK that the pet weight is not entered. However, it is not acceptable for the pet to have no name. In the table definition, you see pet_name was defined with a NOT NULL keyword. This means that the absence of a value cannot be a valid value for the pet_name column. Conversely, pet_weight was defined as NULL, meaning that you could insert a value into the table and leave out the pet’s weight. If you queried the newly entered data, you would see that pet_weight is NULL.
Data Manipulation Language
Most of what you’ll do with T-SQL centers around the Data Manipulation Language (DML). DML consists of the four statements SELECT, INSERT, UPDATE, and DELETE. These are the four statements that you use to get data into a database, update and delete that data, and get it back out again.
SELECT
The SELECT DML statement allows users to retrieve data from the database. A simplified version of the syntax follows:
SELECT <select_list> FROM <table_source> [WHERE <search_condition>]
where the parameters are defined as follows:
<select_list>specifies the columns that you want to return in the query.<table_source>is the table that you want to retrieve data from.<search_condition>is used to filter or scope the results that you are seeking.
The WHERE clause is optional. If you omit this clause, you will return all the rows from the given table. You can think of the WHERE clause like a Boolean expression. That is, the expression will be evaluated across every row in the table.
Basic SELECT Queries
Let’s look at an example. If you wanted to return all the pets’ names and weights, you would issue the following SELECT query:
SELECT pet_name, pet_weight FROM Pets
This statement would return the following result set:
pet_name     pet_weight


Zeus             185


Lady             155


Deno              50


Rex               44


Rover             15
If you wanted to narrow the result set, you could add a WHERE clause like the following:
SELECT pet_name, pet_weight FROM Pets WHERE pet_weight > 100
This WHERE expression would cause the result set to return only pets whose weight was greater than the value 100.
In the example, you explicitly asked SQL Server to return specific columns from the table. You could have used an asterisk (*) instead, and this would have returned all the columns in the table. To return all the columns in the Pets table, you would issue the following statement:
SELECT * FROM Pets
Sometimes tables have millions or billions of rows, and you don’t really want to enumerate all of them at once. There are expressions like TOP that you can use to limit the result set. TOP specifies that only a specific number of results or percentage of results will be returned from the query. For example, SELECT TOP 3 * FROM Pets will return the first three pets stored within the table, as shown here:
Pet_id   pet_name   pet_weight   MicroChipID


1           Zeus          185        398BF49


2           Lady          155        191ABBC


3           Deno           50       790AG441
This limiting capability is also useful when used in conjunction with other clauses defined within the query. The ORDER BY clause is used to instruct SQL Server to order the result set in a particular way. You specify the columns to sort by and the direction of the sort as parameters of the ORDER BY clause. For example, if you wanted to know the top three lightest pets, you would issue the following query:
SELECT TOP 3 * FROM Pets ORDER BY pet_weight ASC
This would yield the following result:
Pet_id   pet_name   pet_weight   MicroChipID


5           Rover         15        A8719841


4           Rex           44        CDD81322


3           Deno          50        790AG441
The ASC parameter instructs SQL Server to order the results in ascending order, or lowest to highest. If you wanted to go the other way and order from highest to lowest, you could have specified DESC, which means descending.
A key value for relational databases is the fact that sometimes different tables hold data that is related to each other. This data can be combined and returned in a single result set. In this example, you have a Pets table and an Owners table. Pets have owners, so if you wanted to figure out which owners have pets with a weight greater than 100, you could accomplish this by joining the tables within the query. When you join together tables, you have the option of specifying what to do with the rows that are matched and those that are not matched. What happens depends on what kind of JOIN you include in your query. For example, if you wanted to know all the pets who have owners, you could execute this statement:
SELECT pet_name,owner_name FROM Pets

 INNER JOIN Owners

 ON Pets.pet_id=Owners.pet_id
This statement will yield the following results:
pet_name     owner_name


Lady            Bryan


Deno            Rob


Zeus            Rob
If you look at the data in both the Pets and Owners tables, you can see that two additional pets, Rex and Rover, were not displayed. This is because the Owners table does not have a matching pet_id for these two pets.
If you wanted to list all the pets regardless of whether they had an owner, you could issue a LEFT OUTER JOIN, which will always include the data from the table defined on the left side of the JOIN statement. The following is an example of listing all the pets and their owners, if they have any:
SELECT pet_name,owner_name FROM Pets

 LEFT OUTER JOIN Owners

 ON Pets.pet_id=Owners.pet_id
This statement will yield the following result:
pet_name   owner_name


Zeus           Rob


Lady           Bryan


Deno           Rob


Rex            NULL


Rover          NULL
Notice that NULL values result when owners do not exist. Rex has no owner name on record. The system doesn’t make up a name where none exists. When no value exists, the system will return NULL.
![]() Note
Note INNER JOIN is the default join if you do not specify the join type.
There are other types of joins: RIGHT OUTER joins are similar to LEFT OUTER joins except they include the result set for the table to the right of the JOIN statement. A FULL OUTER join lists all results for both tables to the left and right of the JOIN statement. For more information on the different join types, see the SQL Server Books Online article “Using Joins” at http://msdn.microsoft.com/en-us/library/ms191472.aspx.
Paging Support
When you want to view a product catalog on a web page, you usually see the results returned from 1–25 for example. The actual query, though, might have returned hundreds or thousands of results. A lot of developers spent time writing complex code in the middle-tier web page layer or the database layer to parse the full query for the specified range. Starting in SQL Server 2012, native paging support is available that allows you to ask for specific ranges of rows to be returned. To illustrate, let’s add a few more rows of data to our Pets table:
INSERT INTO Pets

VALUES(6,'Roscoe',55,'F5CAA29'),

(7,'Missy',67,'B7C2A59'),

(8,'George',12,'AA63BC5'),

(9,'Spot',34,'CC8A674')

GO
If you wanted to know the three heaviest pets, you could leverage the TOP T-SQL statement as follows:
SELECT TOP 3 pet_name,pet_weight FROM Pets ORDER BY pet_weight DESC
This would get the answer, but it would be difficult to find out the next three heaviest pets. This is where the OFFSET and FETCH statements work well. Consider the following statement, which uses OFFSET (0) to specify stating at the beginning and FETCH NEXT 3 ROWS to request only the three heaviest pets:
SELECT pet_name,pet_weight FROM Pets

    ORDER BY pet_weight DESC

        OFFSET (0) ROWS    FETCH NEXT 3 ROWS ONLY
Running this statement yields the same result as our TOP 3 statement:
pet_name   pet_weight


Zeus           185


Lady           155


Missy          67
If you wanted to know the next three, you would set the offset to start at the third result and fetch the next three. Notice the use of OFFSET (3) in the following example:
SELECT pet_name,pet_weight FROM Pets

    ORDER BY pet_weight DESC

        OFFSET (3) ROWS    FETCH NEXT 3 ROWS ONLY;
This would yield the following result:
pet_name   pet_weight


Roscoe       55


Deno         50


Rex          44
More information on OFFSET and FETCH is available in the ORDER BY documentation in SQL Server Books Online located at http://msdn.microsoft.com/en-us/library/ms188385%28v=SQL.110%29.aspx.
SELECT is arguably the most frequently used DML statement. Many different expressions and clauses are possible to use with SELECT. Mastering the use of this statement will be important in your daily use of SQL Server or any other database platform. SQL Server Books Online covers the syntax in the article “SELECT (Transact-SQL)” located at http://msdn.microsoft.com/en-us/library/ms189499.aspx.
INSERT
The INSERT DML statement allows users to write data into a database. A simplified example of the syntax follows:
INSERT <table_name> [(column list)]

VALUES( { DEFAULT | NULL | <expression> } [ ,...n] )
where the parameters are defined as follows:
<table_name>is the table that you want to insert data into.<column list>is a list of specific columns you want to insert data into. This is optional.<expression>is the actual data that you want to insert. The type of data depends on the data type that is defined for the particular column.
Basic INSERT Queries
The following sample script will add more pets to the Pets table:
INSERT INTO Pets (pet_id, pet_name, pet_weight, MicroChipID)

 VALUES (10,'Roxy',7,'1A8AF59'),

(11,'Champ',95,'81CB910'),

(12,'Penny',80,'C710A6B')
Alternatively, you could have omitted the specific columns you wanted to insert. If you do this, SQL Server will assume that the first value will be for the first column definition, the second value entered will be for the second columns definition, and so on. For example, since you are inserting information into all the columns in the Owners table, you could issue this statement and omit owner_id, pet_id, and owner_name from the statement:
INSERT INTO Owners VALUES (4,5,'Frank')
Identity and Sequences
When the Pets table was defined, a primary key column for pet_id was created. Usually, a table has a primary key column that uniquely identifies the information for that specific row of data. Up until now, when an INSERT statement was given, we supplied this primary key. In a real-world application, the next available primary key might not be known, or it may require some T-SQL execution to obtain the next value. This is one of the scenarios where the IDENTITY property of the CREATE TABLE statement can help with automatically generating a value for the new row. Since we already have the Pets table, to use the INDENTITY property, we would have to drop the table and create it. To help illustrate the property create a new table called PetFood as follows:
Now, as data is inserted into the PetFood table, you do not need to specify the pet_food identity, as shown by the following T-SQL statement:
INSERT INTO PetFood VALUES('Lamb and Rice'),('Chicken'),('Corn')
To view the table issue a SELECT * FROM PetFood statement. This will yield the following result:
pet_food_id   food_name


1             Lamb and Rice


2             Chicken


3             Corn
Notice that you didn’t have to figure out what the next available pet_food_id was when you inserted the data into the table. There is a good article on working with identity located at the following web site: www.simple-talk.com/sql/t-sql-programming/identity-columns.
IDENTITY is a powerful and useful property, but it is also limited in some areas. Perhaps the biggest issue with IDENTITY comes with its restriction to a single table. It is hard to share a common identity value across multiple tables in a single transaction. This is because the identity value is created after the insert. There are some ways to get around this, but a much better solution would be to use a SEQUENCE object. A SEQUENCE object can easily be used by more than one table because it’s not bound to any particular table; rather, it’s a separate independent object. To create a SEQUENCE object, use the CREATE SEQUENCE statement as follows:
CREATE SEQUENCE PetFoodIDSequence

    AS INT

    START WITH 1

    INCREMENT BY 1
Let’s drop and re-create our PetFood table so we can use the new PetFoodIDSequence object:
DROP TABLE PetFood

GO

CREATE TABLE PetFood

(pet_food int DEFAULT (NEXT VALUE FOR PetFoodIDSequence),

 food_name VARCHAR (20));

GO
Now, we can insert our pet food as before using the INSERT statement:
INSERT INTO PetFood (food_name) VALUES('Lamb and Rice'),('Chicken'),('Corn')
Running a SELECT statement on the PetFood table will yield the same results as when we used the IDENTITY property.
![]() Note For more information on
Note For more information on SEQUENCE read the following article: http://www.databasejournal.com/features/mssql/sql-server-denali-sequence-object.html.
UPDATE
The UPDATE DML statement allows the user to modify existing data within the database. A simplified definition follows:
UPDATE <object>

SET { column_name = { <expression> | DEFAULT | NULL }

[ WHERE <search_condition> ]
where the parameters are defined as follows:
<object>is the table or view that is being updated.column_nameis the name of the column of data that will be updated.<search_condition>is used to filter or scope the list of rows to update.
As an example, let’s update the Owners table and change the ownership of dogs owned by Frank to Courtney. You can do this with the following UPDATE statement:
UPDATE Owners SET owner_name='Courtney' WHERE owner_name='Frank'
The WHERE clause is optional. However, if you do not specify a search condition, you will update every row. So, unless updating all rows is what you intend to do, you should always specify a WHERE clause.
DELETE
The DELETE DML statement allows users to remove data from the database. A simplified definition follows:
DELETE FROM <table_source> [ WHERE <search_condition> ]
where the parameters are defined as follows:
<table_source>specifies the table that you want to remove items from.<search_condition>is used to scope the amount of rows that will be deleted.
The following example uses the DELETE statement to remove the pet named Penny:
DELETE FROM Pets WHERE pet_name = 'Penny'
The WHERE clause is optional. If you omit it, you will delete all rows in the specified table. Be very careful about omitting it. Omitting the WHERE clause and inadvertently deleting all data from a table is a common mistake. It’s a mistake that you truly want to avoid making.
Transactions
Transactions enable users to create T-SQL batch statements that are either completely applied or do nothing to the existing data. When changes are applied, it is said that the transaction has committed. When the batch is stopped for any reason, such as by an error or being intentionally canceled, the transaction will be rolled back, and changes made within the transaction will not be made to the data.
Executing Transactions
The following example shows how to begin a transaction, execute some statements, and then commit the transaction. The example swaps the names of the two pets, Lady and Deno:
BEGIN TRANSACTION

UPDATE Pets SET pet_name='Lady' WHERE pet_id=3

UPDATE Pets SET pet_name='Deno' WHERE pet_id=2

COMMIT
Notice that the two UPDATE statements are bracketed by the statements BEGIN TRANSACTION and COMMIT. These two UPDATE statements form a transaction. Either they will both succeed or they will both fail. And if they succeed, they will both appear to other database users to have executed simultaneously. No other user but you will ever see both pets having the same name of Lady. You, as the person executing the transaction, are the only user with the ability to query the intermediate state between the two UPDATE statements. We’ll talk more about this in the “Isolating Transactions” section.
If you are executing a transaction and change your mind or make a mistake, you can issue a ROLLBACK statement to undo the damage, for example:
BEGIN TRANSACTION

DELETE FROM Pets

ROLLBACK
This example deletes all data from the Pets table and then issues a ROLLBACK statement to undo that deletion. You can protect yourself by following this pattern. Wrap critical DELETE and UPDATE statements in a transaction. Then, you can roll back in the event you mistype, omit the WHERE clause, or otherwise make a mistake.
Isolating Transactions
When you issue a BEGIN TRANSACTION statement, you are telling SQL Server that from this point in the T-SQL batch, you intend to isolate the effect of the statements from the rest of the user connections. Each transaction lasts either until it completes without errors and a COMMIT TRANSACTION statement is issued or until errors are encountered and all modifications are erased with a ROLLBACK TRANSACTION statement.
To help illustrate the transactional isolation from the rest of user connections, consider the following case where there are two different connections to SQL Server. User1 is connected and issues the following statement:
BEGIN TRANSACTION

UPDATE Pets SET pet_name='Big Boy' WHERE pet_id=5

SELECT pet_name FROM Pets WHERE pet_id=5
At this point, the result set for the SELECT statement is as follows:
pet_name


Big Boy
User2 is connected to the same SQL Server and issues the following statement:
SELECT pet_name FROM Pets WHERE pet_id=5
The result set for User2’s SELECT statement follows:
pet_name


Rover
User2 still sees the old value until User1 issues a COMMIT TRANSACTION statement.
This isolation is valuable and critical to maintain consistency of the database. As a user, you can change the behavior of the isolation. If User2 wanted to know the value even though User1 did not commit the transaction yet, User2 could manually set the transaction isolation level using the SET TRANSACTION ISOLATION statement.
To read the uncommitted data in the Pets table, User2 would issue the following code:
SET TRANSACTION ISOLATION LEVEL READ UNCOMMITTED

GO

SELECT pet_name FROM Pets WHERE pet_id=5

GO
This would return the uncommitted Big Boy value instead of the original Rover value. It is important to note that it is not a best practice to keep transactions open; they take up valuable server resources, and other users could be depending on the data being used within the transaction. In this example, User1 should commit or roll back the transaction as soon as possible.
There are many different isolation levels that can be set. SQL Server Books Online describes all of these in detail in the article “Set Transaction Isolation Level (Transact-SQL)” at http://msdn.microsoft.com/en-us/library/ms173763.aspx.
Deadlocks
Any time you have multiple users trying to access and update the same piece of data, you will run into problems. One user may have read a value and, based on that value, performed some work, when in reality the value was updated right after the original read and now causes problems for the user. SQL Server places locks at different database levels, such as at rows or the entire table itself. This makes the multiuser scenario possible.
A lock is a way to synchronize multiple user access to the same piece of data. Locks have different modes, such as shared or exclusive. Depending on the lock type and the actions each user is trying to perform, you may end up in a deadlock situation. Deadlocks occur when User1 holds a lock on a resource and is requesting access to another resource that User2 holds a lock on. User1 has to wait for User2 to release the lock. However, User2 is also requesting a lock on User1’s resource. Thus, User1 and User2 are both waiting for each other to release the locks. In the end, SQL Server will choose one to be the victim and roll back that user’s transaction. You can find an in-depth discussion on deadlocking in the SQL Server Books Online article called “Deadlocking” at http://msdn.microsoft.com/en-us/library/ms177433.aspx.
SQL Server does a good job of providing tools to debug deadlock situations. You can use SQL Server Profiler to capture a SQL trace. Figure 6-1 shows the output of SQL Server Profiler when a deadlock was encountered.
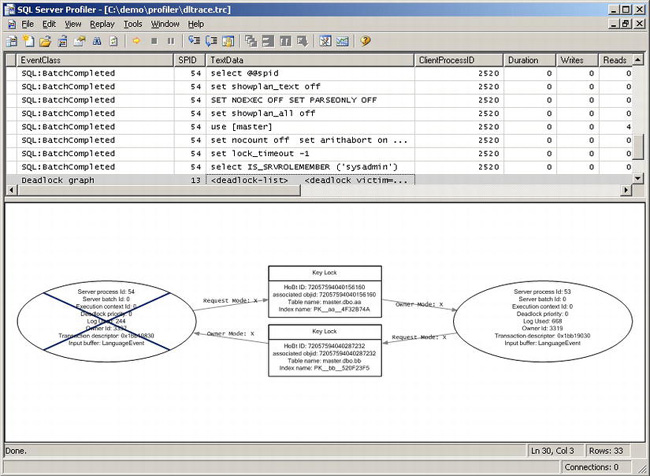
Figure 6-1. SQL Server Profiler trace showing a deadlock event
For a deadlock event, SQL Server Profiler displays the server process IDs that were involved with the deadlock, as well as the deadlock victim. Figure 6-2 shows a detailed view of the deadlock graph showing the actual T-SQL statement that was issued by the deadlock victim.
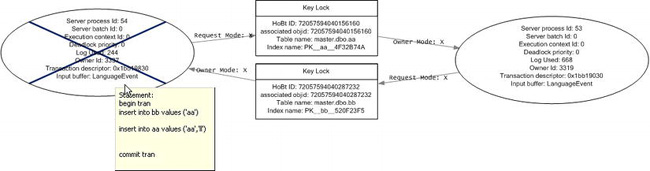
Figure 6-2. Deadlock event showing T-SQL statement issued by the deadlock victim
Alternatively, the Performance Data Collector feature in SQL Server 2008 captures locking as part of the Server Activity collection set. You’ll learn more about SQL Server Profiler and the Performance Data Collector in Chapter 11.
Stored Procedures
A stored procedure is a block of T-SQL or .NET code that is stored within a database. This code is similar to other procedures in other languages because it accepts parameters as inputs and can provide output to the calling application or user. Stored procedures make building database applications easy.
Stored procedures contain a header and a body. In the header, you define the input and output parameters. In the body is the code. For example, the following CREATE PROCEDURE statement creates a procedure that will take a pet name and return the microchip ID for that pet:
CREATE PROCEDURE GetID

@name VARCHAR(50)


AS


BEGIN


SELECT MicroChipID FROM Pets WHERE pet_name=@name


END
Parameters are optional. In this example, you need to specify a name. To execute this procedure, you can issue the following statement:
EXEC GetID 'Roxy'
The return the value is 1A8AF59, which is the value of Roxy’s microchip.
Creating Stored Procedures Using Templates
SSMS provides a template to use when creating a new stored procedure. To view this template, navigate to the Stored Procedures node within the Programmability node of the VetClinic database. Select New Stored Procedure from the context menu. This will open a Query Editor window with the following template:
-- ================================================

-- Template generated from Template Explorer using:

-- Create Procedure (New Menu).SQL

--

-- Use the Specify Values for Template Parameters

-- command (Ctrl-Shift-M) to fill in the parameter

-- values below.

--

-- This block of comments will not be included in

-- the definition of the procedure.

-- ================================================

SET ANSI_NULLS ON

GO

SET QUOTED_IDENTIFIER ON

GO

-- =============================================

-- Author:         <Author,,Name>

-- Create date:  <Create Date,,>

-- Description: <Description,,>

-- =============================================

CREATE PROCEDURE <Procedure_Name, sysname, ProcedureName>

  -- Add the parameters for the stored procedure here

  <@Param1, sysname, @p1> <Datatype_For_Param1, , int> =

     <Default_Value_For_Param1, , 0>,

  <@Param2, sysname, @p2> <Datatype_For_Param2, , int> =

     <Default_Value_For_Param2, , 0>

AS

BEGIN

   -- SET NOCOUNT ON added to prevent extra result sets from

   -- interfering with SELECT statements.

   SET NOCOUNT ON;


    -- Insert statements for procedure here

   SELECT <@Param1, sysname, @p1>, <@Param2, sysname, @p2>

END

GO
Having the syntax already present is helpful, but SSMS makes working with templates easy by giving you a dialog box to use to fill in the values. To launch the Specify Values for Template Parameters dialog box, select this option from the Query menu in SSMS. Figure 6-3 shows this dialog box.
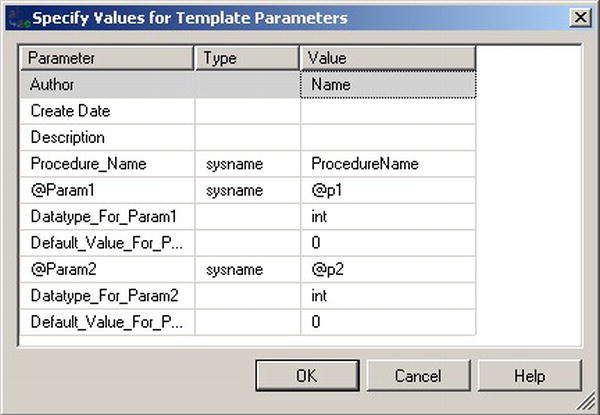
Figure 6-3. Input dialog box for templates
Once you fill the values in the dialog box and click OK, the template automatically updates the CREATE STORED PROCEDURE text in the Query Editor with the data you provided in the dialog box.
Templates make it very easy to create procedures. Many templates are available for SQL Server. To access the list of templates, select Template Explorer from the View menu in SSMS. This will launch a Template Browser window, shown in Figure 6-4.
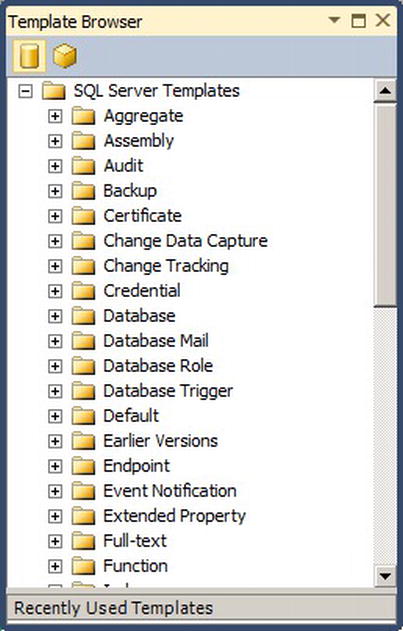
Figure 6-4. Template Browser window in SSMS
Note that there are two buttons on the top of this dialog box; the first one shows SQL Server templates, and the second shows Analysis Services templates. To use a template, simply double-click it, and the template will load in a new Query Editor window.
Modifying Stored Procedures
SSMS does a great job of enumerating all the stored procedures within the database. They are all listed under the Programmability node, which is under a specific database. To modify a stored procedure, you need to issue an ALTER STORED PROCEDURE statement. To modify the GetID procedure created earlier using SSMS, select Modify from the context menu of the GetID stored procedure. This will launch a Query Editor window with the ALTER STORED PROCEDURE text in it. The actual script generated by SSMS is as follows:
USE [VetClinic]

GO

/** Object:  StoredProcedure [dbo].[GetID]    Script Date: 04/29/2009 **/

SET ANSI_NULLS ON

GO

SET QUOTED_IDENTIFIER ON

GO

ALTER PROCEDURE [dbo].[GetID]

@name VARCHAR(50)

AS

BEGIN

SELECT MicroChipID FROM Pets WHERE pet_name=@name

END
SSMS saves you from a lot of typing when you are working with stored procedures.
System Stored Procedures
If you navigate around SSMS and the Programmability node as described earlier, you may notice a System Stored Procedures folder. There are quite a number of these, and each serves its own purpose within SQL Server. For example, the SQL Server Agent job scheduler does not have native DDL statements for creating jobs, so it uses system stored procedures to create and manage jobs. For a complete list, see the SQL Server Books Online article called “System Stored Procedures (Transact-SQL)” at http://msdn.microsoft.com/en-us/library/ms187961.aspx.
![]() Note System stored procedures usually start with the characters
Note System stored procedures usually start with the characters sp_. Thus, it is a good idea to not start your stored procedures with the same three characters.
Functions
In many instances, you can accomplish a task using either a stored procedure or a function. Both functions and stored procedures can be custom defined and part of any application. They both can be written in T-SQL or .NET and contain a header and body. They can both accept parameters and provide output to the calling application or user.
Creating a Function
To illustrate, let’s create a function that accepts a pet weight and returns a table that lists the pets who exceed that weight and their owners. The sample script is as follows:
CREATE FUNCTION GiantPets (@minWeight INTEGER)

RETURNS @retGiantPetsTable TABLE

(

pet_name     VARCHAR(50) NOT NULL,

pet_weight    INT                   NOT NULL,

owner_name VARCHAR(50) NOT NULL

)

AS

BEGIN

     INSERT @retGiantPetsTable

     SELECT p.pet_name, p.pet_weight,o.owner_name

     FROM Pets p, Owners o

     WHERE p.pet_id=o.pet_id AND p.pet_weight > @minWeight


     RETURN

END
Invoking a Function
Functions are designed with the idea that they will send their output to a query or T-SQL statement. With the exception of scalar functions, functions are called differently than stored procedures. Since the example function returns a table, you can call it as part of a SELECT statement by referencing it in the FROM clause, for example:
SELECT * FROM GiantPets(50)
This will return the following result set:
pet_name   pet_weight      owner_name


Lady          155              Bryan


Zeus          185                Rob
System-Defined Functions
The GiantPets function is a user-defined function. As with system stored procedures, SQL Server comes with many built-in functions. There are so many that they are grouped into different categories. Scalar functions use a single value or list of values, as opposed to data from multiple rows of a table. An example of a scalar function is GETDATE(), which returns the current date:
SELECT GETDATE()
Aggregate functions utilize multiple rows of data and return a value to the user. To find the average value for all the rows in a column, you use the AVG function as follows:
SELECT AVG(pet_weight) FROM Pets
There are also a lot of security-related functions. If you wanted to know whether the current user is a member of the sysadmin group, you would use the IS_SVRROLEMEMBER as follows:
SELECT IS_SRVROLEMEMBER('sysadmin')
This function will return 1 for true and 0 for false.
For a complete list of built-in functions, see the SQL Server Books Online article called “Functions (Transact-SQL)” at http://msdn.microsoft.com/en-us/library/ms174318.aspx.
Triggers
A trigger is a special kind of stored procedure that is executed when a special event happens within SQL Server. An event could include the execution of a given DDL or DML statement or a login to SQL Server. For example, if you wanted to make sure MicroChipID was valid before allowing a new pet to be added to the Pets table, you could create a trigger on INSERT. The script follows:
USE [VetClinic]

GO

CREATE TRIGGER ValidateMicroChip

ON Pets

FOR INSERT

AS


IF EXISTS(

SELECT MicroChipID FROM MicroChips

WHERE MicroChipID IN (

SELECT MicroChipID FROM inserted)

)


RAISERROR ('The chip was found!', 16, 1)

ELSE


BEGIN

     RAISERROR ('The chip was NOT found!', 16, 1)

     ROLLBACK

END


GO
Now, when you attempt to insert a new pet into the table using a microchip ID that is not in the MicroChips table, an error will be issued, and the pet information will not be added to the table, as shown in the following script:
INSERT INTO Pets VALUES (8,'Sushi',5,'0034DDA')
This will result in the following result:
Msg 50000, Level 16, State 1, Procedure ValidateMicroChip, Line 13


The chip was NOT found!


Msg 3609, Level 16, State 1, Line 1


The transaction ended in the trigger. The batch has been aborted.
Since the only valid microchip ID is 34BA123, if you used this value, the result would be as follows:
Msg 50000, Level 16, State 1, Procedure ValidateMicroChip, Line 10


The chip was found!


(1 row(s) affected)
Normally, you would not have to raise an error on a successful insert; this was done here only to help illustrate the code path that was executed in the trigger.
If you take a look at the trigger definition, you’ll see that a table called inserted was referenced in the IF EXISTS clause. Within a DML trigger, SQL Server provides this table and a deleted table for DELETE triggers. Together, these tables allow your triggers to do something with the data and, depending on your business requirements, roll back any transactions. In this sample scenario, if the chip wasn’t found, the trigger rolled back the transaction, causing the pet information not to be written to the table. For more information on the inserted and deleted tables, see the SQL Server Books Online article “Using the Inserted and Deleted Tables” at http://msdn.microsoft.com/en-us/library/ms191300.aspx.
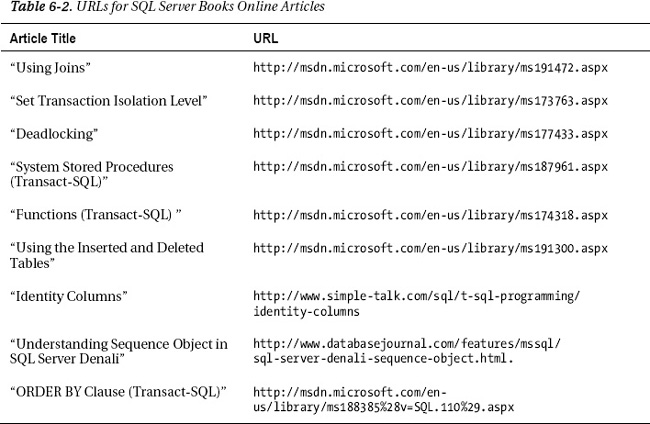
Summary
In this chapter, you learned how to perform basic data retrieval and management using SELECT, INSERT, UPDATE, and DELETE DML statements. Remember that the definitions given in this chapter are simplified. The capabilities of these statements far exceed what was presented here, and you should study these in more detail when time permits.
SQL Server provides a robust dialect of the SQL language called Transact-SQL (T-SQL). With T-SQL, you can easily create reusable components such as stored procedures and functions. SQL Server provides many stored procedures and functions out of the box, making administering SQL Server very easy.
The concepts discussed in this chapter are all core to using the SQL Server relational database engine. Thus, a lot of the content is explained in much more detail within SQL Server Books Online. Table 6-2 provides links for all the articled cited in this chapter.