
Chapter 3
Press Start: Making a Menu
In this chapter, you are going to begin developing the Star Fighter 2D arcade shooter. You will create the first lines of code in your engine and develop the first two screens that the user will see in your game: the game splash screen and the game menu with two game options. Throughout this chapter, you'll learn several essential skills in game development on the Android platform.
You will learn
- Displaying graphics
- Creating activities and intents
- Creating an Android service
- Starting and stopping Android threads
- Playing music files
In addition to the splash screen and game menu, you'll create some background music to play behind the menu.
There is a lot to cover, so let's begin with the very first screen that the player will see in your game, the splash screen.
Building the Splash Screen
The splash screen is the first part of the game that the user is going to see. Think of the splash screen as the opening credits or title card of your game. It should display the name of the game, some game images, and maybe some information about who made the game. The splash screen for Star Fighter is depicted in Figure 3–1.
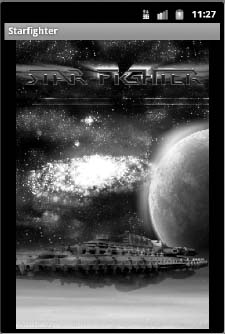
Figure 3–1. Star Fighter splash screen
For games that are built by multiple people at multiple development shops, you may see more than one splash screen before a game begins. This is not uncommon as each development shop, distributer, and producer could have its own splash screens that it wants posted before the game. However, for our game, we are going to create one splash screen because you will be the only developer.
If you play any typical game, you will see that the splash screen will generally transition automatically to the game's main menu. In Star Fighter, you are going to create a splash screen that fades in and out to the main menu. Therefore, to create the splash screen, you will also need to create the activity that will hold the main menu, so that you can properly set up the fading effect of the splash screen without any errors.
Creating an Activity
To begin, open the Star Fighter project that you created in the preceding chapter. If you have not created the Star Fighter project, please go back now and do so before continuing; the remainder of this chapter assumes you are working in the Star Fighter project.
Your Star Fighter project, in its current state, should contain one activity—StarfighterActivity. StarfighterActivity was created automatically by Android and is the automatic entry point to the project. Were you to run your project now, StarfighterActivity would launch. However, you will actually need two activities for this chapter: one for the splash screen and one for the game's main menu. Android has already provided you an activity for the splash screen, so in the next section, you will create a new activity for the main menu.
Even though the activity for the main menu will be empty right now, it will allow you to fully implement the splash screen's fade transition, a task you'll tackle in just a bit.
Creating a New Class
To create a new activity, first create a new Java class in your main package. If you are using the same package name as outlined in the preceding chapter, your main package is com.proandroidgames. Right-click the package name, and select New ![]() Class to bring up the New Java Class window shown in Figure 3–2.
Class to bring up the New Java Class window shown in Figure 3–2.
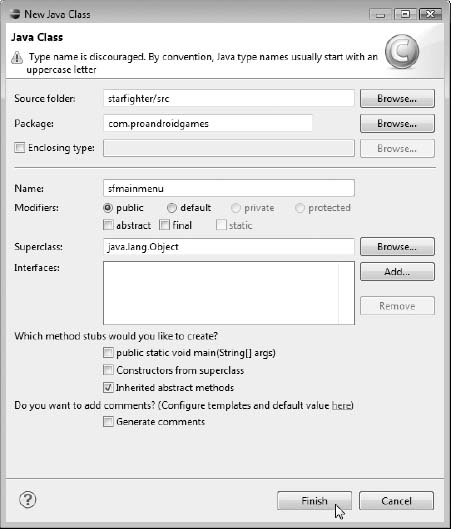
Figure 3–2. The New Java Class creation window
Keep most of the default options as they are. All you need to do at this point is provide a class name. The name for your class should be SFMainMenu. Click the Finish button to create the class.
Right now, the new class that you created is a simple Java class with the following code.
However, the class is not yet an activity. For that, you need to add some code to the class. Once this class is an activity, you can begin to create the splash screen and its effects.
Transforming the Class to an Activity
Import the Activity package, and extend your SFMainMenu class to turn this Java class into an Android activity. Your class code should now appear as follows:
package com.proandroidgames;


import android.app.Activity;


public class SFMainMenu extends Activity {


}
Now, let's associate this activity with the Star Fighter project so that we can create a splash screen. Open the AndroidManifest.xml file to associate the SFMainMenu activity with your project,as shown in Figure 3–3.
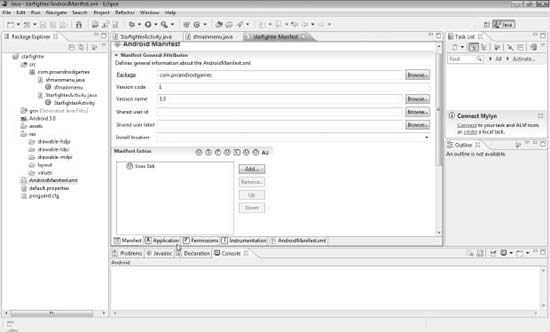
Figure 3–3. The AndroidManifest.xml
Scroll to the bottom of the AndroidManifest Application tab, and locate the area labeled Application Nodes. This area of the manifest lists all of the application nodes that are associated with your project. Right now, the only application node listed should be .StarfighterActivity. Because you want to add a new activity, click the Add button, and select Activity from the screen pictured in Figure 3–4.

Figure 3–4. Creating a new Activity element
This creates an empty Activity element. The empty element that you see in the GUI of AndroidManifest is a representation of an XML element in the AndroidManifest.xml file. Click the AndroidManifest.xml view at the bottom of the tab, and you should see the following snippet of XML code:
<activity></activity>
Obviously, this empty element is not going to do you much good. You need to somehow tell the AndroidManifest that this activity element represents the SFMainMenuActivity. This can be done manually of course. However, let's take a look at doing it the automated way.
Once you have created the new Activity element, you need to associate that new element with the actual SFMainMenu activity you created earlier. Click the Activity element in the Application Nodes section of the AndroidManifest to highlight it. To the right of the Application Nodes section of the AndroidManifest is a section that is now labeled Attributes for Activity, as pictured in Figure 3–5.
NOTE: Were you to click .StarfighterActivity, this section would then be labeled Attributes for .StarfighterActivity.
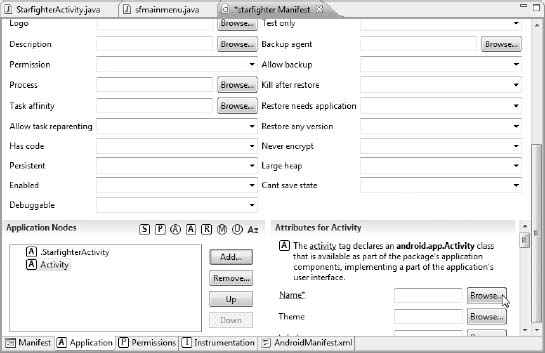
Figure 3–5. Attributes for an activity
Click the Browse button that is next to the Name attribute to bring up a browsing tool that shows you all of the available Activity classes from your project. Your browsing tool options should look like Figure 3–6.
Notice that the SFMainMenu activity is listed in the “Matching items– box. Select the SFMainMenu activity, and click OK.
TIP: If you do not see the SFMainMenu activity as an option in your “Matching items” box, try going back to the SFMainMenu tab in Eclipse. If the tab label has an asterisk before the SFMainMenu name, the file has not been saved. Save the file, and then reopen the Name attribute browser.
If you still do not see the SFMainMenu, confirm that your SFMainMenu class is extending Activity. In the event that you are extending Activity in your class and you still do not have an option to select the SFMainMenuActivity, you can edit the AndroidManifest manually by filling in the needed element attributes (these are provided later in this chapter).
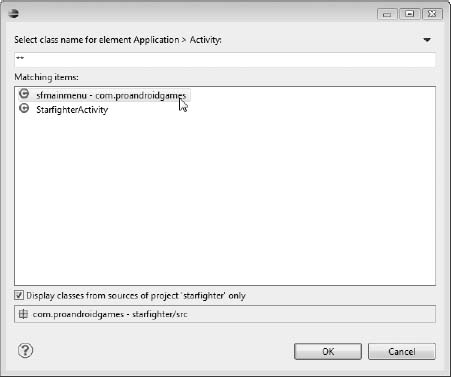
Figure 3–6. The Name attribute selector
After you have selected the SFMainMenu as the name attribute for this activity, set the screen orientation for both the .StarfighterActivity and SFMainMenu activities to portrait, as shown in Figure 3–7.
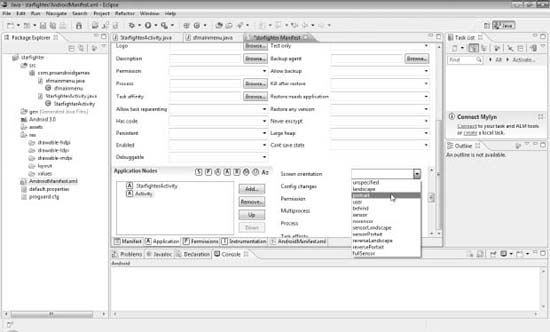
Figure 3–7. Setting “Screen orientation” to portrait
Setting the screen orientation for .StarfighterActivity (your splash screen) and SFMainMenu (the game's main menu) will lock in the orientation of the screen to portrait. Given the style of this game, you want the player to be able to use the game only in portrait mode. Therefore, even if the player tries to rotate a device into landscape mode, the screens for your game will remain portrait.
The finished XML code of your new SFMainMenu activity should appear like this:
<activity android:name="SFMainMenu" android:screenOrientation="portrait"></activity>
The main menu activity is now associated with the Star Fighter project, and you can create the splash screen. Keep in mind that all of the code for the main menu will be added in the following section of the chapter; you just need the activity created now to properly set up your fading effect.
CAUTION: One of the most common causes of Android application crashes and failures is an incorrect setting in the AndroidManifest file, which is easily one of the most important files in your project.
Let's just quickly review where we are at this point and why. The splash screen that you are creating for Star Fighter is going to fade into the main menu. You have created the activity that will hold the main menu, and it is now time to create the splash screen and the fade effect.
Creating Your Splash Screen Image
Now, you need to import the graphic that you will use for your splash screen image into your project. Android is capable of working with most common image formats. However, you are going to stick to two for this game: .png and .9.png. For all of the sprites and other game images, you are going to use standard .png images, and for the splash screen and main menu, you are going to use .9.png files.
A .9.png image is also known as a nine-patch image. A nine-patch image is a special kind of format that allows Android to stretch the image as needed, because it contains a 1-pixel black border around the left and top of the image.
NOTE: Most of the images that you include in your game will not be nine-patch images, because you will want to controls the manipulation of most images yourself. However, for the splash screen and main menu, it is fully appropriate to use nine-patch.
The difference between nine-patch and other image resizing processes is that you can control how Android is allowed to stretch the image by manipulating the black boarder. Figure 3–8 represents our splash screen image in nine-patch format.

Figure 3–8. Nine-patch splash screen
If you look closely at the left-hand side of the picture in Figure 3–8, you will notice the thin line of black dots. This black line is what differentiates nine-patch images from other image formats.
NOTE: The nine-patch image that I have used in this example is meant to stretch freely in all directions. If there are parts of your images that you do not want to stretch, do not draw a border at those areas. The draw9patch tool can help you visualize how your image will stretch depending on how you draw your border.
Unfortunately, applications developed for Android could be run on many different screen sizes on many different devices, from small mobile phones to larger tablets. Therefore, your project has to be able to adjust to all of the different screen sizes. If you're using the nine-patch image as your splash screen, Android can resize the image (with the help of some XML) to fit nicely on any screen size.
TIP: If you have never worked with nine-patch graphics, the Android SDK includes a tool that can help you. In the ools folder of the SDK, you will find the draw9patch tool. Launch this tool and you will be able to import any image, draw your nine-patch border, and save the image back out with the .9.png extension.
Importing the Image
Now that you have your nine-patch image ready, drag the image from wherever you saved it into the
esdrawable-hdpi folder in your Eclipse project, as shown in Figure 3–9.
You may have noticed that there are three folders to choose from: drawable-hdpi, drawable-ldpi, and drawable-mdpi. These folders contain the drawables, or images, for three different types of Android devices: high density (hdpi), medium density (mdpi), and low desity (ldpi).
Why are we using nine-patch graphics to scale the image to fit any screen if Android provides a mechanism to include different images for different screen sizes? The short answer is that the two scenarios are really mutually exclusive. Yes, nine-patch allows for the scaling of an image to fit a device's screen, but that has little to do with the screen density in pixels of the device. The images that you are using (if you use the image from this project) are high-density images and will display as such. However even as large as the images are, they are still not the size of a 10.1-inch Motorola Xoom screen. Therefore, the nine-patch format allows it to be stretched properly.
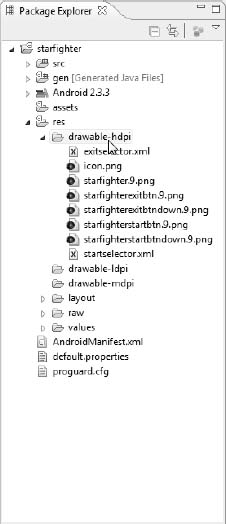
Figure 3–9. Dragging an image to the drawable-hdpi folder
The true benefit of the high-, medium-, and low-density folder separation comes into play when you want to use different layouts and image densities to take advantage of greater screen area or, conversely, to make concessions for screens having less area. If you want to create a menu screen that has four buttons on it, each stacked on top of the other for tablet screens but grouped in side-by-side pairs on smaller devices, these folders will help you achieve that with minimal effort.
For the purposes of our current project, drop your splash screen nine-patch image into the drawable-hdpi folder. You will not address the use of these folders for this game. However, feel free to experiment with them on your own to create different experiences on different devices.
Working with the R.java File
After you drop the image into the folder, Android will create a resource pointer for it. This pointer is placed in the R.java file, which is automatically generated and should not be manually edited. It resides in the gen folder under your package name. If you open the R.java file after adding your image, it should have code similar to the following:
package com.proandroidgames;


public final class R {

...

    public static final class drawable {

        public static final int starfighter=0x7f020002;

    }

...

}
The R.java file is going to manage all of the images, IDs, layouts, and other resources used by your project. Because this file now contains a pointer to your image, you can refer to this image anywhere in your project with the following line of code:
R.drawable.starfighter
CAUTION: Be very careful not to delete or manually modify the R.java file in any way. For example, the hexadecimal (hex) value for the starfighter image pointer may be different on your system than in the sample code in this section. Your file will work on your machine because it was generated in your IDE. If you were to modify your hex value to match the one in the sample, your file would no longer work as expected.
Now that you have an image in your project that you want to display as the splash screen, you'll need to tell Android to display this image to the screen. There are many ways this can be accomplished. However, because you want to apply a fade effect to the image, you are going to use a layout.
A layout is an XML file that is used to tell Android how to position resources on a screen. Let's create the layout for the splash screen.
Creating a Layout File
You are going to use a simple layout file to display the splash screen image, starfighter, onto the screen when the player first loads your game. Your splash screen is going to be straight and to the point–an image of an intriguing space setting and the name of the game.
Now you have to get this image to the screen so that the player can appreciate it. First, right-click the reslayout folder, and select New ![]() Other. From the New wizard, select Android
Other. From the New wizard, select Android ![]() Android XML File, as shown in Figure 3–10.
Android XML File, as shown in Figure 3–10.
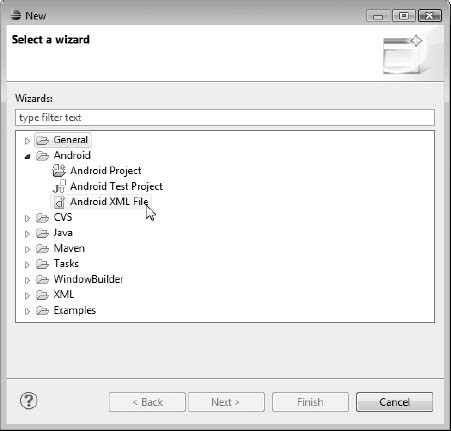
Figure 3–10. The Android XML File option
Name your new xml file splashscreen.xml, and finish the wizard. This process will place a new XML layout file in your layout folder and create a pointer to this file in the R.java file.
At this point, you can attack the layout in on of two ways. You can use a GUI designer or directly edit the XML file. We are going to edit the XML file directly so you'll get a better understanding of exactly what is going into the layout and why.
Editing the XML File
Double-click the splashscreen.xml file in your reslayout folder to actually open the GUI designer. However, if you look at the bottom of the designer window in Eclipse, you will notice two subtabs. One tab, the current tab, is labeled Graphical Layout. The second tab is labeled splashscreen.xml. This tab is the text editor for the XML file. Click the splashscreen.xml tab to enter the text editor.
You XML file should look like this:
<?xml version="1.0" encoding="utf-8"?>
This is an empty XML file. Let's add a layout to this file.
A few different types of layouts can be used in general Android development. Since you are developing a game, you do not really need to worry about 75 percent of these layouts because you simply will not come across them in the course of creating Star Fighter. However, there are two that you could use for this splash screen: LinearLayout and the FrameLayout. You will use the FrameLayout for Star Fighter, because it is great at centering elements and pinning them to a border.
LinearLayout is used to display multiple items on a screen and position them one after the other in either a vertical or horizontal orientation. Think of the LinearLayout as either a single-column or single-row table. It can be used to place any number of items to the screen, including other layouts, in an organized and linear fashion.
FrameLayout is used to hold one item. The one item can be gravitationally set so that it is centered, fills the entire space, or is against any border. The FrameLayout layout seems almost purposely made to display a splash screen that is composed of a single image.
Using FrameLayout
You are going to use FrameLayout to display the splash screen image and a box of text that will identify you as the developer. I know I just went through explaining that FrameLayout was built for displaying one item, and it is. However, if you tell a FrameLayout to display two items, it will display them overlapping each other with much less fussing and code than would be required with any other type of layout.
Return to your splashscreen.xml file, and create the FrameLayout as follows:
<?xml version="1.0" encoding="utf-8"?>

<FrameLayout

  xmlns:android="http://schemas.android.com/apk/res/android"


</FrameLayout>
A FrameLayout layout only take two properties that you need to worry about right now: layout_width and layout_height. These two properties are going to tell Android how to fit the layout onto the activity that you created.
In this situation, you are going to set the layout_width and the layout_height properties to match_parent. The match_parent constant tells Android that the width and height of the view should match the width and the height of the parent of that view, in this case, the activity itself.
TIP: If you have developed on Android before, you may remember a constant called fill_parent. Fill_parent was replaced with match_parent, but the two constants function the same way.
Set the FrameLayout properties as show here:
<?xml version="1.0" encoding="utf-8"?>

<FrameLayout

  xmlns:android="http://schemas.android.com/apk/res/android"
  android:layout_width="match_parent"

  android:layout_height="match_parent">

</FrameLayout>
You now have a functioning FrameLayout, but you have nothing for it to work with. Let's add the image and the text.
Adding an Image and Text
Create an ImageView inside your FrameLayout, and give it the ID "splashScreenImage".
<?xml version="1.0" encoding="utf-8"?>

<FrameLayout

  xmlns:android="http://schemas.android.com/apk/res/android"

  android:layout_width="match_parent"

  android:layout_height="match_parent">

    <ImageView android:id="@+id/splashScreenImage"

    >

    </ImageView>

</FrameLayout>
You have created the ImageView that will hold your splash screen image. Now, you have to set the src property to point to the image that you want to display, in this case, the starfighter image in the resdrawable-hdpi folder. You also need to set the layout_width and layout_height properties just as you did for the FrameLayout.
<?xml version="1.0" encoding="utf-8"?>

<FrameLayout

  xmlns:android="http://schemas.android.com/apk/res/android"

  android:layout_width="match_parent"

  android:layout_height="match_parent">

    <ImageView android:id="@+id/splashScreenImage"

        android:src="@drawable/starfighter"

        android:layout_width="match_parent"

        android:layout_height="match_parent">

    </ImageView>

</FrameLayout>
Notice that the src property is pointing to "@drawable/starfighter"; this tells Android to display the starfighter image from the drawable folder. Now for something that is a little less obvious. If you think back to our discussion on nine-patch images, I mentioned that we needed some code to make use of the scaling abilities of nine-patch. Setting the layout_width and/or the layout_height to match_parent will make use of the nine-patch format to correct scale your image the way you have specified.
Create a TextView now in your layout. This TextView will be used to display whatever credits or text you want to display on your splash screen.
<?xml version="1.0" encoding="utf-8"?>

<FrameLayout

  xmlns:android="http://schemas.android.com/apk/res/android"

  android:layout_width="match_parent"

  android:layout_height="match_parent">

    <ImageView android:id="@+id/splashScreenImage"

        android:src="@drawable/starfighter"
        android:layout_width="match_parent"

        android:layout_height="match_parent">

    </ImageView>

    <TextView

        android:text="game by: j.f.dimarzio - graphics by: ben eagel"

        android:id="@+id/creditsText"

    </TextView>

</FrameLayout>
There is no voodoo to creating this view, and it should seem fairly straightforward. Once again, you need to tell Android the layout_width and layout_height of the TextView. However, if we set the properties to match_parent file as we did on the ImageView and the FrameLayout, your text would cover the image in a very undesirable way.
Rather, you are going to set the layout_width and layout_height to wrap_content, as shown below. The wrap_content constant is going to let Android know that you want the size of the TextView to be determined by the size of the text within it. Therefore, the more text that you add, the larger the TextView will be.
<?xml version="1.0" encoding="utf-8"?>

<FrameLayout

  xmlns:android="http://schemas.android.com/apk/res/android"

  android:layout_width="match_parent"

  android:layout_height="match_parent">

    <ImageView android:id="@+id/splashScreenImage"

        android:src="@drawable/starfighter"

        android:layout_width="match_parent"

        android:layout_height="match_parent">

    </ImageView>

    <TextView

        android:text="game by: j.f.dimarzio graphics by: ben eagel"

        android:id="@+id/creditsText"

        android:layout_height="wrap_content"

        android:layout_width="wrap_content">

    </TextView>

</FrameLayout>
Finally, you want to the text that is displaying the credits not to be too distracting, so you are going to set the gravity of the TextView to pull the text to the bottom center of the FrameView, as shown here.
<?xml version="1.0" encoding="utf-8"?>

<FrameLayout

  xmlns:android="http://schemas.android.com/apk/res/android"

  android:layout_width="match_parent"

  android:layout_height="match_parent">

    <ImageView android:id="@+id/splashScreenImage"

        android:src="@drawable/starfighter"

        android:layout_width="match_parent"

        android:layout_height="match_parent">

    </ImageView>

    <TextView

        android:text="game by: j.f.dimarzio graphics by: ben eagel"

        android:id="@+id/creditsText"

        android:layout_gravity="center_horizontal|bottom"

        android:layout_height="wrap_content"

        android:layout_width="wrap_content">

    </TextView>

</FrameLayout>
You have successfully created the layout that will display your splash screen. Now, you just have to tell StarfighterActivity to use this layout.
Connecting StarfighterActivity with the Layout
Connecting StarfighterActivity with the layout is very easy to do and requires only one line of code.
Save the splashscreen.xml file. Saving the file will create another entry in the R.java file so that you can reference the layout in your other code.
Open the StarfighterActivity.java file in the root of your project's source. This file was created for you automatically when you created the project.
TIP: If you do not have a file named StarfighterActivity.java, check that you following the directions for creating a project in the previous chapter. If you named your project anything other than starfighter, your StarfighterActivity will have a different name.
When you open the StarfighterActivity.java file, you are going to see some automatically generated code that displays a premade layout named main.
package com.proandroidgames;


import android.app.Activity;

import android.os.Bundle;


public class StarfighterActivity extends Activity {

    /** Called when the activity is first created. */

    @Override

    public void onCreate(Bundle savedInstanceState) {

        super.onCreate(savedInstanceState);

        setContentView(R.layout.main);

    }

}
Change the setContentView() from displaying the main layout to displaying the starfighter layout that you just created. The finished activity should look like this.
package com.proandroidgames;


import android.app.Activity;

import android.os.Bundle;


public class StarfighterActivity extends Activity {

    /** Called when the activity is first created. */

    @Override

    public void onCreate(Bundle savedInstanceState) {

        super.onCreate(savedInstanceState);


        /*display the splash screen image from a layout*/

        setContentView(R.layout.splashscreen);

    }

}
Compile and run your code by clicking the green circle with the white arrow in it on the menu bar. You can also press Ctrl + F11 or click Run ![]()
Run from the menu.
If you have never compiled or debugged an Android application before, you may see a screen that asks you if you want to run your application as a JUnit test or an Android application. You will want to run your application as an Android application. You can then choose which version of the emulator, or any attached Android debug mode device, to run your application on.
CAUTION: If you choose to run your code in the Android emulator rather than on an actual Android phone, you may experience some unexpected results. Keep in mind that the emulator is exactly that, an emulator, and it is not an exact representation of what your game will look like on a device. This is not to say that you shouldn't use the emulator at all; just be cautious until you see your work on an actual device.
Launch your game, and you should see the splash screen as it appears in Figure 3–11. This is big accomplishment and the first hurdle in creating the entry point of your game. However, right now, the screen really doesn't do much. In fact, it really doesn't do anything except display. You need to create the fade in and fade out effects that will lead from your splash screen to your main menu.
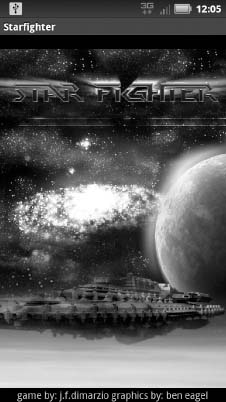
Figure 3–11. The Star Fighter splash screen
Exit StarfighterActivity, and go back to your code. It is time to create the fade in and fade out effects.
Creating Fade Effects
You are going to use animation to create the effect of fading into the splash screen and then fading out the splash screen to the main menu. Android has some built-in animation effects that are very easy to use and very easy to implement.
Why use animation to fade in and fade out? The simple answer is that it is an easy way to make your game look better. If you just had a static screen that flipped from your splash screen to your main menu, you would still accomplish the same goal, but by fading into and out of your screens, you give your game an extra look of professionalism.
Create two more layout files in the reslayout folder: one named fadein.xml and the other fadeout.xml. As the names suggest, the fadein.xml file will control the animation that fades the splash screen onto your device. The fadeout.xml file will control the animation that fades the splash screen out to the main menu.
The type of animation that you are going to create is called an alpha. “Alpha” refers to the alpha value of an image, or its transparency. An alpha value of 1 is opaque, and an alpha value of 0 is transparent. Therefore, to make an image appear as though it is fading in, you need to create an animation that adjusts the alpha value of your image from 0 to 1 over a set amount of time. Conversely, if you want to fade out an image, you need an animation that adjusts the alpha value of your image from 1 to 0 over a set duration of time. For this reason, you will create two different alpha animations to control the fade in and fade out of your splash screen.
After you have created the fadein.xml and fadeout.xml files in your reslayout folder, double-click the fadein.xml file to open it in the editor. The file should be empty except for the following line; if it is not, delete the contents of the file will with exception of this line:
<?xml version="1.0" encoding="utf-8"?>
Now, create an alpha animation thusly:
<?xml version="1.0" encoding="utf-8"?>

<alpha xmlns:android=”http://schemas.android.com/apk/res/android”

/>
You need to define four properties for this animation to complete it: the type of interpolator to use, the starting and ending alpha values, and the total duration of the animation in time.
First, let's define the interpolator. The interpolator tells the animation how to progress. That is, the animation can just run normally; it can start off slow and build up speed; it can start off fast and get slower; or it can repeat. For the fade in effect, we are going to start the animation slowly and then let it build up over the course of a second.
Use the accelerate_interpolator to tell the animation that you want to start off slow and then accelerate over time. The code that follows illustrates how to implement the accelerate_interpolator in fadein.xml:
<?xml version="1.0" encoding="utf-8"?>

<alpha xmlns:android="http://schemas.android.com/apk/res/android"

       android:interpolator="@android:anim/accelerate_interpolator" />
Your fade in animation will now start off slow and gradually speed up until the fade is complete. But how long will it run?
Use the android:duration property to tell the alpha animation how long to run. The android:duration property takes a value in milliseconds. You are going to tell the animation to run for 1 second by setting the android:duration to 1000.
<?xml version="1.0" encoding="utf-8"?>

<alpha xmlns:android="http://schemas.android.com/apk/res/android"

        android:interpolator="@android:anim/accelerate_interpolator"

        android:duration="1000" />
The final step in creating the fade in animation is to set the properties for the starting and ending alpha values of your animation. In this case, you are fading from fully transparent to fully opaque. However, that doesn't mean that these are your only options. You can choose to start and end at any values in between. You could have an animation that started are 25 percent opaque and faded to 100 percent opaque if you wanted to.
Set the android:fromAlpha and android:toAlpha properties to indicate what alpha values you want to start and finish at.
<?xml version="1.0" encoding="utf-8"?>

<alpha xmlns:android="http://schemas.android.com/apk/res/android"

        android:interpolator="@android:anim/accelerate_interpolator"

        android:duration="1000"

        android:fromAlpha="0.0"

        android:toAlpha="1.0"/>
CAUTION: The values for fromAlpha and toAlpha are floats and not ints. This is important because the alpha value only ranges from 0 to 1.
Here, you have set the fromAlpha property to 0.0. This indicates that the animation begins with the view fully transparent. The toAlpha property has been set to 1.0 indicating that the animation is to end with the view fully opaque. This animation will provide you with a smooth fade in.
It is now time to create the fade out.
Think about how the fade out should work in relationship to the fade in. The fade out should work just like the fade in only in reverse. That means that the animation should use an interpolator that starts off fast and gets slower until it finishes. The animation should also start with a fully opaque object and transition to a fully transparent one.
Save the fadein.xml file, and open the fadeout.xml. Here too, you should only have one line of code in fadeout.xml:
<?xml version="1.0" encoding="utf-8"?>
You need to set the android:interpolator, android:duration, android:fromAlpha, and android:toAlpha for fadeout.xml.
You used the accelerate_interpolator in the fade-in animation to start off at a slow rate of fade and gradually move to a greater rate. Therefore, to reverse the animation for a fade out, you are going to use the decelerate_interpolator. The decelerate_interpolator will start the animation off at a faster rate and slowly decrease that rate until the animation finishes.
Once again, you will set up an animation duration of 1 second (1000 milliseconds) for the fade out.
<?xml version="1.0" encoding="utf-8"?>

<alpha xmlns:android="http://schemas.android.com/apk/res/android"

        android:interpolator="@android:anim/decelerate_interpolator"

        android:duration="1000" />
Set the properties android:fromAlpha and android:toAlpha to complete the animation. Because you are fading out from a solid image to nothing, you will be setting the android:fromAlpha to fully opaque and the android:toAlpha to fully transparent. This will start the animation at a solid image and fade it to a transparency.
<?xml version="1.0" encoding="utf-8"?>

<alpha xmlns:android="http://schemas.android.com/apk/res/android"

        android:interpolator="@android:anim/decelerate_interpolator"

        android:duration="1000"

        android:fromAlpha="1.0"

        android:toAlpha="0.0"/>
You can now save your finished fadeout.xml file.
At this point, you have a layout and two animations to control and define your splash screen. Now, you need some way to tell the three of them to interact and create an animation splash screen.
To understand how you are going to create and run the animation, you need to understand how threading works in relationship to your game.
Threading Your Game
One of the biggest obstacles that you, as a game developer, need to overcome is how your game runs on any given platform. At its most basic root element, an Android game is still just a basic Android activity. Every other “application” that is written for Android is also written as an activity. The only difference between your activity and any other is that yours will contain a game, whereas others might be business, mapping, or social media tools.
The problem with this architecture is that, because all Android activities are the same, they are all treated the same. This means that every Android activity that you write will run in the main execution thread of the system. This is bad for games.
Running your game in the main execution thread of the system means that your game has to compete for resources with every other activity running in that thread. This will lead to a choppy or slow game at best and a game that halts or freezes the device at worst.
But fear not, there is a way to get around this singly threaded nightmare. You have to ability to spawn off any number of threads and run anything you want to run within them. Ideally, you will want your game to run in a thread that is separate everything else that runs on the device to ensure that your game runs as smoothly as possible and has access to the resources it needs.
In the remainder of this chapter, you are actually going to spawn two separate threads for the execution of your game. The first thread, discussed in this section, will be for the game to run in, and the second thread (which you will create a little later in this chapter) will be to run any background music that you want to play behind your game.
Why two separate threads? With the exception of animation and game logic, one of the most processor-intensive things you can do on a device is play media, such as music. You will ensure that the game and music will run smoothly and concurrently without interfering with each other. By running the music in a separate thread from the game, you will also be able to kill the music without interfering with the game play should your find that the device's resources are running low.
Now that you understand why you need to spawn different threads for your game, let's create one for the main game and splash screen. This game thread will tie together the splash screen that you created, the fade in and fade out animations, and the main menu.
Creating the Game Thread
Open StarfighterActivity.java once again. Just as a reminder, your file should currently be able to launch the splash screen and should contain the following code.
package com.proandroidgames;


import android.app.Activity;

import android.os.Bundle;


public class StarfighterActivity extends Activity {

    /** Called when the activity is first created. */

    @Override

    public void onCreate(Bundle savedInstanceState) {

        super.onCreate(savedInstanceState);


        /*display the splash screen image from a layout*/

        setContentView(R.layout.splashscreen);

    }

}
Since StarfighterActivity is the activity that is launched by default and the one that launches the splash screen, it is the perfect place to spawn your game thread. The thread that you create now is going to be the one that game will eventually run in.
Instantiate a new Thread(), and override the run() method to spawn a new thread. Within the run() method, call the main menu to run the game in the new thread. This is the basic roadmap for what you are going to do here.
NOTE: As you progress through building the game, the code in this thread will be modified and even moved to accommodate more complex processes.
The following code shows where to spawn the new thread within the StarfighterActivity code.
package com.proandroidgames;


import android.app.Activity;

import android.os.Bundle;


public class StarfighterActivity extends Activity {

    /** Called when the activity is first created. */

    @Override

    public void onCreate(Bundle savedInstanceState) {

        super.onCreate(savedInstanceState);


        /*display the splash screen image*/

        setContentView(R.layout.splashscreen);


        /* Start a new game thread */

        new Thread() {

            @Override

            public void run() {


            }

       }

    }

}
There is one problem with this code though. As it is written, the code will spawn the new game thread within milliseconds of the splash screen being displayed. This would barely be enough time to render the splash screen. Therefore, you need to delay spawning of the game thread until the splash screen has had enough time to display.
The answer is to use a time-delayed Handler(). Android has handlers that can manage threads and activities. The postDelay() method of the Handler() takes two parameters: the thread that is to be delayed and the amount of time to delay.
You are going to create a new constant to hold the amount of time that you want to delay your thread. This constant, GAME_THREAD_DELAY, is going to be the first line of code in your game engine. Placing it there will allow you to adjust the delay on the thread from a single location without hunting through your code for it.
Create a new class file in your game package called SFEngine.java. This is an empty class file that will eventually hold the majority of your game engine. Add the following constant to the class:
package com.proandroidgames;


public class SFEngine {

        /*Constants that will be used in the game*/

        public static final int GAME_THREAD_DELAY = 4000;

}
You are setting the GAME_THREAD_DELAY to 4 seconds; this should be a good amount of time for the splash screen to display before the main menu fades in.
Save SFEngine.java, and reopen the StarfighterActivity. Let's wrap the new game thread in a Handler() and postDelay() it, as shown here.
TIP: Pay close attention to the packages that need to be imported as well; you will receive errors from your code if you try to call a method that lives in a package you have not yet imported. You can also use the Ctrl + Shift + O shortcut to automatically import any referenced packages that you may have missed.
package com.proandroidgames;


import android.app.Activity;

import android.os.Bundle;

import android.os.Handler;


public class StarfighterActivity extends Activity {

    /** Called when the activity is first created. */

    @Override

    public void onCreate(Bundle savedInstanceState) {

        super.onCreate(savedInstanceState);


        /*display the splash screen image*/

        setContentView(R.layout.splashscreen);


        /*start up the splash screen and main menu in a time delayed thread*/

        new Handler().postDelayed(new Thread() {

            @Override

            public void run() {


            }

    }, SFEngine.GAME_THREAD_DELAY);


    }

}
Now, you have created the new thread and set a time delay to pause the spawning of the thread for 4 seconds. Finally, it is time to tell the thread what to do.
Setting a New Intent
In the new thread, you are going to start the main menu activity, kill the splash screen activity, and set the fading animation. To start a new activity, you have to create an Intent() method.
Think of Intent() as an operation that you are telling Android to perform. In this case, you are telling Android to start up your main menu activity. The following code shows you how to create a new Intent() method for starting the main menu.
package com.proandroidgames;


import android.app.Activity;

import android.content.Intent;

import android.os.Bundle;

import android.os.Handler;


public class StarfighterActivity extends Activity {

    /** Called when the activity is first created. */

    @Override

    public void onCreate(Bundle savedInstanceState) {

        super.onCreate(savedInstanceState);

        /*display the splash screen image*/

        setContentView(R.layout.splashscreen);

        /*start up the splash screen and main menu in a time delayed thread*/

        new Handler().postDelayed(new Thread() {

            @Override

            public void run() {

                   Intent mainMenu = new Intent(StarfighterActivity.this, SFMainMenu.class);

                   StarfighterActivity.this.startActivity(mainMenu);

            }

    }, SFEngine.GAME_THREAD_DELAY);


    }

}
Let's discuss what this code does before moving on. The first line creates the new Intent() named mainMenu within the context of StarfighterActivity, and the activity is SFMainMenu. The second line uses the StarfighterActivity context to start the mainMenu activity. Keep in mind all of this is happening within a separate thread from the splash screen.
Killing the Activity
Now that the main menu is started, you want to kill the splash screen activity. The code will navigate the play to the main menu regardless, so why kill the splash screen? Think of it as a bit of housekeeping. By killing the splash screen, you ensure that the play cannot inadvertently navigate back to using the back button on the device. If the players were able to navigate back to the splash screen, they could in theory spawn off any number of concurrent game threads and clog up their devices. Therefore, just to be safe, you are going to kill the splash screen as shown here.
package com.proandroidgames;


import android.app.Activity;

import android.content.Intent;

import android.os.Bundle;

import android.os.Handler;


public class StarfighterActivity extends Activity {

    /** Called when the activity is first created. */

    @Override

    public void onCreate(Bundle savedInstanceState) {

        super.onCreate(savedInstanceState);


        /*display the splash screen image*/

        setContentView(R.layout.splashscreen);


        /*start up the splash screen and main menu in a time delayed thread*/

        new Handler().postDelayed(new Thread() {

            @Override

            public void run() {

                   Intent mainMenu= new Intent(StarfighterActivity.this, SFMainMenu.class);

                   StarfighterActivity.this.startActivity(mainMenu);

                   StarfighterActivity.this.finish();


            }

    }, SFEngine.GAME_THREAD_DELAY);


    }

}
Finally, your new thread needs the animation that will fade the splash screen into the main menu. You will use the overridePendingTransition() method to tell Android that you want to use the two fade animations that you created as the transition from one activity to the other.
package com.proandroidgames;


import android.app.Activity;

import android.content.Intent;

import android.os.Bundle;

import android.os.Handler;


public class StarfighterActivity extends Activity {

    /** Called when the activity is first created. */

    @Override

    public void onCreate(Bundle savedInstanceState) {

        super.onCreate(savedInstanceState);

        /*display the splash screen image*/

        setContentView(R.layout.splashscreen);

        /*start up the splash screen and main menu in a time delayed thread*/

        new Handler().postDelayed(new Thread() {

            @Override

            public void run() {

                   Intent mainMenu= new Intent(StarfighterActivity.this, SFMainMenu.class);

                   StarfighterActivity.this.startActivity(mainMenu);

                   StarfighterActivity.this.finish();

                   overridePendingTransition(R.layout.fadein,R.layout.fadeout);

            }

    }, SFEngine.GAME_THREAD_DELAY);


    }

}
You need to do one last thing before you run your splash screen. In the layout directory, you should see an automatically generated file named main.xml. Let's tell the SFMainMenu activity to use this layout. Since the layout is empty, the activity will not display anything, but it will help you as you move into the next section of the chapter.
Open SFMainMenu.java, and make sure it has the following code, which should be the same code that was in the StarfighterActivity before you started modifying it:
package com.proandroidgames;


import android.app.Activity;

import android.os.Bundle;


public class SFMainMenu extends Activity {

    /** Called when the activity is first created. */

    @Override

    public void onCreate(Bundle savedInstanceState) {

        super.onCreate(savedInstanceState);

        setContentView(R.layout.main);

    }

}
Save SFMainMenu.java.
That is all of the code you need to create the splash screen. You should compile and run this code to see how it works. When you do, your splash screen should be brought to the screen and then fade to a black screen after 4 seconds.
Your next task is to replace the default ‘Hello World' screen with the game's main menu. In the following section of this chapter, you will create the main menu for the game. Then, in the final section, you will use your experience creating threads to spawn another thread for the game music.
Creating the Main Menu
In this section, you are going to create the main menu for the game. The main menu is going to consist of a background image and two buttons. One button will start the game; the other will exit the game.
Adding the Button Images
Using the same drag-and-drop process you used earlier, add the images for the buttons to your resdrawable-hdpi folder. In the project created for this book, there are two images for the Start button and two images for the Exit button. One image for each button will be its resting state, and the other image will represent the pressed state. Figures 3–12 and 3–13 show the two images of the resting states of the Start and Exit buttons respectively.
NOTE: Notice the black border around the left and top edges of the button images. These button images are nine-patch.
Figure 3–12. The Start button's rest state, starfighterstartbtn

Figure 3–13. The Exit button's rest state, starfighterexitbtn
Figures 3–14 and 3–15 represent the pressed states of the Start and Exit buttons respectively.
Figure 3–14. The Start button's pressed state, starfighterstartbtndown

Figure 3–15. The Exit button's pressed state, starfighterexitbtndown
NOTE: The code that is list in this section is going to assume that you have named the images corresponding to the names in the figure captions above. If you name your images differently, be sure to adjust the code samples as needed.
For the background image of your main menu, in an effort to keep things simple, we are going to use the same image as your splash screen. Of course, you should feel free to change this however you like and use whatever image you want to use for your main menu. However, for the purposes of this book, you are going to use the splash screen image behind the main menu as well.
Open the main.xml that is located in the layout folder. This file should have been created automatically when you created your project.
CAUTION: If you find that you do not have a main.xml file, create one now using the same instructions for creating splashscreen.xml in the preceding section of this chapter. Make sure you have a main.xml file and it is empty before proceeding in this section.
Once again, your main.xml should be empty except for the following line of code. If it is not, clear whatever text is in it with the exception of the following:
<?xml version="1.0" encoding="utf-8"?>
You are going to use a RelativeLayout layout to hold the background image and the buttons. Using RelativeLayout gives you control over the precise locations of the views that you place within the layout.
Create RelativeLayout as follows:
<?xml version="1.0" encoding="utf-8"?>

<RelativeLayout xmlns:android="http://schemas.android.com/apk/res/android"

    android:orientation="vertical"

    android:layout_width="match_parent"

    android:layout_height="match_parent"

>


</RelativeLayout>
Here, you have created a RelativeLayout layout with layout_width and layout_height properties set to match_parent.
Next, add the ImageView that will hold the background image. This code is very close to code you wrote in the last section for the splash screen, so I will go light on the explanations. If you need a refresher on what any of these views do, please refer to the previous section.
<?xml version="1.0" encoding="utf-8"?>

<RelativeLayout xmlns:android="http://schemas.android.com/apk/res/android"

    android:orientation="vertical"

    android:layout_width="match_parent"

    android:layout_height="match_parent"

    >

<ImageView android:id="@+id/mainMenuImage"

    android:src="@drawable/starfighter"

    android:layout_width="match_parent"

    android:layout_height="match_parent">

</ImageView>


</RelativeLayout>
Next, you have to place the buttons on the screen, but before that, you have to work a little magic.
Setting the Layouts
Right-click the resdrawable-hdpi folder, and add two new XML files: startselector.xml and exitselector.xml. These files are going to hold a selector that tells your button images to change based on the state of the button. This is what is going to allow your change the image of the button when the player presses it.
Add the following code to startselector.xml:
<?xml version="1.0" encoding="utf-8"?>

<selector

  xmlns:android="http://schemas.android.com/apk/res/android">

  <item android:state_pressed="true"
android:drawable="@drawable/starfighterstartbtndown" />

  <item android:drawable="@drawable/starfighterstartbtn" />

</selector>
Notice that the selector has two item properties, one represents the state of the button if it is pressed (android:state_pressed="true") and the other represents the button in its normal at rest state (no designation other than the image). The property for the pressed state has an image set to the starfighterstartbtndown image, and the rest state image is the starfighterstartbtn image.
Setting the src property of an ImageButton to this selector will have the result of changing the image of the button as the player presses it.
Set the exitselector.xml code as follows to accomplish the same result for the Exit button:
<?xml version="1.0" encoding="utf-8"?>

<selector

  xmlns:android="http://schemas.android.com/apk/res/android">

  <item android:state_pressed="true" android:drawable="@drawable/starfighterexitbtndown"

/>

  <item android:drawable="@drawable/starfighterexitbtn" />

</selector>
With the selectors created to change your button images, you can add the ImageButtons to the layout in main.xml.
Because you want the buttons aligned to the bottom of the screen, you are going to set the alignParentBottom property to true on the RelativeLayout that holds the buttons. Then, setting the height to wrap_content and the width to match_parent will make the layout only as high as the buttons within it and as wide as the screen.
The Start button will be aligned with the left edge of the screen, and the Exit button will be aligned with the right. This will place the buttons to the lower corners of the screen.
<?xml version="1.0" encoding="utf-8"?>

<RelativeLayout xmlns:android="http://schemas.android.com/apk/res/android"

    android:orientation="vertical"

    android:layout_width="match_parent"

    android:layout_height="match_parent"

    >

    <ImageView android:id="@+id/mainMenuImage"

        android:src="@drawable/starfighter"

        android:layout_width="match_parent"

        android:layout_height="match_parent">

    </ImageView>

    <RelativeLayout

        android:id="@+id/buttons"

        android:layout_width="match_parent"

        android:layout_height="wrap_content"

        android:orientation="horizontal"

        android:layout_alignParentBottom="true"

        android:layout_marginBottom="20dp">

        <ImageButton

                android:id="@+id/btnStart"

                android:clickable="true"

                android:layout_alignParentLeft="true"

                android:layout_width="wrap_content"

                android:src="@drawable/startselector"

                android:layout_height="wrap_content" >

        </ImageButton>

        <ImageButton

                android:id="@+id/btnExit"

                android:layout_width="wrap_content"

                android:src="@drawable/exitselector"

                android:layout_height="wrap_content"

                android:layout_alignParentRight="true"

            android:clickable="true" >

        </ImageButton>


        </RelativeLayout>

       </RelativeLayout>
Notice that the src properties of the Start and Exit buttons are set to the start and exit selectors that you created to change the image of the button.
If you run your game now, you should see your splash screen fade into the main menu. The main menu should look something like Figure 3–16. Notice the placement of the buttons and the button images. Try pressing a button and see if the image changes.
NOTE: You may notice that your image buttons have a gray background to them instead of the transparent background in Figure 3–16. You are going to set the ImageButton backgrounds to transparent in the SFMainMenu.java code later in this chapter, and doing so will remove the gray.
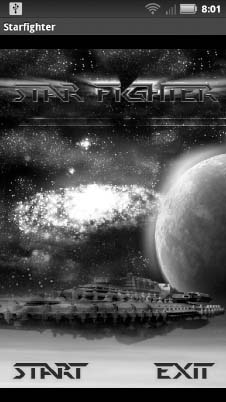
Figure 3–16. The main menu
Wiring the Buttons
The only thing left to do on the main menu is to wire up the buttons so that they actually perform a function. The Exit button will be set up to exit the game and kill all threads. The Start button will start the first level of the game. Since you have not created the first level of the game yet, you are just going to stub out the Start button.
Open the SFEngine.java game engine code. You need to create a few more constants that will be used in the main menu and a function that will do the exit cleanup work. Right now, the engine should look like this:
package com.proandroidgames;


public class SFEngine {

        /*Constants that will be used in the game*/

        public static final int GAME_THREAD_DELAY = 4000;

}
You need to add two constants: one for setting the transparency of the Start and Exit buttons and one for setting the haptic feedback of the buttons.
NOTE: The haptic feedback is the tactile response the certain devices can give when you touch buttons.
Add the following constants to SFEngine:
package com.proandroidgames;


public class SFEngine {

        /*Constants that will be used in the game*/

        public static final int GAME_THREAD_DELAY = 4000;

        public static final int MENU_BUTTON_ALPHA = 0;

        public static final boolean HAPTIC_BUTTON_FEEDBACK = true;

}
Next, create a new method that returns a Boolean value. This method will be called when the Exit button is pressed to perform any housekeeping that is needed in the game before it can exit cleanly.
package com.proandroidgames;


import android.view.View;


public class SFEngine {

        /*Constants that will be used in the game*/

        public static final int GAME_THREAD_DELAY = 4000;

        public static final int MENU_BUTTON_ALPHA = 0;

        public static final boolean HAPTIC_BUTTON_FEEDBACK = true;


        /*Kill game and exit*/

        public boolean onExit(View v) {

        try

        {

                return true;

        }catch(Exception e){

                return false;

        }


        }

}
Now, there is no housekeeping for this method to perform, so it is just going to return true and let the game proceed with its exit routine.
Save the game engine, and open the SFMainMenu.java file.
The first thing you are going to do in the main menu code is to set the background transparency of the image buttons and set up the haptic feedback.
package com.proandroidgames;


import android.app.Activity;

import android.widget.ImageButton;

import android.os.Bundle;


public class SFMainMenu extends Activity {

    /** Called when the activity is first created. */

    @Override

    public void onCreate(Bundle savedInstanceState) {

        super.onCreate(savedInstanceState);

        setContentView(R.layout.main);


        /** Set menu button options */

        ImageButton start = (ImageButton)findViewById(R.id.btnStart);

        ImageButton exit = (ImageButton)findViewById(R.id.btnExit);


        start.getBackground().setAlpha(SFEngine.MENU_BUTTON_ALPHA);

        start.setHapticFeedbackEnabled(SFEngine.HAPTIC_BUTTON_FEEDBACK);


        exit.getBackground().setAlpha(SFEngine.MENU_BUTTON_ALPHA);

        exit.setHapticFeedbackEnabled(SFEngine.HAPTIC_BUTTON_FEEDBACK);

    }

}
Here, you are creating two more ImageButtons in memory. Then, using the findViewById() method, you set those in memory buttons to the actual buttons on the main menu. Finally, you set the background transparency and the haptic feedback of each button.
Adding onClickListeners
Next, you need to establish two onClickListeners for the buttons: one for the Start button and one for the Exit. The onClickListener() method will be executed when the player presses (or clicks) the respective button. Any code that you want executed when either button is pressed needs to be called from that button's onClickListener().
For now, onClickListener() for the Start button is not going to do anything. You are just going to stub it out in preparation for the next chapter where the game play will begin. The onClickListener() for the exit button will call the onExit() function in the game engine, and if the function returns true, the game will be exited.
package com.proandroidgames;


import android.app.Activity;

import android.os.Bundle;

import android.view.View;

import android.view.View.OnClickListener;

import android.widget.ImageButton;


public class SFMainMenu extends Activity {

    /** Called when the activity is first created. */

    @Override

    public void onCreate(Bundle savedInstanceState) {

        super.onCreate(savedInstanceState);

        setContentView(R.layout.main);


        final SFEngine engine = new SFEngine();


        /** Set menu button options */

        ImageButton start = (ImageButton)findViewById(R.id.btnStart);

        ImageButton exit = (ImageButton)findViewById(R.id.btnExit);


        start.getBackground().setAlpha(SFEngine.MENU_BUTTON_ALPHA);

        start.setHapticFeedbackEnabled(SFEngine.HAPTIC_BUTTON_FEEDBACK);


        exit.getBackground().setAlpha(SFEngine.MENU_BUTTON_ALPHA);

        exit.setHapticFeedbackEnabled(SFEngine.HAPTIC_BUTTON_FEEDBACK);


        start.setOnClickListener(new OnClickListener(){

                        @Override

                        public void onClick(View v) {

                                /** Start Game!!!! */

                        }


        });


        exit.setOnClickListener(new OnClickListener(){

                        @Override

                        public void onClick(View v) {

                                boolean clean = false;

                                clean = engine.onExit(v);

                                if (clean)

                                {

                                        int pid= android.os.Process.myPid();

                                        android.os.Process.killProcess(pid);

                                }

                        }

                });

    }


}
Save SFMainMenu.java, and run your code. You should now be able to click the Exit button to close the game. The buttons should also have transparent backgrounds, and the splash screen should fade smoothly into the main menu.
The final step in creating a pretty professional splash screen and main menu is adding some background music.
Adding Music
In this section, you will learn how to spawn a second thread from your game. This thread will be used to run the background music that will play behind your main menu. You will spawn a thread, create a service that will play the music, and then kill the music and the thread in the housekeeping function of the engine.
CAUTION: If you have never worked with music files and Android before, be cautious about the size of your files. If your media files are too large, you may consume all of the available memory for your activity and crash it. I try to keep things like background music to a small 10 or 15 second loop that can be repeated.
The first thing that you will need to do is add a res
aw folder. All music files are stored in the raw folder, but unfortunately, this folder is not created for you when you create the project. Right-click the res folder and select New ![]() Folder. Name the folder
Folder. Name the folder raw, as shown in Figure 3–17.
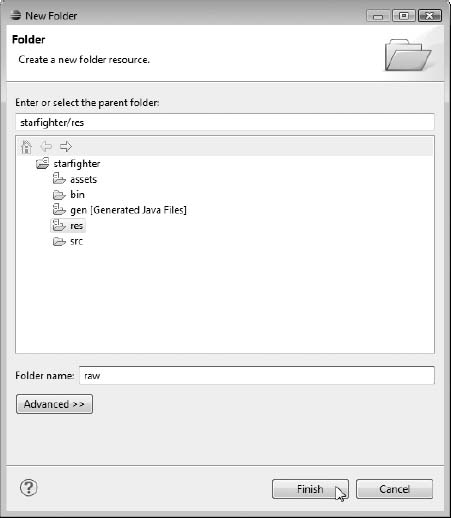
Figure 3–17. Creating the raw folder
The next step is to copy your media files into the res
aw folder.
NOTE: The music that is distributed with this code is royalty free music through the Creative Commons licensing agreement from Matt McFarland at www.mattmcfarland.com. I have taken 15-second samples from his songs to loop during parts of this book's game.
If you are using the files from this project, the music for the main menu is warfieldedit.ogg. Once again, feel free to use whatever music you want to for the main menu; just try to mind the size.
Next, let's add some more constants to the engine that will be used in the music service. Open SFEngine.java, and add the following constants:
package com.proandroidgames;


import android.content.Context;

import android.view.View;


public class SFEngine {

        /*Constants that will be used in the game*/

        public static final int GAME_THREAD_DELAY = 4000;

        public static final int MENU_BUTTON_ALPHA = 0;

        public static final boolean HAPTIC_BUTTON_FEEDBACK = true;

        public static final int SPLASH_SCREEN_MUSIC = R.raw.warfieldedit;

        public static final int R_VOLUME = 100;

        public static final int L_VOLUME = 100;

        public static final boolean LOOP_BACKGROUND_MUSIC = true;

        public static Context context;


        /*Kill game and exit*/

        public boolean onExit(View v) {

        try

        {

                return true;

        }catch(Exception e){

                return false;

        }


        }


}
SPLASH_SCREEN_MUSIC is a constant pointer to the actual music file that you will be playing, in this case, warfieldedit.ogg. The R_VOLUME and L_VOLUME variables will set the initial volume for the music, and LOOP_BACKGROUND_MUSIC is a Boolean value that tells the service whether or not to loop. Finally, the context variable will hold the current context of the thread that the music is playing in so that we can kill it during the game's housekeeping. All of these new constants and variables will be called from the service.
Now, let's create a service that will play this music file. You can then launch this service in a thread from the main menu.
Creating a Music Service
Add a new class file named SFMusic.java to the game package. You should have a blank class as follows:
package com.proandroidgames;


public class SFMusic {


}
The first thing you need to do is to have this class extend Service:
package com.proandroidgames;


import android.app.Service;


public class SFMusic extends Service{


}
At this point, Eclipse may be throwing an error at you, because you have not implemented all of the methods that are required to extend Service. Just ignore that error for now. Add the following methods to your service:
package com.proandroidgames;


import android.app.Service;

import android.content.Intent;

import android.os.IBinder;


public class SFMusic extends Service{


           @Override

           public IBinder onBind(Intent arg0) {

                   return null;

                   }


           @Override

           public void onCreate() {

                   super.onCreate();

                }


           public int onStartCommand(Intent intent, int flags, int startId) {

                   return 1;

           }

           public void onStart(Intent intent, int startId) {


            }

           public void onStop() {


                }


           public IBinder onUnBind(Intent arg0) {

                           // TODO Auto-generated method stub

                           return null;

           }

           public void onPause() {


           }


           @Override

           public void onDestroy() {


           }


           @Override

           public void onLowMemory() {


           }


}
With the service code stubbed out, let's create two variables. The first is a Boolean called isRunning. This will be used to query the service to find out if it is running. At times, you will need to know if the service is running so you can either kill the music, if it is still running, or restart it, if it has stopped.
NOTE: Initially the isRunning Boolean will be set to false. When the service actually starts, you will set it to true.
The second variable that you need to create is the MediaPlayer, which will actually play your music.
package com.proandroidgames;


import android.app.Service;

import android.media.MediaPlayer;

import android.content.Intent;

import android.os.IBinder;


public class SFMusic extends Service{

       public static boolean isRunning = false;

       MediaPlayer player;

       @Override

       public IBinder onBind(Intent arg0) {

               return null;

               }


       @Override

           public void onCreate() {

                   super.onCreate();

                }


           public int onStartCommand(Intent intent, int flags, int startId) {

                   return 1;

           }

           public void onStart(Intent intent, int startId) {


            }

           public void onStop() {


                }


           public IBinder onUnBind(Intent arg0) {

                           // TODO Auto-generated method stub

                           return null;

           }

           public void onPause() {


           }


           @Override

           public void onDestroy() {


           }


           @Override

           public void onLowMemory() {


       }


}
Next, you need to create a method in the service that will set the options for MediaPlayer. These are the options that we create constants for in the engine: volume, looping, and media file. This method will take in the constants that you created and pass them directly to the MediaPlayer. You will call this method from the onCreate() method so that, as soon as the service is created, the MediaPlayer options are set.
package com.proandroidgames;


import android.app.Service;

import android.media.MediaPlayer;

import android.content.Intent;

import android.os.IBinder;

import android.content.Context;


public class SFMusic extends Service{

           public static boolean isRunning = false;

           MediaPlayer player;

           @Override

           public IBinder onBind(Intent arg0) {

                   return null;

                   }


           @Override

           public void onCreate() {

                   super.onCreate();

setMusicOptions(this,SFEngine.LOOP_BACKGROUND_MUSIC,SFEngine.R_VOLUME,SFEngine.L_VOLUME,

SFEngine.SPLASH_SCREEN_MUSIC);

                }

           public void setMusicOptions(Context context, boolean isLooped, int rVolume, int lVolume, int soundFile){

                   player = MediaPlayer.create(context, soundFile);

                   player.setLooping(isLooped);

                   player.setVolume(rVolume,lVolume);

           }

           public int onStartCommand(Intent intent, int flags, int startId) {

                   return 1;

           }

           public void onStart(Intent intent, int startId) {


         }

           public void onStop() {


                }


           public IBinder onUnBind(Intent arg0) {

                           // TODO Auto-generated method stub

                           return null;

           }

           public void onPause() {


           }


           @Override

           public void onDestroy() {


           }


           @Override

           public void onLowMemory() {


           }


}
The last code that you need to add to the service indicates all of the places where the media play is started and stopped. This code should be very easy to follow, but it is a little scattered. Think about it logically; you are going to start the music in any of the methods that deal with starting or creating and stop the music in any of the methods that deal with stopping. Be sure to set the isRunning Boolean accordingly so that you can correctly query if the service is running.
package com.proandroidgames;


import android.app.Service;

import android.content.Context;

import android.content.Intent;

import android.media.MediaPlayer;

import android.os.IBinder;


public class SFMusic extends Service{

           public static boolean isRunning = false;

           MediaPlayer player;


           @Override

           public IBinder onBind(Intent arg0) {

                   return null;

                   }


           @Override

           public void onCreate() {

                   super.onCreate();


setMusicOptions(this,SFEngine.LOOP_BACKGROUND_MUSIC,SFEngine.R_VOLUME,SFEngine.L_VOLUME,

SFEngine.SPLASH_SCREEN_MUSIC);

                   }

           public void setMusicOptions(Context context, boolean isLooped, int rVolume, int lVolume, int soundFile){

                   player = MediaPlayer.create(context, soundFile);

                   player.setLooping(isLooped);

                   player.setVolume(rVolume,lVolume);

           }

           public int onStartCommand(Intent intent, int flags, int startId) {

                   try

                   {

                           player.start();

                           isRunning = true;

                                         }catch(Exception e){

                           isRunning = false;

                           player.stop();

                                         }


                                         return 1;

                   }

                   public void onStart(Intent intent, int startId) {


                                     }

                   public IBinder onUnBind(Intent arg0) {

                                                    // TODO Auto-generated method stub

                                                       return null;

                                  }

                                  public void onStop() {

                                                       isRunning = false;

                                  }

                                  public void onPause() {      }

                                  @Override

                                  public void onDestroy() {

                                                       player.stop();

                                                       player.release();

                                  }

                                  @Override

                                  public void onLowMemory() {

                                                       player.stop();

                                  }


}
The code for the service is now written. However, before you can use it, you need to associate the service with your Android project. Previously you used the AndroidManifest to associate a new Activity with the project. You follow the same procedure to associate your new SFMusic service with the project.
Open AndroidManifest.xml, and click the Application tab near the bottom of the editor window. Once you have the Application tab open, scroll to the bottom of the window to the Application Nodes section. Click the Add button to add a new node, and select Service from the list.
Click the new Service node in the Application Nodes windows, and navigate to Attributes for Service on the right-hand side of the editor window. You should now be able to click the Browse button to the right of the Name attribute. Locate your SFMusic service in the browser, and finish the operation.
Now, you are ready to use your music service in your game.
Playing Your Music
Open the SFEngine.java, and add a new public Thread() named musicThread. You will initialize this thread in the SFMainMenu.
package com.proandroidgames;


import android.content.Context;

import android.content.Intent;

import android.view.View;


public class SFEngine {

                  /*Constants that will be used in the game*/

                  public static final int GAME_THREAD_DELAY = 4000;

                  public static final int MENU_BUTTON_ALPHA = 0;

                  public static final boolean HAPTIC_BUTTON_FEEDBACK = true;

                  public static final int SPLASH_SCREEN_MUSIC = R.raw.warfieldedit;

                  public static final int R_VOLUME = 100;

                  public static final int L_VOLUME = 100;

                  public static final boolean LOOP_BACKGROUND_MUSIC = true;

                  public static Context context;

                  public static Thread musicThread;


                  /*Kill game and exit*/

                  public boolean onExit(View v) {

        try

        {

                          return true;

        }catch(Exception e){

                          return false;

        }


                  }


}
Now, open SFMainMenu.java, and create a new Thread() assigned to musicthread to run your music service.
package com.proandroidgames;


import android.app.Activity;

import android.content.Intent;

import android.os.Bundle;

import android.view.View;

import android.view.View.OnClickListener;

import android.widget.ImageButton;


public class SFMainMenu extends Activity {

    /** Called when the activity is first created. */

    @Override

    public void onCreate(Bundle savedInstanceState) {

        super.onCreate(savedInstanceState);

        setContentView(R.layout.main);


        /** Fire up background music */

        SFEngine.musicThread = new Thread(){

                          public void run(){

                                            Intent bgmusic = new

Intent(getApplicationContext(), SFMusic.class);

                                            startService(bgmusic);

                                            SFEngine.context = getApplicationContext();

                          }

        };

        SFEngine.musicThread.start();


        final SFEngine engine = new SFEngine();


        /** Set menu button options */

        ImageButton start = (ImageButton)findViewById(R.id.btnStart);

        ImageButton exit = (ImageButton)findViewById(R.id.btnExit);


        start.getBackground().setAlpha(SFEngine.MENU_BUTTON_ALPHA);

        start.setHapticFeedbackEnabled(SFEngine.HAPTIC_BUTTON_FEEDBACK);


        exit.getBackground().setAlpha(SFEngine.MENU_BUTTON_ALPHA);

        exit.setHapticFeedbackEnabled(SFEngine.HAPTIC_BUTTON_FEEDBACK);


        start.setOnClickListener(new OnClickListener(){

                                                      @Override

                                                      public void onClick(View v) {

                                                                        /** Start

Game!!!! */

                                                      }


        });


        exit.setOnClickListener(new OnClickListener(){

                                                      @Override

                                                      public void onClick(View v) {

                                                                        boolean clean =

false;

                                                                        clean =

engine.onExit(v);

                                                                        if (clean)

                                                                        {

int pid= android.os.Process.myPid();

android.os.Process.killProcess(pid);

                                                                        }

                                                      }

                          );

    }


}
Finally, you need to kill the background music service during housekeeping. Go back to SFEngine, and add the following code to kill the service and thread:
package com.proandroidgames;


import android.content.Context;

import android.content.Intent;

import android.view.View;


public class SFEngine {

                  /*Constants that will be used in the game*/

                  public static final int GAME_THREAD_DELAY = 4000;

                  public static final int MENU_BUTTON_ALPHA = 0;

                  public static final boolean HAPTIC_BUTTON_FEEDBACK = true;

                  public static final int SPLASH_SCREEN_MUSIC = R.raw.warfieldedit;

                  public static final int R_VOLUME = 100;

                  public static final int L_VOLUME = 100;

                  public static final boolean LOOP_BACKGROUND_MUSIC = true;

                  public static Context context;

                  public static Thread musicThread;


                  /*Kill game and exit*/

                  public boolean onExit(View v) {

        try

        {

                          Intent bgmusic = new Intent(context, SFMusic.class);

                          context.stopService(bgmusic);

                          musicThread.stop();

                          return true;

        }catch(Exception e){

                          return false;

        }


                  }


}
Compile and run your game. You should now have a working splash screen with background music that exits cleanly. In the next chapter, you will begin to build the first level of the game, starting with its background.
Summary
In this chapter, you set forth the first code for your game. You created a splash screen that faded in and then faded out to the game's main menu. You also created the game's main menu with options to start and exit. Last, you used the media player and a raw music file to add some background music to your game.
In the next chapter, you will create a two-layer, scrolling background for your game.