
Chapter 11
Creating an Immersive Environment
In the previous chapter, you learned how to take some of your new 2-D game development skills and apply them to a 3-D game. You learned how OpenGL ES renders objects in 3-D and how to move these objects around to get a 3-D effect.
In this chapter, you are going to build an environment for your 3-D game. Because this is a primer on 3-D development, you will learn how to create the standard of all FPS games-the corridor. You will use the techniques you learned in earlier chapters to create an L-shaped corridor for your player to navigate.
Finally, in the last chapter of this book, you will learn how your players can navigate through this corridor and implement some collision detection to keep them from going through the walls.
Let's start with the BHWalls class that you created in the Chapter 10.
Using the BHWalls class
In the previous chapter, you created a small 3-D test. As part of this test, you created a BHWalls class that creates a square wall shape and applies a texture to it. How does this apply to the 3-D game that you are going to create? Let's examine a 3-D world to find out. In this section, you will learn how to move from the small BHWalls test in the last chapter to a 3-D corridor.
Look around you right now; what do you see? Step outside; look up, and look down.
Chances are, if you were indoors when you looked around, you saw some walls. You could not see into the rooms or environments beyond those walls because the structure of the walls blocked your view. You may know that you are in a house or large building, but your eyes are only seeing the unobstructed portions of the environment.
The same applies if you move outside; yes, the environment is much larger and you can see much more, but what you see is still a finite space. Something always ends up restricting your view-be it a house, trees, or even the ground you are standing on.
Move your attention now to a computer environment. Until you place objects into your environment, your players will have an unobstructed 360-degree view of the world. It is up to you to restrict that view to the specific area that you want them to experience. In Star Fighter, the 2-D game you created earlier in this book, it was easy to control the player's view of the world. You created a single, static view of a scene. All of the action of the game took place in this one view.
With 3-D games, controlling what the players see is a little harder, because the players are in control of their view of the world. Therefore, you must place objects and create environments in such a way that you control what the players have access to see, even though they will be in control of how the see it.
In the early days of 3-D first-person gaming, this control over the play's environmental view was accomplished using corridors. Think back to some of the most popular early first-person shooters like Doom, Quake, and Castle Wolfenstein. They all used rooms and corridors to guide you where you to where you needed to go, yet let you feel as though you were in a much larger, free-roaming environment.
You already have all of the skills needed to create an effective 3-D corridor. No matter how long any single corridor is, it can be built from a series of walls. In Chapter 10, you built a wall and moved it around the player. You could simply build 5, 10, or 15 more of these walls and place them in specific locations to create a long corridor with turns.
Creating a Corridor from Multiple BHWalls Instances
Let's take a look at what exactly BHWalls creates.
…


private float vertices[] = {

        0.0f, 0.0f, 0.0f,

        1.0f, 0.0f, 0.0f,

        1.0f, 1.0f, 0.0f,

        0.0f, 1.0f, 0.0f,

        };


…
This code segment is a piece of the BHWalls class-a very important piece that you should remember from Star Fighter. This array represents one square that can be rendered out to the screen. While this square could theoretically represent anything, for you, it is a wall.
You can render multiple walls, and then using glTranslatef(), you can move each wall into place. The code would look something like this:
… gl.glTranslatef(0.0f, 0.0f, 0f);
gl.glRotatef( 45.0f, 0.0f,1.0f, 0.0f);
corridor.draw(gl);
gl.glTranslatef(0.0f, 0.0f, 1f);
gl.glRotatef( 45.0f, 0.0f,1.0f, 0.0f);
corridor.draw(gl);
gl.glTranslatef(-1.0f, 0.0f, 0f);
gl.glRotatef( 45.0f, 0.0f,1.0f, 0.0f);
corridor.draw(gl);
gl.glTranslatef(-1.0f, 0.0f, 1f);
gl.glRotatef( 45.0f, 0.0f,1.0f, 0.0f);
corridor.draw(gl);
gl.glTranslatef(0.0f, 0.0f, 0f);
gl.glRotatef( 0.0f, 0.0f,0.0f, 0.0f);
corridor.draw(gl);
…
While this is more psudeocode than anything you could use directly in your game, you can see how it would be possible to create a corridor by rendering several walls and using OpenGL to translate and rotate them; you could piece together a corridor.
However, this method has its drawbacks. First, it is time consuming. It would take a long time to create all the walls needed to build a corridor of any substantial size. Second, with that many separate objects to keep track of, messing up something would be very easy. You could lose track of which wall goes where and turn something the wrong way. Finally, with that many objects for OpenGL to create, move, and render, your game would not be as efficient as it could be.
There is a better way to create the game environment. You could build the entire corridor at one time, with one object.
Using the BHCorridor Class
In this section, you are going to create a new class, BHCorridor. The BHCorridor class will be responsible for creating a single corridor from multiple polygons. You will then be able to treat this corridor as a single object.
Being able to treat the corridor as a single object will come in very handy in the next, and final, chapter, where you will allow the player to navigate the corridor. This will require moving objects around, which is much easier when you have fewer objects to keep track of.
Let's build the BHCorridor class. We are going to walk through the full class, because there will be some differences between BHCorridor and the BHWalls class that you used in the previous chapter.
Building the BHCorridorClass
In this section, you will begin to build the BHCorridor class. This class will be used to create a full 3-D corridor at once, rather than piecing one together from a number of separate walls. To begin, create a new class in your Blob Hunter project called BHCorridor.
package com.proandroidgames;


public class BHCorridor {


}
Next, you need to set up your arrays.
package com.proandroidgames;


import java.nio.FloatBuffer;


public class BHCorridor {

        private FloatBuffer vertexBuffer;

        private FloatBuffer textureBuffer;


        private int[] textures = new int[1];


        private float vertices[] = {


        };


        private float texture[] = {


        };


}
In the BHWalls class, and even in SFBackground from earlier in this book, the vertices[] array would hold 12 values, something like this:
private float vertices[] = {

        0.0f, 0.0f, 0.0f,

        1.0f, 0.0f, 0.0f,

        1.0f, 1.0f, 0.0f,

        0.0f, 1.0f, 0.0f,

        };
These values represent the x, y, and z axes coordinates of the corners of the square (more precisely, the corners of two triangles that form a square).
You are going to build on this logic by feeding into the array all of the coordinates needed to build the entire corridor at one time (rather than instantiating multiple wall objects and pasting them together). The corridor that you are going to build will be L shaped, as shown in Figure 11–1.
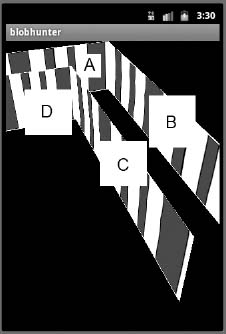
Figure 11–1. The finished corridor shape
The image in Figure 11–1 illustrates the shape of the corridor that you will be creating. An arbitrary texture has been added in this image to help you see the shape. Notice that the corridor is L shaped with a bend to the left and is built from four main wall sections. These sections have been labeled A, B, C, and D, and we will be referring to these segment letters as we build the walls.
Building Multiple Walls with the vertices[]Array
Let's set up the vertices[] array to create multiple walls. You can start with wall segment A. This is a flat wall that is facing a player standing at the end of the corridor.
private float vertices[] = {

        -2.0f, 0.0f, 0.0f,

        1.0f, 0.0f, 0.0f,

        -2.0f, 1.0f, 0.0f,

        1.0f, 1.0f, 0.0f,
Next, you will add the vertex for wall segment B. This segment connects with A on the right-hand side and extends toward the player on the z axis.
private float vertices[] = {

        -2.0f, 0.0f, 0.0f,

        1.0f, 0.0f, 0.0f,

        -2.0f, 1.0f, 0.0f,

        1.0f, 1.0f, 0.0f,


        1.0f, 0.0f, 0.0f,

        1.0f, 0.0f, 5.0f,

        1.0f, 1.0f, 0.0f,

        1.0f, 1.0f, 5.0f,
Now, add the vertex for wall segment C. This wall segment is opposite segment B and also extends toward the player.
private float vertices[] = {

        -2.0f, 0.0f, 0.0f,

        1.0f, 0.0f, 0.0f,

        -2.0f, 1.0f, 0.0f,

        1.0f, 1.0f, 0.0f,


        1.0f, 0.0f, 0.0f,

        1.0f, 0.0f, 5.0f,

        1.0f, 1.0f, 0.0f,

        1.0f, 1.0f, 5.0f,


        0.0f, 0.0f, 1.0f,

        0.0f, 0.0f, 5.0f,

        0.0f, 1.0f, 1.0f,

        0.0f, 1.0f, 5.0f,
Finally, add the vertex for wall segment D. This is the segment that is opposite segment A and extends from the end to segment C toward the left-hand side of the screen.
private float vertices[] = {

        -2.0f, 0.0f, 0.0f,

        1.0f, 0.0f, 0.0f,

        -2.0f, 1.0f, 0.0f,

        1.0f, 1.0f, 0.0f,


        1.0f, 0.0f, 0.0f,

        1.0f, 0.0f, 5.0f,

        1.0f, 1.0f, 0.0f,

        1.0f, 1.0f, 5.0f,


        0.0f, 0.0f, 1.0f,

        0.0f, 0.0f, 5.0f,

        0.0f, 1.0f, 1.0f,

        0.0f, 1.0f, 5.0f,


        -2.0f, 0.0f, 1.0f,

        0.0f, 0.0f, 1.0f,

        -2.0f, 1.0f, 1.0f,

        0.0f, 1.0f, 1.0f,

};
That is it. Those are all of the vertices needed to build the corridor.
NOTE: Because you are working in Java, it is not outside the realm of possibility to store large arrays of data like this in other .java files. You can then load these file and read the arrays out of them.
With the vertices[] array complete, you can create the texture[] array. Like the vertices[] array, the texture[] array will require some minor tweaking before it can be used to apply a texture to the corridor.
Creating the texture[]Array
In the previous chapters, you built a texture[] array that looked something like this:
private float texture[] = {

        -1.0f, 0.0f,

        1.0f, 0f,

        -1f, 1f,

        1f, 1.0f,

};
The texture[] array contains the mapping points that tell OpenGL how the texture fits on the vertices. Since you have created a new vertices[] array with four distinct sets of vertices, you also need a texture[] array that will contain for sets of mapping points: one for each set of vertices.
Try not to get caught up in figuring out how to map the texture to the corridor walls without a z axis coordinate. The mapping points in the texture[] array correspond to the corners of the texture not the wall vertices. Therefore, since you will be mapping the entire texture to each wall, the four sets of texture mapping points will be identical.
private float texture[] = {

        -1.0f, 0.0f,

        1.0f, 0f,

        -1f, 1f,

        1f, 1.0f,


        -1.0f, 0.0f,

        1.0f, 0f,

        -1f, 1f,

        1f, 1.0f,


        -1.0f, 0.0f,

        1.0f, 0f,

        -1f, 1f,

        1f, 1.0f,


        -1.0f, 0.0f,

        1.0f, 0f,

        -1f, 1f,

        1f, 1.0f,


};
Now, your BHCorridor class should look like this:
package com.proandroidgames;


import java.nio.FloatBuffer;


public class BHCorridor {

        private FloatBuffer vertexBuffer;

        private FloatBuffer textureBuffer;


        private int[] textures = new int[1];
private float vertices[] = {
s
-2.0f, 0.0f, 0.0f,
1.0f, 0.0f, 0.0f,
-2.0f, 1.0f, 0.0f,
1.0f, 1.0f, 0.0f,
1.0f, 0.0f, 0.0f,
1.0f, 0.0f, 5.0f,
1.0f, 1.0f, 0.0f,
1.0f, 1.0f, 5.0f,
0.0f, 0.0f, 1.0f,
0.0f, 0.0f, 5.0f,
0.0f, 1.0f, 1.0f,
0.0f, 1.0f, 5.0f,
-2.0f, 0.0f, 1.0f,
0.0f, 0.0f, 1.0f,
-2.0f, 1.0f, 1.0f,
0.0f, 1.0f, 1.0f,
};
private float texture[] = {
-1.0f, 0.0f,
1.0f, 0f,
-1f, 1f,
1f, 1.0f,
-1.0f, 0.0f,
1.0f, 0f,
-1f, 1f,
1f, 1.0f,
-1.0f, 0.0f,
1.0f, 0f,
-1f, 1f,
1f, 1.0f,
-1.0f, 0.0f,
1.0f, 0f,
-1f, 1f,
1f, 1.0f,
};
}
Next, add a constructor that will create your buffers, just like you did for BHWalls and SFBackground.
public BHCorridor() {

        ByteBuffer byteBuf = ByteBuffer.allocateDirect(vertices.length * 4);

        byteBuf.order(ByteOrder.nativeOrder());

        vertexBuffer = byteBuf.asFloatBuffer();

        vertexBuffer.put(vertices);

        vertexBuffer.position(0);


        byteBuf = ByteBuffer.allocateDirect(texture.length * 4);

        byteBuf.order(ByteOrder.nativeOrder());

        textureBuffer = byteBuf.asFloatBuffer();

        textureBuffer.put(texture);

        textureBuffer.position(0);

}
After that, add the loadTexture() method. There are no major changes here either, so no further explanation should be needed (if you are unsure how the loadTexture() method works, check back in Chapter 4 for a detailed explanation).
public void loadTexture(GL10 gl,int texture, Context context) {

        InputStream imagestream = context.getResources().openRawResource(texture);

        Bitmap bitmap = null;

        try {


                bitmap = BitmapFactory.decodeStream(imagestream);


        }catch(Exception e){


        }finally {


                try {

                        imagestream.close();

                        imagestream = null;

                } catch (IOException e) {

                }

        }


        gl.glGenTextures(1, textures, 0);

        gl.glBindTexture(GL10.GL_TEXTURE_2D, textures[0]);


        gl.glTexParameterf(GL10.GL_TEXTURE_2D, GL10.GL_TEXTURE_MIN_FILTER, GL10.GL_NEAREST);

        gl.glTexParameterf(GL10.GL_TEXTURE_2D, GL10.GL_TEXTURE_MAG_FILTER, GL10.GL_LINEAR);


        gl.glTexParameterf(GL10.GL_TEXTURE_2D, GL10.GL_TEXTURE_WRAP_S, GL10.GL_REPEAT);

        gl.glTexParameterf(GL10.GL_TEXTURE_2D, GL10.GL_TEXTURE_WRAP_T, GL10.GL_REPEAT);


        GLUtils.texImage2D(GL10.GL_TEXTURE_2D, 0, bitmap, 0);


        bitmap.recycle();

}
Finally, in the next section, you'll create the draw() method. Remember, the draw() method is called by the renderer to draw out the corridor. There are some changes in the BHCorridor.draw() to account for the multiple sets of vertices in the vertices[] array.
Creating the draw()Method
You are going to use the glDrawArrays() method with pointers to the wall segment vertices. Take a look at your vertices[] array. The array is visually broken up into four sets of four vertices-one for each corner of a wall segment. You need to tell OpenGL where each wall segment begins and ends. Therefore, you will pass into glDrawArrays() the start point and the number of vertices for each wall segment.
The glDrawArrays() call for wall segment A will look like this:
gl.glDrawArrays(GL10.GL_TRIANGLE_STRIP, 0,4);
This line tells OpenGL to start at position 0 in the array and read four vertices. By this logic, wall segment two would start at position 4 in the array and extend for another four vertices, and so on.
With the call to glDrawArrays() being the only difference in the draw() method for the BHCorridor, your method should look like this:
public void draw(GL10 gl) {


gl.glBindTexture(GL10.GL_TEXTURE_2D, textures[0]);

        gl.glFrontFace(GL10.GL_CCW);


        gl.glVertexPointer(3, GL10.GL_FLOAT, 0, vertexBuffer);

        gl.glTexCoordPointer(2, GL10.GL_FLOAT, 0, textureBuffer);


        gl.glEnableClientState(GL10.GL_VERTEX_ARRAY);

        gl.glEnableClientState(GL10.GL_TEXTURE_COORD_ARRAY);


        gl.glDrawArrays(GL10.GL_TRIANGLE_STRIP, 0,4);


        gl.glDrawArrays(GL10.GL_TRIANGLE_STRIP, 4,4);


        gl.glDrawArrays(GL10.GL_TRIANGLE_STRIP, 8,4);


        gl.glDrawArrays(GL10.GL_TRIANGLE_STRIP, 12,4);


        gl.glDisableClientState(GL10.GL_VERTEX_ARRAY);

        gl.glDisableClientState(GL10.GL_TEXTURE_COORD_ARRAY);

        gl.glDisable(GL10.GL_CULL_FACE);


}
Your finished BHCorridor class is shown in Listing 11–1.
Listing 11-1. BHCorridor.java
package com.proandroidgames;


import java.io.IOException;

import java.io.InputStream;

import java.nio.ByteBuffer;

import java.nio.ByteOrder;

import java.nio.FloatBuffer;
import javax.microedition.khronos.opengles.GL10;
import android.content.Context;
import android.graphics.Bitmap;
import android.graphics.BitmapFactory;
import android.opengl.GLUtils;
public class BHCorridor {
private FloatBuffer vertexBuffer;
private FloatBuffer textureBuffer;
private int[] textures = new int[1];
private float vertices[] = {
-2.0f, 0.0f, 0.0f,
1.0f, 0.0f, 0.0f,
-2.0f, 1.0f, 0.0f,
1.0f, 1.0f, 0.0f,
1.0f, 0.0f, 0.0f,
1.0f, 0.0f, 5.0f,
1.0f, 1.0f, 0.0f,
1.0f, 1.0f, 5.0f,
0.0f, 0.0f, 1.0f,
0.0f, 0.0f, 5.0f,
0.0f, 1.0f, 1.0f,
0.0f, 1.0f, 5.0f,
-2.0f, 0.0f, 1.0f,
0.0f, 0.0f, 1.0f,
-2.0f, 1.0f, 1.0f,
0.0f, 1.0f, 1.0f,
};
private float texture[] = {
-1.0f, 0.0f,
1.0f, 0f,
-1f, 1f,
1f, 1.0f,
-1.0f, 0.0f,
1.0f, 0f,
-1f, 1f,
1f, 1.0f,
-1.0f, 0.0f,
1.0f, 0f,
-1f, 1f,
1f, 1.0f,
-1.0f, 0.0f,
1.0f, 0f,
-1f, 1f, 1f, 1.0f,
};
public BHCorridor() {
ByteBuffer byteBuf = ByteBuffer.allocateDirect(vertices.length * 4);
byteBuf.order(ByteOrder.nativeOrder());
vertexBuffer = byteBuf.asFloatBuffer();
vertexBuffer.put(vertices);
vertexBuffer.position(0);
byteBuf = ByteBuffer.allocateDirect(texture.length * 4);
byteBuf.order(ByteOrder.nativeOrder());
textureBuffer = byteBuf.asFloatBuffer();
textureBuffer.put(texture);
textureBuffer.position(0);
}
public void draw(GL10 gl) {
gl.glBindTexture(GL10.GL_TEXTURE_2D, textures[0]);
gl.glFrontFace(GL10.GL_CCW);
gl.glVertexPointer(3, GL10.GL_FLOAT, 0, vertexBuffer);
gl.glTexCoordPointer(2, GL10.GL_FLOAT, 0, textureBuffer);
gl.glEnableClientState(GL10.GL_VERTEX_ARRAY);
gl.glEnableClientState(GL10.GL_TEXTURE_COORD_ARRAY);
gl.glDrawArrays(GL10.GL_TRIANGLE_STRIP, 0,4);
gl.glDrawArrays(GL10.GL_TRIANGLE_STRIP, 4,4);
gl.glDrawArrays(GL10.GL_TRIANGLE_STRIP, 8,4);
gl.glDrawArrays(GL10.GL_TRIANGLE_STRIP, 12,4);
gl.glDisableClientState(GL10.GL_VERTEX_ARRAY);
gl.glDisableClientState(GL10.GL_TEXTURE_COORD_ARRAY);
gl.glDisable(GL10.GL_CULL_FACE);
}
public void loadTexture(GL10 gl,int texture, Context context) {
InputStream imagestream =
context.getResources().openRawResource(texture);
Bitmap bitmap = null;
try {
bitmap = BitmapFactory.decodeStream(imagestream);
}catch(Exception e){
}finally {
try {
imagestream.close(); imagestream = null;
} catch (IOException e) {
}
}
gl.glGenTextures(1, textures, 0);
gl.glBindTexture(GL10.GL_TEXTURE_2D, textures[0]);
gl.glTexParameterf(GL10.GL_TEXTURE_2D, GL10.GL_TEXTURE_MIN_FILTER, GL10.GL_NEAREST);
gl.glTexParameterf(GL10.GL_TEXTURE_2D, GL10.GL_TEXTURE_MAG_FILTER, GL10.GL_LINEAR);
gl.glTexParameterf(GL10.GL_TEXTURE_2D, GL10.GL_TEXTURE_WRAP_S, GL10.GL_REPEAT);
gl.glTexParameterf(GL10.GL_TEXTURE_2D, GL10.GL_TEXTURE_WRAP_T, GL10.GL_REPEAT);
GLUtils.texImage2D(GL10.GL_TEXTURE_2D, 0, bitmap, 0);
bitmap.recycle();
}
}
Adding a Wall Texture
With the BHCorridor class created and able to map a texture to the walls, it is time to add a nice wall texture to replace the temporary one shown in Figure 11–1. Figure 11–2 illustrates the wall texture that you are going to map to the walls of your corridor.
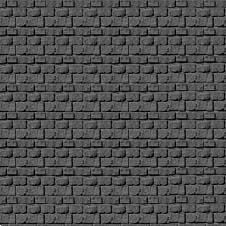
Figure 11–2. The wall texture
Begin by adding this image to your drawable.nodpi folder. Then, add a reference to it in BHEngine as follows:
public static final int BACK_WALL = R.drawable.walltexture256;
Your finished walls will appear as shown in Figure 11–3 when this new texture is applied.
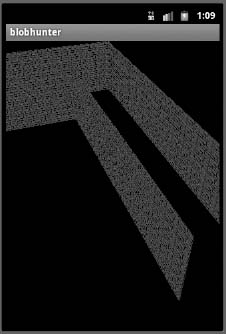
Figure 11–3. The textured walls
In the next section, you are going to instantiate a copy of the BHCorridor class and draw it to the screen with the new texture that you just added to Blob Hunter.
Calling BHCorridor
As in the Star Fighter project from earlier in this book, all of Blob Hunter's rendering is performed in the game rendering class. In Chapter 10, you created this class, BHGameRenderer. In this section, you are going to add a drawCorridor() method that will be called during the game loop. Open the BHGameRenderer.java file, and add a new instance of the BHCorridor, as follows:
private BHCorridor corridor = new BHCorridor();
Now, you can create a drawCorridor() method. The method is going to set up the gluLookAt() (see Chapter 10 for a description of how this works), and it is going to rotate the corridor on its x and y axes to appear as in Figure 11–3.
private void drawCorridor(GL10 gl){


        GLU.gluLookAt(gl, 0f, 0f, 5f, 0f, 0f, 0, 0, 1, 0);

        gl.glRotatef( 40.0f, 1.0f,0.0f, 0.0f);

        gl.glRotatef( 20.0f, 0.0f,1.0f, 0.0f);

        gl.glTranslatef(0.0f, 0.0f, -3f);


        corridor.draw(gl);


}
Again, all of this code should look very familiar. By this point in this book, there should be very little new code. You are just taking the code and skills that you learned in created 2-D games and adapting them to a 3-D environment.
Summary
In this chapter, you learned how to create a multipolygon object-the corridor-in a single call. Then, you added a texture to the corridor and rendered it to the screen using BHGamerRenderer. This is a sharp peak in your learning curve, because it teaches you how to manage some very complex objects. Almost any 3-D environment that you can think of, from a vast cityscape to a complex maze, can be built using this technique.
In the final chapter of this book, Chapter 12, you'll create the controls needed to navigate through this 3-D corridor, including collision detection to ensure the player does not walk though your walls.