
Chapter 5
Creating Your Character
To this point in the book, you have done quite a bit of developing, and you have learned a lot about OpenGL and Android—so much that you should be fairly comfortable now with the slight differences between OpenGL and any of the other API tools you may have used in the past.
You have not written an exorbitant amount of code thus far. But what you have written has made a great start to your game and a big visual impact. You have accomplished developing a two-layer dual-speed scrolling background, background music, splash screen, and main menu system. All of these items have one thing in common, as far as a playable game is concerned: they are pretty boring.
That is to say, a gamer is not going to buy your game to watch a fancy two-layer background scroll by. The gamer needs some action to control. This is what Chapter 5: Create Your Character is all about.
In this chapter, you will create your playable character. By the end of this chapter, you will have an animated character that the player can move on the screen. The first section of this chapter will introduce you to a staple of 2-D game development-sprite animation. Then, using OpenGL ES, you will load different sprites from a full sprite sheet to create the illusion of an animated character. You will learn how to load different sprites at key points in the action to make your character look like it is banking in flight.
Animating Sprites
One of the most time-honored tools in the 2-D game developer's belt is sprite animation. Think back to any of your favorite 2-D games, chances are the animation of any of the characters was achieved using sprite animation.
A sprite is technically any graphic element in a 2-D game. Your main playable character is, therefore, a sprite by definition. Sprites, by themselves, are just static images that sit on the screen and do not change. Sprite animation is the process that you are going to use to give your character some life, even if that character is just a spaceship.
CAUTION: Do not confuse animation with movement. Moving a sprite (image, texture, vertex, or model) around the screen is not the same as animating a sprite; the two concepts and skills are mutually exclusive.
Sprite animation is accomplished using a flip-book style effect. Think of almost any 2-D game, for example, Mario Brothers. Mario Brothers is one of the best examples of 2-D platform gaming that incorporates sprite animation. In the game, you move Mario left or right through a side-scrolling environment. Mario walks, and sometimes runs, in the direction that you move him. His legs are clearly animated in a walking sequence.
This walking animation is actually made up of a series of still pictures. Each picture depicts a different point in the walking action. When the player moves the character to the left or to the right, the different images are swapped out, giving the illusion that Mario is walking.
In the game Star Fighter, you are going to employ the same method to create some animation for your main character. The main playable character in Star Fighter is a spaceship; therefore, it will not require walking animation. Spaceships do require some animating though. In this chapter, you will create animations for banking to the right and banking to the left as the player is flying. In future chapters, you will create animations for exploding in a collision.
The great part about sprite animation is that you learned all of the skills that are needed to implement it in the previous chapter. That is, you learned how to load a texture into OpenGL. More importantly, you learned to map a texture onto a set of vertices. The key to sprite animation is how the texture is mapped onto your vertices.
The textures used in implementing sprite animation are not technically separate images. The time and power that would be needed to load and map a new texture 60 times per second-if you could even do it-would far exceed the capabilities of an Android device. Rather, you will use something called a sprite sheet.
A sprite sheet is a single image that contains on it all of the separate images required to perform sprite animation. Figure 5–1 shows the sprite sheet for the main playable ship.
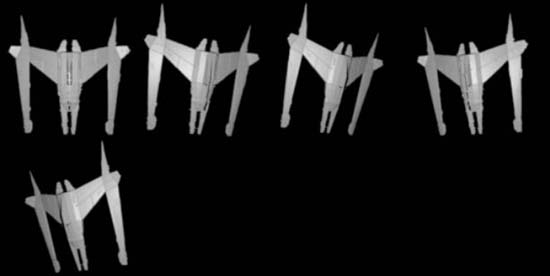
Figure 5–1. Main character sprite sheet
NOTE: The sprite sheet in Figure 5–1 is only partially shown. The actual image as it is loaded into OpenGL is 512 × 512. The bottom half of the image, which is nothing but transparency, has been cropped for better display in the book.
How do you animate one image that is full of smaller ones? It is actually easier than you may think. You will load the image as one texture, but you will only be displaying the portion of the texture that has the image that you want to show the player. When you want to animate the image, you simply use glTranslateF() to move to the next part of the image that you want to display.
Don't worry if this concept doesn't quite make sense yet; you are going to put it into action in the next sections of this chapter. The first step, however, is to create a class that will handle drawing and loading your playable character.
NOTE: You may be wondering why the ships in the sprite sheet are facing down rather than up; especially since the playable character will be at the bottom of the screen flying up toward the top. This is because OpenGL renders all bitmaps from the last line to the first. Therefore, when OpenGL renders this sprite sheet it will appear on the screen as in Figure 5–2.
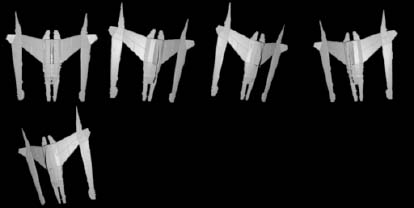
Figure 5-2. How the sprite sheet will look on screen
Yes, you could use draw the sprite sheet the correct way and then use OpenGL to rotate the texture to the correct position. However, it is easy enough to invert the sprite sheet using any imaging software, and that way, you save OpenGL the cycles and trouble of inverting it for you.
Loading Your Character
In the previous chapter, you created a class that loaded a texture for a background image and then drew that image when called. The mechanics that you used to create that class will be the same as those that you will need to load up and draw your main character. You will make small adjustments to allow for the use of a sprite sheet, but otherwise, this code should look familiar.
Start by creating a new class in your project package named SFGoodGuy:
package com.proandroidgames;


public class SFGoodGuy {


}
In the SFGoodGuy() class, stub out a constructor, a draw() method, and a loadTexture() method.
TIP: Remember, you can use the alt + shift + O shortcut in Eclipse to expose any missing imports that you may need.
package com.proandroidgames;


public class SFGoodGuy {


        public SFGoodGuy() {


        }

        public void draw(GL10 gl) {


        }

        public void loadTexture(GL10 gl,int texture, Context context) {


        }

}
Next, establish the buffers that you will use in the class. Again, this should look identical to what you did in the previous chapter when working with the background for the game.
You can also add the code to create the vertices[] array. The vertices will be the same as those used in for the background.
package com.proandroidgames;


public class SFGoodGuy {


        private FloatBuffer vertexBuffer;

        private FloatBuffer textureBuffer;

        private ByteBuffer indexBuffer;

        private int[] textures = new int[1];


        private float vertices[] = {

                0.0f, 0.0f, 0.0f,

                1.0f, 0.0f, 0.0f,

                1.0f, 1.0f, 0.0f,

                0.0f, 1.0f, 0.0f,

        };


        public SFGoodGuy() {


        }

        public void draw(GL10 gl) {


        }

        public void loadTexture(GL10 gl,int texture, Context context) {


        }

}
Now, create the array for the texture mapping.
Creating Texture Mapping Arrays
Texture mapping is where the SFGoodGuy() class will deviate from what you used when loading the background. The texture that you will load into this class is a large sprite sheet that contains five images of the main playable character. Your goal is to display only one of these images at a time.
The key to understanding how to tell OpenGL the location of the image that you want to display is how the images are configured on the sprite sheet. Take a look, again, at the sprite sheet in Figure 5–1. Notice that the images are laid out evenly with four images in the first row and one image in the second. With only four images in the first row of the texture, and the entire texture being 1 unit long, you can surmise that you will only need to display one-fourth of the entire texture to display one of the four images on the first row.
This means that rather than mapping the full texture—from (0,0) to (1,1)—like you did for the background, you only need to map a quarter of it—from (0,0) to (0,.25). You will only be mapping, and thus displaying, the first image of the ship by only using .25, or one-fourth, of the texture.
Create your texture array like this:
package com.proandroidgames;


public class SFGoodGuy {


        private FloatBuffer vertexBuffer;

        private FloatBuffer textureBuffer;

        private ByteBuffer indexBuffer;

        private int[] textures = new int[1];


        private float vertices[] = {

                0.0f, 0.0f, 0.0f,

                1.0f, 0.0f, 0.0f,

                1.0f, 1.0f, 0.0f,

                0.0f, 1.0f, 0.0f,

        };


        private float texture[] = {

                0.0f, 0.0f,

                0.25f, 0.0f,

                0.25f, 0.25f,

                0.0f, 0.25f,

        };


        public SFGoodGuy() {


        }

        public void draw(GL10 gl) {


        }

        public void loadTexture(GL10 gl,int texture, Context context) {


        }

}
The indices array, the draw() method, and the constructor are all the same as those used in the SFBackground class:
package com.paroandroidgames;


import java.io.IOException;

import java.io.InputStream;

import java.nio.ByteBuffer;

import java.nio.ByteOrder;

import java.nio.FloatBuffer;


import javax.microedition.khronos.opengles.GL10;


import android.content.Context;

import android.graphics.Bitmap;

import android.graphics.BitmapFactory;

import android.opengl.GLUtils;


public class SFGoodGuy {


        private FloatBuffer vertexBuffer;

        private FloatBuffer textureBuffer;

        private ByteBuffer indexBuffer;

        private int[] textures = new int[1];


        private float vertices[] = {

                0.0f, 0.0f, 0.0f,

                1.0f, 0.0f, 0.0f,

                1.0f, 1.0f, 0.0f,

                0.0f, 1.0f, 0.0f,

        };


        private float texture[] = {

                0.0f, 0.0f,

                0.25f, 0.0f,

                0.25f, 0.25f,

                0.0f, 0.25f,

        };


        private byte indices[] = {

                0,1,2,

                0,2,3,

        };


        public SFGoodGuy() {

                ByteBuffer byteBuf = ByteBuffer.allocateDirect(vertices.length * 4);

                byteBuf.order(ByteOrder.nativeOrder());

                vertexBuffer = byteBuf.asFloatBuffer();

                vertexBuffer.put(vertices);

                vertexBuffer.position(0);


                byteBuf = ByteBuffer.allocateDirect(texture.length * 4);

                byteBuf.order(ByteOrder.nativeOrder());

                textureBuffer = byteBuf.asFloatBuffer();

                textureBuffer.put(texture);

                textureBuffer.position(0);


                indexBuffer = ByteBuffer.allocateDirect(indices.length);

                indexBuffer.put(indices);

                indexBuffer.position(0);

        }


        public void draw(GL10 gl) {

                gl.glBindTexture(GL10.GL_TEXTURE_2D, textures[0]);

                gl.glFrontFace(GL10.GL_CCW);

                gl.glEnable(GL10.GL_CULL_FACE);

                gl.glCullFace(GL10.GL_BACK);


                gl.glEnableClientState(GL10.GL_VERTEX_ARRAY);

                gl.glEnableClientState(GL10.GL_TEXTURE_COORD_ARRAY);


                gl.glVertexPointer(3, GL10.GL_FLOAT, 0, vertexBuffer);

                gl.glTexCoordPointer(2, GL10.GL_FLOAT, 0, textureBuffer);


                gl.glDrawElements(GL10.GL_TRIANGLES, indices.length,

GL10.GL_UNSIGNED_BYTE, indexBuffer);


                gl.glDisableClientState(GL10.GL_VERTEX_ARRAY);

                gl.glDisableClientState(GL10.GL_TEXTURE_COORD_ARRAY);

                gl.glDisable(GL10.GL_CULL_FACE);

        }

        public void loadTexture(GL10 gl,int texture, Context context) {


        }

}
There is one more change that you need to make to the SFGoodGuy() class before it is finished. In the class for loadTexture() method of the background, you set the glTexParameterf to GL_REPEAT to enable the repeating of the texture as you moved it on the vertices. This is not really necessary for the playable character; therefore, you are going to set this parameter to GL_CLAMP_TO_EDGE.
Finish your SFGoodGuy() class with the following loadTexture() method:
…


        public void loadTexture(GL10 gl,int texture, Context context) {

                InputStream imagestream =

context.getResources().openRawResource(texture);

                Bitmap bitmap = null;

                try {


                        bitmap = BitmapFactory.decodeStream(imagestream);


                }catch(Exception e){


                }finally {

                        try {


                                imagestream.close();

                                imagestream = null;


                        } catch (IOException e) {

                        }

                }


                gl.glGenTextures(1, textures, 0);

                gl.glBindTexture(GL10.GL_TEXTURE_2D, textures[0]);


                gl.glTexParameterf(GL10.GL_TEXTURE_2D, GL10.GL_TEXTURE_MIN_FILTER, GL10.GL_NEAREST);

                gl.glTexParameterf(GL10.GL_TEXTURE_2D, GL10.GL_TEXTURE_MAG_FILTER, GL10.GL_LINEAR);


                gl.glTexParameterf(GL10.GL_TEXTURE_2D, GL10.GL_TEXTURE_WRAP_S, GL10.GL_REPEAT);

                gl.glTexParameterf(GL10.GL_TEXTURE_2D, GL10.GL_TEXTURE_WRAP_T, GL10.GL_REPEAT);


                GLUtils.texImage2D(GL10.GL_TEXTURE_2D, 0, bitmap, 0);


                bitmap.recycle();


        }

}
You now have a functional class that will load your playable character texture as a sprite sheet, display the first sprite in the sprite sheet, and not wrap the texture when it is moved.
Loading a Texture onto Your Character
The next step to loading a playable character is to instantiate a copy of the SFGoodGuy() and load a texture. Save and close the SFGoodGuy() class; you will not be needing to add any more code to it right now.
Let's add a few quick variables and constants to SFEngine. You will need these in your game loop.
First, you will add a variable called playerFlightAction. This is going to be used to track what action the player has taken so that you can respond appropriately in the game loop.
package com.proandroidgames;


import android.content.Context;

import android.content.Intent;

import android.view.Display;

import android.view.View;


public class SFEngine {


…


        public static int playerFlightAction = 0;


        /*Kill game and exit*/

        public boolean onExit(View v) {

        try

        {

                Intent bgmusic = new Intent(context, SFMusic.class);

                context.stopService(bgmusic);

                musicThread.stop();

                return true;

        }catch(Exception e){

                return false;

        }


        }

}
Next, add in a constant that points to the sprite sheet from the last section of this chapter.
package com.proandroidgames;


import android.content.Context;

import android.content.Intent;

import android.view.Display;

import android.view.View;


public class SFEngine {


…


        public static int playerFlightAction = 0;

        public static final int PLAYER_SHIP = R.drawable.good_sprite;


        /*Kill game and exit*/

        public boolean onExit(View v) {

        try

        {

                Intent bgmusic = new Intent(context, SFMusic.class);

                context.stopService(bgmusic);

                musicThread.stop();

                return true;

        }catch(Exception e){

                return false;

        }


        }

}
The next three constants are going to indicate what action the player has taken. These will be assigned to the playerFlightAction variable when the player tries to move the character.
package com.proandroidgames;


import android.content.Context;

import android.content.Intent;

import android.view.Display;

import android.view.View;


public class SFEngine {


…


        public static int playerFlightAction = 0;

        public static final int PLAYER_SHIP = R.drawable.good_sprite;

        public static final int PLAYER_BANK_LEFT_1 = 1;

        public static final int PLAYER_RELEASE = 3;

        public static final int PLAYER_BANK_RIGHT_1 = 4;


        /*Kill game and exit*/

        public boolean onExit(View v) {

        try

        {

                Intent bgmusic = new Intent(context, SFMusic.class);

                context.stopService(bgmusic);

                musicThread.stop();

                return true;

        }catch(Exception e){

                return false;

        }


        }

}
Depending on how observant you are concerning the constants that you just added to SFEngine, you may be wondering why PLAYER_BANK_LEFT_1 has a value of 1 and PLAYER_RELEASE has a value of 3. These values are going to represent stages of your sprite animation. On the sprite sheet, there are two stages in the left-banking animation and two stages in the right-banking animation. However, in the code for the loop, you are going to be able to infer that between PLAYER_BANK_LEFT_1 and PLAYER_RELEASE is a PLAYER_BANK_LEFT_2 with a value of 2, and this constant will not have to be expressed in the SFEngine. This concept will definitely make more sense when you see it in action later in this section.
The next constant that you need will indicate how many loop iterations will equal one frame of sprite animation. Remember, the big difference between the playable character and the background of the game is that you are going to animate the character as it is moved across the screen. Keeping track of this animation is going to be a tricky thing. The game loop is running at 60 frames per second. If you ran a new frame of sprite animation for every iteration of the loop, your animation would be over before the player even had a chance to admire it. The constant PLAYER_FRAMES_BETWEEN_ANI will be set to 9, indicating that for every nine iterations of the main game loop, there will be one frame of sprite animation drawn.
package com.proandroidgames;


import android.content.Context;

import android.content.Intent;

import android.view.Display;

import android.view.View;


public class SFEngine {


…


        public static int playerFlightAction = 0;

        public static final int PLAYER_SHIP = R.drawable.good_sprite;

        public static final int PLAYER_BANK_LEFT_1 = 1;

        public static final int PLAYER_RELEASE = 3;

        public static final int PLAYER_BANK_RIGHT_1 = 4;

        public static final int PLAYER_FRAMES_BETWEEN_ANI = 9;


        /*Kill game and exit*/

        public boolean onExit(View v) {

        try

        {

                Intent bgmusic = new Intent(context, SFMusic.class);

                context.stopService(bgmusic);

                musicThread.stop();

                return true;

        }catch(Exception e){

                return false;

        }


        }

}
Finally, add one more constant and one morevariable. These will represent the speed at which the player's ship will move from left to right and the current position of the player's ship on the x axis.
package com.proandroidgames;


import android.content.Context;

import android.content.Intent;

import android.view.Display;

import android.view.View;


public class SFEngine {


…


        public static int playerFlightAction = 0;

        public static final int PLAYER_SHIP = R.drawable.good_sprite;

        public static final int PLAYER_BANK_LEFT_1 = 1;

        public static final int PLAYER_RELEASE = 3;

        public static final int PLAYER_BANK_RIGHT_1 = 4;

        public static final int PLAYER_FRAMES_BETWEEN_ANI = 9;

        public static final float PLAYER_BANK_SPEED = .1f;

        public static float playerBankPosX = 1.75f;


        /*Kill game and exit*/

        public boolean onExit(View v) {

        try

        {

                Intent bgmusic = new Intent(context, SFMusic.class);

                context.stopService(bgmusic);

                musicThread.stop();

                return true;

        }catch(Exception e){

                return false;

        }


        }

}
SFEngine now has all of the code needed to help you implement your playable character. Save and close the file.
Open the SFGameRenderer.java file. This file is the home to your game loop. In the previous chapter, you created the game loop and added two methods for drawing and scrolling the different layers of the background. Now, you are going to add code to your loop that will draw and move the playable character.
Setting Up the Game Loop
The first step is to instantiate a new SFGoodGuy() called player1:
public class SFGameRenderer implements Renderer{

        private SFBackground background = new SFBackground();

        private SFBackground background2 = new SFBackground();

        private SFGoodGuy player1 = new SFGoodGuy();


        private float bgScroll1;

        private float bgScroll2;

…

}
The player1 object is going to be used in the same way as background and background2. You will call the loadTexture() and draw() methods from player1 to load your character into the game.
You need to create a variable that will track how many iterations of the game loop have passed, so you will know when you flip frames in your sprite animation.
public class SFGameRenderer implements Renderer{

        private SFBackground background = new SFBackground();

        private SFBackground background2 = new SFBackground();

        private SFGoodGuy player1 = new SFGoodGuy();

        private int goodGuyBankFrames = 0;


        private float bgScroll1;

        private float bgScroll2;

…

}
Next, locate the onSurfaceCreated() method of the SFGameRenderer Renderer. This method handles the loading of game textures. In the last chapter, you called the loading methods of background and background2 in this method. Now, you need to add a call to the loadTexture() method of player1.
package com.proandroidgames;


import javax.microedition.khronos.egl.EGLConfig;

import javax.microedition.khronos.opengles.GL10;


import android.opengl.GLSurfaceView.Renderer;


public class SFGameRenderer implements Renderer{

        private SFBackground background = new SFBackground();

        private SFBackground background2 = new SFBackground();

        private SFGoodGuy player1 = new SFGoodGuy();

        private int goodGuyBankFrames = 0;


…


        @Override

        public void onSurfaceCreated(GL10 gl, EGLConfig config) {

                // TODO Auto-generated method stub

                 gl.glEnable(GL10.GL_TEXTURE_2D);

                gl.glClearDepthf(1.0f);

                gl.glEnable(GL10.GL_DEPTH_TEST);

                gl.glDepthFunc(GL10.GL_LEQUAL);


                background.loadTexture(gl,SFEngine.BACKGROUND_LAYER_ONE, SFEngine.context);

                background2.loadTexture(gl,SFEngine.BACKGROUND_LAYER_TWO, SFEngine.context);


                player1.loadTexture(gl, SFEngine.PLAYER_SHIP, SFEngine.context);

        }


}
So far, this code has all been pretty basic: create the texture, and load the texture. Now, it is time for the real meat of the chapter. It is time to write the method that will control the moving of your player's character.
Moving the Character
This section will help you create the code necessary to move your player's character on the screen. To do this, you will create a new method that will server as your core game loop. Finally, you will call methods from this loop that will perform the task of moving your character. Create a new method in SFGameRenderer SFGameRenderer that takes in a GL10.
package com.proandroidgames;


import javax.microedition.khronos.egl.EGLConfig;

import javax.microedition.khronos.opengles.GL10;


import android.opengl.GLSurfaceView.Renderer;


public class SFGameRenderer implements Renderer{


…


         private void movePlayer1(GL10 gl){


         }


…


}
Within the movePlayer1() method, you are going to run a switch statement on the playerFlightAction int that you added to SFEngine earlier in this chapter. Just in case you have never used one, a switch statement will examine the input object (playerFlightAction) and execute specific code based on the value of the input. The cases for this switch statement are PLAYER_BANK_LEFT_1, PLAYER_RELEASE, PLAYER_BANK_RIGHT_1, and default.
package com.proandroidgames;


import javax.microedition.khronos.egl.EGLConfig;

import javax.microedition.khronos.opengles.GL10;


import android.opengl.GLSurfaceView.Renderer;


public class SFGameRenderer implements Renderer{


…


        private void movePlayer1(GL10 gl){

                switch (SFEngine.playerFlightAction){

                case SFEngine.PLAYER_BANK_LEFT_1:


                        break;

                case SFEngine.PLAYER_BANK_RIGHT_1:


                        break;

                case SFEngine.PLAYER_RELEASE:


                        break;

                default:


                        break;

                }


          }


…


}
Let's start with the default case. The default case is going to be called when the player has taken no action at all with the character.
Drawing the Default State of the Character
Right now, the vertices are the same size as the screen. Therefore, if you were to just draw the playable character to the screen now, it would fill the entire screen. You will need to scale the game character by about 75 percent so that it looks good in the game.
To do this you are going to use glScalef(). Multiplying the scale by .25 will reduce the size of the ship to a quarter of its original size. This has one very important after effect that you need to understand.
In the last chapter, you briefly discoveredthat to scale or translate the vertices you need to work in the model matrix mode. Any operation that you do in any matrix mode affects all items in that matrix mode. Therefore, when you scale the vertices for the player ship by .25, you also scale the x and y axes that it occupies. In other words, whereas the x and y axis start at 0 and end at 1 when the scale is defaulted to 0 (full screen), the x and y axes will run for 0 to 4 when the scale is multiplied by .25.
This is important to you, because when you are trying to keep track of the player's location, you need to realize that the background may scroll from 0 to 1 but the player can scroll from 0 to 4.
Load the model matrix view, and scale the player by .25 on the x and y axes.
package com.proandroidgames;


import javax.microedition.khronos.egl.EGLConfig;

import javax.microedition.khronos.opengles.GL10;


import android.opengl.GLSurfaceView.Renderer;


public class SFGameRenderer implements Renderer{


…


        private void movePlayer1(GL10 gl){

                switch (SFEngine.playerFlightAction){

                case SFEngine.PLAYER_BANK_LEFT_1:


                        break;

                case SFEngine.PLAYER_BANK_RIGHT_1:


                        break;

                case SFEngine.PLAYER_RELEASE:


                        break;

                default:

                        gl.glMatrixMode(GL10.GL_MODELVIEW);

                        gl.glLoadIdentity();

                        gl.glPushMatrix();

                        gl.glScalef(.25f, .25f, 1f);


                        break;

                }


       }

…


}
Next, translate the model matrix on the x axis by the value in the variable playerBankPosX. The variable playerBankPosX is going to hold the player's current position on the x axis. Therefore, whenever the player is taking no action, the character will be right at the last place it was left.
package com.proandroidgames;


import javax.microedition.khronos.egl.EGLConfig;

import javax.microedition.khronos.opengles.GL10;


import android.opengl.GLSurfaceView.Renderer;


public class SFGameRenderer implements Renderer{


…


        private void movePlayer1(GL10 gl){

…


                default:

                        gl.glMatrixMode(GL10.GL_MODELVIEW);

                        gl.glLoadIdentity();

                        gl.glPushMatrix();

                        gl.glScalef(.25f, .25f, 1f);

                        gl.glTranslatef(SFEngine.playerBankPosX, 0f, 0f);


                        break;

                }


          }


…


}
When the player is at rest, no other action needs to be taken, so load the texture matrix, and make sure it is at the default position, which is the first sprite in the sprite sheet. Remember, the texture matrix mode will be the mode that you use to shift the position of the sprite sheet texture to flip the animation. If the player is not moving the character, there should be no animation—hence, the texture matrix should default to the first position.
package com.proandroidgames;


import javax.microedition.khronos.egl.EGLConfig;

import javax.microedition.khronos.opengles.GL10;


import android.opengl.GLSurfaceView.Renderer;


public class SFGameRenderer implements Renderer{


…


        private void movePlayer1(GL10 gl){

…


                default:

                        gl.glMatrixMode(GL10.GL_MODELVIEW);

                        gl.glLoadIdentity();

                        gl.glPushMatrix();

                        gl.glScalef(.25f, .25f, 1f);

                        gl.glTranslatef(SFEngine.playerBankPosX, 0f, 0f);

                        gl.glMatrixMode(GL10.GL_TEXTURE);

                        gl.glLoadIdentity();

                        gl.glTranslatef(0.0f,0.0f, 0.0f);

                        player1.draw(gl);

                        gl.glPopMatrix();

                        gl.glLoadIdentity();


                        break;

                }


        }


…


}
The next case in the switch statement that you code is for PLAYER_RELEASE. The PLAYER_RELEASE action will be called when the player releases the control after moving the character. While you have not yet coded the actual controls for the game, the player will touch a control telling the character to move. When the player releases this control, thus telling the character to stop moving, the PLAYER_RELEASE action will be called.
Coding the PLAYER_RELEASE Action
For now, the case for PLAYER_RELEASE will perform the same action as the default case. That is, the character will stay where it has been left on the screen, and no matter what texture was being displayer from the sprite sheet, it will be returned to the first texture on the sheet. Copy and paste the entire code block from default into the case for PLAYER_RELEASE.
package com.proandroidgames;


import javax.microedition.khronos.egl.EGLConfig;

import javax.microedition.khronos.opengles.GL10;


import android.opengl.GLSurfaceView.Renderer;


public class SFGameRenderer implements Renderer{


…


        private void movePlayer1(GL10 gl){

                switch (SFEngine.playerFlightAction){

                case SFEngine.PLAYER_BANK_LEFT_1:


                        break;

                case SFEngine.PLAYER_BANK_RIGHT_1:


                        break;

                case SFEngine.PLAYER_RELEASE:

                        gl.glMatrixMode(GL10.GL_MODELVIEW);

                        gl.glLoadIdentity();

                        gl.glPushMatrix();

                        gl.glScalef(.25f, .25f, 1f);

                        gl.glTranslatef(SFEngine.playerBankPosX, 0f, 0f);

                        gl.glMatrixMode(GL10.GL_TEXTURE);

                        gl.glLoadIdentity();

                        gl.glTranslatef(0.0f,0.0f, 0.0f);

                        player1.draw(gl);

                        gl.glPopMatrix();

                        gl.glLoadIdentity();


                        break;


…


                }


            }


…


}
Before you are finished with the PLAYER_RELEASE case, you need to add one more line of code. Earlier in this chapter, you learned that you cannot flip the animation for your sprite at the same rate as your game loop (60 frames per second), because with only two frames in your sprite animation, it would be over before the player realized it happened. Therefore, you need a variable to hold the number of game loops that have passed. By knowing the number of game loops that have passed, you can compare that number to the PLAYER_FRAMES_BETWEEN_ANI constant to determine when you need to flip the sprite animation frames. The goodGuyBankFrames variable that you created earlier in this chapter will be used to track the number of game loops that have been executed.
In the PLAYER_RELEASE case, add the following lines of code to increment goodGuyBankFrames by one every time a loop is executed.
package com.proandroidgames;


import javax.microedition.khronos.egl.EGLConfig;

import javax.microedition.khronos.opengles.GL10;


import android.opengl.GLSurfaceView.Renderer;


public class SFGameRenderer implements Renderer{


…


        private void movePlayer1(GL10 gl){

                switch (SFEngine.playerFlightAction){

                case SFEngine.PLAYER_BANK_LEFT_1:


                        break;

                case SFEngine.PLAYER_BANK_RIGHT_1:


                        break;

                case SFEngine.PLAYER_RELEASE:

                        gl.glMatrixMode(GL10.GL_MODELVIEW);

                        gl.glLoadIdentity();

                        gl.glPushMatrix();

                        gl.glScalef(.25f, .25f, 1f);

                        gl.glTranslatef(SFEngine.playerBankPosX, 0f, 0f);

                        gl.glMatrixMode(GL10.GL_TEXTURE);

                        gl.glLoadIdentity();

                        gl.glTranslatef(0.0f,0.0f, 0.0f);

                        player1.draw(gl);

                        gl.glPopMatrix();

                        gl.glLoadIdentity();

                        goodGuyBankFrames += 1;


                        break;


…

                }


           }


…


}
The PLAYER_RELEASE and default cases were the easiest of the four cases in your movePlayer1() method. Now, you need to code what will happen when the PLAYER_BANK_LEFT_1 action is called.
The PLAYER_BANK_LEFT_1 action is called when the player uses the controls to bank the character ship to the left. This means that not only do you need to not only move the character along the x axis to the left but you also need to animate the character using the two sprites on the sprite sheet that represent a bank to the left.
Moving the Character to the Left
As far as OpenGL is concerned, the operations of moving the character along the x axis and changing the position of the sprite sheet utilize two different matrix modes. You will need to use the model matrix mode to move the character along the x axis, and you will need to use the texture matrix mode to move the sprite sheet texture—creating the banking animation. Let's tackle the model matrix mode operation first.
The first step is to load up the model matrix mode and set the scale to .25 on the x and y axes.
package com.proandroidgames;


import javax.microedition.khronos.egl.EGLConfig;

import javax.microedition.khronos.opengles.GL10;


import android.opengl.GLSurfaceView.Renderer;


public class SFGameRenderer implements Renderer{


…


        private void movePlayer1(GL10 gl){

                switch (SFEngine.playerFlightAction){

                case SFEngine.PLAYER_BANK_LEFT_1:

                        gl.glMatrixMode(GL10.GL_MODELVIEW);

                        gl.glLoadIdentity();

                        gl.glPushMatrix();

                        gl.glScalef(.25f, .25f, 1f);


                        break;


…

                 }


          }


…


}
Next, you are going to move the vertices along the x axis using glTranslatef(). You subtract the PLAYER_BANK_SPEED from the current x axis position, which is stored in playerBankPosX. (You are subtracting to get the position that you need to move to, because you are trying to move the character to the left along the x axis. If you were trying to move to the right, you would be adding.) Then, you use glTranslatef() to move the vertices to the position in playerBankPosX.
package com.proandroidgames;


import javax.microedition.khronos.egl.EGLConfig;

import javax.microedition.khronos.opengles.GL10;


import android.opengl.GLSurfaceView.Renderer;


public class SFGameRenderer implements Renderer{


…


        private void movePlayer1(GL10 gl){

                switch (SFEngine.playerFlightAction){

                case SFEngine.PLAYER_BANK_LEFT_1:

                        gl.glMatrixMode(GL10.GL_MODELVIEW);

                        gl.glLoadIdentity();

                        gl.glPushMatrix();

                        gl.glScalef(.25f, .25f, 1f);

                        SFEngine.playerBankPosX -= SFEngine.PLAYER_BANK_SPEED;

                        gl.glTranslatef(SFEngine.playerBankPosX, 0f, 0f);


                        break;


…


                }


         }


…


}
Now that you are moving the character along the x axis, you need to flip to the next frame of animation.
Loading the Correct Sprite
Take a look, once again, at the sprite sheet in Figure 5–1. Notice that the two frames of animation that correspond to the left-banking motion are the fourth frame on the first line and the first frame on the second line (keep in mind that the sheet is inverted if it looks backward to you, so the frames that appear to be banking right will bank left when they are rendered).
Load the texture matrix mode, and translate the texture to display the fourth image on the first row. Because textures are translated in percentages, you have to do a little math. Then again, with only four images on a line, the math is pretty easy.
The x axis of the sprite sheet goes from 0 to 1. If you divide that by 4, each sprite on the sheet occupies .25 of the x axis. Therefore, to move the sprite sheet to the fourth sprite on the line, you need to translate it by .75. (The first sprite occupies x values 0 to .24, the second sprite occupies .25 to .49, the third sprite occupies .50 to .74, and the fourth sprite occupies .75 to 1.)
package com.proandroidgames;


import javax.microedition.khronos.egl.EGLConfig;

import javax.microedition.khronos.opengles.GL10;


import android.opengl.GLSurfaceView.Renderer;


public class SFGameRenderer implements Renderer{


…


        private void movePlayer1(GL10 gl){

                switch (SFEngine.playerFlightAction){

                case SFEngine.PLAYER_BANK_LEFT_1:

                        gl.glMatrixMode(GL10.GL_MODELVIEW);

                        gl.glLoadIdentity();

                        gl.glPushMatrix();

                        gl.glScalef(.25f, .25f, 1f);

                        SFEngine.playerBankPosX -= SFEngine.PLAYER_BANK_SPEED;

                        gl.glTranslatef(SFEngine.playerBankPosX, 0f, 0f);

                        gl.glMatrixMode(GL10.GL_TEXTURE);

                        gl.glLoadIdentity();

                        gl.glTranslatef(0.75f,0.0f, 0.0f);


                        break;


…

                }


        }


…


}
The last step before you draw out the ship is to increment goodGuyBankFrames, so you can start tracking when to flip to the second frame in the script sheet.
package com.proandroidgames;


import javax.microedition.khronos.egl.EGLConfig;

import javax.microedition.khronos.opengles.GL10;


import android.opengl.GLSurfaceView.Renderer;


public class SFGameRenderer implements Renderer{


…


         private void movePlayer1(GL10 gl){

                 switch (SFEngine.playerFlightAction){

                 case SFEngine.PLAYER_BANK_LEFT_1:

                        gl.glMatrixMode(GL10.GL_MODELVIEW);

                        gl.glLoadIdentity();

                        gl.glPushMatrix();

                        gl.glScalef(.25f, .25f, 1f);

                        SFEngine.playerBankPosX -= SFEngine.PLAYER_BANK_SPEED;

                        gl.glTranslatef(SFEngine.playerBankPosX, 0f, 0f);

                        gl.glMatrixMode(GL10.GL_TEXTURE);

                        gl.glLoadIdentity();

                        gl.glTranslatef(0.75f,0.0f, 0.0f);

                        goodGuyBankFrames += 1;


                        break;


…


                }


         }


…


}
This code has one major problem. The player can now move the character to the left along the x axis, and the sprite of the ship will change to the first sprite of the left bank animation. The problem is that as the code is written right now, the sprite will move to the left to infinity. You need to wrap the block of code that moves the character in an if. . . else statement that tests to see if the character has reached 0 on the x axis. If the character is at the 0 position, indicating that they are at the left edge of the screen, stop moving the character and return the animation to the default sprite.
package com.proandroidgames;


import javax.microedition.khronos.egl.EGLConfig;

import javax.microedition.khronos.opengles.GL10;


import android.opengl.GLSurfaceView.Renderer;


public class SFGameRenderer implements Renderer{


…


        private void movePlayer1(GL10 gl){

                switch (SFEngine.playerFlightAction){

                case SFEngine.PLAYER_BANK_LEFT_1:

                        gl.glMatrixMode(GL10.GL_MODELVIEW);

                        gl.glLoadIdentity();

                        gl.glPushMatrix();

                        gl.glScalef(.25f, .25f, 1f);

                        if (SFEngine.playerBankPosX > 0){

                                SFEngine.playerBankPosX -= SFEngine.PLAYER_BANK_SPEED;

                                gl.glTranslatef(SFEngine.playerBankPosX, 0f, 0f);

                                gl.glMatrixMode(GL10.GL_TEXTURE);

                                gl.glLoadIdentity();

                                gl.glTranslatef(0.75f,0.0f, 0.0f);

                                goodGuyBankFrames += 1;

                        }else{

                                gl.glTranslatef(SFEngine.playerBankPosX, 0f, 0f);

                                gl.glMatrixMode(GL10.GL_TEXTURE);

                                gl.glLoadIdentity();

                                gl.glTranslatef(0.0f,0.0f, 0.0f);

                        }


                        break;


…


               }


        }


…


}
Now, draw the character by calling the draw() method, and pop the matrix back on the stack. This step in the process should be the same as with the two background layers. In fact, this step in the process is going to be common across almost all OpenGL operations in this game.
package com.proandroidgames;


import javax.microedition.khronos.egl.EGLConfig;

import javax.microedition.khronos.opengles.GL10;


import android.opengl.GLSurfaceView.Renderer;


public class SFGameRenderer implements Renderer{


…


        private void movePlayer1(GL10 gl){

                switch (SFEngine.playerFlightAction){

                case SFEngine.PLAYER_BANK_LEFT_1:

                        gl.glMatrixMode(GL10.GL_MODELVIEW);

                        gl.glLoadIdentity();

                        gl.glPushMatrix();

                        gl.glScalef(.25f, .25f, 1f);

                        if (SFEngine.playerBankPosX > 0){

                                SFEngine.playerBankPosX -= SFEngine.PLAYER_BANK_SPEED;

                                gl.glTranslatef(SFEngine.playerBankPosX, 0f, 0f);

                                gl.glMatrixMode(GL10.GL_TEXTURE);

                                gl.glLoadIdentity();

                                gl.glTranslatef(0.75f,0.0f, 0.0f);

                                goodGuyBankFrames += 1;

                        }else{

                                gl.glTranslatef(SFEngine.playerBankPosX, 0f, 0f);

                                gl.glMatrixMode(GL10.GL_TEXTURE);

                                gl.glLoadIdentity();

                                gl.glTranslatef(0.0f,0.0f, 0.0f);

                        }

                        player1.draw(gl);

                        gl.glPopMatrix();

                        gl.glLoadIdentity();


                        break;


…


                }


        }


…


}
Now you have a case whereby, if the player is moving the character to the left, the vertices are moved along the x axis to the left until they hit zero. Also, the texture starts off at the default (top-down view) sprite, and when the player moves to the left, the sprite is changed to the first frame of left banking animation.
Loading the Second Frame of Animation
You need to flip the animation to the second frame of the left-banking animation if the player moves to the left far enough. Looking at the sprite sheet in Figure 5–1, the second frame of left-banking animation is the first frame on the second row. This will be easy enough to navigate to using glTranslatef(). The question is, how do you know when to flip the sprite?
Earlier in this chapter, you created a constant in SFEngine named PLAYER_FRAMES_BETWEEN_ANI and set it to 9. This constant says that you want to flip the player’s character animation every nine frames of game animation (i.e., of the game loop). You also created a variable named goodGuyBankFrames that is being incremented by 1 every time the player’s character is drawn.
You need to compare the current value of goodGuyBankFrames to PLAYER_FRAMES_BETWEEN_ANI. If goodGuyBankFrames is less, draw the first frame of animation. If goodGuyBankFrames is greater, draw the second frame of animation. Here is what your if . . . then statement should look like.
package com.proandroidgames;


import javax.microedition.khronos.egl.EGLConfig;

import javax.microedition.khronos.opengles.GL10;


import android.opengl.GLSurfaceView.Renderer;


public class SFGameRenderer implements Renderer{


…


        private void movePlayer1(GL10 gl){

                switch (SFEngine.playerFlightAction){

                case SFEngine.PLAYER_BANK_LEFT_1:

                        gl.glMatrixMode(GL10.GL_MODELVIEW);

                        gl.glLoadIdentity();

                        gl.glPushMatrix();

                        gl.glScalef(.25f, .25f, 1f);

                        if (goodGuyBankFrames <SFEngine.PLAYER_FRAMES_BETWEEN_ANI&&

SFEngine.playerBankPosX > 0){

                                SFEngine.playerBankPosX -= SFEngine.PLAYER_BANK_SPEED;

                                gl.glTranslatef(SFEngine.playerBankPosX, 0f, 0f);

                                gl.glMatrixMode(GL10.GL_TEXTURE);

                                gl.glLoadIdentity();

                                gl.glTranslatef(0.75f,0.0f, 0.0f);

                                goodGuyBankFrames += 1;

                        }else if (goodGuyBankFrames > = SFEngine.PLAYER_FRAMES_BETWEEN_ANI && SFEngine.playerBankPosX > 0){

                                SFEngine.playerBankPosX -= SFEngine.PLAYER_BANK_SPEED;


                        }else{

                                gl.glTranslatef(SFEngine.playerBankPosX, 0f, 0f);

                                gl.glMatrixMode(GL10.GL_TEXTURE);

                                gl.glLoadIdentity();

                                gl.glTranslatef(0.0f,0.0f, 0.0f);

                        }

                        player1.draw(gl);

                        gl.glPopMatrix();

                        gl.glLoadIdentity();


                        break;


…


         }


   }


…


}
In the if . . . else if condition, you test if the value of goodGuyBankFrames is greater than PLAYER_FRAMES_BETWEEN_ANI, indicating that you should flip to the next frame of left-banking animation. Let’s write the code block to flip the animation.
In Figure 5-1, the second frame of left banking animation is on the second row in the first position. That means that the upper-left corner of that sprite is at the 0 position on the x axis (furthest to the left) and then a quarter of the way down the sheet on the y axis (.25). Simply use the glTranslatef() method to move the texture to this position.
NOTE: Before you move the texture you need to load the texture matrix mode.
package com.proandroidgames;


import javax.microedition.khronos.egl.EGLConfig;

import javax.microedition.khronos.opengles.GL10;


import android.opengl.GLSurfaceView.Renderer;


public class SFGameRenderer implements Renderer{


…


        private void movePlayer1(GL10 gl){

                switch (SFEngine.playerFlightAction){

                case SFEngine.PLAYER_BANK_LEFT_1:

                        gl.glMatrixMode(GL10.GL_MODELVIEW);

                        gl.glLoadIdentity();

                        gl.glPushMatrix();

                        gl.glScalef(.25f, .25f, 1f);

                        if (goodGuyBankFrames <SFEngine.PLAYER_FRAMES_BETWEEN_ANI &&SFEngine.playerBankPosX > 0){

                                SFEngine.playerBankPosX -= SFEngine.PLAYER_BANK_SPEED;

                                gl.glTranslatef(SFEngine.playerBankPosX, 0f, 0f);

                                gl.glMatrixMode(GL10.GL_TEXTURE);

                                gl.glLoadIdentity();

                                gl.glTranslatef(0.75f,0.0f, 0.0f);

                                goodGuyBankFrames += 1;

                        }else if (goodGuyBankFrames >= SFEngine.PLAYER_FRAMES_BETWEEN_ANI &&SFEngine.playerBankPosX > 0){

                                SFEngine.playerBankPosX -= SFEngine.PLAYER_BANK_SPEED;

                                gl.glTranslatef(SFEngine.playerBankPosX, 0f, 0f);

                                gl.glMatrixMode(GL10.GL_TEXTURE);

                                gl.glLoadIdentity();

                                gl.glTranslatef(0.0f,0.25f, 0.0f);

                        }else{

                                gl.glTranslatef(SFEngine.playerBankPosX, 0f, 0f);

                                gl.glMatrixMode(GL10.GL_TEXTURE);

                                gl.glLoadIdentity();

                                gl.glTranslatef(0.0f,0.0f, 0.0f);

                        }

                        player1.draw(gl);

                        gl.glPopMatrix();

                        gl.glLoadIdentity();


                        break;


…


                }


        }


…


}
Your switch statement for moving the character to the left and implementing two frames of sprite animation is complete.
Moving the Character to the Right
The last case statement you need to complete before the movePlayer1() method is finished is for PLAYER_BANK_RIGHT_1. This case is called when the player wants to move the character to the right-hand side of the screen, in the positive direction of the x axis.
The layout of the case is going to look the same, but you will need to load up different frames from the sprite sheet. First, lay out your model matrix, scale the character vertices, and set up the if . . . else if statement like you did in the PLAYER_BANK_LEFT_1 case.
This if . . . else if statement will have one difference from the statement in the PLAYER_BANK_LEFT_1 case. In the PLAYER_BANK_LEFT_1 case, you tested to see if the current position on the x axis of the vertices was greater than 0, indicating that the character had not gone off the left-hand side of the screen. For the PLAYER_BANK_RIGHT_1 case, you will need to test if the character has reached the furthest right-hand side of the screen.
Under default circumstances, the x axis starts at 0 and ends at 1. However, to make the playable character appear smaller on the screen, you have scaled the x axis to .25. This means the x axis now goes from 0 to 4. You need to test that the playable character has not scrolled further than 4 units to the right. Correct?
No, not entirely.
OpenGL tracks the upper-left corner of the vertices. Therefore, the character would already be off the screen if you tested for the case when it hit 4. You need to take into account the width of the character vertices. The character vertices are 1 unit wide. Testing that the character has not exceeded an x axis value of 3 will keep it on the screen where the player can see it.
package com.proandroidgames;


import javax.microedition.khronos.egl.EGLConfig;

import javax.microedition.khronos.opengles.GL10;


import android.opengl.GLSurfaceView.Renderer;


public class SFGameRenderer implements Renderer{


…


        private void movePlayer1(GL10 gl){

                switch (SFEngine.playerFlightAction){


…


                case SFEngine.PLAYER_BANK_RIGHT_1:

                        gl.glMatrixMode(GL10.GL_MODELVIEW);

                        gl.glLoadIdentity();

                        gl.glPushMatrix();

                        gl.glScalef(.25f, .25f, 1f);

                        if (goodGuyBankFrames < SFEngine.PLAYER_FRAMES_BETWEEN_ANI &&
SFEngine.playerBankPosX < 3){


                        }else if (goodGuyBankFrames >=

SFEngine.PLAYER_FRAMES_BETWEEN_ANI && SFEngine.playerBankPosX < 3){


                        }else{

                                gl.glTranslatef(SFEngine.playerBankPosX, 0f, 0f);

                                gl.glMatrixMode(GL10.GL_TEXTURE);

                                gl.glLoadIdentity();

                                gl.glTranslatef(0.0f,0.0f, 0.0f);

                        }

                        player1.draw(gl);

                        gl.glPopMatrix();

                        gl.glLoadIdentity();


                        break;


…

                }


         }


…


}
This initial block of code in the PLAYER_BANK_RIGHT_1 case is almost the same as in the PLAYER_BANK_LEFT_1. You are adjusting the model matrix, testing the position of the character on the x axis, and testing the number of game loops frames that have run to tell which frame of sprite animation needs to be displayed.
Now, you can display the first and second frames of right-banking animation in the appropriate places.
Loading the Right-Banking Animation
The first frame of animation that should be displayed when the player banks to the right is in the first row, second position (referring to the sprite sheet in Figure 5–1). Therefore, you need to translate the texture matrix by .25 on the x axis and 0 on the y axis to display this frame.
package com.proandroidgames;


import javax.microedition.khronos.egl.EGLConfig;

import javax.microedition.khronos.opengles.GL10;


import android.opengl.GLSurfaceView.Renderer;


public class SFGameRenderer implements Renderer{


…


        private void movePlayer1(GL10 gl){

                switch (SFEngine.playerFlightAction){

…


                case SFEngine.PLAYER_BANK_RIGHT_1:

                        gl.glMatrixMode(GL10.GL_MODELVIEW);

                        gl.glLoadIdentity();

                        gl.glPushMatrix();

                        gl.glScalef(.25f, .25f, 1f);

                        if (goodGuyBankFrames <SFEngine.PLAYER_FRAMES_BETWEEN_ANI &&
SFEngine.playerBankPosX < 3){

                                SFEngine.playerBankPosX += SFEngine.PLAYER_BANK_SPEED;

                                gl.glTranslatef(SFEngine.playerBankPosX, 0f, 0f);

                                gl.glMatrixMode(GL10.GL_TEXTURE);

                                gl.glLoadIdentity();

                                gl.glTranslatef(0.25f,0.0f, 0.0f);

                                goodGuyBankFrames += 1;

                        }else if (goodGuyBankFrames >= SFEngine.PLAYER_FRAMES_BETWEEN_ANI &&SFEngine.playerBankPosX < 3){


                        }else{

                               gl.glTranslatef(SFEngine.playerBankPosX, 0f, 0f);

                               gl.glMatrixMode(GL10.GL_TEXTURE);

                               gl.glLoadIdentity();

                               gl.glTranslatef(0.0f,0.0f, 0.0f);

                        }

                        player1.draw(gl);

                        gl.glPopMatrix();

                        gl.glLoadIdentity();


                        break;


…

                }


        }


…


}
Notice is this code block that the value of PLAYER_BANK_SPEED is added to, rather than subtracted from, the player’s current position. This is the key to moving the vertices to the right, rather than the left, on the x axis.
Repeating this code, you need to translate the texture to .50 on the x axis to display the second frame of sprite animation for the right-hand bank.
package com.proandroidgames;


import javax.microedition.khronos.egl.EGLConfig;

import javax.microedition.khronos.opengles.GL10;


import android.opengl.GLSurfaceView.Renderer;


public class SFGameRenderer implements Renderer{


…


        private void movePlayer1(GL10 gl){

                switch (SFEngine.playerFlightAction){


…


                case SFEngine.PLAYER_BANK_RIGHT_1:

                        gl.glMatrixMode(GL10.GL_MODELVIEW);

                        gl.glLoadIdentity();

                        gl.glPushMatrix();

                        gl.glScalef(.25f, .25f, 1f);

                        if (goodGuyBankFrames < SFEngine.PLAYER_FRAMES_BETWEEN_ANI &&

SFEngine.playerBankPosX < 3){

                                SFEngine.playerBankPosX += SFEngine.PLAYER_BANK_SPEED;

                                gl.glTranslatef(SFEngine.playerBankPosX, 0f, 0f);

                                gl.glMatrixMode(GL10.GL_TEXTURE);

                                gl.glLoadIdentity();

                                gl.glTranslatef(0.25f,0.0f, 0.0f);

                                goodGuyBankFrames += 1;

                        }else if (goodGuyBankFrames >= SFEngine.PLAYER_FRAMES_BETWEEN_ANI &&SFEngine.playerBankPosX < 3){

                                SFEngine.playerBankPosX += SFEngine.PLAYER_BANK_SPEED;

                                gl.glTranslatef(SFEngine.playerBankPosX, 0f, 0f);

                                gl.glMatrixMode(GL10.GL_TEXTURE);

                                gl.glLoadIdentity();

                                gl.glTranslatef(0.50f,0.0f, 0.0f);

                        }else{

                                gl.glTranslatef(SFEngine.playerBankPosX, 0f, 0f);

                                gl.glMatrixMode(GL10.GL_TEXTURE);

                                gl.glLoadIdentity();

                                gl.glTranslatef(0.0f,0.0f, 0.0f);

                        }

                        player1.draw(gl);

                        gl.glPopMatrix();

                        gl.glLoadIdentity();


                        break;


…


                }


        }


…


}
Your movePlayer1() method is now finished. Your playable character will successfully move to the left and to the right when the correct action is applied. All you have to do now is to call the movePlayer1() method from the game loop and create a process to allow the player to actually move the character.
package com.proandroidgames;


import javax.microedition.khronos.egl.EGLConfig;

import javax.microedition.khronos.opengles.GL10;


import android.opengl.GLSurfaceView.Renderer;


public class SFGameRenderer implements Renderer{


…


        @Override

        public void onDrawFrame(GL10 gl) {

                try {

                        Thread.sleep(SFEngine.GAME_THREAD_FPS_SLEEP - loopRunTime);

                } catch (InterruptedException e) {

                        // TODO Auto-generated catch block

                        e.printStackTrace();

                }

                gl.glClear(GL10.GL_COLOR_BUFFER_BIT | GL10.GL_DEPTH_BUFFER_BIT);


                scrollBackground1(gl);

                scrollBackground2(gl);


                movePlayer1(gl);


                //All other game drawing will be called here


                gl.glEnable(GL10.GL_BLEND);

                gl.glBlendFunc(GL10.GL_ONE, GL10.GL_ONE_MINUS_SRC_ALPHA);


        }

…


}
Save and close SFGameRenderer.
In the next section of this chapter, you are going to learn how to listen for a TouchEvent on the screen of an Android device. You will then use that TouchEvent to set the player action, thus moving the character on the screen to the left or to the right.
Moving Your Character Using a Touch Event
You have created the necessary method and calls to move your playable character across the screen. However, as of right now, the player has no way to interact with the game and tell the game loop to make the calls that move the character.
In this section, you will code a simple touch listener that will detect if the player has touched either the right- or left-hand side of the screen. The player will move the character to the left or to the right by touching that side of the screen. The listener will go in the activity that is hosting your game loop, in this case, SFGame.java.
Open SFGame.java, and add an override for the onTouchEvent() method.
package com.proandroidgames;


import android.app.Activity;

import android.os.Bundle;

import android.view.MotionEvent;


public class SFGame extends Activity {


…


        @Override

        public boolean onTouchEvent(MotionEvent event) {


        return false;

        }

}
The onTouchEvent() is a standard Android event listener that will listen for any touch event occurring within the activity. Because your game is run from the SFGame activity, this is the activity that you must listen for touch events on.
TIP: Don’t confuse the game’s activity with the game’s loop. The game loop is the SFGameRenderer; the Activity that launches it is SFGame.
The onTouchEvent() listener will fire only when a device’s screen is touched, swiped, dragged, or released. For this game, you are concerned with only a touch or a release and which side of the screen it happened on. To help you determine this, Android sends a MotionEvent view to the onTouchEvent() listener; it will have everything that you need to determine what kind of touch event fired the listener and where the touch happened on the screen.
Parsing MotionEvent
Your first concern within the onTouchEvent() listener is to get the x and y coordinates of the touch, so you can determine if the touch occurred on the left- or right-hand side of the device screen. The MotionEvent that is passed to the onTouchEvent() listener has getX() and getY() methods that you can use to determine the x and y coordinates of the touch event.
NOTE: The x and y coordinates that you are dealing with in the onTouchEvent() listener are screen coordinates, not OpenGL coordinates.
package com.proandroidgames;


import android.app.Activity;

import android.os.Bundle;

import android.view.MotionEvent;


public class SFGame extends Activity {


…


        @Override

        public boolean onTouchEvent(MotionEvent event) {

                float x = event.getX();

                float y = event.getY();


                return false;

        }


}
Next, you are going to set up a playable area on the screen. That is, you do not want to react to touch events from just anywhere on the screen, so you are going to set up an area at the bottom of the screen that you will react to. The touchable area will be low on the screen, so players can touch it with their thumbs as they hold their devices.
Since the playable character occupies roughly the lower fourth of the device screen, you will set that area up as the area that you will react to.
package com.proandroidgames;


import android.app.Activity;

import android.os.Bundle;

import android.view.MotionEvent;


public class SFGame extends Activity {


…


        @Override

        public boolean onTouchEvent(MotionEvent event) {

                float x = event.getX();

                float y = event.getY();

                int height = SFEngine.display.getHeight() / 4;

                int playableArea = SFEngine.display.getHeight() - height;


                return false;

        }


}
You now have the location of the touch event and the area in which you want to react to touch events. Use a simple if statement to determine whether or not you should react to this event.
package com.proandroidgames;


import android.app.Activity;

import android.os.Bundle;

import android.view.MotionEvent;


public class SFGame extends Activity {


…


        @Override

        public boolean onTouchEvent(MotionEvent event) {

                float x = event.getX();

                float y = event.getY();

                int height = SFEngine.display.getHeight() / 4;

                int playableArea = SFEngine.display.getHeight() - height;

                if (y > playableArea){


                }

                return false;

        }


}
MotionEvent has a very useful method called getAction(), which returns to you the type of action that was detected on the screen. For the purposes of this game, you are concerned with the ACTION_UP and ACTION_DOWN actions. These actions indicate the moments when the player’s finger initially touched the screen (ACTION_DOWN) and then came back off the screen (ACTION_UP).
Trapping ACTION_UP and ACTION_DOWN
Set up a simple switch statement to act on the ACTION_UP and ACTION_DOWN actions. Be sure to leave out the default case, because you only want to react to these two specific cases.
package com.proandroidgames;


import android.app.Activity;

import android.os.Bundle;

import android.view.MotionEvent;


public class SFGame extends Activity {


…


        @Override

        public boolean onTouchEvent(MotionEvent event) {

                float x = event.getX();

                float y = event.getY();

                int height = SFEngine.display.getHeight() / 4;

                int playableArea = SFEngine.display.getHeight() - height;

                if (y > playableArea){

                        switch (event.getAction()){

                        case MotionEvent.ACTION_DOWN:


                                break;

                        case MotionEvent.ACTION_UP:


                                break;

                        }

                }

                return false;

        }


}
Earlier in this chapter, you wrote the code to move the character on the screen. This code reacted to three action constants that you created: PLAYER_BANK_LEFT_1, PLAYER_BANK_RIGHT_1, and PLAYER_RELEASE. These actions will be set in the appropriate cases in the onTechEvent().
Let’s start with the PLAYER_RELEASE. This case will be set when the player lifts a finger back off the screen, thus triggering an ACTION_UP event.
package com.proandroidgames;


import android.app.Activity;

import android.os.Bundle;

import android.view.MotionEvent;


public class SFGame extends Activity {


…


       @Override

       public boolean onTouchEvent(MotionEvent event) {

              float x = event.getX();

              float y = event.getY();

              int height = SFEngine.display.getHeight() / 4;

              int playableArea = SFEngine.display.getHeight() - height;

              if (y > playableArea){

                      switch (event.getAction()){

                              case MotionEvent.ACTION_DOWN:


                                      break;

                              case MotionEvent.ACTION_UP:

                                      SFEngine.playerFlightAction =

       SFEngine.PLAYER_RELEASE;

                                      break;

                       }

              }

              return false;

       }


}
Finally, set the PLAYER_BANK_LEFT_1 and PLAYER_BANK_RIGHT_1 actions. To do this, you still need to determine if the player touched the right- or left-hand side of the screen. This can easily be determined by comparing the getX() value of the MotionEvent to the midpoint of the x axis. If the getX() is less than the midpoint, the action was on the left; if the getX() value is greater than the midpoint, the event happened on the right.
package com.proandroidgames;


import android.app.Activity;

import android.os.Bundle;

import android.view.MotionEvent;


public class SFGame extends Activity {


…


       @Override

       public boolean onTouchEvent(MotionEvent event) {

              float x = event.getX();

              float y = event.getY();

              int height = SFEngine.display.getHeight() / 4;

              int playableArea = SFEngine.display.getHeight() - height;

              if (y > playableArea){

                      switch (event.getAction()){

                      case MotionEvent.ACTION_DOWN:

                              if(x < SFEngine.display.getWidth() / 2){

                                        SFEngine.playerFlightAction =

SFEngine.PLAYER_BANK_LEFT_1;

                              }else{

                                        SFEngine.playerFlightAction = SFEngine.PLAYER_BANK_RIGHT_1;

                                }

                                break;

                        case MotionEvent.ACTION_UP:

                                SFEngine.playerFlightAction = SFEngine.PLAYER_RELEASE;

                                break;

                        }

               }

               return false;

        }


}
Save and close your SFGame.java class. You have just completed the user interface (UI) for this game. The player can now touch the right- or left-hand side of the screen to move the character to the left or to the right.
In the final section of this chapter, we will revisit the game thread and the calculation for frames per second.
Adjusting the FPS Delay
In the previous chapter, you created a delay to slow down your game loop and force it to run at 60 frames per second (FPS). This speed is the most desirable one for developers’ games to run. However, you may have already begun to realize that this speed is not always achievable.
The more functions that you perform in your game loop, the longer the loop will take to finish, and the slower the game will run. This means that the delay that you created needs to be adjusted or turned off altogether, depending on how slowly the game is running.
Just for comparison, running the game in its current state, with two backgrounds and a playable character, I am achieving about 10 frames per second on the Windows emulator, about 35 frames per second on the Droid X, and roughly 43 frames per second on the Motorola Xoom.
One of the problems is that you are delaying the thread indiscriminately. You need to adjust the thread delay of the game loop to account for the amount of time it takes to run the loop. The following code will determine how long it takes for the loop to run and then subtract that amount from the delay. If the loop takes longer to run than the amount of the delay, the delay is turned off.
package com.proandroidgames;


import javax.microedition.khronos.egl.EGLConfig;

import javax.microedition.khronos.opengles.GL10;


import android.opengl.GLSurfaceView.Renderer;


public class SFGameRenderer implements Renderer{


        private SFBackground background = new SFBackground();

        private SFBackground background2 = new SFBackground();

        private SFGoodGuy player1 = new SFGoodGuy();


        private int goodGuyBankFrames = 0;

        private long loopStart = 0;

        private long loopEnd = 0;

        private long loopRunTime = 0 ;


        private float bgScroll1;

        private float bgScroll2;


        @Override

        public void onDrawFrame(GL10 gl) {

                loopStart = System.currentTimeMillis();

                try {

                        if (loopRunTime <SFEngine.GAME_THREAD_FPS_SLEEP){

                                Thread.sleep(SFEngine.GAME_THREAD_FPS_SLEEP -
loopRunTime);

}

                } catch (InterruptedException e) {

                        // TODO Auto-generated catch block

                        e.printStackTrace();

                }

                gl.glClear(GL10.GL_COLOR_BUFFER_BIT | GL10.GL_DEPTH_BUFFER_BIT);


                scrollBackground1(gl);

                scrollBackground2(gl);


                movePlayer1(gl);


                //All other game drawing will be called here


                gl.glEnable(GL10.GL_BLEND);

                gl.glBlendFunc(GL10.GL_ONE, GL10.GL_ONE_MINUS_SRC_ALPHA);

                loopEnd = System.currentTimeMillis();

                loopRunTime = ((loopEnd - loopStart));


        }

…
Compile and run your game. Try to move the character across the screen, and watch for the change in animation.
Summary
In this chapter, you took another big step forward in the Star Fighter game. You can now add the following skills to your list of accomplishments: