
Chapter 6
Adding the Enemies
Your skill set as an Android game developer is getting much broader. In the previous chapter alone, you added your first playable character, worked with sprite animation, and created a basic listener to allow the player to control the character; for a basic 2-D shooter, your game is really shaping up.
In this chapter, you will be creating a class to help you manage your textures. You will also be creating an enemy class that will be used to create the three different types of enemies in Star Fighter. In the next chapter, you will create a basic AI system for these enemies.
Midgame Housekeeping
Remember, the point of this book is to help you through the process of creating a game, from beginning to end. Game creation is not always a linear process. Sometimes, you need to go back and reevaluate things that you have done to optimize the way your game works.
The preceding two chapters focused on teaching you how to load and deal with sprites and sprite sheets. However, with your current code, you are loading a separate sprite sheet for each character. This was the easiest way to learn how to use the sprite sheet, but it is by no means the best way to use a sprite sheet. In fact, by creating a separate sprite sheet for each character you are almost going against the purpose of a sprite sheet–that is, you should load all of the images for all of characters on to one sprite sheet.
TIP: You can, of course, still use multiple sprite sheets if you have too many sprites to fit on one image. But that should not be a problem with the limited number of characters in this game.
By loading all of the images for all of your game's characters onto one sprite sheet, you will drastically reduce the amount of memory consumed by your game and the amount of processing that OpenGL will have to do to render the game.
That being said, it is time to perform some minor housekeeping in your game code to adapt it to use a common sprite sheet
Creating a Texture Class
You are going to create a common texture class with a loadTexture() method. The loadTexture() method will perform the same function as the loadTexture() method in the SFGoodGuy() class. The difference being that this common class will return an int array that you will be able to pass to all of the instantiated characters.
The first step is to open the SFGoodGuy() class and remove the loadTexture() method (and any variable that supported it). The modified SFGoodGuy() class should look like this when you are finished:
package com.proandroidgames;


import java.nio.ByteBuffer;

import java.nio.ByteOrder;

import java.nio.FloatBuffer;


import javax.microedition.khronos.opengles.GL10;


public class SFGoodGuy {


        private FloatBuffer vertexBuffer;

        private FloatBuffer textureBuffer;

        private ByteBuffer indexBuffer;


        private float vertices[] = {

                0.0f, 0.0f, 0.0f,

                1.0f, 0.0f, 0.0f,

                1.0f, 1.0f, 0.0f,

                0.0f, 1.0f, 0.0f,

        };


        private float texture[] = {

                0.0f, 0.0f,

                0.25f, 0.0f,

                0.25f, 0.25f,

                0.0f, 0.25f,

        };


        private byte indices[] = {

                0,1,2,

                0,2,3,

        };


        public SFGoodGuy() {

                ByteBuffer byteBuf = ByteBuffer.allocateDirect(vertices.length * 4);

                byteBuf.order(ByteOrder.nativeOrder());

                vertexBuffer = byteBuf.asFloatBuffer();

                vertexBuffer.put(vertices);

                vertexBuffer.position(0);

                byteBuf = ByteBuffer.allocateDirect(texture.length * 4);

                byteBuf.order(ByteOrder.nativeOrder());

                textureBuffer = byteBuf.asFloatBuffer();

                textureBuffer.put(texture);

                textureBuffer.position(0);


                indexBuffer = ByteBuffer.allocateDirect(indices.length);

                indexBuffer.put(indices);

                indexBuffer.position(0);

        }


        public void draw(GL10 gl, int[] spriteSheet) {

                gl.glBindTexture(GL10.GL_TEXTURE_2D, spriteSheet[0]);


                gl.glFrontFace(GL10.GL_CCW);

                gl.glEnable(GL10.GL_CULL_FACE);

                gl.glCullFace(GL10.GL_BACK);


                gl.glEnableClientState(GL10.GL_VERTEX_ARRAY);

                gl.glEnableClientState(GL10.GL_TEXTURE_COORD_ARRAY);


                gl.glVertexPointer(3, GL10.GL_FLOAT, 0, vertexBuffer);

                gl.glTexCoordPointer(2, GL10.GL_FLOAT, 0, textureBuffer);


                gl.glDrawElements(GL10.GL_TRIANGLES, indices.length,

GL10.GL_UNSIGNED_BYTE, indexBuffer);


                gl.glDisableClientState(GL10.GL_VERTEX_ARRAY);

                gl.glDisableClientState(GL10.GL_TEXTURE_COORD_ARRAY);

                gl.glDisable(GL10.GL_CULL_FACE);

        }


}
CAUTION: When you finish making these changes, depending on the IDE you are using, you will begin to get some errors from other areas of your code. Don't worry about them now; you will address the errors later in this chapter.
Next, let's create a new common class to load your texture into OpenGL and return an int array. Create a new class in your main package named SFTextures().
package com.proandroidgames;


public class SFTextures {


}
Now, create a constructor for SFTextures() that accepts a GL10 instance. This instance will be used to initialize the textures. You will also need a textures variable that initializes an int array of two elements.
package com.proandroidgames;


import javax.microedition.khronos.opengles.GL10;


public class SFTextures {


        private int[] textures = new int[1];


        public SFTextures(GL10 gl){


        }


}
You need to let OpenGL generate some names for the textures that you are loading. Previously, this was done in the loadTexture() method of the SFGoodGuy() class using the glGenTextures() method. However, because you plan on calling this common textures class multiple times, OpenGL would assign new names to the textures every time you call the load method, which would make keeping track of your textures difficult, if not impossible.
To avoid assigning multiple names to the same textures, you are going to move the glGenTextures() method call to the SFTextures() constructor:
package com.proandroidgames;


import javax.microedition.khronos.opengles.GL10;


public class SFTextures {


        private int[] textures = new int[1];


                gl.glGenTextures(1, textures, 0);


        public SFTextures(GL10 gl){


        }


}
You need to create a loadTexture() method for SFTextures(). In the SFGoodGuy() and SFBackground() classes, the loadTexture() method was a simple method with no return. To allow you a better way to control the access of your textures, especially when you start loading multiple sprite sheets, create the loadTexture() method of SFTextures() to return an int array.
package com.proandroidgames;


import javax.microedition.khronos.opengles.GL10;


public class SFTextures {


        private int[] textures = new int[1];


                gl.glGenTextures(1, textures, 0);


        public SFTextures(GL10 gl){


        }


        public int[] loadTexture(GL10 gl,int texture, Context context,int textureNumber)

{


        }


}
Notice the addition of the textureNumber parameter. While this will be a 1 for now, in the next chapter when you start using this class to load multiple sprite sheets, this will be used to indicate which sheet is being loaded.
The core of the loadTexture() method looks otherwise identical to its counterpart in the SFGoodGuy() class. The only changes—other than the call to glGenTextures() being removed—are that the textureNumber parameter is now used as an array pointed in the glBindTextures() call and loadTextures() now returns the texture's int array when it is finished.
package com.proandroidgames;


import java.io.IOException;

import java.io.InputStream;


import javax.microedition.khronos.opengles.GL10;


import android.content.Context;

import android.graphics.Bitmap;

import android.graphics.BitmapFactory;

import android.opengl.GLUtils;


public class SFTextures {


        private int[] textures = new int[1];


                gl.glGenTextures(1, textures, 0);


        public SFTextures(GL10 gl){


        }


        public int[] loadTexture(GL10 gl,int texture, Context context,int textureNumber)

{

                InputStream imagestream =

context.getResources().openRawResource(texture);

                Bitmap bitmap = null;

                try {


                        bitmap = BitmapFactory.decodeStream(imagestream);

                }catch(Exception e){


                }finally {


                        try {

                                imagestream.close();

                                imagestream = null;

                        } catch (IOException e) {

                        }


                }


                gl.glBindTexture(GL10.GL_TEXTURE_2D, textures[textureNumber - 1]);


                gl.glTexParameterf(GL10.GL_TEXTURE_2D, GL10.GL_TEXTURE_MIN_FILTER,

GL10.GL_NEAREST);

                gl.glTexParameterf(GL10.GL_TEXTURE_2D, GL10.GL_TEXTURE_MAG_FILTER,

GL10.GL_LINEAR);


                gl.glTexParameterf(GL10.GL_TEXTURE_2D, GL10.GL_TEXTURE_WRAP_S,

GL10.GL_CLAMP_TO_EDGE);

                gl.glTexParameterf(GL10.GL_TEXTURE_2D, GL10.GL_TEXTURE_WRAP_T,

GL10.GL_CLAMP_TO_EDGE);


                GLUtils.texImage2D(GL10.GL_TEXTURE_2D, 0, bitmap, 0);


                bitmap.recycle();


                return textures;


        }


}
Your common texture class is finished and ready to use. Save SFTextures() and SFGoodGuy(), and close them for now. Again, you should now see errors coming from the SFGameSFGameRenderer() class. Ignore these errors for now; you will take care of them as you move through this chapter.
In the next section, you will be creating the class that will load up your enemy ships and prepare them for battle against the player.
Creating the Enemy Class
No matter what games you may have played, there is surely one thing in common with all of them: there is never just one enemy to fight. Having a single enemy to fight in a game would result in a very quick and very boring game.
In Star Fighter, you will be creating 30 enemies for the player to fight on the screen. We outlined the story that Star Fighter is based on in Chapter 2. According to this story, three different types of enemies are mentioned. In this section of the chapter, you will create the class that these three types of enemies will be based on and the 30 enemies instantiated from.
Adding a New Sprite Sheet
The first thing that you need to add to your project is a new sprite sheet. You learned about the importance and purpose of sprite sheets to 2-D gaming in the previous chapter. Now that you have made provisions in your code to use a common sprite sheet for all of the character sprites, you can add it to your project. Figure 6–1 illustrates the common sprite sheet.
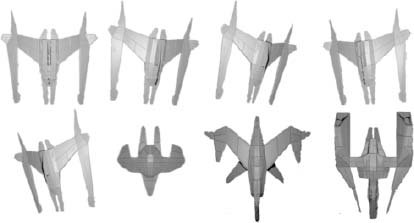
Figure 6–1. The common sprite sheet
Simply remove the good_guy sprite sheet that was in the drawable folder and add this one.
NOTE: Notice that the player's characters are in the same position on this sprite sheet as they were on the last. Therefore, you will not have to change any of the texture positioning for the player's character.
Next, you need to edit the SFEngine class to add the constants and variables that you will be using in this chapter. There are quite a few of them this time. You will need 17 constants to help you control the enemy AI alone. Some of these you may not use until the next chapter, but adding them now is a good idea:
        public static int CHARACTER_SHEET = R.drawable.character_sprite;

        public static int TOTAL_INTERCEPTORS = 10;

        public static int TOTAL_SCOUTS = 15;

        public static int TOTAL_WARSHIPS = 5;

        public static float INTERCEPTOR_SPEED = SCROLL_BACKGROUND_1 * 4f;

        public static float SCOUT_SPEED = SCROLL_BACKGROUND_1 * 6f;

        public static float WARSHIP_SPEED = SCROLL_BACKGROUND_2 * 4f;

        public static final int TYPE_INTERCEPTOR = 1;

        public static final int TYPE_SCOUT = 2;

        public static final int TYPE_WARSHIP = 3;

        public static final int ATTACK_RANDOM = 0;

        public static final int ATTACK_RIGHT = 1;

        public static final int ATTACK_LEFT = 2;

        public static final float BEZIER_X_1 = 0f;

        public static final float BEZIER_X_2 = 1f;

        public static final float BEZIER_X_3 = 2.5f;

        public static final float BEZIER_X_4 = 3f;

        public static final float BEZIER_Y_1 = 0f;

        public static final float BEZIER_Y_2 = 2.4f;

        public static final float BEZIER_Y_3 = 1.5f;

        public static final float BEZIER_Y_4 = 2.6f;
Since the enemies that you add to the screen will start off as a class, much like the background and the playable character, add a new class to your main package named SFEnemy(). This class will be used to bring your enemies into the game.
TIP: Even though you will have 30 total enemies of three different types, they will all be instantiated from the same SFEnemy() class.
Creating the SFEnemy Class
In this section, you will create the class that will be used to spawn all three types of enemies in the Star Fighter game. Add a new class to your project named SFEnemy():
package com.proandroidgames;


public class SFEnemy {


}
Your enemy needs some properties that will help you as you begin to create the AI logic. You will need properties that you can use to set or get the enemy's current x and y positions, the t factor (used to fly the enemy in a curve), and the x and y increments to reach a target.
package com.proandroidgames;


public class SFEnemy {

        public float posY = 0f; //the x position of the enemy

        public float posX = 0f; //the y position of the enemy

        public float posT = 0f; //the t used in calculating a Bezier curve

        public float incrementXToTarget = 0f; //the x increment to reach a potential

target

        public float incrementYToTarget = 0f; //the y increment to reach a potential

target


}
You will also need properties that will let you set or get the direction from which the enemy will attack, whether or not the enemy has been destroyed, and what type of enemy this instantiation represents.
package com.proandroidgames;


public class SFEnemy {

        public float posY = 0f; //the x position of the enemy

        public float posX = 0f; //the y position of the enemy

        public float posT = 0f; //the t used in calculating a Bezier curve

        public float posXToTarget = 0f; //the x increment to reach a potential target

        public float posYToTarget = 0f; //the y increment to reach a potential target


        public int attackDirection = 0; //the attack direction of the ship

        public boolean isDestroyed = false; //has this ship been destroyed?

        public int enemyType = 0; //what type of enemy is this?


}
The next three properties that your enemy class needs are an indicator to let you know if it has locked on to a target (this will be crucial to your AI logic) and two coordinates that will represent the lock on position of the target.
package com.proandroidgames;


public class SFEnemy {

        public float posY = 0f; //the x position of the enemy

        public float posX = 0f; //the y position of the enemy

        public float posT = 0f; //the t used in calculating a Bezier curve

        public float posXToTarget = 0f; //the x increment to reach a potential target

        public float posYToTarget = 0f; //the y increment to reach a potential target

        public int attackDirection = 0; //the attack direction of the ship

        public boolean isDestroyed = false; //has this ship been destroyed?

        public int enemyType = 0; //what type of enemy is this

        public boolean isLockedOn = false; //had the enemy locked on to a target?

        public float lockOnPosX = 0f; //x position of the target

        public float lockOnPosY = 0f; //y position of the target


}
Next, give your SFEnemy() class a constructor that takes in two int parameters. The first parameter will be used to represent the type of enemy that should be created:TYPE_INTERCEPTOR,TYPE_SCOUT, or TYPE_WARSHIP. The second parameter will be used to indicate from which direction on the screen the particular enemy will be attacking: ATTACK_RANDOM,ATTACK_RIGHT, or ATTACK_LEFT.
package com.proandroidgames;


public class SFEnemy {


…


        public SFEnemy(int type, int direction) {


        }


}
In the constructor for SFEnemy(), you need to set the enemy type based on the type int that is passed in to the constructor. You will also set the direction. Seeing these parameters will let you make decisions in your game loop based on the enemy's type and direction of motion.
 package com.proandroidgames;


public class SFEnemy {


…

        public SFEnemy(int type, int direction) {

                enemyType = type;

                attackDirection = direction;


        }


}
The story for Star Fighter (in Chapter 2) described the attack characteristics for the three different enemies. The scout flies in a swift but predictable pattern, the interceptor locks onto and flies directly at the player's character, and the warship maneuvers in a random pattern. Each of these ships is going to need to start from a specific point on the screen.
Typically in scrolling shooters, the enemies start from a point on the y axis that is off the screen and then scroll down toward the player. Therefore, the next thing you will do in your constructor is to establish a y axis starting point for the enemies.
Android's random number generator is a great way to pick that starting point. The Android random number generator will generate a number between 0 and 1. Your enemy's y axis, however, is from 0 to 4. Multiply the number created by the random number generator by 4, and the result will be a valid y axis position on the screen. Add 4 to the valid y position to then push that starting point off the screen.
package com.proandroidgames;


public class SFEnemy {


…


private Random randomPos = new Random();

        public SFEnemy(int type, int direction) {

                enemyType = type;

                attackDirection = direction;

                posY = (randomPos.nextFloat() * 4) + 4;


        }


}
That takes care of the y axis; now, you need to establish an x axis position. Take a look at the constants that you created in SFEngine. Three represent from where on the x axis an enemy could be attacking: ATTACK_LEFT, ATTACK_RANDOM, and ATTACK_RIGHT. The left-hand x-axis value is 0. The right-hand x-axis value is 3 (subtract 1 unit from 4 to account for the size of the sprite).
You can use a case statement to assign the x-axis starting point based on what attack direction is passed into the constructor.
package com.proandroidgames;


public class SFEnemy {


…


        public SFEnemy(int type, int direction) {

                enemyType = type;

                attackDirection = direction;

                posY = (randomPos.nextFloat() * 4) + 4;

                switch(attackDirection){

                        case SFEngine.ATTACK_LEFT:

                                posX = 0;

                                break;

                        case SFEngine.ATTACK_RANDOM:

                                posX = randomPos.nextFloat() * 3;

                                break;

                        case SFEngine.ATTACK_RIGHT:

                                posX = 3;

                                break;

                        }


        }


}
The last variable that you need to establish is the posT. Don't worry about what posT does right now; you will discover that later in this chapter. Set posT to the value of SFEngine.SCOUT_SPEED.
package com.proandroidgames;


public class SFEnemy {


…

        public SFEnemy(int type, int direction) {

                enemyType = type;

                attackDirection = direction;

                posY = (randomPos.nextFloat() * 4) + 4;

                switch(attackDirection){

                        case SFEngine.ATTACK_LEFT:

                                posX = 0;

                                break;

                        case SFEngine.ATTACK_RANDOM:

                                posX = randomPos.nextFloat() * 3;

                                break;

                        case SFEngine.ATTACK_RIGHT:

                                posX = 3;

                                break;

                }

                posT = SFEngine.SCOUT_SPEED;


        }


}
Two of the enemy types that you can create, the interceptor and the warship, will travel in diagonal, but straight, lines. The code to generate those attack paths will be handled in the game loop, because it is relatively easy to guide an object in a straight line. The scout enemy type, on the other hand, will move in a pattern known as a Bezier curve. In the next section, you will create the methods that help the enemy fly in a curve.
The Bezier Curve
While you may not know it by name, you will most likely have seen a Bezier curve before. Figure 6–2 illustrates what a Bezier curve looks like.

Figure 6–2. A quadratic Bezier curve
For the scout to fly in a quadratic Bezier curve from the top to the bottom of the screen, you will need two methods: one to get you the next x axis value on the Bezier curve and one to give you the next y axis value on the Bezier curve. Each time you call these methods, you will be give the next point on the x and y axes that the particular enemy needs to be moved to.
Luckily, plotting points on a Bezier curve is fairly simple. To construct a quadratic Bezier curve, you need four Cartesian points: a start, an end, and two points somewhere in between for the curve to wrap around. These points will never change in the Star Fighter game. Every scout will follow the same curve, from either the left or right. Therefore, eight constants were created in SFEngine to represent the four quadratic Bezier curve points on each axis.
The key value in plotting the points is the t factor The t factor tells the formula where on the curve you are, thus allowing the formula to calculate the x or y coordinate for that single position. Because your ships will be moving at a predefined speed, you will use that value as the seed value for t.
TIP: If you do not understand the math behind the formulas in this section, there are many great resources for Bezier curves, including the following Wikipedia page: http://en.wikipedia.org/wiki/Bézier_curve.
Create two methods in your SFEnemy() class: one to get the next x axis value and one to get the next y axis value.
package com.proandroidgames;


public class SFEnemy {


…

        public SFEnemy(int type, int direction) {


…

        }


        public float getNextScoutX(){


        }

        public float getNextScoutY(){


        }


}
Here is the formula to find a point on a quadratic Bezier curve on the y axis (replace the y with x to find the values on the x axis):
(y1*(t3)) + (y2 * 3 * (t2) * (1-t)) + (y3 * 3 * t * (1-t)2) + (y4* (1-t)3)
Use this formula in your getNextScoutY() method with the correct variables.
package com.proandroidgames;


public class SFEnemy {


…


        public SFEnemy(int type, int direction) {


…

        }


        public float getNextScoutX(){


        }


        public float getNextScoutY(){

                 return (float)((SFEngine.BEZIER_Y_1*(posT*posT*posT)) +

(SFEngine.BEZIER_Y_2 * 3 * (posT * posT) * (1-posT)) + (SFEngine.BEZIER_Y_3 * 3 * posT *

((1-posT) * (1-posT))) + (SFEngine.BEZIER_Y_4 * ((1-posT) * (1-posT) * (1-posT))));


        }


}
Use this same formula for the x axis, with one minor change. You will need to reverse the formula if the enemy is attacking from the left-hand side of the screen as opposed to the right.
package com.proandroidgames;


public class SFEnemy {


…

        public SFEnemy(int type, int direction) {


…

        }


        public float getNextScoutX(){

                if (attackDirection == SFEngine.ATTACK_LEFT){

                        return (float)((SFEngine.BEZIER_X_4*(posT*posT*posT)) +

(SFEngine.BEZIER_X_3 * 3 * (posT * posT) * (1-posT)) + (SFEngine.BEZIER_X_2 * 3 * posT *

((1-posT) * (1-posT))) + (SFEngine.BEZIER_X_1 * ((1-posT) * (1-posT) * (1-posT))));

                }else{

                        return (float)((SFEngine.BEZIER_X_1*(posT*posT*posT)) +

(SFEngine.BEZIER_X_2 * 3 * (posT * posT) * (1-posT)) + (SFEngine.BEZIER_X_3 * 3 * posT *

((1-posT) * (1-posT))) + (SFEngine.BEZIER_X_4 * ((1-posT) * (1-posT) * (1-posT))));

                }


        }


        public float getNextScoutY(){

                 return (float)((SFEngine.BEZIER_Y_1*(posT*posT*posT)) +

(SFEngine.BEZIER_Y_2 * 3 * (posT * posT) * (1-posT)) + (SFEngine.BEZIER_Y_3 * 3 * posT *

((1-posT) * (1-posT))) + (SFEngine.BEZIER_Y_4 * ((1-posT) * (1-posT) * (1-posT))));

        }


}
Notice, when calculating for the right-hand side of the x axis, that the values are x1, x2, x3, and x4—from the left, the points are used in the opposite order: x4, x3, x2, and x1.
The remainder of the SFEnemy class should look the same as the SFGoodGuy class, taking into account the changes made to use the new common sprite sheets.
package com.proandroidgames;


import java.nio.ByteBuffer;

import java.nio.ByteOrder;

import java.nio.FloatBuffer;

import java.util.Random;

import javax.microedition.khronos.opengles.GL10;


public class SFEnemy {


        public float posY = 0f;

        public float posX = 0f;

        public float posT = 0f;

        public float incrementXToTarget = 0f;

        public float incrementYToTarget = 0f;

        public int attackDirection = 0;

        public boolean isDestroyed = false;


        public int enemyType = 0;


        public boolean isLockedOn = false;

        public float lockOnPosX = 0f;

        public float lockOnPosY = 0f;


        private Random randomPos = new Random();


        private FloatBuffer vertexBuffer;

        private FloatBuffer textureBuffer;

        private ByteBuffer indexBuffer;


        private float vertices[] = {

                0.0f, 0.0f, 0.0f,

                1.0f, 0.0f, 0.0f,

                1.0f, 1.0f, 0.0f,

                0.0f, 1.0f, 0.0f,

        };


        private float texture[] = {

                0.0f, 0.0f,

                0.25f, 0.0f,

                0.25f, 0.25f,

                0.0f, 0.25f,

        };


        private byte indices[] = {

                0,1,2,

                0,2,3,

        };


        public SFEnemy(int type, int direction) {

                enemyType = type;

                attackDirection = direction;

                posY = (randomPos.nextFloat() * 4) + 4;

                switch(attackDirection){

                        case SFEngine.ATTACK_LEFT:

                                posX = 0;

                        break;

                        case SFEngine.ATTACK_RANDOM:

                                posX = randomPos.nextFloat() * 3;

                        break;

                        case SFEngine.ATTACK_RIGHT:

                                posX = 3;

                        break;

                }

                posT = SFEngine.SCOUT_SPEED;


                ByteBuffer byteBuf = ByteBuffer.allocateDirect(vertices.length * 4);

                byteBuf.order(ByteOrder.nativeOrder());

                vertexBuffer = byteBuf.asFloatBuffer();

                vertexBuffer.put(vertices);

                vertexBuffer.position(0);


                byteBuf = ByteBuffer.allocateDirect(texture.length * 4);

                byteBuf.order(ByteOrder.nativeOrder());

                textureBuffer = byteBuf.asFloatBuffer();

                textureBuffer.put(texture);

                textureBuffer.position(0);


                indexBuffer = ByteBuffer.allocateDirect(indices.length);

                indexBuffer.put(indices);

                indexBuffer.position(0);

        }


        public float getNextScoutX(){

                if (attackDirection == SFEngine.ATTACK_LEFT){

                        return (float)((SFEngine.BEZIER_X_4*(posT*posT*posT)) +

(SFEngine.BEZIER_X_3 * 3 * (posT * posT) * (1-posT)) + (SFEngine.BEZIER_X_2 * 3 * posT *

((1-posT) * (1-posT))) + (SFEngine.BEZIER_X_1 * ((1-posT) * (1-posT) * (1-posT))));

                }else{

                        return (float)((SFEngine.BEZIER_X_1*(posT*posT*posT)) +

(SFEngine.BEZIER_X_2 * 3 * (posT * posT) * (1-posT)) + (SFEngine.BEZIER_X_3 * 3 * posT *

((1-posT) * (1-posT))) + (SFEngine.BEZIER_X_4 * ((1-posT) * (1-posT) * (1-posT))));

                }


        }


        public float getNextScoutY(){

                return (float)((SFEngine.BEZIER_Y_1*(posT*posT*posT)) +

(SFEngine.BEZIER_Y_2 * 3 * (posT * posT) * (1-posT)) + (SFEngine.BEZIER_Y_3 * 3 * posT *

((1-posT) * (1-posT))) + (SFEngine.BEZIER_Y_4 * ((1-posT) * (1-posT) * (1-posT))));

        }


        public void draw(GL10 gl, int[] spriteSheet) {

                gl.glBindTexture(GL10.GL_TEXTURE_2D, spriteSheet[0]);


                gl.glFrontFace(GL10.GL_CCW);

                gl.glEnable(GL10.GL_CULL_FACE);

                gl.glCullFace(GL10.GL_BACK);


                gl.glEnableClientState(GL10.GL_VERTEX_ARRAY);

                gl.glEnableClientState(GL10.GL_TEXTURE_COORD_ARRAY);


                gl.glVertexPointer(3, GL10.GL_FLOAT, 0, vertexBuffer);

                gl.glTexCoordPointer(2, GL10.GL_FLOAT, 0, textureBuffer);

                gl.glDrawElements(GL10.GL_TRIANGLES, indices.length,

GL10.GL_UNSIGNED_BYTE, indexBuffer);


                gl.glDisableClientState(GL10.GL_VERTEX_ARRAY);

                gl.glDisableClientState(GL10.GL_TEXTURE_COORD_ARRAY);

                gl.glDisable(GL10.GL_CULL_FACE);

        }


}
You now have a working class from which you can spawn all of the enemies in your game. Save the SFEnemy() class. In the next chapter, you will begin to create the AI for your enemies.
Summary
In this chapter, you took another major step forward in your skill set. A lot of work has gone into creating the enemies for your game, and there is still more to do. The following list describes what you have learned in this chapter, and you will expand on what you have learned in Chapter 7:
- Create a common texture class to hold a large sprite sheet.
- Create an array to hold all of the game's enemies for easier processing.
- Create the
SFEnemy()class for spawning three different enemies. - Create method for moving your enemy in a Bezier curve.