
C H A P T E R 3
Caching
Caching is an important cornerstone of high-performance web sites. You can use it to accomplish the following:
- Reduce round-trips: Content cached at the client or in proxies can eliminate web server round-trips. Content cached at the web server can eliminate database round-trips.
- Move content closer to clients: The farther away from clients content is located, the longer it takes to retrieve that content.
- Avoid time-consuming processes of regenerating reusable content: For content that takes a lot of time or resources to generate, system performance and scalability are improved if you can generate content once and then reuse it many times.
- Optimize state management: Caching state information at the client is more scalable than storing it in a central location (within certain bounds, as discussed later).
In this chapter, I’ll cover how and when to use caching in all tiers of your application:
- Browser cache
ViewState- Cookies and web storage
- Silverlight isolated storage
- Proxy cache
- Web server cache
- SQL Server caching
- Distributed caching
- Cache expiration times
Caching at All Tiers
As discussed in Chapter 1, the end-to-end system called a web application contains a number of layers, or tiers, where caching is possible. See Figure 3-1.
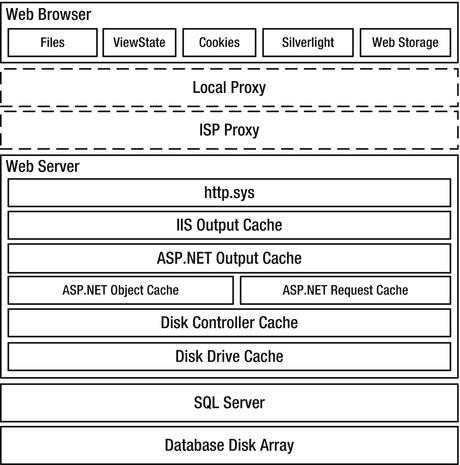
Figure 3-1. Caching options that are available to web applications
You should treat boxes at the same horizontal level in the figure as mutually exclusive content stores. Their relative vertical location gives a rough sense of how far away they are from each other, in terms of access time. For example, you wouldn’t normally store the same data in both the ASP.NET object cache and in the ASP.NET request cache, or in both cookies and ViewState, and the browser can retrieve content cached by http.sys faster than content from SQL Server.
Although you can (and should) cache certain resources in multiple tiers, some types of data should be stored only in a single location. For example, state information stored in a cookie might be stored only there, or a pre-calculated result might exist only in the ASP.NET object cache.
You should consider caching in all tiers, though, and take relative content uniqueness and access frequency into account when deciding whether to cache content in a particular tier. For example, content that is unique per user is generally not a good candidate to cache at the web server tier, since it is relatively unlikely to be reused, particularly in an environment with a large number of load-balanced servers. However, it might be perfectly acceptable to have the user’s browser cache it.
You can configure caching in four different ways:
- Using IIS Manager (a GUI front-end to the underlying XML configuration files)
- By directly editing an XML configuration file
- Declaratively, in an ASP.NET page or control
- Programmatically, in code-behind or in an
HttpModule
I will describe each approach in the following sections.
Browser Cache
Files that the browser retrieves from the server should be stored in the browser’s cache as long as possible to help minimize server round-trips. If a page and all the resources it requires are in the browser’s cache, no server round-trips at all are required; the browser can render the page using only the cached content. Since that presents no load on the network or the server, it is obviously very good for scalability!
Caching Static Content
Every object stored in the browser cache includes an expiration time, beyond which the browser considers the content stale or invalid. You can manage those expiration times with the Cache-Control: max-age HTTP header. The Expires header performed the same function with HTTP 1.0, but Cache-Control overrides Expires when both are present. I prefer to use only Cache-Control when possible, thereby avoiding the confusion that might arise when you have two headers that specify the same thing.
If you set neither the Expires nor Cache-Control: max-age HTTP headers, then the browser uses heuristics to determine how to handle caching. For example, if an object has a Last-Modified header, then IE9 will set the content’s expiration time to the current time plus 10% of the difference between the current time and the Last-Modified time.
After content expires, the browser doesn’t delete it from the cache immediately. Instead, it’s marked stale.
Avoiding Conditional GETs
After content becomes stale, the next time it’s referenced, the browser does a conditional GET (only once per page), asking the server to confirm that it hasn’t changed since the last time it was retrieved. Here’s what a conditional GET request looks like:
GET /check.png HTTP/1.1

Accept: */*

Accept-Language: en-us

Accept-Encoding: gzip, deflate

If-Modified-Since: Sat, 10 Jan 2012 10:52:45 GMT

If-None-Match: "80fc52fa8bb2c81:0"

User-Agent: Mozilla/5.0 (compatible; MSIE 9.0; Windows NT 6.1; WOW64; Trident/5.0)

Host: www.12titans.net

Connection: Keep-Alive
The browser has included If-Modified-Since and If-None-Match headers to ask the web server whether the content has changed (a different Last-Modified date or ETag) since the last time the browser requested it.
Here’s the response:
HTTP/1.1 304 Not Modified

Cache-Control: max-age=1

Last-Modified: Sat, 10 Jan 2012 10:52:45 GMT

Accept-Ranges: bytes

ETag: "80fc52fa8bb2c81:0"

Server: Microsoft-IIS/7.5

Date: Mon, 16 Mar 2012 04:07:01 GMT
IIS responds with 304 Not Modified, indicating that the content hasn’t changed. It also includes headers with the current values of Cache-Control, Last-Modified, and ETag.
Even though the responses to conditional GETs are short, the time it takes for the round-trips alone can have a big effect on performance. Until the interval that you specify with Cache-Control: max-agepasses, the content will remain active in the cache, and the browser won’t make those extra server round-trips.
Setting Cache-Control: max-age
You can set Cache-Control: max-age for static content using IIS Manager. First, select HTTP Response Headers. Then click Set Common Headers on the upper right, and select Expire Web content, as in Figure 3-2.

Figure 3-2. Set a far-future expiration time for static content using IIS Manager.
The HTTP 1.1 standard recommends one year into the future as the maximum expiration time. You should use that as the default for all static content on your site, as in Figure 3-2. Since max-age is specified in seconds, that setting will result in the following HTTP header:
Cache-Control: max-age=31536000
You can also apply this setting in web.config, as follows:
<configuration>

  . . .

  <system.webServer>

    . . .

    <staticContent>

     <clientCache cacheControlMode="UseMaxAge" cacheControlMaxAge="365.00:00:00" />

    </staticContent>

  </system.webServer>

</configuration>
Once you’ve established a site-wide default, you can then set shorter expiration times for specific static files or folders if needed.
Disabling Browser Caching for Static Content
You can partially disable browser caching for a particular static file or folder by selecting it first in the left-hand panel in IIS Manager, then bringing up the same dialog box shown in Figure 3-2, and finally selecting Expire Web Content and Immediately. This results in the following HTTP header:
Cache-Control: no-cache
You can do the same thing in web.config. For example, for a file called image.jpg in the top-level folder of your site, you’d have the following:
<configuration>

  . . .

  <location path="image.jpg">

    <system.webServer>

      <staticContent>

        <clientCache cacheControlMode="DisableCache" />

      </staticContent>

    </system.webServer>

  </location>

</configuration>
As implied by the name of the <staticContent> XML element, this approach works only for static content. You will need to set client cache expiration times for dynamic content declaratively in your .aspx files or set them programmatically.
In spite of its name, Cache-Control: no-cache may not completely disable caching by the browser. According to the HTTP standard, that header requires the client to revalidate the response before reusing it, unless the reuse is the result of back or forward navigation. To disable caching fully, use Cache-Control: no-store, which you can set for static files using the approach in Figure 2-6.
IE9 and earlier implement no-cache as no-store. However, IE10 and most other browsers implement the behavior as defined in the HTTP standard.
Caching Dynamic Content
As an initial rule of thumb, dynamic content should have an expiration time of between 1 and 30 days. An example of doing that declaratively is to place an OutputCache directive at the top of your .aspx page (see dyn-client.aspx):
<%@ Page . . . %>

<%@ OutputCache Duration="86400" Location="Client" VaryByParam="None" %>
That tells the runtime to generate HTTP headers that ask the browser to cache the page for 86,400 seconds (one day). You must include VaryByParam, or the parser will generate an error. A value of None means that multiple versions of the page do not need to be cached independently. The resulting HTTP headers are as follows:
Cache-Control: private, max-age=86400

Expires: Tue, 17 Mar 2012 01:34:17 GMT
Cache-Control: private prevents shared proxies from caching the response.
![]() Note In this example, the page will not be cached on the server.
Note In this example, the page will not be cached on the server.
You can generate the same headers programmatically, either from code-behind or from an HttpModule. Here’s an example (see dyn-client2.aspx):
TimeSpan ds = new TimeSpan(1, 0, 0, 0);

this.Response.Cache.SetExpires(DateTime.UtcNow + ds);

this.Response.Cache.SetMaxAge(ds);
Cache-Control: private is the default and does not need to be set explicitly.
If your content changes more often than once per day, even short client-side expiration times (1 to 10 minutes) can be useful to prevent extra round-trips in some cases.
![]() Note IE9 improved forward/back navigation so that content without an explicit expiration time doesn’t require revalidation. IE10 and most other browsers reuse even
Note IE9 improved forward/back navigation so that content without an explicit expiration time doesn’t require revalidation. IE10 and most other browsers reuse even no-cache resources properly in forward/back navigation.
Using Cache Profiles
When you’re using OutputCache directives, it’s also a good idea to use centralized cache profiles to help ensure consistency and to minimize the effort needed to make subsequent changes. The first step is to define a cache profile in your web.config file. For example, define a profile called Cache1Day to encapsulate the parameters to allow client-side caching for one day:
<system.web>

  <caching>

    <outputCacheSettings>
      <outputCacheProfiles>

        <add name="Cache1Day" duration="86400"

             location="Client" varyByParam="none" />

      </outputCacheProfiles>

    </outputCacheSettings>

  </caching>

</system.web>
To use the profile, just reference it from the OutputCache directive (see dyn-client3.aspx):
<%@ OutputCache CacheProfile="Cache1Day" %>
Disabling Caching
You should disable browser caching of dynamic content only in cases where data must always be the absolute latest, where it can change in response to the user’s state (such as whether they are logged on), or where the page contains sensitive data that should not be stored on the browser.
To disable caching declaratively, set the Location property to None in the OutputCache directive:
<%@ OutputCache Location="None" %>
Here’s the equivalent code (see dyn-disable.aspx):
this.Response.Cache.SetCacheability(HttpCacheability.NoCache);
HttpCacheability.NoCache will disable caching fully on the server, but only partially on the client (content can still be cached for forward / back navigation). The resulting HTTP headers are as follows:
Cache-Control: no-cache

Pragma: no-cache

Expires: -1
The runtime includes the Pragma and Expires headers even though they aren’t needed in HTTP 1.1 and are therefore redundant in most cases. You can eliminate the Expires header as follows (see dyn-disable2.aspx):
this.Response.Cache.SetAllowResponseInBrowserHistory(true);The Expires: -1 header is supposed to prevent the page from being placed on the browser’s history list so that you can’t use the browser’s Back button to navigate to it again. However, in my testing with IE, it doesn’t work that way; the page is always present in the history list. Perhaps it has some effect in other browsers.
To disable browser caching fully, including forward / back navigation, set Cache-Control: no-store programmatically:
this.Response.AppendHeader("Cache-Control", "no-store");
ViewState
ViewState is a collection of information generated by controls on an .aspx page that’s used by the controls to restore their state during a postback. State in this context can include the values of control properties, results of data binding, or input from users. The specifics vary by control.
Consider the case where you click on a button on a page, and the click handler enables some new output in the response. If you then click on another button to perform a different function, you want the new output you previously enabled to be there for subsequent views. The runtime transparently uses ViewState to track the state change. The next time you click a button from the same page, the runtime restores the previous control properties, to put the page quickly back in the same state it was in at the end of the previous request.
The downside of ViewState is that it can become large and introduce performance issues if you don’t take steps to manage it.
As I mentioned in Chapter 1, there are a few places where technologies that help improve performance interact strongly with security. ViewState is one example.
The runtime restores posted form values during an ASP.NET postback, but the mechanism doesn’t use ViewState. For example, let’s say you have a page that contains a DropDownList with ViewState disabled. If the user selects a value from the list and then submits the form, the runtime will restore the submitted value on the page that it generates for the response.
How ViewState Works
- When a user requests a page, before the page life cycle begins, the runtime creates all of the controls for the page, assigns their declarative properties, and adds them to a control tree, with the page at the root of the tree.
- Next, the
PreInitevent on the page fires, followed by theInitevent on all controls, from the bottom of the control tree up, so the page’sInitevent fires last. - Right after the
Initevent fires for each control, the control enablesViewStatetracking. Before that point, the control will not remember changes to its properties across postbacks. Afterwards, whenever you change the value of a property, the control records that change inViewState, so the runtime can restore the property value during postbacks. - By the time the
Initevent fires for your page, all of your controls already haveViewStatetracking enabled, so any changes you make to control properties from that point forward will be stored in the generated page (for controls that haveViewStateenabled). - Next, the runtime fires the
InitCompleteevent for the page. After that, if the page is a postback, the runtime uses incomingViewStatedata to restore the value of any control properties that you modified when you created the old page. - Next, the runtime fires the
PreLoadevent for the page, followed by theLoadevent for the page and then for all child controls (PreLoadis not available for controls). - Later in the page life cycle, the runtime fires the
SaveStateCompleteevent after it has savedViewStateandControlStatefor the page and all controls. - As part of the page-rendering process, the runtime serializes
ViewStateandControlState, encodes them in base-64, and stores them together as a single hidden<input>field on the page called__VIEWSTATE. To be serialized, objects stored inViewStatemust be marked with the[Serializable]attribute or have a customTypeConverter.
You can read and write ViewState only after the Init event and before PreRender.
ControlState is similar to ViewState, in that it also contains page-specific, control-specific state information. However, unlike with ViewState, you can’t easily disable ControlState. It contains information that is required in order for a control to perform certain basic functions. I will walk through an example of using ControlState in Chapter 8, and demonstrate one way to disable it in Chapter 7.
Consider the following ASP.NET markup:
<form id="form1" runat="server">

</form>
From that, the runtime generates the following HTML:
<form name="form1" method="post" action="viewstate1.aspx" id="form1">

<div>

<input type="hidden" name="__VIEWSTATE" id="__VIEWSTATE"

       value="/wEPDwULLTE2MTY2ODcyMjlkZExM0iM4ebB6mDGwogfzmhu/Ur0P" />

</div>

</form>
You can see the <input> tag containing the __VIEWSTATE field.
![]() Note The presence of the
Note The presence of the __VIEWSTATE hidden field in an HTTP POST is how ASP.NET determines the value of Page.IsPostBack.
The browser sends the hidden field back to the server when you submit the <form>, as it does with all <input> fields, and the page lifecycle starts again.
To summarize what this means regarding managing ViewState:
- Whenever you programmatically set a control property, keep in mind that the runtime may encode that value into
ViewState. - When you set control properties declaratively, they aren’t encoded in
ViewState. - You may be able to set some control properties in the page
PreInitevent handler without triggering additionalViewState, but take care that the values aren’t subsequently overwritten by an ASP.NET theme or by incomingViewState. - For custom controls, you can set properties in the
Initevent handler and avoid having the runtime encode them inViewState. However, this only works for properties of the control itself, not for child controls. - Control properties you set in the
SaveStateCompleteevent handler may affect the rendering of the page, but the runtime will not encode the changes inViewState.
Avoiding ViewState Misuse
ViewState does not contain or re-create custom controls on the page, or restore posted values to controls. You should not use it for session data, since it’s specific to a page, not a session.
You can’t use ViewState for server-only objects, such as database connections. It’s not valid after you do a server-side redirect with Server.Transfer().
Avoid using ViewState for static data or data that you can create quickly. Keep in mind that anything you store in ViewState will be encoded and sent to the user and back over a potentially slow network connection.
Using ViewState as a Form of Caching
ViewState can be useful from a caching perspective because it allows you to store information that is associated only with a particular page as part of the page itself.
For example, let’s say you have a page that displays a list of strings, along with a link that allows the user to alternate between sorting the list either ascending or descending. How do you keep track of that? One way would be with a query string. Although that’s appropriate in some circumstances, it means that search engines would see multiple versions of the page, which might not be desirable. It also exposes a string in the URL that hackers could change and that you would therefore need to write additional code to validate.
You could use session state, but in a multi-server environment, that may require a database round-trip.
As an alternative, you can store the current sort order in ViewState so that it’s cached on the page. Here’s an example (see view.aspx):
private const string SortStateKey = "SO";

private const string SortAscending = "a";

public bool IsSortAscending { get; set; }


protected void Page_Load(object sender, EventArgs e)

{

    if (IsPostBack)

    {

        string prevSort = (string)this.ViewState[SortStateKey];

        this.IsSortAscending = prevSort == SortAscending;

    }

    else

    {

        this.ViewState[SortStateKey] = SortAscending;

        this.IsSortAscending = true;

    }

}
If the current page request is not a postback, you store a value into the ViewState object to indicate that the default sort order is ascending. If the request is a postback, you retrieve the previously stored value. Elsewhere in the code, when the user clicks a link or a button to alternate between ascending and descending sort order, you could use this information to determine which sort order to use and then change the value to indicate that you should do the opposite next time.
Protecting ViewState Data Integrity
Since ViewState contains a collection of serialized objects that the runtime reconstitutes on the server, it presents the possibility of abuse, including hacking and denial-of-service attacks. To prevent tampering and help ensure data integrity, the runtime can generate a message authentication code (MAC). The runtime can also encrypt the field in the event you need to use it to store sensitive data.
In an environment with multiple web servers, be sure to configure an explicit validationKey in web.config, and set it the same on all servers. Otherwise, with the default keys that are automatically generated, ViewState generated on one server will not be valid if it’s presented to other servers, since the MACs would be different. Even in single-server environments, it’s a good practice to set a specific validationKey. That helps avoid surprises down the road, including things such as inadvertently invalidating form-containing web pages that are cached by search engines in the event you move to a new server or reload the operating system. Here are the relevant settings in web.config:
<system.web>

  . . .

  <pages enableViewStateMac="true">

    . . .

  </pages>

  <machineKey

    validationKey="50B3847462938741422FF158A5B42D0E8DB8CB5CDA174257" />

</system.web>
The validationKey is an arbitrary hex string, between 40 and 128 characters long.
You should generally not require site-wide encryption of ViewState. If you need to store sensitive information in ViewState, you can encrypt it separately. If you need to protect the structure of the objects, then you can write a custom serializer, or you can serialize into memory first and encrypt the result.
Other Uses of ViewState
You can use ViewState to help prevent cross-site request forgery(CSRF) attacks. The way those attacks usually work is that an attacker creates either HTML that includes a form and a link, which, when clicked, submits the form to the server being attacked, or JavaScript that does the same thing. The form or script might do something like register a new user that the attacker will subsequently use to spam the target site. Attackers might send the HTML or JavaScript to third parties using e-mail, along with socially engineered link text, such as “click here to claim your prize.”
The technique can take advantage of a user’s ambient authority, since requests will include a user’s session or login cookies. Attackers can also use CSRF for things like generating spam accounts or comments, which don’t require cookies.
One way to use ViewState to prevent CSRF attacks is to set the ViewStateUserKey property on a Page. That value is stored in ViewState when the runtime initially renders the page. Then, during a postback, the runtime checks the stored field to make sure that it’s equal to the current ViewStateUserKey. If it isn’t, then the runtime throws an exception, and the page is aborted. Ideally, you should choose ViewStateUserKey so that it is unique per user. Here’s an example that sets an authenticated user’s name as the key (see view2.aspx):
protected void Page_Init(object sender, EventArgs e)

{

    this.ViewStateUserKey =

        this.User.Identity.IsAuthenticated ? this.User.Identity.Name : "default";
}
The result is that the __VIEWSTATE hidden field will be different for each different authenticated user, and users who cause their form to be submitted by another user will receive an error. That prevents attackers from copying the hidden field from one form and using it in a CSRF attack.
![]() Note
Note ViewStateUserKey must be set in Page_Init(), which is before ViewState is restored.
If you’re using sessions, a session ID is another candidate for ViewStateUserKey, although you should be aware that with the standard implementation, the runtime doesn’t send a session cookie to the browser until you save something in the Session object. Session IDs won’t be repeatable until the cookie is set.
IP addresses are another candidate (perhaps as a fallback for anonymous users), but it’s possible for a user’s IP address to change in mid-session, due to things like having their request routed through a different proxy, by moving their laptop from one location to another, or a change due to DHCP. A unique per-client cookie is probably more reliable.
Minimizing ViewState Size
Some controls, such as GridView, can easily generate many kilobytes of ViewState. Since the browser sends ViewState back to the server as part of an HTTP POST, it can adversely affect page load times if it gets too large. See Figure 3-3 for a graph of upload times for various data sizes and uplink speeds.
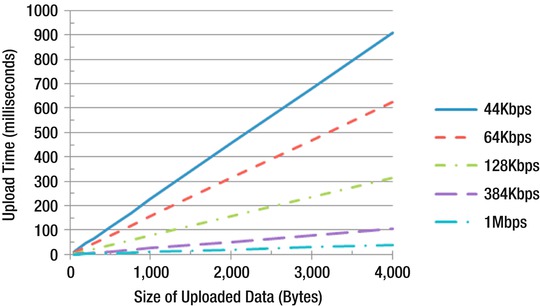
Figure 3-3. Upload times based on data size and upload speed
You can see the size of the ViewState generated by each control on your page by enabling tracing (set Trace to true in the Page directive). Look in the Control Tree section to see the IDs for each control and the size of their rendered content, ViewState and ControlState.
Keep in mind that it is sometimes faster to refetch data from the database for controls such as GridView than to have it sent to the client and back to the server again as ViewState. From Figure 3-3, you can see that just 4KB of ViewState would take around 300ms to send over a DSL connection with a 128Kbps uplink. You can retrieve a lot of data from SQL Server in 300ms, particularly if it’s still in SQL Server’s RAM cache.
In order to determine whether to enable ViewState for a page or control, the runtime looks at the values of two properties, EnableViewState and ViewStateMode.
- If
EnableViewStateisfalse, thenViewStateis always disabled for that page or control. - If
EnableViewStateistrue, then the runtime looks atViewStateMode. If it’s set toInherit(the default for controls), then if the control’s parent hasViewStateModeset toDisabled, thenViewStateis disabled for the control. If the control’s parent hasViewStateModeset toEnabled(the default for a page), thenViewStateis enabled for the control.ViewStatewill also be enabled for the control if it hasViewStateModeset toEnabled.
Because of the potentially large upload times, you should disable ViewState by default, on a per-page basis, by setting ViewStateMode to Disabled in the Page directive (see view3.aspx):
<%@ Page Language="C#" ViewStateMode="Disabled" AutoEventWireup="true"

    CodeFile="view3.aspx.cs" Inherits="view3" %>
The equivalent code is:
this.ViewStateMode = ViewStateMode.Disabled;
You can set this in a Visual Studio page template or in a page base class.
You can disable ViewState for your entire application in web.config:
<system.web>

  . . .

  <pages enableViewState="false">

    . . .

  </pages>

</system.web>
Unfortunately, you can’t override that setting in web.config at the page level, so you can’t selectively turn it back on when you need it. Therefore, disabling it on a per-page basis is more flexible.
![]() Tip You should enable
Tip You should enable ViewState only in pages that post back to the server; pages that don’t post back never need ViewState.
Many ASP.NET controls rely on ViewState to implement various features. You may also need ViewState to re-establish control property values for use in later postbacks that you change during things like click event handlers. When you need it, after disabling it at the page level, you should enable it for those controls only, by setting ViewStateMode to Enabled:
<asp:GridView ID="mygrid" runat="server" ViewStateMode="Enabled" />
You may see some data in the __VIEWSTATE field even after you’ve disabled ViewState for the page. The remaining data is ControlState. If it gets too large, you may want to use a different control, or consider overriding the class or using a control adapter to modify its behavior (see Chapter 7).
Using a Custom Template in Visual Studio
You can create a custom template in Visual Studio that disables ViewState by default so that you don’t have to remember to apply it for every new page or set it in your base class. To create a template, follow these steps:
- Create a page with the settings and content the way you would like to have them, including the code-behind file. Then select File
 Export Template, which will start the Export Template Wizard, as in Figure 3-4.
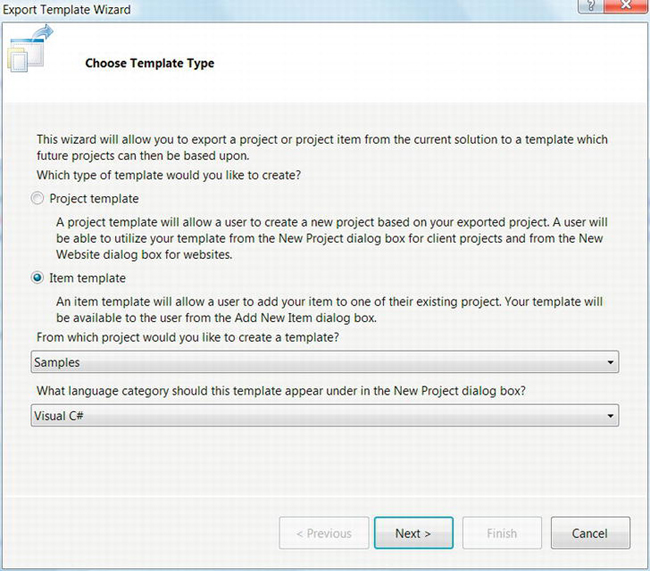
Figure 3-4. The Export Template Wizard in Visual Studio
- Select Item Template, set the project from which you would like to create the template, and set the appropriate language category.
- Click Next, and select the page that you created earlier. Visual Studio only shows the
.aspxfile; the code-behind will also be included. - Click Next, and select any Item References that should be associated with the template. For basic settings as I’m describing here, no additional references are needed.
- Click Next again, and enter a name and description for the template.
- Click Finish, and Visual Studio will create and import the template.
To use the template, select it when you add a new item to your project. Notice that Visual Studio will automatically set some values in the .aspx file, such as CodeFile and Inherits, along with corresponding values in the code-behind, when you create a new item from the template.
Minimizing Serialization Overhead
In addition to latency that’s introduced because of the time it takes to upload ViewState, serialization overhead is another performance-related concern. ASP.NET uses an optimized serializer for ViewState called LosFormatter, where Los stands for “limited object serialization.” It works best with the following types: String, Array, Hashtable, ArrayList, Pair, Triple, int, and Boolean.
If you use types other than those, consider writing a custom TypeConverter to minimize serialization overhead. If the object is not one of the “limited object” types, LosFormatter will first try to serialize it with a TypeConverter. If that fails, then it will fall back to using a BinaryFormatter, which can be very slow and can generate a much larger result.
![]() Tip Rather than placing a custom object in
Tip Rather than placing a custom object in ViewState, consider using a collection of objects grouped using the basic types that LosFormatter is optimized to handle.
Storing ViewState on the Server
In spite of my earlier recommendations, you may run into cases where you need ViewState, but it’s so large that it significantly impairs the performance of your page. You might also need to support certain types of browsers that run over very slow connections, such as mobile devices. In those cases, you may choose to store ViewState on the server side.
To do that, override the LoadPageStateFromPersistenceMedium and SavePageStateToPersistenceMedium methods in the Page class. To demonstrate the concept, consider the following example (see view4.aspx):
public const string ViewKeyName = "__viewkey";


protected override void SavePageStateToPersistenceMedium(object state)

{

    string key = Guid.NewGuid().ToString();

    this.ClientScript.RegisterHiddenField(ViewKeyName, key);

    this.Cache[key] = state;

}
protected override object LoadPageStateFromPersistenceMedium()

{

    string key = this.Request[ViewKeyName];

    if (key == null)

        throw new InvalidOperationException("Invalid ViewState Key");

    object state = this.Cache[key];

    if (state == null)

        throw new InvalidOperationException("ViewState too old");

    return state;

}
The first method creates a new GUID as a key and includes it in the page as a hidden field. You then store the ViewState object in server-side Cache using that key. Note that this would work only on a site with a single IIS worker process. If IIS had to restart, all ViewState would be lost. In a production environment, it should be stored in a database or some similar “persistence medium,” as the name of the methods imply.
The second method retrieves the GUID key from the hidden field and then uses it to retrieve the ViewState from the Cache.
To support low-speed devices in a generalized way, you could make both methods conditional on browser type or ViewState size, and so on, and include them in a common base class.
Cookies and Web Storage
Cookies are name/value pairs of strings that are stored on the client. Cookies are set when the browser receives a Set-Cookie HTTP header in a response from the server. Browsers send the cookie back to the server later if the requested URL matches the path and domain restrictions associated with the cookie when it was first set and if the cookie hasn’t expired. I covered some of the limitations and guidelines surrounding cookies in Chapter 2.
![]() Tip Cookies should be used to cache state information and other data that is specific to a particular user and that is needed across multiple pages.
Tip Cookies should be used to cache state information and other data that is specific to a particular user and that is needed across multiple pages.
Typical uses of cookies include user preferences, shopping cart, advertising history, last-visit date, authentication, and so on. As with ViewState and query strings, you can’t use cookies to store server-side state such as database connections.
Although cookies can be a useful caching mechanism, they can quickly become a performance problem if you don’t manage them carefully. If you set cookies with the default path property, they will be attached to both your pages and your static files, and the browser will send them with every HTTP request it makes to your site. If a page contains 20 different static files, the browser can end up sending the cookies to the server 21 different times (including for the page itself). When cookies are present in HTTP requests, it may also impair an intermediate proxy’s ability to cache your content.
You can set cookies either by setting HTTP headers from ASP.NET, by using JavaScript on the client, from Silverlight, or through configuration settings in IIS. They can be set in the response from a standard .aspx page, from an .asmx web service, or even with static content such as an image. You can also set them from some WCF services, although the approach is somewhat convoluted since WCF is designed to be protocol independent and cookies are a feature of HTTP.
Cookies are another area where security and performance concerns overlap to some extent. Since the information in cookies is visible to users, they are unfortunately subject to abuse. A fast architecture isn’t useful if it’s not secure, and in spite of their benefits from a caching perspective, incorrect use of cookies is a good way to expose your site to a variety of attacks. To help mitigate those concerns, I will cover a few issues related to cookies and security in this section.
Data that might be used to hack into your site or content that is so large that it will cause performance problems should not be stored in cookies; it should be kept on the server side instead and referenced indirectly with a unique key. That is one capability of session state, which I will cover in detail in Chapter 5.
Setting Session Cookies
Here’s an example that sets a cookie programmatically from an .aspx page (see cookie1.aspx):
HttpCookie cookie = new HttpCookie("name");

cookie.Value = "value";

this.Response.AppendCookie(cookie);
This will create a session cookie, since you didn’t set an expiration time. A session in this context means that the cookie lasts only as long as the browser is running. If the user closes the browser or reboots their machine, all session cookies are dropped.
Here’s the resulting HTTP response header:
Set-Cookie: name=value; path=/
To create a session cookie from JavaScript, you can use this function:
function SetCookie(name, value) {

    document.cookie = escape(name) + '=' + escape(value);

}
To create a session cookie from Silverlight, use this:
public void SetCookie(string name, string value) {

    HtmlPage.Document.Cookies = name + "=" + value;

}
See Figure 2-6 for an example of the configuration-based approach to setting cookies.
Multiple Name/Value Pairs in a Single Cookie
In addition to the single name/value per cookie approach, ASP.NET also provides a mechanism to store multiple name/value pairs in a single cookie, called a dictionary cookie. This can be useful to help work around the browser’s limitation of no more than 50 cookies per domain, as described in Chapter 2. It is also more efficient than setting many cookies that all have the same properties. Here’s an example (see cookie2.aspx):
HttpCookie cookie = new HttpCookie("name");

cookie.Values["v1"] = "value1";

cookie.Values["v2"] = "value2";

this.Response.AppendCookie(cookie);
That results in a single cookie in the HTTP response header:
Set-Cookie: name=v1=value1&v2=value2; path=/
Cookie Properties
In addition to name/value pairs, the Set-Cookie HTTP header supports several properties that influence the way the browser handles cookies.
Expires
The expires property contains a date that tells the browser how long it should store the cookie. Setting the expires property makes a cookie become persistent so that the browser can save it across sessions. When the expiration date passes, the browser will delete the cookie and no longer send it to the server.
Here’s an example that sets expires to one year in the future from an .aspx page (see cookie3.aspx):
HttpCookie cookie = new HttpCookie("name");

cookie.Value = "value";

cookie.Expires = DateTime.Now.AddYears(1);

this.Response.AppendCookie(cookie);
Here’s the resulting HTTP response header:
Set-Cookie: name=value; expires=Sun, 23-Dec-2012 11:20:37 GMT; path=/
From JavaScript, a semicolon precedes properties, as in the HTTP header. The following function accepts an expiration time as minutes in the future:
function SetCookie(name, value, minutes) {

    var exp = new Date((new Date()).getTime() + minutes*60000);

    document.cookie = escape(name) + '=' + escape(value) + '; expires=' + exp.toGMTString();

}
Notice that you specify the expiration time as GMT.
Silverlight is similar, since you’re just setting the same JavaScript property:
public void SetCookie(string name, string value, double minutes) {

    DateTime expires = DateTime.UtcNow.AddMinutes(minutes);

    HtmlPage.Document.Cookies = name + "=" + value +

        "; expires =" + expires.ToString("R");

}
To delete a cookie, set an expires date in the past, with the original cookie name, path, and domain.
Path
The path property is a case-sensitive string, with which the path name of a URL must start in order for the browser to send the cookie to the server. The path is not limited to being a folder name. The URL that sets path must begin with the specified path property in order for the property setting to be accepted.
For example, valid path settings for http://www.12titans.net/ch03/page1.aspx include /ch, /ch03, /ch03/, and /ch03/page1. If your intent is to specify a folder name as the path, then the path should end with a slash. If you tried to specify a path of /ch04/ from that page, the browser wouldn’t accept it, since the URL doesn’t start with that string.
![]() Caution Browsers can store multiple cookies with the same name at different paths in the same domain or overlapping domains (such as 12titans.net and www.12titans.net). It is therefore possible for the server to receive more than one cookie with the same name. Disambiguation isn’t always easy (or even possible), since cookie properties such as
Caution Browsers can store multiple cookies with the same name at different paths in the same domain or overlapping domains (such as 12titans.net and www.12titans.net). It is therefore possible for the server to receive more than one cookie with the same name. Disambiguation isn’t always easy (or even possible), since cookie properties such as path and domain are not sent back to the server along with the name/value pairs.
To minimize the bandwidth that your cookies use, and the latency they introduce, you should set them so the browser uploads them only once per page. You should avoid sending cookies with static content, where the server will probably never even look at them. You can also limit how often the browser sends cookies to the server by partitioning your pages by folder name or file name prefix, based on which cookies they need.
The default path is /, which means the browser will send the cookie to the server for all URLs from that domain, including static content, since all URL path names start with a slash. You should set a more restrictive path on all your cookies, even if it means you need to reorganize the hierarchy of the files in your web site in order to do so.
Here’s an example that sets the path from an .aspx page (see cookie4.aspx):
HttpCookie cookie = new HttpCookie("name");

cookie.Value = "value";

cookie.Path = "/ch03/";

this.Response.AppendCookie(cookie);
Here’s the resulting HTTP response header:
Set-Cookie: name=value; path=/ch03/
Here’s an example from JavaScript:
function SetCookie(name, value, path) {

    document.cookie = escape(name) + '=' + escape(value) + '; path=' + path;

}
Here’s an example from Silverlight:
public void SetCookie(string name, string value, string path) {

    HtmlPage.Document.Cookies = String.Format("{0}={1}; path={2}", name, value, path);

}
Domain
You can use the domain property to change which domains should be associated with a cookie.
If you don’t set the domain property, IE will send the cookie to both the current domain and any subdomains. For example, if you set a cookie from a page on 12titans.net, IE will send it with requests to www.12titans.net, page.sub.12titans.net, and so on. Without a domain property, most other browsers will only send the cookie to the current domain. This difference can be a source of bugs for cross-domain cookies.
The value of the domain property is compared to the domain of the URL being requested, using an EndsWith (tail) type match. Note that the browser bases the comparison strictly on the strings, ignoring case; the IP addresses of the servers don’t matter.
The domain property must match the domain of the page that sets it. For example, if you set it to 12titans.net from a page on www.12titans.net (or the other way around), the browser will ignore the cookie.
Here’s an example that sets domain programmatically (see cookie5.aspx):
HttpCookie cookie = new HttpCookie("name");

cookie.Value = "value";

cookie.Domain = "12titans.net";

this.Response.AppendCookie(cookie);
Here’s the resulting HTTP response header:
Set-Cookie: name=value; domain=12titans.net; path=/
From JavaScript, it’s similar to the path property:
function SetCookie(name, value, dom) {

    document.cookie = escape(name) + '=' + escape(value) + '; domain=' + dom;

}
From Silverlight, it looks like this:
public void SetCookie(string name, string value, string dom) {

    HtmlPage.Document.Cookies = name + "=" + value + "; domain=" + dom;

}
HttpOnly
The HttpOnly property tells the browser not to make the cookie visible to JavaScript. You should set it by default to help reduce your application’s attack surface, including the risk of things such as script-based session hijacking. You should disable HttpOnly only when you have script that explicitly needs access to a particular cookie.
Here’s an example that sets HttpOnly programmatically (see cookie6.aspx):
HttpCookie cookie = new HttpCookie("name");

cookie.Value = "value";

cookie.HttpOnly = true;

this.Response.AppendCookie(cookie);
Here’s the resulting HTTP response header:
Set-Cookie: name=value; path=/; HttpOnly
Since its purpose is to restrict script access, HttpOnly cannot be set from JavaScript or Silverlight.
Secure
If the data in a cookie contains sensitive information or if it might be subject to abuse by a third party, then you should generally send it over SSL-protected connections only. Those cookies should also be marked with the secure property, which prevents the browser from sending them to the server unless the connection uses SSL.
Here’s an example that sets secure programmatically (see cookie7.aspx):
HttpCookie cookie = new HttpCookie("name");

cookie.Value = "value";

cookie.Secure = true;

this.Response.AppendCookie(cookie);
Here’s the resulting HTTP response header:
Set-Cookie: name=value; path=/; secure
This is how to do it from JavaScript:
function SetCookie(name, value) {

    document.cookie = name + '=' + escape(value) + '; secure';

}
This is how to do it from Silverlight:
public void SetCookie(string name, string value) {

    HtmlPage.Document.Cookies = name + "=" + value + "; secure";

}
Reading Cookies
When the browser sends cookies to the server or when you use script or Silverlight to read them on the client, the only thing they contain is the name/value pair. Any properties that were originally set on them are not visible.
Here’s an example of reading cookie values programmatically (see cookie8.aspx):
HttpCookie cookie = this.Request.Cookies["name"];

if (cookie != null)

{

    string value = cookie.Value;

}
JavaScript only provides a way to get all cookies and values. You need a little extra code to extract the particular one of interest:
function getcookie(name) {

    var allcookies = document.cookie;

    var start = allcookies.indexOf(escape(name) + '='),

    if (start == -1)

        return null;

    start += name.length + 1;

    var end = allcookies.indexOf(';', start);

    if (end == -1)

        end = allcookies.length;

    var cookieval = allcookies.substring(start, end);

    return unescape(cookieval);

}
In document.cookie, an equals sign separates name/value pairs, and one cookie is separated from another with a semicolon. Since names and values are returned together, you may need more sophisticated parsing in some cases.
Similarly, here’s how to read cookies from Silverlight:
private static string GetCookie(string name)

{

    string allcookies = HtmlPage.Document.Cookies;

    int start = allcookies.IndexOf(name + "=", StringComparison.OrdinalIgnoreCase);

    if (start == -1)

        return null;

    start += name.Length + 1;

    int end = allcookies.IndexOf(';', start);

    if (end == -1)

        end = allcookies.Length;

    string cookieval = allcookies.Substring(start, end - start);

    return cookieval;

}
Storing Binary Data in Cookies
Since cookies are intended to hold strings only, if you want to store binary data in a cookie, it will need to be encoded. One way to do that is with base-64 encoding. Base-64 takes a sequence of 8-bits-per-byte binary data and encodes it as a string with 6-bits-per-character (6 bits is 64 values, which is why it’s called base-64). The 64 values consist of the 52 characters A–Z and a–z, plus 0–9, /, and +. The = character is used for padding at the end of the string, if needed.
As an example of how to store binary data in a cookie, let’s look at encrypted cookies.
If SSL isn’t practical or desirable or if you need to protect certain cookies from your users as well as from others, you can encrypt them using symmetric encryption. Since the results of encryption are binary, you can encode them using base-64.
Here’s a class to handle the encryption (see App_CodeSecure.cs):
using System.IO;

using System.Security.Cryptography;

using System.Text;


public class Secure

{

    private const string minSalt = "&B6yhj$,";


    private static RijndaelManaged Cryptor(string keySeed, string saltString)

    {

        byte[] salt = UTF8Encoding.UTF8.GetBytes(saltString + minSalt);

        Rfc2898DeriveBytes derivedBytes =

            new Rfc2898DeriveBytes(keySeed, salt, 1000);

        RijndaelManaged cryptor = new RijndaelManaged();


        //

        // KeySize must be set before the Key

        //

        cryptor.KeySize = 128;
        cryptor.Key = derivedBytes.GetBytes(16);

        cryptor.IV = derivedBytes.GetBytes(16);

        return cryptor;

    }
This method returns a RijndaelManaged object that you can use to do encryption or decryption. It takes a keySeed as an argument that it uses to generate a strong password, along with a salt string. The salt helps ensure that when you encrypt two strings with the same keySeed, they don’t generate the same ciphertext. You add some arbitrary (and fixed) text to the end of the given salt, to make sure it’s at least 8 characters long.
    public static string EncryptToBase64(string clearText,

                                         string keySeed, string salt)

    {

        using (MemoryStream ms = new MemoryStream())

        {

            using (ICryptoTransform encryptor =

                   Cryptor(keySeed, salt).CreateEncryptor())

            {

                using (CryptoStream encrypt =

                       new CryptoStream(ms, encryptor, CryptoStreamMode.Write))

                {

                    byte[] data = new UTF8Encoding(false).GetBytes(clearText);

                    encrypt.Write(data, 0, data.Length);

                    encrypt.Close();

                    return Convert.ToBase64String(ms.ToArray());

                }

            }

        }

    }
This method encrypts a string and encodes the result in base-64.
    public static string DecryptFromBase64(string cipherText,

                                           string keySeed, string salt)

    {

        byte[] data = Convert.FromBase64String(cipherText);

        using (MemoryStream ms = new MemoryStream())

        {

            using (ICryptoTransform decryptor =

                   Cryptor(keySeed, salt).CreateDecryptor())

            {

                using (CryptoStream decrypt =

                       new CryptoStream(ms, decryptor, CryptoStreamMode.Write))

                {

                    decrypt.Write(data, 0, data.Length);

                    decrypt.FlushFinalBlock();

                    return new UTF8Encoding(false).GetString(ms.ToArray());

                }

            }

        }

    }

}
This method decodes the base-64 ciphertext and decrypts the result.
You can use that class to protect some secret text in a cookie. Use the requesting host’s IP address as salt so that two users won’t see the same ciphertext for the same secret (see encrypt.aspx):
HttpCookie cookie = new HttpCookie("name");

cookie.Value = Secure.EncryptToBase64("my secret text",

                                      "password", this.Request.UserHostAddress);

this.Response.AppendCookie(cookie);
Looking at the HTTP headers with Fiddler, you can see the encrypted cookie:
Set-Cookie: name=Fx1T1c8mG/7HFnkLDo57ng==; path=/
You can recover the secret from the encrypted cookie by providing the same password and salt that you used to encrypt it (see decrypt.aspx):
HttpCookie cookie = this.Request.Cookies["name"];

if (cookie != null)

{

    string secret = Secure.DecryptFromBase64(cookie.Value,

                                             "password", this.Request.UserHostAddress);

    this.SecretLabel.Text = secret;

}
The results of compressing text using GzipStream can be similarly processed and encoded. However, GzipStream is not suitable for use with short strings, since it generates header information that can make the length of the output longer than the input. DeflateStream uses shorter headers.
Using a Compact Privacy Policy
Although most browsers readily accept cookies, Safari and IE6 and later make it possible for users to selectively accept them using “privacy” settings.
First-party cookies are set from pages that are in the same domain as the top-level page (the one in the address bar). Cookies set from all other domains are considered third-party. The default privacy setting in IE6 and later is Medium, which blocks third-party cookies that don’t have a compact privacy policy.
The Medium privacy setting also blocks third-party cookies and restricts first-party cookies that include information that can be used to contact you without your explicit consent. The browser figures that out based on a compact privacy policy that the site provides.
You can see the privacy setting in IE by selecting Tools ![]() Internet Options. Then click the Privacy tab. See Figure 3-5.
Internet Options. Then click the Privacy tab. See Figure 3-5.
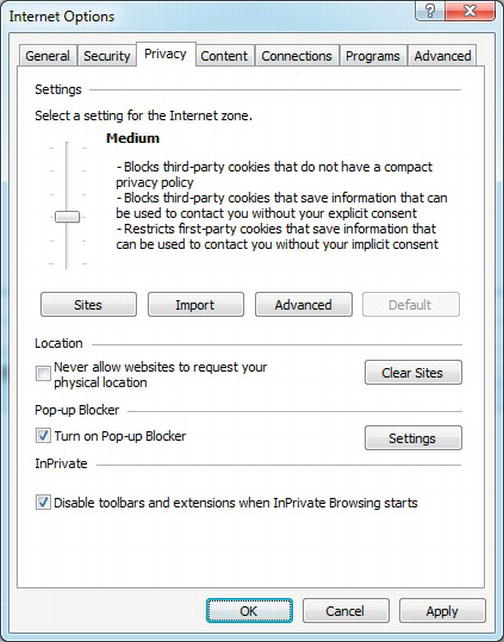
Figure 3-5. Default privacy options in IE9
The default settings aren’t a problem for sites with all of their content in a single domain. However, as I’ve shown in Chapter 2, there are good reasons why your site might perform better if you split it across multiple domains. If you mix domains on a single page, IE can block cookies unless you have a compact privacy policy. The Medium setting can also be a problem if other sites reference your pages in frames or if you use frames (including <iframe>s) with some content from one domain and other content from a different domain.
If users select the High privacy setting, then IE blocks even first-party cookies unless your site has a compact privacy policy. If you’re using cookie-based sessions or authorization cookies, those users may not be able to register or log in to your site. For these reasons, it’s a good idea to include a compact privacy policy, at least whenever you set a cookie.
Compact privacy policies are encoded in an HTTP header that is sent to the browser along with the rest of the response to a web request. The process of creating one normally involves filling out a lengthy questionnaire, since you are making a legal statement about your site’s privacy practices. Several sites online can help you create one that’s appropriate for your site, although they often charge a fee. Free software is also available that can help you. As an example only, here’s a simple one:
P3P: CP="NID DSP CAO COR"
With that HTTP header in place, IE would accept both first-party and third-party cookies from your site. See Table 3-1 for the meaning of the values.
You can set the header from IIS using the same procedure shown in Figure 2-6 or declaratively in web.config as shown after the figure.
Here’s an example that sets the header programmatically (see p3p.aspx):
this.Response.AddHeader("P3P", "CP="NID DSP CAO COR"");
Managing Cookies
To help simplify the management of cookies, including site-wide consistency, it’s a good idea to centralize cookie handling into a common library. The functions of the library might include the following:
- Enforcing the browser’s limits of 50 cookies per domain and no more than 10KB per cookie
- Enforcing project-specific policies for maximum cookie length and cookie naming
- Setting cookie expiration times based on the type of data they contain, rather than hard-coding time intervals into your pages
- Setting the
HttpOnlycookie property by default - Requiring the path property always to be set and not allowing it to be set to the root path
- Consistent serialization, encryption, compression, and encoding
- Automatic rollover from cookies to database storage for objects that are too long or for certain browser types, such as slow mobile devices
- Increment a custom Windows performance counter if the total cookie size or count exceeds certain thresholds (see Chapter 10 for information about performance counters)
An HttpModule can help enforce cookie policies. I describe HttpModules in detail in Chapter 7.
Web Storage
One alternative to cookies in scenarios where you would like to cache data on the client is to use web storage (sometimes known as DOM storage). Browsers starting from IE 8, Firefox 3.5, Safari 4, Chrome 4, and Opera 10.50 all support web storage. The benefit of using web storage over cookies is that the browser doesn’t have to round-trip the data from the client to the server with every request.
There are two types of web storage: per-domain (“local”) and per-session.
- Local storage is available to all pages from the same domain.
- Per-session storage is per-page and per-window, and is released when you close the window.
You have 5MB (Firefox, Chrome, and Opera) or 10MB (IE) of space. Although you can only store strings, you can encode and store binary or more complex objects using JSON.
To use session storage (see store1.aspx and store2.aspx):
sessionStorage.setItem('key', 'value'),

var item = sessionStorage.getItem('key'),
The code is similar for local storage:
localStorage.setItem('key', 'value'),

var item = localStorage.getItem('key'),
Silverlight Isolated Storage
Silverlight applications can cache data on the user’s disk using isolated storage. The default amount of space that’s available is 1MB per application, although the app can ask the user for a larger quota if needed.
Silverlight provides two different containers for isolated storage.
- The first is per-application; each app has a different storage area assigned to it, based on the URL of the
.xapfile that contains the app. - The second is site-specific; each fully qualified domain has a separate storage area. Applications running from the same domain can access the same site storage area for common data, or use the application storage for data that’s unique to the app.
For example, http://www.12titans.net/ClientBin/appOne.xap and http://www.12titans.net/ClientBin/appTwo.xap can access the same site-specific isolated storage area, but not the same application-specific area. The app at http://s1.12titans.net/ClientBin/appOne.xap would use different storage areas at both the site and application level from either of the other two apps, since it’s using a different domain.
Isolated storage is a good place to keep user-specific information that you need when rendering certain pages—particularly information that’s primarily needed on the client side. You can also use it as an alternative to cookies, perhaps by sending stored values back to the server as arguments in web services (WCF) calls.
As an example, you might want to store user preferences in isolated storage, such as the preferred position and size of web parts on a page, preferred colors or fonts, and so on.
Sample Application: “Welcome Back”
Imagine that you want to have every page on your site say “Welcome back, UserName” after users log on. If the text was placed on the page by the server, that would mean every page would be unique per user and therefore could not be placed in the high-performance output cache. If you used Ajax alone to ask the server for the user’s name on every page, that would require an additional round trip.
By using Silverlight or web storage to store the welcome string on the client, the HTML and the script on the page would then be identical for every user, so they could be stored in the output cache on the server.
Let’s write a sample application that uses isolated storage from Silverlight to address this issue.
For this example, you will build two small Silverlight applications. The first one will allow a user to “login,” and will store the user’s name in isolated storage. The second one will retrieve the user’s name from isolated storage and make it available to JavaScript on the page.
In a production version of this code, the app could log the user in and obtain the string to display by calling a WCF service once and storing the result in isolated storage so that it will be accessible from one page to the next. For a web storage approach, you could do something similar using Ajax.
XAML Markup
Start by adding a Silverlight application to your project. Right-click on your solution and select Add ![]() New Project to open the Add New Project dialog box. Select Visual C# and Silverlight on the left and then Silverlight Application on the right. Call the project
New Project to open the Add New Project dialog box. Select Visual C# and Silverlight on the left and then Silverlight Application on the right. Call the project Welcome, and click OK.
Open MainPage.xaml, and edit it as follows:
<UserControl x:Class="Welcome.MainPage"

    xmlns="http://schemas.microsoft.com/winfx/2006/xaml/presentation"

    xmlns:x="http://schemas.microsoft.com/winfx/2006/xaml"

    xmlns:d="http://schemas.microsoft.com/expression/blend/2008"

    xmlns:mc="http://schemas.openxmlformats.org/markup-compatibility/2006"

    mc:Ignorable="d" d:DesignWidth="300" d:DesignHeight="120"

    Width="300" Height="120">

    <StackPanel Orientation="Vertical">

        <Border CornerRadius="6" Background="#ffdedede" Margin="0,0,4,0">

            <TextBlock x:Name="info" Foreground="#ff14517b" Margin="7,2,0,1"

                 FontSize="20">Please Login</TextBlock>

        </Border>

        <TextBox x:Name="UserName" Margin="0,5,3,0" FontSize="20" />

        <Button x:Name="LoginButton" Content="Login" Margin="0,5,3,0"

            Click="LoginButton_Click" FontSize="20" />

    </StackPanel>

</UserControl>
You now have three controls arranged in a vertical <StackPanel>. The top one is a <Border> control with rounded corners that contains a <TextBlock> with the initial message Please Login. The middle control is a <TextBox> to allow the user to enter their name. The bottom control is a <Button with the label Login. It has a Click handler assigned that’s called LoginButton_Click. All three objects have x:Name attributes so that they can be referenced from the code-behind.
See Figure 3-6 for the resulting UI.

Figure 3-6. User interface for the sample Silverlight application
Using Isolated Storage
Next, open MainPage.xaml.cs, and edit it as follows:
using System;

using System.IO.IsolatedStorage;

using System.Windows;

using System.Windows.Browser;

using System.Windows.Controls;


namespace Welcome

{

    public partial class MainPage : UserControl

    {

        public MainPage()

        {

            this.Loaded += new RoutedEventHandler(Page_Loaded);

            InitializeComponent();

        }


        private void Page_Loaded(object sender, RoutedEventArgs e)

        {

            string name = null;

            IsolatedStorageSettings.SiteSettings.TryGetValue(WelcomeKey, out name);

            UpdateUI(name);

        }
The constructor assigns the Page_Loaded() method as a handler for the application’s Load event.
Page_Loaded() uses SiteSettings to get the value that may have been previously associated with the WelcomeKey string. The SiteSettings object implements what amounts to an on-disk hash table that’s available to all applications from the same domain. SiteSettings objects are unique for each domain (based on the domain of the Silverlight application, not the domain of the containing page). The ApplicationSettings object performs a similar function, except the associated storage and settings are specific to a URL instead of a domain.
Page_Loaded() then calls UpdateUI().
        private void UpdateUI(string name)

        {

            bool show;

            if (String.IsNullOrEmpty(name))
            {

                this.Message.Text = "Please Login";

                this.UserName.Visibility = Visibility.Visible;

                this.LoginButton.Content = "Login";

                show = false;

            }

            else

            {

                this.Message.Text = "Welcome back, " + name;

                this.UserName.Visibility = Visibility.Collapsed;

                this.LoginButton.Content = "Logout";

                show = true;

            }

            HtmlElement div = HtmlPage.Document.GetElementById("message");

            if (div != null)

            {

                div.SetStyleAttribute("display", show ? "block" : "none");

            }

        }
If the stored string is not present, the user is not logged in, so UpdateUI() sets the text on the <TextBlock> control to say Please Login, makes the <TextBox> visible, and sets the text on the <Button> to say Login. If the stored string is present, the user is already logged in, so the code updates the <TextBlock> control with a “Welcome back” message, hides the <TextBox> control, and changes the text on the <Button> to Logout.
After completing the Silverlight user control updates, the code looks for an HTML element in the page DOM with the ID of “message.” If it’s there, the code sets the element’s CSS display attribute to either block or none, depending on whether the user is logged in or not. You will use this to show or hide a link on the login page.
        private void LoginButton_Click(object sender, RoutedEventArgs e)

        {

            string name = null;

            if (this.UserName.Visibility == Visibility.Collapsed)

            {

                //

                // Logout

                //

                IsolatedStorageSettings.SiteSettings.Remove(WelcomeKey);

            }

            else

            {

                name = this.UserName.Text;

                if (!String.IsNullOrEmpty(name))

                {

                    //

                    // Login

                    //

                    IsolatedStorageSettings.SiteSettings[WelcomeKey] = name;

                }

            }

            IsolatedStorageSettings.SiteSettings.Save();
            UpdateUI(name);

        }

    }

}
As you specified in the XAML, LoginButton_Click() is called when a user clicks the <Button>. If the UserName <TextBox> isn’t visible, then the user is already logged in, and by clicking the button they want to be logged out. In that case, clear the WelcomeKey setting from SiteSettings in isolated storage to log the user out. Otherwise, store the user’s name from the <TextBox> control in isolated storage. Either way, flush the changes to disk by calling SiteSettings.Save(), and call UpdateUI() to have the UI reflect the new state. If you don’t call Save() explicitly, it will be called for you by the runtime when the application exits or when the user navigates to a new page.
Both SiteSettings and ApplicationSettings can store any serializable object, not just strings as in the example.
HTML and the User’s Experience
In the HTML that Visual Studio autogenerates to host the Silverlight control into a web page, add the following HTML right before the <div> that contains the <object> tag:
<div id="message" style="display:none">

<a href="ContentTestPage.aspx">Go to content</a>

</div>
This is the <div> block containing a link that the Silverlight code will show or hide, depending on whether a user is logged in or not. When the link is visible, the user can click on it to go to a “content” page, which is the second half of this example.
Here’s the main part of the auto-generated HTML:
<div id="silverlightControlHost">

    <object data="data:application/x-silverlight-2," type="application/x-silverlight-2" width="100%" height="100%">

        <param name="source" value="ClientBin/Welcome.xap"/>

        <param name="onError" value="onSilverlightError" />

        <param name="background" value="white" />

        <param name="minRuntimeVersion" value="5.0.60401.0" />

        <param name="autoUpgrade" value="true" />

        <a href="http://go.microsoft.com/fwlink/?LinkID=149156&v=5.0.60401.0" style="text-

decoration:none">

             <img src="http://go.microsoft.com/fwlink/?LinkId=161376" alt="Get Microsoft

Silverlight" style="border-style:none"/>

        </a>

    </object>

<iframe id="_sl_historyFrame"

    style="visibility:hidden;height:0px;width:0px;border:0px">

</iframe>

</div>
The final application (.xap) file in this case was 4.4KB, which is about the size of a small image.
What you see after the app first loads is that when you enter your name and click the Login button, the welcome message is displayed, the button changes to say Logout, and a link appears that says Go to content.
If you refresh the page, or close the browser and open the page again, the app remembers your name and displays the welcome message. If you click the Logout button, the welcome message goes away, and you have another opportunity to log in.
Sharing Isolated Storage With a Second Application
For the second half of the example, create a second Silverlight application, and call it Content. The default XAML will be fine, since we won’t need a user interface this time.
Edit MainPage.xaml.cs as follows:
using System;

using System.IO.IsolatedStorage;

using System.Windows.Browser;

using System.Windows.Controls;


namespace Content

{

    public partial class MainPage : UserControl

    {

        public MainPage()

        {

            HtmlPage.RegisterScriptableObject("Page", this);

            InitializeComponent();

        }


        [ScriptableMember]

        public string WelcomeMessage()

        {

            string name = null;

            IsolatedStorageSettings.SiteSettings.TryGetValue("welcome", out name);

            if (!String.IsNullOrEmpty(name))

            {

                return String.Format(

                "Welcome back, {0}<div><a href="WelcomeTestPage.aspx">Logout</a></div>",

                HttpUtility.HtmlEncode(name));

            }

            else

            {

                return "<a href="WelcomeTestPage.aspx">Login</a>";

            }

        }

    }

}
The constructor calls RegisterScriptableObject(), which will expose to JavaScript public methods in the class with the [ScriptableMember] attribute, such as WelcomeMessage().
The WelcomeMessage() method retrieves the user name from site-level isolated storage that may have been stored there by the Welcome application. If you had used application-level isolated storage in the other application, those settings would not be visible here, since this application uses a different URL, even though it’s in the same domain.
If the user name is present, it returns some HTML with a welcome message and a link back to the welcome page that says Logout. If it’s not there, the returned HTML is a link back to the welcome page that says Login.
In the auto-generated HTML, add the following before the <div> that contains the <object> tag:
<div id="message"></div>

<h2>This is my content</h2>
The <div> is where you will put the welcome message and the link back to the welcome page.
Next, add a parameter for the app that specifies the name of a JavaScript function to call when the application has finished loading:
<param name="onLoad" value="setMessage" />
Finally, at the end of the file, just before </body>, add the onLoad handler:
<script type="text/javascript">

    function setMessage(sender) {

        var msg = document.getElementById("message");

        if (msg != null) {

            try {

                msg.innerHTML = sender.getHost().content.Page.WelcomeMessage();

            } catch (e) {

                msg.innerHTML = "Error";

            }

        }

    }

</script>
The script looks for a DOM element with the “message” ID, and sets its innerHTML property to the value of the WelcomeMessage() method from the Silverlight application.
The result is that after you login on the welcome page, the welcome app writes your user name to isolated storage. You can then click on the link to see the content page, which will show a welcome message with your stored user name, along with a link back to the welcome page.
Deploying and Updating Silverlight Applications
Silverlight applications are compiled into a .xap file, which is a renamed .zip file that contains the application DLLs and resources and a manifest file. From the server’s perspective, a .xap is just a static file, so any web server or CDN can host it, not just IIS. You just need to configure the web server to return the correct MIME type, which is application/x-silverlight-app.
Since Silverlight applications are associated with client-side isolated storage based on their URL, .xap files that use application-level isolated storage should be marked with a relatively near-term cache expiration time, such as a day or a week, to make them easier to update. With a far-future expiration time, in order to maintain high-performance server-side caching (no query strings), the URL would have to be changed when a new version is released, which would mean that the new version wouldn’t have access to the old version’s application-specific isolated storage.
Proxy Cache
Proxy caches, also known as web proxies or web caches, are a combined client and server that act as an intermediate between users and web servers. When a client browser issues an HTTP request through a proxy, the response can come directly from content cached in the proxy, or the proxy can obtain a response from the target server first and then forward it to the client, possibly caching it in the process.
Proxies can be located at the same premises as a user’s computer, such as in a corporate environment, or at an ISP. In the former case, the proxies are usually visible, while in the latter they are usually invisible. A visible proxy is one that the browser knows about and to which it explicitly sends HTTP requests. An invisible proxy is one that the browser doesn’t know about and that transparently intercepts all TCP connections to port 80 (HTTP), regardless of the destination IP address.
From a performance perspective, proxies can be helpful because they can cache content close to users. When content is present in the proxy, it generally results in higher-bandwidth delivery and less latency than delivering it from the source web server. If the content is not in the proxy, then latency increases, since the proxy will have to forward the HTTP request to the web server.
Other factors that often motivate the installation of a proxy include reducing bandwidth consumption and the ability to apply various types of filtering and logging.
You should engineer your web site so that proxies can cache your content as much as possible. The caching helps your site in ways that are similar to how it helps your users: improved performance (by offloading your site) and a reduction in bandwidth use.
Proxies determine which content to cache primarily by evaluating the HTTP response headers. The HTTP 1.1 standard provides some guidelines about caching, but most proxies also implement a number of heuristics in their decision process. You can help to remove ambiguity by setting HTTP headers that clearly indicate your intentions.
Proxies will not cache responses to SSL requests, or requests that use an HTTP PUT, DELETE, or TRACE. Proxies will not cache temporary redirect responses (such as 302 Found) or responses to POST requests unless the response HTTP headers explicitly indicate that they should be.
Although there are still a small number of proxies that support only HTTP 1.0, in my experience they tend to be private proxies, rather than public ones. The other main source of HTTP 1.0 requests is likely to be from uncommon spiders or other low-volume corner cases. If I were building a large web site today, unless there was a specific requirement to support it, I would probably just block all HTTP 1.0 requests, due to site-performance issues (such as lack of keepalive), potential security issues, and differences in caching semantics. Blocking it would also eliminate the extra testing it would otherwise take to ensure things were working correctly (low reward for the effort involved). For example:
if (context.Request.ServerVariables["SERVER_PROTOCOL"] == "HTTP/1.0")

{

    throw new HttpException(505, "HTTP/1.0 not supported; use HTTP/1.1");

}
Using the Cache-Control HTTP Header
The main HTTP header that controls caching in proxies is Cache-Control. When set to private, a shared proxy must not cache the response. When set to public, a shared proxy can cache the response, although it’s not required to.
The ASP.NET runtime marks all dynamic content with Cache-Control: private by default so that proxies won’t cache it. You should override that setting for dynamic content that is the same for all users by marking it with Cache-Control: public. The following example configures the Cache-Control header to tell both proxies and browsers that they can cache the page for 60 seconds, while not caching on the server (see proxy1.aspx):
A Location setting of Any (the default) is similar, except it doesn’t disable server caching. You can use Downstream caching for pages that users other than the original requestor aren’t likely to access in the near future (to avoid polluting the server’s cache).
That’s equivalent to the following code (see proxy2.aspx):
TimeSpan maxAge = TimeSpan.FromSeconds(60.0);

this.Response.Cache.SetMaxAge(maxAge);

this.Response.Cache.SetExpires(DateTime.UtcNow + maxAge);

this.Response.Cache.SetLastModified(DateTime.UtcNow);

this.Response.Cache.SetCacheability(HttpCacheability.Public);

this.Response.Cache.SetNoServerCaching();
![]() Note Calling
Note Calling SetCacheability(HttpCacheability.Public) enables server-side output caching in addition to client and proxy caching. SetNoServerCaching() disables caching on the server without affecting client and proxy caching.
Cassini, one of the development web servers that’s integrated with Visual Studio, always forces the Cache-Control header to be set to private. IIS Express does not exhibit that behavior.
Using Cookies and Authentication with Proxies
Be careful when setting cookies on public pages, including session cookies. Even if the content of the page is the same for all users, the cookies may not be. Along with the content itself, proxies also cache the HTTP headers of the response, which can include Set-Cookie. Although some proxies won’t cache responses that include cookies, others will, particularly if the response also includes Cache-Control: public. This means that if you mark a response with Cache-Control: public that includes a user-specific cookie, it can result in a security vulnerability since the proxy could deliver the cached cookie to a user other than the one you intended.
Because of this restriction, you should think twice about setting cookies on heavily referenced pages, such as your home page, since that could prevent those pages from being cacheable in proxies. In fact, ASP.NET will disable all output caching if you set a cookie, to avoid accidentally sending one user’s cookies to another user. This is another reason to set cookies only when you actually need them.
For example, you should avoid immediately setting a session cookie for every page. If you’re using the built-in session mechanism, ASP.NET won’t set a cookie as long as you don’t store anything in the Session object.
The runtime will also force Cache-Control: private for pages that require authentication to prevent the accidental caching of private content on public proxies.
Static Content
If you’ve assigned an expiration date to your static files as suggested in Chapter 2, the resulting headers generally allow proxies to cache them without taking any additional actions.
However, there are enough corner cases that it’s a good idea to mark your static content explicitly with Cache-Control: public. For example, without that header, some proxies won’t cache responses if the request includes cookies or if the URL includes a query string. You can configure IIS to generate the header for static content using the approach in Figure 2-6.
Proxies won’t cache content that clients can’t cache, so you can prevent caching on both proxies and clients by setting Cache-Control: no-cache, as described in the section on browser caching earlier in this chapter.
Managing Different Versions of the Same Content
You can direct proxies to store several different versions of the same content if the differences can be identified based on the HTTP request headers. For example, the Accept-Language header specifies the user’s language preferences. To inform proxies that they should cache a different version of the content for different language preferences, you set an entry in VaryByHeaders
this.Response.Cache.VaryByHeaders["Accept-Language"] = true;
That will set the Vary HTTP header to Accept-Language.
You can do the same thing declaratively (see proxy3.aspx):
<%@ OutputCache Duration="60" VaryByParam="None" VaryByHeader="Accept-Language" %>
IE9 doesn’t cache responses with a Vary header (except Vary: Accept-Encoding, Vary: Host and Vary: User-Agent), so using them can have an adverse effect on client performance. For that reason, consider using URL routing instead, if possible, to identify alternate content. Otherwise, when evaluating a request that contains Vary, IE can make a conditional request, but only if the request also contains an ETag header.
Using Vary: * by setting VaryByHeaders["*"] to true is a special case, which says that proxies must consider responses different regardless of the request headers. Using Vary: * or Vary: Cookie are useful defense-in-depth techniques with responses that shouldn’t be cached to help avoid accidentally storing user-specific content on proxies. Defense-in-depth is a strategy of protecting against attacks or vulnerabilities using multiple different techniques, in a layered way.
Vary headers are set automatically by the runtime in certain cases. For example, when compression is enabled, Vary: Accept-Encoding is set, and when SetVaryByCustom() is enabled, Vary: * is set.
Web Server Cache
Web servers can cache content in a number of different ways to help improve performance. The server can cache an entire HTTP response in the kernel, in IIS, or in the ASP.NET output cache. It can also cache parts of a response in the form of generated HTML fragments, as well as objects that the server uses to create the page, such as the results of database queries.
Windows Kernel Cache
Windows includes a kernel-mode HTTP driver called http.sys. Since HTTP is a networking protocol, the benefits of putting support for HTTP in the kernel are similar to those for putting TCP support there, including higher performance and increased flexibility.
Doing low-level protocol processing in the kernel makes it possible for multiple processes to bind to port 80, each receiving requests for a particular host—something that’s not readily done with the regular TCP sockets-based mechanism. http.sys also handles request queuing and caching without the context switch overhead that would be involved with user-mode code.
The driver can return cached responses directly to clients, entirely bypassing user mode. That avoids several kernel/user context switches, which reduces latency and improves throughput.
Kernel HTTP caching is enabled by default for static files and is disabled by default for dynamic files.
Limitations
http.sys will cache responses only under certain limited conditions. The conditions that you’re most likely to encounter that will prevent it from caching a response include the following:
- The request contains a query string.
- The requested file is accessed as a default document. For example, if
default.htmis the default document in the top-level folder, thenhttp.syswill not cache it if the incoming URL ishttp://www.12titans.net/. However,http.syscan cache the document when you access it usinghttp://www.12titans.net/default.htm. - Dynamic compression is enabled and is used for the response.
You’re less likely to encounter the other conditions:
- The request is not anonymous.
- The request requires authentication (for example, the request contains an
Authorizationheader). - The web site is configured to use a footer.
- The static file is a Universal Naming Convention (UNC) file, and the
DoDirMonitoringForUncregistry key is not enabled (UNC files are those that start with\hostnameinstead of a drive letter).
![]() Note You can use the
Note You can use the DoDirMonitoringForUnc registry property (a DWORD value) to switch the static file cache for UNC files back to a change notification cache. This is set at HKLMSystemCurrentControlSetServicesInetinfoParameters. The default value is 0, or not enabled. You can set it to 1 to enable caching of UNC static content based on change notification.
- The cache is disabled for the requested file or folder.
- The request has an entity body.
- Certificate mapping is enabled for the URL.
- Custom logging is enabled for the web site.
- The request HTTP version is not 1.1 or 1.0.
- The request contains a
Translate: fheader. - An
Expectheader that does not contain exactly "100 continue" is present. - The request contains either an
If-Rangeheader or aRangeheader. - The total response size is larger than the configured per-response maximum size. The maximum is controlled by the
UriMaxUriBytesregistry key. The default value is 256KB. - The response header size (which includes cookies) is larger than the configured per-response maximum header size. The default value is 1KB.
- The cache is full. The default size is proportional to the physical memory in the computer.
- The response is zero length.
Enabling Kernel Caching for Dynamic Content
You can enable http.sys caching of dynamic content declaratively, by using an OutputCache directive at the top of your .aspx file. Here’s an example (see kernel1.aspx):
<%@ OutputCache Duration="86400" VaryByParam="None" %>
That will also enable ASP.NET output caching. The runtime will expire the cache entry for the page after 86,400 seconds (1 day).
In this case, you are telling the system to expire the cache at a fixed time in future. In order to implement that correctly, http.sys would have to adjust the Cache-Control: max-age parameter steadily downward, to reflect the time remaining before the cache should expire. However, the driver doesn’t have that feature, so instead, the .NET runtime will disable the max-age parameter when http.sys can cache the page.
You can do the same thing entirely programmatically as follows (see kernel2.aspx):
TimeSpan age = TimeSpan.FromDays(1.0);

this.Response.Cache.SetMaxAge(age);

this.Response.Cache.SetExpires(DateTime.UtcNow + age);

this.Response.Cache.SetLastModified(DateTime.UtcNow);

this.Response.Cache.SetCacheability(HttpCacheability.Public);

this.Response.Cache.SetSlidingExpiration(true);
To work around the issue of max-age being disabled, you can enable sliding expiration mode, so the cache expires one day from when each request is made, rather than at a fixed time. However, that call also changes other aspects of caching behavior (such as how the runtime responds to page refreshes), so I suggest testing it carefully before using it.
Once http.sys caches a response, it is occupying kernel memory, which is a relatively scarce resource. To help optimize the use of that memory, if no clients request a cached item again within the next 120 seconds, http.sys will remove the cache entry. You can adjust the cache timeout period with the following registry entry (a DWORD that determines the frequency of the cache scavenger, in seconds):
HKLMSystemCurrentControlSetServicesHttpParametersUriScavengerPeriod
You can use a longer timeout if the traffic on your site tends to arrive in bursts, with significant gaps between them. As an example, on one of the sites I manage, I set the scavenger period to 43200 seconds (12 hours).
You can enable http.sys caching for all dynamic files with a particular file extension in a certain folder by using IIS Manager. You could do this instead of modifying the files to have explicit OutputCache directives, or for dynamic files other than .aspx, such as PHP.
After navigating to the folder or file in your web site that you want to cache, double-click Output Caching in the Features View. Then click Add on the right-hand panel to bring up the Add Cache Rule dialog. Enter the File name extension of the type of file that you want to cache in http.sys, check the Kernel-mode caching checkbox, and click OK. See Figure 3-7.
![]() Note With this approach,
Note With this approach, Cache-Control: public is not set, so the content would not be cacheable on shared proxies.
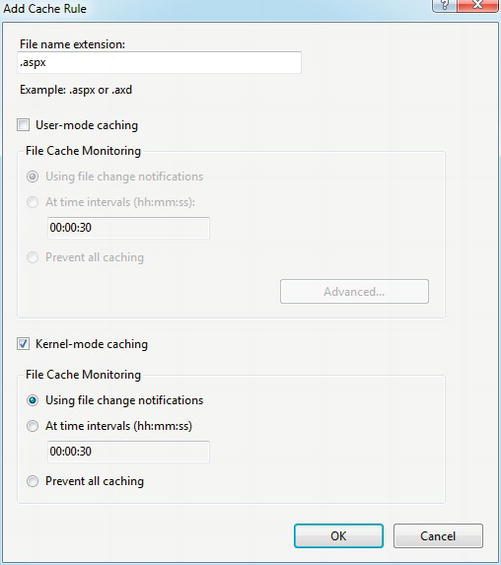
Figure 3-7. Enabling kernel-mode caching for dynamic files
Something else to be aware of when using the GUI is that it places the configuration setting in the IIS configuration file applicationHost.config, which is located in C:WindowsSystem32inetsrvconfig. That makes it a little more work to manage for xcopy-based deployments and source code management compared to settings in web.config.
You can also edit applicationHost.config directly, instead of using the GUI. Here’s an example:
<configuration>

  . . .

  <location path="Samples/ch03">

    <system.webServer>

      <caching>

        <profiles>

          <add extension=".aspx" policy="DontCache"

               kernelCachePolicy="CacheUntilChange" />

        </profiles>

      </caching>

    </system.webServer>

  </location>

</configuration>
Performance Comparison
To get a feeling for the performance difference when using http.sys compared to not using any output caching, let’s run a quick test:
- First, download and install the free IIS 6.0 Resource Kit Tools from Microsoft (the tools work with IIS 7 and 7.5 too):
http://www.microsoft.com/downloads/details.aspx?FamilyID=56FC92EE-A71A-4C73-B628-ADE629C89499&displaylang=en. - Next, add a blank web form to your web site project in
pages/default.aspx, and configure the site to be accessible from IIS, usinglocalhost. Don’t use the Cassini web server that’s integrated with Visual Studio, and don’t include theOutputCachedirective for the first test. - From the Windows Start menu, open IIS Resources WCAT Controller WCAT Controller, to bring up a command window that’s ready to use the Windows Capacity Analysis Tool. Use Notepad to create two configuration files in that folder. Call the first one
s1.cfg:SET Server = "localhost"
SET Port = 80
SET Verb = "GET"
SET KeepAlive = true
NEW TRANSACTION
classId = 1
Weight = 100
NEW REQUEST HTTP
URL = "http://localhost/pages/default.aspx" - This file tells the controller which pages you want to read and how you want to read them. In this case, you’re reading
http://localhost/pages/default.aspxusing HTTPGET, withKeepAliveenabled (later, you might try disablingKeepAliveto see how amazingly expensive it is to open a new connection for each request). - Next, create a test configuration file called
c1.cfg:Warmuptime 3s
Duration 30s
CooldownTime 0s
NumClientMachines 2
NumClientThreads 10 - This specifies the
Warmuptime,Duration, andCooldownTimefor the test (in seconds), as well as how many client machines there will be and how many threads to use for each client. - Before running the test, bring up two windows for the WCAT Client (under IIS Resources in the Start menu). From one of those windows, run the following command to see the files that are currently present in the
http.syscache:netsh http show cachestate - If you don’t have any other web activity on your machine, it should report that there are no cache entries.
 Note For the test results to be comparable, you need to make sure that CPU use during the test is close to 100 percent. On my test machine (with four CPU cores), I found that this required two clients. You should verify that it works for you as well, using Task Manager while the test is running.
 - Start the controller from its window:
wcctl -a localhost -c c1.cfg -s s1.cfg - Then start both clients, one from each of the two other windows:
wcclient localhost - After you start the second client, the test will begin. As soon as it completes, run the
netshcommand again. It should still show that thehttp.syscache is empty. - Check the results from the controller to make sure there were no errors. For this test, you’re most interested in how many requests per second you can get. Here are the results of the test on my machine, as reported at the 20-second point:
- Now edit the
.aspxfile to include the followingOutputCachedirective:<%@ OutputCache Duration="86400" VaryByParam="None" %> - That will enable
http.syscaching and ASP.NET output caching, as described earlier. - Refresh the page, so the runtime compiles it.
- Repeat the test as shown earlier. The test configuration files don’t need to be changed. This time, the result of the second
netshcommand should show that the.aspxfile is in the cache:URL: http://localhost:80/pages/default.aspx
Status code: 200
HTTP verb: GET
Cache policy type: Time to live
Cache entry Time to Live (secs): 86359
Creation time: 2009.3.29:7.44.26:0
Request queue name: Sample
Headers length: 215
Content length: 2247
Hit count: 170778
Force disconnect after serving: FALSE - The test results show a considerable improvement:
Total Requests : 99746 ( 5064/Sec)
In this case, you can process about 84 percent more requests per second with http.sys caching than without.
IIS Output Caching
The next caching layer below http.sys is in the user-mode IIS process. IIS output caching is implemented in the HttpCacheModule (along with support for http.sys caching).
The biggest practical difference between IIS output caching and http.sys is that IIS can vary the cache output based on query strings or HTTP headers. If a query string is present in a URL, http.sys won’t cache it.
You can demonstrate this by changing the s1.cfg file shown earlier to include a query string, while leaving the OutputCache directive in place. After running the test, netsh will show that the page is not in the http.sys cache.
You won’t need to explicitly enable or configure IIS caching for .aspx pages; the runtime manages the settings for you when you enable ASP.NET output caching.
However, if you are using HttpHandlers or non-ASP.NET dynamic content, such as PHP, then you may need to enable IIS output caching explicitly. You can do that using the dialog box in Figure 3-7 and selecting the User Mode Caching box. After that, click the Advanced button to bring up the dialog box in Figure 3-8.
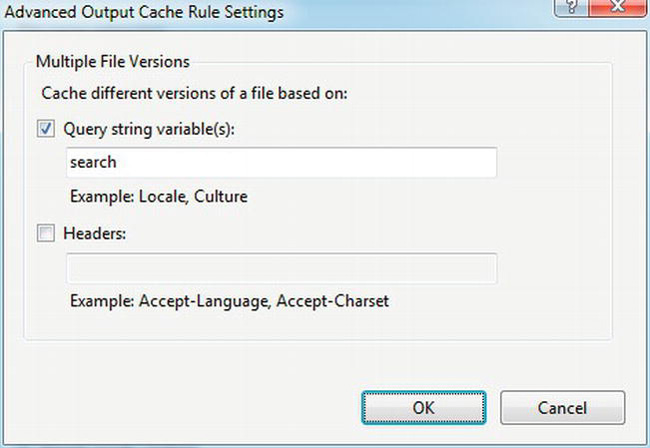
Figure 3-8. Advanced Output Cache Rule Settings dialog box for IIS 7 output caching
From there you can set the query string variables or HTTP headers that IIS should use to vary the cache output.
ASP.NET Output Caching
ASP.NET has an output cache that is separate from the one in IIS; it’s implemented by a standard HttpModule called OutputCacheModule.
You can enable it with the same OutputCache directive that you used earlier to enable http.sys caching:
<%@ OutputCache Duration="86400" VaryByParam="None" %>
Unlike http.sys and IIS, the ASP.NET cache can vary its output based on parameters that are more complex than HTTP headers or query string values, such as a user’s role or the content of a table in the database. In addition to entire pages, it can cache page fragments, and it also supports programmatic invalidation.
As with http.sys and IIS caching, in general you should apply ASP.NET output caching only to pages and controls that have the same output for many users. Be cautious about caching output that is unique per user, since the likelihood of it being requested again from the same server may not be as good as for shared content—a situation that’s compounded as the number of users and pages on your site increases. You also risk polluting your cache by causing the runtime to evict pages that are frequently referenced, as the available space fills. The more load-balanced web servers or IIS worker processes you have, the more unlikely it is that user-specific content generated on any one server will be reused.
Caching per-user content may be appropriate on a single-server site where only a relatively small number of users are active at any one time, and where the odds are good that a user will revisit the same page again in the near future.
Avoid caching output that is infrequently accessed, even if it’s shared. You don’t want to fill your cache with content that won’t be reused. Good candidates for output caching include content that is either the same for all users or that varies only based on which browser the user has, their selected language or role, certain query string values, a specific table in the database, and so on.
If pages have small user-specific variations, such as putting the user’s name on the page, then you should store the relevant information in cookies or in Silverlight isolated storage and use script or Silverlight to place the content on the page, as described in Chapter 2 and in the Silverlight example earlier in this chapter. That way, all users can receive the same HTML, so you can place it in the output cache. However, be sure not to set cookies from the cached page. ASP.NET will disable output caching in that case to avoid accidentally sending user-specific cookies to all users. Instead, you should set cookies from a page that the server doesn’t cache, or perhaps from a purpose-built page, image, or HttpHandler that your pages load when needed.
You can use a similar approach for pages that vary from one request to the next only by information that’s otherwise available directly from JavaScript or Silverlight. For example, you can display the current time on each page with script, rather than adding it on the server.
Caching Page Fragments with User Controls
For data-driven pages and other content that is best created on the server, you should build fixed content separately from dynamic content. You can do that in two ways: user controls (fragments) and substitution controls.
For example, here’s a user control that displays just a string and the date (see ControlsDate.ascx):
<%@ Control Language="C#" AutoEventWireup="true"

    CodeFile="Date.ascx.cs" Inherits="Controls_Date" %>

<%@ OutputCache Duration="5" VaryByParam="None" Shared="true" %>

Control time: <%= DateTime.Now.ToString() %>
It has an OutputCache directive that will cause the text the control generates to be cached for five seconds.
To use the control, first place a Register directive near the top of your .aspx page (see date1.aspx):
<%@ Register Src="~/Controls/Date.ascx" TagPrefix="ct" TagName="Date" %>
Later in the page, call the control and display the date again:
<ct:Date runat="server" />

<br/>Page time: <%= DateTime.Now.ToString() %>
When you run the page, what you’ll see is that the two times start out the same. If you refresh the page quickly a few times, the Control time will stay the same for five seconds and then change, whereas the Page time is updated after every refresh. That’s because after the Date control runs, the runtime reuses its output for all requests that arrive over the following five seconds. After that, the runtime drops the cache entry and executes the control again the next time a request calls it.
You should use a fixed cache Duration for content that you need to update periodically but that you can’t easily associate with an update event such as a SQL Server change notification. For example, let’s say you have a page that shows several images, along with counts of how often users access the images. However, users don’t need to see the absolute latest counts. Instead of retrieving all of the counts from the database each time users access the page, you could have a user control that retrieves them and then enable output caching on the control with a Duration of 300 seconds. The page would use the cached output of the control until it expires.
User controls are not instantiated as objects when the runtime retrieves them from the output cache, so before you place them in the output cache, you should make sure they don’t need to participate programmatically with the rest of the page for each request.
You will revisit user controls in more detail in Chapter 6.
Substitution Caching
You can think of substitution caching as the inverse of user control caching. Instead of dynamically generating the outer page and retrieving inner parts of it from the cache, you cache the outer page and dynamically generate inner parts of it.
Let’s use substitution caching to create output similar to the preceding example. You will cache the .aspx page and generate a new time value for each page view using the substitution control. Here’s the .aspx page (see date2.aspx):
Cached time: <%= DateTime.Now.ToString() %>

<br />Page time:

<asp:Substitution ID="sub" runat="server" MethodName="SubTime" />
Next, add the method specified in the MethodName property of the substitution control to the code-behind. The runtime will call it to generate a string that it will insert in place of the substitution control:
    public static string SubTime(HttpContext context)

    {

        return DateTime.Now.ToString();

    }
If you view the page at this point, the two date strings will always be the same.
Next, enable output caching on the page:
<%@ OutputCache Duration="5" VaryByParam="None" %>
Now when you view the page, the Page time will be different each time, since it’s generated for every page view, but the Cached time will be updated only every five seconds.
![]() Note Although the static method that generates the content for insertion into the substitution control can access the
Note Although the static method that generates the content for insertion into the substitution control can access the HttpContext object for the request, it cannot return an ASP.NET control. The returned string is inserted directly into the final output; it is not compiled and parsed into objects as with a user control.
Disabling Output Caching
Output caching is not appropriate for pages or fragments that require per-access logging or other back-end tracking, authorization, or accounting, since the code that’s embedded in the page or that’s located in code-behind will not be executed when the content is delivered from the cache.
You can programmatically disable output caching for a particular request as follows:
this.Response.Cache.SetNoServerCaching();
If you were to call that method from Page_Load() in the code-behind for the previous example with substitution caching, the two date strings on the page would always be the same, since the page would not be cached. However, this call only disables caching at the page level, not for controls used by the page.
Removing Items from the Output Cache
Once you have placed a page in the ASP.NET output cache, you can remove it later. You might want to do this if something is changed that was used to generate the page. Here’s an example:
HttpResponse.RemoveOutputCacheItem("/pages/default.aspx");
![]() Caution Using
Caution Using RemoveOutputCacheItem() by itself on one machine in a server farm will not remove the page from the cache on other machines or worker processes in the farm.
You can remove several related pages from the output cache at the same time by associating them with an object in the ASP.NET object cache.
For example, first let’s add an object to the cache. You might do this from Global.asax or from an HttpModule (see App_CodeGlobal.cs):
HttpRuntime.Cache.Insert("key", "value", null,

        DateTime.MaxValue, Cache.NoSlidingExpiration,

        CacheItemPriority.NotRemovable, null);
You mark the object as NotRemovable so that it won’t be aged out of the cache or removed if memory pressure starts to increase.
Next, associate entries in the output cache for the related pages with the same cache key. See cache-item-depend1.aspx:
this.Response.AddCacheItemDependency("key");
If you modify the value in the cache that’s associated with the specified key, then all the pages with output caching enabled that have called AddCacheDependency with that key will have their cache entries expired. See cache-item-depend2.aspx:
HttpRuntime.Cache.Insert("key", "a new value", null,

        DateTime.MaxValue, Cache.NoSlidingExpiration,

        CacheItemPriority.NotRemovable, null);
As with RemoveOutputCacheItem earlier in the chapter, this works only on a single server.
If the cache key doesn’t exist at the time you call AddCacheDependency, then the page won’t be cached at all.
You can’t call AddCacheItemDependency from a user control. Instead, you can create a CacheDependency object and assign it to the control’s Dependency property. For example, see ControlsDate3.ascx.cs:
CacheDependency depend = new CacheDependency(this.MapPath("~/depend.txt"));

this.CachePolicy.Dependency = depend;
You configure the output cache entry holding the control to expire if the file depend.txt changes (see date3.aspx).
Database Dependencies
Pages or fragments that depend on the database can be associated with the corresponding tables or queries so that their cache entries automatically expire when those objects change. This also has the advantage of keeping the associated cache entries on all machines in a server farm in sync.
One way to do this is by setting the SqlDependency propertyin the OutputCache directive. Here’s an example:
<%@ OutputCache VaryByParam="None" SqlDependency="CommandNotification" %>
What this does is to set a hidden flag that tells SqlCommand to include a SqlDependency request with all queries, which in turn tells SQL Server to send a notification when the results of those queries might have changed. SQL Server implements change notifications using Service Broker, which you will need to enable in order for this to work, as I describe in Chapter 8.
The net effect of enabling CommandNotification is that the runtime will place your page in the output cache unless one of the database queries it uses is not compatible with query notifications, such as using SELECT * or not specifying two-part table names. See Chapter 8 for details. Provided the underlying queries meet the requirements for SqlDependency, CommandNotification works even when you issue queries from other assemblies, from transactions or stored procedures, or using LINQ to SQL.
Once in the output cache, if the database receives an INSERT, UPDATE, or DELETE command that might modify the results of those queries, even if the command originates from other machines, then it sends a notification back to all servers that posted dependencies. When the web servers receive the notification, they remove the page that issued the original query from the output cache.
If your page issues a number of queries or if you need to bypass queries that aren’t compatible with SqlDependency, then you can instead use AddCacheDependency together with SqlCacheDependency. Here’s an example (see depend1.aspx):
protected void Page_Load(object sender, EventArgs e)

{

    string cs = ConfigurationManager.ConnectionStrings["data"].ConnectionString;

    using (SqlConnection conn = new SqlConnection(cs))

    {

        string sql = "dbo.GetInfo";

        using (SqlCommand cmd = new SqlCommand(sql, conn))

        {

            cmd.CommandType = CommandType.StoredProcedure;

            conn.Open();

            SqlCacheDependency dep = new SqlCacheDependency(cmd);

            mygrid.DataSource = cmd.ExecuteReader();

            mygrid.DataBind();

            this.Response.AddCacheDependency(dep);

        }

    }

}
Execute the query and bind the results to a control as usual, but just before calling ExecuteReader, create a SqlCacheDependency object. Then pass a reference to that object to AddCacheDependency, which will cause the runtime to remove the page from the output cache when it receives a query change notification.
Here’s the corresponding markup:
<%@ Page Language="C#" AutoEventWireup="true"

    CodeFile="depend1.aspx.cs" Inherits="depend1" %>

<%@ OutputCache Duration="86400" VaryByParam="None" %>

<!DOCTYPE html PUBLIC "-//W3C//DTD XHTML 1.0 Transitional//EN"

  "http://www.w3.org/TR/xhtml1/DTD/xhtml1-transitional.dtd">

<html xmlns="http://www.w3.org/1999/xhtml">

<head runat="server">

    <title></title>

</head>

<body>

    <form id="form1" runat="server">

    <div>

        Last updated: <%= DateTime.Now %><br />

        <asp:GridView runat="server" ID="mygrid" />

    </div>

    </form>

</body>

</html>
The first time you request the page, the runtime will execute the database query and place the rendered page in the output cache. If you refresh the page, you will see that the Last updated time doesn’t change.
If you use Server Explorer or SSMS to modify the table that’s the target of the query, then behind the scenes the runtime will receive a notification and remove the page from the cache. The next time you refresh the page, you will see the current time and the updated data in the GridView.
If you’re using LINQ to SQL, you can’t directly attach a SqlDependency object to the underlying query. However, as long as the generated query meets the requirements for query notifications, you can achieve the same effect as follows (see depend2.aspx):
public const string SqlDependencyCookie = "MS.SqlDependencyCookie";


protected void Page_Load(object sender, EventArgs e)

{

    var context = new DataClasses();

    var depend = new SqlDependency();

    var oldCookie = CallContext.GetData(SqlDependencyCookie);

    try

    {

        CallContext.SetData(SqlDependencyCookie, depend.Id);

        depend.OnChange += depend_OnChange;

        var query = from info in context.MyInfos select info;

        var result = query.ToArray();

        mygrid.DataSource = result;

        mygrid.DataBind();

    }

    finally

    {

        CallContext.SetData(SqlDependencyCookie, oldCookie);

    }

}
static void depend_OnChange(object sender, SqlNotificationEventArgs e)

{

    HttpResponse.RemoveOutputCacheItem("/depend2.aspx");

}
After instantiating a copy of the LINQ to SQL data context class, you get the value of the SqlDependencyCookie that’s assigned to the current CallContext, and then set that value to the Id of a newly created SqlDependency object.
Then, assign an OnChange event handler, build and execute the LINQ query, assign the results as the DataSource for the control, and call DataBind(). Afterwards, set the SqlDependencyCookie back to its original value. Otherwise, future database calls could be bound to the same SqlDependency object.
When the OnChange event fires, you remove the page from the output cache.
Although this technique is admittedly somewhat cryptic and indirect, it’s the same method used by the runtime when you set SqlDependency to CommandNotification in the OutputCache directive. Although we could have used CommandNotification in this example, that approach won’t work if you only want to attach a query notification to a subset of queries that you make on a page.
The CallContext approach doesn’t work with SqlCacheDependency, so if you cache your result in the ASP.NET object cache, you will need to use an OnChange event handler to remove it from the cache when the query notification arrives.
Varying the Output Cache
For cases where the output of a page or control varies based on things like cookie values or a user’s role, you can use the VaryByCustom property of the OutputCache directive. For example, let’s say you have a page that generates different output based on the value of a cookie. First, set VaryByCustom in the OutputCache directive (see vary1.aspx):
<%@ OutputCache Duration="300" VaryByParam="None" VaryByCustom="info" %>
Then in your code-behind for global.asax, override the GetVaryByCustomString method (see App_CodeGlobal.cs):
public override string GetVaryByCustomString(HttpContext context, string arg)

{

    if (arg == "info")

    {

        HttpCookie cookie = context.Request.Cookies[arg];

        return cookie == null ? String.Empty : cookie.Value;

    }

    return base.GetVaryByCustomString(context, arg);

}
All pages in your application that use this feature share the same method. When the method is called, the arg string will have the value that you set in the VaryByCustom property on the page. The runtime will generate and store different versions of the page for each unique value that GetVaryByCustomString returns (think of the return value as the key for a hash table). In this case, you’re returning the value of a cookie, so the runtime will cache a different version of the page for each value of the cookie. For cases with greater complexity and multiple dependencies, you can return a string that’s an ordered composite of several different values.
If you specify the special value of browser to VaryByCustom, then the runtime caches different versions of the page based on the browser’s type and major version number.
For cases where the content of the page varies based on query string or form POST parameters, you can use the VaryByParam property of the OutputCache directive, with the parameter names separated by semicolons. For example, to cache different versions of a page based on both the search and pagenum query string parameters:
<%@ OutputCache Duration="300" VaryByParam="search;pagenum" %>
You can also use the special value "*" to vary the cache based on all query string and form POST parameters.
Cache Validation
If it would be better for your application to determine programmatically whether a cache entry is still valid, you can use a cache validation callback. The runtime will invoke the callback to determine whether it should return an entry that’s already in the cache or whether it should flush the cache entry and re-create the page.
Let’s say you have a requirement to be able to bypass output caching for a particular page (see valid1.aspx):
public static void ValidateCache(HttpContext context, Object data,

                                 ref HttpValidationStatus status)

{

    string fresh = context.Request.QueryString["fresh"];

    if (fresh != null)

        status = HttpValidationStatus.Invalid;

    else

        status = HttpValidationStatus.Valid;

}
The callback checks to see whether a query string called fresh is present and has a value assigned to it. If so, then setting status to HttpValidationStatus.Invalid tells the runtime to invalidate the current cache entry and to re-create the page. If the query string value isn’t there, then setting status to HttpValidationStatus.Valid tells the runtime to return the already cached page.
![]() Caution ASP.NET makes a third option available,
Caution ASP.NET makes a third option available, HttpValidationStatus.IgnoreThisRequest, but at least with the versions of the .NET Framework I’ve tested, it seems to do the same thing as Invalid, so I suggest avoiding it.
You should keep the execution time of the validation method short, since the runtime will call it for every page view.
Next, associate the callback with the page by calling AddValidationCallback:
HttpCacheValidateHandler val = new HttpCacheValidateHandler(ValidateCache);

this.Response.Cache.AddValidationCallback(val, null);
If you request the page as just valid1.aspx, you will see the cached result after each page refresh. If you add the query string as valid1.aspx?fresh=y, then the result is not cached. After that, if you load the first URL again, you will see the old content from the client-side cache at first, but if you hit refresh, you will see new content that is once again cached on the server.
When you have pages that use any of the server-side validation or dynamic expiration methods, you may want to avoid caching them in proxies or clients. When the runtime invalidates a page in the output cache on the server, it does not change any copies that proxies or clients may have cached. To enable server-side output caching while disabling proxy and client caching, you should set the Location property of the OutputCache directive to Server. Here’s an example (see server1.aspx):
<%@ OutputCache Duration="300" VaryByParam="None" Location="Server" %>
That’s equivalent to the following code (see server2.aspx):
TimeSpan expires = TimeSpan.FromSeconds(300.0);

this.Response.Cache.SetMaxAge(expires);

this.Response.Cache.SetCacheability(HttpCacheability.Server);

this.Response.Cache.SetValidUntilExpires(true);
The call to SetMaxAge in this case sets the duration of the output caching, but does not actually set the Cache-Control: max-age header as the routine’s name implies.
The call to SetValidUntilExpires() prevents Cache-Control cache invalidation headers sent by the client (such as when you refresh a page) from causing the server’s cache to expire.
Custom OutputCache Providers
There may be times when you would like to have more control or monitoring over how and when objects are added to or removed from the ASP.NET output cache. You can do that by implementing an instance of the OutputCacheProvider.
Here’s a sample implementation based on the ASP.NET object cache (see App_CodeMemoryCacheProvider.cs):
using System;

using System.Web;

using System.Web.Caching;


namespace Samples

{

    public class MemoryCacheProvider : OutputCacheProvider

    {

        public override object Add(string key, object entry, DateTime utcExpiry)

        {

            object result = HttpRuntime.Cache[key];

            if (result == null)

            {

                this.Set(key, entry, utcExpiry);

                result = entry;

            }

            return result;

        }


        public override object Get(string key)

        {

            return HttpRuntime.Cache[key];

        }

        public override void Remove(string key)
        {

            HttpRuntime.Cache.Remove(key);

        }


        public override void Set(string key, object entry, DateTime utcExpiry)

        {

            HttpRuntime.Cache.Insert(key, entry, null, utcExpiry,

                Cache.NoSlidingExpiration, CacheItemPriority.High, null);

        }

    }

}
The abstract class OutputCacheProvider requires the implementation of four methods: Add, Get, Remove and Set.
To configure ASP.NET to use the provider, make the following entry in web.config:
<system.web>

  . . .

  <caching>

    <outputCache>

      <providers>

        <add name="MemoryCacheProvider" type="Samples.MemoryCacheProvider" />

      </providers>

    </outputCache>

  </caching>

</system.web>
You can set defaultProvider to MemoryCacheProvider in the <outputCache> element to have all pages and controls use the new provider by default. You can also use the new provider for certain controls only by specifying the ProviderName property in their OutputCache directive (see ControlsProviderDate.ascx):
<%@ OutputCache Duration="5" VaryByParam="None" Shared="true"

    ProviderName="MemoryCacheProvider" %>
Since that approach doesn’t work for pages, you can programmatically choose which output cache provider a given page should use by overriding the GetOutputCachingProvider method in global.asax and returning the cache provider’s name when the runtime should use it for the current request (see App_CodeGlobal.cs):
public override string GetOutputCacheProviderName(HttpContext context)

{

    if (context.Request.Url.AbsolutePath.EndsWith("provider2.aspx"))

    {

        return "MemoryCacheProvider";

    }

    return base.GetOutputCacheProviderName(context);

}
On a large site with limited RAM at the web tier, you could use a custom cache provider to store objects elsewhere, such as on the local disk, in a database, in the cloud, or in a distributed caching tier such as AppFabric. You could also apply a caching policy of some kind, such as only caching the top N most popular pages.
![]() Caution If you choose a non-memory-backed implementation for an
Caution If you choose a non-memory-backed implementation for an OutputCacheProvider, make sure it’s much less expensive to save and retrieve the object from the cache than it is to simply recreate it.
A custom provider allows you to monitor and influence memory use more directly, and is a good place to have some performance counters to monitor cache effectiveness (see Chapter 10 for more information about performance counters). It can also be a useful tool for debugging output cache behavior.
ASP.NET Object Caching
ASP.NET can cache objects that are frequently referenced or expensive to create. Several different options are available, depending on the object’s scope and expected lifetime.
Caching Objects with Global Scope and Indefinite Lifetime
You can use static variables to cache objects that should always be in memory and that different web pages can use at the same time. For best performance, use initializers instead of static constructors. Better yet, only set the variables when they are first referenced (lazy initialization).
You can use the HttpContext.Application object for similar purposes, although it’s a bit slower, since it uses a hash table. As with all global variables that you can read and write from multiple threads, you should use some form of locking to ensure consistent state in case you’re reading the object in one thread while writing it in another. In this case, the Application object includes its own Lock() and UnLock() methods. Here’s an example (see app1.aspx):
HttpApplicationState app = this.Context.Application;

string myValue = null;

app.Lock();

try

{

    myValue = (string)app["key"];

    if (myValue == null)

    {

        myValue = "value";

        app["key"] = myValue;

    }

}

finally

{

    app.UnLock();

}
Caching Objects Used Only by the Current Request
You can use HttpContext.Items to cache objects that are needed only during the current request. The runtime drops the collection when the current request is complete.
This is the mechanism I prefer for passing data between an HttpModule and page-specific code. It can also be useful for sharing data with or between user controls, when access to properties would be difficult.
Since the Items collection is local to the current request, multiple threads don’t usually access it at the same time, so it doesn’t require locking. Here’san example:
this.Context.Items["key"] = "value";
Caching Objects Used by More Than One Page Request
You can use HttpContext.Cache to cache objects that are needed by more than one page request.
Examples include results of database queries, results of web service calls, the contents of frequently used local files, preparsed data structures, and so on.
As with the Application object, multiple threads can access the Cache object at the same time, so you should use a lock to ensure a consistent state between related operations. Even though the Cache object is “thread safe,” this applies only to single operations, not to sequences. I don’t recommend using the Cache object for the lock, since other code not under your control might use the same object, resulting in deadlocks or performance issues; you should create a separate Object for that purpose. Here’s an example access pattern:
public static readonly Object lockObject = new Object();

private const string myKey = "key";


. . .

string result = null;

lock (lockObject)

{

    string result = this.Cache[myKey] as string;

    if (result == null)

    {

        result = GetMyResult();

        this.Cache[myKey] = result;

    }

}

//

// use result

//
Using the indexer to add an item to the cache, as in the example, is equivalent to calling Cache.Insert(myKey, result).
Without locking, it would be possible for the conditional to succeed in one thread, and then a context switch right after that could allow the conditional to succeed in another thread too. One thread would set the Cache entry, and then the other thread would set it again.
The runtime can remove objects from this cache at any time, depending on memory pressure and other factors. There is no guarantee that your data will still be there when you next look for it, even during the same web request.
![]() Note When you reference a cached object more than once from the same request, you should store the object in a temporary variable so you have a consistent reference, as in the example.
Note When you reference a cached object more than once from the same request, you should store the object in a temporary variable so you have a consistent reference, as in the example.
When you add an object to the cache, you can specify how long the runtime should keep it there. However, the specification is only a hint; the runtime can still drop the object at any time. Here’s an example (see cache1.aspx):
string result = DateTime.Now.ToString();

this.Cache.Add(myKey, result, null, DateTime.UtcNow.AddSeconds(5),

               Cache.NoSlidingExpiration, CacheItemPriority.High, null);
You are asking the runtime to retain the object in the cache for up to 5 seconds. To avoid bugs that can arise on the boundary of time changes due to Daylight Savings, set absolute expiration times based on DateTime.UtcNow instead of DateTime.Now. With the latter, right before the time changes, a few seconds or minutes from DateTime.Now may appear to be in the past or more than an hour away.
You can also specify a sliding expiration time, as a TimeSpan, which advises the runtime to retain the object until the specified interval from when you last accessed it.
![]() Tip It’s a good idea to double-check how long the runtime is retaining your objects in the cache compared to the hints that you specify using the debugger or custom performance counters. By default, the
Tip It’s a good idea to double-check how long the runtime is retaining your objects in the cache compared to the hints that you specify using the debugger or custom performance counters. By default, the Cache class has an aggressive policy of dropping objects; you might find that the runtime is dropping your objects much sooner than you expect.
To encourage the runtime to retain objects longer, you can increase the CacheItemPriority from the Framework’s default setting of Normal. I generally use a setting of High for my default, as in the example.
File-Based Dependencies
You can associate a CacheDependency with a cache entry that’s associated with a file so that when the file changes, the cache entry is removed (see App_CodeXmlDepend.cs):
using System;

using System.Web;

using System.Web.Caching;

using System.Xml;


public class XmlDepend

{

    public static readonly Object lockObject = new Object();


    public static XmlDocument MyDocument(string path)

    {

        string key = "mydoc:" + path;
        Cache cache = HttpContext.Current.Cache;

        lock (lockObject)

        {

            XmlDocument doc = cache[key] as XmlDocument;

            if (doc == null)

            {

                doc = new XmlDocument();

                doc.Load(path);

                CacheDependency cd = new CacheDependency(path);

                cache.Insert(key, doc, cd);

            }

            return doc;

        }

    }

}
Pass the method a path to an XML file, which it uses to construct a unique key for the Cache. Since all pages on the site share the same Cache, this helps avoid possible collisions. Next, establish a lock using a shared lock object. If the XmlDocument is still in the Cache, return it. Otherwise, load it from disk. Create a CacheDependency object, and pass it along with the key and the XmlDocument to Cache.Insert().
The CacheDependency object registers with the operating system to listen for changes to the specified file. If the file changes, it receives a notification and removes the XmlDocument from the Cache.
Database Dependencies
You can use a similar mechanism with database queries (see App_CodeDataDepend.cs):
using System;

using System.Configuration;

using System.Data;

using System.Data.SqlClient;

using System.Web;

using System.Web.Caching;


public static class DataDepend

{

    public static readonly Object lockObject = new Object();

    public const string DataKey = "key";


    public static DataSet MyData()

    {

        DataSet ds;

        Cache cache = HttpContext.Current.Cache;

        lock (lockObject)

        {

            ds = (DataSet)cache[DataKey];

            if (ds == null)

            {

                string cs = ConfigurationManager.ConnectionStrings["data"]

                                                .ConnectionString;

                using (SqlConnection conn = new SqlConnection(cs))
                {

                    string sql = "dbo.GetInfo";

                    using (SqlCommand cmd = new SqlCommand(sql, conn))

                    {

                        cmd.CommandType = CommandType.StoredProcedure;

                        using (SqlDataAdapter adapter = new SqlDataAdapter(cmd))

                        {

                            conn.Open();

                            SqlCacheDependency dep = new SqlCacheDependency(cmd);

                            adapter.Fill(ds);

                            cache.Insert(DataKey, ds, dep);

                        }

                    }

                }

            }

        }

        return ds;

    }

}
This code is similar to the earlier example, where you used SqlCacheDependency to invalidate the output cache when the data changes. In this example, you are using the object cache instead.
Before you issue the query, associate a SqlCacheDependency object with the SqlCommand. A SqlDataAdapter then sends the query to SQL Server and reads the results into a DataSet. Insert the DataSet into the Cache and associate it with the SqlCacheDependency object.
Later, when SQL Server processes a command that might change the results of the query that generated the DataSet, it sends a notification event to the SqlCacheDependency object. The command that triggers the notification can originate from any host that’s connected to the database; it’s not limited to the one that originated the query. When the server receives the notification, it invalidates the cache entry; the next time your application needs the data, it will reissue the query and re-create the DataSet.
Using WeakReferences for Caching
You can allow the .NET garbage collector (GC) to manage a cache for you. When you have objects that don’t require an explicit expiration policy or when you’d like the policy to be “whatever fits in memory,” you can store them in a static WeakReference or Dictionary<Tkey, WeakReference>. Here’s an example (see App_CodeWeak.cs):
using System;

using System.Data;


public static class Weak

{

    public static WeakReference MyItem { get; set; }

    public static readonly Object lockObject = new Object();


    public static DataSet WeakData()

    {

        DataSet ds = null;

        lock (lockObject)

        {
            if (MyItem != null)

                ds = MyItem.Target as DataSet;

            if (ds == null)

            {

                ds = new DataSet();

                MyItem = new WeakReference(ds);

            }

        }

        return ds;

    }

}
If MyItem is not null, and if the GC hasn’t reclaimed the object held by the WeakReference yet, then cast it to the right type and return it. Otherwise, create the object and associate it with a WeakReference.
If the GC decides that it needs more memory, it will reclaim the DataSet. If there is no memory pressure, then the DataSet will still be available the next time it’s needed.
You might consider using WeakReferences for “speculative” caching, where there’s a chance that an object might be reused but you’re not sure.
A potential advantage compared to using the Cache class is that the GC and memory pressure alone drive WeakReferences. It should also be more efficient, since the GC replaces the Cache object’s policy management logic.
Caching in SQL Server
In addition to caching the results of database queries in the ASP.NET part of your application, as described earlier, SQL Server itself can also act as a cache. This type of caching is largely transparent and automatic. Even so, there are a few things you can do to encourage and take advantage of it.
While processing your queries, SQL Server may need to read data pages into RAM from disk. It will keep those pages in RAM for as long as it can, depending on the memory requirements of other requests. It’s similar to the ASP.NET Cache object in that way. If the server doesn’t need the RAM for something else after the query is first issued, SQL Server can very quickly return results using the pages in memory, rather than fetching them again from disk first. The net effect is that with enough RAM, it can act as a large cache once it has processed a query the first time.
To take advantage of this, first make sure that your database server has plenty of memory. See Chapter 8 for more details on how SQL Server manages memory and how you can determine whether you need more.
Next, you can prefetch data pages so that they will be available for future queries. Let’s say that after you’ve completed processing a page, you can anticipate the user’s next action, along with an associated query. In that case, you can queue a request to a background thread on the web server to issue that query (or a related one) to cause SQL Server to read the pages you will need into its memory. That way, when the user takes the action you anticipated, the data they require will already be in memory, and the query will complete more quickly. Even if the anticipated query is an UPDATE, INSERT, or DELETE, the query you use for precaching should always be a SELECT that references the same rows and indexes. The goal is not necessarily to perform the actual action, just to get the needed data into memory. Of course, if it’s appropriate, you can also cache the results on the web server.
This approach works best for data that your application doesn’t access too frequently. For example, if most of the pages on your site query a particular table, there’s no reason to precache that table from the few web pages that don’t use it; since so many other pages use the data frequently, it will be there anyway.
An example where it would be useful is an image gallery. After issuing a query to retrieve the data for the current page of images, you might know that there’s a good chance the user will want to see the next page too. After completing the current page, you can queue a query for the next page’s data in a background thread. Even if a different web server in your load-balanced server farm processes the next page, the data will still be in memory on the database server, where SQL Server can return it quickly.
I will cover data precaching in more detail in Chapter 8.
Distributed Caching
To help offload database servers and ease scale out, it’s possible to store some content in a dedicated in-memory-only caching tier instead of in a database. Since the content is not persisted to disk, short-lived content is generally most appropriate, such as session state. To achieve scale-out, you distribute the caching tier among a number of servers and include support for high-availability, failover, and so on.
The premise of distributed caching systems is that they are faster, easier to scale, and less expensive than database-oriented solutions. They can be the right solution for some environments. However, you should also watch for a number of pitfalls.
One argument in support of distributed caches is that they are faster because they don’t have to persist the data. However, in order to support the failure of individual nodes, the data set does have to be stored in at least two servers. Therefore, a properly designed distributed caching architecture will have to wait for an acknowledgment that the data has been sent to at least two nodes. You are effectively trading off disk bandwidth on a database server for network bandwidth and latency. Different distributed cache architectures approach this problem in different ways (multicast, unicast, and so on), but the net effect is the same.
Write throughput on SQL Server is largely determined by the speed of writing sequentially to the database log. Just adding a few additional drives can significantly increase write throughput. Adding battery-backed write cache on a disk controller or a SAN can also help. I will cover this in more detail in Chapters 8 and 10.
Read overhead in a distributed cache can require more than one round-trip, depending on the details of the cache and application architecture. Regardless of the technique that the system uses to query and read the distributed cache, if the data set you need isn’t there, and you have to go to the database for it, that will increase latency.
Some systems rely on a directory to determine where a given object resides, part of which you can cache on the web servers. However, the more changes your application makes to the main cache, the less effective the cached directory tends to be. As the size of the directory increases and as you spread the cached entries out among a large number of servers, the hit rate will naturally decline.
On the scalability front, the argument in favor of distributed caches is that they are easy to scale in theory by just adding more cheap servers, whereas scaling up a database server is perceived as expensive, and scaling out is perceived as technically difficult.
However, the usual initial approach to scaling up your database should involve just adding more RAM to improve caching and adding more drives to make the log or data volumes faster, which is almost certainly no more expensive than adding distributed cache servers. Scaling out does require some code, but it doesn’t have to be difficult or complex.
From a cost perspective, you should consider whether your application might be able to use the free SQL Server Express. It uses the same relational database engine as the full SQL Server Standard but is limited in terms of how much RAM it can use and how large the database can be (a few features are also limited by edition).
I’ll cover partitioning and scaling techniques and ways to leverage SQL Server Express in Chapters 5 and 8.
The advantage of using SQL Server instead of a distributed cache is that it simplifies your architecture by eliminating an entire tier. Deployment, testing, software maintenance, debugging, and operations efforts are all reduced. Having fewer tiers also tends to increase your ability to be agile. Responding quickly to new business opportunities gets easier, which is in keeping with the ultra-fast approach, as described in Chapter 1.
I’m not saying that there is never a role for distributing caching; in some applications, it can be a great tool. However, when I can, I prefer to rely on time-tested logic to handle critical functions such as locking, memory management, updates, transactions, queries, and so on. Those algorithms can be complex and difficult to implement correctly and efficiently, and small mistakes might not be noticed or found right away. For me, having one less component in the architecture that might introduce bugs and latency is usually a good thing.
Cache Expiration Times
One way to manage the expiration of cached content is to use relatively short expiration times. With that approach, the client checks back frequently with the server to see whether newer content is available. The extra round-trips that causes, though, are undesirable.
Another way is to arrange for a cache flush mechanism of some kind so that content is ejected from the cache when the underlying data changes. Most tiers don’t support this type of mechanism; it’s not possible to tell a client or a proxy proactively to flush their caches, for example. ASP.NET does have a comprehensive cache flush system, including integration with SQL Server, using SqlDependency, as discussed earlier.
Another approach is to set far-future expiration times. Then, when the content is changed, its name is also changed, instead of waiting for the remote caches to expire.
In most web sites, you will use all three methods: relatively short expiration times for content where the name shouldn’t be changed, such as dynamic content, Silverlight applications that use isolated storage, and favicon.ico; active invalidation for certain SQL Server queries; and far-future expiration dates for most static content.
Dynamic Content
For most sites, I like to set a relatively short default expiration time of between 1 and 30 days for dynamic content, depending on the nature of the application. Shorter or longer times are then set on an exception basis, including the possibility of disabling caching.
When you’re thinking about disabling caching because a page changes frequently, consider using a very short expiration time instead, particularly for heavily referenced content. For example, let’s say you have a page that takes 50ms to execute and that your users view once per second per server. If you assign the page a 5-second lifetime in the output cache, where a cache hit takes 1ms or less to process, then for each 5-second interval this would result in a 78 percent reduction in the CPU time needed to render that page.
Static Content
For long-lived content such as static files, expiration times aren’t as useful since the content will not change in sync with the expiration times. In these cases, you should use a far-future expiration date and manage changes in the contents of the files by changing their names, perhaps by including a date string in the name of the files or their folders. You should then update references to the changed file in your project (ideally, using an automated process).
In addition, consider including old static data with new releases. That may allow things like old pages that are cached by search engines, or old e-mails that reference external images, to still work correctly after updates are applied.
![]() Tip You can isolate references to regularly updated static content in a user control, a master page, a CSS file, or an ASP.NET
Tip You can isolate references to regularly updated static content in a user control, a master page, a CSS file, or an ASP.NET .skin file to minimize the number of places that have to be updated when the content changes. See Chapter 6. You can use Control Adapters and URL routing to help manage path and name changes. See Chapters 6 and 7.
As your content’s frequency-of-change increases, it starts to make sense to get the location of the content (or even the content itself) from a database, instead of embedding it in your source files and trying to manage it with new deployments of your site. Of course, at some point, “static” content starts to become “dynamic” content, and the dynamic content rules apply instead.
A very common problem, even on large web sites, is allowing static content to expire too quickly. I suggest using one year as a default expiration time. You can then set this to a shorter time on an exception basis, if needed. Remember, every time a client requests content that could have been cached, it presents an extra load on the server and slows down the page and the site.
Summary
In this chapter, I covered following:
- Taking content uniqueness and access frequency into account when deciding whether to cache in a particular tier
- Using IIS and ASP.NET to enable or disable browser caching
- Using
ViewStateto cache information that’s specific to a particular page - Understanding the importance of minimizing the size of
ViewState: You should disable it by default on a per-page basis and enable it only when you need it - Creating a custom template in Visual Studio and using it to help simplify the process of establishing consistent per-page defaults
- Storing
ViewStateon the server when needed - Using cookies to cache state information on the client
- Setting cookies and their properties and reading the resulting name/value pairs from ASP.NET, JavaScript, and Silverlight
- Setting the
pathproperty on cookies to limit how often the browser sends them to the server, since cookies consume bandwidth and add latency - Encoding binary data in cookies
- Using a compact privacy policy to help make sure that your user’s browser accepts your cookies
- Using web storage as an alternative to cookies for caching on the client
- Using isolated storage to cache data in the user’s filesystem
- Using ASP.NET and IIS to make your content cacheable by proxies by setting the
Cache-Control: publicHTTP header - Enabling the high-performance kernel cache on your web servers to cache your dynamic content
- Finding that caching a page using
http.syssatisfied 84 percent more requests per second - Using IIS to cache dynamic content that varies based on query strings or HTTP headers
- Configuring ASP.NET output caching for pages and page fragments using the
OutputCachedirective - Using substitution caching
- Removing items from the output cache with
RemoveOutputCacheItem()andAddCacheItemDependency(). - Using page-level database dependencies with the
SqlDependencyparameter in theOutputCachedirective - Using
SqlDependencywith LINQ to SQL - Varying the output cache based on objects such as cookies
- Using a cache validation callback to decide whether the cached version of your content is still valid
- Using a custom
OutputCacheprovider - Caching objects using
HttpApplicationState,HttpContext.Items,HttpContext.Cache, andWeakReferences - Using file and database dependencies with cached objects
- Using locking around references to static fields and cached objects that might be accessible to more than one thread
- Using SQL Server as an extended cache
- Potential pitfalls to watch for if you’re considering distributed caching
- Managing cache expiration times, with suggested defaults of 1 year for static content and between 1 and 30 days for dynamic content