
C H A P T E R 2
Client Performance
The process of displaying a web page involves distributed computing. A browser on the client PC requests and parses the HTML, JavaScript, CSS, images, and other objects on a page, while one or more servers generate and deliver dynamic and static content. Building a fast system therefore requires a capacity for speed in both the browser and the server, as well as in the network and other components in between. One way to think about this is by viewing the server as really sending one or more programs to the browser in the form of HTML (which is after all, Hypertext Markup Language) and JavaScript. The browser then has to parse and execute those programs and render the results to the screen.
For existing sites, I’ve found that larger user-visible performance improvements can often be obtained by optimizing the output of your web site so that it runs faster on the client rather than by making your server-side code run faster. It is therefore a good place to start on the road to building an ultra-fast site.
Particularly on the browser side of the performance equation, many small improvements can quickly add up to a large one. Slow sites are often the result of the “death by 1,000 cuts” syndrome. A few extra characters here or there don’t matter. However, many small transgressions can quickly add up to make the difference between a slow site and a fast one, or between a fast site and an ultra-fast one. Another way to think about this is that it’s often a lot easier to save a handful of bytes in 100 places than 100 bytes in a handful of places.
Imagine building a house. A little neglect here or there won’t compromise the quality of the final product. However, if the attitude becomes pervasive, it doesn’t take long before the whole structure suffers as a result. In fact, at some point, repairs are impossible, and you have to tear down the house and build again from scratch to get it right. A similar thing happens with many aspects of software, including performance and scalability.
In this chapter, I will cover the following:
- Browser page processing
- Browser caching
- Network optimizations
- JavaScript grouping and placement
- Downloading less
- Using JavaScript to gate page requests
- Using JavaScript to reduce HTML size
- Uploading less
- Optimizing CSS
- Using image sprites and clustering
- Leveraging dynamic HTML and JavaScript (Ajax)
- Improving layout and rendering speed
- Precaching
- Using CSS layout without tables
- Optimizing JavaScript performance
The example files for this chapter are available online at www.12titans.net and in the download that’s available from www.apress.com.
Browser Page Processing
When a browser loads a page, it’s not performing a batch process. Users don’t close their eyes after they enter a URL and open them again when the browser has finished loading the page. Browsers do what they can to overlap activity on multiple network connections with page parsing and rendering to the screen. The steps that browsers follow are often extremely visible to users and can have a significant impact on both perceived performance and total page load time.
Network Connections and the Initial HTTP Request
To retrieve a web page, browsers start with a URL. The browser determines the IP address of the server using DNS. Then, using HTTP over TCP, the browser connects to the server and requests the content associated with the URL. The browser parses the response and renders it to the screen in parallel with the ongoing network activity, queuing and requesting content from other URLs in parallel as it goes.
Rather than getting too sidetracked with the variations from one browser to another, my focus here will mostly be on Internet Explorer 9 (IE9, or just IE). Other browsers work similarly, although there are definite differences from one implementation to another. With Firefox, users can set parameters that change some of the details of how it processes pages, so the page load experience may not be 100 percent identical from one user to another, even when they’re using the same browser.
Figure 2-1 shows the TCP networking aspect of connecting to a remote server and requesting a URL with HTTP.
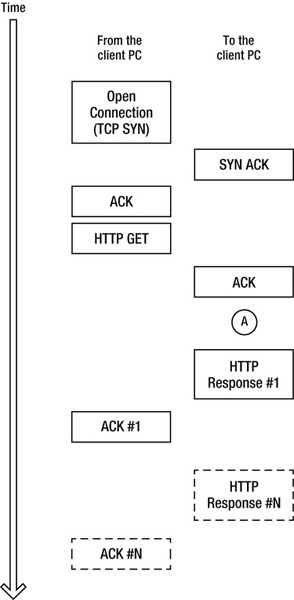
Figure 2-1. Typical TCP protocol exchange when requesting a web page, with each box representing a packet
The client browser asks the server to open a connection by sending a TCP SYN packet. The server responds by acknowledging the SYN using a SYN ACK, and the client responds with an ACK. After this three-way handshake, the connection is open.
The browser then sends an HTTP GET, which includes the requested URL, cookies, and other details. Upon receipt, the server ACKs that packet, and during the time marked as A in Figure 2-1, it generates its response to the client’s request.
The server then sends the response in one or more packets, and the client sends one or more ACKs. How often the ACKs are required is determined by the size of the TCP “window,” which is a big factor in achievable network speeds.
You can see that the response to the browser’s request doesn’t arrive all at once. There are gaps of time between when the client sends a packet and when the server responds, as well as in between successive packets.
Horizontal zones, such as area A in Figure 2-1 where there are no boxes containing packets, indicate that the network is idle during those times. Downloading multiple resources over parallel connections can help minimize that idle time and thereby minimize total page load time.
The maximum packet size varies from 500 to 1,500 bytes, depending on the network maximum transmission unit (MTU). The first data packet from the server includes the HTTP response header, usually along with some HTML, depending on the size of the header. Because of the way that the TCP network protocol works (a feature called slow start), there can be a relatively long delay between the time when the first data packet arrives and when the next one does, while the network connection ramps up to full speed.
The SYN and SYN ACK packets, along with TCP slow-start, combine to make opening a network connection a relatively time-consuming process. This is therefore something that we would like to avoid doing too much.
Page Parsing and New Resource Requests
While IE is waiting for the next packet of data, it parses what it already has and looks for any resource URLs that it might be able to download in parallel. It will open as many as six connections to each server.
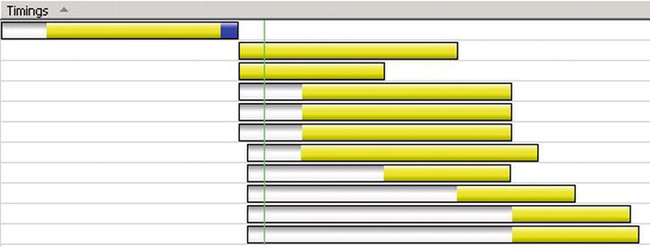
The timeline shown here (captured using IE’s F12 developer tools) illustrates how IE handles a page where an <img> tag is located after of a bunch of text (see file01.htm).

The horizontal axis is time, and each row corresponds to a different request made by the browser. The first row shows the time taken to read the HTML page. The section on the left of the horizontal bar is the time from when IE initially created the request to when it sends the request. The middle section is the time taken to open a TCP connection (if required), send the initial HTTP GET request, and receive the first packet of the HTTP response. The section on the right is the time taken for the rest of the response to arrive.
The second row shows the retrieval of the image. Since the image is small, all of the image data is included with the HTTP response headers in the same packet.
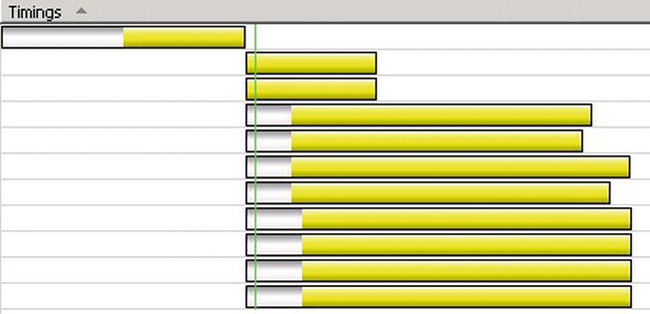
The next timeline shows what happens when the <img> tag is located close to the beginning of the file so that it’s in the first packet of data received by IE (see file02.htm):

The first row is roughly the same. However, the request for the image starts shortly after the first packet of HTML arrives. As a result, it takes less total time to retrieve the page and the image. (The vertical bar is the point at which IE raised the document ready event).
To leverage this aspect of how IE processes a page, you should put one or more requests for objects near the top of your HTML.
Page Resource Order and Reordering
IE retrieves all resources requested in the <head> section of the HTML before it starts rendering the <body>. Since the <head> section can’t contain any tags that will cause the browser to draw content on the screen, users will see nothing until it has downloaded all resources in the <head> section.
While IE is blocked waiting on resources for the <head> section, it uses a feature called lookahead to download resources from the <body> section in parallel. However, lookahead has limitations, so in general, if you place the requests in the <body> section instead when possible, you can help the browser optimize the downloading of resources in parallel.
![]() Note The HTML specification calls for
Note The HTML specification calls for <link> and <style> tags (for CSS) to be in the <head> section, although current browsers don’t enforce that limitation.
As HTML parsing continues, resources that the page references, including images, are generally queued for retrieval in the order IE encounters them. IE9 will request an image near the top of the file before other resources from the same domain (IE8 may queue JavaScript resources before images due to lookahead). You may be able to improve the (apparent) performance of a page by managing object download order, either by rearranging your HTML or using out-of-order loading. For example, if you have a large image banner or logo at the top of your page, although it may be important for site aesthetics or branding, it may not be the first thing that users want to see. However, if it’s at the top of the HTML, it will be the first thing downloaded by the browser.
You can use JavaScript and CSS to achieve out-of-order object loading. For example, you can reserve the space on the page with an <img> tag and request the image associated with that tag earlier or later in the file using script. That way, you can call the script according to when users should see the image. Here’s an example of late loading:
<img id="myimg" width="50" height="50" />

. . .

<script type="text/javascript">

document.getElementById("myimg").src = "myimage.jpg";

</script>
Or, using jQuery:
<img id="myimg" width="50" height="50" />

. . .

<script type="text/javascript">

$("#myimg").attr("src", "myimage.jpg");

</script>
The <img> tag only has the width, the height, and an ID. Script later in the file then sets the src attribute, which will cause the browser to queue the download.
![]() Note As a best practice, you should always specify the
Note As a best practice, you should always specify the width and height for your images, using either properties or CSS. Doing so helps minimize the time taken by the browser to lay out the page, as it does not have to reflow the content after determining the image’s true size.
For early loading:
<script type="text/javascript">

var myimg = new Image();

myimg.src = "myimage.jpg";

</script>

. . .

<img src="myimage.jpg" width="50" height="50" />
Allocate an Image object, and set its src attribute to the desired filename. This will cause the browser to queue the image for downloading. Then, in the <img> tag, just use the same filename again. Since the browser should cache the image, it will be downloaded only once.
You should use late loading for images that the user wouldn’t consider important or that are below the fold, where they won’t be seen right away. You should use early loading for images that are important to the user and that are above the fold.
Browser Caching
All components of URLs except the hostname are case-sensitive. Since the Windows filesystem and IIS URL handling are not (unlike Unix/Linux with Apache), this can result in the browser downloading the same object more than once if you don’t use a consistent case for URLs that refer to the same object. Browsers canonicalize URIs (removing “..”) and then use a direct string comparison to determine whether two URIs refer to the same object. For example, the following code would cause the browser to download the same image twice:
<img src="myimage.jpg" width="50" height="50" />

<img src="myimage.JPG" width="50" height="50" />
One approach to addressing this issue is to adopt a policy of always having your URLs entirely in lowercase.
For dynamic content, it might also make sense to check for mixed-case incoming URLs in an ASP.NET HttpModule, so that you can detect and compensate for any markup or external sites that reference or generate such URLs. To determine if this is an issue for your site, you could increment a performance counter to provide an indication of how often the server encounters such URLs, or you could write the URL and its referrer to a log, or examine the IIS logs. I cover HttpModules in Chapter 7.
The browser cache associates a particular URL with some content, so for best performance you should always reference identical content using identical URLs. If you are running several sites, you can improve performance by using a shared domain for common static content. For example, if you’re running both www.12titans.net and www.apress.com and there’s a good chance that visitors to one site will also visit the other, then you might want to have a third domain or subdomain (or a CDN), such as static.12titans.net, that both sites can use for common static content.
If several developers are working on the site, they should take care to share and reuse content, rather than duplicating it on a page-by-page, developer-by-developer, or even project-by-project basis. Make sure that your site doesn’t have multiple copies of the same file.
A similar strategy also applies to your domain name. If you have several different domains that refer to the same site, you can improve client-side caching if you reference them consistently and help users do the same. For example, you might instead redirect all references from domains like 12titans.net and www.12titans.com to www.12titans.net, rather than serving identical content from all three domains. Otherwise, a user who visited the site first with one domain name and then with another would need to download all cacheable content twice instead of only once. Keep in mind that you can’t control how others link to your site. You might be consistent on your site about using www, but another site could link to you without it.
Merging identical domains also helps with search engine optimization. It’s possible that search engines will exclude or otherwise penalize your site if they see many copies of identical content.
Network Optimizations
When IE doesn’t find images and other resources in its cache, it places requests to retrieve them in queues that it services with a maximum of six connections per domain.
![]() Note Browsers don’t look at the IP address of a domain when determining whether to open a new connection; they do a direct string comparison of the domain names (ignoring case).
Note Browsers don’t look at the IP address of a domain when determining whether to open a new connection; they do a direct string comparison of the domain names (ignoring case).
Consider the following HTML (see file03.htm):
<img src="q1.gif" height="16" width="16" />

<img src="q2.gif" height="16" width="16" />

<img src="q3.gif" height="16" width="16" />

<img src="q4.gif" height="16" width="16" />

<img src="q5.gif" height="16" width="16" />

<img src="q6.gif" height="16" width="16" />

<img src="q7.gif" height="16" width="16" />

<img src="q8.gif" height="16" width="16" />

<img src="q9.gif" height="16" width="16" />

<img src="q10.gif" height="16" width="16" />
There are ten images, all loaded from the same domain as the page (the “host” domain). Here’s a timeline that shows how IE loads the page:
The first row shows the time to open the connection and read the HTML. The next row shows the first image being requested, which uses the same connection as the first request. The third row shows IE starting the request for the second image at the same time as the first, which requires a new connection. The requests for the next four images start after a short delay, but are active at the same time as the first two images, indicating that they are using their own connections.
If the server permits, IE keeps those connections open after the requests complete. After each request completes, IE starts a new request; the beginning of the active part of each row corresponds to the end of an earlier row.
Let’s change the HTML to request five images from each of two different domains (see file04.htm):
<img src="q1.gif" height="16" width="16" />

<img src="q2.gif" height="16" width="16" />

<img src="q3.gif" height="16" width="16" />

<img src="q4.gif" height="16" width="16" />

<img src="q5.gif" height="16" width="16" />

<img src="http://s1.12titans.net/samples/ch02/q6.gif" height="16" width="16" />

<img src="http://s1.12titans.net/samples/ch02/q7.gif" height="16" width="16" />

<img src="http://s1.12titans.net/samples/ch02/q8.gif" height="16" width="16" />

<img src="http://s1.12titans.net/samples/ch02/q9.gif" height="16" width="16" />

<img src="http://s1.12titans.net/samples/ch02/q10.gif" height="16" width="16" />
Here’s the resulting timeline:
The sequence of events is the same for the HTML and the first few images. However, now IE requests all of the other images at the same time. This page loads in about half to a third of the time as the original.
You can take advantage of parallel object downloads by strategically (and consistently) using several different domains or subdomains for your static content. Because it takes a little while to open a new TCP connection and the browser limits the maximum number of simultaneous connections, a good rule of thumb is to load your static content from two or three domains. You might want to have several domain aliases for your site. That allows you to optimize download parallelism by simply adjusting the domain names in your pages, without having to manage which content is in which domain. Consider automating the process of assigning static files to particular domains using an ASP.NET control adapter (see Chapter 7)—just be sure to use a consistent domain for each resource, to avoid unwanted cache misses.
JavaScript Grouping and Placement
To reduce round-trips, you should have as few script files as possible. You can arrange this by doing one or more of the following:
- Combine them together statically (such as with an editor)
- Combine them together dynamically, either:
- As a compile post-processing step or
- Programmatically (on-demand) when the browser requests the script. The .NET Framework supports automated bundling, which I cover in Chapter 6.
Mid-document script includes can cause the browser to delay rendering the page until after the script file arrives. From a performance perspective, it’s better to place your includes at the end of your HTML when you can. A common reason for using mid-document script includes is to insert HTML into the page using document.write().
- Instead of
document.write(), useinnerHTMLor direct DOM manipulation, which you can do late in the HTML- If you can’t avoid
document.write()(such as with scripts from third-parties), then instead of using multiple<script>files, either:
- Wrap the script with absolute positioning and run it late in the file, or
- Run the script in a hidden
<div>, and then move the contents of the<div>into its desired location by manipulating the DOM using JavaScript
Avoiding document.write()
Here’s some script that does an inline document.write() (see img1.js):
document.write('<img src="q1.gif" height="16" width="16" />'),
The pattern to avoid is the one that includes the script in the middle of your HTML (see file06.htm):
<div>

<script type="text/javascript" src="img1.js"></script>

</div>
One alternative is to set a variable to a string containing the HTML that you want to insert on the page (see img2.js):
var qimg = '<img src="q1.gif" height="16" width="16" />';
Include the script file at the end of the HTML (see file07.htm):
<style type="text/css">

#exd{height:16px;width:16px}

</style>

<div id="exd">

</div>

<script type="text/javascript" src="img2.js"></script>

<script type="text/javascript">

document.getElementById('exd').innerHTML = qimg;

</script>
Add the new HTML to the DOM using the innerHTML property of a containing <div>. Assign the <div> tag a width and height to match the image to avoid HTML page re-layouts when its contents are updated (done in the example using CSS).
Here’s another approach (see img3.js):
function putimg(qdiv) {

    var myim = new Image(16, 16);

    myim.src = "q1.gif";

    qdiv.appendChild(myim);

}
The script is included at the end of file08.htm:
<style type="text/css">

#exd{height:16px;width:16px}

</style>

<div id="exd">

</div>

<script type="text/javascript" src="img3.js"></script>

<script type="text/javascript">

putimg(document.getElementById('exd'));

</script>
This time, use a function to create an Image object and append it as a child of the DOM node of the <div>.
Reordering Script That You Can’t Modify
Let’s say that you have an image at the top of your page that’s inserted by a script you don’t have control over, followed by some text (see file09.htm):
To move the script to the end of the HTML, you can assign absolute positions to both of the <div> tags and then reverse their order (see file10.htm):
<style type="text/css">

.content,.banner{position:absolute; left:10px}

.content{top:40px}

.banner{top:10px}

</style>

<div class="content">

Lorem Ipsum

</div>

<div class="banner">

<script type="text/javascript" src="img1.js"></script>

</div>
Alternatively, you can call the script in a hidden <div> and then move that DOM node into position (see file11.htm):
<style type="text/css">

.temp{display:none}

#banner{height:20px;width:16px}

</style>

<div id="banner">

</div>

<div>

Lorem ipsum

</div>

<div class="temp">

<div id="mystuff">

<script type="text/javascript" src="img1.js"></script>

</div>

</div>

<script type="text/javascript">

var ba = document.getElementById('banner'),

var ms = document.getElementById('mystuff'),

if ((ba != null) && (ms != null))

    ba.appendChild(ms);

</script>
![]() Note
Note ba.appendChild(ms) removes the argument node (ms) from its parent before appending it as a child of the source (ba).
Requesting Images and Other Objects After the Page Loads
You can combine use of the page onload handler with the late image load technique to make very late requests, after everything else on the page has downloaded. Rollover images are an example, since they don’t need to be displayed when the page is initially rendered, but if they are eventually used, the user experience will be much better if they are already in the browser’s cache (image sprites or transparency variations are generally a better solutions for rollover images; see the sections “Image Sprites and Clustering” and “Use Transparency as an Alternative to Rollover Images” for details). Large, low-priority images, or images that are below the fold are other candidates for late loading.
Here’s an example (see file12.htm):
<body onload="lateimage()">

<img id="slow" height="16" width="16" />

<div>

Lorem ipsum

</div>

<script type="text/javascript">

function lateimage() {

    document.getElementById('slow').src = "big.jpg";

}

</script>
An <img> tag with an id, height, and width, but without src, is a placeholder for the image. Then the <body> onload handler sets the src of the <img> tag to be the path to the image, which causes the browser to load the image.
![]() Note Although it was fixed in IE9, don’t be tempted to use an empty string for the
Note Although it was fixed in IE9, don’t be tempted to use an empty string for the src tag. Doing so can cause older browsers to issue a GET request for the current folder’s default document, as though you set src="./"
Using jQuery to do the same thing makes it easy to avoid changing the <body> tag:
<body>

<img id="slow" height="16" width="16" />

<div>

Lorem ipsum

</div>

<script type="text/javascript">

$(window).load(function () {

    $('#slow').attr('src', 'big.jpg'),

});

</script>
Script Defer and Async
Using <script defer> can sometimes help improve the performance of a page by delaying the point at which the browser parses and executes the associated script until after the page has loaded. Unfortunately, it’s often not a very practical option.
One issue in versions of IE before IE10 is that there are bugs that may result in the browser deferring the script forever. Another issue is that since other scripts on the page execute as the page loads, it might not be able to access any script in the deferred file when you need it. A further complication is that deferred scripts can’t call document.write() since they are run after the page load is complete.
HTML5 introduced <script async>. It’s like defer, except the browser executes the script as soon as the download completes, rather than after the page loads. Scripts marked async may execute out of order, whereas deferred scripts always execute in order. Although IE10, Firefox, Chrome and Safari support async, it’s not available in IE9 (or earlier versions of IE).
Downloading Less
Every byte of content consumes resources. The server statically or dynamically generates each byte and sends it over the network to the browser, which then has to process everything it receives. Assuming no changes in the core logic that creates the page, every byte you save will reduce the time it takes the browser to download and display the resulting page. The following sections describe several techniques to accomplish this.
Reduce the Number of Resources per Page
Eliminate “spacer” GIFs, and use CSS instead. Since today’s browsers have good CSS support, there should no longer be a reason to use spacers, yet it’s surprising how prevalent they are. Using margin and padding should serve the same purpose.
You should replace “text images” (images with words on them) with CSS and text. The result will be much smaller and easier to maintain (you won’t need graphics programs to make changes). You can more easily support localization that way, too. Apply background gradients using CSS for browser that support it, or use background images.
For example, consider the following HTML, which overlays an image with a transparent background onto a gradient (see file13.htm):
<style type="text/css">

.hdr{border:1px solid #000;height:40px;background:url(top-grad.gif)}

.logo{height:40px;width:250px;float:left}

</style>

<div class="hdr">

<img class="logo" src="logo.png" />

</div>
The result looks like this:
![]()
You can achieve the same result on client machines that have the Lucida Handwriting font installed by using the following code instead (see file14.htm):
<style type="text/css">

.hdr{border:1px solid #000;height:40px;background:url(top-grad.gif)}

.txtlogo{font-family:lucida handwriting,cursive;

    font-size:32px;color:#fff;padding:3px}

.txtlogo span{color:yellow}

</style>
<div class="hdr">

<span class="txtlogo"><span>12</span> Titans</span>

</div>
The .txtlogo span CSS selector says to apply color:yellow for <span> tags that follow a txtlogo class assignment. That way, you can avoid specifying a separate class or ID on the <span> tag.
Although I’m still using the gradient image, I’ve replaced the logo image with text plus CSS formatting, which saves a round-trip. On machines that don’t have the right font, the browser will use the standard cursive font as a fallback.
In cases where the exact look of the text is important, such as for branding reasons, you can replace or overlay the text with an image in the page onload handler (see file15.htm):
<body onload="getlogo()">

<style type="text/css">

.hdr{border:1px solid #000;height:40px;background:url(top-grad.gif)}

#txtlogo{font-family:lucida handwriting,cursive;

    font-size:32px;color:#fff;padding:3px}

#txtlogo span{color:yellow}

</style>

<div class="hdr">

<span id="txtlogo"><span>12</span> Titanx</span>

</div>

<script type="text/javascript">

var limg;

function getlogo() {

    limg = new Image(250, 40);

    limg.onload = gotlogo;

    limg.src = "logo.png";

}

function gotlogo() {

    var logo = document.getElementById("txtlogo");

    logo.parentNode.replaceChild(limg, logo);

}

</script>
The page onload handler creates a new Image object and sets the onload handler for the image to the gotlogo() function. After the browser loads the image, gotlogo() uses it to replace the <span> tag containing the text. I’ve changed the last letter of the text so that you can more easily see when the image loads in case you have the Lucida Handwriting font installed. Of course, the larger the image is and the more objects there are on the page, the more noticeable the performance benefit.
Minify Your HTML, CSS, and JavaScript
Minimize the size of your HTML, CSS, and JavaScript by removing extra spaces, tabs, newlines, and comments. I’m always surprised when I view the source HTML for a site and see lots of comments. The browser can’t use them, so they shouldn’t be there. One way to avoid sending comments in your .aspx files to clients is to enclose them in an ASP.NET comment block. Here’s an example:
<%-- this is a comment that won’t be sent to the browser --%>
For static files, you can remove comments as a post-compile step or as part of the installation and deployment process.
The .NET Framework has some automated support for CSS and JavaScript minification, which I cover in Chapter 6.
Maximize Compressibility
Since lowercase appears more frequently than uppercase, it sometimes compresses better, depending on the compression algorithm being used (the bit patterns of lowercase letters can help too). You should therefore prefer lowercase in your text files to maximize their compressibility.
For example, in your HTML, <img src="myimage.jpg" /> is better than <IMG SRC="myimage.JPG" />. In addition to improving server-side compression, this also helps in cases where a user accesses otherwise uncompressed content (including HTTP headers) over dial-up with a modem that has compression enabled, as most of them do.
I cover server-side compression in Chapter 4.
Image Optimization
Images often consume a larger fraction of total site bandwidth than HTML does. Aggressively managing the size of your images is important for the same reasons as optimizing HTML size: every byte you can save is a byte that the browser doesn’t have to download and process.
Minimize the Number of Images on Your Pages
The first step in image optimization should be to think about whether you need the image at all. I personally prefer the Zen aesthetic of simple, uncluttered sites that avoid a large number of images. Reducing the number of images can have a big impact on site performance, since it also eliminates the associated round-trips.
As an alternative to images, consider using CSS to define backgrounds or section dividers. Varying border thickness and color can sometimes be used to good effect.
After you’ve eliminated as many images as you can, the next step is to make the remaining ones as small as you can.
I am not suggesting that your site needs to look bad and have no images or only a few tiny ones in order to achieve good performance. Rather, the idea is to look carefully at what your requirements really are and create your images in line with those requirements. Do you really need 50 or more images on your home page? Do you really need an 800 × 600-pixel background? Do you really need top image quality for your tiny thumbnails?
Use Transparency as an Alternative to Rollover Images
Varying object opacity using CSS is another option. You can use transparency stylistically or as an alternative to a separate rollover image. For example, the following CSS works on all modern browsers (see file16.htm):
<style type="text/css">

.hov:hover img{-ms-filter:"progid:DXImageTransform.Microsoft.Alpha(Opacity=60)";

    filter:alpha(opacity=60);opacity:0.6}

</style>

<a class="hov" href="#">

<img src="images/right.png" height="56" width="56" border="0" />

</a>
When you mouse over the image, the :hover style will alter its opacity.
Optimize Background Images
For background images, be sure to take advantage of the browser’s ability to duplicate a single image through tiling. The background gradient image used earlier in file14.htm is 1-pixel wide and the height of the containing <div>. The browser then copies it as needed to tile the background.
For IE10 and other browsers that support CSS3, you can use CSS to create a background gradient. Here’s an example (see file17.htm):
<style type="text/css">

.hdr{border:1px solid #000;height:40px;background-color:#0052ce;

background-image: -webkit-gradient(linear, 0% 0%, 0% 100%, from(#3F8afa), to(#0154ce));

background-image: -webkit-linear-gradient(top, #3F8afa, #0154ce);

background-image:    -moz-linear-gradient(top, #3F8afa, #0154ce);

background-image:     -ms-linear-gradient(top, #3F8afa, #0154ce);

background-image:      -o-linear-gradient(top, #3F8afa, #0154ce); }

.txtlogo{font-family:lucida handwriting,cursive;font-size:32px;

color:#fff;padding:3px}

.txtlogo span{color:yellow}

</style>

<div class="hdr">

<span class="txtlogo"><span>12</span> Titans</span>

</div>
The result is very close to file13.htm shown earlier, but it requires no images now instead of two. It will fall back to a solid color for older browsers.
Inline Image Encoding
You can use inline image encoding to save a round trip. Most current browsers support this approach, using the data URI scheme.
IE7 and older versions of IE do not support inline images. IE8 has partial support:
- Maximum size of 32KB
<object>(images only)<link><img src><input type=image>- CSS declarations that accept a URL
IE9 and later don’t have the size limitation, and allow you to use inline images in most places where you would otherwise reference a regular image URL.
The data URI specifies both the image type and the encoding. You will normally use base-64 encoding. For example, for the top-grad.gif file used above:
#hdr{border:1px solid #000;height:40px;

background:url(data:image/gif;base64,R0lGODlhAQAoANUAAAAAAP///wFUzgNV0ANVzwVX0QZY0gdY0gha

0wpb1Qxd1g1e1w9g2BFh2RJj2xVk3BZm3Rho3hpp4Bxr4h5t4x9u5CFw5SRx5yVz6Cd16Sl26it47C157S987jF97

zOA8jJ+8TWB8zaD9DiE9TqF9zqG9zyH+D2I+D6J+T+K+v///wAAAAAAAAAAAAAAAAAAAAAAAAAAAAAAAAAAAAAAAA

AAAAAAAAAAAAAAAAAAAAAAAAAAAAAAAAAAAAAAAAAAACH5BAEAACoALAAAAAABACgAAAYlwBTqZCqRRqLQB+TpcDa

aDOZiqVAmkgjk4WgwFooE4mAoDAiCIAA7)
The original image was 264 bytes, and the encoded version is 374 bytes.
The encoded data must not contain new lines. There are several sites online you can use to do the encoding for you, such as dataurl.net. In some cases, you may also choose to do the encoding at run time—that can simplify development and maintenance in some cases, since encoded images don’t have names.
With base-64 encoding, images will be about 40 percent larger than the original, so there’s a tradeoff between the network and data overhead of an HTTP request/response and that additional size.
This approach is most effective with smallish images, when the browser can cache the containing file, such as with CSS or JavaScript includes. It’s less appealing for large images, or when you need to use the same image many times in your application—from both a data size and maintenance perspective.
Choose the Right Image Format
Images with only a few colors or that require consistent and smooth gradients or sharp edges should use a lossless format. In those cases, you should in general prefer PNG to GIF. PNG files tend to be smaller, and the format supports alpha channels for variable transparency (blending) as well as gamma correction and progressive display (interlacing), which the other lossless formats do not support.
For larger PNG files, encoding them with progressive display is desirable, in keeping with our principle for focusing on perceived performance. A page doesn’t feel as slow when the browser progressively renders large images.
Although PNGs tend to be smaller than GIFs, that isn’t always the case. It’s worthwhile to compare the sizes when making a choice. Notice in the previous examples that the small background gradient image I used was a GIF, for example, since it was smaller than the equivalent PNG.
In addition, IE6 unfortunately does not support PNG alpha channels, although IE7+ and Firefox do. Therefore, if you’re using transparency, as with the logo image in the file15.htm example shown earlier, and if support for IE6 is important, then GIFs are the right choice there too, although GIFs can only do 100 percent transparency and not alpha blending.
Use the minimum bit depth that you really need. An 8-bit image will be roughly one-third the size of a 24-bit image. The fewer colors your image needs, the lower the bit depth can be. Sometimes you can apply dithering that will make a lower-bit depth image more acceptable than it would be otherwise.
Most photographs should be JPG files.
Optimize Image Compression and Dimensions
Check to see whether you can increase the level of compression for JPG files. Higher-compression ratios result in a loss of quality, particularly for edge definition. In fact, some image-editing software, including Adobe Photoshop, refers to the degree of image compression as quality. With many images, though, the difference in quality isn’t very noticeable for small to moderate changes in compression, and the resulting decrease in file size can be considerable. If higher levels of compression won’t work for all images, perhaps they will for some, such as small thumbnails. In keeping with one of the themes of this chapter, even small changes are worthwhile.
If the image has an empty border area or other unnecessary details, you should crop it as much as you can without sacrificing useful content. Use CSS instead for borders and margins.
Some very good tools are available to help simplify image optimization. For example, Adobe Photoshop has a Save for Web feature that makes it easy to compare several different approaches. The control panel for optimizing images is shown in Figure 2-2, in JPG mode.
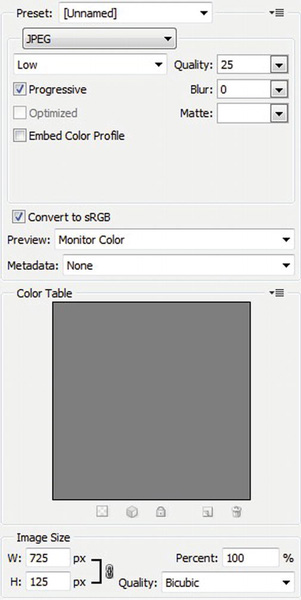
Figure 2-2. Adobe Photoshop CS5’s Save for Web control panel for optimizing images
You can change the quality setting to adjust the amount of compression, enable or disable progressive rendering, apply a blur to the image to help reduce artifacts, and resize the image. Photoshop shows the impact of the changes in either two or four images to the left of the control panel, including how large the image is, so you can readily compare them to one another and to the original. You can also select and evaluate formats other than JPG, including GIF and PNG.
To further reduce the size of your images, don’t check the Embed Color Profile box, and select Metadata: None. Metadata alone can be many kilobytes, depending on where the image originated.
When to Use Image Slicing
Image slicing takes a large image and splits it up into multiple smaller images. You might use this approach to make it possible to apply links or script or CSS to just part of the image, rather than to the whole thing. However, the resulting multiple round-trips can have a significant performance impact, particularly when the images are relatively small. Even though the first image arrives before the full one would have, the round-trip overhead can give the page a slow feeling.
For large images, though, slices can improve perceived performance. If you spread them among multiple domains, the resulting overlap of network accesses can also reduce total page load time. Therefore, we sometimes have a choice between two of our guiding principles: improving perceived performance and reducing round-trips. In general, you should prefer perceived performance; that’s what really counts in the end.
A reasonable rule of thumb for deciding whether perceived performance would benefit from slicing is to watch a page load with a network speed similar to what your users will see. If a single image takes more than a few seconds, if it feels much slower than the rest of the page, or if it’s something that your users will be waiting for, then you might consider slicing it. You should not slice images that take less than about a second that users won’t care about or that are loaded below the fold where they can’t even be seen. In fact, those images are candidates to be combined together using image sprites or clustering, as described later in this chapter.
You can use Photoshop to slice your images, with the slicing tool in the default toolbar. Simply use the tool to draw a rectangle around each area that you’d like to have as a separate slice. Then, in Save for Web, when you save the result, each slice will be saved as a separate image. Each slice can have a different format or a different level of optimization.
Since slicing is often used for menus, don’t forget that CSS-based text is a much better alternative, as I described earlier.
Client-Side Image Maps
In cases where adding multiple links to a large image is your main motivation for slicing, you should use client-side image maps instead. Here’s an example (see map1.htm):
<img src="big.jpg" height="50" width="200" usemap="#mymap" />

<map name="mymap">

    <area shape="rect" coords="0,0,50,50" href="one.aspx" title="One" />

    <area shape="rect" coords="50,0,100,50" href="two.aspx" title="Two" />

    <area shape="circ" coords="150,25,25" href="three.aspx" title="Three" />

</map>
The image will have three zones: two rectangular in shape and one circular. Hovering over the zones will show the corresponding title string as a tooltip, as well as the destination URL in the browser’s status bar. Clicking the zone will cause the browser to navigate to the destination URL, just like with an <a> tag.
Specify Image Size Attributes
You should specify an image’s native size or larger in the <img> tag’s height and width attributes.
If you would like the image to be displayed at a smaller size, then it’s better to resize the image on the server and avoid downloading the extra bits. In addition, the resizing algorithms used by an application like Photoshop will generally result in a much better-looking image than whatever the browser happens to do.
Enlarging an image by specifying a larger-than-actual size is generally not useful and requires the browser to do extra work that could otherwise be avoided. If you need a little extra filler, try using a larger border or a CSS-based background color.
You can also resize images dynamically on the server. See Chapter 6 for details.
Web Site Icon File
When the browser finishes loading the first page it sees from your site, it will request /favicon.ico. If the file is present, the browser will display it somewhere associated with the site, such as in the address bar, to the left of your URLs (as with IE and Firefox). You should make sure that the file is present on your site. If it’s not there, the browser will re-request it every so often, resulting in round-trips and “file not found” errors that you could avoid by returning the file. The file must be a 16 × 16-pixel image in ICO format (which is not the same as JPG, GIF, or PNG).
You can specify an alternate name for the icon file with a <link> tag in your HTML. Here’s an example:
<link rel="shortcut icon" href="/myicon.ico" type="image/x-icon" />
However, since this approach requires adding extra text to all your pages, you should avoid it if you can.
Most static content can be versioned by changing the name of the files (or the folders they’re in). Since you should keep the name favicon.ico, you should also rely on the content expiring from the browser cache in the event you want to update the icon. That means unlike with normal images and static content, favicon.ico should be marked with a relatively near-term cache expiration date, perhaps a month or so.
General HTML, CSS, and JavaScript Optimization
Here are a few general things you can do to clean up your pages:
- Check for and remove redundant tags. For example, if you have two
<span>tags right next to each other, you can merge them.- Remove
<meta refresh>tags. Automatic page updates might at first seem appealing in some cases, but think about the situation where a user walks away from their PC or goes to another tab in their browser. If the updates continue, as they would with<meta refresh>, you are just wasting client and server resources. In addition,<meta refresh>can cause performance problems because it will conditionally revalidate resources when it navigates to the target URL (similar to, but not exactly the same as if you had hit the browser’s refresh button).- Remove unused, empty content tags, such as
<span></span>.- Remove extraneous tags from automated content generators.
- Minimize the length of your
altandtitletext.- Remove comments and extra whitespace.
- Remove unused CSS.
- Where it’s legal syntax, use self-closing tags, such as
<img />, instead of<img></img>. They aren’t legal with<script>or<iframe>.- Remove unused JavaScript. When you’re using JavaScript libraries, it’s particularly easy to accumulate a large number of functions that are never used.
Using an HTML Optimizer
Microsoft’s Expression Web has a very handy Optimize HTML command, as in Figure 2-3. It can also remove unused CSS classes.
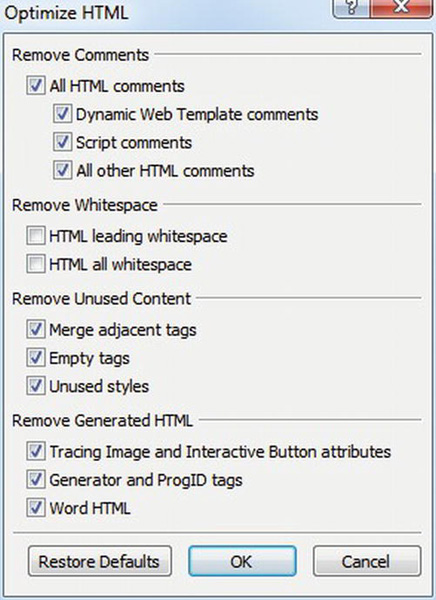
Figure 2-3. The Optimize HTML menu for single files in Expression Web
You can optimize an entire web site as part of the publishing process, as in Figure 2-4.
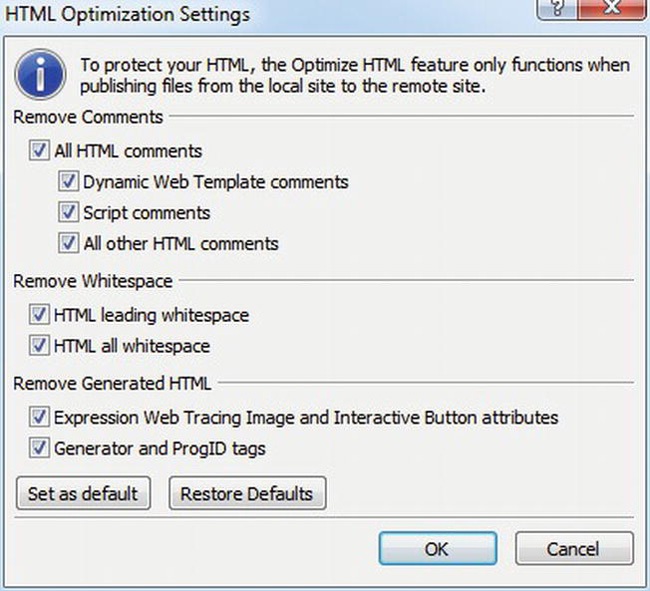
Figure 2-4. Optimize HTML while publishing your web site from Expression Web
Avoid Optimization Techniques That Violate the HTML Standards
You may hear about optimization techniques that can reduce the size of your HTML by violating various aspects of the HTML standards. I don’t recommend using them, for several reasons:
- Some tools can help find different types of bugs in your HTML, or identify accessibility issues, and so on. The HTML parsers used by those tools are not always as “friendly” as the parsers used by browsers, so HTML that violates the standard has a higher probability of not being properly understood.
- You might want to store your content in a database or use a local search engine of some kind. The more standardized your markup is, the better the odds are that it will integrate with those applications quickly, smoothly, and effectively.
- There are many obscure browser bugs in the handling of nonstandard HTML. It’s difficult to expect one browser to behave the same as others when it comes to bugs.
- In addition to being “browser-friendly,” you should also want your site to be search-engine friendly. The parsers used by a large search engine like Google might understand your nonstandard code, but other search engines might not. The situation might be compounded if you use a
<!DOCTYPE>that declares conformance with a particular version of the standard, and then you violate that standard.
In fact, it’s a good practice to run your pages through an HTML validation service periodically, such as the one offered by W3C at http://validator.w3.org/.
Eliminating CSS Round-Trips for the First Page View
Client-side caching of CSS files will reduce the load time for a page the second time a user sees it (known as PLT2), since the browser won’t need to request the cached content again from the server. However, since requesting a file requires a round-trip and since that round-trip increases the time to load the page the first time a user sees it (PLT1), it is sometimes worth considering an optimization that can help mitigate the increase to PLT1 while not sacrificing PLT2. The algorithm works as follows:
- The first time the browser requests a particular page, include the CSS inside the HTML using a
<style>tag instead of using<link>.- In the page
onloadhandler, dynamically insert a<link>tag into the DOM that references the CSS file. That will cause the browser to request the file from the server, but it won’t slow down the rendering of the page.- Set a cookie in the HTTP response headers for the CSS file. The response should be marked with a far-future cache expiration date, and it should be publically cacheable so that it can be stored in proxies (even though some proxies won’t cache responses that include
Set-Cookie).- For the second and subsequent requests of pages that use the CSS file, which you can identify because the cookie is set, generate a
<link>tag on the page instead of embedding the CSS. The CSS file will be loaded from the browser’s cache, so an extra round-trip won’t be required.- Here’s an example of how to load a CSS file from the page
onloadhandler (seefile19.htm):<body onload="getcss()">
<style type="text/css">
.hdr{border:1px solid #000;height:40px;background:url(images/top-grad.gif)}
.logo{height:40px;width:250px;float:left}
</style>
<div class="hdr">
<img class="logo" src="logo.png" />
</div>
<script type="text/javascript">
function getcss() {
var h = document.getElementsByTagName('head'),
var l = document.createElement('link'),
l.type = 'text/css';
l.rel = 'stylesheet';
l.href = 'css/file19.css';
h[0].appendChild(l);
}
</script>
</body>
With the embedded <style> section, the browser will render the page correctly before the CSS include file is loaded.
The CSS file contains the same information as in the <style> tag, except the path to the referenced image is relative to the folder containing the CSS, rather than relative to the folder containing the HTML:
.hdr{border:1px solid #000;height:40px;background:url(../images/top-grad.gif)}

.logo{height:40px;width:250px;float:left}
You can manage path name differences either by applying regular expressions when you merge the files (and caching the results), by using dynamically generated CSS. You can use root-relative paths (which are the same in both cases), but I’ve found they often cause problems during development, when application or virtual folder prefixes can come and go. You may also put the CSS in the same folder as the markup, but then the browser will send any cookies you set for the markup with requests for the CSS as well.
You can set the cookie for the CSS file using a Set-Cookie HTTP header that you configure from IIS Manager. First, select the file in the Content View, then switch to Features View, double-click HTTP Response Headers, and select Add from the panel on the right. See Figure 2-5.

Figure 2-5. Using the Add Custom HTTP Response Header in IIS Manager to set a cookie
In this case, I’m setting a cookie called C to a value of A, with a far-future expiration date. The path is set to the folder containing the HTML content (/samples/ch02) so that the cookie is uploaded to the server only for requests to that path, saving bandwidth.
Alternatively, you can accomplish the same thing by creating a new web.config file in the same folder as the CSS file (the IIS Manager GUI creates this same file):
<?xml version="1.0" encoding="utf-8"?>

<configuration>

    <location path="file19.css">

        <system.webServer>

            <httpProtocol>

                <customHeaders>

                    <add name="Set-Cookie"

value="C=A;expires=Sat, 01-Jan-2050 00:00:00 GMT;path=/samples/ch02/" />

                </customHeaders>

            </httpProtocol>
        </system.webServer>

    </location>

</configuration>
This approach is particularly useful for the pages that users see when they first come to your site, where PLT1 is especially important, such as the home page. The disadvantages are that extra work is required on the cache management side, since there would be different versions of the page depending on whether the cookie is set, and that every page after the first one will have the cookie included with it. However, since many of the page views on an average site tend to originate from browsers that have empty caches and since the cookie is very small, it can be a reasonable trade-off.
In some cases, it might be advisable to always generate the CSS inline and cause the include file to be loaded with script on the entry page, rather than doing so dynamically or using the cookie approach. This would allow you to mark the page as publically cacheable so that it can be cached by proxies and http.sys, and the home page would always have a fast PLT1.
Using JavaScript to Gate Page Requests
You shouldn’t allow users to submit a web form until they have completed all required fields. You should also validate fields on the client before submitting the form. In addition to reducing the load on the server by preventing invalid submits, this approach has the advantage of providing more immediate user feedback, which improves perceived performance.
You can use a similar approach with links. For example, you might want to wait a few seconds after a page loads before enabling a link that refreshes the current page (use this approach with care, though, since users dislike pages that are visibly complete but are not interactive).
Submit Buttons
Here’s an example that doesn’t enable the submit button until the entered text is at least three characters long (see file23.htm):
<form>

<input id="par" name="par" width="150" onkeyup="check(this)" />

<input id="sub" type="submit" value="OK" />

</form>

<script type="text/javascript">

var s = document.getElementById('sub'),

s.disabled = true;

function check(v) {

    s.disabled = v.value.length < 3;

}

</script>
It’s important to revalidate data on the server since it is possible for hackers to bypass the script checks on the page. In fact, it’s a good idea to log requests where invalid fields are detected on the server that should have been prevented by client-side script. In addition to being an indication of potential bugs in client or server code, they could also be indications of a security threat.
JavaScript can also be used to avoid submitting a form if the selected parameters are the same as the ones that were used to generate the page. For example, you can prevent users from re-requesting a page if a selected sort key on a table is the same as the current one or if they are requesting the same page again (unless the content might have changed).
Links
Here’s an example that waits five seconds before enabling a Refresh link (see file20.htm):
<a id="ref" dhref="file20.htm"></a>

<script type="text/javascript">

var r = document.getElementById("ref");

r.style.color = "gray";

r.style.textDecoration = "underline";

var sec = 5;

enableLink();

function enableLink() {

    if (sec > 0) {

        r.innerHTML = "Refresh available in " + sec + " seconds";

        setTimeout("enableLink()", 1000);

    } else {

        r.innerHTML = "Refresh";

        r.style.color = "black";

        r.href = r.dhref;

    }

    sec--;

}

</script>
You temporarily store the destination URL in a new property called dhref, and use setTimeout() to have the JavaScript runtime call you back once a second to provide user feedback. Without some user feedback, a disabled link on its own might be confusing. The first parameter to setTimeout() is the function name to call, and the second is the time interval in milliseconds. After five seconds, you activate the link by setting the href property from the temporary dhref. This approach also helps prevent the cursor from changing to indicate that it’s on a valid link when you hover over the text.
You also want to prevent the link from being disabled again if the user hits the back button in their browser to come back to this page from another one. You therefore need to record some state information on the client by either using web storage (preferred; see Chapter 3 for details) or by setting a cookie from script. If you use a cookie, you should configure it to expire quickly, probably after just a few minutes. It should have a path set on it, so that it’s only attached to the minimum number of URLs possible. The script could then check for the presence of the cookie or an entry in web storage. If it’s there, then the link can be enabled immediately.
You can also disable a link after a user clicks it, to prevent them from clicking twice. Here’s an example that disables the link after a click, and then waits three seconds before navigating to the destination page, to give you a chance to see the disabled link (see file21.htm):
<a id="some" href="file19.htm" onclick="disableMe(this);return false;">Go somewhere</a>

<script type="text/javascript">

var v;

function disableMe(val) {

    v = val;

    v.style.color = "gray";

    v.style.textDecoration = "underline";

    v.dhref = v.href;

    v.removeAttribute("href");

    setTimeout("goSome()", 3000);

}
function goSome() {

    window.location.href = v.dhref;

}

</script>
Since you start with a valid link in the <a> tag, when the user clicks, you move the destination URL from the href property to dhref and change the color and textDecoration style of the link text. Removing the href property prevents the browser from changing the cursor to indicate that the text is a valid link. Then you use setTimeout() to call a function after three seconds that will cause the browser to go to the new page.
Using JavaScript to Reduce HTML Size
You can generate frequently repeating HTML on the client and thereby decrease the size of the downloaded text. A secondary benefit is that it can effectively remove keywords from the page that you would rather not have indexed by search engines.
Generate Repetitive HTML
For example, if you have a drop-down box with a list of all the countries in the world or with all of the states in the United States, the JavaScript to generate them will be much smaller than the pure HTML would be.
Consider this XHTML:
<select>

<option value='AF'>Afghanistan</option>

<option value='AL'>Albania</option>

<option value='DZ'>Algeria</option>

<option value='US' selected>United States</option>

</select>
To create the same thing using JavaScript, put the following code in an include file (see file24.js):
var countryList = "AF,Afghanistan,AL,Albania,DZ,Algeria,US,United States";

function DisplayCountries(selected) {

  var countries = countryList.split(",");

  var count = countries.length;

  var i = 0;

  document.write('<select>'),

  while(i < count) {

    document.write('<option value="'),

    document.write(countries[i]);

    document.write('"'),

    document.write(countries[i] == selected ? ' selected' : "");

    document.write(">");

    document.write(countries[i+1]);

    document.write('</option>'),

    i=i+2;

  }

  document.write('</select>'),

}
Then include the file and call the function from where you want the option list to appear in your HTML (see file24.htm):
<script type="text/javascript" src="file24.js"></script>

<script type="text/javascript">

DisplayCountries("US");

</script>
Of course, in a real application, the list of countries would be much longer. If the drop-down menu is used on multiple pages or on pages that can’t be cached, putting the JavaScript to generate it in an include file helps further because the script file can be cached. For a long list of items, the script will be shorter than the HTML, so if you’re already loading another script file into which you can place the code, both PLT1 and PLT2 will be decreased.
![]() Note Using script to generate HTML will result in the related text not being accessible to search engines. That can be a good thing, as mentioned earlier, in the event that you have text on your page that isn’t relevant to your content. However, if it hides important content, keywords, or links, the trade-off for performance probably isn’t worth it.
Note Using script to generate HTML will result in the related text not being accessible to search engines. That can be a good thing, as mentioned earlier, in the event that you have text on your page that isn’t relevant to your content. However, if it hides important content, keywords, or links, the trade-off for performance probably isn’t worth it.
Add Repetitive Text to Your Tags
Another way to make your HTML shorter with script is to use it to add, append, or prepend repetitive text to your tags. Sometimes this can improve search engine friendliness, too.
For example, let’s say that you have a long query string parameter that you’d like to attach to a bunch of links on your page, such as a tracking ID of some kind. Rather than attaching it in the HTML directly, where it increases the length of the file and possibly confuses search engines, you can do it by manipulating the DOM. That way, search engines would see the bare URL, but users would see one that was properly tailored for them.
For example (see file25.htm):
<a id="lk" href="file25.htm">My Link</a>

<script type="text/javascript">

var l = document.getElementById('lk'),

l.href += "?trk=9028310983019283092319380023744793939";

</script>
You can also use this approach to generate URLs that have common prefixes, rather than hard-coding them in your HTML.
![]() Caution Using this approach to create or modify resource URLs that are requested when the page first loads can break or confuse the browser’s lookahead downloader, resulting in slower performance.
Caution Using this approach to create or modify resource URLs that are requested when the page first loads can break or confuse the browser’s lookahead downloader, resulting in slower performance.
Uploading Less
For every HTTP request, the browser sends a bunch of information to the server. Here’s an example request for http://www.apress.com/ using IE9 on my desktop PC:
GET http://www.apress.com/ HTTP/1.1

Accept: text/html, application/xhtml+xml, */*

Accept-Language: en-US

User-Agent: Mozilla/5.0 (compatible; MSIE 9.0; Windows NT 6.1; WOW64; Trident/5.0)

Accept-Encoding: gzip, deflate

Connection: Keep-Alive

Host: www.apress.com

Cookie: __utma=26350701.1476874901.1296991670.1296991670.1305244143.2
You can tell a few things about my machine from these headers. The User-Agent string tells you which browser I’m using (MSIE 9.0), which operating system I’m using (Windows NT 6.1, otherwise known as Windows 7), and that I’m using a 64-bit operating system (WOW64). One cookie is also included.
Similar information is sent to the server with every request on a page, including every image, JavaScript file, and CSS file. That process takes time. For this example, there are about 325 bytes sent. A DSL connection with a 128Kbps uplink can upload text at about 10.2KB/sec. That’s about 32ms per requested object. For a page with 16 objects on it, that would be about 512ms, or close to a half-second just for the browser to send the HTTP requests. A typical 56Kbps dial-up connection might actually connect at 44Kbps, which would be about 3.5KB/sec throughput, or 1.5 seconds just to send the HTTP requests.
These numbers are useful for two reasons. First, they add to the importance of reducing the number of HTTP requests that the browser needs to make per page. Even if the responses have nothing in them, the time to send the requests can, by itself, make a big difference in performance. Second, they help emphasize that reducing the amount of data uploaded is important. Unfortunately, working from the server side, you don’t have a way to alter things like the client’s User-Agent string, or most of the other headers. The two that you do have control over, though, are cookies and the URL.
When the server asks the browser to set a cookie, it does so by sending a Set-Cookie header in the HTTP response. Here’s an example:
Set-Cookie: ads=TW.Ads.8cb5307a6a45c34;

  expires=Tue, 03-Feb-2009 12:41:30 GMT;

  path=/pages; HttpOnly
The header includes the name=value pair for the cookie, along with an optional expiration time, path, domain name, and property keywords such as HttpOnly. Modern browsers accept a maximum of 50 cookies per domain, each of which can be at most 10KB long.
The cookie in the HTTP response shown earlier is 61 bytes long. If it was 9KB, which is well within the limits of the standard, the total upload time per request would increase by a factor of 28, to about 900ms per request, or an astounding 14 seconds for a page that references 16 objects.
Most objects on a page, and in particular nearly all static objects, rarely need cookies. Cookies are generally used to store some state information, such as who you are (either by name or by session), credentials showing that you have previously logged on, and so on. The server can then examine the cookie as part of processing the request, and take some action based on what it finds. Perhaps the page is rendered differently, or it might direct you to a different page if a certain cookie is missing. Those types of actions are usually taken only for dynamic content.
Static content usually does not involve any programmatic decision making (except perhaps for authorization); the server is presented with the URL, and the content is delivered. Since the server doesn’t usually look at cookies that are associated with static content, you should be careful not to associate cookies with those files, to save the client from having to send them back. One exception is when receiving a particular static file should trigger a later action by the server on the dynamic side, such as with the CSS example earlier.
One way you can decrease the time that browsers spend uploading cookies is by using the cookie path property. The path tells the browser to send that cookie only when the first part of the requested URL starts with the path string, which is case-sensitive. In the earlier example, the browser will send the cookie back to the server only when the URL starts with /pages, which includes both /pages/page.aspx and /pagesmore/stuff.aspx. If it’s not explicitly set, the default cookie path is the root, which means that the cookie will be attached to all URLs in the domain of the site that set it.
With the earlier HTTP request example, if you eliminated cookies from the 16 static objects on the page, that would reduce upload time by about 69 / 325 = 21%.
I recommend putting all of your dynamic content under a single top-level folder, such as /pages. Static content should be placed in a separate folder, such as /static. With that layout, cookie paths can be set either on /pages/ or on specific subfolders.
Another approach to avoiding this problem is to put your static content into one or more different subdomains. You might have s1.12titans.net, s2.12titans.net, and www.12titans.net, for example. That would allow you to set cookies at the root of your main site (even accidentally) without causing an adverse impact on the performance of static files. In the “Network Optimizations” section earlier in this chapter, I covered using separate subdomains to help improve download performance through the use of multiple simultaneous network connections.
You should keep cookie names and their associated values as short as possible. There’s no need to use a long name for a cookie when one or two letters will work just fine. I suggest using two character names in most cases. Cookie values should be abbreviated, encoded, and possibly compressed to keep them short.
![]() Note When HTTP compression is enabled, only the body of the response is compressed, not the headers, which includes cookies. If cookies are long enough to benefit from compression, you will need to do it programmatically.
Note When HTTP compression is enabled, only the body of the response is compressed, not the headers, which includes cookies. If cookies are long enough to benefit from compression, you will need to do it programmatically.
You can also merge multiple cookies into one, perhaps using a comma character as a field separator or the ASP.NET dictionary cookie mechanism (see Chapter 3). Minimizing the number of cookies is also important because browsers allow only up to 50 cookies per domain. If you create too many cookies, the browser will silently drop older cookies.
Optimizing CSS
In your HTML, one of the first and easiest CSS optimizations is to replace any style properties with CSS classes or ID tags. For example, instead of this:
<div style="display:none; width:250px; z-index:1000;

  background-color:red; border:3px solid #C63; padding:0">
assign the style information to a class, and put it in a CSS file:
.info { display:none; width:250px; z-index:1000; background-color:red;

  border:3px solid #C63; padding:0 }
Then remove the style property from the <div> and replace it with the new class:
Even though that doesn’t reduce the total amount of text, there are several advantages of moving the style information into a static include file:
- It makes it easier to change the style of your pages consistently on a site-wide basis.
- It simplifies the process of dynamically switching to a different style, perhaps using ASP.NET themes.
- It helps facilitate parallel development, where a web designer might work only with the CSS to establish the look of the pages, while a programmer works on the associated HTML at the same time.
- The CSS include file can be cached on the client so that when it’s requested for other pages on your site, it doesn’t have to be downloaded again.
While you’re factoring the style information out of your HTML, be sure to watch for duplicates.
You can share common elements of each class by listing more than one class name before the definition, separated by commas. For example, instead of this:
.one { background-color:red; border:3px solid #C63; padding:0 }

.two { background-color:red; border:3px solid #C63; padding:0; color:white }
do this:
.one,.two { background-color:red; border:3px solid #C63; padding:0 }

.two { color:white }
You list the common background-color, border, and padding values once and attach them to both classes. List the color property separately that’s unique to the two class.
Some CSS properties can be inherited from parent tags by child tags. You should set inherited page-wide defaults on the body selector so that they don’t have to be duplicated for every style. This is particularly useful for things like fonts and color properties.
Although many CSS properties are inherited, not all of them are. The following CSS properties can be inherited:
The following properties don’t inherit:
borderand related propertiesdisplayfloatclearheightwidthmarginand related propertiesminandmax-heightandwidthoutlineoverflowpaddingand related propertiestext-decorationvertical-alignz-index
As an example of inheritance, don’t do this:
h1 {color: blue}

h1.name {color: blue; font-style: italic}
Do this instead:
h1 {color: blue}

h1.name {font-style: italic}
The color attribute is inherited by h1.name from the h1 entry.
Here are a few more easy optimizations:
- When you specify zero pixels, the
pxunit specifier isn’t required.- Whitespace is not required before or after braces, colons, or semicolons in a CSS rule.
- When specifying the same value for the top, right, bottom, and left margins or padding, you only need to list the value once, not four times.
- Use three-digit hex color codes instead of the six-digit version when you can. A three-digit code is equivalent to a six-digit that has each digit twice. For example,
#0a9is the same as#00aa99.- Use hex color codes instead of their
rgb()equivalents.- Use the text version of color names instead of the numeric version, when they’re the same length or shorter. The following standard colors have three-digit equivalents that are shorter than their names: black (
#000), fuchsia (#f0f), white (#fff), and yellow (#ff0). If the color name has four or fewer characters, you should always use it. You should only use color names with between five and seven characters if they don’t have a three-digit hex code.- Use CSS shorthand when possible. For example, instead of using four different values for
margin-top,margin-right,margin-bottom, andmargin-left, you can list them in a singlemarginstyle.- A semicolon is not required at the end of a CSS property list. It is only needed in between properties.
- To demonstrate several of these suggestions, consider this CSS:
body

{

  margin-top: 0px;

  margin-right: 1px;

  margin-bottom: 2px;

  margin-left: 3px;

  position: absolute;

  top: 0px;

  left: 0px;

  right: 0px;

  bottom: 0px;

  background-color: #00ffff;

}

table

{

  padding: 0px 0px 0px 0px;

  margin: 0px 0px 0px 0px;

  border-collapse: collapse;

}

tr

{

  padding: 0px 0px 0px 0px;

  margin: 0px 0px 0px 0px;

}

td

{

  padding: 0px 0px 0px 0px;

  margin: 0px 0px 0px 0px;

}
This can be optimized into the following, which is exactly equivalent:
body{margin:0 1px 2px 3px;background-color:#0ff}

table{border-collapse:collapse}

table,tr,td{padding:0;margin:0}
The fact that styles can cascade (as in Cascading Style Sheets) can also be used to make your CSS smaller.
If you wanted to set the padding for td elements to be 2px, one approach would be as follows:
table,tr{padding:0;margin:0}

td{padding:2px;margin:0}
However, you can shorten the CSS by allowing the format to cascade from one selector to another:
table,tr,td{padding:0;margin:0}

td{padding:2px}
The first td setting of padding:0 is overridden by the next line, which sets it to 2px.
Using Image Sprites and Clustering
One way to reduce the number of round-trips required to retrieve images on a page is to combine multiple images into a single file and then use CSS to display them individually. The resulting file usually loads faster since it avoids round-trips and the associated upload overhead; the smaller the files are, the larger the improvement. One way to do this is by using a technique called image sprites.
The first step in implementing sprites is to combine your images into a single file. You can do this in an image editor, or you can use an online generator (search the Web for CSS sprite generator to see several possibilities). If the images are close to the same size, one way to arrange them is in a single column, with all the left edges on the left side. As you’re making the file, record the X and Y coordinates of the upper-left corner of each embedded image, along with its size. You might need a more complex layout might if there is a large variation in images sizes. You should arrange them so that the amount of empty space in the aggregated image is minimized in order to help minimize the final size of the file. See Figure 2-6 for an example.
![]() Note In IE, square images require less memory than an equal number of pixels arranged as a thin rectangle. The difference in memory use between an image thousands of pixels tall and a few dozen pixels wide and a square version can be multiple megabytes.
Note In IE, square images require less memory than an equal number of pixels arranged as a thin rectangle. The difference in memory use between an image thousands of pixels tall and a few dozen pixels wide and a square version can be multiple megabytes.

Figure 2-6. Sample image sprite
The next step is to create the CSS to display the desired image. The first style you need is one that sets the background to the new composite image and sets the image size as a clipping rectangle. In the example, all of the images are 56 × 56 pixels in size, so the height and width CSS properties are set accordingly, and anything beyond that size will be clipped:
.sp { background: url(csg.png); height:56px; width:56px; display: block }
The display: block property is needed for Firefox in order for it to accept a height and width on nonblock elements such as an <a> tag.
Next, create one selector for each image that specifies how the background image should be positioned inside the clipping rectangle. In the example, the images are all on the left side, so their X offsets are zero. Images are normally aligned so that their upper-left corner is in the upper-left of the target location. You can move the image up within the clipping rectangle defined above by specifying a negative Y coordinate. The clipping rectangle will hide the rest of the image.
In the example, the images are separated by 1 pixel. To display the first image, we need to move the composite up by 1 pixel. The image is 56 pixels tall, and there’s another 1 pixel between it and the next image, so to see the next one, you need to move the composite up by 58 pixels, and so on for the rest of the images. See Figure 2-7.
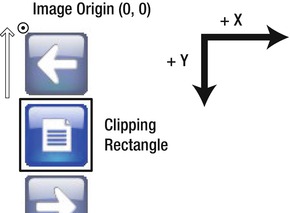
Figure 2-7. Move the image up within the clipping rectangle by applying a negative offset.
In addition to the X and Y offsets, give each image a :hover selector if it should be displayed when the mouse hovers over the original. This has the added advantage of replacing any JavaScript that might have otherwise been used for the same purpose. float: left is included for Firefox in order to get the block elements to line up horizontally instead of vertically. Here’s the resulting CSS for the example:
:hover.sprite-left { background-position: 0 -1px }

.sprite-notes { background-position: 0 -58px }

:hover.sprite-right { background-position: 0 -115px }

.sprite-right { float:left; background-position: 0 -172px }

.sprite-left { float:left; background-position: 0 -229px }

.sprite-notes-p { background-position: 0 -286px }
Finally, you can apply the CSS to your HTML. The class that assigns the background image and sets the size of the clipping rectangle should be set first, followed by the class that properly positions the image within that rectangle. The classes will work with several different HTML tags, including <span>, <div>, and <a>. Ironically, one of the tags they should not be used on is <img>, since the CSS doesn’t replace the image src property. Here are a few examples:
<span class="sp sprite-notes"></span>

<div class="sp sprite-notes-p"></div>

<a class="sp sprite-left" href="#"></a>

<a class="sp sprite-right" href="#"></a>
Notice that the sp class is applied first, followed by a space and the other class. This is a general technique that you can use to apply one class and then another. The resulting page is shown in Figure 2-8 (also see file26.htm):

Figure 2-8. Web page with CSS sprite images
When you hover over the left and right arrows, the images will be replaced, as per the :hover directive.
CSS images are loaded from paths relative to the CSS file. If your CSS is in an include file that’s located in an ASP.NET theme, there may be cases where using an <img> tag is preferable so that the images can be more easily managed outside the theme system. In that event, you can use a slightly different technique, where an outer <div> sets the size of the clipping rectangle, and CSS on the <img> tag is used to position the image, but this time using relative positioning. Here’s an example (see file27.htm):
<style>

.clu { position:relative; height:56px; width:56px; overflow:hidden }

.clu-notes { position:relative; top:-58px }

</style>

<div class="clu">

<img class="clu-notes" src="csg.png" width="56" height="343" border="0" />

</div>
Although this approach still uses composite images, I call it image clustering to differentiate it from the other technique.
Leveraging Dynamic HTML and JavaScript (Ajax)
You can make some types of page changes entirely on the client to avoid a server round-trip. For example:
- Show and hide parts of the page. For example, you can set the CSS property
display: nonewith script.- Show the current time using script, rather than setting it on the server. If the current time is the only thing on a page that changes regularly, using script might also allow you to cache the page longer than you could otherwise.
- Apply user-configured UI customizations. You can use script to set or change fonts and colors, for example, or to position content blocks.
- Leverage event-based actions, such as timers, mouse movement, key presses, and so on. For example, you can allow a large image to be dragged within a clipping window, rather than panning it on the server.
Normally, when you click a link or a button to go to a new page, the browser does either an HTTP GET or POST, and the server responds with an entirely new page. This is also true for ASP.NET postbacks, which are just a specialized form of POST.
It’s possible to submit a request to the server without leaving the current page and without causing the response to be loaded as a new page. This technique is called Ajax, short for Asynchronous JavaScript and XML, although the name is actually a misnomer, since the core mechanism has nothing to do with XML, and it doesn’t have to be asynchronous. Ajax has the following high-level features:
- It can retrieve arbitrary text from the server without requiring the page to reload.
- It facilitates fast partial-page updates or refreshes.
- It supports synchronous and asynchronous requests.
- It is supported on all modern browsers.
You might use Ajax to retrieve HTML fragments from the server and insert them directly into the page. You can also parse text that the server returns and use the results to update the page, or the server can generate JavaScript that the browser executes.
The enabling technology behind Ajax is the XmlHttpRequest object, which allows you to submit an HTTP request and receive the response without leaving the page.
Here’s an example that builds on the earlier image sprite code (see file28.htm):
<title>Chapter 2: File 28</title>

<style type="text/css">

.sp { background:url(csg.png); height:56px; width:56px; display:block }

.sprite-right { position:absolute; top:10; left:10; background-position:0 -172px }

</style>

</head>

<body>

<a class="sp sprite-right" href="#" onclick="move(this)"></a>

<script type="text/javascript">
var req = null;

var im = null;

function move(obj) {

    im = obj;

    req = getreq();

    if (req != null) {

        try {

            req.onreadystatechange = done;

            req.open("GET", "ajax1.aspx", true);

            req.send(null);

        } catch (e) {

            return null;

        }

    }

}

function getreq() {

    if (window.XMLHttpRequest) {

        req = new XMLHttpRequest();

    } else if (window.ActiveXObject) {

        req = new ActiveXObject("Microsoft.XMLHTTP");

    }

    return req;

}

function done() {

    if ((req.readyState == 4) && (req.status == 200)) {

        var resp = req.responseText.split(":");

        im.style.top = resp[0] + "px";

        im.style.left = resp[1] + "px";

    }

}

</script>
Each time you click the image, you use the XmlHttpRequest control to request the ajax1.aspx page, which returns a pair of random numbers separated by a colon. The response is parsed with script and used to move the image to a random location on the screen.
The HTML is mostly the same as before; there’s an <a> tag with a CSS class that assigns a background image and position, along with an appropriate size. The function move() is called when you click the image.
- First,
move()callsgetreq()to get a reference to anXmlHttpRequestobject in a browser-independent way.- Next, it sets
onreadystatechangeon the returnedXmlHttpRequestobject to the function that should be called when the request returns or fails.- Then it calls
open()to set the parameters for a request to the server toGET ajax1.aspx. The third parameter is set totrueto indicate that the call should be made asynchronously (synchronous Ajax requests block the UI thread and can potentially cause the browser to hang).- Then
send()is called to start the request.- After
send()returns, thedone()function is called:
- The
readyStateproperty indicates the state of the call, and a value of4means that it completed successfully.- The
statusfield is the HTTP status code, where200means that the request was processed successfully,404would beNot Found, and so on.- The body of the response is located in the
XmlHttpRequestobject’sresponseTextproperty, which you split into two fields with the stringsplitfunction.- The resulting values are parsed as integers and then used to set the absolute position
topandleftstyle properties of the<a>tag.
The server code for ajax1.aspx generates two random integers between 0 and 500 (see ajax1.aspx):
<script runat="server" language="C#">

Random random = new Random();

</script>

<%= random.Next(500) %>:<%= random.Next(500) %>

<% Response.Cache.SetCacheability(HttpCacheability.NoCache); %>
The response is marked not cacheable to ensure that the client receives a different pair of values for each request.
There are times when a lightweight do-it-yourself approach as I’ve demonstrated here is appropriate, but most projects would benefit from adopting a library to help simplify and streamline your code. I happen to like jQuery, although it’s only one option. The downside of frameworks is that they can be relatively large, which will increase page load time on first access. However, if you are using them for some other purpose, then they should already be cached on the client.
Here’s an implementation of the client-side code using jQuery (see file29.htm):
<a id="im" class="sp sprite-right" href="#" onclick="move()"></a>

<script type="text/javascript" src="jquery-1.7.1.min.js"></script>

<script type="text/javascript">

function move() {

    $.ajax('ajax1.aspx')

        .done(function (data) {

            var resp = data.split(":");

            var tf = parseInt(resp[0]);

            var lf = parseInt(resp[1]);

            $('#im').css('top', tf + "px")

                .css('left', lf + "px");

        });

}

</script>
Improving Layout and Rendering Speed
The browser can’t complete the layout for <table> tags until it knows the sizes of all resources contained in the table. For example, if you have an image in a <table> and don’t specify its size in the <img> tag, then the browser has to retrieve the image before it can complete the layout and begin rendering. If you include the size, then the browser can finish computing the table’s layout and begin rendering while it’s still waiting for the image to load.
Using the <col> tag with a width property can also reduce the time it takes to layout and render a table, particularly for large or complex tables. Here’s an example:
<table>

<col width="400" />

<col width="300" />

<tr>

<td>

This column will be 400 pixels wide

</td>

<td>

This one will be 300 pixels wide

</tr>

</table>
You can also associate a CSS class with a <col> tag. All major browsers support the <col> tag.
Be sure to include a <!DOCTYPE> tag as the first line of your HTML. <!DOCTYPE> tells the browser which “dialect” of HTML you’re using on the page, such as whether it’s old-and-quirky HTML, new HTML5, or something in between. Knowing that information helps the browser render the page more quickly, because it enables the browser’s lookahead parser to avoid restarts.
One option is the in-between variety, also known as Transitional, which is what Visual Studio sets by default when you create a new .aspx page. It allows deprecated HTML elements like <font>, although framesets are not allowed:
<!DOCTYPE html PUBLIC "-//W3C//DTD XHTML 1.0 Transitional//EN"

    "http://www.w3.org/TR/xhtml1/DTD/xhtml1-transitional.dtd">
The Strict <!DOCTYPE> doesn’t allow deprecated elements such as <font>:
<!DOCTYPE html PUBLIC "-//W3C//DTD XHTML 1.0 Strict//EN"

    "http://www.w3.org/TR/xhtml1/DTD/xhtml1-strict.dtd">
Both Transitional and Strict require your markup to be well formed XML, so remember to close all your tags and to use quotes on attributes, such as:
<img src="myimage.jpg" />
Since “bare” ampersands are illegal in XML, you should escape them in URLs with &. Here’s an example:
<a href="page.aspx?a=1&b=2">My page</a>
If you’re only targeting current browsers, HTML5 is another option:
<!DOCTYPE html>
This is also nice since it’s much shorter.
For static HTML, you should specify the character set you’re using. One approach is to use a <meta charset> tag. If you don’t specify the character set explicitly, the browser tries to guess it. Not only do you risk having the browser guess incorrectly, but the process of guessing also takes time.
Here’s how to specify UTF-8 encoding with a <meta> tag:
<meta http-equiv="Content-type" content="text/html; charset=utf-8">
Be sure to include the tag early in your HTML, before <title>.
As a shorter and much more reliable alternative, you can also specify the character set for your page using the Content-Type HTTP header. For dynamic pages, the ASP.NET runtime adds this header to the response for you automatically by default:
Content-Type: text/html; charset=utf-8
Precaching
In cases where you can anticipate the next page on your site that a user is likely to visit, you can use JavaScript to precache objects used by that page. When the user goes there, the page will load more quickly, since some of the objects it uses will already be in cache on the client. The user shouldn’t notice precaching, since it happens after the current page finishes loading, when the network would have been idle otherwise.
Using Fiddler can be very useful here to help you figure out the objects used by the most common destination pages after the current one.
You can also use precaching to load objects that users frequently access on your site from a page other than the current one. This can improve performance even when users don’t show a clear pattern of which page they go to next. Processing IIS log files with a tool such as logparser can help you identify frequently referenced objects (see Chapter 4).
Precaching Images
One approach is to precache images using the page’s onload handler. For example:
<body onload="preload()">

. . .

<script type="text/javascript">

function preload() {

    var pre = new Image(0,0);

    pre.src = "http://s1.12titans.net/static/next1.jpg";

    var prx = new Image(0,0);

    prx.src = "http://s2.12titans.net/static/next2.jpg";

}

</script>

</body>
The onload handler creates a new Image object and then sets its src property. That will cause the image to be downloaded and cached so that it is available immediately on any following page that might need it. The zero width and height specified in the constructor minimizes the work the browser has to do after it finishes retrieving the image. Images that you request in this way are placed into the same queue that the browser uses when loading the rest of page, so the same rules apply: multiple images should be spread across multiple domains so that they can be requested and downloaded in parallel.
You can do the same thing using jQuery, without explicitly setting the onload handler in the <body> tag:
<body>

. . .

<script type="text/javascript" src="jquery-1.7.1.min.js"></script>

<script type="text/javascript">

$(window).load(function() {

    var pre = new Image(0,0);

    pre.src = "http://s1.12titans.net/static/next1.jpg";
    var prx = new Image(0,0);

    prx.src = "http://s2.12titans.net/static/next2.jpg";

});

</script>

</body>
Use the page load handler for precaching, rather than the document ready event, to avoid delaying the download of resources that the current page needs.
When deciding which images to precache, you should take into account what will be most helpful to users. Good choices might include things like a composite sprite image or images that are needed for navigation. Images above the fold are generally more important than those below the fold, since the latter can’t even be seen when the page first loads.
Precaching CSS and JavaScript
You can also precache CSS and JavaScript. Precaching script can have a bigger impact than images because of the negative effects that loading them can have on page performance.
In case you might be tempted, it’s not possible to use an Image object to precache CSS or JavaScript. The file will be downloaded if you set it as the src property. However, because the MIME type of the response is not an image, IE simply discards the result.
One solution is to use Ajax. However, this approach is not ideal because it doesn’t allow content to be downloaded from domains other than the one associated with the containing page. Building on the earlier example:
<body onload="preload()">

. . .

<script type="text/javascript">

function preload()

{

    var req = getreq();

    if (req != null) {

        req.open("GET", "/static/next.js", true);

        req.send(null);

    }

    var rex = getreq();

    if (rex != null) {

        rex.open("GET", "/static/next.css", true);

        rex.send(null);

    }

}

</script>

</body>
Notice that the third parameter to the open() function is true. This means that the request is made asynchronously, so the browser doesn’t wait for the first request to finish before it starts the second one, subject to limits on the maximum number of simultaneous connections. Even more importantly, it also prevents blocking (and possibly hanging) the UI thread.
However, if your scripts and CSS reside on several different domains, as I’m advocating, then a different approach is required. You can dynamically create <script> elements. Unfortunately, this has the side effect that the script is parsed and executed, so you need to be careful only to reference code that doesn’t cause any undesirable side effects. Here’s an example:
<body onload="preload()">

. . .

<script type="text/javascript">

function preload() {

    var scr = document.createElement("script");

    scr.src = "http://s1.12titans.net/ch02/next.js";

}

</script>

</body>
Note that the <script> element does not have to be inserted into the DOM; the file will still be downloaded and placed in the browser’s cache.
You can use a similar technique for CSS:
<body onload="preload()">

. . .

<script type="text/javascript">

function preload() {

    var lnk = document.createElement("link");

    lnk.rel = "stylesheet";

    lnk.type = "text/css";

    lnk.href = "http://s1.12titans.net/ch02/next.css";

    document.getElementsByTagName('head')[0].appendChild(lnk);

}

</script>

</body>
However, unlike with <script>, the dynamic <link> tag does need to be added to the DOM in order for the file to be downloaded. Unfortunately, the result is that the CSS in the downloaded file will be applied to the current page, so it’s important to make sure it doesn’t cause any problems (such as conflicting selectors) before using this technique.
Using CSS Layout Without Tables
There’s a long-standing debate among web designers about the desirability of using CSS instead of tables for layout. Those in favor of that approach cite things like “purity of semantics” and “separation of concern” between content and style. Those opposed believe that using tables is easier to learn and implement. My recommendation is somewhere in between. I generally prefer CSS, but I also think there are times when tables can be a perfectly good solution.
From a performance perspective, CSS-based layouts tend to be much faster than their table-based equivalents. Equally important, though, is that when you use CSS, you can place content in your HTML in the order of importance to your users. Since the browser renders content in the order it’s encountered, you can make it so that users will see the most important content first, regardless of its location on the screen, which also improves perceived performance.
An additional benefit is that because one of the algorithms used by search engines ranks pages by how far away keywords are from the beginning of a file, moving your main content closer to the beginning can help improve the rank of your page. In addition, pages designed this way often look better on a wider range of devices, such as small-screen mobiles.
The area where this has the most impact is for the high-level arrangement of sections on a page; it’s definitely worth the effort to avoid enclosing most of your page in a single large table. With a typical page that has a large navigation column on the left side of the page, if you use a table for the layout, that column will come first in the HTML, before your main content. By using CSS, you can avoid that requirement and have your content first instead.
There are CSS frameworks available that can simplify this process, such as the 960 Grid System, Blueprint CSS (and their fluid versions), or Twitter Bootstrap (my current personal favorite). However, they can be a bit bulky.
If you prefer to do it yourself, the most powerful approach starts with absolute positioning. One downside is that the resulting layout may end up not being flexible in some ways. For example, the size of a top header section might be fixed, so extra-long text might not fit without some additional coding. Moving things around on the page can also be a little complicated, because adjusting the position of one item doesn’t automatically change the position of others. However, the idea here is to set this up as a template (probably using an ASP.NET master page, as I discuss in Chapter 6) so that it has to be done only once or a small number of times for your site, and not for every page.
Here are the key concepts for doing tableless layout using CSS with absolute positioning:
<div>is your friend.- You can apply absolute positioning to as few as one or two edges. The other boundaries of the
<div>can be set usingwidthormargin.- You can position edges using either percentages or pixels.
- You can specify widths as either percentages or pixels.
One disadvantage of using absolute positioning for a multicolumn page layout is that it’s challenging to position a footer properly. Since there isn’t a single container around all the columns, footers require some tricks that are beyond this book’s scope. However, this issue is well addressed in CSS frameworks, such as those mentioned earlier.
Here’s the CSS for an example layout:
<style type="text/css">

.hdr,.lft,.rgt,.ctr{position:absolute;top:90px;border:1px solid #000;padding:10px}

.hdr {

top: 10px;

left: 10px;

right: 10px;

height: 55px

}

.lft {

left: 10px;

width: 120px

}

.rgt {

right: 10px;

width: 160px

}

.ctr {

left: 155px;

right: 195px;

padding: 1em

}

h1,h2{margin:0}

</style>
You can use separate classes for the header (hdr), left (lft), right (rgt), and center (ctr) content areas. All of the classes have absolute positioning set, along with a default position of 90 pixels from the top of the page, a 1-pixel-wide black margin and 10 pixels of padding. Each class then sets its specific location with offsets relative to the edges of the page, using the left or right properties. The hdr class also overrides the top property, and the ctr class overrides padding. The margin for the <h1> and <h2> tags is set to zero to make the page look more consistent across browsers.
Notice that the rgt and lft columns have their width determined explicitly, using the width property. However, the ctr column binds its left and right edges to the edges of the page using absolute positioning. The result is that if the page is resized, the size of that column will also change. This is sometimes called a liquid layout.
The position of the outer edges of the two outer columns is straightforward: place the <div> a certain distance from the respective edge and assign it a width.
The exact location of the upper edge and both edges of the center area takes a little math. The total width of a <div> is determined by adding the content width (the value of the width property) to the left and right padding and to the width of the left and right margins and borders. Using the left side as an example: 10(position from left side of the page) + 120(content width) + 10(left padding) + 10(right padding) + 0(left and right margins) + 1(left border) + 1(right border) = 152. In the example, I’ve specified a 3-pixel space between the each area of the page so that the borders can be clearly seen, which puts the left offset of the center area at 152 + 3 = 155 pixels. The same process is repeated for the other areas.
With the CSS in place, the HTML consists of wrapping the four sections of the page in separate <div> tags and attaching the appropriate class to each:
<body>

<div class="hdr">

<h1>Page Header</h1>

</div>

<div class="ctr">

<h2>Heading</h2>

<p>Lorem ipsum dolor sit amet, consectetur adipiscing elit.

Donec vehicula. Praesent sed erat. Integer suscipit pede

laoreet tortor. Aenean pulvinar, lectus malesuada ullamcorper

sollicitudin, lectus orci vehicula augue, vel ultricies eros

urna eget nulla. Suspendisse ac nisl.</p>

</div>

<div class="lft">

<p>Aenean tempus ultrices turpis. Aenean mollis.

Ut vestibulum suscipit pede. Vestibulum commodo odio

eget arcu.</p>

</div>

<div class="rgt">

<p>Suspendisse imperdiet ligula imperdiet purus. Suspendisse

potenti. Aliquam id diam id lorem tristique malesuada.</p>

</div>

</body>
Notice that the center (main) content comes before the left and right columns, which was one of our goals. See Figure 2-9.
Figure 2-9. Three-column tableless layout using CSS with absolute positioning
Optimizing JavaScript Performance
Since the JavaScript referenced by a page needs to be parsed and executed by the browser, you should take care to make sure that it performs well. In addition to the techniques that you might apply to a compiled language, a few performance guidelines are specific to JavaScript:
- You should use temporary variables when accessing the same multi-level “dotted” objects more than once, such as in loops (each “dot” takes time to process).
- The
innerHTMLproperty is very powerful and a useful way to dynamically modify your page, particularly as part of leveraging Ajax. However, you can use the much fastertextContentproperty instead when the content contains only text and no HTML.- In the event that a number of strings will eventually be written into the page with
document.write(), it’s more efficient to write them individually rather than concatenating them together first. For example, don’t do this:var str = "The value for " + myname + " is this: " + myvalue;
document.write(str);Do this instead:
document.write("The value for ");

document.write(myname);

document.write(" is this: ");

document.write(myvalue);
Summary
In this chapter, I covered the following:
- The steps that the browser follows when requesting and processing a page, and how you can use that information to optimize your HTML for faster load times.
- Why you should include a few resource URLs in the first 500 bytes or so of your page.
- Using early and late loading to request images according to their priority to the user instead of their position on the screen.
- Using consistent case for your URLs and consistent names for your files to avoid having clients download the same files more than once, even when they’re cacheable.
- Assigning your static files to multiple domains to help the browser download them in parallel.
- Placing
<script>includes late in your HTML or preceding them with one or more images to help increase network parallelism.- Minimizing the number of script files in your project by combining them and by avoiding the need for
document.write().- Using absolute positioning or DOM manipulation to reorder scripts that you can’t modify.
- Using the page
onloadhandler to load large, low-priority images, or images that are below the fold or that might not be used (such as rollover images).- Using CSS to replace text images.
- Using lowercase URLs, tag names, property names, and so on, to help maximize the compressibility of your HTML.
- How to reduce the number and size of the images you need through careful requirements analysis.
- Using transparency as an alternative to rollover images.
- Using inline image encoding (data URI scheme).
- Optimizing the size of your images with careful cropping and correct choice of the image format, quality level, bit depth, and dimensions.
- Using image slicing to improve perceived performance when you’re loading large images.
- Using client-side image maps instead of multiple images or slicing.
- Why you should specify the size of images in your
<img>tags, using the native image size or larger.- Including a web site icon file in your project and specifying a near-term cache expiration date for it.
- Applying general HTML, CSS, and JavaScript optimizations such as removing redundant tags and using self-closing tags.
- Using the Optimize HTML feature in Expression Web.
- Avoiding optimization techniques that violate the HTML standards.
- Eliminating CSS round-trips for the first page view.
- Using JavaScript to gate page requests by strategically disabling buttons and links.
- Using JavaScript to reduce HTML size by generating repetitive HTML or by adding frequently repeating text to tag properties.
- Minimizing the amount of data that clients have to upload when they are requesting objects on a page.
- Reducing the bandwidth and time consumed by cookies by using the
pathproperty, by not associating cookies with static files, and by using short or encoded names and values.- Replacing CSS
styleproperties with classes, IDs, or other selectors in a separate (cacheable) CSS file.- Merging duplicate CSS styles and common elements and minimizing the size of your CSS with property inheritance, shorthand, cascading, and other optimizations.
- Using image sprites and clustering to reduce round-trips.
- Using dynamic HTML and JavaScript to make certain types of page changes entirely on the client.
- Using Ajax for partial-page updates.
- Improving page layout and rendering speed.
- Using precaching to help the next page that the user is likely to see load quickly.
- Using tableless layout to help optimize the order of content in your HTML so that users see what’s important to them right away when the page starts to render.
- Improving the performance of your JavaScript.