
Sprites In-Depth
In this chapter, I focus on working with sprites. You can create sprites in numerous ways from individual image files and texture atlases. I also explain how to create and play sprite animations.
A texture atlas is a regular texture that contains more than one image. Often it’s used to store all animation frames of a single character in one texture, but it’s not limited to that—in fact, you can place any image into a texture atlas. The goal is to get as many images as possible into each texture atlas. To help create a texture atlas, you have a great tool to rely on called TexturePacker, also introduced in this chapter.
Sprite batching is a technique for speeding up the drawing of sprites. As the name implies, batching sprites allows the GPU to render all the sprites in one go (or in technical terms, in one draw call). It speeds up drawing identical sprites but is most effective when using a texture atlas. If you use a texture atlas along with sprite batching, you can draw all the images in that texture atlas in one draw call.
A draw call is the process of transmitting the necessary information to the graphics hardware in order to render a texture or parts of it. For example, when you’re using the spriteFromFile method to create a CCSprite node, that sprite creates one draw call. The CPU overhead for issuing each draw call can add up so much that it can decrease the framerate, particularly when you want to display more sprites.
CCSpriteBatchNode functions like an extra layer to which you can add sprite nodes, as long as they all use the same texture. From then on, all the sprite children of the CCSpriteBatchNode are drawn with a single draw call. Effectively, the CPU tells the GPU what texture it should draw from but also passes a long list of frames and positions to the GPU so it can render a large number of sprites from that texture all by itself.
To summarize: sprite batching speeds up drawing identical sprites using the same texture and is most effective when using a texture atlas created with TexturePacker. The more sprites you display onscreen, and the bigger the sprites are (and particularly if they’re rotated and scaled too), the greater the benefit of using sprite batching.
The lessons you’ll learn in this chapter will become the foundation for the parallax-scrolling shoot-’em-up game in Chapters 7 and 8.
The newer iPhone models starting with iPhone 4 use a high-resolution display called the Retina display. It has a resolution of 960×640 pixels, which doubles the number of pixels in each direction (previous-generation devices were 480×320 pixels). The 3rd-generation iPad also has a Retina display, doubling the resolution of previous iPads from 1024×768 pixels to 2048×1536 pixels.
To make this distinction, the Retina display graphics are commonly called high-definition (HD) graphics, whereas non-Retina graphics are standard-definition (SD) graphics. HD is not limited to image files. Cocos2d also supports HD resolution versions of particle effects, bitmap fonts, and tilemaps. For each of those, you should create the HD version first and then downscale the asset for SD resolution.
Table 6-1 sketches a brief overview of the technical specifications of iOS devices. If you recall from Chapter 2, cocos2d 2.0 doesn’t support 1st- and 2nd-generation devices, but they’re in the table for comparison. One thing to keep in mind: the maximum texture size for iPad 2 has been increased to 4096×4096 but only if the device is running iOS 5.1 or newer.
Table 6-1. The Technical Specifications of iOS Devices
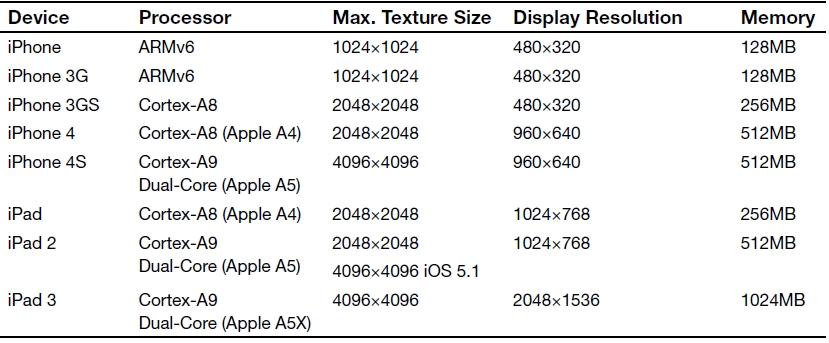
Cocos2d uses a resolution-independent coordinate system using points instead of pixels. One point is exactly one pixel on the SD devices, but one point is two pixels on Retina display devices. By writing all positions in points, the coordinates will remain the same on both devices! On a Retina iPhone the pixel resolution is 960×640, but the point resolution remains 480×320, which makes it a lot easier to develop apps for both Retina and non-Retina devices.
Tip To set an object to an exact pixel location on Retina devices, express the points in fractions. For example, the point 100.5,99.5 will set an object to the pixel coordinate 201,200 on a Retina device. However, this also sets the pixel position to 100.5,99.5 on a non-Retina device, which is referred to as subpixel rendering. Because the image is not on an exact pixel location, some blending can occur, which can cause objects to not align properly or to leave gaps. Avoiding this kind of situation is generally recommended.
Cocos2d is smart when it comes to loading images. If your code has Retina support enabled, and the app is running on an iPhone or iPod touch device that has a Retina display, cocos2d tries to load a sprite with the -hd suffix first. When the app is running on a Retina iPad, cocos2d looks for the sprite with the –ipadhd suffix instead. These suffixes are not fixed and can be changed through the CCFileUtils singleton class, although I recommended sticking with the defaults as they’re most widely supported by third-party tools. You can find this code with explanations in newly created cocos2d projects in the AppDelegate.m file:
// If the 1st suffix is not found and if fallback is enabled then fallback suffixes
// are searched. If no fallback file is found, it will try the file without any suffix.
// On iPad Retina : "-ipadhd", fallback: "-ipad", second fallback: "-hd"
// On iPad : "-ipad", fallback: "-hd"
// On iPhone Retina: "-hd"

CCFileUtils *sharedFileUtils = [CCFileUtils sharedFileUtils];
[sharedFileUtils setEnableFallbackSuffixes:NO];
[sharedFileUtils setiPhoneRetinaDisplaySuffix:@"-hd"];
[sharedFileUtils setiPadSuffix:@"-ipad"];
[sharedFileUtils setiPadRetinaDisplaySuffix:@"-ipadhd"];
So if you specify in your code to load a file named ship.png, then on a Retina display device it will first try to load ship-hd.png, and if that file doesn’t exist or the device isn’t a Retina display device, the SD image ship.png is loaded. On the iPad it tries to load the ship-ipad.png file and, if fallback is enabled, it also tries loading ship-hd.png before trying to load ship.png. On the Retina iPad cocos2d first looks for ship-ipadhd.png and, if fallback is enabled, it also tries ship-ipad.png, followed by ship-hd.png, before finally reverting to load ship.png.
Because those fallback mechanisms can be quite tricky to get right, I strongly recommend that you provide assets for all variants. For iPhone and iPod touch apps, you need standard resolution files with no suffix and the Retina resolution with the –hd suffix. For iPad apps, you will want to supply -ipad and -ipadhd assets. And for a universal app, you should really provide all four variants.
Of course, this makes sense only if all HD images have exactly twice the resolution of the SD ones. Otherwise, you’ll notice that HD images which are not exactly twice the resolution are more or less offset when displayed in your app. In general, you should avoid using HD images, whose pixel resolution is not divisible by two without a remainder. If you do support Retina displays, you should create all images in HD resolution first and then scale them down by 50 percent and save them as the SD images. Upscaling SD images doesn’t give you Retina display quality with more image details—that can only be done by the computer experts on CSI. The programming community at large is still perplexed about how they do that.
The nice thing about cocos2d’s HD image support is that your game doesn’t even have to know if it’s running on a Retina device. The code is the same. The only thing you do need to care about is that you need two images instead of one, or four if you create a universal app.
In theory, it’s also possible to use only HD graphics and then scale them down at runtime using the scale property of sprites to match the display resolution. But this comes with a major drawback: memory usage! The HD image in Figure 6-1 uses 128 KB of texture memory, assuming 32-bit color quality. The SD version consumes only 32 KB of memory. The non-Retina devices have generally half the memory (or less) than Retina devices and quickly run out of memory when you have them load textures taking up four times as much memory as needed.
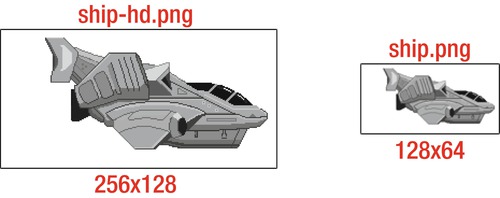
Figure 6-1 . Sprites in two resolutions for HD (Retina) and SD (non-Retina) displays
Displaying a scaled-down version of an image also incurs a performance penalty because four times more pixels must be processed each frame to display a scaled-down version of the image. On the other hand, upscaling standard resolution images for Retina devices simply provides no visual improvement, so you could just as well disable Retina mode in cocos2d altogether and simply provide only SD assets.
To enable support for Retina display resolutions in cocos2d, you must call the CCDirector method enableRetinaDisplay. Typically this is already done as part of the AppDelegate initialization code, so you only need to change this if you absolutely don’t plan to have Retina assets in your app and want to disable Retina mode.
if (![director enableRetinaDisplay:YES])
{
  CCLOG(@"Retina Display Not supported");
}
Caution If you enable Retina display support, you should supply HD images for all your sprites, bitmap fonts, particle effects, and so on. If you don’t, the resulting effect will be that your app looks normal on SD devices, but all the visuals that don’t have an HD version will be drawn in half the size on Retina displays. Always test your app on standard and Retina resolution devices. If you don’t have both, you can also change the iOS Simulator via Hardware ![]() Device to emulate a Retina device. Note that iOS Simulator set to emulate a Retina device runs a lot slower than usual. And the iPad Retina Simulator may even be unplayable if the 2048x1536 window doesn’t fit entirely on your screen.
Device to emulate a Retina device. Note that iOS Simulator set to emulate a Retina device runs a lot slower than usual. And the iPad Retina Simulator may even be unplayable if the 2048x1536 window doesn’t fit entirely on your screen.
CCSpriteBatchNode
Every time a texture is drawn on the screen, the graphics hardware has to prepare the rendering, render the graphics, and clean up after rendering. There’s an inherent overhead caused by starting and ending the rendering of a single texture. You can alleviate it by letting the graphics hardware know that you have a group of sprites that should be rendered using the same texture. In that case, the graphics hardware will perform the preparation and cleanup steps only once for a group of sprites.
Figure 6-2 shows an example of this kind of batch rendering. You can see the hundreds of identical bullets on the screen. If you rendered them each one at a time, your framerate would drop by at least 15 percent in this case, and by a lot more if the bullet texture were larger and the sprites were rotated and scaled. With a CCSpriteBatchNode, you can keep your app running at top speed. To test the effect of sprite batching, try out the Kobold2D template project named Sprite-Performance and read my blog post about sprite batch performance here: www.learn-cocos2d.com/2011/09/cocos2d-spritebatch-performance-test.
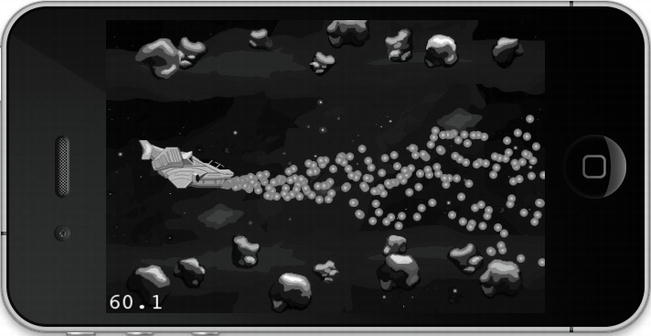
Figure 6-2 . Drawing many CCSprite nodes using the same texture is more efficient when they’re added to a CCSpriteBatchNode
As a refresher, here’s how to create a CCSprite the normal way:
CCSprite* sprite = [CCSprite spriteWithFile:@"bullet.png"];
[self addChild:sprite];
Listing 6-1 changes the creation of the same CCSprite to use a CCSpriteBatchNode instead. Of course, just adding one CCSprite to it won’t give you any benefit, so I’ll be adding a number of sprites using the same texture to the CCSpriteBatchNode.
Listing 6-1. Creating Multiple CCSprites and Adding Them to a CCSpriteBatchNode to Render Them Faster
CCSpriteBatchNode* batch = [CCSpriteBatchNode batchNodeWithFile:@"bullet.png"];
[self addChild:batch];

for (int i = 0; i < 100; i++)
{
  CCSprite* bullet = [CCSprite spriteWithFile:@"bullet.png"];
  [batch addChild:bullet];
}
Notice that in Listing 6-1 the CCSpriteBatchNode takes a file as an argument, even though the CCSpriteBatchNode itself isn’t displayed. It’s more like a CCLayer in that regard, except that you can add only CCSprite nodes to it. The reason it takes an image file as an argument is that all CCSprite nodes added to the CCSpriteBatchNode must use the same texture. If you accidentally add a sprite with a different texture, or a non-sprite node to the batch node, you’ll see one of these two error messages in the Debug Console:
'NSInternalInconsistencyException', reason: 'CCSprite is not using the same texture id'
'NSInternalInconsistencyException', reason: 'CCSpriteBatchNode only supports CCSprites as children'
When to Use CCSpriteBatchNode
You can use CCSpriteBatchNode whenever you display two or more CCSprites of the same kind. The more CCSprites you can group together, the greater the benefit of using CCSpriteBatchNode.
There are limitations, though. Because all the CCSprite nodes are added to the CCSpriteBatchNode, all CCSprite nodes added to it will be drawn at the same z-order (depth). If your game is supposed to have bullets flying behind and in front of enemies, you would have to use two CCSpriteBatchNodes to group the bullet sprites of the lower and the higher z-order independently.
Another drawback is that all CCSprites added to the CCSpriteBatchNode need to use the same texture. But that also means the CCSpriteBatchNode becomes most important when you’re using a texture atlas. With a texture atlas, you’re not limited to drawing only one image; instead, you can add a number of different images to the same texture atlas and draw all of them using the same CCSpriteBatchNode—speeding up the rendering of all the images of the same texture atlas.
If all your game’s images could fit into the same texture atlas, you could compose almost your entire game using just a single CCSpriteBatchNode (although this would be the rare exception).
Think of the CCSpriteBatchNode as similar to a CCLayer, except that it only accepts CCSprite nodes using the same texture. With that mind-set, I’m sure you’ll find the right places to use the CCSpriteBatchNode.
This project demonstrates how to use CCSpriteBatchNode. Let’s take the first steps toward the scrolling shoot-’em-up game in Chapters 7 and 8. Because developers often start by using just the CCSprite node and then improve the code to support CCSpriteBatchNode, I found it interesting to show this process exactly and how the code changes along the way.
The project uses two classes—Ship and Bullet, both derived from CCSprite—to illustrate how you can change a project from using regular CCSprite objects to a CCSpriteBatchNode.
A Common and Fatal Mistake
Before I begin, I want you to know about a common trap developers new to Objective-C can quickly find themselves in. It’s easy to make this mistake but hard to figure out the cause and how to fix it. I fell into this trap myself once. Take a look at Listing 6-2; do you see what’s wrong with this code?
Listing 6-2. A Commonly Made Fatal Mistake When Subclassing CCSprite (or Other Classes for That Matter)
-(id) init
{
  if ((self = [super initWithFile:@"ship.png"]))
  {
      [self scheduleUpdate];
  }
  return self;
}
No, it’s not about scheduleUpdate; that’s just to throw you off guard. The problem lies in the fact that the -(id) init method is the default initializer, which is eventually called by any other specialized initializer like initWithFile. Can you imagine now what’s wrong with the code?
Well, initWithFile will eventually call the default initializer, -(id) init. Then, because this class’s implementation overrides it, it will call [super initWithFile: ..] again. Repeat ad infinitum.
The solution is very simple. As shown in Listing 6-3, just give the initializer method a different name—something other than -(id) init.
Listing 6-3. Fixing the Infinite Loop Caused by the Code in Listing 6-2
-(id) initWithShipImage
{
  if ((self = [super initWithFile:@"ship.png"]))
  {
      [self scheduleUpdate];
  }
  return self;
}
Bullets Without a SpriteBatch
The Sprites01 project creates a new CCSprite for each Bulet. Notice how in Listing 6-4 the ship sprite is adding the bullets to its parent node. It doesn’t add them to itself—otherwise, all the flying bullets would be positioned relative to the ship and mimic the ship’s movement.
Listing 6-4. The Ship Shootingthe Bullets
-(void) update:(ccTime)delta
{
  // Keep creating new bullets
  Bullet* bullet = [Bullet bulletWithShip:self];

  // Add the bullets to the ship's parent
  CCNode* gameScene = [self parent];
  [gameScene addChild:bullet z:0 tag:GameSceneNodeTagBullet];
}
The Bullet sprites are added to the ship’s parent for the simple reason that adding them to the ship would position all flying bullets at an offset to the ship. This means that if the ship were to move—if it didn’t, this would be a really boring game—all the flying bullets would change their positions relative to the ship, as if they were somehow attached to it.
Tip The bullets are all added with the same z-order, 0. All nodes using the same z-order are drawn in the order in which they’re added to the scene hierarchy, meaning the node added last will be drawn in front of all other previously added nodes with the same z-order.
In addition, all bullets use the same tag. Tags don’t need to be unique, and sometimes it can be helpful to use a tag to denote group membership of nodes. You could then loop through all children of a node and perform different code based on the node tag.
The bullets also use an update method to update their position and to remove themselves at some point. Although sprites aren’t drawn if they’re outside the screen, they still consume memory and CPU power, so it’s good practice to remove any stray objects that leave the screen area at some point in time. In this case, you simply check the bullet’s position against the right-hand side of the screen, as shown in Listing 6-5.
Listing 6-5. Moving and Removing the Bullets
-(void) update:(ccTime)delta
{
  // update position of the bullet
  // multiply the velocity by the time since the last update was called
  // this ensures same bullet velocity even if framerate drops
  self.position = ccpAdd(self.position, ccpMult(velocity, delta));

  // delete the bullet if it leaves the screen
  if (self.position.x > outsideScreen)
  {
      [self removeFromParentAndCleanup:YES];
  }
}
The bullet position is updated by multiplying its velocity (speed and direction given by a CGPoint) and then adding the result to the bullet’s position. The velocity simply determines how many pixels to move in each direction every second. Multiplying the velocity by the time gives the distance the bullet traveled. The reason for using the delta time when updating the position is that this makes the movement of the bullets independent from the framerate. If you don’t do that for all moving objects, your game would slow down proportionally with a decreasing framerate—for example, when there’s a boss fight with lots of sprites on the screen.
Calculating the movement in the aptly named update method update is much more effective than using CCMoveTo or CCMoveBy actions in this case. It avoids some overhead and the problem that actions run for a given duration. If the ship were to move closer to the right-hand side of the screen, the move actions would cause the bullets to move more slowly because they need to travel a shorter distance in the same time.
Tip You can have the CCMoveTo and CCMoveBy actions move a node at a fixed speed to any position. To do so, you would first have to calculate the distance between the node’s current position to its desired destination by using the ccpDistance method. Then divide the distance by the desired speed (in pixels per frame). This works well enough, but the drawback is that ccpDistance calls the sqrtf (square root) method, which is computationally expensive. You should avoid doing this regularly. For something as simple as updating node positions every frame, avoid using move actions for continuously moving nodes.
Introducing the CCSpriteBatchNode
In the Sprites01 project, I decided to add the CCSpriteBatchNode for bullets to the GameScene itself, because bullets aren’t supposed to be added to the Ship class. Because the Ship class has no access to the GameScene, I also needed to add the singleton accessor sharedGameLayer to allow the ship to get to the CCSpriteBatchNode, as shown in Listing 6-6.
Listing 6-6. The GameScene Gets a CCSpriteBatchNode for Bullets and Accessors for the Ship Class
static GameScene* sharedGameLayer;
+(GameScene*) sharedGameLayer
{
    NSAssert(sharedGameLayer ! = nil, @" instance not yet initialized!");
    return sharedGameLayer;
}
-(id) init
{
 if ((self = [super init]))
  {
     sharedGameLayer = self;
     . . .
     CCSpriteBatchNode* batch = [CCSpriteBatchNode batchNodeWithFile:@"bullet.png"];
     [self addChild:batch z:1 tag:GameSceneNodeTagBulletSpriteBatch];
  }
  return self;
}

-(void) dealloc
{
    sharedGameLayer = nil;
}

-(CCSpriteBatchNode*) bulletSpriteBatch
{
    CCNode* node = [self getChildByTag:GameSceneNodeTagBulletSpriteBatch];
    NSAssert([node isKindOfClass:[CCSpriteBatchNode class]], @"not a SpriteBatch");
    return (CCSpriteBatchNode*)node;
}
Caution I know this singleton and the additional accessor method bulletSpriteBatch may not be to everyone’s liking. Why don’t you simply pass the CCSpriteBatchNode as a pointer to the Ship class, either in the initializer or via a property?
One reason is that Ship doesn’t own the bullet sprite batch, and therefore it shouldn’t keep a reference to it. Moreover, if the Ship class also holds a reference to the sprite batch, it could cause your whole scene to not be deallocated if you’re not careful. Nodes should never hold references to nodes that are not children or grandchildren of itself.
A node that holds a reference to its parent or any of its grandparents would cause the parent to not get deallocated. And the child nodes won’t be deallocated unless its parent gets deallocated. That means a node holding a strong reference to one of its parents will create a so-called retain cycle. This vicious circle causes a memory leak and potentially weird side effects because some nodes may remain in memory. Therefore it’s good practice to monitor the execution of a scene’s dealloc method. Whenever it doesn’t get called when changing scenes, you should investigate the cause.,
Now the Ship class can add the bullets to the sprite batch directly using the sharedGameLayer and bulletSpriteBatch accessors, as shown in Listing 6-7.
Listing 6-7. GameScene Gets a CCSpriteBatchNode for Bullets and Accessors for the Ship Class
-(void) update:(ccTime)delta
{
  Bullet* bullet = [Bullet bulletWithShip:self];
  [[[GameLayer sharedGameLayer] bulletSpriteBatch] addChild:bullet
                                                          z:0
                                                        tag:GameSceneNodeTagBullet];
}
While you’re optimizing this code, why not get rid of the unnecessary memory allocations and releases caused by the Bullet class? Allocating and releasing memory is an expensive operation you should aim to minimize during game play. A common solution is to instantiate a fixed number of objects when the game starts and then simply enable or disable/hide the objects as needed. This is called object pooling.
Because you can safely define an upper limit for the number of bullets that can be on the screen at the same time, bullets are an excellent candidate for pooling to avoid allocating and releasing bullets during game play. Because the bullets share the same texture, the additional memory used by having a greater number of bullets that resides in memory at all times is negligible. Listing 6-8 shows the changes to GameScene’s init method implemented in the Sprites01 project.
Listing 6-8. Creating a Reasonable Number of Bullet Sprites Up Front Avoids Unnecessary Memory Allocations During Game Play
CCSpriteBatchNode* batch = [CCSpriteBatchNode batchNodeWithFile:@"bullet.png"];
[self addChild:batch z:0 tag:GameSceneNodeTagBulletSpriteBatch];

// Create a number of bullets up front and reuse them whenever necessary.
for (int i = 0; i < 400; i++)
{
    Bullet* bullet = [Bullet bullet];
    bullet.visible = NO;
    [batch addChild:bullet];
}
All the bullets are made invisible because you don’t use them just yet. The GameScene class gets a new method in Listing 6-9 that allows it to shoot bullets from the ship by reactivating inactive bullets in sequence. This process is often called object pooling. Shooting is now rerouted through the GameScene because it contains the CCSpriteBatchNode used for the bullets. Once an inactive bullet has been selected, it’s instructed to shoot itself.
Listing 6-9. Shooting Is Now Rerouted
-(void) shootBulletFromShip:(Ship*)ship
{
    CCArray* bullets = [self.bulletSpriteBatch children];

    CCNode* node = [bullets objectAtIndex:nextInactiveBullet];
    NSAssert([node isKindOfClass:[Bullet class]], @"not a bullet!");

    Bullet* bullet = (Bullet*)node;
    [bullet shootBulletFromShip:ship];

    nextInactiveBullet++;
    if (nextInactiveBullet >= bullets.count)
    {
        nextInactiveBullet = 0;
    }
}
By keeping the reference counter nextInactiveBulle t, each shot uses the sprite-batched bullet from that index. Once all bullets have been shot once, the index is reset. This works fine as long as the number of bullets in the pool is always greater than the maximum number of bullets on the screen.
The Bullet class’s shoot method in Listing 6-10 only performs the necessary steps to reinitialize a bullet, including rescheduling its update selector by first unscheduling the update selector in case it’s already running. Most importantly, the Bullet is set to be visible again. Its position and velocity are also reset. The Bullet class’s shoot method simply resets the relevant variables such as position and velocity and then sets the bullet to be visible. Once the bullet has reached the end of its lifetime, it’s simply set to not be visible again.
Listing 6-10. The Bullet Class’s Shoot Method Reinitializing a Bullet
-(void) shootBulletFromShip:(Ship*)ship
{
  float spread = (CCRANDOM_0_1() - 0.5f) * 0.5f;
  velocity = CGPointMake(1, spread);

  outsideScreen = [CCDirector sharedDirector].winSize.width;
  self.position = CGPointMake(ship.position.x + ship.contentSize.width * 0.5f, ←
       ship.position.y;
  self.visible = YES;

  [self scheduleUpdate];
}
-(void) update:(ccTime)delta
{
  self.position = ccpAdd(self.position, velocity);
  if (self.position.x > outsideScreen)
  {
       self.visible = NO;
       [self unscheduleUpdate];
  }
}
Sprite Animations the Hard Way
Now brace yourself. I’d like to show you how sprite animations work. Figure 6-3 shows the ship’s animation frames. Remember that you have the entire animation in both HD and SD resolution.

Figure 6-3 . The ship’s animation—five frames with different flames
Sprite animations are another good reason to use CCSpriteBatchNode, because you can put all animation frames into the same texture to conserve memory. It’s quite a bit of code actually, as you’ll see in Listing 6-11 and in the Sprites01 project. After that, I show you how to create the same animation using a texture atlas, which cuts down the amount of code you have to write.
Listing 6-11. Adding an Animation to the Ship Without Using a Texture Atlas Requires Quite a Bit of Code
// Load the ship's animation frames as textures and create a sprite frame
NSMutableArray* frames = [NSMutableArray arrayWithCapacity:5];
for (int i = 0; i < 5; i++)
{
    // Create a texture for the animation frame
    NSString* file = [NSString stringWithFormat:@"ship-anim%i.png", i];
    CCTexture2D* texture = [[CCTextureCache sharedTextureCache] addImage:file];

    // The whole image should be used as the animation frame
    CGSize texSize = texture.contentSize;
    CGRect texRect = CGRectMake(0, 0, texSize.width, texSize.height);

    // Create a sprite frame from the texture
    CCSpriteFrame* frame = [CCSpriteFrame frameWithTexture:texture rect:texRect];
    [frames addObject:frame];
}
// Create an animation object from all the sprite animation frames
CCAnimation* anim = [CCAnimation animationWithSpriteFrames:frames delay:0.08f];

// Run the animation by using the CCAnimate action and loop it with CCRepeatForever
CCAnimate* animate = [CCAnimate actionWithAnimation:anim];
CCRepeatForever* repeat = [CCRepeatForever actionWithAction:animate];
[self runAction:repeat];
All that just to create a sprite animation with five frames? I’m afraid so. I’ll walk you through the code backward this time, which may explain the setup better. At the very end you’re using a CCAnimate action to play an animation. In this case, you’re also using a CCRepeatForever action to loop the animation.
The CCAnimate action uses a CCAnimation object (which is a container for animation frames) that defines the delay between each individual frame. In many cases, you’ll later want to refer to a previously created animation. For that purpose, cocos2d has a CCAnimationCache class that stores CCAnimation instances by name, as shown in Listing 6-12. Using the CCAnimationCache, you can access a particular animation by name later.
Listing 6-12. The CCAnimationCache Class Can Store Animations for You, Which Can Be Retrieved by Name
CCAnimation* anim = [CCAnimation animationWithSpriteFrames:frames delay:1];

// Store the animation in the CCAnimationCache
[[CCAnimationCache sharedAnimationCache] addAnimation:anim name:@"move"];

// Sometime later: retrieve the move animation from the CCAnimationCache
CCAnimation* move = [[CCAnimationCache sharedAnimationCache] animationByName:@"move"];
Going back to Listing 6-11, notice the for loop. This is where it gets complicated. The CCAnimation class must be initialized with an NSArray containing CCSpriteFrame objects. A sprite frame consists only of a reference to a texture and a rectangle that defines the area of the texture that should be drawn. The texture rectangle equals the texture’s contentSize property—in other words, the size of the actual image contained in the texture. Keep in mind that the texture can be bigger than the image it contains because textures can only have dimensions that are powers of two.
Now, unfortunately the CCSpriteFrame doesn’t take an image filename as input; it only accepts existing CCTexture2D objects. You create the texture using the CCTextureCache singleton’s addImage method, normally used to preload images as textures into memory without having to create a CCSprite or other object. You construct the filename using NSString’s stringWithFormat method, which allows you to use the loop variable i to be appended to the filename, instead of having to write out all five filenames.
To recap, from top to bottom, here’s how you can create and run a sprite animation:
- Create NSMutableArray.
- For each animation frame:
a. Create a CCTexture2D for each image.
b. Create a CCSpriteFrame using the CCTexture2D.
c. Add each CCSpriteFrame to the NSMutableArray.
- Create a CCAnimation using the frames in the NSMutableArray.
- Optionally, add the CCAnimation to the CCAnimationCache with a name.
- Use a CCAnimate action to play the animation.
Shh, calm down—no need to take that Valium. If you pack your animation frames into a texture atlas, things will get a bit easier and more efficient at the same time. More helpful is to encapsulate all this code into a helper method and stick to a naming convention for your animation files.
Animation Helper Category
Because the code to create the animation frames and the animation is common to all animations, you should consider encapsulating this into a helper method. I’ve done so by adding the CCAnimationHelper class to the project Sprite01. Instead of using static methods, I extend the CCAnimation class using an Objective-C feature called a category. Categories offer a way to add methods to an existing class without having to modify the original class. The only downside is that with a category you can’t add member variables to the class; you can only add methods. The following code is the @interface for the CCAnimation category, which I informally named Helper:
@interface CCAnimation (Helper)
+(CCAnimation*) animationWithFile:(NSString*)name
                       frameCount:(int)frameCount
                            delay:(float)delay;
@end
The @interface for an Objective-C category uses the same name as the class it extends and adds a category name within parentheses. The category name is like a variable name and thus cannot contain spaces or other characters you can’t use in variables—punctuation characters, for example. The @interface also must not contain curly brackets, because adding member variables to a category isn’t possible or allowed.
The actual @implementation for the CCAnimation category uses the same schema as the @interface by appending the category name in parentheses after the class name. Everything else is just like writing regular class methods; in this case, my extension method is named animationWithFile and takes the filename, the number of frames, and the animation delay as input:
@implementation CCAnimation (Helper)

// Creates an animation from single files
+(CCAnimation*) animationWithFile:(NSString*)name
                       frameCount:(int)frameCount
                            delay:(float)delay
{
  // Load the animation frames as textures and create the sprite frames
  NSMutableArray* frames = [NSMutableArray arrayWithCapacity:frameCount];
  for (int i = 0; i < frameCount; i++)
  {
      // Assuming all animation files are named "nameX.png"
      NSString* file = [NSString stringWithFormat:@"%@%i.png", name, i];
      CCTexture2D* texture = [[CCTextureCache sharedTextureCache] addImage:file];

      // Assuming that image file animations always use the whole image
      CGSize texSize = texture.contentSize;
      CGRect texRect = CGRectMake(0, 0, texSize.width, texSize.height);
      CCSpriteFrame* frame = [CCSpriteFrame frameWithTexture:texture rect:texRect];
      [frames addObject:frame];
  }
  // Return a CCAnimation object using all the sprite animation frames
  return [CCAnimation animationWithSpriteFrames:frames delay:delay];
}

@end
Here’s how the naming convention comes into play. The Ship’s animations have the base name ship-anim followed by a consecutive number starting with 0 and ending in the .png file extension. For example, the filenames for the Ship’s animation are named ship-anim0.png through ship-anim4.png. If you create all your animations using that naming scheme, you can use the preceding CCAnimation extension method for all your animations.
Tip I can’t help but notice that a lot of developers and artists have a habit of consecutively naming files with a fixed number of digits, by adding leading zeros where necessary. For example, you might be tempted to name your files my-anim0001 through my-anim0024. I think this habit goes back to the good ol’ computer operating systems that were incapable of natural sorting and thus incorrectly sorted filenames with consecutive numbers, with file1 followed by file10 and then file2. Those days are long gone, and you’ll actually make it harder for the programmer to load files named like that in a for loop, because you’ll have to take into account how many leading zeros should be prepended. There is a nice formatting shortcut, %03i, to prepend zeros so that the number is always at least three digits long. However, I think it’s better in our modern world to just name filenames consecutively without prepending any leading zeros. You gain a little bit of simplicity and peace of mind.
This greatly simplifies the code used to create an animation from individual files:
// The whole shebang is now encapsulated into a Category extension method
CCAnimation* anim = [CCAnimation animationWithFile:@"ship-anim"
                    frameCount:5
                    delay:0.08f];
Essentially this cuts down the number of lines from nine to just this one. As for the filename, you only need to pass the base name of your animation—in this case ship-anim. The helper method adds the consecutive numbers based on the frameCount parameter and also appends the .png file extension. You can also use the base name for the animation as the name for the animation when you add it to the CCAnimationCache so you don’t have to remember alternate names for the same animation. Previously I named the ship’s animation move. Now it’s called ship-anim, in line with the filenames. You could store and access the animation from the CCAnimationCache by using its base name like so:
NSString* shipAnimName = @"ship-anim";

CCAnimation* anim = [CCAnimation animationWithFile:shipAnimName
                     frameCount:5
                     delay:0.08f];
[[CCAnimationCache sharedAnimationCache] addAnimation:anim name:shipAnimName];

// sometime later:
CCAnimation* shipAnim = [shipSprite animationByName:shipAnimName];
The animationWithFile helper method makes two assumptions: animation image filenames are consecutively numbered beginning with 0, and the files must have the .png file extension. It’s up to you whether to stick to this exact naming convention or change it to accommodate your own needs. For example, you might find it more convenient to start numbering your animations starting with 1 instead of 0. In that case, you’ll have to change the for loop so that the name string is formatted with i + 1. The important part is to stick to whatever naming convention you choose to make your life (and your code) easier.
You should take away three things from this:
- Encapsulate commonly used code by defining your own methods.
- Use Objective-C categories to add methods to existing classes.
- Define resource filenaming conventions to support your code.
Working with Texture Atlases
Texture atlases help conserve precious memory and speed up the rendering of sprites. Because a texture atlas is nothing but a big texture, you can render all the images it contains using a CCSpriteBatchNode, thus reducing the draw call overhead. Using texture atlases is a win-win for both memory usage and performance.
So far, for all the sprites used, I simply loaded the image file they need to display. Internally, this image becomes the sprite’s texture, which contains the image, but the texture width and height always have to be a power of two—for example, 1024×128 or 256×512. The texture size is increased automatically to conform to this rule, possibly taking up more memory than the image size would suggest. For example, an image with dimensions of 140×600 becomes a texture with dimensions of 256×1024 in memory. This texture is wasting a lot of precious memory, and the amount of wasted memory becomes significant if you have several such images and you load them each into individual textures.
That’s where the texture atlas comes in. It’s simply an image that is already aligned to a power-of-two dimension and contains multiple images. Each image contained in the texture atlas has a sprite frame that defines the rectangle area where the image is within the texture atlas. In other words, a sprite frame is a CGRect structure that defines which part of the texture atlas should be used as the sprite’s image. These sprite frames are saved in a separate .plist file so that cocos2d can render very specific images from a large texture atlas texture.
Introducing TexturePacker
Packing images into a texture atlas and noting the rectangular sprite frames they occupy would be a monumental task if it weren’t for TexturePacker, a 2D sprite-packing tool (shown in Figure 6-4). The TexturePacker app is available in both free and paid versions and can be downloaded from www.texturepacker.com.
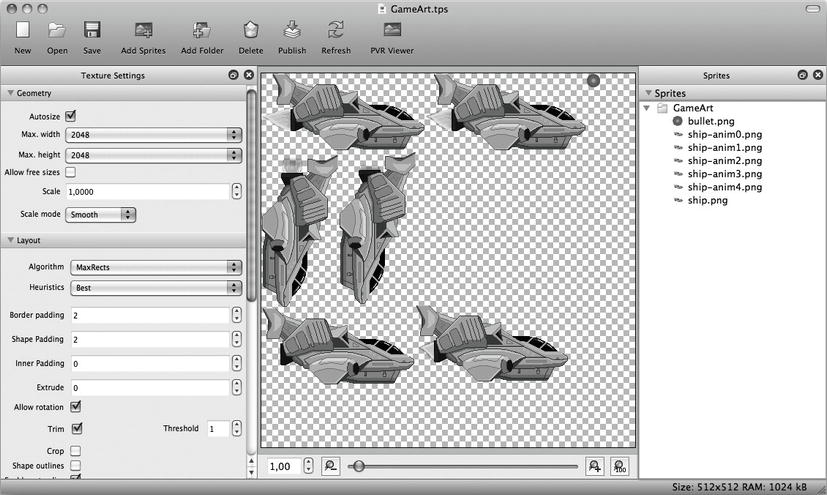
Figure 6-4 . TexturePacker with the ship’s animation frames already packed into a texture atlas
The free version TexturePacker Essential is sufficient for basic needs and you can use it to create commercial apps. It doesn’t have the Pro version’s more advanced features, such as saving high-resolution data for Retina displays, scaling down images for non-Retina displays on the fly, or optimizing the graphics to save memory. The Pro version requires a paid license that comes at a reasonably low price.
You can also run TexturePacker as a command-line tool via the Terminal app, allowing it to be integrated in your Xcode build process. You can find more information on the TexturePacker command-line tool and how to use it on the TexturePacker web site.
In this chapter, I use TexturePacker Pro because it can also export to the PVR image format, the native image format for iPhone’s PowerVR graphics chip. The Pro version also conveniently creates the SD and HD textures you need to be able to run the project on all variants of the iPhone.
Preparing the Project for TexturePacker
To use TexturePacker, the project Sprites02 need a little reorganizing. Currently all images in the HD and SD variants are in the Resources folder. Because you’re going to use a texture atlas that contains all the images in one texture, the individual images don’t need to be copied onto the device anymore.
First create a new folder called Assets that keeps all the source images and the save file for the texture atlases. You don’t need to have both HD and SD versions of each image anymore because TexturePacker will scale down the images for you. So, with TexturePacker you’re working only with the HD variants, and the image files don’t need to have the -hd suffix anymore. Figure 6-5 shows the Assets folder of the Sprites02 project.
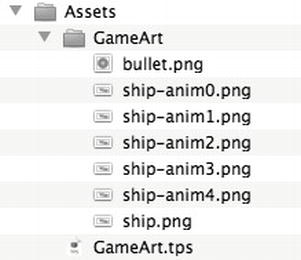
Figure 6-5 . The folder contents of the Assets folder
Another tip that makes handling image files easier is to put all image files that should be packed into the same texture atlas in the same subfolder. In the case of the Sprites02 project, the Assets folder has a subfolder called GameArt that contains all the image files that are packed into the game-art texture atlas.
TexturePacker simply adds new image files in that folder when you’re refreshing the texture atlas in TexturePacker, so you don’t have to add individual images manually anymore. TexturePacker will create one .tps (TexturePacker Save) file for each folder.
Caution If you have an individual image file called bullet.png, the HD version must be named bullet-hd.png, and in cocos2d you have to load the file with the string @"bullet.png".
A common mistake that happens when you move from individual images to a texture atlas is to add images to the texture atlas that have the –hd prefix in their filename. In that case, the resulting texture atlas for SD and HD versions might be named bulletatlas.pvr.czz and bulletatlas-hd.pvr.czz. But the images contained in the texture atlas, now called sprite frames, will all have the name bullet-hd.png even in the SD texture atlas. Thus, you’d have to change all references in cocos2d from @"bullet.png" to @"bullet-hd.png". To avoid this issue, for creating a texture atlas I recommend using HD version images without the –hd suffix in the filename.
Even worse would be to manually create two texture atlases, one for SD images containing only image files without the –hd suffix and one for HD images containing only image files with the –hd suffix. If you then loaded @"bullet.png" in cocos2d, it wouldn’t be able to find the –hd image on Retina devices. If you loaded @"bullet-hd.png", the SD images wouldn’t load. That’s because the distinction between SD and HD is done at the texture atlas level; you will have a texture atlas with the –hd suffix and one without. The names of the sprite frames inside a texture atlas must be identical for both SD and HD texture atlases.
Creating a Texture Atlas with TexturePacker
Working with TexturePacker is very straightforward and involves only a few steps, as illustrated in Figure 6-6. In most cases you’re fine using the default settings.

Figure 6-6 . The process of working with TexturePacker is straightforward
First add the images you want to add to the texture atlas. You can always add more at a later time or remove existing ones. Click the Add Sprites or Add Folder button, or simply drag and drop sprites or folders on the right pane. TexturePacker can load images from the most common graphics formats. In this case, you add all ship images and animation frames, as well as the bullet image. You can find them in the Assets folder in the Sprites02 example.
Simply drop the GameArt folder on the right pane. After doing so, the sprites immediately appear in the center pane, which is the real-time preview of our texture atlas. It updates immediately whenever you change any setting, including image optimizations and image layout.
In the status bar at the bottom right-hand corner, you also see how big the resulting texture will be and how much memory it will use on the device. In this case, the texture atlas is 1024×1024 pixels and will use up 4MB of texture memory. This information is for the HD texture. The SD texture will be about 512×512 pixels in size and consume a quarter of the memory, which is 512KB. Note that the SD texture atlas may not always be exactly half the width and height of the HD atlas. That’s because some layout features such as padding don’t scale when the SD texture is created.
Caution Unless you develop your game exclusively for the latest generation of devices, you shouldn’t use a texture width or height above 2048 pixels. All devices supported by cocos2d 2.0 support texture dimensions of 2048×2048 pixels—only iPhone 4S and iPad 2 and newer support 4096×4096 texture dimensions. You can limit the maximum texture size that TexturePacker should generate in the left-hand pane’s Geometry section.
TexturePacker uses several tricks to optimize the texture space to create an optimal packing rate. First it trims the transparent border pixels of each image. Cocos2d compensates for this by adding the trimmed area as an offset to the sprite’s position when drawing it. This has two advantages: it reduces the texture size and speeds up the rendering of the sprites.
You may also notice that some images are rotated. TexurePacker rotates them to optimize how the texture atlas space is used. Again, cocos2d compensates by restoring the original orientation when loading the image into memory. If you add two or more exactly identical images, TexturePacker will add only one image to further save texture atlas space. If the images are referenced by different filenames, then you can load the image in cocos2d by using any of the image’s source filenames. Whenever an image in a texture atlas has multiple source files containing the same image, TexturePacker will draw a small overlay (a stack of paper) over the image in the center pane.
In case you’re wondering about the Border Padding and Shape Padding settings, they determine how many pixels of space are left between all images and the border of the atlas. The default of 2 pixels ensures that all the images in the texture atlas can be drawn without any artifacts. With less padding, images can show stray pixels around their borders when displayed in your game. The amount and color of these stray pixels depend on the surrounding pixels from other images in the texture atlas. This is a technical issue that has to do with how the graphics hardware filters textures, and the only solution is to leave a certain amount of padding between all images in a texture atlas.
Before you can save the texture atlas, you need to make adjustments to the TexturePacker Output settings depicted in Figure 6-7.
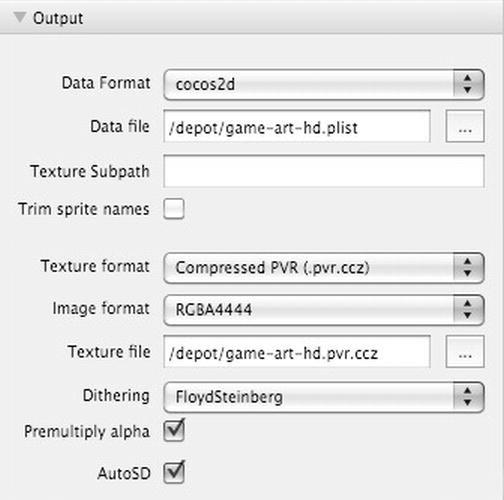
Figure 6-7 . TexturePacker Output settings
First make sure that the data format is set to cocos2d because TexturePacker can be used with other game engines as well.
For the data file, specify a file located in the project’s Resources folder. Make sure the file has the -hd suffix. In the Sprites02 project, the file is named game-art-hd.plist. TexturePacker will save the HD texture to the given filename but will omit the -hd suffix for the SD version, which is exactly how cocos2d wants the data. To have TexturePacker automatically create the SD version of the texture atlas, you also need to check the AutoSD check box at the bottom.
Finally, choose Texture Format and Image Format for the exported texture atlas. The recommended Texture Format setting is Compressed PVR (.pvr.ccz), which is a compressed version of the iPhone’s native PVR format. This format typically loads a lot faster than PNG, and if you have images with a 16-bit color depth, the compressed PVR format will create smaller files than PNG. The PNG file format will always store 32-bit color values, regardless of the actual color bit depth of the image.
Note Color depth, bit depth, or bits per pixel is the number of bits that are stored to represent a pixel’s color information. A color depth of 4 bits allows each pixel in the image to have one of 16 possible colors. With a color depth of 16 bits, an image’s pixel can display a range of 65,536 colors. And with a 24-bit color depth it can have millions of colors—so many, in fact, that an image with 24-bit color depth is sometimes referred to as a true-color image. Why is this format commonly referred to as 32-bit? Because the additional 8 bits in the most common file formats are used to store the opacity of each pixel.
I encourage you to read the Wikipedia articles on color depth (http://en.wikipedia.org/wiki/Color_depth) and the RGB color model (http://en.wikipedia.org/wiki/RGB) to learn more about how computing devices display color.
When using the PVR format, you should also enable the Premultiply alpha check box to avoid dark borders around sprites in some cases. In your project’s app delegate, after cocos2d has been initialized and shortly before running the first scene, you should also let cocos2d know that your PVR images uses premultiplied alpha. In cocos2d project templates this is already set in the AppDelegate.m file.
// Enable pre multiplied alpha for PVR textures to avoid artifacts
[CCTexture2D PVRImagesHavePremultipliedAlpha:YES];
For the Image Format setting, you have a variety of options. The default format is RGBA8888, which gives the best-looking results. It provides 24-bit color depth and an 8-bit alpha channel. The downside is that it’s also the slowest to render, and particularly on 1st- and 2nd-generation devices, falling back to a lower-quality image format and favoring rendering speed are recommended. However, providing device-specific variants of texture atlases is cumbersome to work with. You may want to simply render fewer sprites on older devices or possibly even drop support for those devices altogether.
The best compromise between quality, memory usage, and rendering speed is provided by the RGBA4444 format. It uses 4 bits per color and 4 bits for the alpha channel. This is the most commonly used image format for sprites.
If transparency isn’t important to you, and you’d like to have more color variations, you should use the RGB5551 format, which provides 5 bits per color and only 1 bit for the alpha channel. The 1 bit for the alpha channel can be either set or not, which means your image can have only fully transparent or fully opaque pixels. In other words, RGB5551 sprites can’t blend with pixels in the background.
If you don’t need any transparency at all, like for background images, you can use the RGB565 format, which provides 5 bits for red, 6 bits for green, and 5 bits for the blue color channel. It doesn’t use an alpha channel. The fact that there are 6 bits for green colors and only 5 bits for the other two color channels has something to do with our hunter-gatherer background. Our retina is simply trained to differentiate better between green color tones, so that extra bit is provided to the green channel where we would notice a “missing color bit” more easily.
The PVRTC2 and PVRTC4 image formats provide 2 and 4 bits per pixel, respectively, and no alpha channel. Only use this format for monotonous or dark background images and if you really need to squeeze out some memory and rendering speed because they come with a severe impact on image quality. Think of the artifacts seen in JPEG images with a relatively low-quality setting.
The Dithering option allows you to optimize the image quality whenever the image format requires the image’s color depth to be reduced. Dithering emulates gradients by randomly distributing pixels with similar color tones across a larger area. This effectively reduces the “banding” effect when the color depth of an image is reduced. Because all the dithering options are applied in real time in the TexturePacker preview without affecting your source images, you can just try the various dithering algorithms to find out which provides the best quality.
Tip While evaluating dithering algorithms, keep in mind that the ultimate quality test is of course your game running on a device. Some artifacts that are clearly visible on your computer screen may not be noticeable on the device. In particular, that’s because the color profile of your computer screen is different from the device’s color profile, either through manual adjustments (brightness, contrast, color tone), limitations imposed by the display technology, or a change in color vibrancy as the display ages. That also means a single device isn’t representative for the final look of the game. At the very least, you should test the game with the device brightness set to minimum and maximum levels.
When you’re done with the Output settings, simply click Publish, and TexturePacker will write the HD and SD textures and the accompanying plist files to your Resources folder.
Using the Texture Atlas with cocos2d
The next thing you should do is add the new texture atlas to the Xcode project’s Resource group. Cocos2d only needs the game-art-hd.pvr.ccz, game-art.pvr.ccz, game-art-hd.plist, and game-art.plist files for the texture atlas. Don’t add the TexturePacker .tps files and individual source image files to your project. The code in Listing 6-13 now replaces the code in Listing 6-11.
Listing 6-13. The Ship Class Now Uses the Texture Atlas for Its Initial Frame and the Animation
// Load the texture atlas sprite frames; this also loads the Texture with the same name
CCSpriteFrameCache* frameCache = [CCSpriteFrameCache sharedSpriteFrameCache];
[frameCache addSpriteFramesWithFile:@"game-art.plist"];

// Loading the ship's sprite using a sprite frame name (e.g., the file name)
if ((self = [super initWithSpriteFrameName:@"ship.png"]))
{
   // Load the ship's animation frames
   NSMutableArray* frames = [NSMutableArray arrayWithCapacity:5];
   for (int i = 0; i < 5; i++)
   {
        NSString* file = [NSString stringWithFormat:@"ship-anim%i.png", i];

        CCSpriteFrame* frame = [frameCache spriteFrameByName:file];
        [frames addObject:frame];
   }

   // Create an animation object from all the sprite animation frames
   CCAnimation* anim = [CCAnimation animationWithSpriteFrames:frames delay:0.08f];

   // Run the animation by using the CCAnimate action
   CCAnimate* animate = [CCAnimate actionWithAnimation:anim];
   CCRepeatForever* repeat = [CCRepeatForever actionWithAction:animate];
   [self runAction:repeat];
}
At the very beginning of the code, I assigned the sharedSpriteFrameCache to a local variable. The only reason to do so is that the [CCSpriteFrameCache sharedSpriteFrameCache] singleton accessor is pretty lengthy to write.
To load a texture atlas, use the CCSpriteFrameCache’s method addSpriteFramesWithFile and pass it the name of the .plist file for this texture atlas. The CCSpriteFrameCache will load the sprite frames and will also try to load the texture. Cocos2d automatically tries to load the -hd suffixed files on Retina display devices.
Note If you’re using a large texture atlas texture—with dimensions of 1024×1024 or higher—you should load this texture before game play begins. It will take a moment to load such a large texture (in the worst case it will freeze the game for a few seconds). You may not notice the delay when testing on a Retina iPad, but users with an iPhone 3GS will surely notice the delay.
Because the Ship class derives from CCSprite, and because I wanted it to use the ship.png image from the texture atlas, I changed its initialization to use the initWithSpriteFrameName method. This is identical to the code that initializes a regular CCSprite from a texture atlas using a sprite frame name.
CCSprite* sprite = [CCSprite spriteWithSpriteFrameName:@"ship.png"];
If you load several texture atlases, and only one contains the sprite frame with the name ship.png, cocos2d will still find that frame and use the correct texture for the sprite. In essence, you work with the sprite frames by name as if they were the image’s filenames, but you don’t need to know which texture contains the actual image (unless you use a CCSpriteBatchNode, of course, which requires that all its children use the same texture).
In Listing 6-13 you could get rid of most of the extra code required to initialize a CCSpriteFrame object. There’s no need any more to load a Texture2D and define the texture’s dimensions. Instead, simply call [CCSpriteFrame spriteFrameByName:file] to create the sprite frame with the corresponding name.
Updating the CCAnimation Helper Category
Although you could significantly reduce the code to create a CCAnimation by using a texture atlas, it’s still worthwhile to encapsulate this code into the CCAnimationHelper class. After all, one line of code is still less than five lines, especially if you would otherwise use the same five lines of code everywhere. Without further ado, Listing 6-14 shows the extended CCAnimation Helper interface declaration, which adds the animationWithFrame method.
Listing 6-14. The @interface for the CCAnimation Helper Category
interface CCAnimation (Helper)
+(CCAnimation*) animationWithFile:(NSString*)name
                        frameCount:(int)frameCount
                             delay:(float)delay;

+(CCAnimation*) animationWithFrame:(NSString*)frame
                        frameCount:(int)frameCount
                             delay:(float)delay;
@end
This code is essentially the same method using the same parameters, except that this method uses sprite frames instead of filenames. The implementation is nothing spectacular and is very similar to the animationWithFile method shown in Listing 6-15.
Listing 6-15. The animationWithFrame Helper Method Makes It Easier to Create an Animation
// Creates an animation from sprite frames
+(CCAnimation*) animationWithFrame:(NSString*)frame
                        frameCount:(int)frameCount
                             delay:(float)delay
{
  // load the ship's animation frames as textures and create a sprite frame
  NSMutableArray* frames = [NSMutableArray arrayWithCapacity:frameCount];
  for (int i = 0; i < frameCount; i++)
  {
      NSString* file = [NSString stringWithFormat:@"%@%i.png", frame, i];
      CCSpriteFrameCache* frameCache = [CCSpriteFrameCache sharedSpriteFrameCache];
      CCSpriteFrame* frame = [frameCache spriteFrameByName:file];
      [frames addObject:frame];
  }

  // Return an animation object from all the sprite animation frames
  return [CCAnimation animationWithSpriteFrames:frames delay:delay];
}
The big plus is now, once again, that you can create an animation from a texture atlas using sprite frame names with just one line of code:
// Create an animation object from all the sprite animation frames
CCAnimation* anim = [CCAnimation animationWithFrame:@"ship-anim"
                    frameCount:5
                    delay:0.08f];
The much, much bigger plus, though, is that you can now work with your animations as single files and only later create a texture atlas. All you have to do is to change one line of code from using animationWithFile to the animationWithFrame method. This allows you to quickly prototype animations using individual files, and only when you’re satisfied do you pack the animation frames into a texture atlas and load the animation images from it.
You’ll also find this updated CCAnimationHelper code in the Sprites02 project.
All into One and One for All
Whenever possible, you should add all your game’s images into one texture atlas or as few as possible, and preferably use one CCSpriteBatchNode to draw all the sprites from the same texture atlas. It’s more effective both from a workflow perspective and for performance to use one texture atlas with dimensions of 2048×2048 than 10 smaller ones, and you will have to use at least 10 sprite batch nodes instead of just one. That means 10 draw calls at a minimum, which is less than ideal. Organizing your images may require some thought, but it’s well worth it.
Unlike code, which you should separate into distinct logical components, with a texture atlas your goal should be to put as many images as possible into the same texture atlas while trying to reduce the wasted space of each texture atlas as much as possible.
It may seem logical to use one texture atlas for your player’s images; another for monster A, B, and C and their animations; and so on. But that would mean more draw calls. However, that’s helpful only if you have a huge number of images for each game object and you want to be selective about which images to load into memory at any one time. One such scenario might be a shoot-’em-up game with different worlds where you know that each world has separate types of enemies. In that case, it makes sense to not mix and match enemies of different worlds into the same texture atlas. Otherwise, just for organization’s sake, you shouldn’t split up your texture atlases by game objects but rather fill each texture atlas as much as possible.
Don’t fall into the habit of creating one texture atlas per graphical object because it seems logical to do so. The best-performing texture atlases are full to the brim with a great variety of images that can all be rendered with a single sprite batch node.
As long as your game’s images can fit into two or three texture atlases of 2048×2048 size, you should just put all the images into those texture atlases and load them up front. This will use 32MB to 48MB of memory for your textures. Your actual program code and other assets such as audio files don’t take up that much space, so you should be able to keep these texture atlases in memory even on iOS devices with just 256MB of memory.
Once you pass that point, however, you need a better strategy to handle your texture memory. One such strategy, as mentioned earlier, could be to divide your game’s images into worlds and load only the texture atlases needed for the current world. This will introduce a short delay when a new world is loaded and would be a good use for the LoadingScene described in Chapter 5.
Because cocos2d automatically caches all images, you need a way to specifically unload textures that you know you don’t need. You can rely on cocos2d to do that for you:
[[CCSpriteFrameCache sharedSpriteFrameCache] removeUnusedSpriteFrames];
[[CCTextureCache sharedTextureCache] removeUnusedTextures];
Obviously you should call these methods only when you want to remove unused textures. You typically do that after changing scenes—not during game play. Keep in mind that changing scenes causes the previous scene to be deallocated only after the new scene has been initialized. This means you can’t use the removeUnused methods in the init method of a scene because the textures will still be in use—that is, unless you use the LoadingScene from Chapter 5 in between two scenes, in which case you should extend it so that it removes unused textures before replacing itself with the new scene.
If you absolutely want to remove all textures from memory before loading new ones, you should use the purge methods instead:
[CCSpriteFrameCache purgeSharedSpriteFrameCache];
[CCTextureCache purgeSharedTextureCache];
Summary
In this chapter, you learned how to use a CCSpriteBatchNode to render multiple sprites using the same texture faster, whether that texture is a single image or a sprite frame of a texture atlas.
Subclassing your game objects from CCSprite also introduces a few subtle differences and stumbling blocks, which I demonstrated earlier in this chapter, before moving on to show you how to create sprite animations. Because the code to create animations is very complex, I gave you the solution in the form of a CCAnimationHelper category.
I also showed you how to work with texture atlases and why and how you should use them. Of course, one can’t say “texture atlas” without mentioning TexturePacker in the same sentence. It’s hands down the best tool to create and modify texture atlases, and if you don’t want to spend money on it, you can still use the free command-line version without the advanced features.
In the next chapter, you’ll be working on your next game, as we work on making the shooter game playable.