
Cocos2d and UIKit Views
For most iOS developers there’s a clear dividing line: if you want to program “regular” apps with no or little multimedia content, you’ll be using Cocoa Touch and its UIKit framework to create the iPhone’s and iPad’s native user interfaces.
But if you want to develop iOS games and multimedia applications, you want to use cocos2d and have little incentive to use anything but CCSprite and CCMenu to create your game’s scenes and user interfaces.
A great number of developers are experienced only in either environment, and they often find it confusing to cross the border from Cocoa Touch to cocos2d and vice versa. In almost all these cases, the programmers want to combine the best of both worlds, leveraging their existing knowledge of either Cocoa Touch or cocos2d to create hybrid applications.
Because Cocoa Touch and cocos2d work fundamentally in different ways and require a different mind-set, it’s usually not straightforward to create such hybrids. This chapter will help you transition in both directions. You’ll learn how to add Cocoa Touch views and features to a cocos2d application; at the same time, you’ll also learn how you can plug in cocos2d to an existing Cocoa Touch application.
What Is Cocoa Touch?
Cocoa Touch is the name of the application programming interface (API) used to create iOS applications. It’s of course inspired by Cocoa, the API for programming Mac OS X applications.
Cocoa Touch is comprised of several frameworks, including Core Animation, Core Data, Map Kit, Store Kit, and Web Kit, just to name a few. But strictly speaking, even cocos2d is a Cocoa Touch library because the OpenGL ES framework, as well as Core Audio, OpenAL, and AV Foundation (AV stands for Audio/Video) frameworks that cocos2d is built on, are part of Cocoa Touch.
It’s no wonder then that most programmers refer specifically to UIKit when they’re asking about how to integrate Cocoa Touch views into cocos2d. UIKit is the framework that provides programmers with the native iOS controls and views used to build the graphical user interfaces (GUIs) of iOS applications. At the same time, other frameworks such as iAd, Web Kit, Game Kit, and Map Kit typically include specialized views, and they’re mostly built with the GUI elements provided by UIKit.
So, technically, even if programmers discuss integration issues of Game Center with cocos2d, they often refer to the views as being part of UIKit, even though the actual view is provided by Game Kit or Web Kit, for example. For reference, here are the cocos2d forum topics tagged with UIKit and Cocoa Touch:
http://www.cocos2d-iphone.org/forum/tags/uikit
http://www.cocos2d-iphone.org/forum/tags/cocoa-touch
Using Cocoa Touch and cocos2d Together
Before you get to work with the code in this chapter, I want to step back for a moment and discuss why one would want to mix cocos2d with Cocoa Touch (UIKit views), what the limitations are, and what the differences between Cocoa Touch and cocos2d are.
Why Mix Cocoa Touch with cocos2d?
There are many good reasons to mix Cocoa Touch and cocos2d. Essentially, they all boil down to a better user experience or faster development.
For one, if you’re a cocos2d programmer, you’ll be adding some Cocoa Touch views to your application sooner or later, most commonly to generate some revenue with iAd or if you’re writing a Game Center–enabled game. But you also might want to provide users with a native-looking user interface, which you can design efficiently with Interface Builder and later skin with textures that maintain the game’s look and feel so that your user interface doesn’t look like the Settings app. A great example of such a skinned app is Carcassone—you have to look twice to see that its user interface is actually entirely made with UIKit views.
Although you can make reasonably good user interfaces with cocos2d, there’s simply a much greater variety of already existing controls available from UIKit that cocos2d doesn’t provide. Cocos2d provides CCMenu and that’s about it in terms of user interface controls. And the occasional reimplementation of popular UIKit views in cocos2d always lacks in feel and features. Sliders, on/off toggle buttons, navigation views, and tab bars can all be highly useful in designing your game’s user interface, especially in those games or parts of the game where performance is not of the utmost importance.
If you’re a Cocoa Touch programmer and you need some multimedia content in your game, it’s much easier to rely on cocos2d to do that job and do it with high performance rather than programming it directly with OpenGL ES. After all, cocos2d shields you from OpenGL ES and provides an interface that’s much easier to use.
Cocoa Touch does provide powerful graphical frameworks like Core Graphics and Core Animation. But they suffer from a major disadvantage: they’re often not fast enough for real-time games. They were designed to display and animate user interface elements, not games.
Limitations of Mixing Cocoa Touch with cocos2d
When designing your app or game that mixes Cocoa Touch views with the cocos2d view, you should be aware of some limitations. Most obviously, UIKit views aren’t designed for high performance, so you may notice a drop in performance, especially if you use UIKit views in fast-paced games and during game play.
For example, it’s more favorable for performance to rely on CCLabelBMFont to display the score during game play than using a UITextField for the same purpose. And likewise, you should prefer to use CCMenu for the in-game pause menu button rather than using a UIButton. In menu screens, though, those performance considerations are usually not a problem, and you can see improved productivity from being able to use Interface Builder to create your menu screens.
You should also be aware that any UIKit view can only be either in front of the entire cocos2d view or entirely behind it. You can’t have a UIKit view that’s in front of some of the cocos2d scene’s sprites, labels, effects, and so on, while at the same time being behind other cocos2d sprites, labels, effects, or other nodes. In other words, you can’t “sandwich” a UIKit view between two or more cocos2d nodes.
You can do the opposite, however, although with some limitations and manual labor. You can “sandwich” the cocos2d view: UIKit views in the background, then a transparent cocos2d view with some nodes, and then some more UIKit views in the foreground. This approach requires a little more work setting up the view hierarchy and making the cocos2d view transparent. Imagine playing a full-motion video in the background, over which you draw cocos2d sprites, and the rest of the user interface is made up of UIKit views.
But touch input remains a problem: either the UIKit views and not the cocos2d view will receive input, or those UIKit views added to the cocos2d view and the cocos2d view itself will receive input but not the views in the background. This has to do with the fact that the cocos2d view receives all touches on the screen simply because it occupies the entire screen. So, you need to write additional code to process the touches on the cocos2d view and then decide whether the cocos2d view should forward the touches—for example, if the user didn’t touch any of the cocos2d sprites currently displayed on screen.
Allowing all views to receive input is possible, and I’ll provide you with a basic solution later in this chapter. But it’s up to you to improve and adapt it for your own needs. Depending on your needs, the necessary code changes may actually be substantial and challenging in order to fully support UIKit views both in front of the cocos2d view and behind it and have all views reacting properly to touch input.
How Is Cocoa Touch Different from cocos2d?
Let’s take a look at the major differences of Cocoa Touch programming compared to working with cocos2d. One difference is the Model-View-Controller pattern common to Cocoa Touch applications but essentially missing from cocos2d. And then you also have to consider the differences caused by cocos2d’s OpenGL ES view because it behaves differently in some aspects than a regular UIView.
The Model-View-Controller Pattern
Probably the first and biggest difference for programmers coming from a Cocoa Touch background is that cocos2d doesn’t strictly adhere to the Model-View-Controller (MVC) pattern, which is commonplace in Cocoa and Cocoa Touch.
The MVC pattern divides the programming tasks into the three subsets: model, view, and controller. The model contains any algorithms that run behind the scenes and maintains the state of the world; in essence, the model represents knowledge. The view is the visual representation of the model and renders the current state of the world based on the model data. And the controller essentially provides a means for the user to interact with the world through user input, but it’s also used to react to other external events such as receiving data over the network. The model, view, and controller are each separate classes to decouple the user interface from business (or game) logic.
In games, you can apply the MVC pattern, and many have attempted to do so with cocos2d. You’ll find a good number of articles on the subject if you search for cocos2d mvc, and my personal favorite treatment of the subject is this two-part article by Bartek Wilczyński:
http://xperienced.com.pl/blog/how-to-implement-mvc-pattern-in-cocos2d-game
http://xperienced.com.pl/blog/how-to-implement-mvc-pattern-in-cocos2d-gamepart-2
For Cocoa Touch programmers, the fact that cocos2d doesn’t follow the MVC pattern may come as a culture shock. But it’s one you can work around. On the other hand, as a cocos2d programmer, you likely won’t even notice that you’re using MVC because the entire Cocoa Touch framework is designed for the MVC pattern. You’ll happily use the controllers and views provided to you, and you’ll find no problem adding the logic and algorithms (the model) into either controller or view, or both. That’s also a valid pattern, albeit more tightly coupled and less maintainable in large projects.
Instead of relying on UIKit for displaying its graphics, cocos2d creates an OpenGL ES view. This means cocos2d has more direct access to graphics resources and can render its view much faster.
Of course, behind the scenes, all UIKit views are also rendered by OpenGL ES; there’s just a lot more stuff going behind the scenes that’s needed for graphical user interfaces but is essentially a waste of performance if you want to make games. You may remember the very early games that were written entirely with UIKit, Core Graphics, and Core Animation? If not, good for you. They were often slow and unresponsive.
One immediately noticeable difference between Cocoa Touch and cocos2d is the coordinate system. Cocos2d has the origin point (0,0) at the lower left-hand corner of the screen, whereas UIKit views have their origin point at the upper left-hand corner. You need to consider the differences in coordinate systems used by UIKit and OpenGL ES when positioning but also when manually rotating UIKit views.
And because cocos2d is programmed to interact directly with the graphics hardware, it uses its own hierarchy of displaying graphical elements. In cocos2d that’s the CCNode hierarchy where you can add any CCNode-based class to any other CCNode, with a CCScene as the very first element in that hierarchy. The UIKit framework, on the other hand, operates with a view hierarchy where you add UIView-based classes to another, often with a UIWindow as the topmost element. Both view hierarchies are incompatible, so you can’t add a UIView to a CCNode, and vice versa. This is noticeable when you change from one CCScene to another using a CCTransitionScene. While the cocos2d nodes all move aside, the UIKit views remains fixed in place unless you also move them separately and in sync with the cocos2d animation. It’s actually a good idea to avoid this kind of situation in the first place.
Alert: Your First UIKit View in cocos2d
The simplest and most straightforward example for using a UIKit view with cocos2d is found in the example project CocosWithCocoa01. It displays a UIAlertView on top of the cocos2d scene created from the default cocos2d project template. To re-create the project from scratch, open Xcode and go to File ![]() New
New ![]() New Project to bring up the New Project dialog. In that dialog, select cocos2d under the iOS list and create the cocos2d project.
New Project to bring up the New Project dialog. In that dialog, select cocos2d under the iOS list and create the cocos2d project.
Let’s modify the HelloWorldLayer class to display a UIAlertView. The interface in HelloWorldLayer.h needs only one small addition; namely, the HelloWorldLayer class needs to support the UIAlertViewDelegate protocol:
@interface HelloWorldLayer : CCLayer < UIAlertViewDelegate>
{
}
All other changes are made to the HelloWorldLayer.m implementation file. The init method of the “Hello World” sample is modified to use a color gradient background, just so you see the visual effect of the UIAlertView darkening the screen, and to call the showAlertView method.
-(id) init
{
    if ((self = [super init]))
    {
        CCLayerGradient* layer = [CCLayerGradient layerWithColor:ccc4(100,150,255,255)
                                                     fadingTo:ccc4(255,200,50,100)
                                                  alongVector:ccp(0.75f, 0.25f)];
        [self addChild:layer];

        CCLabelTTF *label = [CCLabelTTF labelWithString:@"Hello World"
                                      fontName:@"Marker Felt"
                                      fontSize:64];
        CGSize size = [CCDirector sharedDirector].winSize;
        label.position = ccp(size.width / 2, size.height / 2);
        [self addChild:label];

        self.isTouchEnabled = YES;
        [self showAlertView];
    }
    return self;
}
The showAlertView method allocates a UIAlertView with a title, two buttons, and the message text “Hello Cocoa Touch!” For a delegate, you’ll be using self now that you’ve added the UIAlertViewDelegate protocol to the HelloWorldLayer class.
Finally, you can show the alert view. Listing 15-1 shows the resulting code.
Listing 15-1. A UIAlertViewIs Created and Shown over cocos2d’s View (CCGLView Class)
-(void) showAlertView
{
    UIAlertView* alertView = [[UIAlertView alloc] initWithTitle:@"UIAlertView Example"
                                                     message:@"Hello Cocoa Touch!"
                                                  delegate:self
                                      cancelButtonTitle:@"Well"
                                      otherButtonTitles:@"Done", nil];

    [alertView show];
}
Tip It’s not necessary to add a UIAlertView to another view. This makes it very straightforward to create UIAlertView messages. The only drawback is that UIAlertView will always be drawn above everything else and will swallow all touches as long as it’s displayed. No amount of sending views to back or reordering the view hierarchy will change that. If you need a simple solution for a pause menu, UIAlertView is your cheap and dirty friend, especially during development. But keep in mind that while touches are disabled, you’ll still be receiving acceleration events, which you’ll have to turn off or ignore while the UIAlertView is shown.
The HelloWorldLayer class will receive all events from the UIAlertView and can respond to them by simply implementing one or more of the UIAlertViewDelegate methods. For this example, I decided to respond to the didDismissWithButtonIndex message (see Listing 15-2), which is sent whenever the user taps a button, which always dismisses the UIAlertView regardless of which button was tapped. Another CCLabelTTF, with a string and color that depend on the buttonIndex, is added to the cocos2d scene at a random position every time the alert view is dismissed.
Listing 15-2. Responding to the UIAlertView didDismissWithButtonIndex Message
-(void) alertView:(UIAlertView*)alertView←
    didDismissWithButtonIndex:(NSInteger)buttonIndex
{
    NSString* message = @"Well";
    ccColor3B labelColor = ccYELLOW;
    if (buttonIndex == 1)
    {
        message = @"Done";
        labelColor = ccGREEN;
    }

    CCLabelTTF* label = [CCLabelTTF labelWithString:message
        fontName:@"Arial"
        fontSize:32];

    CGSize size = [CCDirector sharedDirector].winSize;
    label.position = CGPointMake(CCRANDOM_0_1() * size.width,←
        CCRANDOM_0_1() * size.height);
    label.color = labelColor;
    [self addChild:label];

    // keep the alert view alive by bringing it up again
    [self showAlertView];
}
The showAlertView method is called again whenever the alert view has been dismissed, so the alert view will keep showing up again, allowing you to add another label to the cocos2d view. You can see the result in Figure 15-1.
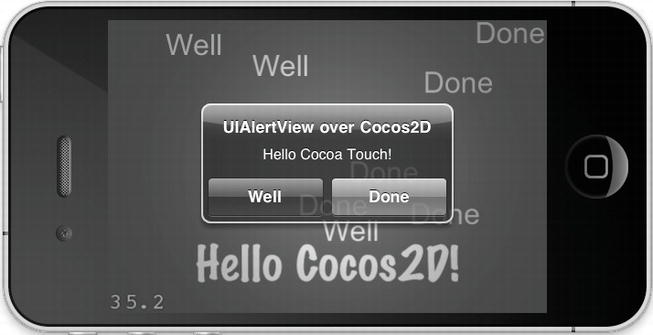
Figure 15-1 . A UIAlertView is displayed over the cocos2d view
Embedding UIKit Views in a cocos2d App
Next you’ll be embedding more commonly used UIKit views in cocos2d. One of the simplest and most common is the UITextField, which you’ll add on top of cocos2d, as you’ve done before. It gets more complicated when you move it to the background of cocos2d, which requires making the cocos2d view transparent.
Finally, I’ll show you how you can add your Interface Builder views into a cocos2d app, instead of creating the views programmatically.
Adding Views in Front of the cocos2d View
In the CocosWithCocoa01 project, I’ve added UITextField views on top of the cocos2d view. The UITextField is a simple text entry box that automatically brings up the iPhone keyboard when you tap it.
-(void) addSomeTextFields
{
    // regular text field with rounded corners
    UITextField* textField = [[UITextField alloc] initWithFrame:←
        CGRectMake(40, 20, 200, 24)];
    textField.text = @"Regular UITextField";
    textField.borderStyle = UITextBorderStyleRoundedRect;

    // get the cocos2d view (it's the CCGLView class which inherits from UIView)
    UIView* glView = [CCDirector sharedDirector].view;

    // add the text field view to the cocos2d CCGLView
    [glView addSubview:textField];
}
It’s important to note that the process of programmatically creating any UIView class is very similar to how you create the UITextField. You pick the desired class derived from UIView and then call alloc and initWithFrame. You can create most UIView controls by just providing a frame rectangle. However, you usually have to set some properties afterward to configure the control; in this example, I’ve set the textField to use the rounded style as well as setting the initial text.
Caution The frame rectangle is where many programmers first notice the different coordinate systems of cocos2d nodes and UIView classes. Whereas in cocos2d the origin (0, 0) is at the lower left-hand corner of the screen, the origin for UIView classes is at the upper left-hand corner of the screen. This means that the UITextField is actually 20 pixels below the top border of the screen and not 20 pixels above the bottom border. You’ll have to keep this in mind when working with UIView classes.
Because the UITextField, like most other UIView classes, doesn’t have a show method, you need some other way to attach it to the view hierarchy. Because the cocos2d view is the CCGLView class, which in turn inherits from UIView, you can simply add the UITextField to the cocos2d view as a subview. The CCDirector has a view property that lets you access the cocos2d view and then call the addSubview method on it to add the textField. By default this adds the view on top of the cocos2d view.
If you try this now, you’ll see a text field on your scene, and when you tap the text field, the iPhone keyboard will come up, and you can start editing text. No extra code needed. Except the keyboard won’t go away anymore.
That’s by design because the Return key might be a valid key to start a new line rather than to stop editing. So, you need some way to dismiss the keyboard. To do so, open the HelloWorldLayer header file and add the UITextFieldDelegate protocol like so:
@interface HelloWorldLayer : CCLayer < UIAlertViewDelegate, UITextFieldDelegate>
{
}
Doing so allows the HelloWorldLayer class to respond to UITextFieldDelegate methods like textFieldShouldReturn. For this to work, you must assign the HelloWorldLayer class instance to the UITextField by assigning self to the delegate property. Add the bold line at the end of the initialization block of the UITextField:
// regular text field with rounded corners
UITextField* textField = [[UITextField alloc] initWithFrame:←
    CGRectMake(40, 20, 200, 24)];
textField.text = @" Regular UITextField";
textField.borderStyle = UITextBorderStyleRoundedRect;
textField.delegate = self;
Most UIKit views have this delegate method and an accompanying delegate protocol. So, if you ever wonder how you can respond to events of a certain UIView, it’s usually done by implementing the class’s accompanying delegate protocol and responding to the appropriate message. Of course, one very common and repeated mistake you’ll make (I know I do) is to forget to actually assign the delegate to the class interface. So, whenever a delegate method isn’t being called, or you get a compiler warning on the line where you assign the delegate object, you should check whether that object’s class uses and implements the view’s delegate protocol.
In our case, the textFieldShouldReturn message of the UITextFieldDelegate protocol is sent whenever the user taps the Return key on the iPhone keyboard:
-(BOOL) textFieldShouldReturn:(UITextField *)textField
{
    // dismiss the keyboard
    [textField resignFirstResponder];

    // if the text is empty, remove the text field
    if (textField.text.length == 0)
    {
        [textField removeFromSuperview];
    }
    return YES;
}
By sending the resignFirstResponder message to the textField, the keyboard will be dismissed. Simply as an exercise on how to remove a UIView from the cocos2d view, I’ve added a condition that sends the removeFromSuperview message to the textField if the textField is empty when the user presses Return. Notice how this entire method doesn’t care which UITextField is sending the message, nor does it care where in the view hierarchy the textField was added. You’ll take advantage of that next by adding another UITextField.
If you try what you have so far, you’ll notice that the keyboard is dismissed when you press Return, and if you’ve deleted all characters from the text field, the entire text field will vanish.
Tip Keep in mind that if it’s possible that your scene changes while the user is editing text in a UITextField, you would have to manually send the resignFirstResponder message to all text fields in order to dismiss the keyboard. Otherwise, the keyboard may remain visible during and after the scene change, and the user won’t be able to dismiss it anymore. To avoid this situation, it’s preferable to also respond to the textFieldDidBeginEditing message and use that to temporarily disable any buttons or events that could change the current scene. Then reenable the buttons or events when you receive the textFieldShouldReturn message.
Skinning the UITextField with a UIImage
No, I’m not going to peel off the text field’s skin! If you haven’t heard the term skinning before, it basically means adding (or changing) a texture to a user interface control or view. Essentially you change the native look of the control or view and replace it with your own.
In Listing 15-3 you’re adding some more code at the bottom of the addSomeTextFields method in order to create a second UITextField that uses a texture as background.
Listing 15-3. Skinning a UITextField View
-(void) addSomeTextFields
{
    ...

    // text field that uses an image as background (aka "skinning")
    UITextField* textFieldSkinned = [[UITextField alloc] initWithFrame:←
        CGRectMake(40, 60, 200, 24)];
    textFieldSkinned.text = @"With background image";
    textFieldSkinned.delegate = self;

    // load and assign the UIImage as background of the text field
    CCFileUtils* fileUtils = [CCFileUtils sharedFileUtils];
    NSString* file = [fileUtils fullPathFromRelativePath:@"background-frame.png"];
    UIImage* image = [[UIImage alloc] initWithContentsOfFile:file];
    textFieldSkinned.background = image;

    // get the cocos2d view (it's the CCGLView class which inherits from UIView)
    UIView* glView = [CCDirector sharedDirector].view;

    // add the text field view to the cocos2d CCGLView
    [glView addSubview:textField];
    [glView addSubview:textFieldSkinned];
}
Creating the UITextField should be familiar, and you also add self as a delegate of the text field. The code that dismisses the keyboard and removes the text field when it’s empty (see Listing 15-2) now works for this new UITextField as well.
The next part is what cocos2d users with little or no Cocoa Touch programming experience may find odd. You can’t just add a CCSprite or the sprite’s texture to a UIView. You need a UIImage class for skinning Cocoa Touch views, which you can then comfortably create via initWithContentsOfFile. Or not? Well, the returned UIImage might be nil.
It turns out that cocos2d allows you to use filenames without specifying a path because internally it adds the path to the application’s bundle file for you. This full path to a bundle file looks something like this on an iOS device, and the path will be different when running the app in the Simulator or on another device:
/var/mobile/Applications/...lots of letters.../CocosWithCocoa.app/background-frame.png
Because UIImage and most other Cocoa Touch classes dealing with files expect the full path to the file, you have to use the CCFileUtils method fullPathFromRelativePath to create an NSString, which contains the full path to the file in the app bundle. Then you get a valid UIImage, and you can assign it to the background property. You can see what this looks like in Figure 15-2.
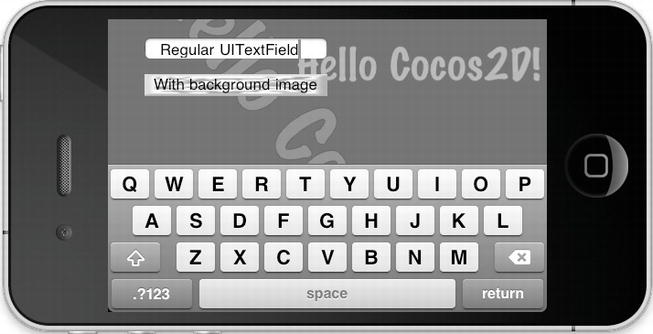
Figure 15-2 . Two UITextField views with the iPhone keyboard raised
Tip The background image of a UIView will always be scaled and stretched to fit the UIView’s frame. This will often blur or otherwise distort the texture. To avoid that, you should design background images of UIViews to the exact dimensions of the UIView. Alternatively, design the texture for the largest possible size of the UIView so that even if it’s scaled, it’s scaled down and doesn’t lose as much image quality compared to upscaling the texture.
Adding Views Behind the cocos2d View
What if you want to add a UIView behind the cocos2d view? For example, to play a video in the background? You need to change a few things to allow UIKit views in the background. You’ll find these code changes in the CocosWithCocoa02 project.
Moving the UITextFields to the Background
Adding the UITextField views to the app’s window is straightforward. For this example, you get to skip over the UITextField initialization code in the addSomeTextFields method because it doesn’t change. The only change is in adding the UITextField views as subviews of the cocos2d view’s superview, which happens to be the app’s UIWindow object:
-(void) addSomeTextFields
{
    // get the cocos2d view (it's the CCGLView class which inherits from UIView)
    UIView* glView = [CCDirector sharedDirector].view;
    // The window is the superview of the cocos2d view
    UIView* window = glView.superview;


    // UITextField initialization code omitted
    ...

    // add the text fields to the window
    [window addSubview:textField];
    [window addSubview:textFieldSkinned];
}
You can simply access the window because it happens to be the superview of the cocos2d glView . The superview is the Cocoa term for what you would call the parent node in the cocos2d node hierarchy. You can then add the text fields to the window instead of the glView.
However, you won’t notice a difference if you run the project now. Because you’ve added the text fields after the cocos2d view, they’re automatically rendered after the cocos2d view by default. This is the same behavior as in the cocos2d node hierarchy. To actually move the text fields to the back, you can either send the sendSubviewToBack message to all of them or, more easily, send the bringSubviewToFront message to the glView, like so:
    // add the text fields to the window
    [window addSubview:textField];
    [window addSubview:textFieldSkinned];

    // send the cocos2d view to the front so it is in front of the other views
    [window bringSubviewToFront:glView];
Note that the sendSubviewToBack and bringSubviewToFront messages are sent to the view that contains the view that should be sent to the back or front. In this case, that’s the window. If you run the project now, you’ll see a difference. But you won’t be seeing the text fields anymore. What’s the problem now?
Making the cocos2d View Transparent
By default, the cocos2d view is completely opaque. Anything behind the glView will be obstructed because the cocos2d CCGLView is filled each frame with an opaque clear color. It also has its opaque property set to YES. You can easily remedy this by adding the following lines to the addSomeTextFields method:
// make the cocos2d view transparent
glClearColor(0, 0, 0, 0);
glView.opaque = NO;
The opaque flag is set to NO, and the glClearColor is all zero. It’s not strictly necessary to use a black color however; it’s sufficient to reduce the alpha channel (fourth parameter) of glClearColor so that the clear color is at least somewhat transparent. But for this example and in most cases, you don’t want the background to be tinted or just partially opaque. You may also wonder why setting the view’s opaque property to NO isn’t enough to make the view transparent. The answer is simple: OpenGL ES doesn’t respect that property and draws its clear color anyway.
This is only half of the story. What’s easy to forget and something you just have to know is that cocos2d’s CCGLView has to be set up with a pixelFormat that actually uses an alpha channel. Without the alpha channel, you can’t make the cocos2d view transparent.
By default, cocos2d initialized the CCGLView with the kEAGLColorFormatRGB565 pixel format. This pixel format uses 16 bits per pixel and has no alpha channel. The only other pixelFormat currently supported is kEAGLColorFormatRGBA8, which has 8 bits per color channel plus an 8-bit alpha channel, which results in 32 bits per pixel. Obviously, this has an impact on performance and memory usage because the framebuffer memory size doubles. That’s the reason why the kEAGLColorFormatRGB565 pixel format is the default, but there’s really no other choice than to use kEAGLColorFormatRGBA8 if you want to make the cocos2d view transparent.
Open the AppDelegate.m file, and in the applicationDidFinishLaunching method look for the line that initialized the CCGLView. Then change that to use the kEAGLColorFormatRGBA8 pixel format:
CCGLView *glView = [CCGLView viewWithFrame:[window bounds]
                 pixelFormat:kEAGLColorFormatRGBA8
                 depthFormat:0];
Kobold2D users can make that change in the config.lua file by changing the GLViewColorFormat setting accordingly:
GLViewColorFormat = GLViewColorFormat.RGBA8888,
Now you can run the app again, and you’ll see the “Hello Cocos2D!” labels being drawn over the text fields. There’s only one issue remaining: the text fields underneath the cocos2d view won’t respond to your touches!
Properly Propagating Touch Events via Hit Testing
The easiest way to have the views behind the cocos2d view respond to touch events is to completely disable touch input on the cocos2d view. You won’t be receiving any messages from the CCTouchDispatcher anymore if you add this line:
// This will disable all touch events on the cocos2d view
glView.userInteractionEnabled = NO;
Now the text fields behind the cocos2d view will act normally, but touch input for the cocos2d view is disabled. UIKit views, which are in front of the cocos2d view, should also work normally and respond to touches, unless you’ve added them to the cocos2d glView directly instead of the window.
You may be wondering why disabling touch input on the cocos2d view is the best, or at least the easiest, option. For that, you have to understand that the cocos2d view is a UIView that spans the entire screen area. Although you can see through it now that you’ve set it up to be transparent, it still responds positively to the UIView hitTest event. After all, any touch is somewhere on the screen, and because the cocos2d view is as big as the screen and doesn’t take into account what’s actually displayed inside its view, it responds positively to the hit test. So, any touch that reaches the cocos2d view will be processed by it or the CCTouchDispatcher class. Anything underneath the cocos2d view is cut off from receiving touch events.
Unfortunately, cocos2d doesn’t have a built-in system to forward the hitTest event to its nodes for them to decide whether they actually need to respond to the touch. I present you with a solution that uses the node’s bounding boxes and requires extending the CCGLView class with a category.
Caution Only add the following hit test code to the CCGLView class if you absolutely need it in your project. It will have a negative effect on performance whenever a touch event is fired, which is basically the whole time the user has at least one finger on the touchscreen. The more nodes there are in your scene, the larger the performance penalty will be.
Open the HelloWorldLayer.h file and add this category interface, preferably before the HelloWorldLayer interface:
@interface CCGLView (hittest)
-(UIView*) hitTest:(CGPoint)point withEvent:(UIEvent*)event;
@end
Now at the beginning of the HelloWorldLayer.m file add the CCGLView hit test category implementation shown in Listing 15-4. The hitTest method is part of the UIView class and gets called when the UIKit framework is trying to determine which view wants to respond to a touch event. The method either returns a UIView instance, which should receive the touch input, or returns nil to signal that the hit test was unsuccessful, in which case the UIKit framework keeps looking for other views that might want to process the touch event.
Listing 15-4. Preparing to Hit Test All cocos2d Scene Children
@implementation CCGLView (hittest)

...

-(UIView*) hitTest:(CGPoint)point withEvent:(UIEvent*)event
{
    UIView* hitView = [super hitTest:point withEvent:event];

    if (hitView == self)
    {
        CCScene* runningScene = [CCDirector sharedDirector].runningScene;
        CCArray* sceneChildren = runningScene.children;
        CGPoint glPoint = [[CCDirector sharedDirector] convertToGL:point];

        BOOL hit = [self hitTestNodeChildren:sceneChildren point:glPoint];
        return (hit ? self : nil);
    }

    return hitView;
}
@end
In this case, you first call the super implementation to receive the view the hitTest would normally return. In almost all cases, this will be the CCGLView itself, but because you can add subviews to the CCGLView, it might return a subview, and in this case you want to allow the subview to handle the touch.
Otherwise, the runningScene is obtained from the CCDirector, which gives you access to the cocos2d node hierarchy via the children array. Because the hitTest point is in Cocoa Touch coordinates, you also have to convert it to GL coordinates before passing both the sceneChildren and the glPoint to the hitTestNodeChildren method shown in Listing 15-5. If that method returns a hit, the hitTest responds by returning self. Otherwise, it lets the hitTest fail by returning nil, allowing all views behind the cocos2d view to take their turn and proceed with the hit testing.
The hitTestNodeChildren method in Listing 15-5 is more complicated and harder to understand because it uses recursion to traverse the cocos2d node hierarchy. In other words, the function can call itself to go even deeper into the cocos2d node hierarchy. Add the hitTestNodeChildren method just above the hitTest method.
Listing 15-5. Recursively Testing All Nodes to Test If Their boundingBox Contains a Given Point
@implementation CCGLView (hittest)
-(BOOL) hitTestNodeChildren:(CCArray*)children point:(CGPoint)point
{
    BOOL hit = NO;

    if (children.count > 0)
    {
        Class sceneClass = [CCScene class];
        Class layerClass = [CCLayer class];

        for (CCNode* node in children)
        {
           // check the node's children first
           hit = [self hitTestNodeChildren:node.children point:point];

           // abort search on first hit
           if (hit)
           {
           break;
           }

           // scenes/layers are typically full screen, so do not hitTest them
           if ([node isKindOfClass:sceneClass] || [node isKindOfClass:layerClass])
           {
           continue;
           }

           // check the node itself
           hit = CGRectContainsPoint(node.boundingBox, point);

           // abort search on first hit
           if (hit)
           {
           break;
           }
        }
    }

    return hit;
}
...

@end
The first half of the for loop simply traverses deeper into the cocos2d node hierarchy by calling the function recursively with the current node’s children. If any of the recursive calls have found a hit, the loop is aborted right there.
In the second half, the actual node being iterated is checked. This performs the actual hit test by first making sure you’re not testing a CCScene or CCLayer class node. The reason is that they both typically have their boundingBox set to the entire screen area. If you’d test any of these classes, you’d always “hit” them, and that’s exactly what you’re trying to avoid.
Now that you’re sure the test is on a node with a reasonable bounding box, the actual check is as simple as testing for whether the point is inside the boundingBox:
hit = CGRectContainsPoint(node.boundingBox, point);
Again, if there was a hit, the loop aborts, and the method returns. This is an optimization because you only ever need to find any node that responds positively to the hit test.
Obviously, this solution has some drawbacks. For one, it assumes that a node should get a touch event if the touch is inside its boundingBox. What it doesn’t know is whether there’s some kind of game state that would prevent the node from processing the touch—for example, if the node is a CCMenuItem that’s currently disabled. Or if the touch is on a sprite that actually performs a pixel-perfect collision check; in that case, the bounding box check is too broad. Moreover, the boundingBox is excessively large when the node is rotated because it’s an axis-aligned bounding box that changes in size as the node rotates.
What you can do to alleviate this situation is add a hitTest method to a CCNode class category, which performs just the bounding box check by default but can be overridden by subclasses to perform more accurate or conditional checks.
Sandwiching the cocos2d View
Just to complete this test, I’d like to add another text field—but in front of the cocos2d view so that you truly have a sandwiched cocos2d view with UIKit views in the back and in the front, and all of them can respond to touches.
The change is rather simple; just add this code at the end of the addSomeTextFields method and make sure you add the textFieldFront as subview of the window and not the glView:
UITextField* textFieldFront = [[UITextField alloc] initWithFrame:←
    CGRectMake(280, 40, 200, 24)];
textFieldFront.text = @" On top of Cocos2D";
textFieldFront.borderStyle = UITextBorderStyleRoundedRect;
textFieldFront.delegate = self;

[window addSubview:textFieldFront];
Actually, you could also add the textFieldFront to the glView as a subview without any immediately noticeable change. But adding the text field to the window allows you to reorder it in the view hierarchy at any time; for example, you could move it behind the cocos2d view using the sendSubviewToBack method of the window. You wouldn’t be able to do that if you add the view directly to cocos2d’s glView.
Check out Figure 15-3 for the result. You’ll have UIKit views on top of the cocos2d view and behind it. The text view at the back can still be edited and manipulated as the Cut, Copy, Paste, Replace button shows. More importantly, despite the accompanying text field being behind the cocos2d view, the Cut, Copy, Paste, Replace pop-over button is automatically on top of the cocos2d view. Just how it ought to be!

Figure 15-3 . UIKit views on top and behind the cocos2d view, with input enabled for all of them
Adding Views Designed with Interface Builder
At this point, you may be wondering how you could add a view that was designed with Apple’s Interface Builder. Let’s tackle this now. Code-wise, it’s surprisingly simple, and you can look it up in the CocosWithCocoa02 project if you want.
The first order of business is to create an Interface Builder resource file. In Xcode 4, you create it comfortably from within the project using the File ![]() New
New ![]() New File command from the menu or right-click a group and select New File.
New File command from the menu or right-click a group and select New File.
You’ll be prompted to choose a template from the file template dialog. As you can see in Figure 15-4, you should create the Interface Builder file using the UIViewController subclass template. This will also create the Interface Builder nib file for you and connect it with your view controller, which is essential for the view to work.
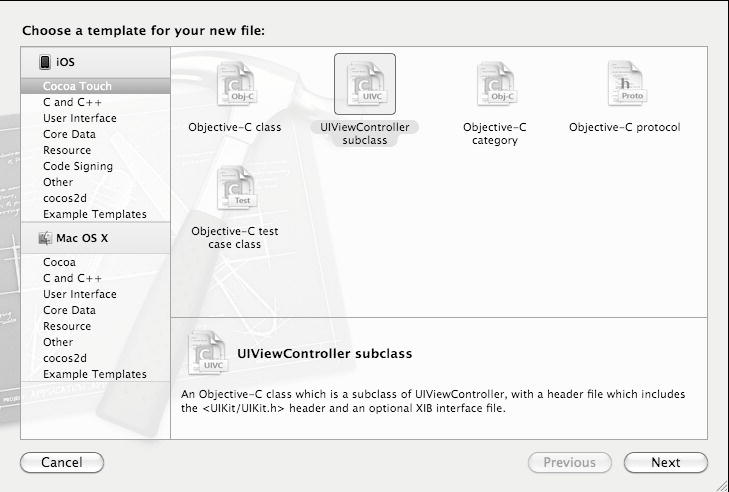
Figure 15-4 . Create an Interface Builder view by creating a UIViewController subclass
Make sure the check box With XIB for user interface in Figure 15-5 is checked, and make sure the Subclass of text is the UIViewController. I decided to save this template using the filename MyView.m. You should end up with three new files in your project: MyView.h, MyView.m, and MyView.xib.
Note The developer documentation and even the Cocoa Touch API refer to Interface Builder files as nib files, even though they use the extension .xib. They used to have the .nib extension, and it simply stuck as a tradition even though the file extension was changed years ago. So, nib and xib are used interchangeably and refer to the same thing.
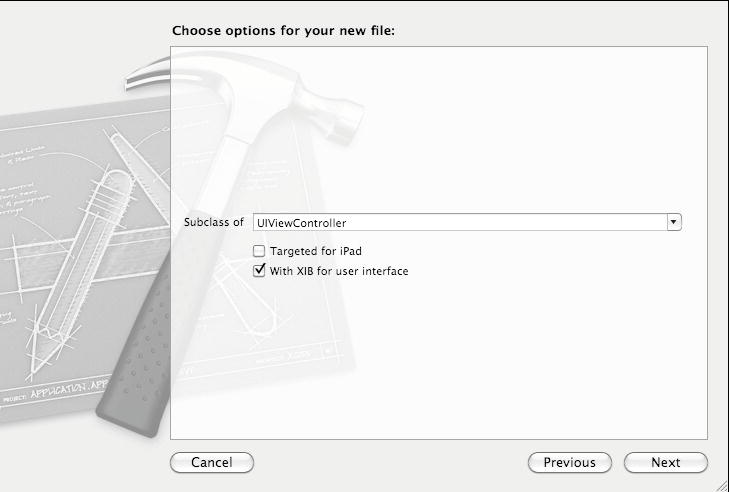
Figure 15-5 . Make sure “With XIB for user interface” is checked
If you click the MyView.xib file, you’ll be presented with the Interface Builder, which is no longer a separate application but integrated into Xcode 4. You’ll see an iPhone screen’s view, onto which you can drag and drop views from the Object Library, accessible via View ![]() Utilities
Utilities ![]() Object Library in case it’s not currently visible.
Object Library in case it’s not currently visible.
With Interface Builder, you can easily create your UIKit user interface visually. Because it’s beyond the scope of the book to explain the Interface Builder workflow, I’ll refer you to Apple’s Xcode 4 User Guide and specifically the section on Designing User Interfaces:
http://developer.apple.com/library/mac/#documentation/ToolsLanguages/Conceptual/Xcode4UserGuide/InterfaceBuilder/InterfaceBuilder.html
While I’m at it, if you need a refresher or introduction to views and windows, take a look at Apple’s View Programming Guide for iOS:
http://developer.apple.com/library/ios/#documentation/WindowsViews/Conceptual/ViewPG_iPhoneOS/Introduction/Introduction.html
Note Unfortunately, you can’t use Interface Builder to design your cocos2d view. For that you have to use a separate editor like CocoShop, CocoaBuilder, LevelHelper, or any other editing tool with cocos2d support that fits your need. See Chapter 17 for a list of cocos2d editing tools.
For now, it’s sufficient to just add any views to the Interface Builder view, like sliders, buttons, labels, and whatnot. But ideally you should at least do the following: select the main view and bring up the Attributes Inspector via View ![]() Utilities
Utilities ![]() Attributes Inspector. The first attribute under Simulated Metrics is called Orientation, and you should change that to Landscape because the application is currently only capable of running in Landscape mode. If you don’t do that, your views will be rotated by 90 degrees when you run the application.
Attributes Inspector. The first attribute under Simulated Metrics is called Orientation, and you should change that to Landscape because the application is currently only capable of running in Landscape mode. If you don’t do that, your views will be rotated by 90 degrees when you run the application.
The MyView class doesn’t need to be modified; the default implementation works just fine. You can directly load the MyView.xib file by adding the following code at the end of the addSomeTextFields method:
// add an Interface Builder view
MyView* myViewController = [[MyView alloc] initWithNibName:@"MyView" bundle:nil];
[window addSubview:myViewController.view];
[window sendSubviewToBack: myViewController.view]; // optional
Notice that the initWithNibName takes the name of the xib file as a parameter but without the .xib extension. If you add the extension, you’ll receive an error message that the xib could not be loaded. The bundle parameter is nil, which means the app should look for the file in the main bundle.
Because the MyView class inherits from UIViewController, you can access the actual view with the myViewController.view property. You’ll add that to the window, and if you want, you can also issue an sendSubviewToBack message to put the view in the background.
You can now create and add views designed with Interface Builder to a cocos2d app. Your result might look something like the one in Figure 15-6.
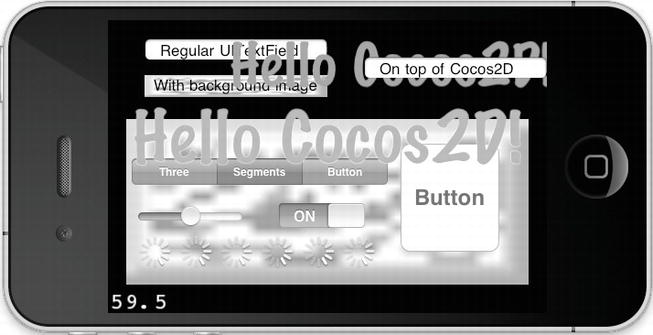
Figure 15-6 . The resulting project shows the MyView.xib file designed with Interface Builder in the bottom half
Embedding the cocos2d View in Cocoa Touch Apps
Many developers don’t realize it’s actually possible to embed a cocos2d view in a regular application using UIKit views as its main user interface. The cocos2d view doesn’t even have to be full-screen!
The difficulty merely lies in setting up the project. I’ll show you how it’s done.
Creating a View-Based Application Project with cocos2d
Fire up your Xcode 4 and create a copy of the ARC-enabled cocos2d template, or simply follow the steps in Chapter 2 again. The important bit is that you need the cocos2d-library target.
Then add a new target to the project via File ![]() New
New ![]() Target. Select the Single View Application template, as shown in Figure 15-7, and name the new target ViewBasedAppWithCocos2D. Make sure to enable Automatic Reference Counting for this new target, and for this example I decided not to use Storyboards. You’ll end up with a target that has a view controller class, the corresponding .xib files for iPhone and iPad, and an app delegate class. If you run it right now, you’ll see a blank iPhone view with just the status bar on top.
Target. Select the Single View Application template, as shown in Figure 15-7, and name the new target ViewBasedAppWithCocos2D. Make sure to enable Automatic Reference Counting for this new target, and for this example I decided not to use Storyboards. You’ll end up with a target that has a view controller class, the corresponding .xib files for iPhone and iPad, and an app delegate class. If you run it right now, you’ll see a blank iPhone view with just the status bar on top.
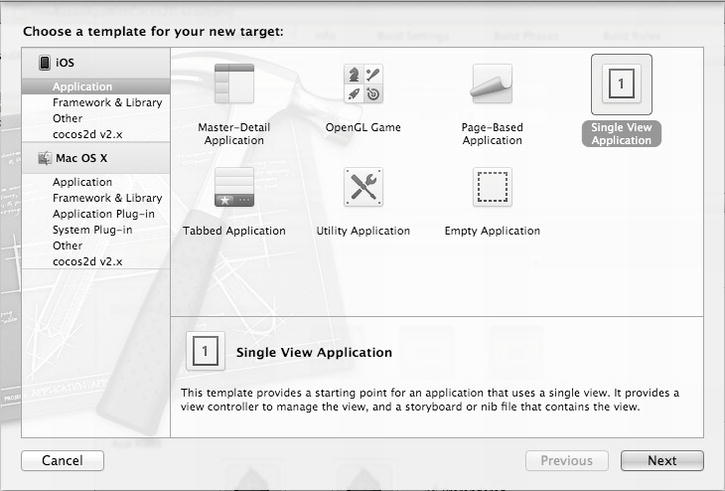
Figure 15-7 . The starting point for embedding a cocos2d view is the Single View Application template
The next step is to link the cocos2d-library with the ViewBasedAppWithCocos2D target. You can do this as described in Chapter 2 by selecting the target and switching to the Build Phases tab. Under the Link Binary with Libraries section, click the + button to bring up the add dialog. In this case you’ll want to add not only the libcocos2d-library.a file but also the frameworks required by cocos2d. They are:
- AudioToolbox.framework
- AVFoundation.framework
- GameKit.framework
- libz.dylib
- OpenAL.framework
- OpenGLES.framework
- QuartzCore.framework
Note that you can select all libraries in one go by holding down the Command key while selecting the items in the list. The added frameworks and libraries may be added to the root of the project in the Project Navigator. You can safely drag them into the Frameworks group where they belong, just to get them out of sight because you don’t need to work with them.
On the target’s Build Settings tab, locate the Header Search Paths setting. You need to add the path to the Kazmath library here, which is:
"cocos2d-2.x-ARC-iOS/libs/kazmath/include"
Alternatively you can simply add the entire project folder to the search path. You can do that by setting Header Search Paths to this:
./**
You may also remove the original application target and scheme because you won’t need them anymore.
You can now build and run the ViewBasedAppWithCocos2D target. It should build the cocos2d source code now. But of course without a user interface, it’s the same dull and empty app as it was before. Let’s change that!
Designing the User Interface of the Hybrid App
Select the ViewController_iPhone.xib file in the Project Navigator to see the Interface Builder view. Using the Object Library (View ![]() Utilities
Utilities ![]() Object Library), drag and drop the following objects onto the view. You can arrange these objects in the design area in any way you like:
Object Library), drag and drop the following objects onto the view. You can arrange these objects in the design area in any way you like:
- View (basic rectangular drawing region)
- Switch (on/off control)
- Segmented Control (multiple buttons in a single control)
Now select the newly added view object and switch to the Identity Inspector (View ![]() Utilities
Utilities ![]() Identity Inspector). You’ll notice that the first item shows that the view is derived from the UIView class. Because this should become the cocos2d CCGLView, use the drop-down button to select a custom class from the list. One of the first items should be the CCGLView class. If not, scroll the list until you find the CCGLView or simply type in the name of the class. The resulting user interface mockup should look something like Figure 15-8.
Identity Inspector). You’ll notice that the first item shows that the view is derived from the UIView class. Because this should become the cocos2d CCGLView, use the drop-down button to select a custom class from the list. One of the first items should be the CCGLView class. If not, scroll the list until you find the CCGLView or simply type in the name of the class. The resulting user interface mockup should look something like Figure 15-8.
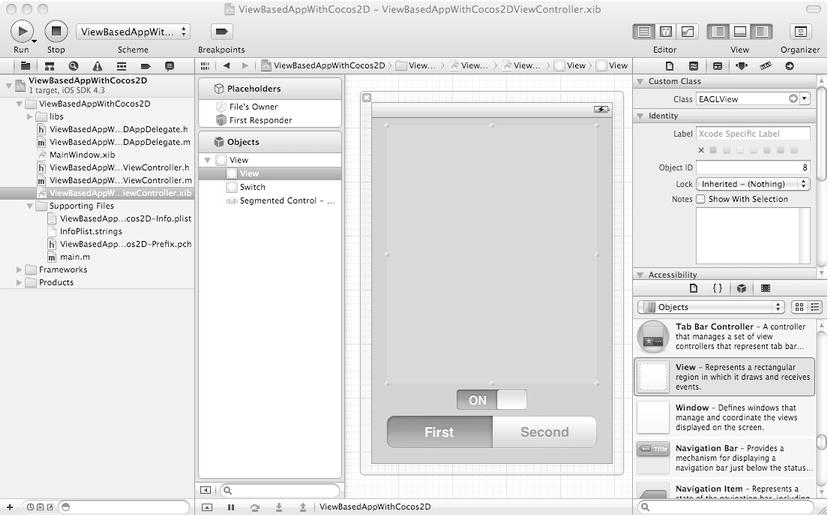
Figure 15-8 . The Interface Builder view of the hybrid app’s user interface
Interface Builder will automatically instantiate the CCGLView for you. You only need to attach the CCDirector with this particular view. The On/Off Switch should serve as the toggle button that turns the cocos2d view on and off.
First, some preparations. Select the CCGLView view and switch to the Attributes Inspector (View ![]() Utilities
Utilities ![]() Attributes Inspector). Check the Hidden check box so that the view is initially hidden. With the Attributes Inspector still open, select the On/Off Switch and change its initial State to Off. You’ll hide and unhide the CCGLView programmatically.
Attributes Inspector). Check the Hidden check box so that the view is initially hidden. With the Attributes Inspector still open, select the On/Off Switch and change its initial State to Off. You’ll hide and unhide the CCGLView programmatically.
Note The cocos2d CCDirector class can manage only one CCGLView at a time, mainly because the CCDirector class is a singleton. An app using multiple cocos2d views at the same time is not currently possible without significant changes to cocos2d. Support for multiple cocos2d views is on the development roadmap.
Now you need to make the connection from the buttons on the view to the ViewController class. The easiest way to do so is to open an Assistant Editor in Xcode 4 via View ![]() Editor
Editor ![]() Assistant. You can customize the layout of the Assistant Editor with one of the selections available under View
Assistant. You can customize the layout of the Assistant Editor with one of the selections available under View ![]() Assistant Editor. The Assistant Editor will automatically display the ViewController.h file.
Assistant Editor. The Assistant Editor will automatically display the ViewController.h file.
In the Interface Builder view, select the On/Off Switch and right-click it. It doesn’t matter if you select it from the list or click its view. The context menu that opens shows a list of events that the control sends. Click the circle next to the Value Changed event and drag it over to the Assistant Editor. You’ll notice that it will highlight a line with the label Insert Action if you drag it somewhere below the class @interface brackets and above the @end statement. That’s where you should drop the arrow to make the connection. A pop-up view will show up and ask you for the name of the event. I decided to call mine switchChanged. You can leave all the other settings at their default values and then make the connection by clicking the Connect button in the pop-up view.
Interface Builder has automatically created the necessary code for you in order to receive the particular event that you just connected. There’s new code both in the interface and implementation sections of the ViewController class. Before you review the code changes, you should also connect the same Value Changed event of the Segmented Control and name it sceneChanged.
This concludes the user interface design part of this project. Now let’s move on to hooking up cocos2d.
Start Your cocos2d Engine
If you followed the user interface design part, you’ll find two empty methods called switchChanged and sceneChanged in the ViewController.m class implementation file, next to some other boilerplate code that was added by the View-based Application template.
The first step is to get cocos2d up and running. One thing that’s comfortable when working with cocos2d projects created from one of the cocos2d templates is that you rarely need to add a header file to any of your classes. That’s because the cocos2d.h file is imported in the project’s prefix header. Because this is not the case in the View-based Application template, open the ViewBasedAppWithCocos2D-Prefix.pch file in the Supporting Files group and add the cocos2d header:
#import < Availability.h>

#ifndef __IPHONE_4_0
#warning "This project uses features only available in iPhone SDK 4.0 and later."
#endif

#ifdef __OBJC__
    #import < UIKit/UIKit.h>
    #import < Foundation/Foundation.h>
    #import "cocos2d.h"
#endif
Now open the AppDelegate.m file. Because this app delegate class was created by Apple’s Single View project template, cocos2d isn’t being initialized. You have to add the necessary cocos2d startup code manually. You need to add the highlighted code in Listing 15-7 to the didFinishLaunchingWithOptions method.
Listing 15-7. Setting Up the Director in AppDelegate.m
- (BOOL)application:(UIApplication *)application ←
    didFinishLaunchingWithOptions:(NSDictionary *)launchOptions
{
    self.window = [[UIWindow alloc] initWithFrame:[[UIScreen mainScreen] bounds]];
    // Override point for customization after application launch.
    if ([[UIDevice currentDevice] userInterfaceIdiom] == UIUserInterfaceIdiomPhone) {
           self.viewController = [[ViewController alloc] ←
           initWithNibName:@"ViewController_iPhone" bundle:nil];
    } else {
           self.viewController = [[ViewController alloc] ←
           initWithNibName:@"ViewController_iPad" bundle:nil];
    }

    // initialize cocos2d director
    CCDirectorIOS* director = (CCDirectorIOS*)[CCDirector sharedDirector];
    director.wantsFullScreenLayout = NO;
    director.projection = kCCDirectorProjection2D;
    director.animationInterval = 1.0 / 60.0;
    director.displayStats = YES;
    [director enableRetinaDisplay:YES];

    // find the CCGLView in the xib view
    NSArray* subviews = self.viewController.view.subviews;
    for (int i = 0; i < subviews.count; i++)
    {
           UIView* subview = [subviews objectAtIndex:i];
           if ([subview isKindOfClass:[CCGLView class]])
        {
        director.view = (CCGLView*)subview;
        break;
        }
    }

    self.window.rootViewController = self.viewController;
    [self.window makeKeyAndVisible];
    return YES;
}
That’s surprisingly little code to get cocos2d running. As usual, you set the animation interval, projection, enable Retina mode, and the rest is just connecting the director with the CCGLView. The latter part simply goes over the list of subviews in the view controller’s view to find one that’s subclassed from CCGLView. Once the right view is found, it’s assigned to the director as the director’s view.
To enable the fps display via displayStats you’ll also have to add all of the fps_images png files from any cocos2d project to your project via the File ![]() Add Files To … command. Otherwise, the framerate counter won’t be displayed.
Add Files To … command. Otherwise, the framerate counter won’t be displayed.
Next you need to add a cocos2d scene class to the project. Using the File ![]() Add Files to “ViewBasedAppWithCocos2D”… menu item, browse into the cocos2d project you created earlier and then locate and select both the header and implementation files of the HelloWorldLayer class. Make sure the Copy items into destination group’s folder (if needed) check box is checked. Alternatively, you can also create a new cocos2d scene class from a cocos2d file template or manually. You’ll be using the HelloWorldLayer class throughout this example.
Add Files to “ViewBasedAppWithCocos2D”… menu item, browse into the cocos2d project you created earlier and then locate and select both the header and implementation files of the HelloWorldLayer class. Make sure the Copy items into destination group’s folder (if needed) check box is checked. Alternatively, you can also create a new cocos2d scene class from a cocos2d file template or manually. You’ll be using the HelloWorldLayer class throughout this example.
Import the HelloWorldLayer class in the ViewController.m file so that you can run it as your main cocos2d scene:
#import "HelloWorldLayer.h"
All that’s left now is to actually start up cocos2d and show and hide its CCGLView. The switchChanged method in Listing 15-8 contains all the code that’s needed to run and show or stop and hide cocos2d.
Listing 15-8. Starting and Stopping the cocos2d Scene
- (IBAction)switchChanged:(id)sender
{
    UISwitch* switchButton = (UISwitch*)sender;
    CCDirectorIOS* director = (CCDirectorIOS*)[CCDirector sharedDirector];

    if (switchButton.on)
    {
        // if there's no running scene yet, add one
        if (director.runningScene == nil)
        {
        [director runWithScene:[HelloWorldLayer scene]];
        }

        [director startAnimation];
        director.view.hidden = NO;
    }
    else
    {
        [director stopAnimation];
        director.view.hidden = YES;
    }
}
There’s only one special case in this code that checks whether there’s a currently running scene. If there’s none, you know that this is the first time the user tapped the On/Off switch and so you must run the first scene. You can easily start and stop the cocos2d engine at any time.
It gets a lot more complicated if you want to shut down cocos2d entirely and boot it up again. Most of the time you want to avoid that. You can reduce the memory usage of cocos2d temporarily by cleaning all caches. All cocos2d cache classes have methods to uncache unused or all cached assets. Before stopping cocos2d you may also want to switch to an empty scene to make sure cocos2d isn’t referencing any assets for the time being. If you do that, the memory footprint of cocos2d is pretty minimal, and you can avoid the hassle of completely shutting down and rebooting cocos2d. Not only would this add additional loading time, it’s also prone to cause a variety of issues. Although cocos2d supports it, this shutdown and restart behavior is barely tested and gets very little to no support.
Notice that the director methods startAnimation and stopAnimation are used to run and stop cocos2d. Just for the very first time when there is no running scene, you need to call runWithScene. But if you want to run a different scene each time cocos2d is restarted, you should call replaceScene directly after the call to startAnimation. The runWithScene method can be called only once during the lifetime of the application and must not be used again.
Technically, the stopAnimation method only stops cocos2d from refreshing its view. Unless the view is hidden or obstructed by another view, the last frame cocos2d has rendered will remain as a static image in the CCGLView. That’s why hiding the CCGLView is a good idea. Calling stopAnimation is necessary to ensure that certain UIKit views are responsive and animate smoothly, in particular all views derived from UIScrollView. It’s good practice to call stopAnimation whenever you hide the cocos2d view, to conserve performance for the foreground views as well as conserve battery power. Once the foreground view is dismissed, you call startAnimation again and you can unhide the CCGLView, and the cocos2d view and director continue where they were.
Tip If you want to see how this app behaves with autorotation, you have to make a small change to the ViewBasedAppWithCocos2DViewController class. Simply return YES from the shouldAutorotateToInterfaceOrientation method to enable rotation to all orientations. Although your app doesn’t support it well (it’s not designed for landscape orientation), it serves to show that the cocos2d view will be correctly autorotated.
The last step to complete this project is to use the Segmented Control’s buttons to change scenes in the cocos2d view. Listing 15-9, taken from the ViewController class, shows the code that was added to the sceneChanged method.
Listing 15-9. Changing Scenes Whenever You Press a UIKit Button
- (IBAction)sceneChanged:(id)sender
{
    CCDirector* director = [CCDirector sharedDirector];
    if (director.view.hidden == NO)
    {
        UISegmentedControl* sceneChanger = (UISegmentedControl*)sender;
        int selection = sceneChanger.selectedSegmentIndex;

        CCScene* newScene = [HelloWorldLayer scene];
        CCScene* trans = nil;
        if (selection == 0)
        {
           trans = [CCTransitionSlideInL transitionWithDuration:1 scene:newScene];
        }
        else if (selection == 1)
        {
           trans = [CCTransitionShrinkGrow transitionWithDuration:1 scene:newScene];
        }
        else
        {
           trans = [CCTransitionSlideInR transitionWithDuration:1 scene:newScene];
        }

        [director replaceScene:trans];
    }
}
Because the user can press the Segmented Control buttons at any time, even before the cocos2d view is initialized, the first thing this method does is to check that the director.view exists and is not hidden. Otherwise, the remaining code could crash the app.
The sender parameter is always the control that triggered the event. Here I rightfully assume that it’s a UISegmentedControl. If you ever change the control, you have to change the control’s class here as well. Via the selectedSegmentIndex, you get the index of the currently selected button, which is then used to decide which transition to use for the new scene. I’m simply creating a new instance of the same HelloWorldLayer class; of course, you can also use different scene classes for each button if you want. At last, trans is used with the director method replaceScene to actually change the scene to the new one using a transition.
Note The cocos2d transitions will act only on the cocos2d view and its nodes. UIKit views will be unaffected by the cocos2d transitions. But you can use UIView animations and transitions on the cocos2d view. You can learn more about UIView animations here: http://developer.apple.com/library/ios/#documentation/WindowsViews/Conceptual/ViewPG_iPhoneOS/AnimatingViews/AnimatingViews.html.
I spiced up my HelloWorldLayer scene with some additional cocos2d labels in the background and labels for the buttons. You’ll find these code changes to the HelloWorldLayer class in the ViewBasedAppWithCocos2D project. The result looks something like Figure 15-9.
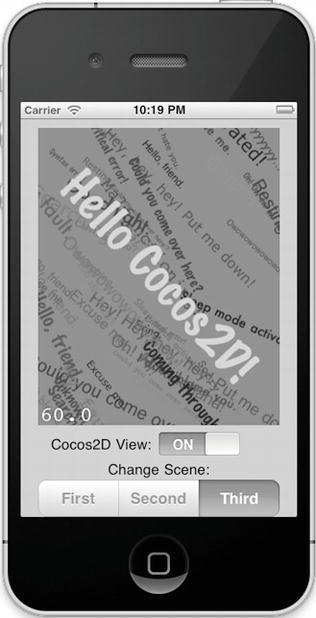
Figure 15-9 . A cocos2d view in a view-based application
Summary
This chapter provided you with everything you need to know to successfully and painlessly mix cocos2d with regular UIKit views. You now have the option to choose how much UIKit you want in your cocos2d app and when, where, and how you’d like your cocos2d view in your UIKit app.
The trickiest aspects were making the cocos2d view transparent in order to allow UIKit views in the background as well as performing hit tests on cocos2d nodes in an attempt to allow all views to receive input, whether UIKit or cocos2d and regardless of where they are in the view hierarchy.
Adding cocos2d to a UIKit app also proved to be fairly simple, even if you need to turn the cocos2d view on and off only at specific times. You may have also taken away that the cocos2d view doesn’t need to be full-screen at all but can be any size, or even resized while the app is running.
But you also learned that mixing cocos2d and UIKit views is not without drawbacks, specifically performance-wise. Keep a watchful eye on your app’s performance by testing it regularly on a device, particularly on first- and second-generation devices. You only get the best performance if you avoid using UIKit views for your game scene, but for menu scenes they can be a great help and timesaver.