
Game Building Blocks
The game DoodleDrop in Chapter 4 was written to be easy to understand if you’re new to cocos2d. If you're a more experienced developer, though, you probably noticed that there's no separation of code—everything is in just one file. Clearly, that doesn’t scale, and if you’re going to make bigger, more exciting games than DoodleDrop, you’ll have to find a suitable way to structure your code. Otherwise, you might end up with one class driving your game’s logic. The code size can quickly grow to thousands of lines, making it hard to navigate and tempting to change anything from anywhere, very likely introducing subtle and hard-to-find bugs.
Each new project demands its own code design. In this chapter, I introduce you to some of the building blocks for writing more complex cocos2d games. You can then use the code foundation laid out in this chapter to create the side-scrolling shooter game you’ll be building in the next few chapters.
Because this chapter contains lots of reference material, I concentrate on the relevant code and omit the details of creating new cocos2d classes as shown in earlier chapters. You may want to download the book’s source code at this point to see this chapter’s projects in action. You can download the book’s source code from the book’s page on www.apress.com or from the Learn Cocos2D web site at www.learn-cocos2d.com/store/book-learn-cocos2d.
The DoodleDrop game had only one scene and one layer. More complex games need several scenes and multiple layers. How and when to use them will become second nature for you. Let’s see what’s involved.
Adding More Scenes
In Listings 4-1 and 4-2 in the previous chapter, I outlined the basic code needed to create a scene. Those basics still apply. Adding more scenes is a matter of adding more classes built on that same basic code. It’s when you’re transitioning between scenes that things get a little more interesting. There’s a set of three methods in CCNode that are sent to each node object (sprite, label, menu item, and so on) in the current scene hierarchy when you’re replacing a scene via the CCDirector replaceScene method. You can use these methods to react to scene changes, remove some memory, or load additional assets in the new scene.
The onEnter and onExit methods get called at certain times during a scene change, depending on whether a CCTransitionScene is used. You must always call the super implementation of these methods to avoid input problems and memory leaks. Take a look at Listing 5-1 and note that all these methods call the super implementation.
Listing 5-1. The onEnter and onExit Methods
-(void) onEnter
{
    // Sent to new scene right after its init method was run.
    // If using a CCTransitionScene: sent when the transition begins.

    [super onEnter];
}

-(void) onEnterTransitionDidFinish
{
    // Sent to the new scene right after onEnter.
    // If using a CCTransitionScene: sent when the transition has ended.

    [super onEnterTransitionDidFinish];
}

-(void) onExit
{
    // Sent to the previous scene right before its dealloc method is run.
    // If using a CCTransitionScene: sent when the transition has ended.

    [super onExit];
}

-(void) onExitTransitionDidStart
{
    // Sent to the previous scene only when using a CCTransitionScene.
    // It's sent when the transition begins, at the same time as the
    // new scene's onEnter method is run.

    [super onExitTransitionDidStart];
}
Note If you don’t make the call to the super implementation in the onEnter methods, your new scene won’t react to touch or accelerometer input. If you don’t call super in onExit, the current scene won’t be released from memory. Similar issues may occur if you don’t call the super implementation in the other two methods. Because it’s easy to forget this, and the resulting behavior doesn’t lead you to realize that it may be related to these methods, it’s important to stress this point.
These methods are useful whenever you need to do something in any node (CCNode, CCLayer, CCScene, CCSprite, CCLabelTTF, and so on) right before a scene is changed or right after. The difference from simply writing the same code in a node’s init or dealloc method is that the scene is already fully set up during onEnter, and it still contains all nodes during onExit.
That can be important. For example, if you perform a transition to change scenes, you may want to pause certain animations or hide user interface elements until the transition finishes. Here’s the sequence in which these methods get called when using a scene transition from FirstLayer to SecondLayer, based on the logging information from the ScenesAndLayers01 project:
- scene: SecondLayer
- init: SecondLayer
- onExitTransitionDidStart: FirstLayer
- onEnter: SecondLayer
- // Transition is running here for a few seconds ...
- onExit: FirstLayer
- onEnterTransitionDidFinish: SecondLayer
- dealloc: FirstLayer
At first, SecondLayer’s + (id) scene method is called to initialize a CCScene. This also adds a CCLayer to the scene. The SecondLayer’s init method is then called, directly followed by the onEnter method in line 4. Just before that, all the nodes in FirstLayer receive the onExitTransitionDidStart message as a hint that the scene has started to transition to another scene.
In line 5, the transition is animating the new scene, and when it’s done, the FirstLayer and all its nodes receive the onExit message before the FirstLayer is deallocated in line 8. At the same time the SecondLayer receives the onEnterTransitionDidFinish message in line 7.
If you’re not using a scene transition to change scenes, the process changes slightly. Most notably the FirstLayer and its nodes receive the onExit message right away, and are also deallocated immediately following onExit. The SecondLayer and its nodes receive both onEnter and onEnterTransitionDidFinish messages consecutively, making them interchangeable. Receiving the onEnterTransitionDidFinish method in this case is superfluous; I would consider this a bug and wouldn’t rely on that behavior to stay.
The following is the sequence of messages sent to FirstLayer and SecondLayer in the order they will occur during the scene change without using a transition:
- scene: SecondLayer
- init: SecondLayer
- onExit: FirstLayer
- dealloc: FirstLayer
- onEnter: SecondLayer
- onEnterTransitionDidFinish: SecondLayer
Note that the FirstScene dealloc method is always called after the other scene was initialized. This means that during a transition the previous scene is still in memory until the transition has ended.
If you want to allocate memory-intensive nodes only after the previous scene is guaranteed to be deallocated, you have to schedule a selector to wait at least one frame before doing the memory allocations, to be certain that the previous scene’s memory is released. You can schedule a method that's guaranteed to be called during the next frame by setting the delay parameter to 0 when scheduling the method:
[self scheduleOnce:@selector(waitOneFrame:) delay:0.0f];
The drawback to this solution is that all nodes you add after the delay will not be seen for one frame, and during the entire transition. So it’s best to save this for assets that are initially outside the visible area or general memory allocations, such as arrays, collision maps, or other game data.
Loading Next Paragraph, Please Stand By
Sooner or later you’ll face noticeable loading times during scene transitions. As you add more content, loading times correspondingly increase. As I just explained, a new scene is allocated before the scene transition starts. If you have very complex code or load a lot of assets in the new scene’s init or onEnter methods, there will be an obvious delay before the transition begins. This is especially problematic if the new scene takes more than fractions of a second to load, and the user initiated the scene change by clicking a button. The user may get the impression that the game has locked up or frozen. The way to alleviate this problem is to add another scene in between: a loading scene. You’ll find the example implementation of the LoadingScene class in the ScenesAndLayers01 project.
In effect, the LoadingScene class acts as an intermediate scene. It's derived from the cocos2d CCScene class. You don’t have to create a new LoadingScene for each transition; you can use one scene for which you simply specify the target scene you’d like to be loaded. An enum works best for this; it’s defined in the LoadingScene header file shown in Listing 5-2.
Listing 5-2. LoadingScene.h
typedef enum
{
    TargetSceneINVALID = 0,
    TargetSceneFirst,
    TargetSceneSecond,
    TargetSceneMAX,
} TargetSceneTypes;

// LoadingScene is derived directly from Scene. We don't need a CCLayer for this scene.
@interface LoadingScene : CCScene
{
    TargetSceneTypes targetScene;
}

+(id) sceneWithTargetScene:(TargetSceneTypes)sceneType;
-(id) initWithTargetScene:(TargetSceneTypes)sceneType;
Tip It’s good practice to set the first enum value to be an INVALID value, unless you intend to make the first the default. Variables in Objective-C are initialized to 0 automatically unless you specify a different value.
You can also also add a MAX or NUM entry at the end of the enum if you intend to iterate over every enum value, as in:
for (int i = TargetSceneINVALID + 1; i < TargetScenesMAX; i++) { .. }
In the case of the LoadingScene, it’s not necessary, but I tend to add these entries merely out of habit, even if I don’t need them.
This brings me to the LoadingScene class implementation of the ScenesAndLayers01 project in Listing 5-3. You’ll notice that the scene is initialized differently and that it uses scheduleUpdate to delay replacing the LoadingScene with the actual target scene.
Listing 5-3. The LoadingScene Class Uses a Switch to Decide Whether to Load the Target Scene
+(id) sceneWithTargetScene:(TargetSceneTypes)sceneType;
{
    return [[self alloc] initWithTargetScene:sceneType];
}

-(id) initWithTargetScene:(TargetSceneTypes)sceneType
{
    if ((self = [super init]))
    {
     targetScene = sceneType;

     CCLabelTTF* label = [CCLabelTTF labelWithString:@"Loading . . ."
                          fontName:@"Marker Felt"
                          fontSize:64];
     CGSize size = [CCDirector sharedDirector].winSize;
     label.position = CGPointMake(size.width / 2, size.height / 2);
     [self addChild:label];

     // Must wait one frame before loading the target scene!
     [self scheduleOnce:@selector(loadScene:) delay:0.0f];
    }

    return self;
}
-(void) loadScene:(ccTime)delta
{
    // Decide which scene to load based on the TargetScenes enum.
    switch (targetScene)
    {
        case TargetSceneFirstScene:
          [[CCDirector sharedDirector] replaceScene:[FirstLayer scene]];
          break;
        case TargetSceneOtherScene:
          [[CCDirector sharedDirector] replaceScene:[SecondLayer scene]];
          break;

        default:
          // Always warn if an unspecified enum value was used
         NSAssert2(nil, @"%@: unsupported TargetScene %i", ←
          NSStringFromSelector(_cmd), targetScene);
         break;
    }
}
Because the LoadingScene is derived from CCScene and requires a new parameter passed to it, it’s no longer sufficient to call [CCScene node]. The sceneWithTargetScene method first allocates self, calls the initWithTargetScene method, and returns the new instance. The sceneWithTargetScene class method isn't strictly necessary but is good style. It makes the calling code shorter because you can avoid calling alloc. Also, most cocos2d and Cocoa classes have such initializing class methods, and many developers expect classes to offer them.
The init method of the LoadingScene class simply stores the target scene in a member variable, creates the “Loading…” label, and calls scheduleOnce with a 0.0f delay to ensure the loadScene method is called one frame after init.
Caution Why not just call replaceScene right inside the init method? Two reasons. Reason number 1 is never call CCDirector’s replaceScene in a node’s init method. It will cause a crash. The Director can’t cope with replacing a scene from a node that’s currently being initialized. Reason number 2 is that you need to give the LoadingScene class time to draw itself—otherwise it won’t be visible and it would appear as if the previous scene just froze.
The update method then uses a simple switch statement based on the provided TargetSceneTypes enum to determine which scene is to be replaced. The default switch contains an NSAssert, which always triggers when the default case is hit. This is good practice because you’ll be editing and expanding this list several times, and if you forgot to update the switch statement with a new case, you’ll be notified of that.
This is a very simple LoadingScene implementation that you can use in your own games. Simply extend the enum and switch statement with more target scenes or use the same target scene multiple times but with different transitions. But as I mentioned, don’t overdo the transitions just because they’re cool-looking.
Using the LoadingScene has an important effect regarding memory. Because you’re replacing the existing scene with the lightweight LoadingScene and then replacing the LoadingScene with the actual target scene, you’re giving the previous scene enough time to remove itself from memory. Effectively there’s no longer any overlap of two potentially memory-hungry scenes at the same time, thereby reducing spikes in memory usage during scene changes.
The project ScenesAndLayers02 illustrates how you can use multiple layers to scroll the contents of a game’s objects layer while the content of the user interface layer, where it says “Here be your Game Scores” (see Figure 5-1), remains static. You’ll learn how multiple layers can cooperate and react only to their own touch input, as well as how to access the various layers from any node.
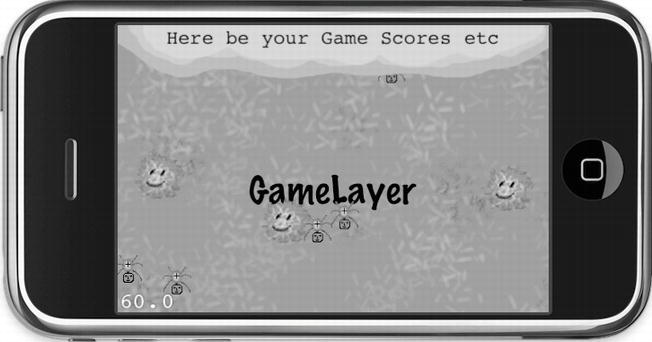
Figure 5-1. The ScenesAndLayers04 project. So far, so normal
Start by putting the MultiLayerScene together in the init method. If you skim over the code in Listing 5-4, you’ll barely notice anything different from what we’ve done so far.
Listing 5-4. Initializing the MultiLayerScene
-(id) init
{
    if ((self = [super init]))
    {
        sharedMultiLayerScene = self;
        // The GameLayer will be moved, rotated and scaled independently
        GameLayer* gameLayer = [GameLayer node];
        [self addChild:gameLayer z:1 tag:LayerTagGameLayer];
        gameLayerPosition = gameLayer.position;

        // The UserInterfaceLayer remains static and relative to the screen area.
        UserInterfaceLayer* uiLayer = [UserInterfaceLayer node];
        [self addChild:uiLayer z:2 tag:LayerTagUserInterfaceLayer];
    }
    return self;
}
Tip It’s worth mentioning that I’ve started using enum values for tags, like LayerTagGameLayer. Doing so has the advantage over using numbers in that you can actually read whose tag it is instead of having to remember which layer had tag 7 assigned to it. It also shows that the actual tag values aren’t important—what’s important is that you use the same value consistently for the same node. Using a human-readable tag makes that task easier and less error prone. The same goes for action tags, of course.
You may have noticed the variable multiLayerSceneInstance and that it gets self assigned. A bit strange, isn’t it? What would that be good for? Recall how to create a singleton class from Chapter 3. In this case, I’ll turn the MultiLayerScene class into a singleton by giving other classes the ability to access the current instance via a class method. See Listing 5-5 and, if you want, compare it with Listing 3-1 to spot the differences. In this case the class is already initialized—not initialized on demand within the sharedLayer method.
Listing 5-5. Turning the MultiLayerScene into a Semi-Singleton Object
static MultiLayerScene* sharedMultiLayerScene;

+(MultiLayerScene*) sharedLayer
{
  NSAssert(sharedMultiLayerScene! = nil, @"MultiLayerScene not available!");
  return sharedMultiLayerScene;
}

-(void) dealloc
{
  // MultiLayerScene will be deallocated now, you must set it to nil manually
  sharedMultiLayerScene = nil;
}
Simply put, the sharedMultiLayerScene is a static global variable that will hold the current MultiLayerScene object during its lifetime. The static keyword denotes that the sharedMultiLayerScene variable is accessible only within the implementation file it's defined in. At the same time, it's not an instance variable; it lives outside the scope of any class. That’s why it is defined outside any method, and it can be accessed in class methods like sharedLayer.
When the layer is deallocated, the sharedMultiLayerScene variable is set back to nil to avoid crashes, because the sharedMultiLayerScene variable would be pointing to an already released object after the dealloc method has run. Variables declared static live on past the deallocation of a class. Using static variables to store pointers to dynamically allocated classes requires great care to ensure that the static variable always points to a valid object and is nil otherwise.
The reason for this semi-singleton is that you’ll be using several layers, each with its own child nodes, but you still need to somehow access the main layer. It’s a very comfortable way to give other layers and nodes of the current scene access to the main layer.
Caution This semi-singleton works only if there is only ever one instance of MultiLayerScene allocated at any one time. It also can’t be used to initialize MultiLayerScene, unlike a regular singleton class.
You grant access to the GameLayer and UserInterfaceLayer through property getter methods, for ease of use. The properties are defined in Listing 5-6, which shows the relevant part from MultiLayerScene.h.
Listing 5-6. Property Definitions for Accessing the GameLayer and UserInterfaceLayer
@property (readonly) GameLayer* gameLayer;
@property (readonly) UserInterfaceLayer* uiLayer;
The properties are defined as readonly, because we only ever want to retrieve the layers, never set them through the property. Their implementation in Listing 5-7 is a straightforward wrapper to the getChildByTag method, but they also perform a safety check just in case, verifying that the retrieved object is of the correct class.
Listing 5-7. Implementation of the Property Getters
-(GameLayer*) gameLayer
{
  CCNode* layer = [self getChildByTag:LayerTagGameLayer];
  NSAssert([layer isKindOfClass:[GameLayer class]], @"%@: not a GameLayer!", ←
     NSStringFromSelector(_cmd));
  return (GameLayer*)layer;
}

-(UserInterfaceLayer*) uiLayer
{
  CCNode* layer = [[MultiLayerScene sharedLayer] getChildByTag:LayerTagUILayer];
  NSAssert([layer isKindOfClass:[UserInterfaceLayer class]], @"%@: not a UILayer!", ←
     NSStringFromSelector(_cmd));
  return (UserInterfaceLayer*)layer;
}
This makes it easy to access the various layers from any node of the MultiLayerScene.
- You can access the “scene” layer of MultiLayerScene:
MultiLayerScene* sceneLayer = [MultiLayerScene sharedLayer];
- You can access the other layers through the scene layer:
GameLayer* gameLayer = [sceneLayer gameLayer];
UserInterfaceLayer* uiLayer = [sceneLayer uiLayer];
- As an alternative, because of the @property definition, you can also use the dot accessor. Whichever you prefer is up to you, as long as you stick to it consistently. Technically and performance-wise, there's absolutely no difference.
GameLayer* gameLayer = sceneLayer.gameLayer;
UserInterfaceLayer* uiLayer = sceneLayer.uiLayer;
The UserInterfaceLayer and GameLayer classes both handle touch input, but independently. To achieve the correct results, you need to use TargetedTouchHandlers, and by using the priority parameter, you can make sure that the UserInterfaceLayer gets to look at a touch event before the GameLayer. The UserInterfaceLayer uses the isTouchForMe method to determine whether it should handle the touch, and it returns YES from the ccTouchBegan method if it did handle the touch. This keeps other targeted touch handlers from receiving this touch. Listing 5-8 illustrates the important bits of the touch event code for the UserInterfaceLayer.
Listing 5-8. Touch Input Processing Using TargetedTouchDelegate
// Register TargetedTouch handler with higher priority than GameLayer
-(void) registerWithTouchDispatcher
{
    [[CCDirector sharedDirector].touchDispatcher addTargetedDelegate:self
                                      priority:-1
                                   swallowsTouches:YES];
}

// Checks if the touch location was in an area that this layer wants to handle as input.
-(BOOL) isTouchForMe:(CGPoint)touchLocation
{
    CCNode* node = [self getChildByTag:UILayerTagFrameSprite];
    return CGRectContainsPoint([node boundingBox], touchLocation);
}

-(BOOL) ccTouchBegan:(UITouch*)touch withEvent:(UIEvent *)event
{
    CGPoint location = [MultiLayerScene locationFromTouch:touch];
    BOOL isTouchHandled = [self isTouchForMe:location];
    if (isTouchHandled)
    {
        CCNode* node = [self getChildByTag:UILayerTagFrameSprite];
        NSAssert([node isKindOfClass:[CCSprite class]], @"node is not a CCSprite");

        // Highlight the UI layer's sprite for the duration of the touch
        ((CCSprite*)node).color = ccRED;

        // Access the GameLayer via MultiLayerScene.
        GameLayer* gameLayer = [MultiLayerScene sharedLayer].gameLayer;

        // Run Actions on GameLayer ... (code removed for clarity)
    }

    return isTouchHandled;
}

-(void) ccTouchEnded:(UITouch*)touch withEvent:(UIEvent *)event
{
  CCNode* node = [self getChildByTag:UILayerTagFrameSprite];
  NSAssert([node isKindOfClass:[CCSprite class]], @"node is not a CCSprite");
  ((CCSprite*)node).color = ccWHITE;
}
In registerWithTouchDispatcher, the UserInterfaceLayer registers itself as a targeted touch handler with a priority of −1. Because GameLayer uses the same code but with a priority of 0, the UserInterfaceLayer is the first layer to receive touch input.
In ccTouchBegan, the first thing to do is to check whether this touch is of relevance to the UserInterfaceLayer. The isTouchForMe method implements a simple “point in boundingBox” check via CGRectContainsPoint to see whether the touch began on the uiframe sprite. More useful methods are available in CGGeometry to test intersection, containing points, or equality. Refer to Apple’s documentation to learn more about the CGGeometry methods (http://developer.apple.com/mac/library/documentation/GraphicsImaging/Reference/CGGeometry/Reference/reference.html).
If the touch location check determines that the touch is on the sprite, ccTouchBegan returns YES, signaling that this touch event was used and should not be processed by other layers with a targeted touch delegate of lower priority.
Only if the isTouchForMe check fails will the GameLayer receive the touch input and use it to scroll itself when the user moves a finger over the screen. You can compare GameLayer’s input handling code in Listing 5-9.
Listing 5-9. GameLayer Receives the Remaining Touch Events and Uses Them to Scroll Itself
-(void) registerWithTouchDispatcher
{
  [[CCDirector sharedDirector].touchDispatcher addTargetedDelegate:self
                                    priority:0
                                 swallowsTouches:YES];
}

-(BOOL) ccTouchBegan:(UITouch*)touch withEvent:(UIEvent *)event
{
  lastTouchLocation = [MultiLayerScene locationFromTouch:touch];

  // Stop the move action so it doesn't interfere with the user's scrolling.
  [self stopActionByTag:ActionTagGameLayerMovesBack];

  // Always swallow touches, GameLayer is the last layer to receive touches.
  return YES;
}

-(void) ccTouchMoved:(UITouch*)touch withEvent:(UIEvent *)event
{
  CGPoint currentTouchLocation = [MultiLayerScene locationFromTouch:touch];

  // Take the difference of the current to the last touch location.
  CGPoint moveTo = ccpSub(lastTouchLocation, currentTouchLocation);

  // Then reverse to give the impression of moving the background
  moveTo = ccpMult(moveTo, -1);

  lastTouchLocation = currentTouchLocation;

  // Adjust the layer's position accordingly, and with it all child nodes.
  self.position = ccpAdd(self.position, moveTo);
}

-(void) ccTouchEnded:(UITouch*)touch withEvent:(UIEvent *)event
{
  // Move the game layer back to its designated position.
  CCMoveTo* move = [CCMoveTo actionWithDuration:1 position:gameLayerPosition];
  CCEaseIn* ease = [CCEaseIn actionWithAction:move rate:0.5f];
  ease.tag = ActionTagGameLayerMovesBack;
  [self runAction:ease];
}
Because GameLayer is the last layer to receive input, it doesn’t need to do any isTouchForMe checks and simply swallows all touches.
Tip Instead of handling user input in multiple layers, consider having one layer dedicated to all input handling. It can decide what to do, forward touches to other layers, and call methods on other nodes. The advantage of this is shorter and less error-prone input handling code, because all the decisions are made in one class instead of being spread out to a variety of classes.
The ccTouchMoved event calculates the difference between the previous and current touch location. It's then reversed by multiplying it by −1 to change the effect from moving the camera over the background to moving the background under the camera. If you have a hard time imagining what I mean by that, try the ScenesAndLayers02 project and then try it a second time, commenting out the moveTo = ccpMult(moveTo, -1); line. You’ll notice the second time that every finger movement moves the layer in the opposite direction.
ccTouchEnded simply moves the layer back to its center position automatically when the user lifts the finger off the screen. Figure 5-2 shows this project in action with the whole GameLayer rotated and zoomed out. Every game object on the GameLayer abides by every movement, rotation, and scaling of the GameLayer automatically, whereas the UserInterfaceLayer always stays put.
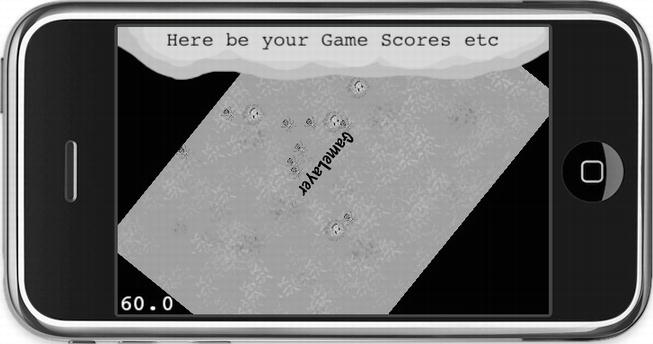
Figure 5-2 . The utility of multiple layers becomes clear once the GameLayer is zoomed out and rotated, with all its nodes adhering to the layer’s behavior, while the UserInterfaceLayer on top remains in place, unaffected
So far you’ve examined multiple scenes and multiple layers. Now you want to cover what—levels?
Well, the concept of levels is common in many games, so I don’t think I need to explain that. What’s much harder is deciding which approach best serves a level-based game. In cocos2d you can go either way—choosing a new scene for each level or using separate layers to manage multiple levels. Both have their uses, and which one to choose depends mostly on what purpose levels serve in your game.
Scenes as Levels
The most straightforward approach is to run each level as a separate scene. You can either create a new Scene class for each level or choose to initialize one common LevelScene class and pass as a parameter the level number or other information necessary to load the correct level data.
This approach works best if you have clearly separated levels and most everything that happens within a level is no longer relevant or needed after the player has progressed through that level. Maybe you keep the player’s score and the number of lives left, but that’s about it. The user interface is probably minimal, noninteractive, and purely informative without any interactive elements other than a pause button.
I imagine this approach works best for twitch-based action game levels.
Layers as Levels
Using separate layers in the same scene to load and display levels is an approach I recommend if you have a complex user interface that should not be reset when a level changes. You may even want to keep the player and other game objects in the exact same positions and states when changing levels.
You probably have a number of variables that keep the current game state and user interface settings, such as an inventory. It's more work to save and restore these game settings and reset all visual elements than to switch out one layer with another within the same scene.
This may be the ideal solution for a hidden object or adventure game, where you move from room to room, especially if you want to replace the level contents using an animation that moves in or out beneath the user interface.
The CCLayerMultiplex class may be the ideal solution for such an approach. It can contain multiple nodes, but only one is active at any given time. Listing 5-10 shows an example of using the CCLayerMultiplex class. The only drawback is that you can’t transition between the layers. There’s only one layer visible at a time, which makes any transition effects impossible.
Listing 5-10. Using the CCMultiplexLayer Class to Switch Between Multiple Layers
CCLayer* layer1 = [CCLayer node];
CCLayer* layer2 = [CCLayer node];
CCLayerMultiplex* mpLayer = [CCLayerMultiplex layerWithLayers:layer1, layer2, nil];

// Switches to layer2 but keeps layer1 as child of mpLayer.
[mpLayer switchTo:1];

// Switches to layer1, removes layer2 from mpLayer and releases its memory.
// After this call you must not switch back to layer2 (index: 1) anymore!
[mpLayer switchToAndReleaseMe:0];
CCLayerColor and CCLayerGradient
In the ScenesAndLayers project, so far the background is simply a black screen. You can see it when you scroll to the edge of the grassy background image or tap the “user interface” to have the GameLayer zoom out. To change the background color, cocos2d provides a CCLayerColor, which is added to the ScenesAndLayers02 project and works like this:
// Set background color to magenta. The most unobtrusive color imaginable.
CCLayerColor* colorLayer = [CCLayerColor layerWithColor:ccc4(255, 0, 255, 255)];
[self addChild:colorLayer];
In the same way, you can create a much more vibrant background using CCLayerGradient. It allows you to specify two colors between which cocos2d will smoothly interpolate. And you can adjust the gradient's direction.
CCLayerGradient* gradient = [CCLayerGradient layerWithColor:ccc4(0, 150, 255, 255)
                              fadingTo:ccc4(255, 150, 50, 255)
                             alongVector:CGPointMake(1.0f, 1.0f)];
[self addChild:gradient];
The gradient direction is given by a vector. In this case the vector points one unit to the right and one unit up, which has the gradient rotated at a perfect 45° angle. The vector points in the direction of the fadingTo color, which means the blue-ish color is at the bottom left whereas the orange-ish color is more to the upper right. To reverse the orientation of the color, you can either switch colors or simply reverse the signs of the vector.
Note that you can also change the width and height of CCLayerColor and CCLayerGradient and thus the area they fill with a color:
[gradientLayer changeWidth:400 height:200];
Subclassing Game Objects from CCSprite
Very often your game objects implement logic of their own. It makes sense to create a separate class for each type of game object. This could be your player character, various enemy types, bullets, missiles, platforms, and just about everything else that can be individually placed in a game’s scene and needs to run logic of its own.
The question then is, where to subclass from?
A lot of developers choose the seemingly obvious route of subclassing CCSprite. I don’t think that’s a good idea. The relationship of subclassing is a “is a” relationship. Think closely: is your player character a CCSprite? Are all your enemy characters CCSprites?
At first the answer seems logical: of course they're sprites! That’s what they use to display themselves. But wait a second. For all we know, game characters can also be characters in the literal sense. In Rogue-like games, your player character is an @. So, would that character be a CCLabelTTF then?
I think the confusion comes from CCSprite being the most widely used class to display anything onscreen. But the true relationship of your game characters to CCNode classes is a “has a” relationship. Your player class “has a” CCSprite that it uses to display itself, and it may even have to use multiple sprites for weapons, armor, and so on—and maybe even particle effects for running at high speed, a health bar, and a label to display the player’s name in multiplayer modes.
The distinction becomes even clearer when you think of why you’d normally subclass the CCSprite class: in general, to add new features to the CCSprite class—for example, to have a CCSprite class that uses a CCRenderTexture to modify how it's displayed based on what's beneath it on the screen. Essentially you'd want to subclass CCSprite to change the behavior of the CCSprite class itself and how the sprite is displayed—not to add gameplay code to it.
Input handling, animating the player, collision detection, physics—in general, game logic. None of these things belongs to a CCSprite class because this code is about how an object behaves and how you interact with it, not how a sprite is drawn on the screen. Another way to look at it is to consider which of the code you add to a subclassed CCSprite is generally useful and usable by all sprites. Most game code is very specific to an individual game object, be it player, boss monster, or collectible item.
Consider the case where you want your player to have several visual representations that it should be able to switch to seamlessly. If the player needs to morph from one sprite to another using FadeIn/FadeOut actions, you’re going to have to use two sprites—or if you want your game objects to appear on different parts of the screen at the same time, as in a game like Asteroids where the asteroid leaving the top of the screen should also show up partially at the bottom of the screen. You need two sprites to do this, and that’s just one reason why composition (or aggregation) is preferable to subclassing (or inheritance). Inheritance causes tight coupling between classes, with changes to parent classes potentially introducing bugs and anomalies in subclasses. The deeper the class hierarchy, the more code will reside in base classes, which amplifies the problem.
Another good reason is that a game object encapsulates its visual representation. If the logic is self-contained, only the game object itself should ever change any of the CCNode properties, such as position, scale, rotation, or even running and stopping actions. One of the core problems many game developers face sooner or later is that their game objects are directly manipulated by outside influences. For example, you may inadvertently create situations where the scene’s layer, the user interface, and the player object itself all change the player sprite’s position. This is undesirable. You want all the other systems to notify the player object to change its position, giving the player object itself the final say about how to interpret these commands—whether to apply them, modify them, or ignore them.
Composing Game Objects Using CCSprite
Let’s try this. Instead of creating a new class derived from a CCSprite class, create it from cocos2d’s base class CCNode. Although you can also base your class on the Objective-C base class NSObject, it’s easier to stick to CCNode because it's generally easier to work with CCNode as your base class within cocos2d. Otherwise you can’t use convenience features like CCNode’s scheduling methods.
I decided to turn the spiders in the ScenesAndLayers02 project into a class of their own. The class is simply called Spider. Listing 5-11 reveals the Spider class’s header file.
Listing 5-11. The Spider Class Interface
#import "cocos2d.h"

@interface Spider : CCNode
{
 CCSprite* spiderSprite;
 int numUpdates;
}

+(id) spiderWithParentNode:(CCNode*)parentNode;
-(id) initWithParentNode:(CCNode*)parentNode;

@end
You can see that the CCSprite is added as a member variable to the class and is named spiderSprite. This is called composition because you compose the Spider class of a CCSprite used to display it and later, possibly, other objects (including additional CCSprite classes) and variables.
The Spider class in Listing 5-12 has a spiderWithParentNode class method to create an instance of the Spider class. Another convenient feature I added is to pass a parentNode as a parameter to the initWithParentNode method. By doing that, the Spider class can add itself to the node hierarchy by calling [parentNode addChild:self], which makes creating an instance of a Spider class a one-liner in GameLayer.m because you only need to write [Spider spiderWithParentNode:self].
On the other hand, the spiderSprite should be self-contained because it's created and managed by the Spider class. The spiderSprite is added via [self addChild:spiderSprite] to the Spider class and not the parentNode. Although you could do that, I don't recommend it because it breaks encapsulation. For one, the parentNode code could possibly remove the spiderSprite from its hierarchy, and moving the Spider object would no longer move the spiderSprite.
Listing 5-12. The Spider Class Implementation
#import "Spider.h"

@implementation Spider

// Static initializer, mimics cocos2d's memory allocation scheme.
+(id) spiderWithParentNode:(CCNode*)parentNode
{

  return [[self alloc] initWithParentNode:parentNode];
}
-(id) initWithParentNode:(CCNode*)parentNode
{
  if ((self = [super init]))
  {
     [parentNode addChild:self];

     CGSize screenSize = [CCDirector sharedDirector].winSize;

     spiderSprite = [CCSprite spriteWithFile:@"spider.png"];
     spiderSprite.position = CGPointMake(CCRANDOM_0_1() * screenSize.width, ←
       CCRANDOM_0_1() * screenSize.height);
     [self addChild:spiderSprite];

     [self scheduleUpdate];
  }

    return self;
}

-(void) update:(ccTime)delta
{
    numUpdates++;
    if (numUpdates > 60)
    {
        numUpdates = 0;
        [spiderSprite stopAllActions];

        // Let the Spider move randomly.
        CGPoint moveTo = CGPointMake(CCRANDOM_0_1() * 200–100, ←
          CCRANDOM_0_1() * 100–50);
        CCMoveBy* move = [CCMoveBy actionWithDuration:1 position:moveTo];
        [spiderSprite runAction:move];
    }
}

@end
The Spider class now uses its own game logic to move the spiders around on the screen. Granted, it won’t win any prizes at this year’s Artificial Intelligence Symposium; it’s just meant as an example.
Up to this point you know you can receive touch input using CCLayer nodes, but in fact any class can receive touch input by using the CCTouchDispatcher class directly. Your class only needs to implement either the CCStandardTouchDelegate or CCTargetedTouchDelegate protocol. You add the appropriate protocol definition in angle brackets following the parent class in the @interface definition, as shown in Listing 5-13.
Listing 5-13. The CCTargetedTouchDelegate Protocol
@interface Spider : CCNode < CCTargetedTouchDelegate>
{
 ...
}
The implementation in Listing 5-14 highlights the changes made to the Spider class. The Spider class now reacts to targeted touch input. Whenever you tap a spider, it quickly moves away from your finger. (Contrary to common perceptions, spiders are usually more afraid of humans than the other way around, exceptions notwithstanding.)
The Spider class is registered with CCTouchDispatcher to receive input as a touch delegate, but this delegate association must also be removed on cleanup. Otherwise, the scheduler or touch dispatcher would still keep a reference to the Spider class even though it was released from memory, and that would likely cause a crash shortly thereafter. And it must be in the cleanup method, not dealloc, for the simple reason that the touch dispatcher holds (retains) a reference to your class. If you don’t instruct the touch dispatcher to remove your class, it will never be deallocated.
Listing 5-14. The Changed Spider Class
-(id) initWithParentNode:(CCNode*)parentNode
{
    if ((self = [super init]))
    {
     ...

     // Manually add this class as receiver of targeted touch events.
     [[CCDirector sharedDirector].touchDispatcher addTargetedDelegate:self
                                       priority:-1
                                    swallowsTouches:YES];
    }

    return self;
}

-(void) cleanup
{
  // Must manually remove this class as touch input receiver!
  [[CCTouchDispatcher sharedDispatcher] removeDelegate:self];

  [super cleanup];
}

// Extract common logic into a separate method accepting parameters.
-(void) moveAway:(float)duration position:(CGPoint)moveTo
{
  [spiderSprite stopAllActions];
  CCMoveBy* move = [CCMoveBy actionWithDuration:duration position:moveTo];
  [spiderSprite runAction:move];
}

-(void) update:(ccTime)delta
{
  numUpdates++;
  if (numUpdates > 50)
  {
     numUpdates = 0;

     // Move at regular speed.
     CGPoint moveTo = CGPointMake(CCRANDOM_0_1() * 200–100, ←
     CCRANDOM_0_1() * 100–50);
     [self moveAway:2 position:moveTo];
  }
}
-(BOOL) ccTouchBegan:(UITouch *)touch withEvent:(UIEvent *)event
{
    // Check if this touch is on the Spider's sprite.
    CGPoint touchLocation = [MultiLayerScene locationFromTouch:touch];
    BOOL isTouchHandled = CGRectContainsPoint([spiderSprite boundingBox], ←
     touchLocation);
    if (isTouchHandled)
    {
        // Reset move counter.
        numUpdates = 0;

        // Move away from touch loation rapidly.
        CGPoint moveTo;
        float moveDistance = 40;
        float rand = CCRANDOM_0_1();

        // Randomly pick one of four corners to move away to.
        if (rand < 0.25f)
            moveTo = CGPointMake(moveDistance, moveDistance);
        else if (rand < 0.5f)
            moveTo = CGPointMake(−moveDistance, moveDistance);
        else if (rand < 0.75f)
            moveTo = CGPointMake(moveDistance, -moveDistance);
        else
            moveTo = CGPointMake(−moveDistance, -moveDistance);

        // Move quickly:
        [self moveAway:0.1f position:moveTo];
    }

    return isTouchHandled;
}
I decided to improve the move logic by extracting the functionality into a separate method. The straightforward way would have been to just copy the existing code from the update method to the ccTouchBegan method. However, copy-and-paste is evil. If you join the Cult of Programmology, be aware that it's considered a deadly sin to duplicate existing code.
Caution Using copy-and-paste is very easy, and everyone knows how to do it, which makes it so tempting. But whenever you duplicate code, you duplicate the effort needed to change that code later. Consider the case where you duplicate the same sequence of actions ten times and you need to change the duration of the action sequence. You can’t change it just once; you have to change it ten times now, and more importantly you have to test the change ten times because you might have forgotten to apply the change to one of the ten places. More code also means more chances of introducing a bug, and since this bug will possibly happen in only one of ten cases, it’ll be harder to find as well. I’ve had the pleasure to work with a project that was 30,000 lines of pretty much identical code copied and pasted hundreds of times. All in one file. Don’t go there, or I will haunt you! To avoid copy & paste style programming, I suggest to take the DRY principle to heart. DRY stands for “Don’t repeat yourself,”and the principle is described at http://c2.com/cgi/wiki?DontRepeatYourself.
Using methods to extract common functionality, exposing what needs to be flexible as parameters, is a very simple task. I hope that the moveAway method in Listing 5-14 illustrates my point well. It doesn't contain much code, but even the smallest amount of duplicated code increases the time you spend maintaining It.
The ccTouchBegan method takes the touch location and checks via the CGRectContainsPoint whether the touch location is inside the spider sprite’s boundingBox. If so, it handles the touch and runs the code that lets the spider move away quickly in one of four directions.
In summary, using a CCNode as a base class for your game objects makes a few things more inconvenient at first glance. The benefits do become visible when you start creating larger projects, however, like when you're dealing with more than a dozen of classes for game objects. It's okay if you prefer to subclass CCSprite for now. But when you get more proficient—and more ambitious—please come back to this chapter and try this approach. It leads to a better code structure and more clearly separated boundaries and responsibilities of the individual game elements.
Please remain seated as I walk you through a few more CCNode-derived classes that fulfill very specific purposes. They are CCProgressTimer, CCParallaxNode, and CCMotionStreak.
In the ScenesAndLayers07 project, I’ve added a CCProgressTimer node to the UserInterfaceLayer class. You can see how it cuts off chunks from a sprite in a radial fashion in Figure 5-3 .
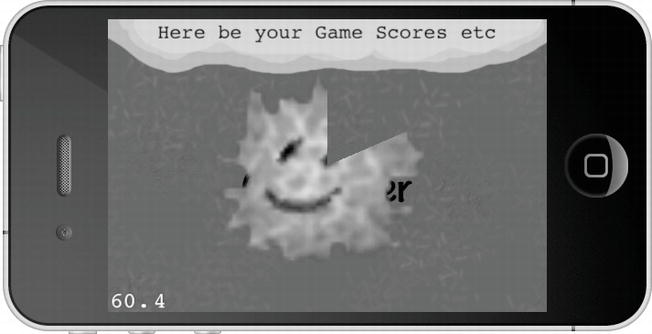
Figure 5-3 . The CCProgressTimer in action. I would say it’s about 10 past 12
The progress timer class is useful for any kind of progress display, like a loading bar or the time it takes an icon to become available again. Think of the action buttons in World of Warcraft and their recast timer. The progress timer takes a sprite and, based on a percentage, displays only part of it to visualize some kind of progress in your game. Listing 5-15 shows how to initialize the CCProgressTimer node.
Listing 5-15. Initializing a CCProgressTimer Node
// Progress timer is a sprite that is only partially displayed
// to visualize some kind of progress.
CCSprite* fireSprite = [CCSprite spriteWithFile:@"firething.png"];
CCProgressTimer* timer = [CCProgressTimer progressWithSprite:fireSprite];
timer.type = kCCProgressTimerTypeRadial;
timer.percentage = 0;
[self addChild:timer z:1 tag:UILayerTagProgressTimer];

// The update is needed for the progress timer.
[self scheduleUpdate];
The timer type is from the CCProgressTimerType enum defined in CCProgressTimer.h. You can choose between radial and rectangular progress timers—the latter requires the timer type to be set to kCCProgressTimerTypeBar. There’s one caveat: the timer doesn’t update itself. You have to change the timer’s percentage value frequently to update the progress. That’s why I called the scheduleUpdate method in Listing 5-15. Listing 5-16 shows the implementation of the update method that does the actual progressing.
Listing 5-16. The Implementation of the update Method
-(void) update:(ccTime)delta
{
  CCNode* node = [self getChildByTag:UILayerTagProgressTimer];
  NSAssert([node isKindOfClass:[CCProgressTimer class]], @"node is not a ←
     CCProgressTimer");

  // Updates the progress timer
  CCProgressTimer* timer = (CCProgressTimer*)node;
  timer.percentage + = delta * 10;
  if (timer.percentage > = 100)
  {
     timer.percentage = 0;
  }
}
You must frequently update the CCProgressTimer node’s percentage property as needed—it won’t progress by itself automatically. The progress here is simply the passing of time. Isn’t that what games are all about?
Parallaxing is an effect used in 2D games to give the impression of depth, created by using layered images that move at different rates. The images in the foreground move faster relative to the images in the background. Although you can’t see the parallax effect in a static image, Figure 5-4 at least gives you a first impression of a background made up of individual layers. The clouds are at the very back; the mountains are in front of the clouds but behind the (ugly) trees. At the very bottom is the road where you might typically add a player character moving left and right along this scenery.

Figure 5-4 . The CCParallaxNode lets you create an illusion of depth
Note Why does parallaxing create the illusion of depth? Because our minds are trained to this effect. Imagine you’re traveling in a car at high speed and looking out a side window. You notice the trees next to the road (closest to you) zipping by so fast you can hardly focus on a single one. Look a little further, and you’ll see the barnyard passing you by at a seemingly much slower rater. Then look to the mountains at the horizon, and you’ll hardly notice you’re moving past them at all. This is the parallax effect in a three-dimensional world, where there are an infinite number of parallax layers. In a 2D game we have to (very roughly) simulate the same effect with around two to eight parallax layers. Each layer tries to fool your mind into thinking that it’s a certain distance away from your viewpoint, simply because it’s moving at certain speeds relative to other layers. It works surprisingly well.
Cocos2d has a specialized node you can use to create this effect. The code to create a CCParallaxNode in Listing 5-17 is found in the Parallax01 project.
Listing 5-17. The CCParallaxNode Requires a Lot of Setup Work, but the Results Are Worth It
// Load the sprites for each parallax layer, from background to foreground.
CCSprite* para1 = [CCSprite spriteWithFile:@"parallax1.png"];
CCSprite* para2 = [CCSprite spriteWithFile:@"parallax2.png"];
CCSprite* para3 = [CCSprite spriteWithFile:@"parallax3.png"];
CCSprite* para4 = [CCSprite spriteWithFile:@"parallax4.png"];

// Set the correct offsets depending on the screen and image sizes.
para1.anchorPoint = CGPointMake(0, 1);
para2.anchorPoint = CGPointMake(0, 1);
para3.anchorPoint = CGPointMake(0, 0.6f);
para4.anchorPoint = CGPointMake(0, 0);

CGPoint topOffset = CGPointMake(0, screenSize.height);
CGPoint midOffset = CGPointMake(0, screenSize.height / 2);
CGPoint downOffset = CGPointZero;
// Create a parallax node and add the sprites to it.
CCParallaxNode* paraNode = [CCParallaxNode node];
[paraNode addChild:para1
          z:1
     parallaxRatio:CGPointMake(0.5f, 0)
    positionOffset:topOffset];

[paraNode addChild:para2 z:2 parallaxRatio:CGPointMake(1, 0) positionOffset:topOffset];
[paraNode addChild:para3 z:4 parallaxRatio:CGPointMake(2, 0) positionOffset:midOffset];
[paraNode addChild:para4 z:3 parallaxRatio:CGPointMake(3, 0) positionOffset:downOffset];
[self addChild:paraNode z:0 tag:ParallaxSceneTagParallaxNode];

// Move the parallax node to show the parallaxing effect.
CCMoveBy* move1 = [CCMoveBy actionWithDuration:5 position:CGPointMake(−160, 0)];
CCMoveBy* move2 = [CCMoveBy actionWithDuration:15 position:CGPointMake(160, 0)];
CCSequence* sequence = [CCSequence actions:move1, move2, nil];
CCRepeatForever* repeat = [CCRepeatForever actionWithAction:sequence];
[paraNode runAction:repeat];
To create a CCParallaxNode, you first create the desired CCSprite nodes that make up the individual parallaxing images and then you have to properly position them on the screen. In this case, I chose to modify their anchor points instead because it was easier to align the sprites with the screen borders. You create the CCParallaxNode as you do any other node, but you add its children using a special initializer. With it you specify the parallaxRatio, which is a CGPoint used as a multiplier for any movement of the CCParallaxNode. In this case, the CCSprite para1 would move at half the speed, para2 at normal speed, para3 at double the speed of the CCParallaxNode, and so on.
Using a sequence of CCMoveBy actions, the CCParallaxNode is moved from left to right and back. Notice how the clouds in the background move slowest, and the trees and gravel in the foreground scroll by the fastest. This gives the illusion of depth.
Note You can’t modify the positions of individual child nodes once they’re added to the CCParallaxNode. You can only scroll as far as the largest and fastest-moving image before the background shows through. You can see this effect if you modify the CCMoveBy actions to scroll a lot farther. You can increase the scrolling distance by adding more of the same sprites with the appropriate offsets. But if you require endless scrolling in one or both directions, you’ll have to implement your own parallax system. In fact, this is what you’re going to do in Chapter 7.
CCMotionStreak is essentially a wrapper around CCRibbon. It causes the CCRibbon elements to more or less slowly fade out and disappear after you’ve drawn them. Try it in the ScenesAndLayers10 project and take a look at Figure 5-5 to get an impression how the fade-out effect might look.
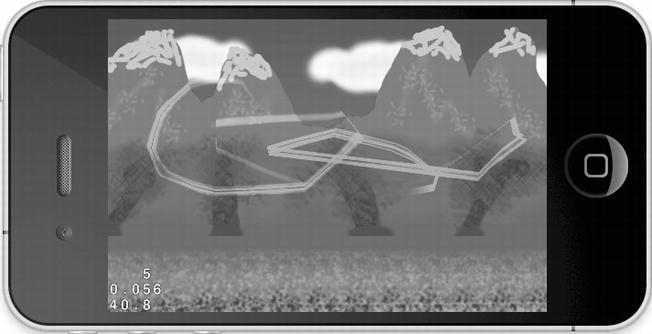
Figure 5-5 . The CCMotionStreak class lets you draw a slowly fading line
As you can see in Listing 5-18, you can use CCMotionStreak to draw a slowly fading line, where a texture is stretched to the entire length of the line. For example, you can use this to create high-speed bullets that stretch out the faster they move. Listing 5-19 shows the code to create and move a CCMotionStreak node to the location of a touch. In the Parallax01 project, you can touch the screen to draw a motion streak line.
Listing 5-18. The CCMotionStreak Creates a Line Stroke Effect
-(void) resetMotionStreak
{
  // Removes the CCMotionStreak and creates a new one.
  [self removeChildByTag:ParallaxSceneTagMotionStreak cleanup:YES];
  CCMotionStreak* streak = [CCMotionStreak streakWithFade:0.99f
                             minSeg:8
                              width:32
                              color:ccc3(255, 0, 255)
                        textureFilename:@"spider.png"];
  [self addChild:streak z:5 tag:ParallaxSceneTagMotionStreak];

  streak.blendFunc = (ccBlendFunc){GL_ONE, GL_ONE};
}

-(CCMotionStreak*) getMotionStreak
{
  CCNode* node = [self getChildByTag:ParallaxSceneTagMotionStreak];
  NSAssert([node isKindOfClass:[CCMotionStreak class]], @"not a CCMotionStreak");

  return (CCMotionStreak*)node;
}

-(CGPoint) locationFromTouch:(UITouch*)touch
{
  CGPoint touchLocation = [touch locationInView: [touch view]];
  return [[CCDirector sharedDirector] convertToGL:touchLocation];
}

-(void) moveMotionStreakToTouch:(UITouch*)touch
{
  CCMotionStreak* streak = [self getMotionStreak];
  streak.position = [self locationFromTouch:touch];
}

-(BOOL) ccTouchBegan:(UITouch*)touch withEvent:(UIEvent *)event
{
  [self moveMotionStreakToTouch:touch];
  // Always swallow touches.
  return YES;
}

-(void) ccTouchMoved:(UITouch*)touch withEvent:(UIEvent *)event
{
  [self moveMotionStreakToTouch:touch];
}
The fade parameter of CCMotionStreak determines how fast ribbon elements fade out—the smaller the number, the quicker they disappear, and the shorter the line will be. The minSeg parameter apparently modifies how many segments the line consists of at a minimum. However, it has almost no discernable effect, though it shouldn’t be too low to prevent graphical glitches like gaps in the streak, nor too high (dozens or more) to avoid performance issues. The color is used to tint the texture.
Tip If you’re interested in creating a line-drawing game similar to Flight Control or Harbor Master, then CCMotionStreak won’t help you draw the line—literally speaking, of course. The problem is that motion streak lines disappear quickly. Instead you should check out the Line-Drawing Game Starterkit that I’m selling: www.learn-cocos2d.com/store/line-drawing-game-starterkit. It contains all the code necessary to draw paths with your finger, drawing lines with OpenGL and having an object follow that line—among other things.
Summary
In this chapter, you learned more about scenes and layers—how and when to use them and for what. I explained why it’s usually not a good idea to subclass game objects directly from CCSprite, and I showed you how to create a fully self-contained game object class that derives from CCNode instead and contains a sprite. That way it it’s easier to extend should the object need multiple sprites, particle effects, or what have you.
Finally, you learned how to use some of the more specialized CCNode classes like CCProgressTimer, CCParallaxNode, and CCMotionStreak.
You now have enough knowledge about cocos2d to start creating more complex games, like the side-scrolling shooter I’m preparing you for. And with complex games come complex graphics, including animations. How to handle all these sprites efficiently, both in terms of memory and performance, is the topic of the next chapter.