
This chapter introduces you to the essential building blocks of the cocos2d game engine. You’ll be using most of these classes in every game you create, so understanding what’s available and how the classes work together will help you write better games. Armed with this knowledge, you’ll find it a lot easier to start working with cocos2d.
Accompanying this chapter is an Xcode project called Essentials that includes everything I discuss here, plus additional examples. The source code is full of comments.
This chapter starts with a high-level overview of the cocos2d game engine architecture. Because every game engine is different in the way game objects are managed and presented on the screen, it’s best to begin with an understanding of what the individual elements are and how they fit together.
Sometimes called a scene hierarchy, the scene graph is a hierarchy of every cocos2d node that’s currently active.
A cocos2d node is any object derived from the CCNode class. Most nodes, like CCSprite and CCLabelTTF, are displayed on the screen, but a few have no visual representation, including CCNode, CCScene, and CCLayer. They are no less important, though, and they frequently cause confusion for new cocos2d developers.
In the upcoming sections I go into more detail on those classes and explain what they're used for. For now, I focus on the high-level concepts, and it’s sufficient for you to know that CCSprite displays a texture on the screen, CCLabelTTF prints arbitrary text, and CCNode, CCScene, and CCLayer are used mainly to group nodes together.
Figure 3-1 depicts the shoot ’em up game that you’ll create, starting in Chapter 6, and illustrates what's not immediately noticeable to players of the game but very important for game developers to understand.
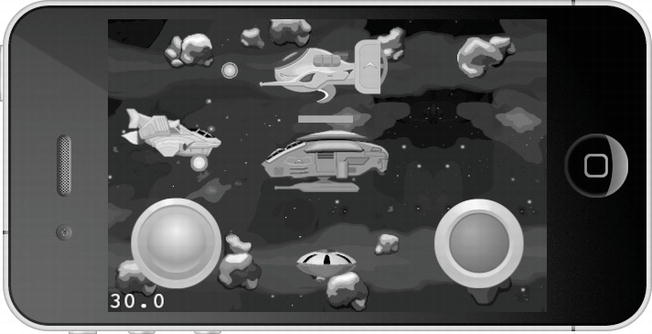
Figure 3-1 . A shoot ’em up game
The scene in Figure 3-1 is entirely made of CCSprite objects. At least that’s what you can see. What you can’t see is how the CCScene and CCLayer classes are used to group and order the various sprites—several background layers, the player’s ship, the enemies, the bullets, and the virtual joypad and button. To illustrate the layering of this scene’s elements, Figure 3-2 shows an exploded view drawing of that scene.
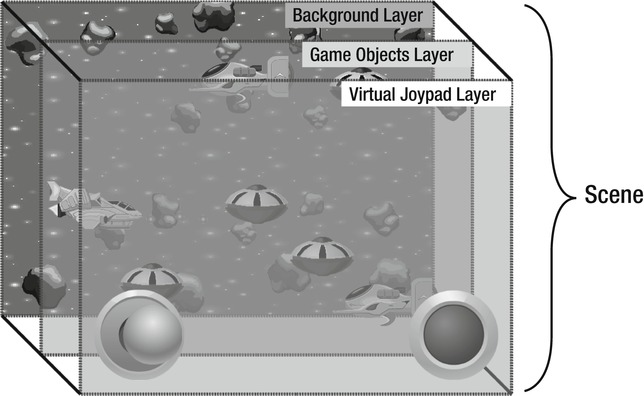
Figure 3-2 . An exploded view illustrating a typical cocos2d game scene layout
In this particular case, three layers help maintain the proper draw order of the sprites in relation to each other: the background layer, the game objects layer, and the virtual joypad layer. Using multiple layers in a scene is also helpful if you want to hide an entire layer’s nodes, move the layer and thus all the nodes it contains, or reorder the layer so that its nodes are drawn above or behind another layer’s nodes. You can even rotate and scale a layer, which would rotate and scale all the nodes contained in that layer. This makes using layers a powerful concept.
In this respect, the game scene is modeled using layers in just the way you edit an image in an image-editing program such as Photoshop, Seashore, or GIMP. However, the nodes (brush strokes) in each layer aren’t static and instead remain individual elements.
The actual Scene object is just the container for all the layers (the actual image, so to speak), just like a layer is a container for other nodes. Each of these nodes can run custom game logic, the scene, the layers, the individual nodes, the sprites, the labels, and so on, depending on how you organize your code.
Any node can have any other node as a child, and every node in the hierarchy—except for the scene itself—has one parent object, which is the object the node is a child of. If you remove the node from the scene graph or you haven’t added it yet, it won't have a parent object. Note that this parent-child relationship of nodes is not to be confused with inheritance in object-oriented programming. In other words, the parent node is not the node’s super class!
This treelike hierarchy of nodes that you can create is what's called the scene graph, which I’ll sometimes call the node hierarchy. For those familiar with programming design patterns, you’ll recognize this hierarchical structure as the Composite design pattern. Figure 3-3 shows what the simplified node hierarchy of this scene looks like as a tree structure.
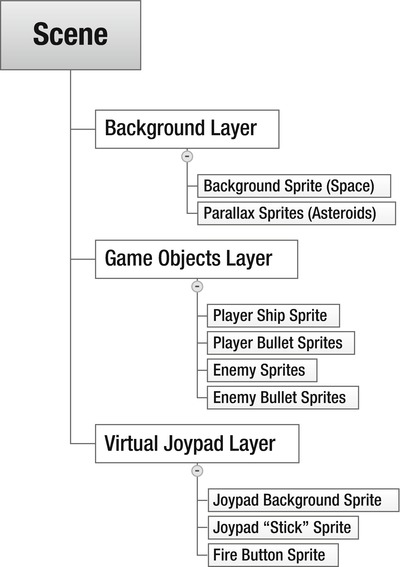
Figure 3-3 . The node hierarchy of the scene illustrated in Figure 3-2
Note that this particular scene/layer/nodes structure is not enforced by cocos2d, except that the scene graph always has a CCScene class object as its root node. But other than that, you can use any CCNode class instead of CCLayer to create your “layers.” You could even add all of your nodes to the scene itself; if your project has only a small number of nodes, that’s perfectly reasonable.
I generally prefer to use the plain CCNode class over CCLayer for layering and grouping objects; in most cases, the CCLayer class adds unnecessary overhead because it contains code to receive touch and accelerometer input in iOS apps and handles keyboard and mouse input in Mac OS X apps. Strip away support for input handling, and the CCLayer class is practically just a CCNode class. The same goes for CCScene, which is also just an abstract concept in order to enforce a common root node class. Otherwise a CCScene class is virtually the same as a CCNode.
Caution The nodes in a cocos2d node hierarchy are positioned relative to their parent nodes. The child nodes inherit certain properties from their parents, such as scale and rotation but not color and opacity. This may be confusing the first time you experience it.
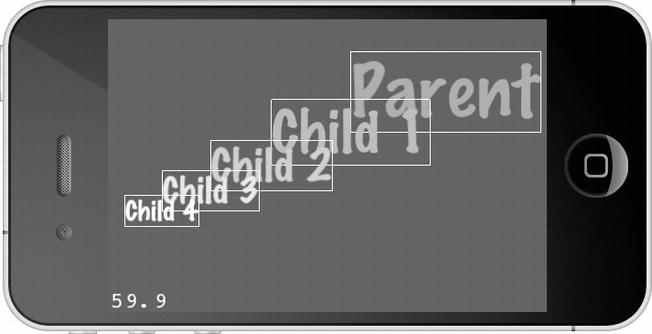
Figure 3-4 . Caution: the default position of a child node is unexpectedly offset from its parent’s position
At this point, you may be wondering what classes derive from CCNode. Figure 3-5 shows the CCNode class hierarchy. The node classes you’ll be working with the most are highlighted, and you can make quite impressive games with just these classes. I'll explain the most important classes shortly, and over the course of the book you’ll get to know even the more obscure ones in depth.
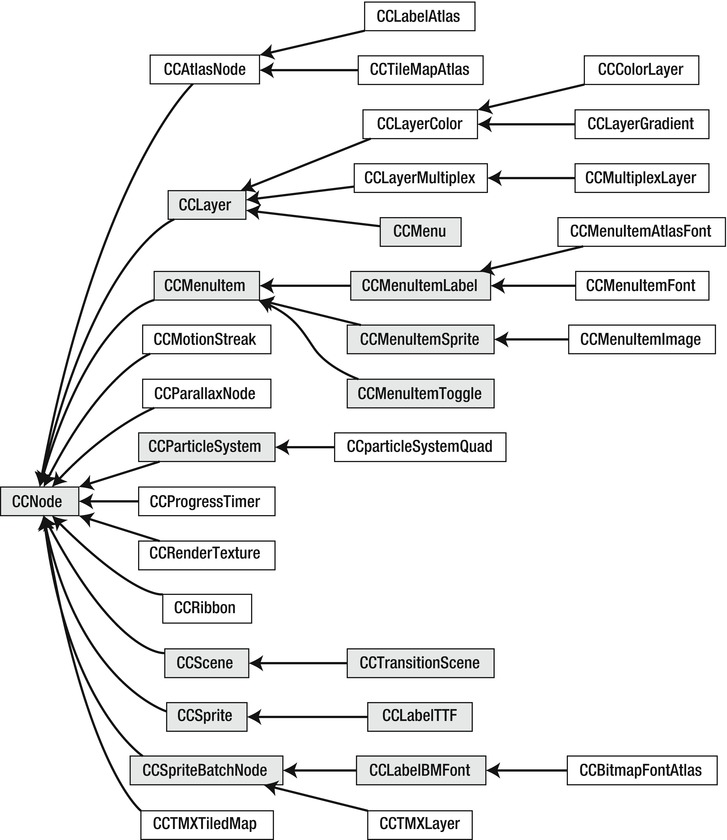
Figure 3-5 . The CCNode class hierarchy
CCNode
CCNode is the base class for all nodes. It’s an abstract class that has no visual representation and defines all properties and methods common to all nodes.
Working with Nodes
The CCNode class implements all the methods to add, get, and remove child nodes. Here are some of the ways you can work with child nodes:
- You can create a new node:
CCNode* childNode = [CCNode node];
- You can add the new node as a child:
[myNode addChild:childNode z:0 tag:123];
- You can retrieve the child node:
CCNode* retrievedNode = [myNode getChildByTag:123];
- You can remove the child node by tag; cleanup will also stop any running actions:
[myNode removeChildByTag:123 cleanup:YES];
- You can remove the node if you have a pointer to it:
[myNode removeChild:retrievedNode];
- You can remove every child of the node:
[myNode removeAllChildrenWithCleanup:YES];
- You can remove myNode from its parent:
[myNode removeFromParentAndCleanup:YES];
The z parameter in addChild determines the draw order of the node. The node with the lowest z value is drawn first; the one with the highest z value is drawn last. If multiple nodes have the same z value, they're simply drawn in the order they were added. Of course, this applies only to nodes that have a visual representation, such as sprites.
The tag parameter lets you identify and obtain specific nodes at a later time using the getChildByTag method.
Note If several nodes end up with the same tag number, getChildByTag will return the first node with that tag number. The remaining nodes will be inaccessible. Make sure you use unique tag numbers for your nodes.
Nodes can also run actions. I’ll cover actions more in a bit. For now, just know that actions can move, rotate, and scale nodes—and can do other things with nodes over time.
- Here’s an action declaration:
CCAction* action = [CCBlink actionWithDuration:10 blinks:20];
action.tag = 234;
- Running the action makes the node blink:
[myNode runAction:action];
If you need to access the action at a later time, you get it by its tag:
CCAction* retrievedAction = [myNode getActionByTag:234];
- You can stop the action by tag:
[myNode stopActionByTag:234];
- Or you can stop it by pointer:
[myNode stopAction:action];
- Or you can stop all actions running on this node:
[myNode stopAllActions];
Nodes can schedule messages, which is Objective-C lingo for calling a method. In many cases, you’ll want a particular update method to be running on a node in order to do some processing, such as checking for collisions. The simplest way to schedule the particular update method to be called every frame is like this, typically found in the node’s init method:
[self scheduleUpdate];
If a node has the update method scheduled, it will send the update message to your class every frame. You must implement this particular method in your node class:
-(void) update:(ccTime)delta
{
    // this method is called every frame
}
Dead simple, isn’t it? Notice that the update method has a fixed signature, meaning it’s always defined exactly this way. The delta parameter is the elapsed time since the method was last called. This is the preferred way to schedule updates that should take place every frame, but there are reasons to use other update methods that give you more flexibility.
If you want a different method to be run, or if you don’t want the method to be called every frame but every tenth of a second, you should use this method:
[self schedule:@selector(updateTenTimesPerSecond:) interval:0.1f];
This will send the updateTenTimesPerSecond message to your node class ten times per second:
-(void) updateTenTimesPerSecond:(ccTime)delta
{
    // this method is called according to its interval, ten times per second
}
Note that if interval is 0, you should use the scheduleUpdate method instead because it's slightly faster. It's faster because cocos2d has optimizations for the common update selector if it's scheduled with scheduleUpdate, whereas all other scheduled selectors incur an additional overhead because they're stored in lists and prioritized against each other.
The method’s signature is still the same: it receives a delta time as its only parameter. But this time the method can be named any way you want, and it's called only every tenth of a second. This may be useful to check for win conditions if they're so complex you don’t want to run them every frame. Or if you want something to happen after 10 minutes, you could schedule a selector with an interval of 600.
Each selector can only be scheduled once for each object. If you schedule the same selector for the same object a second time, cocos2d will print out a warning telling you that the selector was already scheduled and its interval has been updated.
Note The @selector(…) syntax may seem weird. It’s the Objective-C way of referring to a specific method by name. The crucial thing here is not to overlook the colon at the end. It tells Objective-C to look for the method with the given name and exactly one parameter. If you forget to add the colon at the end, the program will still compile, but it will crash later. In the Debugger Console, the error log will read “unrecognized selector sent to instance. . . .”
There’s one major caveat with scheduling your own selectors, and with the @selector(. . .) keyword in general. By default, the compiler does not complain at allif the method’s name doesn’t exist. Instead, your app will simply crash with an “unrecognized selector sent to instance” error . Because the message is sent by cocos2d internally, you’ll find it hard to figure out the cause of the problem. Luckily, there’s a compiler warning you can enable. Figure 3-6 shows the “Undeclared Selector” warning enabled for the NodeHierarchy project, and the Essentials Xcode project for this chapter has it enabled as well.
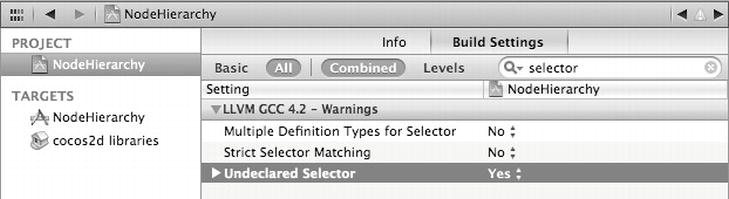
Figure 3-6 . Activating the build setting to warn about undeclared selectors
What’s left is to show how to stop these scheduled methods from being called. You can do so by unscheduling them:
- You can stop all scheduled selectors of the node:
[self unscheduleAllSelectors]; - You can unscheduled the default update method:
[self unscheduleUpdate]; - You can stop a particular selector, in this case the updateTenTimesPerSecond method:
[self unschedule:@selector(updateTenTimesPerSecond:)];
There’s also a useful trick for scheduling and unscheduling selectors. Quite often you’ll find that in the scheduled method, you want a particular method to no longer be called, without having to replicate the exact name and number of parameters, because they can change. Here’s how you’d run a scheduled selector and stop it on the first call:
[self scheduleOnce:@selector(tenMinutesElapsed:) delay:600];
This is identical to scheduling the selector as usual:
[self schedule:@selector(tenMinutesElapsed:) interval:600];
And then unscheduling the selector inside the scheduled method by using the _cmd variable as the selector:
-(void) tenMinutesElapsed:(ccTime)delta
{
    // unschedule the current method by using the _cmd keyword
    [self unschedule:_cmd];
}
The hidden variable _cmd is available in all Objective-C methods. It's the selector of the current method. In the previous code example, _cmd is equivalent to writing @selector(tenMinutesElapsed:). Unscheduling _cmd effectively stops the tenMinutesElapsed method from ever being called again. You can also use _cmd for scheduling the selector in the first place if you want the current method to be rescheduled. Let’s assume you need a method called at varying intervals, and this interval is changed each time the method is called. In this case, your code can make use of _cmd like this:
-(void) scheduleUpdates
{
    // schedule the first update as usual
    [self schedule:@selector(irregularUpdate:) interval:1];
}
-(void) irregularUpdate:(ccTime)delta
{
    // unschedule the method first so cocos2d won’t complain
    [self unschedule:_cmd];
    // I assume you'd have some kind of logic other than random to determine
    // the next time the method should be called
    float nextUpdate = CCRANDOM_0_1() * 10;
    // then re-schedule it with the new interval using _cmd as the selector
    [self schedule:_cmd interval:nextUpdate];
}
Using the _cmd keyword will save you a lot of pain in the long run because it avoids the dreaded issue of scheduling or unscheduling the wrong selector, and it decouples the code from having to know the name of the method it's used in.
I'll mention one final scheduling issue, and that’s prioritizing updates. Take a look at the following code:
// in Node A
[self scheduleUpdate];
// in Node B
[self scheduleUpdateWithPriority:1];
// in Node C
[self scheduleUpdateWithPriority:-1];
This may take a moment to sink in. All nodes are still calling the same –(void) update:(ccTime)delta method for themselves. However, scheduling the update methods with a priority causes the one in Node C to be run first. Then the one in Node A is called because, by default, scheduleUpdate uses a priority of 0. Node B’s update method is called last because it has the highest number. The update methods are called in the order from lowest-priority number to highest.
You might wonder where that’s useful. To be honest, they’re rarely needed, but in those cases it’s quite useful to be able to prioritize updates, such as when applying forces to physics objects before or after the physics simulation itself is updated or ensuring that the game-over condition is checked only after all game objects have run their update methods. And sometimes, usually late in the project, you may discover an odd bug that turns out to be a timing issue, and it forces you to run the player’s update method after all other objects have updated themselves.
Until you need to solve a particular problem by using prioritized updates, you can safely ignore them. Also, keep in mind that each prioritized update method call adds a little overhead because the methods need to be called in a specific order. A quite common implementation for prioritized updates is to have a central object driving the game update of other objects by forwarding the update methods to the objects in the desired order. That way you can also see clearly in the code which object gets called when:
-(void) update:(ccTime)delta
{
   [inputHandler update:delta];
   [player update:delta];
   [enemies update:delta];
   [physics update:delta];
   [networkData update:delta];
   [userInterface update:delta];
}
A positive benefit of this approach is that it makes selectively pausing certain objects easier. How to pause the game but allow user input on the pause menu is a question that comes up often. The solution is to update your layers individually, and if the game is paused you don’t forward the update message to the layers except for the layer that displays the pause menu.
Director, Scenes, and Layers
Like CCNode, the CCScene and CCLayer classes have no visual representation and are used internally as abstract concepts for the starting point of the scene graph, which is always a CCScene-derived object. The CCScene class is the container for all other nodes of the scene. And CCLayer is typically used to group nodes together, particularly to maintain the correct drawing order among multiple layers. But also to receive touch and accelerometer input In iOS, and mouse and keyboard input in Mac OS X.
I start this section with the CCDirector class, however, because it's the class that, among other things, allows you to run and replace scenes.
The Director
The CCDirector class, or simply Director for short, is the heart of the cocos2d game engine. If you recall the "Hello World" application from Chapter 2, you’ll remember that a lot of the cocos2d initialization procedure involved calls to [CCDirector sharedDirector].
The CCDirector class is a singleton, which means there can be only one instance of the CCDirector class at any time, and it can be accessed globally by calling the class method sharedDirector. For now that’s all you need to know about singletons. Later in this chapter, in the section “A Note on Singletons in cocos2d,” I explain what a singleton is and which other singleton classes cocos2d uses.
The CCDirector class stores global configuration settings for cocos2d and also manages the cocos2d scenes. The major responsibilities of the CCDirector class include the following:
- Providing access to the currently running scene
- Changing scenes
- Providing access to cocos2d configuration details
- Providing access to cocos2d’s OpenGL view and window
- Modifying certain OpenGL projection and enabling depth tests
- Converting UIKit and OpenGL coordinates
- Pausing, resuming, and ending the game
- Displaying debugging stats
- Counting the total number of frames rendered
In earlier cocos2d versions you could also choose between several Director types. That's no longer the case in cocos2d 2.0. The CCDirector now uses Apple’s CADisplayLink class exclusively to synchronize screen updates with the display’s refresh rate.
CCScene
A CCScene object is always the first node in the scene graph. In cocos2d, a scene is an abstract concept, and the CCScene class contains virtually no additional code compared to CCNode. But the CCDirector requires a CCScene-derived class to be able to change the currently active scene graph via the CCDirector runWithScene, replaceScene, and pushScene methods. You can also wrap a CCScene class into a class derived from CCSceneTransition to animate the transition between a currently running scene and the new scene.
Normally, the only children of a CCScene are those derived from CCLayer, which in turn contain the individual game objects, although this convention is not enforced by cocos2d. Because the scene object itself in most cases doesn’t contain any game-specific code and is rarely subclassed, it’s most often created in a static method +(id) scene inside the CCLayer object. I mention this method in Chapter 2, but here it is again to refresh your memory:
+(id) scene
{
   CCScene *scene = [CCScene node];
   CCLayer* layer = [HelloWorld node];
   [scene addChild:layer];
   return scene;
}
The very first place you’ll create a scene is at the end of the app delegate’s applicationDidFinishLaunching method. You use Director to start the first scene with the runWithScene method:
// only use this to run the very first scene
[[CCDirector sharedDirector] runWithScene:[HelloWorld scene]];
For all subsequent scene changes, you must replace the existing scene with the aptly named replaceScene method:
// use replaceScene to change all subsequent scenes
[[CCDirector sharedDirector] replaceScene:[HelloWorld scene]];
As you’ll soon learn in an upcoming section, you can also use transitional effects when replacing scenes. The following is an example that uses the CCTransitionShrinkGrow class as an intermediary scene that manages the transition animation:
CCScene* scene = [HelloWorld scene];
CCSceneTransition* tran = [CCTransitionShrinkGrow transitionWithDuration:2 scene:scene];
[[CCDirector sharedDirector] replaceScene:tran];
Caution If you run the preceding code in the HelloWorld scene, it will work just fine, creating a new instance of HelloWorld and replacing the old one, effectively reloading the scene. However, don’t try to reload the current scene by passing self as a parameter to replaceScene. This will freeze or crash your game!
Keep in mind that when you replace one scene with another, the new scene is loaded into memory before the old scene’s memory is freed. This creates a short spike in memory usage. Replacing scenes is always a crucial point where you can run into memory warnings or straight into a crash related to not enough free memory. You should test scene switching early and often when your app uses a lot of memory.
Note Cocos2d does a good job of cleaning up its own memory when you replace one scene with another. It removes all nodes, stops all actions, and unschedules all selectors. No extra work is required on your part. I mention this because sometimes I come across code that makes explicit calls to the removeAll and cleanup cocos2d methods. Remember, if in doubt, trust cocos2d’s memory management.
This issue becomes even more pronounced when you start using transitions. With transitions, the new scene is created, the transition runs, and only after the transition has done its job is the old scene removed from memory. It’s good practice to add log statements to your scene or to the layer that creates the scene:
-(id) init
{
   self = [super init];
   if (self)
   {
     CCLOG(@"%@: %@", NSStringFromSelector(_cmd), self);
   }
}
-(void) dealloc
{
   CCLOG(@"%@: %@", NSStringFromSelector(_cmd), self);
}
Keep an eye on these log messages. If you notice that the dealloc log message is never sent when you switch from one scene to another, that's a huge warning sign. In that case, you’re leaking the whole scene, not freeing its memory. It's extremely unlikely when using ARC, but it can still happen—for example, if you assign the scene to a custom class’s property, such as a view controller or singleton whose lifetime isn’t tied to cocos2d scenes. In that case, the scene might be replaced but not removed from memory because the custom class still has a reference to the scene. You're most likely to run into this issue when assigning node objects as delegates for UIKit classes, like Game Center. Be extra careful to set any delegate to nil before replacing the scene.
One thing you should never do is add a node as a child to the scene graph and then pass this node to another node which then keeps a reference to it. Retain cycles—where object A holds on to object B while object B itself holds a reference to object A—are still possible with ARC. In these cases, neither object lets go of the other, keeping them in memory until the app is closed.
Use cocos2d’s methods to access node objects instead. As long as you let cocos2d worry about managing the memory of nodes, you'll be fine.
With regard to changing scenes, the pushScene and popScene methods of Director can be useful tools. They run the new scene without removing the old scene from memory. If you think of your scenes as sheets of paper, pushing a scene means a new sheet of paper is added on top of the currently visible one. The paper underneath stays in place and in memory, unlike in replacing scenes. For each pushed scenes, you then need to call popScene (like removing the topmost sheet of paper) until only the initial scene is left.
The idea is to make changing scenes faster. But there’s the conundrum: if your scenes are lightweight enough to share memory with each other, they’ll load fast anyway. And if they're complex and thus slow to load, chances are they take away each other’s precious memory—and memory usage can quickly climb to a critical level.
The biggest issue with pushScene and popScene is that you need to keep track of how many scenes were pushed in order to pop the exact amount. If you’re not very careful about managing your pushes and pops, you’ll end up forgetting a pop or popping one scene too many. Besides, all those scenes have to share the same memory.
There are cases where pushScene and popScene are very handy. One is if you have one common scene used in many places, such as the Settings screen where you can change music and sound volume. You can push the Settings scene to display it, and its Back button then simply calls popScene; the game will return to the previous state. Whether you opened the Settings menu from the main menum, from within the game, or from someplace else, this technique works fine and lets you avoid having to keep track of where the Settings menu was opened.
Another case where pushScene and popScene are very useful is if you want to retain the state of the initial scene without having to revert to saving and loading that scene’s state. For example, you could push the scene that shows the current leaderboard in a multiplayer game and then pop it again without having to save and load the game state, because the game scene remains in memory. And the game hasn’t advanced while the player was inspecting the leaderboard because the game scene was automatically paused while the leaderboard scene was visible.
However, you need to ensure that there’s always enough additional free memory available for the pushed scene at any time the scene could be pushed, which is hard to test for. Any scene you may want to push should therefore be very lightweight, consume little memory, and should only pop itself but never push other scenes or even call replaceScene.
For example, to display a Settings scene from anywhere on top of the current scene, use this code:
[[CCDirector sharedDirector] pushScene:[Settings scene]];
Now inside the Settings scene you need to call popScene when you want to go back to the previous scene that’s still in memory:
[[CCDirector sharedDirector] popScene];
Caution You can animate only the pushScene with CCSceneTransition and not popScene. This is a drawback of pushing and popping scenes you should be aware of.
Transitions, meaning any class derived from CCTransitionScene, can give your game a really professional look. Figure 3-7 gives you an overview of the CCTransitionScene class hierarchy and shows the available transition classes. Figure 3-7 also complements the CCNode class hierarchy in Figure 3-5, where the CCTransitionScene subclasses were not included for the sake of clarity.
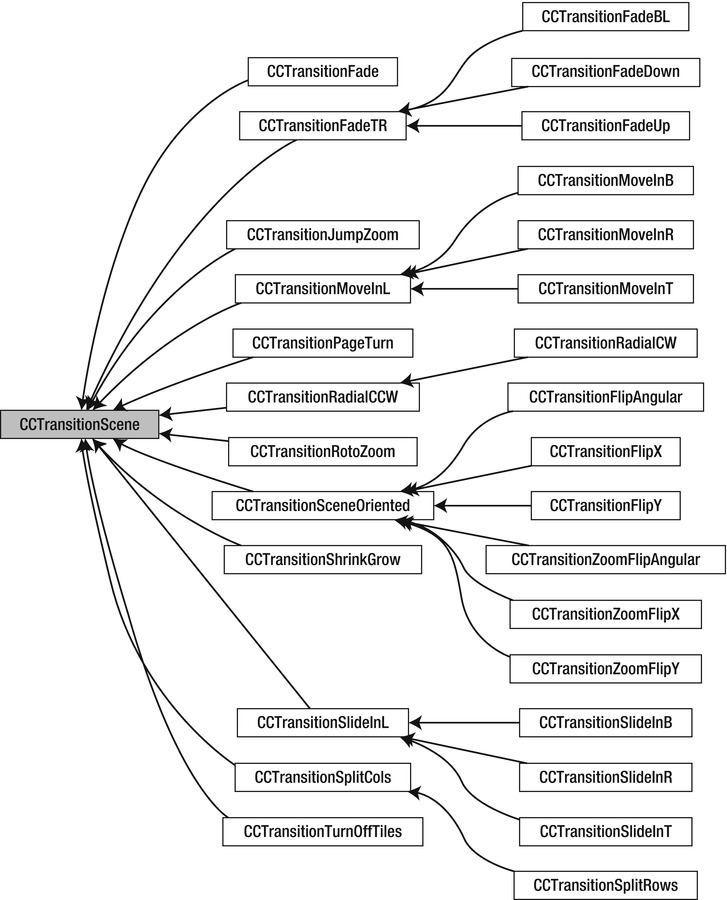
Figure 3-7 . The CCTransitionScene class hierarchy
Caution Not every transition is really useful in a game, even though they all look neat. What players care most about is the speed of a transition. Even waiting two seconds before they can interact with the next scene is quite a strain; I prefer to transition scenes within a second or less, or avoid them altogether if it fits the situation.
Transitions add only one more line of code to replacing a scene, although admittedly that one line can be a long one, given how long the names of transitions are and how they get even longer with the number of parameters they often require. Here’s the very popular fade transition as an example; it fades to white in one second:
// initialize a transition scene with the scene we'd like to display next
CCTransitionFade* tran = [CCTransitionFade transitionWithDuration:1
            scene:[HelloWorld scene]
            withColor:ccWHITE];
// use the transition scene object instead of HelloWorld
[[CCDirector sharedDirector] replaceScene:tran];
You can use a CCTransitionScene with replaceScene and pushScene, but as I said earlier, you can’t use a transition with popScene (at least not at this time—this may be improved in a future version of cocos2d).
A variety of transitions are available, although most are variations of directions—as in, where the transition moves to or from which side it starts. Here’s a list of the currently available transitions, along with a short description for each:
- CCTransitionFade: Fades to a specific color and back. There’s also the CCTransitionCrossFade variation.
- CCTransitionFadeTR (three more variations): Tiles flip over to reveal a new scene.
- CCTransitionJumpZoom: Scene bounces and gets smaller; new scene does the reverse.
- CCTransitionMoveInL (three more variations): Scene moves out; new scene moves in at the same time, either from left, right, top, or bottom.
- CCTransitionSceneOriented (six variations): A variety of transitions flipping and optionally zooming the whole scene around on one of its axis.
- CCTransitionPageTurn: An effect like turning a page.
- CCTransitionProgress (six variations): Like a radar screen that reveals the new scene with a radial or axis-aligned wipe animation.
- CCTransitionRotoZoom: Scene rotates and gets smaller; new scene does the reverse.
- CCTransitionShrinkGrow: Current scene shrinks; new scene grows over it.
- CCTransitionSlideInL (three more variations): New scene slides over the current scene, either from left, right, top, or bottom.
- CCTransitionSplitCols (one variation): Columns of scene move up or down to reveal new scene.
- CCTransitionTurnOffTiles: Tiles are randomly replaced by tiles of new scene.
CCLayer
Sometimes you need more than one layer in your scene. In such cases you can add more CCLayer objects to your scene. One way to do so is directly in the scene method:
+(id) scene
{
   CCScene* scene = [CCScene node];
   CCLayer* backgroundLayer = [HelloWorldBackground node];
   [scene addChild: backgroundLayer];
   CCLayer* layer = [HelloWorld node];
   [scene addChild:layer];
   CCLayer* userInterfaceLayer = [HelloWorldUserInterface node];
   [scene addChild: userInterfaceLayer];
   return scene;
}
This scene now has three distinct layers: the backgroundLayer, the regular game object layer, and on top of that the userInterfaceLayer. Because the layers are added to the scene in the order created, any nodes added to the backgroundLayer will be drawn behind the other layers. Likewise, nodes added to the userInterfaceLayer will always be drawn on top of any nodes in the layer and backgroundLayer.
Tip Again, strictly speaking, a layer does not have to be derived from the CCLayer class; it could also be a simple CCNode. This is often preferable when you need the layer only to group nodes together and don’t require it to handle user input.
One case where you might want to use multiple layers per scene is if you have a scrolling background and a static frame surrounding the background, possibly including user interface elements. Using two separate layers makes it easy to move the background layer by simply adjusting the layer’s position while the foreground layer remains in place. In addition, all objects of the same layer will be either in front of or behind objects of another layer, depending on the z-order of the layers. Of course, you can achieve the same effect without layers, but it requires each individual object in the background to be moved separately. That’s ineffective, so avoid it if you can.
Like scenes, layers have the same dimension as the cocos2d OpenGL view. For iOS devices, this is almost always the size of the screen; on Mac OS X, it's the size of the window.
Layers are primarily a grouping concept. For example, you can use any action with a layer, and the action will affect all the objects on the layer. That means you can move all layer objects around in unison or rotate and scale them all at once. In general, use a layer if you need a group of objects to perform the same actions and behaviors. Moving all objects to scroll them is one such case; sometimes you might want to rotate them or reorder them so they're drawn on top of other objects. If all these objects are children of a layer, you can simply change the layer’s properties or run an action on the layer to affect all its child nodes.
Note Many recommend not using too many CCLayer objects per scene. This advice is often misunderstood. You can use as many layers as you want without affecting performance any more than using any other node. However, things change if the layer also accepts input, because touch or accelerometer events are costly tasks. Don’t use several layers receiving touch or accelerometer input at the same time—one will do. Preferably one layer receives and handles input and, where necessary, informs other nodes or classes about the input events by forwarding them to registered objects. You usually do this via the performSelector method that calls a method with a defined method signature. See cocos2d’s CCScheduler class for an example implementation.
The CCLayer class is designed to receive touch input, but only if you explicitly enable it. To enable receiving touch events, set the property isTouchEnabled to YES:
self.isTouchEnabled = YES;
This is best done in the class’s init method, but you can change it at any time.
Once the isTouchEnabled property is set, a variety of methods for receiving touch input will start to get called. These are the events received when a new touch begins, when a finger is moved on the touchscreen, and when the user lifts the finger off the screen. Canceled touches are rare, and you can safely ignore this method for the most part or simply forward it to the ccTouchesEnded method.
- This is called when a finger just begins touching the screen:
-(void) ccTouchesBegan:(NSSet *)touches withEvent:(UIEvent *)event
- This is called whenever the finger moves on the screen:
-(void) ccTouchesMoved:(NSSet *)touches withEvent:(UIEvent *)event
- This is called when a finger is lifted off the screen:
-(void) ccTouchesEnded:(NSSet *)touches withEvent:(UIEvent *)event
- This is called to cancel a touch:
-(void) ccTouchesCancelled:(NSSet *)touches withEvent:(UIEvent *)event
Cancel events are rare and in most cases should behave just like touches ended.
In many cases, you want to know where a touch occurred. Because the touch events are received by the Cocoa Touch API, the location must be converted to OpenGL coordinates. The following method does this for you:
-(CGPoint) locationFromTouches:(NSSet *)touches
{
   UITouch *touch = touches.anyObject;
   CGPoint touchLocation = [touch locationInView:touch.view];
   return [[CCDirector sharedDirector] convertToGL:touchLocation];
}
This method works only with a single touch because it uses [touches anyObject]. To keep track of multitouch locations, you have to keep track of each touch individually.
By default, the layer receives the same events as Apple’s UIResponder class. Cocos2d also supports targeted touch handlers. The difference is that targeted touches receive only one touch at a time, in contrast to the UIResponder touch events that always receive a set of touches. The targeted touch handler simply splits those touches into separate events that, depending on your game’s needs, may be easier to work with. More importantly, the targeted touch handler lets you remove certain touches from the event queue, specifying that you’ve handled this touch and don’t want it to be forwarded to other layers. This makes it easy to sort out if touches are in a specific area of the screen; if they are, you mark the touch as claimed, and all the remaining layers don’t need to do this area check again.
To enable the targeted touch handler, add the following method to your layer’s class:
-(void) registerWithTouchDispatcher
{
   [[CCDirector sharedDirector].touchDispatcher addTargetedDelegate:self
            priority:INT_MIN+1
            swallowsTouches:YES];
}
Caution If you leave the registerWithTouchDispatcher method empty, you won’t receive any touches at all! If you want to keep the method but also want to use the default handler, you’ll have to call [super registerWithTouchDispatcher] in this method. It’s also worth mentioning that the registerWithTouchDispatcher method is only called in CCLayer classes. You can also add non-CCLayer nodes as touch delegates, but in that case you must call [[CCDirector sharedDirector].touchDispatcher removeDelegate:self] at a later time.
Now, instead of using the default touch input methods, you’re using a slightly different set of methods. They're almost equivalent with the exception of receiving a (UITouch*) touch instead of a (NSSet*) touches as the first parameter:
-(BOOL) ccTouchBegan:(UITouch *)touch withEvent:(UIEvent *)event {}
-(void) ccTouchMoved:(UITouch *)touch withEvent:(UIEvent *)event {}
-(void) ccTouchEnded:(UITouch *)touch withEvent:(UIEvent *)event {}
-(void) ccTouchCancelled:(UITouch *)touch withEvent:(UIEvent *)event {}
What’s important to note here is that ccTouchBegan returns a BOOL value. If you return YES in that method, it means you don’t want this particular touch to be propagated to other targeted touch handlers with a lower priority—you have effectively “swallowed” this touch.
Note Cocos2d has no built-in support for recognizing gestures, but Kobold2D supports all gesture recognizer types via the KKInput class by writing [KKInput sharedInput].gesturePanEnabled = YES. You can then check the state and properties of the gesture at any time. For cocos2d, this forum thread is a good starting point for a gesture recognizer implementation: www.cocos2d-iphone.org/forum/topic/8929.
Receiving Accelerometer Events
Like touch input, the accelerometer must be specifically enabled to receive accelerometer events:
self.isAccelerometerEnabled = YES;
Once more, you add a specific method to the layer that receives the accelerometer events:
-(void) accelerometer:(UIAccelerometer *)accelerometer
            didAccelerate:(UIAcceleration *)acceleration
{
    CCLOG(@"acceleration:x:%f/y:%f/z:%f", ←
     acceleration.x, acceleration.y, acceleration.z);
}
You can use the acceleration parameter to determine the acceleration in any of the three directions.
Tip The KKInput class in Kobold2D not only does accelerometer input, it also provides a simple interface to the gyroscope. For both accelerometer and gyroscope, you can access the high-pass and low-pass filtered values via properties.
If you’re creating a Mac OS X app, you want to be able to process keyboard presses. You first have to enable keyboard events:
self.isKeyboardEnabled = YES;
The callback methods to receive keyboard events are defined in the CCKeyboardEventDelegate protocol as follows:
-(BOOL) ccKeyDown:(NSEvent*)event
{
   CCLOG(@"key pressed: %@", event.characters);
}
-(BOOL) ccKeyUp:(NSEvent*)event
{
   CCLOG(@"key released: %@", event.characters);
}
-(BOOL) ccFlagsChanged:(NSEvent*)event
{
   CCLOG(@"flags changed: %@", event.characters);
}
The flags changed event is received whenever the user presses or releases a modifier key, regardless of whether any other key is pressed at the same time. You can use it to implement controls that are assigned directly to a modifier key.
A very simplistic keyboard event check to react to presses or releases of the D key would go something like this:
NSString* key = event.charactersIgnoringModifiers;
if ([key caseInsensitiveCompare:@"d"] == NSOrderedSame)
{
    CCLOG(@"D key");
}
The problem with this approach is that depending on the user’s locale, the keys may be in different parts of the keyboard, possibly requiring the Option key as well. Furthermore, in many regions of the world, like Asia, Russia, or the Middle East, users may be unable to (easily) create a D key on their keyboards.
Kobold2D therefore supports locale-independent keyboard input based on key codes. You can check whether the D key was pressed in Kobold2D like this:
[[KKInput sharedInput] isKeyDownThisFrame:KKKeyCode_D];
This works independently of whether the user has had the Shift key pressed or not. To include the Shift key in the check, simply write:
KKInput* input = [KKInput sharedInput];
[input isKeyDownThisFrame:KKKeyCode_D modifierFlags:KKModifierShiftKeyMask];
Kobold2D users don't need to delve further into this subject because Kobold2D already provides solid, documented keyboard and mouse input implementation: www.kobold2d.com/display/KKDOC/Processing+User+Input. But cocos2d users can learn more about keyboard event handling in this forum thread: www.cocos2d-iphone.org/forum/topic/11725. Apple’s documentation on handling key events is also very helpful: http://developer.apple.com/library/mac/#documentation/cocoa/conceptual/EventOverview/HandlingKeyEvents/HandlingKeyEvents.html.
Similar to all other input methods, you first have to enable mouse input via the following:
self.isMouseEnabled = YES;
Then your layer will start receiving CCMouseEventDelegate protocol messages, of which there are quite a few:
// received when the mouse moves with no button pressed
-(BOOL) ccMouseMoved:(NSEvent*)event {}
// received when the mouse moves while the corresponding button is held down
-(BOOL) ccMouseDragged:(NSEvent*)event {}
-(BOOL) ccRightMouseDragged:(NSEvent*)event {}
-(BOOL) ccOtherMouseDragged:(NSEvent*)event {}
// received when the corresponding mouse button is pressed (left, right, other)
-(BOOL) ccMouseDown:(NSEvent*)event {}
-(BOOL) ccRightMouseDown:(NSEvent*)event {}
-(BOOL) ccOtherMouseDown:(NSEvent*)event {}
// received when the corresponding mouse button is released (left, right, other)
-(BOOL) ccMouseUp:(NSEvent*)event {}
-(BOOL) ccRightMouseUp:(NSEvent*)event {}
-(BOOL) ccOtherMouseUp:(NSEvent*)event {}
// received when the scroll wheel is turned
-(BOOL) ccScrollWheel:(NSEvent*)event {}
Because you get specific events for each mouse button, you mainly use the NSEvent object to get the current mouse cursor position. You have to convert that position to cocos2d coordinates via the Director’s convertEventToGL method:
CGPoint mousePos = [[CCDirector sharedDirector] convertEventToGL:event];
Kobold2D users have to do no such thing. You can check at any time whether a mouse button is pressed:
[[KKInput sharedInput] isMouseButtonDown:KKMouseButtonLeft];
The mouse position is also readily available and already converted to cocos2d coordinates, so you can simply write this in a scheduled method to use a sprite as the mouse cursor:
sprite.position = [KKInput sharedInput].mouseLocation;
Apple has a great tutorial on handling mouse events if you want to learn more about It: http://developer.apple.com/library/mac/#documentation/Cocoa/Conceptual/EventOverview/HandlingMouseEvents/HandlingMouseEvents.html.
CCSprite, certainly the most commonly used class, uses an image to display the sprite onscreen. The simplest way to create a sprite is from a file that's loaded into a CCTexture2D texture and assigned to the sprite. You have to add the image file to the Resources group in Xcode; otherwise, the app can't find the file:
CCSprite* sprite = [CCSprite spriteWithFile:@"Default.png"];
[self addChild:sprite];
Here’s a question for you: where do you think this sprite will be positioned on the screen? Contrary to what you might be used to from other game engines, the texture is centered on the sprite’s position. The sprite just initialized will be located at position 0,0, so it's positioned at the lower left-hand corner of the screen. Because the sprite’s texture is centered on the sprite’s position, the texture is only partially visible. Assuming the image is 80×30 pixels in size, you’d have to move the sprite to position 40,15 to make the texture align perfectly with the lower left-hand corner of the screen and be fully visible.
Although unusual at first glance, centering the texture on the sprite does have great advantages. Once you start using the rotation or scale properties of the sprite, the sprite will stay centered on its position.
Every node has an anchor point, but it only starts to make a difference if the node has a texture, like CCSprite or CCLabelTTF. By default, the anchorPoint property is at 0.5,0.5, or, in other words, at the center of the texture (texture width and height times 0.5).
The anchor point has nothing to do with the node’s position, even though changing the anchorPoint will change where the texture is rendered onscreen. By modifying the anchorPoint, you change only where the texture of the node is drawn relative to the node’s position. But that also raises the question: why would you want to modify the anchorPoint, and what effects can you achieve by doing so?
For example, setting the anchorPoint to 0,0 effectively moves the texture so that its lower left-hand corner aligns with the node’s position. If you set the anchorPoint to 1,1 instead, the top right-hand corner of the texture will align with the node’s position. Sometimes this can be useful to align textures with the screen borders or other elements; specifically, it's useful as a way for CCLabel classes to right-align or top-align the text, for example.
Generally, you don't want to modify the anchorPoint unless you have a good reason to do so, because it can have wide-ranging side effects such as offsetting position-based collision checks. It also has an effect on rotation and scaling because the texture will no longer be rotated or scaled around its center position.
I know of three situations where changing the anchor point may be helpful:
- To align nodes with the screen window borders more easily.
- To right/left/top/bottom-align a label, button, or image.
- To align an image whose size was changed without having to modify the sprite’s position.
In all other cases use the position property of the node.
In the following example code, the sprite image will neatly align with the lower left-hand corner of the screen because its anchorPoint is set to 0,0, which causes the texture’s lower left-hand corner to align with the sprite’s default position, which is also 0,0:
CCSprite* sprite = [CCSprite spriteWithFile:@"Default.png"];
sprite.anchorPoint = CGPointMake(0, 0);
[self addChild:sprite];
CCLabelTTF is the simplest choice when it comes to displaying text on the screen. Here’s how to create a CCLabelTTF object to display some text:
CCLabelTTF* label = [CCLabelTTF labelWithString:@"text"
            fontName:@"AppleGothic"
            fontSize:32];
[self addChild:label];
In case you’re wondering which TrueType fonts are available on iOS devices, you’ll find a list of fonts in the Essentials project for this chapter.
Internally, the given TrueType font is used to render the text on a CCTexture2D texture. Because this happens every time the text changes, it’s not something you should do every frame. Re-creating the texture of a CCLabelTTF is really slow, and it's done every time the string of the label is modified:
[label setString:@"new text"];
Also notice that increasing or decreasing the length of the text of a label makes the text behave as if it's center-aligned on the label’s position. The following sentences are center-aligned to illustrate this effect:
Hello World!
Hello World Once Again!
Hello Our World and all the other Worlds out there!
The center alignment is because of the anchor point and its default position of 0.5,0.5, which causes the center of the texture (in this case the label’s text is the texture) to be center-aligned with the label’s position. In many cases you want to align labels left, right, up, or down, and you can use the anchorPoint property to easily do that. The following code shows how you can align a label by simply changing the anchorPoint property:
// align label to the right
label.anchorPoint = CGPointMake(1, 0.5f);
// align label to the left
label.anchorPoint = CGPointMake(0, 0.5f);
// align label to the top
label.anchorPoint = CGPointMake(0.5f, 1);
// align label to the bottom
label.anchorPoint = CGPointMake(0.5f, 0);
// use case: place label at top-right corner of the screen
// the label's text extends to the left and down and is always completely on screen
CGSize size = [[CCDirector sharedDirector] winSize];
label.position = CGPointMake(size.width, size.height);
label.anchorPoint = CGPointMake(1, 1);
You’ll soon need some kind of button a user can click to perform an action, such as going to another scene or toggling music on and off. This is where the CCMenu class comes into play. CCMenu is a subclass of CCLayer and accepts only CCMenuItem nodes as children. You can see the CCMenuItem class hierarchy in Figure 3-5 and in Figure 3-8 for the sake of clarity.
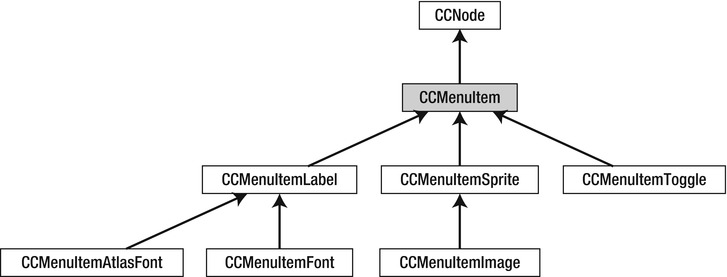
Figure 3-8 . The CCMenuItem class hierarchy
Listing 3-1 shows the code for setting up a menu. You can find the menu code in the Essentials project in the MenuScene class.
Listing 3-1. Creating Menus in cocos2d with Text and Image Menu Items
CGSize size = [CCDirector sharedDirector].winSize;

// set CCMenuItemFont default properties
[CCMenuItemFont setFontName:@"Helvetica-BoldOblique"];
[CCMenuItemFont setFontSize:26];

// create a few labels with text and selector
CCMenuItemFont* item1 = [CCMenuItemFont itemWithString:@"Go Back!"
                        target:self
                      selector:@selector(menuItem1Touched:)];

// create a menu item using existing sprites
CCSprite* normal = [CCSprite spriteWithFile:@"Icon.png"];
normal.color = ccRED;
CCSprite* selected = [CCSprite spriteWithFile:@"Icon.png"];
selected.color = ccGREEN;
CCMenuItemSprite* item2 = [CCMenuItemSprite←
                      itemWithNormalSprite:normal
                          selectedSprite:selected
                               target:self
                             selector:@selector(menuItem2Touched:)];

// create a toggle item using two other menu items (toggle works with images, too)
[CCMenuItemFont setFontName:@"STHeitiJ-Light"];
[CCMenuItemFont setFontSize:18];
CCMenuItemFont* toggleOn = [CCMenuItemFont itemWithString:@"I'm ON!"];
CCMenuItemFont* toggleOff = [CCMenuItemFont itemWithString:@"I'm OFF!"];
CCMenuItemToggle* item3 = [CCMenuItemToggle itemWithTarget:self
                           selector:@selector(menuItem3Touched:)
                             items:toggleOn, toggleOff, nil];

// create the menu using the items
CCMenu* menu = [CCMenu menuWithItems:item1, item2, item3, nil];
menu.position = CGPointMake(size.width/2, size.height/2);
[self addChild:menu];

// aligning is important, so the menu items don't occupy the same location
[menu alignItemsVerticallyWithPadding:40];
Warning The lists of menu items always end with nil as the last parameter. This is a technical requirement. If you forget to add nil as the last parameter, your app will crash at that particular line.
It takes a fair bit of code to set up a menu. The first menu item is based on CCMenuItemFont and simply displays a string. When the menu item is touched, it calls the method menuItem1Touched. Internally, CCMenuItemFont simply creates a CCLabel. If you already have a CCLabel, you can use that with the CCMenuItemLabel class instead.
Likewise, there are two menu item classes for images: one is CCMenuItemImage, which creates an image from a file and uses a CCSprite internally, and the other is one I’ve used here, CCMenuItemSprite. This class takes existing sprites as input, which I think is more convenient because you can use the same image and simply tint its color to achieve a highlighting effect when touched.
CCMenuItemToggle accepts exactly two CCMenuItem-derived objects and, when touched, toggles between the two items. You can use either text labels or images with CCMenuItemToggle.
Finally, CCMenu itself is created and positioned. Because the menu items are all children of CCMenu, they're positioned relative to the menu. To keep them from stacking up on each other, you have to call one of CCMenu's align methods, like alignItemsVerticallyWithPadding, as shown at the end of Listing 3-1.
Because CCMenu is a node containing all menu items, you can use actions on the menu to let it scroll in and out. This makes your menu screens appear less static, which is usually a good thing. See the Essentials project for an example. In the meantime, take a look at Figure 3-9 to see what your current menu looks like.
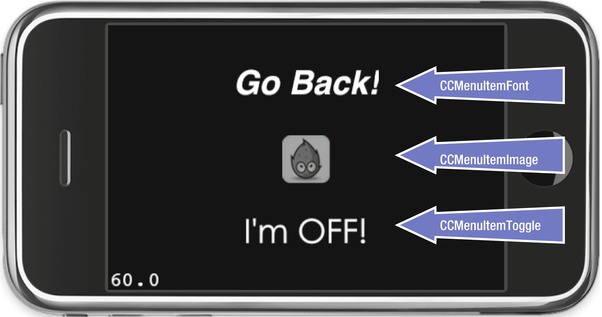
Figure 3-9 . This is the menu produced by the code in Listing 3-1
Menu Items with Blocks
Instead of specifying a target and selector, menu items can also use blocks. What now?
A block is like a C function but with the important distinction that the block code can access variables in the scope where the block is declared. You can write a block inside other functions, store it in variables, and pass it as a parameter. Blocks also have access to variables in the scope they're declared in. This makes blocks a very powerful concept, but underused because the syntax is slightly confusing. Apparently Apple also recognized that because they changed the title of the Blocks Programming Guide to A Short Practical Guide to Blocks, which you’ll find here: http://developer.apple.com/library/ios/#featuredarticles/Short_Practical_Guide_Blocks/_index.html.
Without going into too much theory, blocks are best explained by example. Let’s see how a menu item using a block looks:
NSArray* items = [NSArray arrayWithObjects:toggleBlockOn, toggleBlockOff, nil];
CCMenuItemToggle* item4 = [CCMenuItemToggle itemWithItems:items
            block:^(id sender) {
    // sender is the CCMenuItemToggle
    CCMenuItemToggle* toggleItem = (CCMenuItemToggle*)sender;
    int index = toggleItem.selectedIndex;
    CCLOG(@"item 4 touched with block: %@ - selected index: %i", sender, index);
}];
Now look at the same block again, but this time you make use of the fact that the block has access to variables in the scope where the block is declared. In this case, instead of using the sender, which turns out to be the CCMenuItemToggle, you can simply refer to the item4 variable directly. This is called capturing state. Even if you assigned a different object to item4 directly after where the block is declared, the block will still refer to the object that was stored in the item4 variable at the time the block was created.
NSArray* items = [NSArray arrayWithObjects:toggleBlockOn, toggleBlockOff, nil];
CCMenuItemToggle* item4 = [CCMenuItemToggle itemWithItems:items
            block:^(id sender) {
    int index = item4.selectedIndex;
    CCLOG(@"item 4 touched with block: %@ - selected index: %i", item4, index);
}];
item4 = nil;//inside the block item4 will still be the menu item object
This particular menu item initializer takes a block as a parameter. Unfortunately, cocos2d doesn’t document which signature the block function should have, so you’ll have to dig up this information from any cocos2d method that accepts a block. Consulting with the CCMenuItem.m file where CCMenuItemToggle is implemented, you can see the block returns void (no return value) and passes an id sender object to the function:
block:(void(^)(id sender))block
Therefore, the block you need to implement needs to have the following signature:
^(id sender) {
  // your code here . . .
}
By now you’ll have noticed the oddly placed caret (^) symbol. That tells the compiler that the following code is a block. Following the caret, you first declare the parameter list in brackets, and following that is your code in curly brackets. So that’s pretty straightforward.
One thing you may have noticed is that the block doesn't declare a return type. For void and int parameters, this is optional because the compiler assumes that the return type is void if no return statement is used inside the block. And if there's a return statement returning a value, it defaults to int. Because this leads to compiler errors when you want to return a different value than int, I find it good practice to specify the return type even if you don’t have to. The return type always follows the caret symbol:
^void(id sender) {
  // your code here . . .
}
Now you’re probably wondering why you'd want to bother with syntactically odd blocks when you can just use target and selector instead? For one, it allows you to write the menu item handling code right where you define the menu item. Moreover, the block has access to local variables. In this example, the message NSString can be used within the block:
NSString* message = @"some kind of string";
NSArray* items = [NSArray arrayWithObjects:toggleBlockOn, toggleBlockOff, nil];
CCMenuItemToggle* item4 = [CCMenuItemToggle itemWithItems:items
            block:^void(id sender) {
  CCLOG(@"message is:%@", message);
}];
What’s more, you can re-use the same block for multiple menu items by assigning the block to a variable. For clarity, I omit the NSArray* items declarations from this example:
NSString* message = @"some kind of string";
void (^toggleBlock)(id sender) = ^void(id sender) {
   CCLOG(@"message is: %@ ", message);
};
CCMenuItemToggle* item6 = [CCMenuItemToggle itemWithItems:items
            block:toggleBlock];
CCMenuItemToggle* item7 = [CCMenuItemToggle itemWithItems:items
            block:toggleBlock];
message = @"a different string";
CCMenuItemToggle* item8 = [CCMenuItemToggle itemWithItems:items
            block:toggleBlock];
Effectively you have one block that handles three menu items. And because the message string has changed before item8, this particular menu item will print out a different string every time you toggle it.
One issue when you start working with blocks is how the implementation and variable declaration differ in subtle but important ways. In the implementation (right-hand side of the equals symbol) you specify the return type following the caret symbol. However, in the variable declaration (left-hand side of the equation), the return type comes first and is never optional. You always have to specify void even if you can omit it on the right-hand side—another reason to always use the return type on the right-hand side as well.
What’s more, the variable’s name follows the caret symbol, and you have to write both in brackets to avoid compiler errors. Compare the variable declaration on the left-hand side with the block implementation on the right-hand side:
void (^toggleBlock)(id sender) = ^void(id sender) { /* block code here */ };
These small but subtle differences regarding declaration and implementation are probably what’s most off-putting about the block syntax. But once you’ve seen several example uses, you get used to it, and eventually it becomes second nature. Note that once It's declared as a variable, you can pass the block variable around and you can even call it just as you'd call a C function:
toggleBlock(nil);
Tip In the Essentials project I’ve added a method named -(void) moreBlocksExamples that contains many examples of how to write blocks. There’s also an example using typedef and a preprocessor macro to allow you to write blocks with less syntactic horror. This example declares a block variable whose declaration and implementation were given a readable name: NegateBlock Negate = NegateBlockImp{ return !input; }; CCLOG(@"Negate returned: %@", Negate(YES) ? @"YES" : @"NO");
Blocks have a wide variety of uses. For example, they’re used as callback mechanisms for Game Center classes, and they’re essential for multithreading applications with Grand Central Dispatch and other Cocoa technologies. Internally, cocos2d converts all target/selector menu items to calls with blocks as well. Despite the syntactical oddities, I encourage you to work with blocks because you may be required to understand and use them sooner than you think. And you can start unlocking their powerful secrets sooner as well.
Actions
Actions are lightweight, one-shot classes you use on nodes to perform certain, well, actions. They allow you to move, rotate, scale, tint, fade, and do a lot of other things with a node. Because actions work with every node, you can use them on sprites, labels, and even menus or whole scenes! That’s what makes them so powerful.
In Figure 3-10 you can see the CCAction class hierarchy without the many subclasses of CCActionInterval and CCActionInstant. (You'll see their class hierarchies in Figures 3-11 and Figure 3-16.)
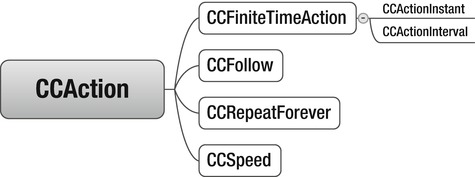
Figure 3-10 . The CCAction class hierarchy with subclasses of CCActionInstant and CCActionInterval omitted
Only three actions directly derive from CCAction:
- CCFollow (allows a node to follow another node)
- CCRepeatForever (repeats an action indefinitely)
- CCSpeed (changes the update frequency of an action while it's running)
With the CCFollow action, you can instruct a node to follow another node. For example, to have a label follow the player character sprite, the code might look something like this:
[label runAction:[CCFollow actionWithTarget:playerSprite]];
You can also have actions or even a whole sequence of actions repeat (loop) forever with CCRepeatForever. You can create endlessly looping animations this way, for example. This code lets a node rotate forever like an endlessly spinning wheel:
CCRotateBy* rotateBy = [CCRotateBy actionWithDuration:2 angle:360];
CCRepeatForever* repeat = [CCRepeatForever actionWithAction:rotateBy];
[myNode runAction:repeat];
You can use the CCSpeed action to influence the speed of an action while it's running. Let’s take the earlier rotation example and wrap it with a CCSpeed action:
CCRotateBy* rotateBy = [CCRotateBy actionWithDuration:2 angle:360];
CCRepeatForever* repeat = [CCRepeatForever actionWithAction:rotateBy];
CCSpeed* speedAction = [CCSpeed actionWithAction:repeat speed:0.5f];
speedAction.tag = 1;
[myNode runAction:speedAction];
Now the node will take twice as long to make a full revelution because the CCSpeed action’s speed is set to 0.5f. You can change the speed property of the CCSpeed action later to influence the speed of the wrapped action while it's running. Without CCSpeed, you’d have to create new CCRotateBy and CCRepeatForever actions to accomplish a change in speed. That would not only waste precious CPU time, it might also cause stutters or jumps in the rotation animation.
To make the node suddenly rotate faster, you only need to get the speed action and modify its speed property:
CCSpeed* speedAction = (CCSpeed*)[myNode getActionByTag:1];
speedAction.speed = 2;
Note You can’t add a CCSpeed action to a CCSequence action, because you can only use actions derived from CCFiniteTimeAction in a sequence.
Because most actions happen over time, such as a rotation for three seconds, you’d normally have to write an update method and add variables to store the intermediate results. The CCActionInterval actions shown in Figure 3-11wrap this kind of logic for you and turn it into simple, parameterized methods:

Figure 3-11 . The CCActionInterval class hierarchy with subclasses of CCActionEase and CCGridAction omitted
// have myNode move to 100, 200 and arrive there in 3 seconds
CCMoveTo* move = [CCMoveTo actionWithDuration:3 position:CGPointMake(100, 200)];
[myNode runAction:move];
Once you start using this particular code, you’ll notice that, depending on the distance myNode has to move, its speed will be different. This very common problem has a simple solution: calculate the distance from the current position to the target position and then divide it by the speed you want the node to move. The result is the correct duration to have the node move to the target position at the same speed, regardless of where the node and target positions are.
// have myNode move at a fixed speed to any position
CGPoint targetPos = CGPointMake(100, 200);
float speed = 10; // in pixels per second
float duration = ccpDistance(myNode.position, targetPos) / speed;
CCMoveTo* move = [CCMoveTo actionWithDuration:duration position:targetPos];
[myNode runAction:move];
By the way, you don’t have to remove an action. Once an action has completed its task, it removes itself from the node automatically and releases the memory it uses. That, unfortunately, is also actions' greatest weakness: you can't re-use them. If you need the same action or action sequence later on, you have to create new instances of the action classes.
Caution A tip found in the official cocos2d documentation recommends simply “re-initializing” an action by sending it the appropriate initWith. . . message again. But this is dangerous and can lead to memory leaks and possibly crashes because not every action class can be safely re-initialized. And for some actions, it simply doesn’t have the desired effect.
If you keep a reference to an action, maybe in an attempt to re-use it later, and then use it in multiple messages to runAction, you’ll notice that either the action has no effect or the node behaves unexpectedly. The simplest way to provoke this issue is to try to use the same action on two different nodes, like so:
CCMoveTo* move = [CCMoveTo actionWithDuration:duration position:targetPos];
[myNode runAction:move]; // this node will stay put
[otherNode runAction:move]; // this node will move
Only the otherNode will run the action because it was the last node to use it. Actions only act on a single node, and therefore myNode won't move at all. If you want both nodes to move, you have to create two instances of the CCMoveTo class. There’s really no other way around this.
When you add several actions to the same node, they all perform their duties at the same time. For example, you could have an object rotate and fade out at the same time by adding the corresponding actions. But what if you want to run the actions one after the other?
Sometimes it’s more useful to sequence actions, meaning as soon as one action has completed its job, the next one starts running. That’s where CCSequence comes in. It's so powerful and frequently used, it deserves an extra mention. You can use any number and type of actions in a sequence, which makes it easy to have a node move to a target location and, at arrival, have it rotate around and then fade out, each action followed by the next one until the sequence is complete.
Here’s how to cycle a label’s colors from red to blue to green while waiting 1 second each after the red and blue tinting actions have run:
CCTintTo* tint1 = [CCTintTo actionWithDuration:4 red:255 green:0 blue:0];
CCDelayTime* wait1 = [CCDelayTime actionWithDuration:1];
CCTintTo* tint2 = [CCTintTo actionWithDuration:4 red:0 green:0 blue:255];
CCDelayTime* wait2 = [CCDelayTime actionWithDuration:1];
CCTintTo* tint3 = [CCTintTo actionWithDuration:4 red:0 green:255 blue:0];
CCSequence* sequence = [CCSequence actions:tint1, wait1, tint2, wait2, tint3, nil];
[label runAction:sequence];
You can also use a CCRepeatForever action with the sequence:
CCSequence* sequence = [CCSequence actions:tint1, tint2, tint3, nil];
CCRepeatForever* repeat = [CCRepeatForever actionWithAction:sequence];
[label runAction:repeat];
And being able to modify the speed of the entire repeating sequence can come in handy too:
CCSequence* sequence = [CCSequence actions:tint1, tint2, tint3, nil];
CCRepeatForever* repeat = [CCRepeatForever actionWithAction:sequence];
CCSpeed* speedAction = [CCSpeed actionWithAction:repeat speed:0.75f];
[label runAction:speedAction];
Note As with menu items, a list of actions always ends with nil. If you forget to add nil as the last parameter, the line creating the CCSequence will crash!
Actions become even more powerful when you use actions based on the CCActionEase class. Ease actions allow you to modify the effect of an action over time. For example, if you use a CCMoveTo action on a node, the node will move the whole distance at the same speed until it's arrived. With CCActionEase, you can have the node start slow and speed up toward the target, or vice versa. Or you can let it move past the target location a little and then bounce back. To see easing in action, check out this demo application that runs in a web browser: www.robertpenner.com/easing/easing_demo.html.
Ease actions create very dynamic animations that are normally very time-consuming to implement. The following code shows how to use an ease action to modify the behavior of a regular action. The rate parameter determines how pronounced the effect of the ease action is and should be greater than 1 to see any effect.
// I want myNode to move to 100, 200 and arrive there in 3 seconds
CCMoveTo* move = [CCMoveTo actionWithDuration:3 position:CGPointMake(100, 200)];
// this time the node should slowly speed up and then slow down as it moves
CCEaseInOut* ease = [CCEaseInOut actionWithAction:move rate:4];
[myNode runAction:ease];
Note In the preceding example, the ease action is run on the node, not the move action. It’s all too easy to forget to change the runAction line when you’re working with actions—a common mistake by even to the most experienced cocos2d developers. If you notice your actions aren’t working as expected or at all, double-check that you’re actually running the correct action. And if the correct actions are used, but you’re still not seeing the desired result, verify that it’s the correct node running the action. That’s another common mistake.
Cocos2d implements the following CCActionEase classes:
- CCEaseBackIn, CCEaseBackInOut, CCEaseBackOut
- CCEaseBounceIn, CCEaseBounceInOut, CCEaseBounceOut
- CCEaseElasticIn, CCEaseElasticInOut, CCEaseElasticOut
- CCEaseExponentialIn, CCEaseExponentialInOut, CCEaseExponentialOut
- CCEaseIn, CCEaseInOut, CCEaseOut
- CCEaseSineIn, CCEaseSineInOut, CCEaseSineOut
In Chapter 4, you’ll use a number of these ease actions in the DoodleDrop project so you can see what effect they have. The CCActionEase class hierarchy is shown in Figure 3-12 for reference.
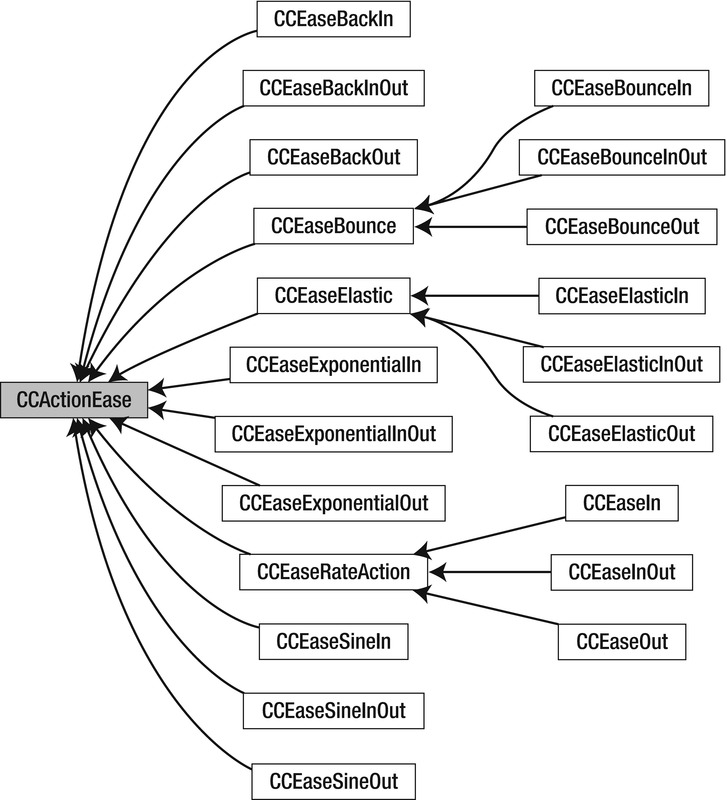
Figure 3-12 . The CCActionEase class hierarchy
Grid actions are purely visual actions derived from CCGridAction and one of its two subclasses, CCGrid3DAction and CCTiledGrid3DAction. Their class hierarchies are shown in Figures 3-13 and 3-14.
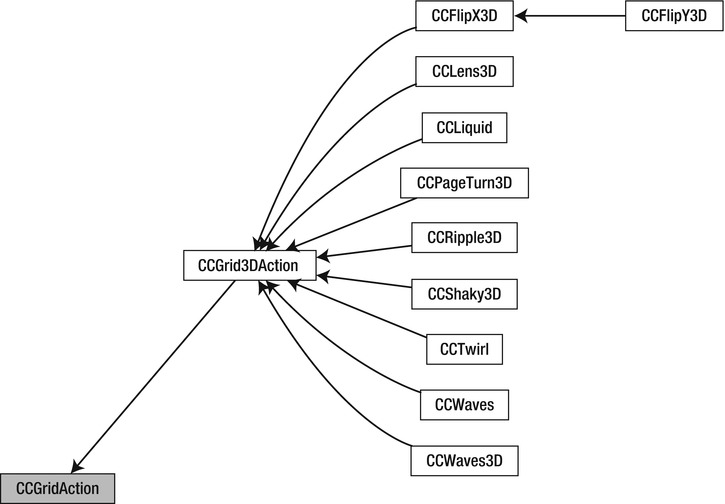
Figure 3-13 . The CCGrid3DAction class hierarchy
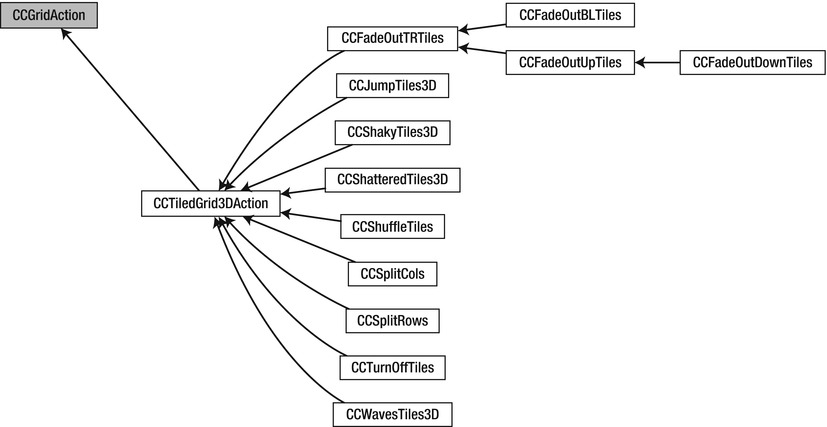
Figure 3-14 . The CCTiledGrid3DAction class hierarchy
The specialty of the grid actions are three-dimensional effects such as turning a page (CCPageTurn3D; see Figure 3-15) or simulating waves and liquids (CCWaves, CCLiquid). The downside is that the 3D effects may show visual artifacts unless you enable depth buffering, which requires more memory and has a negative impact on rendering performance.
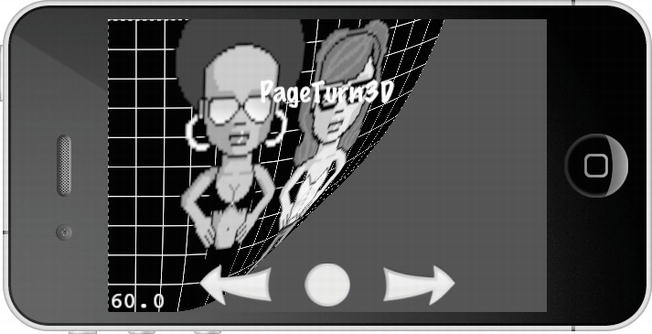
Figure 3-15 . The CCPageTurn3D action in action
To enable depth buffering in a cocos2d application, you have to change the line where EAGLView is initialized in your project’s AppDelegate.m file. You do this by changing the depthFormat parameter from its default value 0 to either GL_DEPTH_COMPONENT16_OES for a 16-bit depth buffer or GL_DEPTH_COMPONENT24_OES for a 24-bit depth buffer:
CCGLView *glView = [CCGLView viewWithFrame:[window_ bounds]
            pixelFormat:kEAGLColorFormatRGB565
            depthFormat:GL_DEPTH_COMPONENT16_OES
            preserveBackbuffer:NO
            sharegroup:nil
            multiSampling:NO
            numberOfSamples:0];
Kobold2D users can make this change in the config.lua file by modifying the GLViewDepthFormat parameter as follows:
GLViewDepthFormat = GLViewDepthFormat.Depth16Bit,
Ideally, you should try the 16-bit depth buffer first; it uses less memory, but in a few cases a24-bit depth buffer may be necessary if visual artifacts still occur when using 3D actions.
You may wonder why there are instantaneous actions based on the CCInstantAction class (see Figure 3-16 for the class hierarchy), when you could just as well change the node’s property to achieve the same effect. For example, there are instant actions to flip the node, to place it at a specific location, or to toggle its visible property.
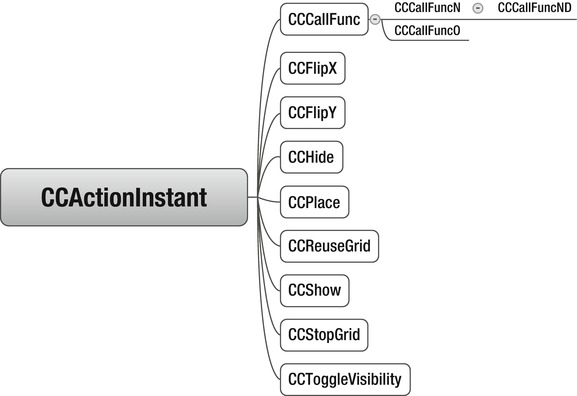
Figure 3-16 . The CCActionInstant class hierarchy
The main reason instant actions exist is because they're useful in action sequences. Sometimes in a sequence of actions you have to change a certain property of the node, such as visibility or position, and then continue with the sequence. Instant actions make this possible. True, they're rarely used—with CCCallFunc and its variants being the notable exception.
CCCallFunc Actions
When using an action sequence, you may want to be notified at certain times, for example when the sequence has ended, and then perhaps start another sequence immediately thereafter. To do that, you can make use of several versions of CCCallFunc actions that'll send a message whenever it's their turn in the sequence. Let’s rewrite the color cycle sequence so that it calls a method each time one of the CCTintTo actions has done its job:
// sends a message to target using selector with this signature:
// –(void) onCallFunc;
CCCallFunc* func = [CCCallFunc actionWithTarget:self
            selector:@selector(onCallFunc)];
// sends a message to target using selector with this signature:
// -(void) onCallFuncN:(id)sender;
CCCallFuncN* funcN = [CCCallFuncN actionWithTarget:self
            selector:@selector(onCallFuncN:)];
// Caution: avoid using this due to ARC issues.
// sends a message to target using selector with this signature
// -(void) onCallFuncND:(id)sender data:(void*)data;
CCCallFuncO* funcO = [CCCallFuncO actionWithTarget:self
            selector:@selector(onCallFuncO:)
            object:self];
// sends a message to target using selector with this signature:
// -(void) onCallFuncO:(id)object;
void* someDataPointer = nil;
CCCallFuncND* funcND = [CCCallFuncND actionWithTarget:self
            selector:@selector(onCallFuncND:data:)
            data:someDataPointer];
CCSequence* seq = [CCSequence actions: ←
  tint1, func, tint2, funcN, tint3, funcO, funcND, nil];
[label runAction:seq];
The difference between these variants of CCCallFunc is in which selector they call and thus which context is available to the method they call. For example, when CCCallFunc calls the onCallFunc method, you have no way of knowing who called the method or why. There’s no context, but in many cases that context isn't needed.
Caution Never use an Objective-C class (any id type) as the data parameter of CCCallFuncND. Doing so runs the risk of leaking memory or crashing your app in an ARC-enabled project. For id types, always use the CCCallFuncO action or consider using the CCCallBlock actions later in this section because the block can use any variable that’s in scope where the block is declared.
The action sequence seq will call the methods in the following code one after another. The sender parameter will always be derived from CCNode—it’s the node that’s running the actions. You can use the data parameter any way you want, including passing values, structs, or other pointers. You only have to properly cast the data pointer.
-(void) onCallFunc
{
     CCLOG(@"end of tint1!");
}
-(void) onCallFuncN:(id)sender
{
     CCLOG(@"end of tint2! sender: %@", sender);
}
-(void) onCallFuncO:(id)object
{
   // object is the object you passed to CCCallFuncO
   CCLOG(@"call func with object %@", object);
}
-(void) onCallFuncND:(id)sender data:(void*)data
{
     CCLOG(@"end of sequence! sender: %@ - data: %p", sender, data);
}
Of course, the CCCallFunc actions also work with CCRepeatForever sequences. Your methods will be called repeatedly at the appropriate time.
CCCallBlock Actions
For all intents and purposes, you can replace the CCCallFunc actions with CCCallBlock actions. The only thing block actions don’t allow is passing an arbitrary void* pointer—mainly because doing so conflicts with ARC (see the previous Caution box).
The CCCallBlock, CCCallBlockN, and CCCallBlockO classes are initialized and used as follows:
CCCallBlock* blockA = [CCCallBlock actionWithBlock:^void(){
  CCLOG(@"action with block got called");
}];
CCCallBlock* blockB = [CCCallBlock actionWithBlock:^{
  CCLOG(@"action with block got called");
}];
CCCallBlockN* blockN = [CCCallBlockN actionWithBlock:^void(CCNode* node){
  CCLOG(@"action with block got called with node %@", node);
}];
CCCallBlockO* blockO = [CCCallBlockO actionWithBlock:^void(id object){
  CCLOG(@"action with block got called with object %@", object);
}
            object:background];
CCSequence* sequence = [CCSequence actions:block, blockN, blockO, nil];
[label runAction:sequence];
The blockA and blockB instances of the CCCallBlock class only differ in the way the block is declared. Because that particular block has no return value, you can omit void. And because it takes no parameters, you can also omit the brackets as well. This means ^void(){ .. } and ^{ .. } declare exactly the same type of block, the latter simply being a shorthand for the former.
The block used in the CCCallBlockN class must take a single parameter of type CCNode*. The node is the node that's running the CCCallBlockN action. The block used by CCCallBlockO requires a single parameter of type id. That’s the object passed as the second parameter to CCCallBlockO. It’s easy to miss, unfortunately, because the object parameter follows the block parameter and therefore causes some syntactical awkwardness because it’s either dangling at the end of the block or floating by itself after what seems to be an empty line.
It's syntactically cleaner and easier to read if you assign the block to a variable and rewrite the CCCallBlockO initialization like this:
void (^callBlock)(id object) = ^void(id object){
   CCLOG(@"action with block got called with object %@", object);
   [label setString:@"label string changed by block"];
};
CCCallBlockO* blockO2 = [CCCallBlockO actionWithBlock:callBlock
            object:background];
Which reminds me: you can assign blocks to variables—and what that looks like. I’m hoping that maybe now, after a few pages, blocks are starting to click with you. If not, don't worry. I’ll be re-visiting them a couple more times over the course of the book.
In case you're missing the potentially useful CCCallBlockNO class, whose block would take both the sending node and a user-supplied object as a parameter, remember that blocks have access to the local scope. Essentially, you won’t even need to use either CCCallBlockN or CCCallBlockO in most cases because you can just access the variables label and background from inside the block without their being passed as block parameters:
// assuming label and background are already declared & initialized at this point . . .
CCCallBlock* block = [CCCallBlock actionWithBlock:^void(){
  CCLOG(@"label: %@ -- background object: %@", label, background);
}];
Writer’s block may be a bad thing, but coder’s block is nothing but awesome!
Orientation, Singletons, Tests, and API References
This section summarizes three aspects of cocos2d that don’t receive the attention they deserve—or in the case of the Singleton pattern, perhaps they receive too much. Singletons are often singled out as bad practice, with some developers even going as far as stating that no project should ever use them. Pragmatists like me, though, have yet to see a game engine or game project that didn’t use singletons, and reasonably so.
Then there are cocos2d test cases and the API references, both helpful resources that can help answer your questions—if only you knew where to look for them. But I’d like to start off by explaining how to get your app locked to a certain device orientation.
Orientation Course in Device Orientation
More often than not, you want to lock your app to be used only in one of the four possible device orientations, or at least in either Landscape or Portrait modes.
I’ll start with Kobold2D because it just works like any other Cocoa Touch app. Kobold2D respects the Supported Device Orientations setting of the target. Select your project’s target, go to the Summary tab, and you’ll find the Supported Device Orientations setting under the iPhone / iPad Deployment Info heading. By default, all four device orientations are supported. To restrict the app to Landscape orientations, simply deselect the Portrait orientations as shown in Figure 3-17. That's really all you need to do.

Figure 3-17 . Kobold2D recognizes the Supported Device Orientations setting in Xcode
If you can’t see the device orientation setting, make sure you've selected the iOS target. After all, almost all Kobold2D projects also include a Mac build target.
In a purely cocos2d app, you have to open AppDelegate.m and locate the shouldAutorotateToInterfaceOrientation method. Kobold2D users can also add this method to the AppDelegate class to change the supported orientations while the app is running. The default implementation allows autorotation to both Landscape orientations and is similar to this one, except for the method parameter which I changed from interfaceOrientation to orientation to make the source code in the book more readable:
-(BOOL)shouldAutorotateToInterfaceOrientation:(UIInterfaceOrientation)orientation
{
    return UIInterfaceOrientationIsLandscape(orientation);
}
The system queries this method frequently to determine whether it's allowed to autorotate the app to a certain interface orientation. The method should return YES if the app supports the orientation it was passed in, and NO otherwise. You should return YES for at least one interface orientation—otherwise iOS defaults to Portrait mode.
The iOS SDK offers two macros to test whether an interface orientation is either one of the two Portrait modes or one of the two Landscape modes:
BOOL isLandscape = UIInterfaceOrientationIsLandscape(orientation);
BOOL isPortrait = UIInterfaceOrientationIsPortrait(orientation);
Allowing your app to rotate to both Landscape or both Portrait orientations Is recommended because some users prefer the home button on the left side, others on the right side, and others just want to use the app in the orientation they’re currently holding the device in. Therefore the decision should be left up to the user where possible.
However, there are reasons to restrict your app to one particular device orientation. For example, if your app is accelerometer controlled, like the popular Labyrinth game, tilting the device too far in one direction could trigger autorotation inadvertently. That could make the game unplayable. To force your app to use only a specific orientation, compare the orientation parameter with one of the four UIInterfaceOrientation types. In this example, only the Landscape Left orientation is allowed:
-(BOOL)shouldAutorotateToInterfaceOrientation:(UIInterfaceOrientation)orientation
{
    return interfaceOrientation == UIInterfaceOrientationLandscapeLeft;
}
Note The UIInterfaceOrientationLandscapeLeft orientation is the orientation as depicted by the Landscape Left icon in Figure 3-17. That means the home button is on the left side. This is important to note in case you’ve been using an earlier cocos2d version where the device orientation was used instead of the interface orientation. Whereas the device orientation used to be set to UIDeviceOrientationLandscapeRight, you now have to use UIInterfaceOrientationLandscapeLeft, and where UIDeviceOrientationLandscapeLeft was used, you have to use UIInterfaceOrientationLandscapeRight.
In the rare case where you want to support all four orientations, just return YES in the shouldAutorotateToInterfaceOrientation method.
Singletons in cocos2d
Cocos2d makes good use of the Singleton design pattern, which is regularly and hotly debated. In principle, a singleton is a regular class that's instantiated only once during the lifetime of the application. To ensure that this is the case, you use a static method to both create and access the instance of the object. So, instead of using alloc/init or a static autorelease initializer, you gain access to a singleton object via methods that begin with shared. The most prominent singleton class in cocos2d is the CCDirector class:
CCDirector* director = [CCDirector sharedDirector];
The director itself hosts other singleton classes, which in cocos2d v1.x are separate classes. Starting with cocos2d v2.0 you can access the CCScheduler, CCActionManager, and CCTouchDispatcher as properties of the CCDirector class.
CCDirector* director = [CCDirector sharedDirector];
CCScheduler* scheduler = director.scheduler;
CCActionManager* actionManager = director.actionManager;
// only when building for iOS
CCTouchDispatcher* touchDispatcher = director.touchDispatcher;
// only when building for Mac OS X
CCEventDispatcher* eventDispatcher = director.eventDispatcher;
The four cache classes in cocos2d are also implemented as Singleton classes:
CCAnimationCache* animCache = [CCAnimationCache sharedAnimationCache];
CCShaderCache* shaderCache = [CCShaderCach sharedShaderCache];
CCSpriteFrameCache* sfCache = [CCSpriteFrameCache sharedSpriteFrameCache];
CCTextureCache* textureCache = [CCTextureCache sharedTextureCache];
Each of these classes caches specific resources. Caching here means that loaded resources are kept in memory even if they’re no longer in use. This prevents the resources from having to be reloaded from flash memory, which is relatively slow. But the caches also prevent you from loading the same resource twice. Whether you create a single sprite or a thousand sprites using the same texture, the texture will only be loaded and stored in memory once.
There are a few more (but rarely used) singleton classes in cocos2d:
CCConfiguration* config = [CCConfiguration sharedConfiguration];
CCProfiler* profiler = [CCProfiler sharedProfiler];
To complete the list, the CocosDenshion audio engine also provides two singleton classes to the CDAudioManager and its easier-to-use cousin SimpleAudioEngine:
CDAudioManager* sharedManager = [CDAudioManager sharedManager];
SimpleAudioEngine* sharedEngine = [SimpleAudioEngine sharedEngine];
The upside of a singleton is that it can be used anywhere by any class at any time. It acts almost like a global class, much like global variables. Singletons are very useful if you have a combination of data and methods you need to use in many different places.
Caching and audio are good examples of this, because any of your classes—whether the player, an enemy, a menu button, or a cutscene—might want to play a sound effect or change the background music. So it makes a lot of sense to use a singleton for playing audio. Likewise, if you have global game stats—perhaps the size of the player’s army and each platoon’s number of troops—you might want to store that information in a singleton so you can carry it over from one level to another.
Implementing a singleton is straightforward, as Listing 3-2 shows. This code implements the class MyManager as a singleton with minimal code. The sharedManager static method grants access to the single instance of MyManager. The first time the sharedManager method runs, the sharedManager instance is allocated and initialized; from then on the existing instance is returned.
Listing 3-2. Implementing the Exemplary Class MyManager as a Singleton
static MyManager *sharedManager = nil;

+(MyManager*) sharedManager
{
   static dispatch_once_t once;
   static MyManager* sharedManager;
   dispatch_once(&once, ^{ sharedManager = [[self alloc] init]; });
   return sharedManager;
}
Note Listing 3-2 is not only Apple’s recommended way to write a singleton, it’s also the fastest and safest with only four lines of code. Yet singletons have a long history, and you’re bound to run into a number of solutions, most of which basically do the exact same thing but with subtle differences. The Q&A site Stackoverflow.com has a great discussion about Objective-C singletons in which a great variety of implementations and their pros and cons are debated: http://stackoverflow.com/questions/145154/what-does-your-objective-c-singleton-look-like
Singletons also have ugly sides. Because they’re simple to use and implement and can be accessed from any other class, there’s a tendency to overuse them. They’re like global variables, which most programmers agree should be used scarcely and judiciously.
For example, you might think you have only one player object, so why not make the player class a singleton? Everything seems to be fine—until you realize that whenever the player advances from one level to another, the singleton not only keeps the player’s score but also his last animation frame, his health, and all the items he's picked up, and then he might even begin the new level in Berserk mode because that mode was active when he left the previous level.
To fix that, you add another method to reset certain variables when changing levels. So far, so good. But as you add more features to the game, you end up having to add and maintain more and more variables when switching a level. What’s worse, suppose one day a friend suggests you give the iPad version a two-player mode. But, wait, your player is a singleton; you can have only one player at any time! This gives you a major headache: refactor a lot of code or miss out on the cool two-player mode?
Or why not make the second player a singleton, too? And whenever the second player needs to know something of the first player, it’ll just use that singleton. So, they keep a reference to each other, which means you can’t have a single-player game without initializing the other players as well. This is one side effect of classes strongly dependent on each other, also known as tight coupling. The more classes are tightly coupled with each other, the harder it is to make changes to any part of your code. It’s like mixing cement that’s slowly drying up until it’s so hard that any change is easier to do by hacking it instead of improving the code. That’s the point where bugs seem to occur everywhere, at random, with no connection to a recent change. In one word: frustrating.
The more you rely on singletons, the more likely such issues will arise. Before creating a singleton class, always consider whether you really need only one instance of this class and its data and whether that might change later.
I understand it’s hard for a beginner to judge when and where to use a singleton, particularly if you haven’t had much experience with object-oriented programming. The Q&A web site Stackoverflow.com hosts a discussion with additional links that illustrates the controversy around the Singleton design pattern and gives some food for thought: http://stackoverflow.com/questions/137975/what-is-so-bad-about-singletons.
My advice is to study popular uses of singletons. The use of singletons in the cocos2d game engine for resource management is perfectly fine, because it simplifies the overall design of the game engine. Most other game engines use singletons for similar purposes as well, and I’ve rarely heard anyone complain about that. You’ll even find singletons in the iOS SDK. Singletons are generally not as bad as some make them sound like, although they do tend to be very problematic by introducing strong dependencies, and the problems grow exponentially with the size of the code base.
Did you know that cocos2d comes with a lot of sample code? In your cocos2d-iphone folder, you’ll find a project aptly named cocos2d-ios.xcodeproj that contains a lot of test targets you can build and run. You can see how things work and then check the code to see how it’s implemented.
But I’m also somewhat hesitant to recommend the test cases because you’ll see a lot of nonstandard code. Some of the tests are downright sloppy. After all, the code was written just to test that the code is working. It wasn’t written to teach best programming practices. So take everything you see in the test cases with a grain of salt.
Nevertheless, the test cases document practically every feature of cocos2d. It can’t hurt to run each of the test cases once to see what’s in them, or at least those that seem interesting to you. For example, the test cases show off all the actions that cocos2d supports, including the 3D actions with ripple, wave, or page turn effects.
Cocos2d API Reference
The cocos2d API reference describes every class, every method, every property in cocos2d. Finding out, for example, which varieties of initializer methods a class supports, or what properties it has, is very helpful. This is valuable information that can help you plan your code ahead of time and learn more about the cocos2d API as you stumble across methods and parameters you didn’t know existed.
Whenever you have a question like “Can I do x with this class y?” you should consult the API reference, look for class y, and see what properties and methods it has available to you. Take, for example, the CCNode class reference here: www.learn-cocos2d.com/api-ref/latest/cocos2d-iphone/html/interface_c_c_node.html. When you glance over it, you may notice how it reads like a condensed version of the CCNode section of this chapter. The API reference doesn’t tell you the why’s and how’s, but it does show you what’s available.
The official cocos2d API reference is hosted here: www.cocos2d-iphone.org/api-ref. Be sure to select the API reference for the cocos2d version you’re using, as there is at least one API reference for each minor version of cocos2d. Sadly, the cocos2d API reference is incomplete and missing several classes, methods, and properties. In particular, most of the Mac OS X features are absent.
On the Learn Cocos2D web site, I host API references for all the libraries used in Kobold2D, including cocos2d-iphone, the cocos2d-iphone-extensions project, Box2D, and Chipmunk. The cocos2d API reference on my web site is a cleaned-up version of the official API reference and includes all the undocumented classes, methods, and properties not found in the official API reference. The cocos2d API reference and many others are also split into iOS and Mac OS X versions, so you won't be confused by references to code that’s not available on your target platform.
In addition, I find the Kobold2D API references easier to browse because they use a tree-like class index and keep the relatively large class collaboration and inheritance diagrams hidden by default. You can find the Kobold2D API references either at www.learn-cocos2d.com/api-ref or directly from the Kobold2D website: www.kobold2d.com/x/xgMO. Again, use the link for the appropriate version, which for this book is Kobold2D 2.0.
API References in Xcode and elsewhere
If you install Kobold2D from the installer package, it also installs the API references of all libraries used in Kobold2D (including cocos2d of course) as documentation sets. These so-called docsets are available from within Xcode. Choose Help > Xcode Help to browse the available documentation sets. Even if you don't plan to use Kobold2D, you should install it for this reason alone.
The alternative for cocos2d users—and in fact this is generally recommended—is to install the Dash (Docs & Snippets) app from the Mac App Store. Dash remains resident and waits for you to press a keyboard shortcut to bring its window to the front. Then just type in whatever function, property, or class name you want to search for, and it shows you the results not just for Xcode documentation but for a number of other documentation sets like PHP, HTML, Java, and so on.
I mention Dash as an alternative because one of the optionally downloadable docsets is for cocos2d. Simply go to Dash’s Preferences screen and download the cocos2d docset if you want an offline version. Kobold2D users, however, shouldn’t do so since you already have the cocos2d docset.
You can download Dash (Docs & Snippets) from the Mac App Store via this link:
Summary
Wow! That was a lot to take in! I don’t expect you to remember all of this chapter’s content at once. Feel free to come back at any time to look again at cocos2d’s scene graph and how to use the various CCNode classes. I wrote this chapter to be a good reference whenever you need it, as well as the accompanying NodeHierarchy and Essentials Xcode projects.
Armed with this chapter’s knowledge and a fair bit of motivation on your side, you could be starting to write your own games now.
You know what, let’s do that together. Read on to the next chapter, and I’ll walk you through your first complete game project!