
Getting Started
I’ll get you up to speed on developing cocos2d games as quickly as possible. By the end of this chapter, you’ll be able to create new cocos2d projects based on the supplied Xcode project templates. I’ll also introduce you to the important bits of knowledge you need to keep in mind during game development.
And because it’s been a big source of confusion, I’ll explain how to enable automatic reference counting (ARC) in a cocos2d project. At the end of this chapter, you’ll have a first cocos2d project based on one of the cocos2d project templates up and running.
What You Need to Get Started
In this section, I’ll quickly walk you through the requirements and necessary steps to get started. Getting registered as an iOS developer and creating the necessary provisioning profiles are both excellently documented by Apple, so I won’t re-create that detailed information here.
Here are the minimum hardware and software requirements for developing iOS applications:
- Intel-based Mac computer
- Mac OS X 10.6 (Snow Leopard) or newer, Mac OS X 10.7 (Lion) or newer for iOS 5.1 features.
- Any iOS device
For development, any Intel-based Mac computer suffices. Even the Mac mini and MacBook Air are perfectly fine for developing iOS applications and games. Having at least 2GB of RAM installed will make using your computer smoother, especially because game development tools often require much more memory than most other software. You’ll be handling a lot of images, audio files, and program code, and you’ll probably be running all these tools in parallel.
Note that Apple typically only supports the current and previous Mac OS X versions for iOS and Mac OS X development. Right now these are Mac OS X 10.7 Lion and Mac OS X 10.8 Mountain Lion, with development on Mac OS X 10.6 Snow Leopard still an option albeit not with the latest features. Be prepared to update your Mac to a newer Mac OS X version frequently, typically once every 12 to 24 months. Note that there’s always the option to install Mac OS X separately to an external hard drive if for some reason you don’t want to or can’t update your Mac’s operating system.
If you’re running an older Mac computer please consult the Max OS X Technical Specifications web site (www.apple.com/macosx/specs.html ) to learn whether your Mac meets the system requirements and how to purchase and upgrade to the latest Mac OS X version.
If you haven’t already done so, you might want to register yourself as an iOS developer with Apple. Access to the iOS Developer Program costs $99 per year. If you plan to submit Mac OS X apps to the Mac App Store, you’ll also have to register as a Mac OS X developer, for an additional $99 per year.
You can register as an iOS developer at http://developer.apple.com/programs/ios.
To register as a Mac OS X developer, go to http://developer.apple.com/programs/mac.
Strictly speaking you do not need to register as a developer right away. You can also download Xcode for free and take your first steps with the iOS Simulator.
But as a registered developer you get additional benefits. For example, you have access to the iOS Developer Portal where you can set up your development devices and provisioning profiles to deploy your app to one or more iOS devices. You also get access to iTunes Connect where you can manage your contracts, manage and submit your apps, and review financial reports.
In addition, you’ll be offered beta versions, sometimes also called preview versions, of Apple software. You should generally refrain from using Apple beta software however. I know it’s cool to have access to it and tempting to use the latest software as part of an exclusive club. But trust me on this: you’ll easily run into compatibility issues that no one can help you with because the Apple beta software can not be publicly discussed. I strictly refrain from using Apple beta versions because even minor incompatibilities can be huge productivity killers.
Tip If you do want to try out Apple beta software, be sure to install it separately so that you can switch back to the official version at any time. This is specifically important if you plan to install a beta Mac OS X version, because it’s very possible that either cocos2d or any of the other tools and libraries you’re using has severe compatibility issues with the beta OS. Don’t allow the beta OS to permanently replace your current OS, or you’ll be stuck and alone with any issues you may encounter. Install Mac OS beta versions on a separate (external) hard drive instead and use the System Preferences Startup Disk tool to switch between startup disks.
Certificates and Provisioning Profiles
Eventually you’ll want to deploy the games you’re building onto your iOS device. To do so, you must create an iOS development certificate, register your iOS device, and enable it for development. You complete this setup with Xcode’s Organizer, where you can download and install your development and distribution provisioning profiles.
All these steps are well explained on the iOS Provisioning Portal. Apple has done an excellent job of documenting them on the How To tabs of each section of the Provisioning Portal. Registered iOS developers can access the iOS Provisioning Portal at http://developer.apple.com/ios/manage/overview/index.action .
Download and Install Xcode and the iOS SDK
You can download the latest Xcode version, which includes the iOS SDK, from the Xcode web site: https://developer.apple.com/xcode . The 1.5GB download may take a while to download and install, so you may want to start downloading it right away.
After you’ve installed Xcode, you’re set with everything you need to develop iOS applications. If you’ve never worked with Xcode before, I suggest you familiarize yourself with it by reading the Xcode 4 User Guide: https://developer.apple.com/library/ios/documentation/ToolsLanguages/Conceptual/Xcode4UserGuide/index.html
Specifically, you should know the names of the four main areas of the Xcode window as shown in Figure 2-1: the Navigation (left), Editor (center), Utility (right), and Debug (bottom) areas. With the exception of the Editor area, you can hide and unhide any of these areas from view via the Xcode View menu.
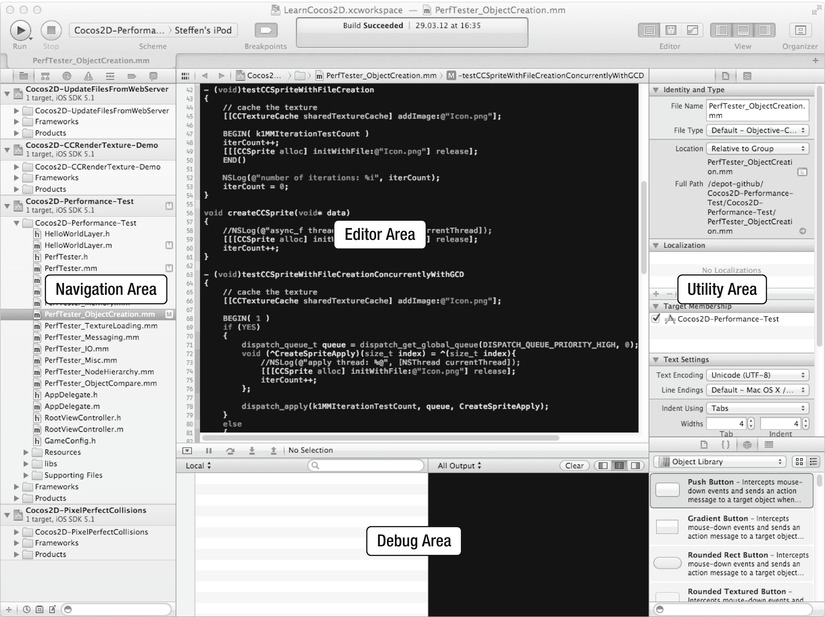
Figure 2-1 . The Xcode 4 window with its four main areas: Navigation, Editor, Utility, and Debug
The next step is to download either cocos2d-iphone or Kobold2D. If you download the book’s source code (see Chapter 1) you’ll find the exact cocos2d and Kobold2D versions that the book’s source code was written for. The latest versions available from the Web may not be 100% compatible with the book because they’re continually improved. Unless you feel comfortable deviating from the book’s source code on occasion, you should stick to the cocos2d and Kobold2D versions provided with the book.
You can download the book’s source code, including the corresponding cocos2d and Kobold2D versions, from the Downloads section on the Learn Cocos2D book’s store page: www.learn-cocos2d.com/store/book-learn-cocos2d .
Download the latest cocos2d versions from www.cocos2d-iphone.org/download . The latest Kobold2D installer package is available from www.kobold2d.com/display/KKSITE/Kobold2D+Download.
Kobold2D users only need to run the installer package. Doing so also installs the Kobold2D Template Projects and the Xcode documentation for cocos2d-iphone, Box2D, Chipmunk, and other libraries.
After installation has succeeded, you’ll find the Kobold2D files in your home directory under ∼/Kobold2D. You can safely move the ∼/Kobold2D folder anywhere else on your hard disk if you want, but I recommend leaving it as is for now.
Each new version of Kobold2D is installed to a subfolder of ∼/Kobold2D, typically named Kobold2D-2.0.0 or similar, depending on the version number. That’s where your Kobold2D projects for this particular Kobold2D version are located, as well as the Kobold2D Project Starter and Project Upgrader tools.
Note To uninstall Kobold2D simply delete the Kobold2D folder. Remember, your projects also reside in that folder, so make a backup of your projects before deleting it. You may also want to delete the Kobold2D documentation for Xcode by deleting the files beginning with com.kobold2d in the folder ∼/Library/Developer/Shared/Documentation/DocSets.
Create a Kobold2D Project
Kobold2D projects are created with the Kobold2D Project Starter.app, which you’ll find in each versioned Kobold2D subfolder—for example, in ∼/Kobold2D/Kobold2D-2.0.0. Runing this app will show a dialog like the one in Figure 2-2.
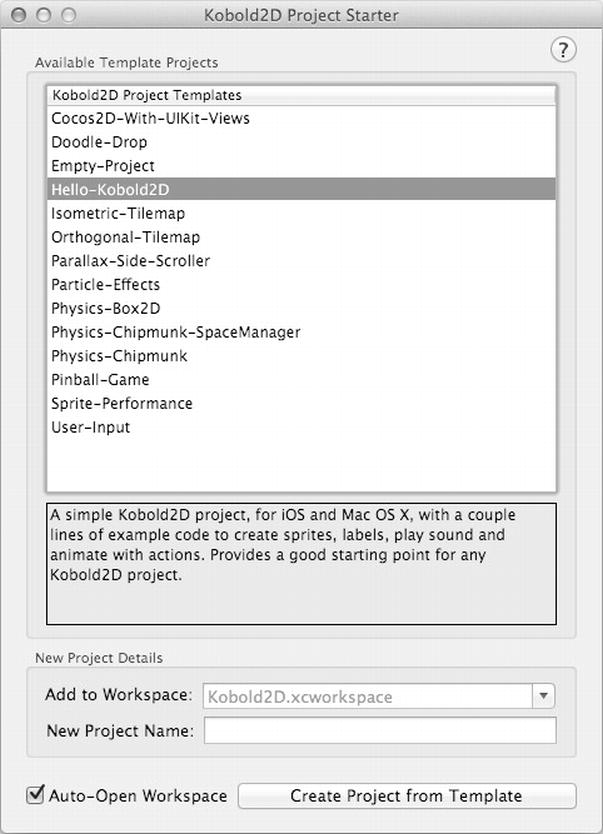
Figure 2-2 . The Kobold2D Project Starter tool
You can choose a Template Project to use for your project. The Hello-Kobold2D and the Empty-Project templates are ideal if you want to start from scratch, as are the Physics templates. All other templates are more or less complete games or illustrate some aspect of Kobold2D or cocos2d. All the template projects have ARC enabled.
By default, new projects are added to the Kobold2D.xcworkspace, but you can override this by entering a workspace name. It helps to have closely related projects in the same workspace.
Enter a name for your project and click Create Project from Template. With Auto-Open Workspace checked, Xcode will automatically open the workspace with your newly created project. You can get started right away, and your project has ARC enabled automatically.
Note Kobold2D makes creating and sharing project templates very easy. You can change an existing project’s name, provide a description file, and start sharing the template with other users. This process is documented at www.kobold2d.com/x/TgUO. To create a new Kobold2D project, you’ll be using the Kobold2D Project Starter app exclusively. You can’t create new Kobold2D projects from within Xcode, but in return you get a lot more projects to choose from and you can make your own project templates easily.
Click the Run button and you should see the iPhone Simulator starting up, as in Figure 2-3.

Figure 2-3 . The Hello Kobold2D project
Install cocos2d and its Xcode Project Templates
Tip If you’ve already installed Kobold2D and are planning to use it, you can skip ahead to the section “Anatomy of cocos2d and Kobold2D Applications.” If not, keep in mind that for cocos2d you’ll have to enable ARC in each cocos2d project separately following the instructions given in the upcoming section “How to enable ARC in a cocos2d Project.” Alternatively, download the book’s source code and use the supplied ARC-enabled cocos2d template projects. In any case, you can safely install both cocos2d and Kobold2D, and there will be no conflicts between them.
To use cocos2d, you need to extract the downloaded file by double-clicking it. This should create a folder named cocos2d-iphone-2.0 or similar, depending on the exact version number and other suffiXEs. You can move or rename this folder as you please.
To install the cocos2d Xcode templates, open the Terminal app (in the Utilities folder under Applications in Finder—or just search for Terminal.app in Spotlight to locate it). The cocos2d Xcode project templates installation procedure is driven by a shell script that you’ll have to run from the command-line program Terminal.
First, change to the directory where cocos2d is installed. For example, if you downloaded and extracted cocos2d in the Downloads folder, you will have a folder named cocos2d-iphone-2.0 or similar. If the path to cocos2d-iphone varies on your system, be sure to use the correct path. In this example, you would have to enter the following:
./Downloads/cocos2d-iphone-2.0/install-templates.sh –f
Press Return to run the template installation script. If everything goes fine, you should see a number of lines printed in the Terminal window. Most of them will start with “. . .copying.” If that’s the case, the templates should now be installed.
Note that the leading dot before the path is essential—without it, you’ll most likely get a “No such file or directory” error.
The templates are copied to the user’s Developer directory, which is ∼/Library/Developer/Xcode/Templates. This is the directory to browse to in Finder if you ever want to delete the cocos2d Xcode templates. The -f switch forces the script to replace any existing cocos2d template files so that you don’t get any errors if you’ve previously installed the cocos2d Xcode templates.
Remember that you will have to run this script each time you download a new cocos2d version to upgrade the Xcode project templates to the latest version.
Note To uninstall cocos2d, simply delete the cocos2d-iphone-2.0 folder and any cocos2d projects you no longer need. To remove the cocos2d Xcode templates, delete the two folders beginning with cocos2d in ∼/Library/Developer/Xcode/Templates and ∼/Library/Developer/Xcode/Templates/File Templates.
How to Create a cocos2d Project
After installing the cocos2d project templates, open Xcode and select File ![]() New Project. Clicking the cocos2d v2.x entry on the left-hand side should display the three cocos2d icons shown in Figure 2-4. If that’s not what you’re seeing, go back to the previous section and verify that installing the cocos2d Xcode project templates succeeded without errors.
New Project. Clicking the cocos2d v2.x entry on the left-hand side should display the three cocos2d icons shown in Figure 2-4. If that’s not what you’re seeing, go back to the previous section and verify that installing the cocos2d Xcode project templates succeeded without errors.
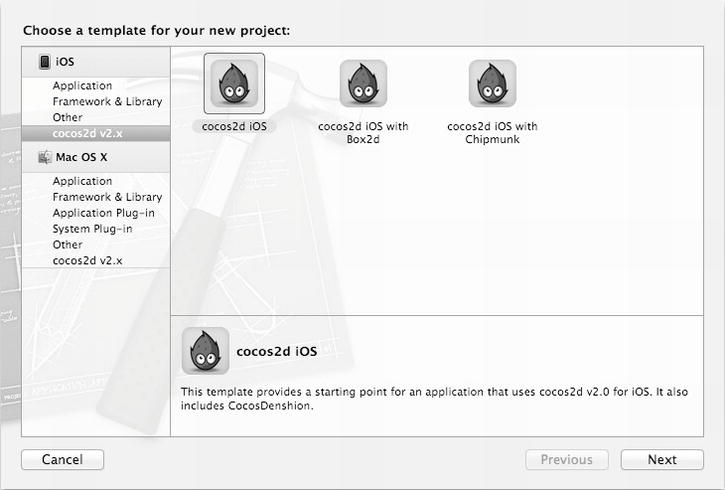
Figure 2-4 . The cocos2d Xcode project templates
Note I discuss the Box2D and Chipmunk application templates in Chapter 13. Feel free to try them if you want to have some fun with physics right now.
Choose the cocos2d iOS template, click Next, name it, and save it anywhere on your computer.
Tip It’s good practice not to use space characters in Xcode project names. Xcode doesn’t mind, but some tools you use might. It’s a matter of defensively avoiding any potential hiccups. Even today, occasional problems occur related to spaces and special characters in filenames. I always restrict myself to naming anything code-related—whether projects, source files, or resources—to letters, digits, and the dash and underscore characters. Note that the app’s name, as it appears on iTunes or on the device, defaults to the project’s name. You can change this in the Info.plist file by entering the app’s real name in the Bundle Display Name entry.
Xcode will create the cocos2d project based on the selected template. An Xcode project window like the one in Figure 2-5 will open.

Figure 2-5 . The newly created HelloWorld project in Xcode 4
When you click Run, the project will build and then run in the iOS Simulator. The result should look like Figure 2-6.
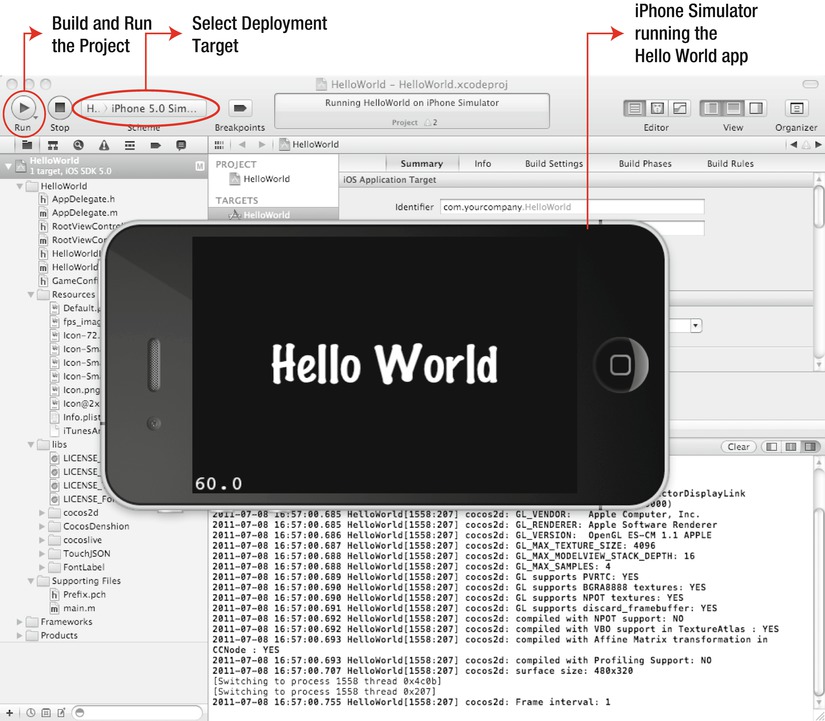
Figure 2-6 . The template project works and displays a “Hello World” label running in the iPhone Simulator
How to Enable ARC in a cocos2d Project
Although all Kobold2D projects have ARC enabled automatically, cocos2d projects don’t. Moreover, it’s not as simple as flipping a switch. To enable ARC in a newly created cocos2d project, you need to perform the steps outlined In this section (Kobold2D users can skip this entire section).
Build the cocos2d code as a Static Library
Cocos2d may be compatible with ARC, but the cocos2d source code is not compliant with ARC. That means you have to build the cocos2d source code with ARC disabled if you want to use it in a project that has ARC enabled. By far the best way to do that is to build the cocos2d code as a static library, allowing the code to be built without ARC. Then you can safely link the cocos2d static library with your application’s target, which has ARC enabled.
First, locate and delete the libs group in the Navigation area. When the confirmation dialog in Figure 2-7 pops up, click Remove References. Don’t trash the files because you’ll be needing them later.
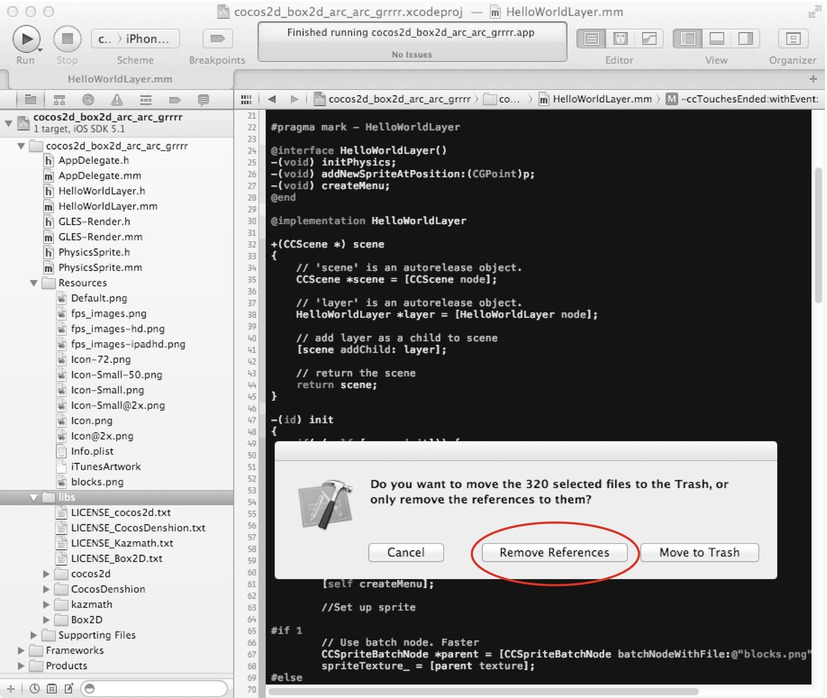
Figure 2-7 . Remove but do not trash the libs group from the project
Select the Project itself in the Navigation area, as seen in Figure 2-8. The project is always the first entry and has a blue document icon. Then click the Add Target button at the bottom.

Figure 2-8 . Add a new target to the project
In the Add Target template dialog shown in Figure 2-9, navigate to the Framework & Library group and select Cocoa Touch Static Library. Then click Next.
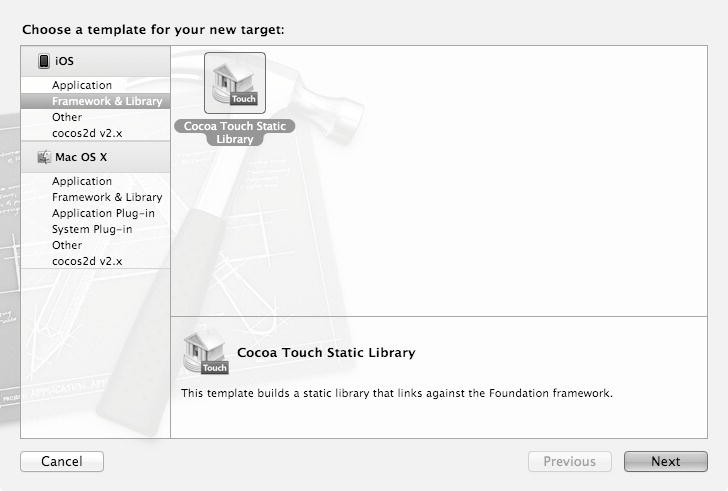
Figure 2-9 . Select the Cocoa Touch Static Library template
Name the static library appropriately—for example, cocos2d-library would be a good name. Be sure to deselect both Include Unit Tests and Use Automatic Reference Counting. The settings should match those in Figure 2-10. Then click Finish to add the static library target to your project.
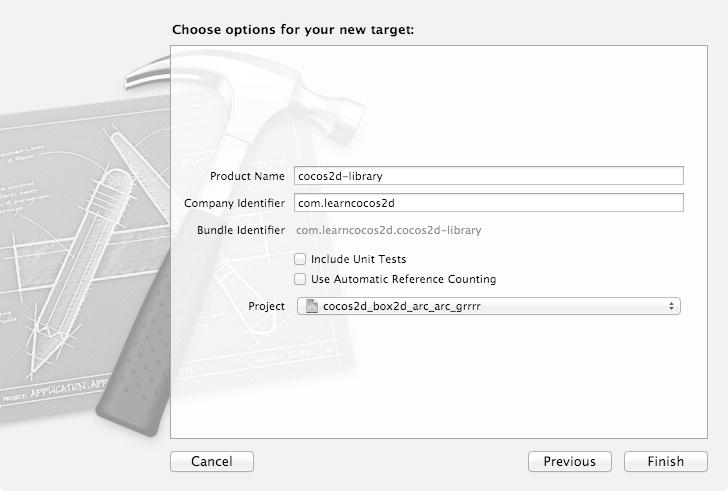
Figure 2-10 . Name the static library and deselect both check boXEs
After creating the cocos2d-library target, select it, and the Build Settings pane is shown. You need to browse the Build Settings to make two changes in the Search Paths section. The easiest way to find those is by entering search in the search filter textbox in the upper right-hand corner of the Build Settings pane (see Figure 2-11). Set the Always Search User Paths setting to Yes and set the User Header Search Paths to the somewhat cryptic ./** string.

Figure 2-11 . Set Always Search User Paths to Yes and User Header Search Paths to ./**
Note You can edit the User Header Search Paths setting in two ways: by clicking it twice with a delay between the clicks—this allows you to enter the text directly—or by double-clicking the field, which brings up an additional dialog with a nondescript check box in it. In that case, either enter just a dot and click the check box or enter the full string ./** but don’t check the check box. Otherwise you might end up with the string ./**/** which will cause compiler errors. Be sure to verify that the string is correct after the edit dialog closes.
Now select the other target of the project. That’s the one that was already there when you created the project. Select the Build Phases tab and expand the Link Binary With Libraries list, as shown in Figure 2-12.
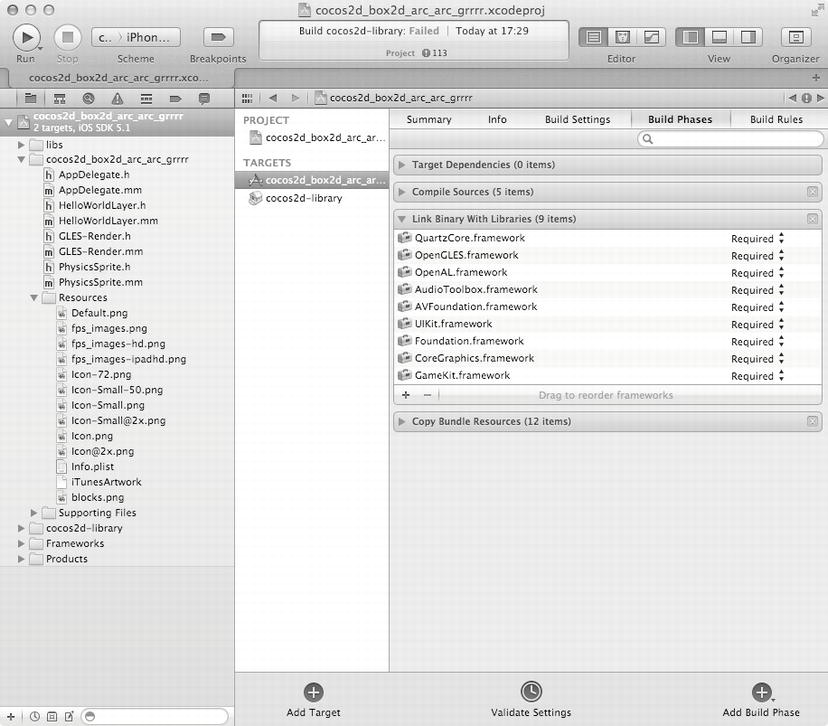
Figure 2-12 . Select the original target and expand the Link Binary With Libraries list
Click the small + button below the list to bring up the selection dialog shown in Figure 2-13. From that, select the libcocos2d-library.a entry and click Add.
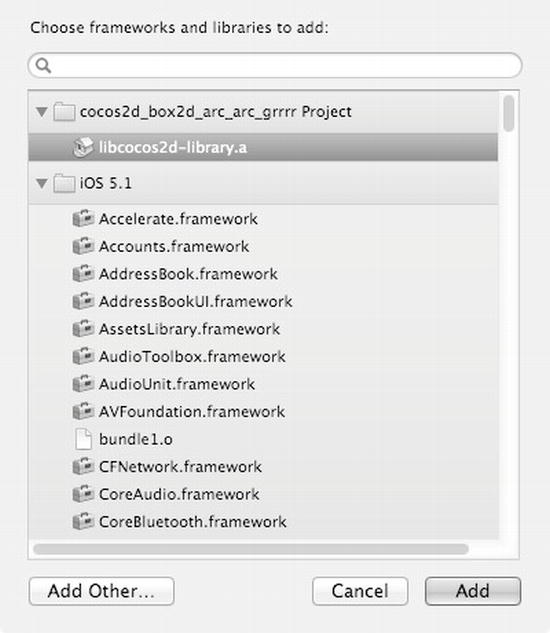
Figure 2-13 . Select the original target and expand the Link Binary With Libraries list
The last step is to re-add the cocos2d files to the static library target. Click File ![]() Add Files to “name-of-project” to bring up the file dialog shown in Figure 2-14. Navigate to your project’s folder and then locate and select the libs folder. Make sure the "Copy items into destination group’s folder (if needed)" check box is not checked and that the "Create groups for any added folders" radio button is selected. Finally verify that the cocos2d-library target is the only target whose check box is checked before clicking the Add button. If in doubt, compare your settings with Figure 2-14.
Add Files to “name-of-project” to bring up the file dialog shown in Figure 2-14. Navigate to your project’s folder and then locate and select the libs folder. Make sure the "Copy items into destination group’s folder (if needed)" check box is not checked and that the "Create groups for any added folders" radio button is selected. Finally verify that the cocos2d-library target is the only target whose check box is checked before clicking the Add button. If in doubt, compare your settings with Figure 2-14.
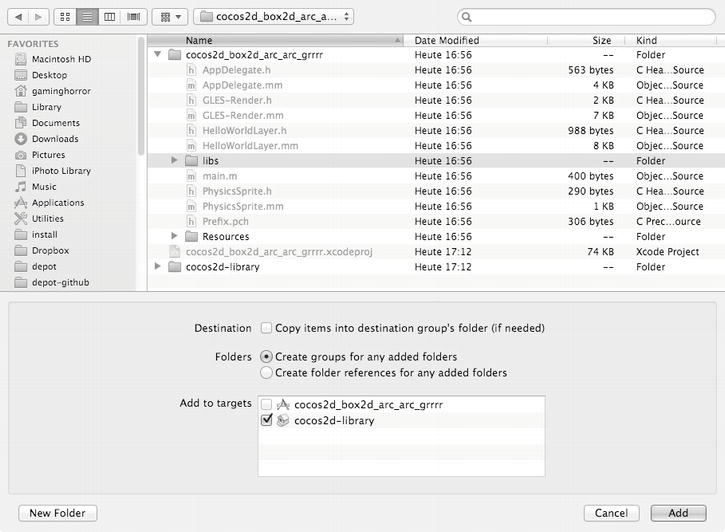
Figure 2-14 . Select and add the libs folder to the cocos2d-library target
Now build and run the project to verify that everything is working. The cocos2d code and any other library source code provided by cocos2d is now built as a static library and linked with the application target.
Tip The cocos2d-library project has created additional files that are not needed in your project. Locate the cocos2d-library.h and cocos2d-library.m files in the navigation area and delete the files. It’s just an empty stub class that Xcode always creates when adding a static library target.
Refactor the Project’s Source Code to ARC
With the cocos2d source code building as a static library that has ARC disabled, the next step is to enable ARC for your project’s source code. Fortunately, Xcode provides a convenience function to convert existing code to ARC.
From the Xcode menu choose Edit ![]() Refactor
Refactor ![]() Convert to Objective-C ARC.. . . This brings up the dialog shown in Figure 2-15, where you can select the targets to convert. Select only your app’s target and not the cocos2d-library target. Then click Check.
Convert to Objective-C ARC.. . . This brings up the dialog shown in Figure 2-15, where you can select the targets to convert. Select only your app’s target and not the cocos2d-library target. Then click Check.
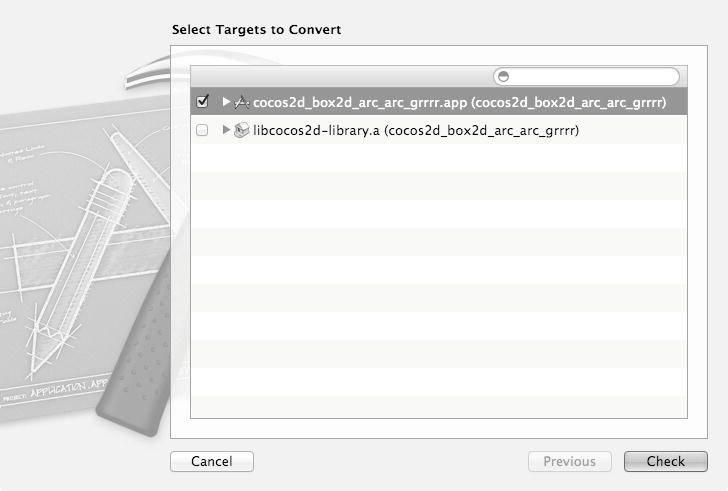
Figure 2-15 . Convert only your project’s target and not the cocos2d-library target
Xcode first tries to build your code with ARC enabled to determine the changes it will have to make. This only takes a few seconds. When complete, an introduction dialog explains what comes next. Read the text and click Next. The dialog shown in Figure 2-16 allows you to review the changes it is about to make. You can safely accept them all by clicking Save.
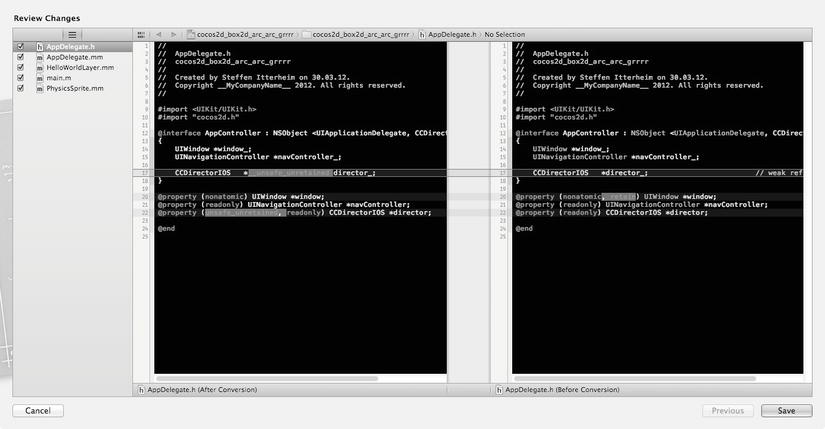
Figure 2-16 . Review how Xcode is changing the code to make it comply with ARC
Afterwards, Xcode has also enabled the Objective-C Automatic Reference Counting build setting for the converted target. The code should build and run with ARC enabled, so go ahead and try it out now.
The Anatomy of cocos2d and Kobold2D Applications
So you now know how to create ARC-enabled cocos2d and Kobold2D projects. Perfect. Say no more, say no more.
But now you want to know how it works, right? Well, I didn’t expect you’d let me off the hook so easily. And something tells me that however deep I go into the details over the course of the book, you’ll want to know more. That’s the spirit!
Let’s check what’s in the respective "Hello World" projects and see how it all works together so you get a rough overview of how things are connected. Feel free to play around with this "Hello World" project. If anything breaks, you can just start over by creating a new project based on one of the project templates.
Figure 2-17 shows the Project Navigator area for both a Kobold2D and a cocos2d project. You’ll notice they’re mostly identical as far as the source code is concerned. Because Kobold2D utilizes an Xcode workspace, you’ll also find an additional project named Kobold2D-Libraries. That’s where you can access all the library source code. In a cocos2d project these files are located in the libs group.
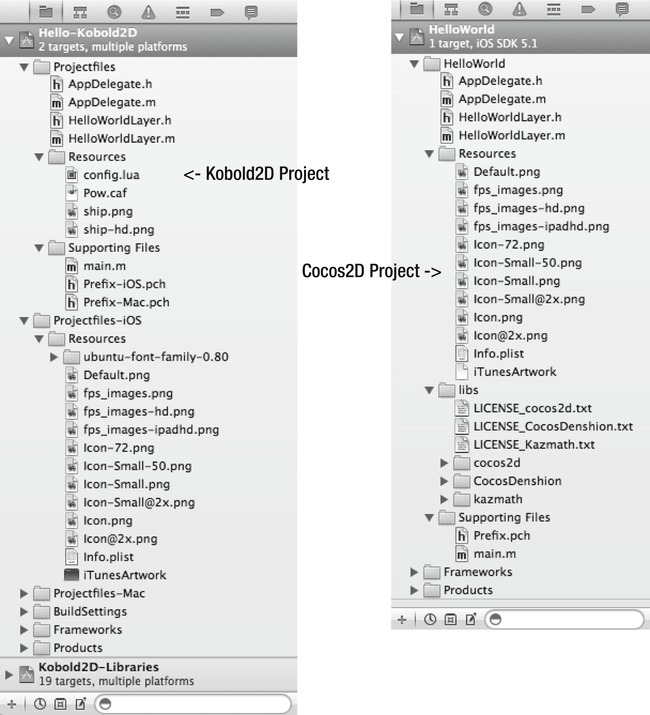
Figure 2-17 . Xcode’s Project Navigator eXEmplary for a Kobold2D and a cocos2d project
Both cocos2d and Kobold2D projects essentially reference two different types of files: source code files and resource files (for example, images and property lists). I get to the resource files over the course of the book, so let’s concentrate on the most important ones.
The Default.png file is the image displayed when iOS is loading your app, and Icon.png is, of course, the app’s icon. Several variations of these files may be used, depending on the device. For example, Retina devices will load the image files with the @2x suffix. For a full list of image sizes and formats of app icons, launch images, and others, refer to Apple’s Custom Icon and Image Creation Guidelines: http://developer.apple.com/library/ios/#documentation/userexperience/conceptual/mobilehig/IconsImages/IconsImages.html .
Cocos2d uses the fps_images.png files to display the framerate; you should not remove or modify them.
Inside the Info.plist file you’ll find a number of settings for your application. You only need to make changes here when you get close to publishing your app. You can also change the most important Info.plist settings, such as supported device orientations, more conveniently if you select your project’s target (see Figure 2-5).
If you’re familiar with programming in C or similar languages, you may recognize main.m in the Supporting Files group as the starting point of the application. The only other file in this group is the precompiled header file Prefix.pch, respectively Prefix-iOS.pch and Prefix-Mac.pch in Kobold2D projects.
Everything that happens between the main function and the AppDelegate class is part of the behind-the-scenes magic of the iOS SDK, over which you have no control. because you’ll practically never need to change main.m, you can safely ignore its contents. Still, it never hurts to peek inside.
The main function creates an @autoreleasepool and then calls UIApplicationMain to start the application using AppController as the class that implements the UIApplicationDelegate protocol. You can find the implementation of the AppController class in the files named AppDelegate. This is what the main function looks like in an ARC-enabled cocos2d application:
int main(int argc, char *argv[])
{
    @autoreleasepool
    {
     int retVal = UIApplicationMain(argc, argv, nil, @"AppController");
     return retVal;
    }
}
The only interesting point to take away from this is that every iOS application uses an @autoreleasepool, which ARC needs to manage memory.
In Kobold2D apps, the main function only calls KKMain which performs the preceding and ends up using the AppDelegate class as well. But KKMain also initializes Lua, loads the config.lua file, and calls the appropriate startup function depending on the operating system (iOS or Mac OS).
int main(int argc, char *argv[])
{
    // Forward main to a default implementation provided by Kobold2D™.
    return KKMain(argc, argv, NULL);
}
In case you’re wondering what the Prefix.pch header files are for, they’re special header files used to speed up compilation. The PCH abbreviation stands for Pre-Compiled Header. You’re supposed to add the header files of frameworks that rarely or never change to the prefix header. This causes the framework’s code to be compiled in advance and made available to all your classes. Unfortunately, it also has the disadvantage that, if a header added to the prefix header changes, all your code will have to be recompiled—which is why you should only add header files that rarely or never change.
For example, the cocos2d.h header file is a good candidate to add to the prefix header of a cocos2d project, as shown in Listing 2-1. To create a noticeable increase in compilation time, your project would need to be reasonably complex, however, so don’t get your stopwatch out just yet. But it’s good practice to add cocos2d.h as a prefix header right away, if only to never have to write #import "cocos2d.h" in any of your source files again.
Listing 2-1. Adding the cocos2d.h Header File to the Prefix Header
#ifdef __OBJC__
#import <Foundation/Foundation.h>
#import <UIKit/UIKit.h>
#import "cocos2d.h"
#endif
Note The Prefix header files in a Kobold2D project already have the cocos2d.h added to it, as well as a number of other reasonable header files.
Every iOS application has one AppDelegate class that implements the UIApplicationDelegate protocol. In our HelloWorld project, it’s simply called AppDelegate.
The AppDelegate is a global concept found in every iOS application. It tracks state changes of the application by receiving messages from the iOS at certain points in time. For example, it allows you to determine when the user gets an incoming phone call or when the application is low on memory. Cocos2d is typically initialized in the applicationDidFinishLaunching method.
The AppDelegate class in a Kobold2D project is a subclass of the KKAppDelegate class provided by Kobold2D. Like the AppController class, it subclasses NSObject and implements the UIApplicationDelegate protocol. KKAppDelegate does a lot of the work behind the scenes, leaving you to deal with only three callback functions that you may want to use or not. For example, the initializationComplete method is called by Kobold2D just before the first scene is run. This is where you should add any code that needs to run before the first scene is initialized. All the other settings you’d normally modify the source code of the AppDelegate class for can be altered more conveniently in the config.lua file in Kobold2D projects.
To learn more about the AppDelegate’s various methods, what they do, and when these messages are sent by the iOS SDK, you can look it up in Apple’s reference documentation on the UIApplicationDelegate protocol at http://developer.apple.com/iphone/library/documentation/uikit/reference/UIApplicationDelegate_Protocol .
Note I’m talking about application startup, so I might as well talk about application shutdown. You may eventually notice an oddity with the AppDelegate’s dealloc method. It never gets called! Any breakpoint set in the AppDelegate’s dealloc method will never be hit!
This is normal behavior. When iOS terminates an application, it simply wipes the memory clean to speed up the shutdown process. That’s why any code inside the dealloc method of the AppDelegate class is never run. As it’s very bad practice to call dealloc manually, this and calling [super dealloc] is forbidden under ARC because ARC itself takes care of that for you. If you ever need to run code in your AppDelegate just before the application terminates, do it inside the applicationWillTerminate method.
In a pure cocos2d project the most commonly changed lines of code in the AppDelegate class are:
[director_ setDisplayStats:YES];
[director_ setAnimationInterval:1.0/60];
In a Kobold2D application, you can modify these and other settings in the config.lua file. Look for these two lines:
DisplayFPS = YES,
MaxFrameRate = 60,
Display Stats
The setDisplayStats method enables the numbers you see in the lower left-hand corner of the screen. See Figure 2-3 for an example. The numbers are stacked in three lines. From top to bottom, the first line indicates the number of draw calls. You want to keep this number as low as possible because a draw call is an expensive operation (more on this later). The second line is the time it took to update the frame. It tells you how much headroom you have before the framerate starts dropping. And the bottom-most number is the current framerate.
Caution Except for the number of draw calls, you have to entirely disregard the frame time and framerate numbers when running your app on the iOS Simulator. The Simulator performance has simply no significance, as it may be faster or slower by factors than an actual iOS device. It’s like trying to measure the performance of a sports car while driving it through a cornfield. It sort of works, it may even be fun, but you still don’t know what its street performance will be. Yet that’s the only thing that matters.
If you need to tweak the responsiveness of the FPS display, you can do so by modifying the CC_DIRECTOR_STATS_INTERVAL line in ccConfig.h. By default it’s set to 0.1, which means the framerate display will be updated ten times per second. If you increase the value, the frames per second (FPS) display will average out over a longer period of time. However, you won’t be able to see any sudden, short drops in framerate, which can still be noticeable.
The animation interval determines how often cocos2d updates the screen. Effectively, this affects the maximum framerate your game can achieve. The animation interval is not given in frames per second, though. It’s the inverse because it determines how frequently cocos2d should update the screen. That’s why the parameter is 1 divided by 60, because that results in 0.0167 seconds. If your app takes longer than this to update the game logic and render the screen, the framerate will drop below 60 FPS. It’s your responsibility to keep the game running at a high framerate. Don’t worry, I explain techniques to improve performance throughout the book.
In some cases, locking the framerate to 30 frames per second may be preferable. Doing so may be helpful in very complex games where you know you can’t achieve 60 FPS consistently, and the framerate fluctuates anywhere between 30 and 60 FPS. In such a case, it’s often better to lock the framerate to the lowest common denominator, because a lower but steady framerate is perceived as smoother by players than a framerate that tends to fluctuate abruptly, even when the actual average framerate may be higher. Human perception is a tricky thing.
Note You can’t render more than 60 FPS on iOS devices. The device’s display is locked to update at 60 frames per second (Hz), and forcing cocos2d to render more frames than 60 per second is, at best, not doing anything. At worst, it can actually slow down your framerate. Stick with the animationInterval of 1.0/60 if you want to run cocos2d at the fastest possible rate.
The HelloWorldLayer class is where cocos2d code does its magic to display the “Hello World” label. Before I get into that, you should understand that cocos2d uses a hierarchy of CCNode objects to determine what’s displayed where.
The base class of all nodes is the CCNode class, which contains a position but has no visual representation. It’s the parent class for all other node classes, including the two most fundamental ones: CCScene and CCLayer.
CCScene is an abstract concept and does nothing more than allow proper placement of objects in the scene according to their piXEl coordinates. A CCScene node is thus always used as the parent object for every cocos2d scene hierarchy. You can only have one running scene at any time.
The CCLayer class does very little by itself other than allow touch and accelerometer input. You’ll normally use it as the first class added to the CCScene, simply because most games use at least simple touch input. Strictly speaking CCLayer is not needed to layer objects—you can achieve the same effect with CCNode or any other class derived from CCNode.
If you open the HelloWorldLayer.h header file, you’ll see that the HelloWorldLayer class is derived from CCLayer. So where does the CCScene class come into play?
Because CCScene is merely an abstract concept, the default way of setting up a scene in cocos2d has always been to use a static initializer +(id) scene in your class. This method creates a regular CCScene object and then adds an instance of the HelloWorldLayer class to the scene. In almost all cases, that’s the only place where a CCScene is created and used. The following is a generic example of the +(id) scene method:
+(id) scene
{
    CCScene *scene = [CCScene node];
    id layer = [HelloWorldLayer node];
    [scene addChild:layer];

    return scene;
}
First, a CCScene object is created using the class method +(id) nodeof the CCScene class. Next, the HelloWorldLayer class is created using the same +(id) node method and then added to the scene. The scene is then returned to the caller.
In a Kobold2D project,you may notice that the +(id) scene method is absent. You can use the config.lua setting FirstSceneClassName to instruct Kobold2D to run this particular class as the first scene:
FirstSceneClassName = "HelloWorldLayer",
If this particular class doesn’t derive from CCScene, Kobold2D will create the CCScene object automatically behind the scenes.
Moving on to the –(id) init method of the HelloWorldLayer class, that’s where the code starts to deviate between cocos2d, Kobold2D, and each individual project template. There are some commonalities though. Listing 2-2 represents a minimal init code for a "Hello World" app. The actual code in the project differs, but you’ll definitely see a CCLabelTTF being added in the project you created earlier.
Notice something that might seem odd: self is assigned the return value from the init message sent to the super object in the call to self = [super init]. If you come from a C++ background, you’ll shudder in pain looking at this. Don’t get too upset; it’s all right. It simply means that in Objective-C you have to manually call the superclass’s init method. There’s no automatic call to the parent class. And you do have to assign self the return value of the [super init] message because it might return nil.
Listing 2-2. The init Method Creates and Adds a “Hello World” Label
-(id) init
{
if ((self = [super init]))
{
// create and initialize a label
CCLabelTTF* label = [CCLabelTTF labelWithString:@"Hello World"
fontName:@"Marker Felt"
fontSize:64];
// get the window (screen) size from CCDirector
CGSize size = [[CCDirector sharedDirector] winSize];
// position the label at the center of the screen
label.position = CGPointMake(size.width / 2, size.height / 2);
// add the label as a child to this Layer
[self addChild:label];
}
return self;
}
The CCLabelTTF class draws text on the screen using a TrueType font.
If you’re deeply concerned by the way Objective-C programmers write the call to [super init], here’s an alternative that might ease your mind, even though it’s not as common among cocos2d developers. It’s fundamentally the same, and Apple also uses this style:
-(id) init
{
    self = [super init];
    if (self != nil)
    {
     // do init stuff here . . .
    }
    return self;
}
Now let me explain how the label is added to the scene. If you look again at the init method in Listing 2-2, you’ll see that a CCLabelTTF object is created using one of init’s static initializer methods. It’ll return a new instance of the CCLabelTTF class. To not have its memory freed after control leaves the init method, you have to add the label to self as a child using the [self addChild:label] message. In essence, holding a reference to an object keeps the object alive. In this case, cocos2d takes control over the object’s memory until you remove it from the scene or switch scenes.
In between creating and adding the label, the label is assigned a position at the center of the screen. Note that whether you assign the position before or after the call to addChild doesn’t matter.
If you’ve never done any Objective-C programming before, good for you! You’ll come to take for granted memory management that works as you would expect. As long as you keep a reference to an object, it will be kept alive. You don’t need to worry about allocating or freeing memory at all.
If you have programmed with Objective-C before, you may have to overcome the uneasy feeling of “just letting go.” ARC is not magic, but it can be trusted to do the right thing 100% of the time. You might want to read Apple’s Transitioning to ARC Release Notes here: http://developer.apple.com/library/ios/#releasenotes/ObjectiveC/RN-TransitioningToARC/Introduction/Introduction.html .
To give you an example, these two lines of code are identical in ARC:
CCSprite* sprite = [CCSprite spriteWithFile:@”file.png”];
CCSprite* sprite = [[CCSprite alloc] initWithFile:@”file.png”];
Before ARC, you actually had to differentiate between allocating an autorelease object (first line) or a regularly initialized object (second line). With ARC, you should prefer the first version if available because it’s more readable and is faster under ARC. But either way is fine, and both create an object whose memory is freed when the sprite variable goes out of scope. It’s as simple as that.
The only thing that doesn’t change with ARC is that you have to send the alloc message to a class to create an instance of that class. This also allocates and initializes the object’s memory.
Changing the World
What good is a template project like HelloWorld if I don’t have you tinker with it at least a little? I’ll have you change the world by touching it! How’s that for a start?
First you’ll make two changes to the init method to enable touch input and to use a tag value to retrieve the label at a later point. The changes are highlighted in Listing 2-3.
Listing 2-3. Enabling Touch and Gaining Access to the Label Object
-(id) init
{
if ((self = [super init]))
{
// create and initialize a label
CCLabelTTF* label = [CCLabelTTF labelWithString:@"Hello World"
fontName:@"Marker Felt"
fontSize:64];
// get the window (screen) size from CCDirector
CGSize size = [[CCDirector sharedDirector] winSize];
// position the label at the center of the screen
label.position = CGPointMake(size.width / 2, size.height / 2);
// add the label as a child to this Layer
[self addChild: label];
// our label needs a tag so we can find it later on
// you can pick any arbitrary number
label.tag = 13;
// must be enabled if you want to receive touch events!
self.isTouchEnabled = YES;
}
return self;
}
The label object gets 13 assigned to its tag property. Now why did you do that? I know, I told you to, but I must have had a reason, right? In the previous section, I explained that that’s how you can later access a child object of your class—you can refer to it by its tag. The tag number is completely arbitrary, other than that it must be a positive number and every object should have its own tag number, so there aren’t two with the same number, or you couldn’t tell which you’d be retrieving.
Tip Instead of using magic numbers like 13 as tag values, you should get in the habit of defining constants to use with tags. You’ll have a hard time remembering what tag number 13 stands for, compared to writing a meaningful variable name like kTagForLabel. I get to this in Chapter 5.
In addition, self.isTouchEnabled is set to YES. This property of the CCLayer class tells it that you want to receive touch messages. Only then will the method ccTouchesBegan be called:
-(void) ccTouchesBegan:(NSSet*)touches withEvent:(UIEvent*)event
{
    CCLabelTTF* label = (CCLabelTTF*)[self getChildByTag:13];
    label.scale = CCRANDOM_0_1();
}
By using [self getChildByTag:13], you can access the CCLabelTTF object by its tag property, which you assigned in the init method. You can then use the label as usual. In this case, we use cocos2d’s handy CCRANDOM_0_1() macro to change the label’s scale property to a value between 0 and 1. This will change the label’s size every time you touch the screen.
Because getChildByTag will always return the label, you can safely cast it to a(CCLabelTTF*) object. However, be aware that doing so will crash your game if the retrieved object isn’t derived from the CCLabelTTF class for some reason. This could easily happen if you accidentally give another object the same tag number 13. For that reason, it’s good practice to use a defensive programming style and verify that what you’re working with is exactly what you expect. Defensive programming uses assertions to verify that assumptions made are true. For this, you should use the NSAssert method:
-(void) ccTouchesBegan:(NSSet*)touches withEvent:(UIEvent*)event;
{
    CCNode* node = [self getChildByTag:13];

    // defensive programming: verify the returned node is a CCLabelTTF
    NSAssert([node isKindOfClass:[CCLabelTTF class]], ←

     @"node is not a CCLabelTTF!");
CCLabelTTF* label = (CCLabelTTF*)node;
    label.scale = CCRANDOM_0_1();
}
In this case, you expect the node returned by getChildByTag to be an object derived from CCLabelTTF, but you can never be sure, which is why adding an NSAssert to verify the fact is helpful in finding errors before they lead to a crash.
Note that this adds two more lines of code, but in terms of performance things remain the same. The call to NSAssert is completely removed in Release builds, and the cast CCLabelTTF* label = (CCLabelTTF*)node; is what you’ve done already, just on the same line. Essentially, both versions perform exactly the same, but in the second case you get the benefit of being notified when you didn’t get the expected CCLabelTTF object, instead of crashing with an EXC_BAD_ACCESS error.
What Else You Should Know
Because this is the “Getting Started” chapter, I think it’s important to take the opportunity to introduce you to some vital but often overlooked aspects of iOS game development. I want you to be aware of the subtle differences among various iOS devices. In particular, available memory is often incorrectly considered because you can use only a fraction of each device’s memory safely.
I also want you to know that the iOS Simulator is a great tool for testing your game, but it can’t be used to assess performance, memory usage, and other features. The Simulator experience can differ greatly from running your game on an actual iOS device. Don’t fall into the trap of making assessments based on your game’s behavior in the iOS Simulator. Only the device counts.
When you develop for iOS devices, you need to take into account their differences. Most independent and hobby game developers can’t afford to purchase each slightly different iOS device—of which there are eight at the time of this writing, with roughly two more to be released each year. At the very least, you need to understand that there are important differences.
You might want to refer to Apple’s spec sheets to familiarize yourself with the iOS device technical specifications. The following links list the iPhone, iPod touch, and iPad device specifications, respectively:
- http://support.apple.com/specs/#iphone
- http://support.apple.com/specs/#ipodtouch
- http://support.apple.com/specs/#ipad
Table 2-1 summarizes the most important hardware differences that concern game developers. The iPhone and iPod touch models are listed by generation, with the corresponding iPhone model suffix in brackets. Where there are two numbers for Processor speed or memory, the first number is that of the iPhone model and the second number is that of the iPod touch model.
Table 2-1. iOS Hardware Differences
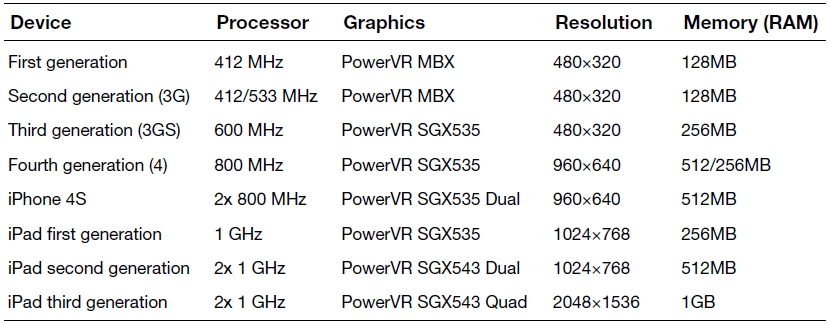
As you can see, with every new generation, iOS devices usually have a faster CPU, a more powerful graphics chip, and increased memory and screen resolution. This trend will continue, with newer devices getting more and more powerful.
With cocos2d 2.0 you can’t target the first- and second-generation devices, which make up an increasingly smaller fraction of the iOS market. That means you’re looking at a minimum of 256MB of memory on the oldest devices you can support. However, there’s still a wide range between 256MB and 1024MB of memory, respectively a 600 MHz CPU and a Dual-Core CPU with 2x 1 GHz on the third-generation iPad.
Usually when game developers look at hardware features, they tend to focus on the CPU speed and graphics chip to assess what’s technically possible. However, being mobile devices, the iOS devices (until the most recent iPhone 4) are limited mostly by the amount of available memory. This is also quite frequently underestimated by new developers. For example, a 1000x1000 tilemap can easily consume several hundred megabytes of memory, not counting the texture memory. And a 2048x2048 texture with 32-bit color depth already consumes 16MB of memory, so you can’t have too many of them in memory at the same time.
Note Don’t confuse RAM with the flash storage memory where MP3s, videos, apps, and photos are stored, of which even the smallest iOS device has 8GB. Flash storage memory is equivalent to the hard drive on your desktop computer. RAM is the memory your application uses to store code, data, and textures while it’s running. When I talk about memory, I mean RAM.
Current iOS devices have between 256MB and 1GB of RAM installed. However, that’s not the amount of memory available to apps. iOS uses a big chunk of memory all the time, and this is compounded by iOS multitasking introduced with iOS 4.
Over time, iOS developers have been able to close in on the theoretical maximum amount of RAM an app can use before it’s forcibly closed by the OS. Table 2–2 shows what you can expect to work with.
Table 2–2. Installed Memory Is Not Available Memory
| Installed Memory | Available Memory | Memory Warning Threshold |
|---|---|---|
| 128MB | Around 30MB | Around 20MB |
| 256MB | Around 90MB | Around 70MB |
| 512MB | Around 300MB | Around 250MB (estimated) |
Ideally, you want to keep your memory usage below the number in the Memory Warning Threshold column at all times. Around that point your app might start receiving Memory Warning notifications. You can ignore Memory Warning Level 1 notifications, but if the app continues to use more memory, you may get a Memory Warning Level 2 message, at which point the OS basically threatens to close your app if you don’t free some memory right now. It’s like your mom threatening not to buy your new computer if you don’t clean up your room right now! Please oblige.
Cocos2d and Kobold2D automatically free memory by calling the purgeCachedData method whenever the AppDelegate class receives an applicationDidReceive MemoryWarning message.
If you’re developing on a device with 512MB or more memory, keep in mind that a great number of iOS devices are models with only 256MB. It’s a good idea to have an actual device around from the oldest generation of devices that you aim to support. You might want to buy a cheap, used, third-generation device to test your game primarily with that device in order to catch memory warnings and performance issues early in development. That’s when they are still easy and cheap to fix, especially if they require a change in the game’s design. In general, it’s advisable to use the device for development that’s the weakest one available to you in terms of hardware capabilities.
You can measure the memory usage of your app using the Instruments application, explained in Apple’s Instruments User Guide: https://developer.apple.com/library/ios/#documentation/DeveloperTools/Conceptual/InstrumentsUserGuide/Introduction/Introduction.html .
Apple’s iOS SDK allows you to run and test iPhone and iPad applications on your Mac with the iOS Simulator. The primary purpose of the iOS Simulator is to let you more rapidly test your application, because deployment to an iOS device takes longer and longer as your game gets bigger and bigger. Games in particular use a lot of images and other assets that need to be transferred, slowing down deployment.
However, there are several caveats to using the iOS Simulator. The following sections reveal what the iOS Simulator does not allow you to do. For all these reasons, I recommend that you test your game early and often on a device. At least after every major change or near the end of the day, you should run a test on your iOS device to verify that the game behaves exactly as intended.
Can’t Assess Performance
The performance of your game running in the iOS Simulator depends entirely on your computer’s CPU. The graphics-rendering process doesn’t even use the hardware acceleration capabilities of your Mac’s graphics chip. That’s why the framerate of your game running in the simulator has no meaning at all. You can’t even be sure that comparing the framerate before and after a change will reveal the same results on the device. Always do your performance testing on the device using the Release build configuration.
The iOS Simulator can use all the memory available on your computer, so there’s a lot more memory available on the Simulator than on the device. This means you won’t get Memory Warning notifications, and your game will run fine on the iOS Simulator, but you may be in for a shock (a crash) when you try the game for the first time on an iOS device.
You can, however, assess how much memory is currently used by your game using the iOS Simulator and Instruments. You can also send a fake memory warning message to your app from the iOS Simulator menu via Hardware ![]() Simulate Memory Warning.
Simulate Memory Warning.
Can’t Use All iOS Device Features
Some features, such as device orientation, can be simulated using menu items or keyboard shortcuts, but this comes nowhere close to the experience of a real device. Certain hardware features, such as multitouch input, accelerometer, vibration, or obtaining location information can’t be tested at all on the iOS Simulator because your computer’s hardware can’t simulate these features. No, it doesn’t help to shake your Mac or touch its screen. Try it if you don’t believe me.
Tip The iSimulate app (www.vimov.com/isimulate ) is an invaluable development tool, as it allows an iOS device to send accelerometer, GPS, compass, and multi-touch events to an app running in the iOS Simulator.
From time to time you may encounter nasty cases where a game runs just fine on the iOS Simulator but crashes on the device or the game slows down for no apparent reason. There may also be graphical glitches that appear only on the iOS Simulator or only on the device. If in doubt, and before delving into a prolonged quest to figure out what’s wrong, always try running your game on the device if you’re having trouble on the iOS Simulator, or vice versa. Sometimes, the problem may just go away, but if not, you may get a hint about what’s going on.
Don’t bother figuring out issues that only occur on the Simulator. Likewise, don’t ignore any issues that only occur on the device but work fine on the Simulator.
By default, an Xcode project will use the Debug build configuration with code optimizations turned off for debugging purposes, and logging turned on for the same reason.
One NSLog or CCLOG in the wrong place can spam the Debugger Console with logging messages, causing slowdowns and lag. Logging is very slow, and a continuous stream of log messages printed to the Debugger Console can drag your game’s performance down to a crawl. If you suspect your game’s performance to be particularly slow in Debug builds, always check the Debugger Console for excessive logging activities. In Xcode, click Run ![]() Console to show the Debugger Console window.
Console to show the Debugger Console window.
The exclusion of logging and typically better code optimization settings are the main reason you should only use Release builds to test your game’s performance. You can temporarily set your project to use the Release build configuration by selecting Product ![]() Manage Schemes. . . from the Xcode menu. Then select your app’s target and edit it. Select the Run configuration on the left, as in Figure 2-18. Then just change the Build Configuration to Release.
Manage Schemes. . . from the Xcode menu. Then select your app’s target and edit it. Select the Run configuration on the left, as in Figure 2-18. Then just change the Build Configuration to Release.

Figure 2-18 . Changing the Build Configuration of a build scheme
You can also create a duplicate of the scheme and set one to use the Debug build configuration and the other to use Release. That way you can quickly change between build configurations without having to go through the Manage Schemes menu. Note that you don’t need to do the same with the cocos2d-library scheme—it will automatically use the same build configuration as the app.
Summary
Wow, that was a lot for a “Getting Started” chapter! In the first part of this chapter you learned to download and set up all the necessary tools to the point where you had your first cocos2d and Kobold2D template projects running. You also learned how to enable ARC in cocos2d projects.
I then walked you through the basics of the template project to get you up to speed with how an iOS cocos2d application works in principle, and somewhat in detail as well. I do have a pet peeve about proper memory management, which is why I also included those details. I think it’s important because it’s easy to misunderstand or even completely ignore memory management, and then you might be building your game on a very crumbly foundation.
I did manage to sneak in a short “do it yourself” section to at least show you how touch input is done in cocos2d and how cocos2d objects are stored and retrieved.
Finally, I thought it important to give you the details about the various iOS devices and what you can expect in terms of available memory. I also discussed the iOS Simulator and how it differs for testing your game compared with testing it on a device.
In the next chapter, you’ll learn all the essential features of cocos2d, which will bring you closer to making a complete cocos2d game.