
Chapter 11
Isometric Tilemaps
With isometric tilemaps you can get the best of both worlds—using two-dimensional graphics to achieve a three-dimensional look. This is why isometric tilemap games are so widely popular. Isometric tilemap games started to get a strong foothold in the late 1990s but slowly disappeared with the increasing 3D rendering performance of desktop computers and consoles. They’ve reemerged with force in recent years in mobile games and web games, where 3D rendering is very costly or unavailable. Examples range from classic computer role-playing games like Ultima VII and Diablo to current Facebook-hype Farmville and many of its official and unofficial companion games.
Isometric games allow you to create believable game worlds that seem to have spatial depth with relatively simple graphics and tools. In addition, 2D graphics require far less powerful devices than real 3D computer graphics.
Figure 11-1 shows an example of the isometric tilemap game you’ll build in this chapter. You’ll control a ninja character who sneaks around in this world, avoiding collisions with walls and mountains. The ninja will also be able to hide behind certain objects, such as trees and cacti.
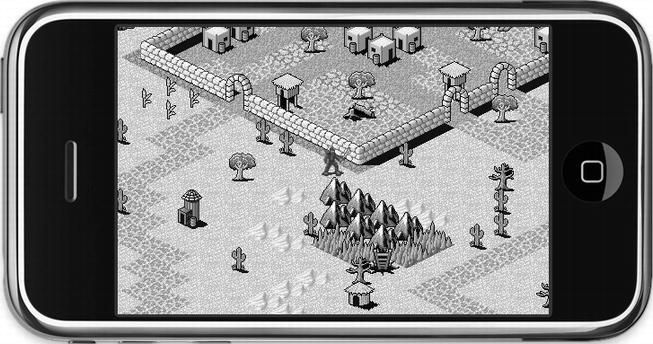
Figure 11-1. An isometric tilemap game
Note All tilesets used in this chapter were created by David E. Gervais and published under the Creative Commons license. You can download more of his work at http://pousse.rapiere.free.fr/tome/index.htm.
Designing Isometric Tile Graphics
To help you understand how to design isometric graphics, I’ll first introduce the concept of projection. In a 3D world, you can look at the objects from all sides, because 3D worlds can freely project the 3D world onto your two-dimensional screen from any angle and position. This conversion from a three-dimensional world onto a two-dimensional screen is called perspective projection. Taking a photograph is also a form of perspective projection of the real world onto a 2D image. Both projections retain the perspective of the viewer’s point of view.
In an isometric tilemap world, each individual tilemap image is already a projection of a seemingly three-dimensional object onto a flat surface. This projection is usually performed with a special form of parallel projection called isometric projection. The image then becomes more or less skewed, but our minds still recognize it as a three-dimensional object.
Tip To learn more about the various projection techniques and technical details of each, I recommend browsing the section about parallel projection on Wikipedia at http://en.wikipedia.org/wiki/Parallel_projection.
In terms of tilemaps, Figure 11-2 shows the concrete steps for creating an isometric projection of an orthogonal image. The square is first rotated by 45 degrees and then scaled down along its y-axis to give it its typical isometric diamond shape.
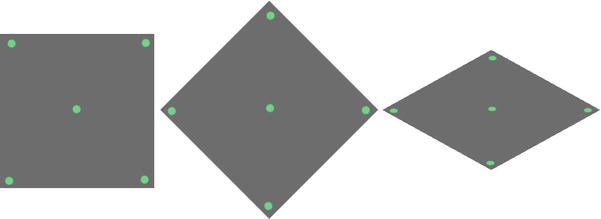
Figure 11-2. An orthogonal turned isometric by rotating it by 45 degrees and then compressing it vertically
However, Figure 11-2 is just the theoretical approach to illustrate the projection of the isometric shape. You can’t turn an orthogonal image into an isometric image by simply rotating and compressing it, because the rotation would affect the image content. It would just look flat and very wrong, just like Figure 11-3.
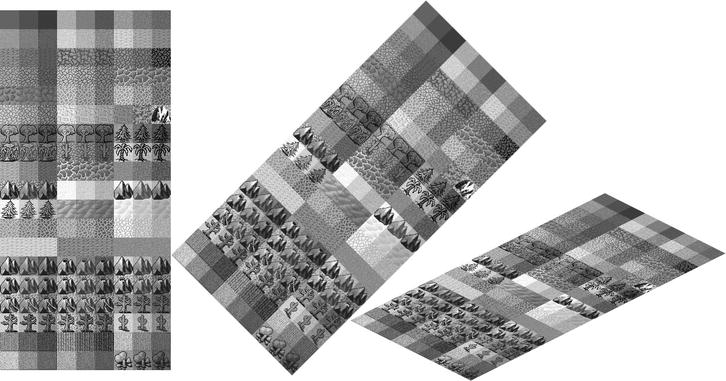
Figure 11-3. Turning an orthogonal tileset into an isometric tileset—it’s not that simple!
Instead, consider the diamond shape from Figure 11-2 as your drawing canvas of the floor. The simplest isometric tiles you can design are flat ground tiles. Just fill the diamond shape with a certain pattern, and you get yourself usable isometric tiles. Figure 11-4 shows a number of flat-colored isometric tiles laid out next to each other, creating a ground floor pattern. Ground floor tiles are not impressive and look very flat. Yet they are essential as the game world’s background layer.

Figure 11-4. Ground floor isometric tiles have no depth. They’re used as solid surface areas
To add actual visual depth to an isometric tilemap, you need to have object tiles that extend beyond the diamond shape. The most commonly used approach is to draw three-dimensional objects as if they were viewed at a 45-degree angle and then draw them up and over the diamond shape, typically extending no more than one tile above. In the example in Figure 11-5, you can see this quite nicely by looking at the doorway. The door arch is drawn mostly over the isometric tile above the one that the door’s frame is standing on. This gives the arch its visual depth.

Figure 11-5. Add depth by drawing objects up to twice as high as the diamond shape
Isometric tilemaps allow object tiles to overlap one another because the tiles are drawn from back to front, which means object tiles closer to the viewer are always drawn over tiles behind them, adding to the feeling of depth. But this approach requires careful design of individual tiles and the tilemap itself, because too much overlap or overlapping the wrong tiles can quickly destroy the illusion of depth.
As a good practice, try not to overlap object tiles that have wildly different shapes but use the same or similar color palette. In the case of Figure 11-5, for example, you would not want to place the crystal tile directly behind the doorway. The loss in contrast and merging outlines of these tiles could easily destroy the perception of depth.
Likewise, although you can create isometric object tiles that span much higher than twice the tile height, it’s very hard to create a convincing 3D look if objects appear very high because the player will see only part of the tilemap. If you were building a huge castle whose walls span a dozen tiles high and the player approached them from below, the walls could easily be mistaken for a large section of ground floor. You can even end up creating optical illusions like the drawings of M. C. Escher because the isometric tiles do not get smaller the farther away from the screen they are. So, there’s always a fine line between what works and what doesn’t when designing isometric tiles and tilemaps.
Figure 11-6 shows a finely crafted isometric tileset named dg_iso32.png , which contains a good variation of ground floor tiles; object tiles such as walls, trees, and houses; and adornment objects or items that can be placed on any ground tile. The tiles in this set are each 54x49 pixels in size. The height can be chosen arbitrarily; it can be more or less than 49 pixels and depends on how much overlap between tiles you like in your tilemap. The actual height of the diamond shape is 27 pixels. This will become important when you create the tilemap in Tiled (Qt) Map Editor.
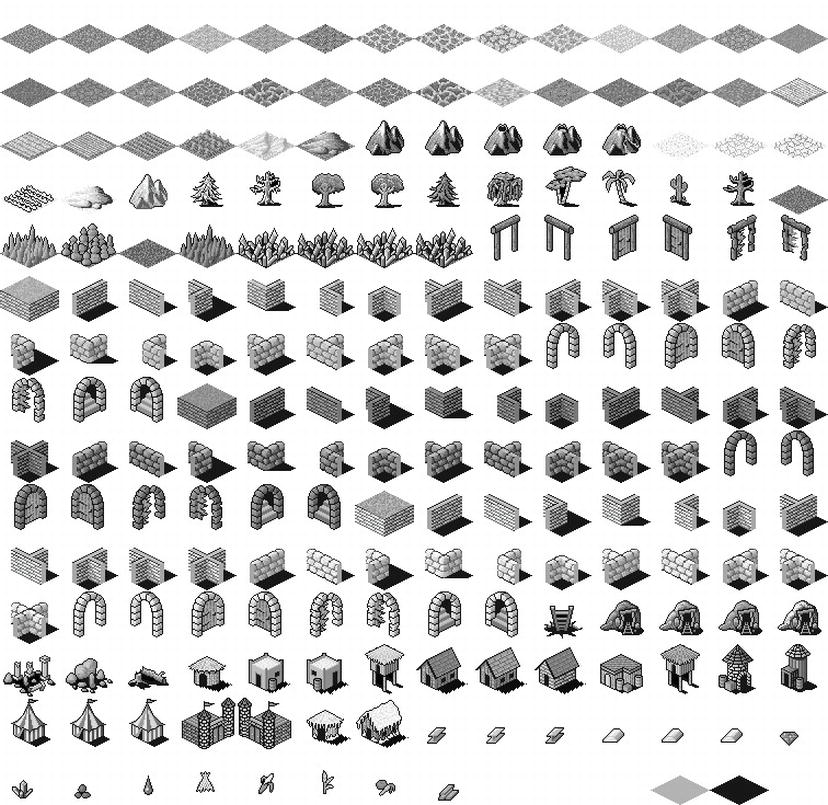
Figure 11-6. David Gervais’s finely crafted isometric tileset
Isometric Tilemap Editing with Tiled
You’ll use the Tiled Map Editor once again to create the isometric tilemap. Basic tilemap editing is the same as with orthogonal maps, but you have to follow certain crucial steps to correctly set up a new isometric tilemap and load an isometric tileset.
Creating a New Isometric Tilemap
Open Tiled and choose File ![]() New to open the New Map dialog in Figure 11-7. Set the orientation obviously to Isometric, and the map size to 30 tiles wide and high, just right for our example project. The odd thing here is the tile size width and height, which seem to be off a bit.
New to open the New Map dialog in Figure 11-7. Set the orientation obviously to Isometric, and the map size to 30 tiles wide and high, just right for our example project. The odd thing here is the tile size width and height, which seem to be off a bit.
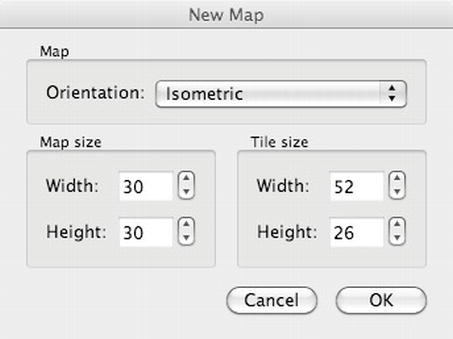
Figure 11-7. Create a new isometric tilemap in Tiled
I already mentioned that the individual tiles in dg_iso32.png are 54x49 pixels. The size of the diamond shape, which you have to consider when laying down tiles, is 54x27 pixels. Yet the tile size in the New Map dialog is 52x26. This is because David Gervais designed his tiles to require overlapping of 2 pixels in the horizontal and 1 pixel in the vertical direction in order to close all gaps between the tiles.
This offset is on purpose, because isometric tiles are often designed to overlap each other a little. In this case, the size of the tiles in the Tiled isometric map must be 2 pixels less wide and 1 pixel less high than the actual size of the diamond shapes in the tileset. Other isometric tilesets may require different offsets, or even no offset at all.
If you see any artifacts like the ones in Figure 11-8, you’ve set the wrong tile size when creating a new isometric map with David Gervais’ tileset. You can find this erroneous tilemap as isometric-no-offset.tmx in the project’s Resources folder, for illustration purposes.

Figure 11-8. Artifacts like these indicate a tile-size offset problem
If you did make a mistake and picked incorrect offsets and you don’t want to lose the tilemap you’ve just spent hours designing, or if you have other reasons to tweak the tilemap size or tileset size, there’s a simple way to do this, but it requires manipulating the TMX file directly because there’s no such option in Tiled itself.
The following trick makes it easy to experiment with various offsets until you get it just right. Close Tiled if it’s currently running and then select the TMX file in your Xcode project; you’ll see that it’s displayed as a plain-text XML file. You can edit the file with any other text editor just as well. At the beginning of the file, you’ll find the map section:
<map version = "1.0" orientation = "isometric" width = "30" height = "30" tilewidth = "54"←
    tileheight = "27">
You can edit the tilewidth and tileheight parameters until you’ve found the correct offsets for the tilemap. Likewise, if you’re having problems determining the tile size of the isometric tileset you’re using, you can modify the tilewidth and tileheight parameters of the tileset(s):
<tileset firstgid = "1" name = "dg_iso32" tilewidth = "54" tileheight = "49">
    <image source = "dg_iso32.png"/>
</tileset>
Just make sure to close and reload the TMX file in Tiled after you made any manual changes to it, because Tiled won’t automatically reload the file.
Creating a New Isometric Tileset
Next you need to load a tileset containing isometric tiles. For this chapter you’ll be using the dg_iso32.png tileset image found in the IsoTilemap01 project’s Resources folder. In Tiled, choose Map ![]() New Tileset . . . and browse to the dg_iso32.png file.
New Tileset . . . and browse to the dg_iso32.png file.
Notice that Tiled will set default tile width and height according to the settings in the New Map dialog, shown in Figure 11-7. For isometric tilemaps, the defaults always need to be corrected because of the overlap of isometric tiles. As I mentioned earlier, the dg_iso32.png tileset uses a tile width of 54 pixels and a tile height of 49 pixels. Note that you have to use the full canvas height of the isometric tiles, not the diamond shape height of 27 pixels. Figure 11-9 shows the correct setup for this tileset.
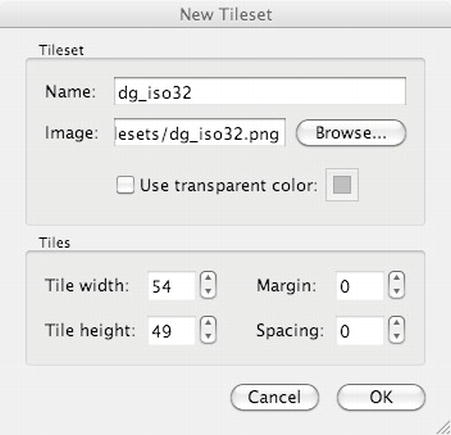
Figure 11-9. Adding the tileset with width 54 pixels and height 49 pixels
The most important rule for designing isometric maps is that you need at least two layers so that game characters can walk behind certain tiles. One layer is for flat ground objects and floor tiles, and the other is for all other objects that either overlap other tiles or are not fully opaque, such as items. In the tileset of Figure 11-6, the first two rows are ground tiles and need to be placed on the ground floor, whereas in row 3 the mountains as well as almost all tiles in row 4 and after need to be placed on the Objects layer.
In Tiled, add two new layers via Layer ![]() Add Tile Layer … and name them Ground and Objects. Make sure the Objects layer is drawn on top of the Ground layer. When designing your tilemap, you should take great care to lay down only fully opaque, flat floor tiles on the Ground layer. All other tiles have to be placed on the Objects layer.
Add Tile Layer … and name them Ground and Objects. Make sure the Objects layer is drawn on top of the Ground layer. When designing your tilemap, you should take great care to lay down only fully opaque, flat floor tiles on the Ground layer. All other tiles have to be placed on the Objects layer.
Cocos2d has issues with properly displaying game characters and other sprites behind partially occluding tiles in tilemaps, unless you apply the following steps. As one part of the solution, you need to add a special property named cc_vertexz to tiled layers. I explain the solution in more detail shortly; for now, select the Ground layer and click Layer ![]() Layer Properties. … Add a new property named cc_vertexz and set its value to −1000. Do the same with the Objects layer but instead of entering −1000, enter the string automatic, as in Figure 11-10.
Layer Properties. … Add a new property named cc_vertexz and set its value to −1000. Do the same with the Objects layer but instead of entering −1000, enter the string automatic, as in Figure 11-10.
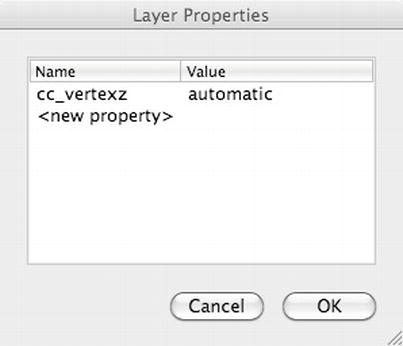
Figure 11-10. The Objects layer needs the cc_vertexz property set to automatic
Now you can spend some time designing a nice-looking tilemap, or you can simply load the one I designed in the IsoTilemap01 project. Be sure to put only floor tiles on the Ground layer and only overlapping and transparent tiles on the Objects layer. When you’re done, you should have a nice-looking tilemap like the one in Figure 11-11.
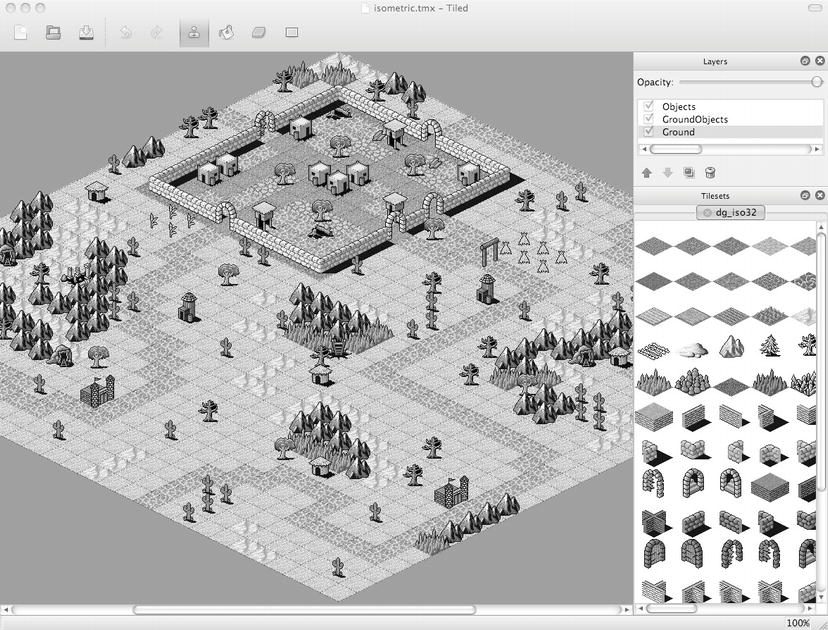
Figure 11-11. A completed isometric tilemap in Tiled using David Gervais’s tileset
Let’s use this isometric tilemap in a cocos2d game. As you might expect, some things will have to change compared to working with orthogonal tilemaps. In particular, you need to set up cocos2d properly to allow isometric tiles to partially occlude game characters. Determining a touched tile also requires different code than orthogonal tilemaps, and when scrolling, you can no longer stop scrolling at the borders of the tilemap because the tilemap itself has a diamond shape.
Loading the Isometric Tilemap in Cocos2d
This is easy. Compared to orthogonal tilemaps, you don’t need to change anything except load the isometric.tmx file instead of orthogonal.tmx.
CCTMXTiledMap* tileMap = [CCTMXTiledMap tiledMapWithTMXFile:@"isometric.tmx"];
[self addChild:tileMap z:-1 tag:TileMapNode];
tileMap.position = CGPointMake(−500, -300);
I do set the isometric tilemap’s position to −500, −300 right away, assuming the tilemap size is 30x30 tiles. This approximately centers the screen on the lower corner of the small village on the north of the tilemap in Figure 11-11. I do this to illustrate the following point about properly setting up Cocos2D for isometric tilemaps, and in Figure 11-12 you can see there’s something obviously wrong with the tilemap.
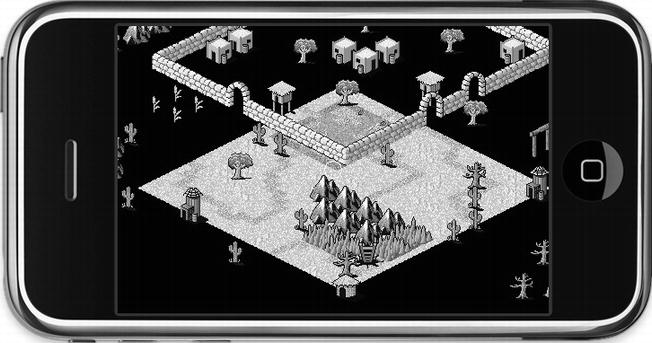
Figure 11-12. Without 2D projection, the Ground layer will render incorrectly
Set up Cocos2d for Isometric Tilemaps
If you followed the creation of the tilemap thus far and you set the cc_vertexz properties on the ground and objects layers in Tiled as described earlier, the resulting tilemap may look like the one in Figure 11-12. Somehow, the Ground layer is zoomed far out, and tiles from the Objects layer seem to be floating in midair. It looks like a scary place to be.
The way to fix this and enable proper rendering of overlapping sprites is to initialize cocos2d in a different way from how the cocos2d Application template in Xcode sets things up. It initializes cocos2d in a standard way, which is fine for most games but fails to work properly with isometric tilemap games. In the IsoTilemap01 project, the cocos2d startup code is altered to the code in Listing 11-1 with the changes and additions highlighted in bold.
Listing 11-1. Manually Initializing cocos2d’s EAGLView
- (BOOL)application:(UIApplication *)application didFinishLaunchingWithOptions:(NSDictionary *)launchOptions
{
    // Create the main window
    window_ = [[UIWindow alloc] initWithFrame:[[UIScreen mainScreen] bounds]];

    // Create an CCGLView with a RGB565 color buffer, and a depth buffer of 24-bits
    CCGLView *glView = [CCGLView viewWithFrame:[window_ bounds]
                            pixelFormat:kEAGLColorFormatRGB565
                            depthFormat:GL_DEPTH_COMPONENT24_OES
                       preserveBackbuffer:NO
                              sharegroup:nil
                         multiSampling:NO
                       numberOfSamples:0];

    director_ = (CCDirectorIOS*)[CCDirector sharedDirector];
    [director_setProjection:kCCDirectorProjection2D];
    ...
You have to change two things for isometric tilemaps. First, you need to enable the OpenGL depth buffer to allow a more fine-grained control over the z-ordering of objects. Second, CCDirector has to use a 2D projection to work with the depth buffer.
Tip If you’re a Kobold2D user, you can make these changes in the config.lua file. Look for the GLViewDepthFormat and Enable2DProjection settings and change them to these values:
GLViewDepthFormat = GLViewDepthFormat.Depth24Bit,
Enable2DProjection = YES,
You first create a UIWindow and then decide on a CCDirector type to use and set the animation interval to 60 frames per second. This is the default behavior.
The EAGLView line is important because for overlapping tiles to render properly, you have to specify a depth buffer with the depthFormat parameter. In this case, it’s GL_DEPTH_COMPONENT24_OES, which creates a depth buffer of 24 bits. To conserve memory, you can also use a 16-bit depth buffer, which may be sufficient.
Depth buffering allows OpenGL to determine whether a certain pixel is in front or behind another pixel so it can decide whether to actually draw the new pixel or discard it. This comes at a cost of additional memory usage—nearly 2 MB for a 24-bit depth buffer on Retina devices—but it allows sprites and tiles to correctly overlap one another.
The other really important line in the initialization is setProjection, which puts cocos2d in 2D projection mode. This changes a couple of OpenGL parameters that affect the way cocos2d renders nodes. In this case, it fixes the issue in Figure 11-12 where the ground floor is not rendered as expected, with the final result shown in Figure 11-13. But it also enables you to finely tune the z-order of sprites by using the vertexZ property rather than the zOrder property of sprites.

Figure 11-13. With 2D projection, the Ground layer is displayed as expected
By default, cocos2d’s z-ordering of nodes is based on the z value when you’re adding a node via the addChild method. Nodes with a lower z-order are drawn before nodes with a higher z-order. Nodes that have the same z-order are drawn in the order in which they’ve been added to the node hierarchy, meaning nodes added last will be drawn over nodes added before that node. This allows cocos2d to order nodes without using a depth buffer.
If you enable depth buffering, you can also use the vertexZ property to change each node’s draw order freely. Cocos2d requires this freedom in order to let the cc_vertexz tilemap property work its magic. Later you’ll manipulate the vertexZ property of the player character to correctly draw the player sprite in front of or behind other isometric tiles.
The next thing to do is determine from a touch location the coordinates of the touched tile. You can find this code in the IsoTilemap01 project. Before I get to that, let’s see what the interface and implementation of the TileMapLayer class look like thus far. It’s nothing you haven’t seen before:
// TileMapLayer.h
#import "cocos2d.h"

enum
{
    TileMapNode = 0,
};

@interface TileMapLayer : CCLayer
{
}
+(CCScene *) scene;
@end

// TileMapLayer.m
#import "TileMapLayer.h"

@implementation TileMapLayer
+(CCScene *) scene
{
    CCScene *scene = [CCScene node];
    TileMapLayer *layer = [TileMapLayer node];
    [scene addChild: layer];
    return scene;
}

-(id) init
{
    self = [super init];
    if (self)
    {
     CCTMXTiledMap* tileMap = [CCTMXTiledMap tiledMapWithTMXFile:@"isometric.tmx"];
     [self addChild:tileMap z:-1 tag:TileMapNode];

     // offset the tilemap's start position to move it into view
     tileMap.position = CGPointMake(−500, -500);

     self.isTouchEnabled = YES;
    }
    return self;
}
@end
If you refer to Figure 10-11 in the previous chapter, you’ll recall that the tilemap indices of orthogonal tilemaps have their origin point (0, 0) at the top-left corner. Now, with isometric tilemaps, there is no top-left corner anymore. The tilemap itself is rotated by 45 degrees, which makes the topmost tile the point of origin. Figure 11-14 illustrates this well. Tiles toward the bottom right have increasing X coordinates, while Tiles toward the bottom left have increasing Y coordinates. The bottommost tile then has the coordinates 29, 29 in a map consisting of 30x30 tiles.
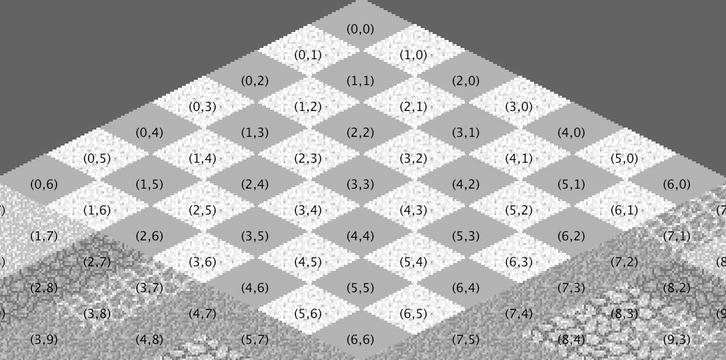
Figure 11-14. The coordinate system of an isometric tilemap
This may seem strange at first, but if you lean your head a bit to the right, you may notice that the tile coordinates follow the exact same order as in orthogonal tilemaps, except that the whole map is rotated by 45 degrees.
You can now straighten your head again, because I need you to focus on the modified tilePosFromLocation method, which calculates the touched tile coordinates from a touch location on the screen. As Listing 11-2 shows, it’s a wee bit more complex than the orthogonal counterpart.
Listing 11-2. Calculating the Tile Coordinates from a Touch Location
-(CGPoint) tilePosFromLocation:(CGPoint)location tileMap:(CCTMXTiledMap*)tileMap
{
    // Tilemap position must be subtracted, in case the tilemap position is scrolling
    CGPoint pos = ccpSub(location, tileMap.position);

    float halfMapWidth = tileMap.mapSize.width * 0.5f;
    float mapHeight = tileMap.mapSize.height;
    float pointWidth = tileMap.tileSize.width / CC_CONTENT_SCALE_FACTOR();
    float pointHeight = tileMap.tileSize.height / CC_CONTENT_SCALE_FACTOR();

    CGPoint tilePosDiv = CGPointMake(pos.x / pointWidth, pos.y / pointHeight);
    float inverseTileY = mapHeight - tilePosDiv.y;

    // Cast to int makes sure that result is in whole numbers
    float posX = (int)(inverseTileY + tilePosDiv.x - halfMapWidth);
    float posY = (int)(inverseTileY - tilePosDiv.x + halfMapWidth);

    // make sure coordinates are within isomap bounds
    posX = MAX(0, posX);
    posX = MIN(tileMap.mapSize.width - 1, posX);
    posY = MAX(0, posY);
    posY = MIN(tileMap.mapSize.height - 1, posY);

    return CGPointMake(posX, posY);
}
Subtracting the tilemap position to take scrolling of the tilemap into account is the same as in the orthogonal version of this method. Next I create a number of variables, just to make the code a bit more readable and have less to type, and then divide the map size width by half. I then create a CGPoint tilePosDiv, which is the pixel location within the tilemap divided by the tilemap’s width and height (in points, not pixels), and an inverseTileY variable, which is simply the inverse of the tilemap’s y coordinates. This inversion is necessary because the tilemap y coordinates count from top down, whereas screen y coordinates count from bottom up.
Now you can get to actually calculating the x,y coordinates of the touched tile. The calculation starts with the inverse y coordinate, which will be in the range of 0 to 29 for a tilemap that has a height of 30 tiles. It defines the vertical position in the tilemap from which you’ll be looking for the x and y tile coordinates horizontally.
This becomes clearer if you look at Figure 11-4 and locate tile coordinate (3,3). You’ll notice that when you move on a horizontal line to the left of tile coordinate (3,3), the x coordinates decrease and the y coordinates increase: (2,4), (1,5), (0,6). Similarly, if you move to the right of tile coordinate (3,3), the x coordinates increase while the y coordinates decrease: (4,2), (5,1), (6,0).
That means you can get both x and y tile coordinates from the inverseTileY position. In the case of the x tile coordinate, you add the tilePosDiv.x coordinate and then subtract halfMapWidth. For the y tile coordinate, you subtract the sum of tilePosDiv.x and halfMapWidth from inverseTileY.
Tip I’ll spare you the details of the mathematical concepts behind this calculation, because you can apply the code as is and don’t need to change anything. If you’re interested in understanding the intricate details of isometric projection and the mathematics behind it, I recommend reading the excellently illustrated article by Herbert Glarner at www.gandraxa.com/isometric_projection.aspx.
By applying the Objective-C MIN and MAX macros, I ensure that the returned tile coordinate is within the bounds of the tilemap. In other words, it will return coordinates from (0,0) to (29,29) for the 30x30 tilemap used by the isometric tilemap projects.
Scrolling the Isometric Tilemap
With the tilePosFromLocation method updated to work with isometric tilemaps, the IsoTilemap01 project continues by implementing isometric tilemap scrolling, using the tile coordinates returned from the tilePosFromLocation method. Just as in the orthogonal tilemap project, you do this using the centerTileMapOnTileCoord method, shown in Listing 11-3.
Listing 11-3. Scrolling the Screen to Center on a Specific Tile Coordinate
-(void) centerTileMapOnTileCoord:(CGPoint)tilePos tileMap:(CCTMXTiledMap*)tileMap
{
    // center tilemap on the given tile pos
    CGSize screenSize = [CCDirector sharedDirector].winSize;
    CGPoint screenCenter = CGPointMake(screenSize.width * 0.5f,←
     screenSize.height * 0.5f);

    // get the ground layer
    CCTMXLayer* layer = [tileMap layerNamed:@"Ground"];
    NSAssert(layer ! = nil, @"Ground layer not found!");

    // internally tile Y coordinates are off by 1
    tilePos.y - = 1;

    // get the pixel coordinates for a tile at these coordinates
    CGPoint scrollPosition = [layer positionAt:tilePos];

    // negate the position to account for scrolling
    scrollPosition = ccpMult(scrollPosition, -1);

    // add offset to screen center
    scrollPosition = ccpAdd(scrollPosition, screenCenter);

    // move the tilemap
    CCAction* move = [CCMoveTo actionWithDuration:0.2f position:scrollPosition];
    [tileMap stopAllActions];
    [tileMap runAction:move];
}
First, the screen center position is determined as before. Then you want to use the convenience method of the layer, positionAt, which returns a screen position for a tile coordinate. To do so, get the Ground layer and assert that it exists. It doesn’t matter which layer you use, as long as all layers use the same size tiles.
Before calling the positionAt method, I have to subtract 1 from the tile y coordinate to fix a persistent offset problem. Seasoned programmers may be worried that using a tile y coordinate of 0 and subtracting 1 from it could lead to an invalid index and thus a disastrous crash. But in this case, the positionAt method doesn’t use the tile coordinates as indices, and it works with any tile coordinate, even negative ones.
The positionAt method returns the pixel position of the given tile coordinate within the tilemap and stores it in the scrollPosition variable. This method isn’t specific to isometric tilemaps; it works for all tilemap types: orthogonal, isometric, and hexagonal. Internally, cocos2d checks which type of tilemap is currently being used and then uses the appropriate calculation, because they differ in profound ways. If you’re interested in the specific implementation of each of these calculations, take a look at the methods positionForOrthoAt, positionForIsoAt, and positionForHexAt in the cocos2d CCTMXLayer.m implementation file.
Because the tilemap may be scrolling, in which case it will have a negative position, the scrollPosition is multiplied by −1, negating it. After that I just add the screenCenter position to it, and I know where to scroll to. The move action is the same as before and moves the tilemap so that the touched tile is centered onscreen.
This World Deserves a Better End
Because of the diamond-shaped nature of isometric tilemaps, it’s inevitable that the scrolling tilemap will reveal parts outside of the tilemap, as shown in Figure 11-15. Indeed, the tilePosFromLocation method ensures that the returned tile coordinate is always within bounds, so you can use that safely even if the player touches outside the tilemap. But if you don’t want the player to see the end of your isometric tilemap world, you’ll have to use a trick.
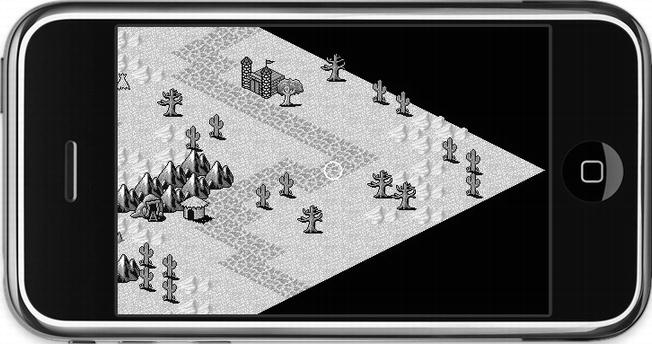
Figure 11-15. It’s the end of the world as we know it (and it feels wrong)
Open Tiled and load the isometric.tmx file from the IsoTilemap01 project’s Resources folder. What you want to do is to add a border around the existing map and fill it with tiles that give the impression of an impassable area. In Tiled, use Map ![]() Resize Map … to bring up the Resize dialog shown in Figure 11-16. You need to add 10 tiles to each side of this tilemap to completely fill the border. Depending on the tile size, you’ll have to experiment to find the minimum number of tiles that needs to be appended. In this case, enter 50 as the new width and height and also enter 10 in the offset boxes. This makes the tilemap 20x20 tiles larger and also moves everything you’ve edited previously to the center so that you end up with a border of 10 tiles on each side.
Resize Map … to bring up the Resize dialog shown in Figure 11-16. You need to add 10 tiles to each side of this tilemap to completely fill the border. Depending on the tile size, you’ll have to experiment to find the minimum number of tiles that needs to be appended. In this case, enter 50 as the new width and height and also enter 10 in the offset boxes. This makes the tilemap 20x20 tiles larger and also moves everything you’ve edited previously to the center so that you end up with a border of 10 tiles on each side.
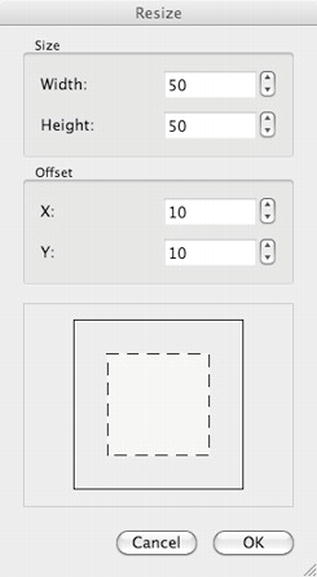
Figure 11-16. Resizing the map in Tiled to add a border
You can now fill this border area to give the impression of an area of the map that’s simply impassable. It helps to choose a darker ground tile to hint to the player that this area can’t be entered, and of course you should add impenetrable objects onto the Objects layer and around the border of the playable area. Your result should look something like Figure 11-17. I saved my version into the Resources folder of the project and named it isometric-with-border.tmx. So if you don’t want to do the editing, you only need to load isometric-with-border.tmx instead of the isometric.tmx file.
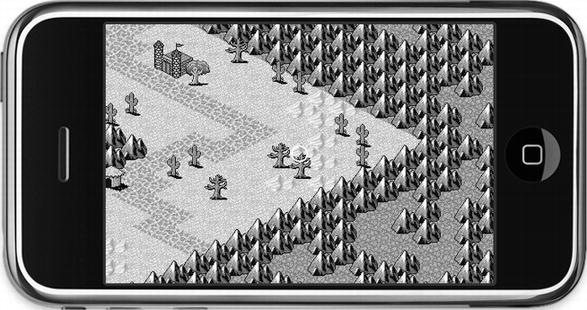
Figure 11-17. A convincing impassable map border area
Note The impassable area in Figure 11-17 does look quite repetitive and boring. You may be tempted to add more detail to that area, but that’s a double-edged sword. On one side, more details and variations within the impassable area will make it look better. On the other, it can also fool the player into thinking about and, even worse, spending time trying to reach that one spot in the impassable area that looks like it could be visited. For example, houses or cave entrances are places the player would want to explore, so avoid using those in the border area. The player might assume it’s a secret area and he simply has to figure out how to get there. If you have a player thinking like this, it’s bad for your game. You don’t want to tempt the player into trying things that are absolutely impossible to achieve. It just wastes his time and it ends in frustration.
The IsoTilemap02 project implements the code that prevents you from scrolling outside the playable area by defining the inner tile coordinates of the playable area. I added two CGPoint variables, playableAreaMin and playableAreaMax, to the TileMapLayer class:
@interface TileMapLayer : CCLayer
{
    CGPoint playableAreaMin, playableAreaMax;
}
The playable area variables are initialized with a border size of 10 tiles in the init method of the class:
-(id) init
{
    self = [super init];
    if (self)
    {
        ...

        const int borderSize = 10;
        playableAreaMin = CGPointMake(borderSize, borderSize);
        playableAreaMax = CGPointMake(tileMap.mapSize.width - 1 - borderSize, ←
                                      tileMap.mapSize.height - 1 - borderSize);
    }
    return self;
}
The playable area is defined as anything within the bounds of the tile coordinates (10, 10) to (39, 39). All tiles outside this area should be considered not part of the playfield. All that remains is to update the tilePosFromLocation method by replacing the MIN/MAX lines to implement this rule of the playable area. Instead of keeping the tile coordinates within the bounds of the whole tilemap, you now want to keep it within the bounds of the playable area, as such:
posX = MAX(playableAreaMin.x, posX);
posX = MIN(playableAreaMax.x, posX);
posY = MAX(playableAreaMin.y, posY);
posY = MIN(playableAreaMax.y, posY);
If you try this, you’ll see that only the tiles within the playable area can be centered onscreen. What’s more, clicks outside the playable area aren’t just ignored; the tilemap scrolls as close as possible to the tile you clicked. This way, you don’t destroy the player’s impression of a world that seemingly extends far beyond what the player can see.
Adding a Movable Player Character
By adding a player character moving about the tilemap world, you get closer to an actual isometric game. In this case, I chose ninja.png as the player character and added it to the IsoTilemap02 project. The player is a class derived from CCSprite, aptly named Player. Listing 11-4 shows the header file.
Listing 11-4. The Player Class Interface
#import < Foundation/Foundation.h>
#import "cocos2d.h"

@interface Player : CCSprite
{
}
+(id) player;
@end
The +(id) player method in Listing 11-5 allocates and initializes the sprite with the ninja.png file.
Listing 11-5. The Player Class Implementation
#import "Player.h"

@implementation Player
+(id) player
{
    return [[self alloc] initWithFile:@"ninja.png"];
}
@end
You then create the player in the TileMapLayer class’s init method:
#import "Player.h"

...

-(id) init
{
    self = [super init];
    if (self)
    {
        ...

        CGSize screenSize = [CCDirector sharedDirector].winSize;

        // Create the player and add it
        player = [Player player];
        player.position = CGPointMake(screenSize.width / 2, screenSize.height / 2);
        // offset player's texture to best match the tile center position
        player.anchorPoint = CGPointMake(0.3f, 0.1f);
        [self addChild:player];
    }
    return self;
}
You will also have to update the TileMapLayer interface to add the player instance variable and forward-declare the Player class:
@class Player;

@interface TileMapLayer : CCLayer
{
    CGPoint playableAreaMin, playableAreaMax;
    Player* player;
}
The player’s position is set to the center of the screen on purpose. Because you already have a method that allows you to center a specific tile on the screen, centering the player sprite on the screen as well makes it behave as if it were moving across the tilemap, when in fact it always remains at the same position. You don’t have to move the player sprite at all!
The player’s anchorPoint is offset a little from its default of (0.5f, 0.5f) to (0.3f, 0.1f) to approximately center the sprite’s feet on the center position of the tile. Otherwise, it might look wrong because all other game objects like trees and cacti have their roots, literally speaking, at the center of the tile. So, it’s only natural to try to place the player’s feet at that position as well.
If you try this now, even though the player sprite never moves, it looks as if the player is walking about the tilemap world. Perfect!
Well, not quite. If you move over mountains and walls and trees and buildings, the player sprite is always drawn in front of them.
Enabling the Player to Move Behind Tiles
To allow the player to be partially hidden by object tiles in front of him, such as buildings, walls, trees, and whatnot, you have to change his vertexZ value as he moves around on the map. At the start of this chapter, when you created the Objects layer in Tiled, you gave it a property named cc_vertexz and set it to automatic. This instructed cocos2d to assign consecutive vertexZ values to the tiles in that layer. Figure 11-18 shows you which vertexZ values the tiles are assigned in a tilemap that’s 50x50 tiles in size. This is different from the tile indices shown in Figure 11-14 because the vertexZ values increase in both X and Y directions. You could say that vertexZ values decrease with each horizontal row of the tilemap.
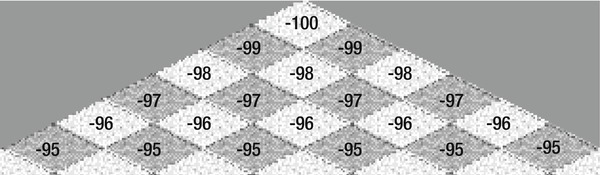
Figure 11-18. The vertexZ values of tiles in the 50x50 tilemap
This is reflected in code by the updateVertexZ method added to the Player class:
-(void) updateVertexZ:(CGPoint)tilePos tileMap:(CCTMXTiledMap*)tileMap
{
    float lowestZ = −(tileMap.mapSize.width + tileMap.mapSize.height);
    float currentZ = tilePos.x + tilePos.y;
    self.vertexZ = lowestZ + currentZ – 1.5f;
}
The lowest vertexZ value is simply the sum of the map size width and height in the negative. Likewise, you can get the difference of any tile coordinate in the tilemap to the lowest vertexZ value, which is the tile at position 0, 0. It’s the sum of the X and Z coordinates of that position. For example, the tile at position 2, 2 is 2 + 2 = 4 less than the lowest vertexZ value. If you add the two, you get −100 + 4 = −96. Since the player sprite is added to the TileMapLayer after the tilemap, it will render on top of tiles with the same vertexZ value. Because of this, I also subtract 1.5 so that the end result is a vertexZ value of −96.5 if the player is standing on the tile coordinate 2, 2. That also places the player behind any object on the same tile. If you want your player to be in front of any object on the same tile, you should subtract 1.0f or less.
To make this code work, you also have to define the updateVertexZ method in the Player class’s interface:
@interface Player : CCSprite
{
}
+(id) player;
-(void) updateVertexZ:(CGPoint)tilePos tileMap:(CCTMXTiledMap*)tileMap;
@end
And then you should call the updateVertexZ method every time the tilemap is moved, which is done in the ccTouchesBegan method of the TileMapLayer class:
-(void) ccTouchesBegan:(NSSet *)touches withEvent:(UIEvent *)event
{
    CCNode* node = [self getChildByTag:TileMapNode];
    NSAssert([node isKindOfClass:[CCTMXTiledMap class]], @"not a CCTMXTiledMap");
    CCTMXTiledMap* tileMap = (CCTMXTiledMap*)node;

    CGPoint touchLocation = [self locationFromTouches:touches];
    CGPoint tilePos = [self tilePosFromLocation:touchLocation tileMap:tileMap];

    [self centerTileMapOnTileCoord:tilePos tileMap:tileMap];

    // update the player's vertexZ
    [player updateVertexZ:tilePos tileMap:tileMap];
}
If you try this now, you’ll see that the ninja player will hide behind walls, trees, and other large objects, like a good ninja does.
Moving the Player, Tile by Tile
So far, the player (actually, the screen) moves faster the further away from the center the screen is touched. The player also moves across the tiles freely, but he really should be moving from tile to tile in only four directions. The IsoTilemap03 project changes the control mechanism to one that allows you to move the player in one of the four allowed directions as long as you keep a finger on the screen. The move direction depends on where you touch the screen relative to the player.
This requires some additions to the TileMapLayer interface, shown in Listing 11-6.
Listing 11-6. The TileMapLayer Class Interface
typedef enum
{
    MoveDirectionNone = 0,
    MoveDirectionUpperLeft,
    MoveDirectionLowerLeft,
    MoveDirectionUpperRight,
    MoveDirectionLowerRight,

    MAX_MoveDirections,
} EMoveDirection;

@class Player;
@interface TileMapLayer : CCLayer
{
    CGPoint playableAreaMin, playableAreaMax;
    Player* player;
    CGPoint screenCenter;
    CGRect upperLeft, lowerLeft, upperRight, lowerRight;
    CGPoint moveOffsets[MAX_MoveDirections];
    EMoveDirection currentMoveDirection;
}
The EMoveDirection enum is later used to determine in which direction the player intends to walk, with MoveDirectionNone signaling no movement. Let’s look at changes in the implementation of the TileMapLayer class’s init method in Listing 11-7.
Listing 11-7. Initializing the Player’s Movement Directions
// divide the screen into 4 areas
screenCenter = CGPointMake(screenSize.width / 2, screenSize.height / 2);
upperLeft = CGRectMake(0, screenCenter.y, screenCenter.x, screenCenter.y);
lowerLeft = CGRectMake(0, 0, screenCenter.x, screenCenter.y);
upperRight = CGRectMake(screenCenter.x, screenCenter.y, screenCenter.x,←
    screenCenter.y);
lowerRight = CGRectMake(screenCenter.x, 0, screenCenter.x, screenCenter.y);

moveOffsets[MoveDirectionNone] = CGPointZero;
moveOffsets[MoveDirectionUpperLeft] = CGPointMake(−1, 0);
moveOffsets[MoveDirectionLowerLeft] = CGPointMake(0, 1);
moveOffsets[MoveDirectionUpperRight] = CGPointMake(0, -1);
moveOffsets[MoveDirectionLowerRight] = CGPointMake(1, 0);

currentMoveDirection = MoveDirectionNone;

// continuously check for walking
[self scheduleUpdate];
The four CGRect variables, upperLeft, lowerLeft, upperRight, and lowerRight, divide the screen into four quadrants, each of which is the touch area to move the player in the desired direction. Thus, a touch in the lower-right area of the screen will move the player to the right and down along the tilemap.
The moveOffsets array contains a CGPoint for each move direction that, when added to the current tile coordinate, will return the next tile coordinate in that direction. The currentMoveDirection variable simply holds which direction the player is moving toward, and you need a scheduleUpdate to continuously check whether the player still wants to move.
The ccTouchesBegan method (Listing 11-8) has changed to simply check which quadrant of the screen received the touch and then sets the currentMoveDirection. The newly added ccTouchesEnded method sets the currentMoveDirection back to MoveDirectionNone.
Listing 11-8. Moving the Player Based on Touch Location
-(void) ccTouchesBegan:(NSSet *)touches withEvent:(UIEvent *)event
{
    // get the position in tile coordinates from the touch location
    CGPoint touchLocation = [self locationFromTouches:touches];

    // check where the touch was and set the move direction accordingly
    if (CGRectContainsPoint(upperLeft, touchLocation))
    {
        currentMoveDirection = MoveDirectionUpperLeft;
    }
    else if (CGRectContainsPoint(lowerLeft, touchLocation))
    {
        currentMoveDirection = MoveDirectionLowerLeft;
    }
    else if (CGRectContainsPoint(upperRight, touchLocation))
    {
        currentMoveDirection = MoveDirectionUpperRight;
    }
    else if (CGRectContainsPoint(lowerRight, touchLocation))
    {
        currentMoveDirection = MoveDirectionLowerRight;
    }
}

-(void) ccTouchesEnded:(NSSet *)touches withEvent:(UIEvent *)event
{
        currentMoveDirection = MoveDirectionNone;
}
The gist of the work has now been moved to the update method, which is scheduled to be called every frame:
-(void) update:(ccTime)delta
{
    CCNode* node = [self getChildByTag:TileMapNode];
    NSAssert([node isKindOfClass:[CCTMXTiledMap class]], @"not a CCTMXTiledMap");
    CCTMXTiledMap* tileMap = (CCTMXTiledMap*)node;

    // if the tilemap is currently being moved, wait until it's done moving
    if (tileMap.numberOfRunningActions == 0)
    {
        if (currentMoveDirection ! = MoveDirectionNone)
        {
        CGPoint tilePos = [self tilePosFromLocation:screenCenter tileMap:tileMap];

        CGPoint offset = moveOffsets[currentMoveDirection];
        tilePos = CGPointMake(tilePos.x + offset.x, tilePos.y + offset.y);
        tilePos = [self ensureTilePosIsWithinBounds:tilePos];

        [self centerTileMapOnTileCoord:tilePos tileMap:tileMap];
        }
    }

    // continuously fix the player's Z position
    CGPoint tilePos = [self floatTilePosFromLocation:screenCenter tileMap:tileMap];
    [player updateVertexZ:tilePos tileMap:tileMap];
}
The tilemap has a running action only when it is moving, so I give it a new move action only if it has no move action currently running and the currentMoveDirection isn’t MoveDirectionNone. The tilePosFromLocation is no longer retrieved from the screen touch location, but instead the screenCenter position is used. Since the player is always centered on the screen, this is a convenient shortcut to the tile coordinate at the center of the screen.
The moveOffsets array returns a CGPoint that is added to tilePos to get the new tile coordinate we intend to move to. Because this can be outside the playable area, the new tile coordinate is run through the ensureTilePosIsWithinBounds method. It’s the same code we used before to keep the tile coordinate within the playable area but refactored into a separate method to avoid duplicating this code. Lastly, the centerTileMapOnTileCoord method is called to move and center the screen on the desired tile coordinate, which also adds the move action.
The methods ensureTilePosIsWithinBounds and floatTilePosFromLocation have been refactored to be reusable. Previously they were merged into the tilePosFromLocation method. The refactored methods still perform the same functions but individual aspects such as adjusting the tile position to be in the playable area can now be used by other code too. Following are the refactored methods:
-(CGPoint) ensureTilePosIsWithinBounds:(CGPoint)tilePos
{
    tilePos.x = MAX(playableAreaMin.x, tilePos.x);
    tilePos.x = MIN(playableAreaMax.x, tilePos.x);
    tilePos.y = MAX(playableAreaMin.y, tilePos.y);
    tilePos.y = MIN(playableAreaMax.y, tilePos.y);
    return tilePos;
}

-(CGPoint) floatTilePosFromLocation:(CGPoint)location tileMap:(CCTMXTiledMap*)tileMap
{
    CGPoint pos = ccpSub(location, tileMap.position);
    float halfMapWidth = tileMap.mapSize.width * 0.5f;
    float mapHeight = tileMap.mapSize.height;
    float tileWidth = tileMap.tileSize.width / CC_CONTENT_SCALE_FACTOR();
    float tileHeight = tileMap.tileSize.height / CC_CONTENT_SCALE_FACTOR();

    CGPoint tilePosDiv = CGPointMake(pos.x / tileWidth, pos.y / tileHeight);
    float mapHeightDiff = mapHeight - tilePosDiv.y;

    // Cast to int makes sure that result is in whole numbers
    float posX = (mapHeightDiff + tilePosDiv.x - halfMapWidth);
    float posY = (mapHeightDiff - tilePosDiv.x + halfMapWidth);
    return CGPointMake(posX, posY);
}

-(CGPoint) tilePosFromLocation:(CGPoint)location tileMap:(CCTMXTiledMap*)tileMap
{
    CGPoint pos = [self floatTilePosFromLocation:location tileMap:tileMap];
    pos = [self ensureTilePosIsWithinBounds:CGPointMake((int)pos.x, (int)pos.y)];
    return pos;
}
With the player now moving across the tilemap tile by tile, we can keep updating the player’s vertexZ value. Previously, the vertexZ value was set to the target tile coordinate immediately, which caused the player to be drawn below all object tiles he was moving over. By continuously updating the vertexZ value as the player moves across the tilemap, his z position is now more accurate and removes any overlap glitches from the previous IsoTilemap02 project.
Note When you’re moving the player through an arc, you’ll notice that as he moves through the arc he’ll suddenly appear in front of the arc or disappear behind it, depending on the direction he’s moving. This is an unavoidable side effect of 2D isometric tilemaps. You can reduce this effect only by drawing your archways higher than any character in your game. You could also split the arc into three tiles so that only the middle section is passable, whereas the two sides of the archway are regarded as blocking tiles.
Lastly, you don’t want the player to walk over walls and mountains. He may be a ninja, but he’s not that good. To solve that problem, add a new layer in Tiled via Layer ![]() Add Tile Layer … and name it Collisions; then move the Opacity slider just above the Layers list to about the middle. Now pick a tile from the tileset whose color is a strong contrast to the tilemap, because you’ll use it to draw collision areas over the tilemap, and they should be easily recognizable despite having a low opacity.
Add Tile Layer … and name it Collisions; then move the Opacity slider just above the Layers list to about the middle. Now pick a tile from the tileset whose color is a strong contrast to the tilemap, because you’ll use it to draw collision areas over the tilemap, and they should be easily recognizable despite having a low opacity.
I chose one of the purple tiles. Right-click the tile of your choice and select Tile Properties … from the context menu. Note that this command has no equivalent in the Tiled menu; tile properties can be accessed only by right-clicking a tile. In the Tile Properties dialog shown in Figure 11-19, add a property named blocks_movement and set the value to 1. Actually, I’m going to ignore the value in code; it’s only important that the blocks_movement value exists.
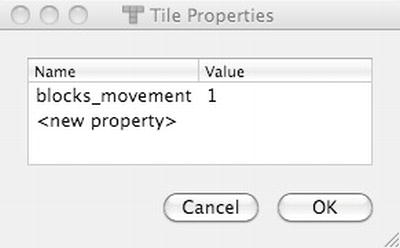
Figure 11-19. Add a blocks_movement tile property
With the Collisions layer selected, draw on the tilemap with the tile that has the blocks_movement property set. Place a tile everywhere you don’t want the player to move onto—for example, walls, mountains, houses, and so on.
The tilemap isometric-with-border.tmx in the IsoTilemap03 project is already prepared with a Collisions layer. The Collisions layer is only for checking whether a tile can be moved on and should not be displayed in the game, so the first thing you do in the init method of the TileMapLayer class is to set this layer invisible (see Listing 11-9).
Listing 11-9. Hiding the Collisions Layer
CCTMXTiledMap* tileMap = [CCTMXTiledMap tiledMapWithTMXFile:←
    @"isometric-with-border.tmx"];
[self addChild:tileMap z:-1 tag:TileMapNode];

CCTMXLayer* collisionsLayer = [tileMap layerNamed:@"Collisions"];
collisionsLayer.visible = NO;
To check whether a certain tile coordinate is blocked, I’ve added the isTilePosBlocked method to the IsoTilemap03 project, as shown in Listing 11-10.
Listing 11-10. Determine Whether a Tile Is Blocked
-(BOOL) isTilePosBlocked:(CGPoint)tilePos tileMap:(CCTMXTiledMap*)tileMap
{
    CCTMXLayer* layer = [tileMap layerNamed:@"Collisions"];
    NSAssert(layer ! = nil, @"Collisions layer not found!");

    BOOL isBlocked = NO;
    unsigned int tileGID = [layer tileGIDAt:tilePos];
    if (tileGID > 0)
    {
     NSDictionary* tileProperties = [tileMap propertiesForGID:tileGID];
     id blocks_movement = [tileProperties objectForKey:@"blocks_movement"];
     isBlocked = (blocks_movement ! = nil);
    }

    return isBlocked;
}
The code first tries to get a tile at the given tile coordinate from the Collisions layer. If there is no tile there, the tileGID will be 0, and you can safely assume that this tile is not blocked. But if there is a valid tileGID at the tilePos coordinate, the tileMap is queried for the properties of the tile, which returns an NSDictionary object. If the dictionary’s objectForKey method returns a valid object for the key named blocks_movement, the tile is blocked.
The place to check for collision is in the update method, as shown in Listing 11-11.
Listing 11-11. Checking for Collision in the update Method
-(void) update:(ccTime)delta
{
    ...

    // if the tilemap is currently being moved, wait until it's done moving
    if ([tileMap numberOfRunningActions] == 0)
    {
     if (currentMoveDirection ! = MoveDirectionNone)
     {
     CGPoint tilePos = [self tilePosFromLocation:screenCenter tileMap:tileMap];

     CGPoint offset = moveOffsets[currentMoveDirection];
     tilePos = CGPointMake(tilePos.x + offset.x, tilePos.y + offset.y);
     tilePos = [self ensureTilePosIsWithinBounds:tilePos];

     if ([self isTilePosBlocked:tilePos tileMap:tileMap] == NO)
     {
     [self centerTileMapOnTileCoord:tilePos tileMap:tileMap];
     }
     }
    }

    ...
}
Before moving the tilemap, the isTilePosBlocked method is called to see whether the player can actually move there. If the destination tile coordinate is not blocked, he will move; otherwise, he won’t.
Adding More Content to the Game
So far, we have a game where you guide a character through an isometric tilemap world. Hiding behind trees and avoiding collisions are just the foundation for a game set in this world. What if you want to add more actors to the world, whether enemies or nonplayer characters (NPCs)?
In principle, you animate them just as you’d move the player, except that the player is centered onscreen whereas NPCs can be anywhere on the tilemap. Still, you only need to determine which direction the NPC should walk toward and then move him like the layer is moved in the centerTileMapOnTileCoord method. The only difference is that the actions are run on the NPC, and the directions need to be reversed, because you aren’t moving the layer; the NPC is moving on the layer.
As soon as you have NPCs wandering around, the next step is to ask how you can get them to move from A to B while avoiding obstacles and finding the shortest route. The answer to that is the A* pathfinding algorithm, which is an industry standard and has been adapted and tweaked for many situations. Tile-based games are ideal candidates for this particular pathfinding algorithm, because actor positions are usually restricted to the tile coordinates. For an in-depth introduction to the A* pathfinding algorithm and, honestly, to a lot of game programming topics in general, you must visit Amit’s A* pages at http://theory.stanford.edu/~amitp/GameProgramming/.
And you’ll want to visit Amit’s Game Programming Information pages in general. He links to articles concerning artificial intelligence and tile-based games, including procedural world generation. A lot of the articles may seem dated, but, in fact, most of them are timeless and are still valuable sources of information. Check them out at www-cs-students.stanford.edu/~amitp/gameprog.html.
Summary
In this chapter, you learned what’s special about isometric tilemaps, how isometric tiles are designed, and how to create a tilemap with a perceived depth. You learned how to create and improve such an isometric tilemap with Tiled by adding an impassable border and preventing collisions.
You also learned the techniques necessary to set up a tilemap for use with cocos2d and how to set up cocos2d itself with 2D projection and a depth buffer for correct rendering of overlapping tiles and sprites.
Finally, you added a player whose sprite is correctly clipped depending on whether it’s in front or behind tiles. You can also move the player around tile by tile by tapping and holding the screen relative to the player sprite to make him go in that direction. That he will do unless the direction is blocked by a mountain, wall, or any other movement-blocking tile that you set in Tiled.
So far, you’ve worked with games that need to be controlled and animated in discrete steps. You were responsible for implementing all the actor’s movement and rotation as well as checking for collisions. In the next two chapters, I introduce you to physics engines, which allow you to lean back as you watch your game’s objects bounce around and collide with each other all by themselves. If this is the first time you’ve worked with a physics engine, it will be a magical experience. Hold on to your hat!