
![]()
One of the most important components to an enterprise-level application is security. It is a fact that enterprise applications must be rock solid and secure so that data and application functionality cannot fall into the wrong hands. Utilizing a combination of application server security and application-level security can help secure applications from thugs who are targeting enterprise data.
Three different types of security can be applied to enterprise-level applications: declarative, programmatic, and transport security. Declarative security occurs within an application’s deployment descriptor or via annotations that are added to classes and methods within the application. Declarative security is used to provide the application server container with the ability to guard access to certain application features via the use of user authentication and roles. Programmatic security occurs when the developer manually codes the authentication methods, customizing the requirements for authentication into an application. Transport security occurs between the client and the server, and it is responsible for securing information as it is passed between the two.
This chapter will touch upon each of these three levels of security. It contains recipes that cover application server configurations for setting up database and cover LDAP authentication for applications that are deployed within the container. You will also learn how to utilize XML configuration, annotations, and JSF EL to secure portions of your applications. Lastly, it’ll touch upon how to secure transport via SSL and certificates.
14-1. Setting Up Application Users and Groups in GlassFish
Problem
You want to create users, groups, and roles within your application server container for use with applications that are deployed to the container.
Solution
Log into the GlassFish administrative console to add users to the File security realm. You can then add the users to groups by specifying the group names when creating the users. This example will walk you through the configuration of a new user within the GlassFish application server (v4).
- Log into the administrative console by navigating to http://localhost:4848 and then logging in as a GlassFish administrative user.
- Use the tree menu on the left side of the screen to navigate to the Configurations
 server-config Security Realms menu. Once you click the Realms menu option, the Realms form will appear (Figure 14-1).
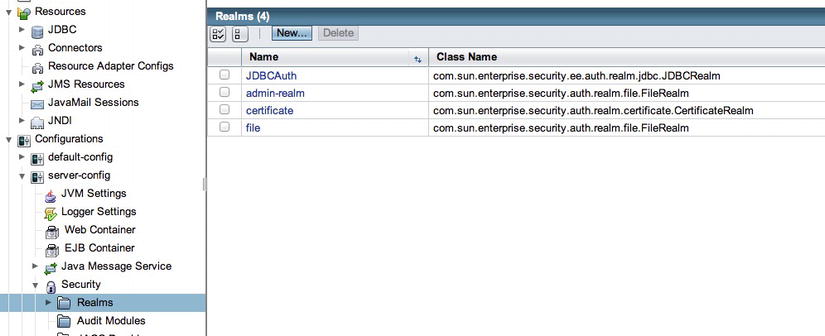
Figure 14-1 . GlassFish Realms form
- Click the “file” realm link to enter the Edit Realm form, as shown in Figure 14-2.
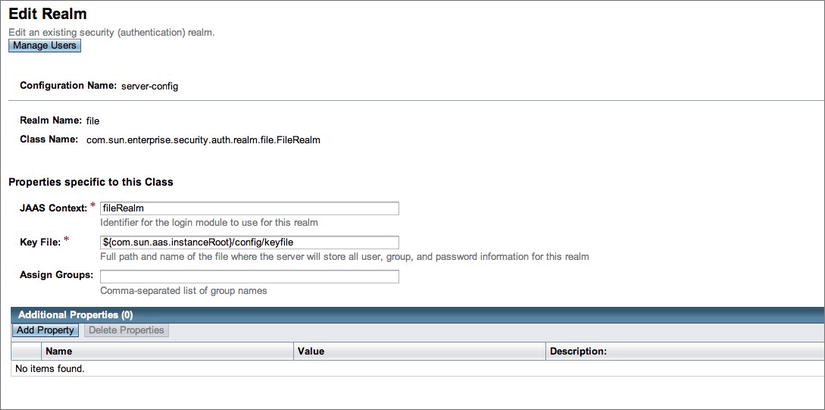
Figure 14-2 . GlassFish Edit Realm form
- Click the Manage Users button within the Edit Realm form to open the File Users form, and then click the New button within the File Users form (Figure 14-3) to enter the New File Realm User form (Figure 14-4).
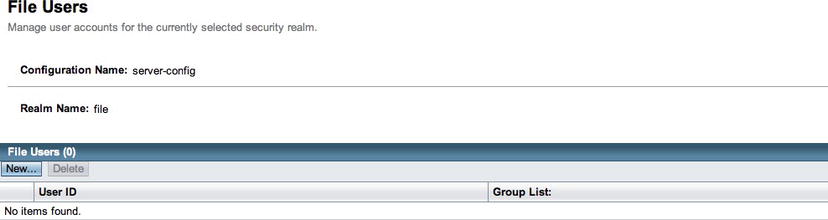
Figure 14-3 . GlassFish File Users form
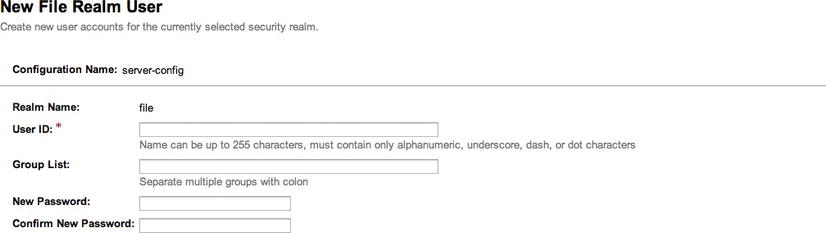
Figure 14-4 . GlassFish New File Realm User form
- Fill in a user ID and the password information to complete the New File Realm User form, and optionally add a group name to the Group List field. Click the Save button to add the user to the File Users list (Figure 14-5).
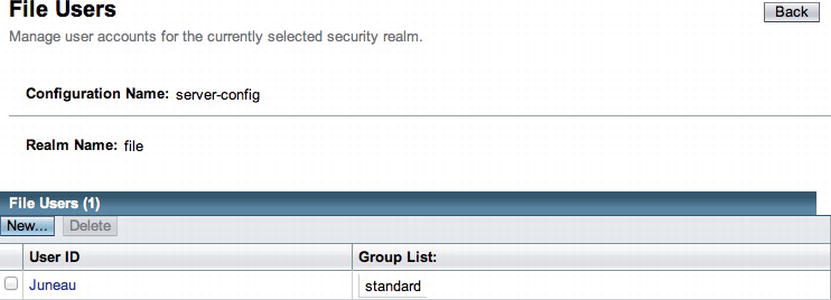
Figure 14-5 . File Users list
Once they’re created, users within GlassFish realms can be used for application authentication purposes. To learn more about configuring your applications to utilize GlassFish user authentication, please refer to Recipe 14-2.
How It Works
Adding an authentication prompt to allow user access to secured areas can be one of the best forms of protection for any application. Fortunately, the Java platform makes authentication easy for you to add to your applications. Most application servers have some mechanism for adding user accounts that can be used to access applications that are deployed in the one of the server domains. GlassFish is no exception because it provides the ability to add users and groups to different security realms, which can then be applied to applications for authentication purposes.
When adding users to GlassFish, they must be incorporated with a security realm. The File security realm is available for use with the default installation, although more security realms can be created if desired. Adding users to realms is a fairly simple process, and individual users can be added by following the steps noted in the solution to this recipe. When creating a user, one of the options that can be specified is a group. You can think of a GlassFish user group as a role, in that more than one user can belong to a group. GlassFish does not contain a mechanism for managing the groups themselves; in fact, a group is merely a String value to GlassFish. However, if you follow through the steps in Recipe 14-2, you will see that groups can be mapped to roles at the application level. Therefore, if UserA belongs to a group named standard, then UserA can also belong to a group named admin. The application can then grant access to UserA for different portions of the application, depending upon which groups or roles the user belongs to.
Users in GlassFish are simplistic in that they are used for authentication and access purposes within the deployed applications only. Users can be managed only on a per-server installation basis, so they are a bit cumbersome since they cannot be shared across servers to provide a single sign-on solution. For that reason, it is recommended that GlassFish users be used for smaller applications or test purposes only. For a more substantial and enterprise authentication solution, either database or LDAP user accounts would be a better choice.
![]() Note To learn about configuring form-based authentication within the GlassFish application server and utilizing a database to store user credentials, see Recipe 11-6.
Note To learn about configuring form-based authentication within the GlassFish application server and utilizing a database to store user credentials, see Recipe 11-6.
14-2. Performing Basic Web Application Authentication
Problem
You have established users and associated them with groups within the application server container. Now you want to assign users to particular roles based upon the access levels that they require for the application and apply a basic authentication mechanism for access to specified application views.
Solution
Configure forms-based security using basic authentication within the web application deployment descriptor. Map roles to groups within the glassfish-web.xml deployment descriptor, if needed. The following excerpt was taken from the web.xml deployment descriptor of the JavaEERecipes sources. It demonstrates how to secure all of the views that reside within the chapter14 folder (determined by the url-pattern element within web.xml) such that a user name and password combination is required for access. The auth-method tag within web.xml specifies the type of authentication that will be used for the application. In the example, you’ll use BASIC authentication. Only those user names and passwords that have been configured in the GlassFish file realm with the appropriate group will be granted access; in this case, it is the users role.
<security-constraint>
       <web-resource-collection>
           <web-resource-name>secured</web-resource-name>
           <url-pattern>/faces/chapter14/*</url-pattern>
           <http-method>GET</http-method>
           <http-method>POST</http-method>
       </web-resource-collection>

       <auth-constraint>
           <role-name>users</role-name>
       </auth-constraint>

       <user-data-constraint>
       <transport-guarantee>CONFIDENTIAL</transport-guarantee>
       </user-data-constraint>
</security-constraint>

<login-config>
    <auth-method>BASIC</auth-method>
    <realm-name>file</realm-name>
</login-config>

<security-role>
    <role-name>users</role-name>
</security-role>
If role names specified in the web.xml deployment descriptor are the same as the group names that have been associated with users in GlassFish, then you are done. Users will be granted access to those areas of the application that have been secured, based upon the group association. However, if a role name differs from those groups that have been associated to users, you can manually map role names to group names by specifying a security-role-mapping in the glassfish-web.xml file for the application. The following excerpt, taken from the glassfish-web.xml configuration file for the JavaEERecipes application, demonstrates how to do map roles to GlassFish users. In this case, the role standard that was specified for the account in Recipe 14-1 is mapped to the users role. The users role has access to the /faces/chapter14/* url-pattern.
<security-role-mapping>
  <role-name>users</role-name>
  <group-name>standard</group-name>
</security-role-mapping>
Once everything has been configured, then access will be granted according to the configurations that have been placed within the web.xml deployment descriptor. To test the authentication mechanism, deploy the JavaEERecipes WAR file to your GlassFish v4 application server, and visit the following URL:
http://localhost:8080/JavaEERecipes/faces/chapter14/index.xhtml.
Solution #2
Use annotations to declare roles within an application for access to secured pages as deemed necessary. To implement access control on a particular class or method, annotate using @DeclareRoles and/or @RolesAllowed, specifying the roles that can be used to access them. Those users who are authenticated belonging to one of the specified roles will be granted access to the content.
In the example corresponding to this recipe, the chapter14_recipe14_02.xhtml JSF view contains two command buttons that invoke actions within a managed bean. Each of the buttons invokes a different action in the bean. One of the buttons invokes a method that is secured via the @RolesAllowed annotation, and the other does not. The following excerpt is taken from the class org.javaeerecipes.chapter14.recipe14_02.Recipe14_02b, which is the managed bean controller that contains the two methods being called from the command buttons:
public class Recipe14_02b implements Serializable {

    public Recipe14_02b() {
    }

    public String unsecuredProcess(){
        return "chapter14_recipe14_02_1.xhtml";
    }

    @RolesAllowed("users")
    public String securedProcess(){
        return "chapter14_recipe14_02_2.xhtml";
    }
}
When the commandButton that invokes the securedProcess method is clicked, the user will be prompted to authenticate if they have not already done so.
How It Works
There are a couple of ways to secure an application using basic application server authentication. Commonly, applications provide basic authentication security via the use of XML configuration within the web.xml deployment descriptor along with optional configuration within the glassfish-web.xml deployment descriptor. It is also possible to add basic authentication security into an application using code only, via declarative security. Declarative security is based on the use of annotations for declaring roles for access to application classes and methods. While both of these techniques are very similar in concept, each of them has its own set of bonuses in certain situations.
In Solution #1 to this recipe, XML configuration is used to secure access to all web views that reside within a specific folder in the application. To add security via XML configuration files, the web.xml deployment descriptor needs to have the security-constraint, login-config, and security-role elements added to it for mapping application roles to GlassFish users and groups. The security-constraint element encompasses a handful of subelements that are used to tell the application server container which areas of the application to secure and which accounts are able to access those secured areas. First, a web-resource-collection element is used to declare the locations of the application to secure and which HTTP methods to secure. The following elements should be embedded within a web-resource-collection element:
- web-resource-name: This is an optional name that can be specified for the secured location. In the recipe solution, the name secured is specified.
- url-pattern: This is the URL pattern that will be used to determine which areas of the application are to be secured. An asterisk (*) is to be used as a wildcard. In the recipe solution, chapter14/* specifies that all views contained within the chapter14 folder should be secured. If you want to secure a specific page, then utilize the URL pattern to that page, including the page name.
- http-method: This is used to specify which HTTP methods should be secured for access to the locations specified by the url-pattern element.
Another subelement that can be declared within the security-constraint element is the auth-constraint element. This element lists the different security roles that are used to secure the locations specified by the url-pattern via adding role-name subelements. In the recipe solution, the users role is declared for the application. A user-data-constraint element can also be included as a subelement to the security-constraint element in order to specify the type of protection that will be applied when data is transported between the client and the server. In the example, this has been set to CONFIDENTIAL. The values that can be specified for the transport guarantee are as follows:
- NONE: Data requires no transport security.
- INTEGRAL: Data cannot be changed in transit between the client and the server.
- CONFIDENTIAL: Outside entities are unable to observe the contents of the transmission. Secure Sockets Layer (SSL) will be used in this case, and it must be configured within the web server.
The security-role XML element lists the different roles that can be used for securing access to the application pages. Add the role-name subelement to the security-role for each role specification. The login-config XML element is used to specify the method of authentication that is to be used for securing the application. The auth-method should be set to BASIC for most cases, but all possible values are BASIC, DIGEST, FORM, and CLIENT-CERT.
Adding the designated elements to the web.xml deployment descriptor, as described in this section, provides sufficient ability for applications to be secured via a user name/login to specified secure locations. In some cases, it makes sense to use annotations to declare roles from within the application code itself. For such cases, the @DeclareRoles and @RolesAllowed annotations can be specified on a class or method. The following annotations can be used to specify security within a class. For each of the annotations, either a single role or a list of roles can be specified.
-
@DeclareRoles: This is specified at the class level, and each role that is allowed to access the class should be indicated within the annotation. For instance, one or more roles can be specified for access to the class using the following syntax:
Class level:
@DeclareRoles("users")
public class MyClass {
 . . .
}
Method level:
public class MyClass {
 . . .
    @DeclareRoles({"role1", "role2"})
    public void calculatePay(){
        . . .
    }
. . .
}
- @RolesAllowed: This is specified at either the class or method level. A list of roles that are allowed to access the class or method should be indicated within the annotation. The syntax is the same as with that of @DeclareRoles.
- @PermitAll: This is specified at the class or method level. It indicates that all roles are allowed access.
- @DenyAll: This is specified at the class or method level. It indicates that no roles are allowed access.
When both the @DeclareRoles and @RolesAllowed annotations are used within the same class, the combination of the roles listed within each are allowed to access that class. The roles specified for access on a particular method using @RolesAllowed override the roles that are listed to access the entire class.
It is possible to programmatically check to see which roles an authenticated user belongs to by calling the SessionContext isUserInRole method. This allows you to permit access to particular features of an application using conditional logic, as demonstrated by the following lines of code:
@DeclareRoles({"role1", "role2, "role3"}
public class MyClass {

    . . .
    @RolesAllowed("role2")
    public void calculatePay(){
        . . .
    }

    @PermitAll
    public void calculatePay(){
        if (ctx.isUserInRole("role1")) {
            . . .
        } else if (ctx.isUserInRole("role3")){
            . . .
        }
    }
    . . .
}
14-3. Developing a Programmatic Login Form
Problem
You want to secure your JSF application to a specified group of users. Furthermore, you want to create a custom login view, which will be used to pass user credentials to the appropriate business objects for authentication.
Solution
Develop a login form that consists of user name and password inputText fields, along with a commandButton to invoke a programmatic login action that resides within a managed bean controller. Develop logic within the managed bean controller to authenticate users. In the following example, a login form is generated using JSF and Facelets, utilizing a managed bean for authentication control.
A login form is basically the same as any other form, except it accepts a user name and a password as arguments and passes them to a JavaBean that utilizes the information to accept or deny the authentication request. The login form also utilizes a standard HTML form element that passes the user name (j_username) and password (j_password) field values to an action named j_security_check. The following code is used to comprise the login.xhtml form for a JSF authentication mechanism:
<?xml version="1.0" encoding="UTF-8" ?>
<!DOCTYPE html PUBLIC "-//W3C//DTD XHTML 1.0 Transitional//EN" "http://www.w3.org/TR/xhtml1/DTD/xhtml1-transitional.dtd">
<html xmlns="http://www.w3.org/1999/xhtml"
      xmlns:ui="http://xmlns.jcp.org/jsf/facelets"
      xmlns:h="http://xmlns.jcp.org/jsf/html"
      xmlns:f="http://xmlns.jcp.org/jsf/core"
      xmlns:p="http://primefaces.org/ui">

    <ui:composition template="/layout/custom_template.xhtml">
        <ui:define name="title">
            <h:outputText value="Welcome to the Acme Bookstore"></h:outputText>
        </ui:define>
        <ui:define name="content">


                    <form method="post" action="j_security_check" name="loginForm">
                        <center>
                            <p align="center" class="sub_head_sub"><br />
                                <strong>Acme Bookstore</strong>
                            </p>
                            <span class="normal">
                                You must authenticate to gain access to this application.  If you require
                                an account, please contact an administrator.
                            </span>
                            <br/>
                            <span class="error">
                                <h:messages errorStyle="color: red" infoStyle="color: green" globalOnly="true"/>
                            </span>
                            <h:panelGrid columns="2">
                <h:outputLabel id="userNameLabel" for="j_username" value="Username:"/>
                <h:inputText id="j_username" autocomplete="off" />
                <h:outputLabel id="passwordLabel" for="j_password" value="Password:"/>
                <h:inputSecret id="j_password" autocomplete="off"/>
                <div/>
                <h:panelGroup>
                    <h:commandButton type="submit" value="Login"/>
                    <h:commandButton type="reset" value="Clear"/>
                </h:panelGroup>
            </h:panelGrid>

                        </center>
                    </form>

            </ui:define>

    </ui:composition>

</html>
![]() Note The inputSecret component used in this example will display a series of asterisks, rather than plain text, when input is typed into the text box.
Note The inputSecret component used in this example will display a series of asterisks, rather than plain text, when input is typed into the text box.
Once loaded, the login form will resemble Figure 14-6 when using the Acme Bookstore template.
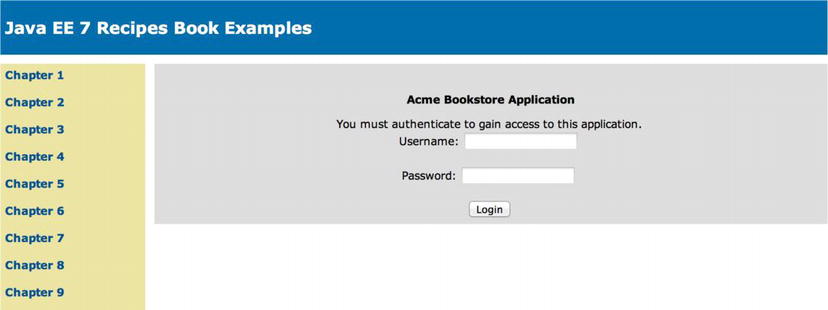
Figure 14-6 . Login Form Example
Coding the Authentication Backend
The authentication backend is responsible for performing the authentication and maintaining state for a user session. The backend logic consists of an EJB for maintaining the authentication logic and a JSF managed bean that is used for binding view methods and fields to backend logic. The managed bean controller should be session scoped so that the user state can be managed for an entire session. Lastly, if you’re using a database table to contain all of the user names that have access to the application, then an entity class will be required for that database table.
EJB
The Enterprise JavaBean that is required for the authentication backend is a stateless session bean that contains a login method, which makes calls to the application server container authentication mechanism. The following code is from the class org.javaeerecipes.chapter14.recipe14_03.AutheticationBean.java file in the JavaEERecipes sources:
import java.io.Serializable;
import javax.ejb.Remove;
import javax.ejb.Stateless;
import javax.faces.application.FacesMessage;

import javax.persistence.CacheRetrieveMode;

import javax.faces.context.FacesContext;
import javax.persistence.EntityManager;
import javax.persistence.NoResultException;
import javax.persistence.PersistenceContext;
import javax.persistence.Query;
import javax.servlet.ServletException;
import javax.servlet.http.HttpServletRequest;
import javax.servlet.http.HttpSession;

@Stateless
public class AuthenticationBean implements Serializable  {
    // We will be storing/retrieving users, passwords, and roles from a JPA object datastore
    @PersistenceContext(unitName = "EnvironmentalReviewPU")
    private EntityManager em;
    private boolean authenticated = false;
    private String username = null;
    private String password = null;
    HttpSession session = null;
    User user;


    public AuthenticationBean() {
    }


    public void findUser() {
        try {
            em.flush();

            getUser();
          // The following is a JPA query to look for the existence of one or more users by a                                                                                        specific name
            Query userQry = em.createQuery(
                    "select object(u) from User u "
                    + "where u.username = :username").setParameter("username", getUser().                                                                       getUsername().toUpperCase());

            // Enable forced database query
            userQry.setHint("javax.persistence.cache.retrieveMode", CacheRetrieveMode.BYPASS);
            setUser((User) userQry.getSingleResult());

            FacesContext.getCurrentInstance().addMessage(null, new
        FacesMessage(FacesMessage.SEVERITY_INFO, "Successfully Authenticated", ""));
        } catch (Exception e) {

            FacesContext.getCurrentInstance().addMessage(null, new
        FacesMessage(FacesMessage.SEVERITY_ERROR, "Invalid username/password", ""));
            setUser(null);

        }

    }

    public HttpSession getSession() {
        FacesContext context = FacesContext.getCurrentInstance();
        HttpServletRequest request = (HttpServletRequest) context.getExternalContext().getRequest();
        session = request.getSession(false);
        return session;
    }

    public boolean login() {

        HttpSession session = getSession();
        HttpServletRequest request = null;
        Query userQry = null;
        System.out.println("In the login method. . ." + getUser().getUsername());
        try {
            FacesContext context = FacesContext.getCurrentInstance();
            request = (HttpServletRequest) context.getExternalContext().getRequest();
            request.login(getUser().getUsername(), this.password);

            session.setMaxInactiveInterval(1800);

            em.flush();

            userQry = em.createQuery(
                    "select count(u) from User u "
                    + "where u.username = :username").setParameter("username",
    getUser().getUsername().toUpperCase());
            userQry.setHint("javax.persistence.cache.retrieveMode", CacheRetrieveMode.BYPASS);
            Long count = (Long)userQry.getSingleResult();
            if (count > 0){

                userQry = em.createQuery(
                        "select object(u) from User u "
                        + "where u.username = :username").setParameter("username",
    getUser().getUsername().toUpperCase());

                // Enable forced database query
                userQry.setHint("javax.persistence.cache.retrieveMode", CacheRetrieveMode.BYPASS);
                setUser((User) userQry.getSingleResult());
                System.out.println("Setting  User, user exists in database with role ->" +                                                                             user.getSecurityRole());
                setAuthenticated(true);
                session.setAttribute("authenticated", new Boolean(true));
            } else {
               // User cannot authenticate successfully
               FacesContext.getCurrentInstance().addMessage(null, new
    FacesMessage(FacesMessage.SEVERITY_ERROR, "Invalid username/password", ""));
            }


            FacesContext.getCurrentInstance().addMessage(null, new
     FacesMessage(FacesMessage.SEVERITY_INFO, "Successfully Authenticated", ""));


            return authenticated;
        } catch (NoResultException| ServletException ex) {
            setUser(null);
            setAuthenticated(false);
            session = getSession();
            session.setAttribute("authenticated", new Boolean(false));
            if(request != null){
                try {
                    request.logout();
                } catch (ServletException ex1) {
                    System.out.println("AuthBean#login Error: " + ex);
                }
            }
            FacesContext.getCurrentInstance().addMessage(null, new
    FacesMessage(FacesMessage.SEVERITY_ERROR, "Invalid username/password", ""));
            return false;

        } finally {
            setPassword(null);
        }
    }


    /**
     * @return the isAuthenticated
     */
    public boolean isAuthenticated() {

        if (getSession().getAttribute("authenticated") != null) {
            boolean auth = (Boolean) getSession().getAttribute("authenticated");
            if (auth) {
                authenticated = true;
            }
        } else {
            authenticated = false;
        }
        //      System.out.println("Are we authenticated? " + auth);
        return authenticated;
    }

    /**
     * @param isAuthenticated the isAuthenticated to set
     */
    public void setAuthenticated(boolean isAuthenticated) {
        this.authenticated = isAuthenticated;
    }

    @Remove
    public void remove() {
        System.out.println("Being removed from session. . .");
        setUser(null);
    }

    /**
     * @return the username
     */
    public String getUsername() {
        try {
            System.out.println("The current username is: " + user.getUsername());
            username = getUser().getUsername();
        } catch (NullPointerException ex) {
        }
        return username;
    }

    /**
     * @param username the username to set
     */
    public void setUsername(String username) {
        getUser().setUsername(username);
        System.out.println("Just set the username to : " + getUser().getUsername());
        this.username = null;
    }

    /**
     * @return the password
     */
    public String getPassword() {
        return this.password;
    }

    /**
     * @param password the password to set
     */
    public void setPassword(String password) {
        this.password = password;
    }

    /**
     * @return the user
     */
    public User getUser(){
        if (this.user == null) {
            user = new User();
        }
        return user;
    }

    /**
     * @param user the user to set
     */
    public void setUser(User user) {
        this.user = user;
    }
}
The managed bean controller is responsible for coordinating authentication efforts between the JSF view and the EJB. It also has a session scope so that the user’s state can be maintained throughout the life of the application session. The following code is taken from the org.javaeerecipes.chapter14.recipe14_03.AuthenticationController.java file that is contained within the JavaEERecipes sources:
import javax.faces.bean.SessionScoped;
import java.io.Serializable;
import javax.ejb.EJB;
import javax.faces.bean.ManagedBean;
import javax.faces.context.ExternalContext;
import javax.faces.context.FacesContext;
import javax.servlet.http.HttpServletRequest;
import javax.servlet.http.HttpSession;

@ManagedBean(name = "JavaEERecipesPU")
@SessionScoped
public class AuthenticationController implements Serializable {

    @EJB
    private AuthenticationBean authenticationFacade;
    private String username;
    private User user;
    private boolean authenticated;
    private HttpSession session = null;
    private String userAgent;

    /**
     * Creates a new instance of AuthenticationController
     */
    public AuthenticationController() {
        getUser();
    }

    public HttpSession getSession() {
        // if(session == null){
        FacesContext context = FacesContext.getCurrentInstance();
        HttpServletRequest request = (HttpServletRequest) context.getExternalContext().getRequest();
        session = request.getSession();

        return session;
    }

    /**
     * @return the username
     */
    public String getUsername() {
        this.username = getUser().getUsername();
        return this.username;
    }

    /**
     * @param username the username to set
     */
    public void setUsername(String username) {
        this.username = username;
        getUser().setUsername(username);
    }

    /**
     * @return the password
     */
    public String getPassword() {
        return authenticationFacade.getPassword();
    }

    /**
     * @param password the password to set
     */
    public void setPassword(String password) {
        authenticationFacade.setPassword(password);
    }

    public User getUser() {
        if (this.user == null) {
            user = new User();
            setUser(authenticationFacade.getUser());
        }

        return user;
    }

    public void setUser(User user) {
        this.user = user;
    }

    public String login() {
        authenticationFacade.setUser(getUser());
        boolean authResult = authenticationFacade.login();

        if (authResult) {
            this.authenticated = true;

            setUser(authenticationFacade.getUser());


            return "SUCCESS_LOGIN";
        } else {
            this.authenticated = false;
            setUser(null);
            return "BAD_LOGIN";
        }

    }

    public String logout() {
        user = null;
        this.authenticated = false;
        FacesContext facesContext = FacesContext.getCurrentInstance();
        ExternalContext externalContext = facesContext.getExternalContext();
        externalContext.invalidateSession();
        return "SUCCESS_LOGOUT";
    }

    /**
     * @return the authenticated
     */
    public boolean isAuthenticated() {
        try {
            // Allows subsequent requests to obtain authentication status from the session state
            boolean auth = (Boolean) getSession().getAttribute("authenticated");
            if (auth) {
                this.authenticated = true;

            } else {
                authenticated = false;
            }
        } catch (Exception e) {
            this.authenticated = false;
        }

        return authenticated;
    }

    public void setAuthenticated(boolean authenticated) {
        this.authenticated = authenticated;
    }
}
For any application, it is a good idea to maintain a list of users who have the ability to access the application pages. Furthermore, if an application requires fine-grained access control, it is important to assign roles to each user to indicate which privilege level each user should have for the application. A database table can be used for this purpose, and the table should contain a field for the user name of each person who has access to the application, as well as a field for the user role. The following SQL is used for creating the USER database table in an Oracle database:
create table users(
id number,
username varchar(150) not null,
password varchar(50) not null,
primary key (id));
The following class listing is that for the org.javaeerecipes.chapter14.recipe14_03.User.java file, which is an entity class within the JavaEERecipes sources:
import java.io.Serializable;
import java.math.BigDecimal;
import javax.persistence.Column;
import javax.persistence.Entity;
import javax.persistence.Id;
import javax.persistence.Table;


/**
 * Entity class User
 */
@Entity

@Table(name = "USER")

public class User implements Serializable {

    @Id
    @Column(name = "USER_ID", nullable = false)
    private BigDecimal userId;

    @Column(name = "USERNAME")
    private String username;

    @Column(name = "SECURITY_ROLE")
    private String securityRole;

    /** Creates a new instance of User */
    public User() {
    }

    /**
     * Creates a new instance of User with the specified values.
     * @param userId the userId of the User
     */
    public User(BigDecimal userId) {
        this.userId = userId;
    }

    /**
     * Gets the userId of this User.
     * @return the userId
     */
    public BigDecimal getUserId() {
        return this.userId;
    }

    /**
     * Sets the userId of this User to the specified value.
     * @param userId the new userId
     */
    public void setUserId(BigDecimal userId) {
        this.userId = userId;
    }

    /**
     * Gets the username of this User.
     * @return the username
     */
    public String getUsername() {
        return this.username;
    }

    /**
     * Sets the username of this User to the specified value.
     * @param username the new username
     */
    public void setUsername(String username) {
        this.username = username;
    }


    /**
     * Gets the securityRole of this User.
     * @return the securityRole
     */
    public String getSecurityRole() {
        return this.securityRole;
    }

    /**
     * Sets the securityRole of this User to the specified value.
     * @param securityRole the new securityRole
     */
    public void setSecurityRole(String securityRole) {
        this.securityRole = securityRole;
    }

    /**
     * Returns a hash code value for the object.  This implementation computes
     * a hash code value based on the id fields in this object.
     * @return a hash code value for this object.
     */
    @Override
    public int hashCode() {
        int hash = 0;
        hash += (this.userId != null ? this.userId.hashCode() : 0);
        return hash;
    }

    /**
     * Determines whether another object is equal to this User.  The result is
     * <code>true</code> if and only if the argument is not null and is a User object that
     * has the same id field values as this object.
     * @param object the reference object with which to compare
     * @return <code>true</code> if this object is the same as the argument;
     * <code>false</code> otherwise.
     */
    @Override
    public boolean equals(Object object) {
        return false;
        }
        User other = (User)object;
        if (this.userId != other.userId && (this.userId == null ||
    !this.userId.equals(other.userId))) return false;
        return true;
    }
}
How It Works
The HTTP request login method can be used to programmatically authenticate users for an application when the application server form-based authentication has been configured. A JSF form can pass parameters to a managed bean controller, which can pass them to the HTTP request login method to perform programmatic authentication using the credentials.
As demonstrated in the login form that is listed in the solution to this recipe, a standard JSF view can be coded that passes values from the inputText components to a corresponding managed bean controller. The corresponding fields, username and password, are bound to properties within the managed bean controller. The user name is then set into the username property of a new User entity object, and the password value is passed directly into the EJB for later use. The password is not stored in the managed bean controller at all, and therefore, it is not stored into the session.
Let’s take a moment to discuss the methods within the managed bean controller. In the example, a commandButton is contained within the view, which is bound to the managed bean controller’s login method. Once invoked, the login method invokes a method within the EJB, which is responsible for performing the actual authentication against the application server container and JPA data store user table. In this case, the EJB method is also named login, and when it is invoked, then the User entity object is passed to the EJB so that the username property that is stored in the object can be used for authentication purposes. The login method within the managed bean controller invokes the EJB login method, which passes back a Boolean value to indicate whether the credentials have successfully authenticated the user. Depending upon the outcome, the user is then granted or denied access to the application. Also within the managed bean controller is a logout method. This method invalidates the current session by obtaining the external context, which is the application server context, and then by invoking its invalidate method.
The login method within the EJB is where the real activity occurs because it is where the application server HTTP request login method is invoked to verify the credentials. First, the HttpServletRequest object is obtained from the external context, and then its login method is called. This method accepts the user name and password values, initiates the application server authentication mechanism, and raises an exception if the credentials are invalid. Otherwise, if the credentials are valid, then a time limit is set on the HttpSession object. The value passed to the session.setMaxInactiveInterval method indicates how long a user session can be inactive before the application server automatically invalidates the session. The remainder of this method is used for performing application-specific authentication using the User entity object. In the example, the entity manager is flushed, and then a query is issued that counts the number of User entity objects matching the user name that has been entered via the login form. When querying the entity, a hint is set that forces the database to be queried each time the request is initiated. The following line of code is an excerpt from the EJB login method that demonstrates how to set this hint:
user.setHint("javax.persistence.cache.retrieveMode", CacheRetrieveMode.BYPASS);
If there are zero matching entity objects for a given username, then the user is not authenticated to the application, and a false value is returned to the managed bean controller to indicate invalid credentials. Otherwise, if there is a matching entity object for the given user name, then the matching entity object is obtained, and a session attribute is set to indicate that the user was successfully authenticated.
![]() Note Applications can contain their own set of users, one that is separate from those users who are managed by the GlassFish application server or database. One way of doing so is to create a separate database table for each application, which will be used to store user names and roles for those users who may access the application. The login logic that is contained within the managed bean controller can then perform a query on the application-specific table to see whether the user name specified within the login view is contained within the table. If the user name is in the table, then the user can be granted access to the application; otherwise, no access will be granted. This approach adds two steps into the authentication process: application server forms-based authentication and authentication at the database table level.
Note Applications can contain their own set of users, one that is separate from those users who are managed by the GlassFish application server or database. One way of doing so is to create a separate database table for each application, which will be used to store user names and roles for those users who may access the application. The login logic that is contained within the managed bean controller can then perform a query on the application-specific table to see whether the user name specified within the login view is contained within the table. If the user name is in the table, then the user can be granted access to the application; otherwise, no access will be granted. This approach adds two steps into the authentication process: application server forms-based authentication and authentication at the database table level.
14-4. Managing Page Access Within a JSF Application
Problem
You have set up authentication for your JSF application, specifying access to a limited user base via a user name and password combination. You want to limit certain views within your application such that only members of a particular role will be granted permission access.
Solution
Authenticate a user to an application and store a Boolean indicating that the user has been successfully authenticated. Utilize that Boolean to perform conditional logic within JSF views to render forms that should be accessed only via authenticated users. If a user is successfully authenticated, then the form is rendered, and if the user is not successfully authenticated, then the form will provide an error message indicating that authentication is required for access.
The following JSF view demonstrates the use of conditional logic for displaying portions of the page that require controlled access:
<?xml version="1.0" encoding="UTF-8" ?>
<!DOCTYPE html PUBLIC "-//W3C//DTD XHTML 1.0 Transitional//EN" "http://www.w3.org/TR/xhtml1/DTD/xhtml1-transitional.dtd">
<html xmlns="http://www.w3.org/1999/xhtml"
      xmlns:ui="http://xmlns.jcp.org/jsf/facelets"
      xmlns:h="http://xmlns.jcp.org/jsf/html"
      xmlns:f="http://xmlns.jcp.org/jsf/core"
      xmlns:p="http://primefaces.org/ui">

    <ui:composition template="/layout/custom_template.xhtml">
        <ui:define name="title">
            <h:outputText value="Java EE 7 Recipes Controlled Access"></h:outputText>
        </ui:define>
        <ui:define name="body">
            <h:panelGroup id="messagePanel" layout="block">
                <h:messages errorStyle="color: red" infoStyle="color: green" layout="table"/>
            </h:panelGroup>
            <p:panel rendered="#{authenticationController.authenticated}">
                <h:form>

                    This portion of the view contains secret content!


                </h:form>
            </p:panel>
            <p:panel rendered="#{!authenticationController.authenticated}">
                Please <a href="#{request.contextPath}/faces/chapter14/recipe14_03.xhtml">                                                                  authenticate</a> to use this form.

            </p:panel>
        </ui:define>
    </ui:composition>

</html>
How It Works
The rendered attribute of JSF components can be used to perform conditional rendering. If you bind the rendered attribute to a managed bean property that returns a Boolean indicating whether a user is authenticated, then this technique can be used to control access to certain components. In this example, this technique is demonstrated using a PrimeFaces panel component. The panel contains information that should be secured, and it is rendered only if the authenticated property returns a true value. If the authenticated property contains a false value, then a different panel component is rendered, which displays a message to the user indicating that authentication is required.
The managed bean controller that is used for programmatic authentication within a JSF application should contain a Boolean value that can be bound to the conditional logic within the JSF view to indicate whether the current user has successfully authenticated. For this example, the managed bean controller, org.javaeerecipes.chapter14.recipe14_03.AuthenticationController, contains a Boolean field named authenticated. The following excerpt from the class shows the isAuthenticated method, which is called when the authenticated property is accessed from a JSF view:
public boolean isAuthenticated() {
    try {
        boolean auth = (Boolean) getSession().getAttribute("authenticated");
        if (auth) {
            this.authenticated = true;

        } else {
            authenticated = false;
        }
    } catch (Exception e) {
        this.authenticated = false;
    }

    return authenticated;
}
This same technique can be used to hide or show individual components based upon a user’s authentication. Furthermore, fine-grained access control can be used to provide Boolean values to the rendered attribute by utilizing JSF EL conditional expressions. For instance, if some components should be accessed only by users who belong in certain security roles, then a conditional expression can be used to render a component if the user belongs to a specified role. The following line of code demonstrates how to render an outputText component if a user belongs to the ADMIN security role:
<h:outputLink rendered="${authenticationController.user.securityRole eq 'ADMIN'}" value="#" onclick="dialog.show()">Delete Property</h:outputLink>
Although the rendered attribute may not allow you to secure every part of an application, when used along with other security measures such as annotating methods (Recipe 14-2), it can help provide a very secure environment.
14-5. Configuring LDAP Authentication Within GlassFish
Problem
You want to authenticate users to your application based upon a centrally located LDAP server for your organization’s enterprise.
Solution
Create a security realm for GlassFish from within the administrative console utility, and set it up as a com.sun.enterprise.security.auth.realm.ldap.LDAPRealm. To create an LDAP security realm within GlassFish, use the following procedure:
- Log into the GlassFish administrative console.
- Traverse to the Realms form by expanding the left tree menu Configurations Security server-config Realms.
- Click the New… button within the Realms form to create a new security realm.
- Within the New Realm form, provide a name for the security realm. Next, select com.sun.enterprise.security.auth.realm.ldap.LDAPRealm from the Class Name pull-down menu. This will open the configurations for setting up an LDAP realm (Figure 14-7).
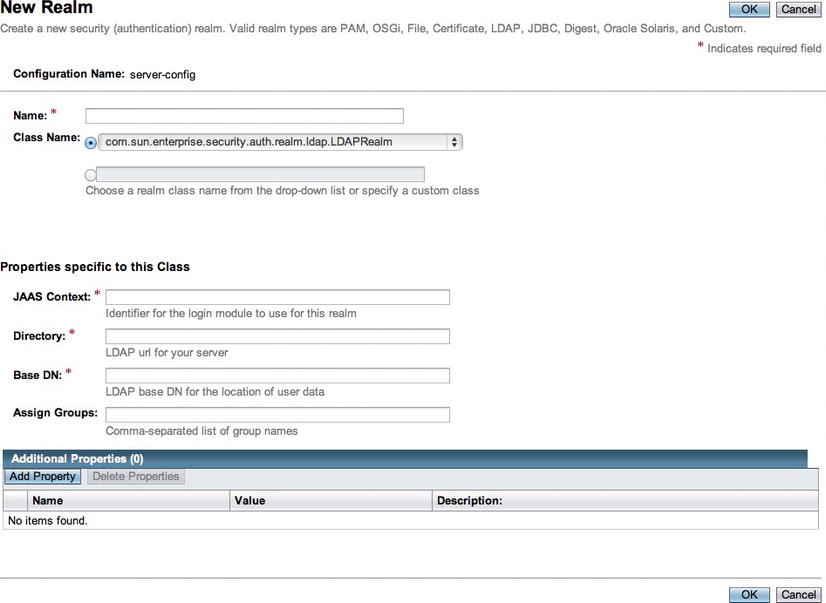
Figure 14-7 . New LDAP security realm
- Complete the properties specific to the class in order to connect to an LDAP server of your choice.
- Add the following additional properties by clicking the Add Property button and providing the name-value information for each:
- search-bind-dn: Enter the fully qualified DN for your LDAP host, directory, and the LDAP account to which you will authenticate. For example:
CN=account-name,OU=AccountGroup,DC=dc1,DC=dc2,DC=dc3
- search-bind-password: Enter the password for the account name you specified previously.
- search-filter: Type the following as the value for this property: (sAMAccountName=%s).
- search-bind-dn: Enter the fully qualified DN for your LDAP host, directory, and the LDAP account to which you will authenticate. For example:
- Restart the application server.
How It Works
Perhaps the most efficient way to authenticate to applications is to utilize an LDAP account. Using an LDAP account for authentication can provide a single sign-on solution across all of an organization’s servers and applications. LDAP authentication also provides a single point of maintenance for account information and still allows individual applications to maintain their own fine-grained security via roles. The solution to this recipe enumerates the steps that are involved in setting up an LDAP security realm within the GlassFish application server. However, you can follow similar procedures for setting up an LDAP security realm in other application server containers.
Once you have LDAP authentication set up within the application server, you can configure your applications to use it. To configure an application to use LDAP authentication, add the following configurations to the web.xml deployment descriptor:
<login-config>
        <auth-method>FORM</auth-method>
        <realm-name>REALM-NAME</realm-name>
        <form-login-config>
            <form-login-page>/faces/login.xhtml</form-login-page>
            <form-error-page>/faces/loginError.xhtml</form-error-page>
        </form-login-config>
</login-config>
In the previous excerpt from web.xml, the realm-name element should be the same as the name given to the LDAP security realm you created within GlassFish. The form-login-page and form-error-page values should reference the views that are to be used for logging into an application and the view that is displayed when there is a login error, respectively. Authenticating into an LDAP security realm is the same as that covered in Recipe 14-3. Simply call the HttpRequest object’s login method to authenticate using the credentials provided by the user via the login view.
14-6. Configuring Custom Security Certificates Within GlassFish
Problem
You want to utilize custom certificates for securing access via SSL within your GlassFish environment.
Solution
Obtain a certificate from a certified certificate authority, and then install it into the GlassFish application server container. Once installed, route requests via a secured port that utilizes SSL and force users to accept the security certificate to proceed. To install a certificate that has been obtained from a valid certificate authority, follow these steps:
- Copy the trusted root certificate from your certified authority to your server. Issue the following command from the command line or terminal:
keytool –import –alias root –keystore keystore_name.keystore –trustcacerts –file trustedcarootcertificate.crt - Next, import the trusted certificate:
keytool –import –alias cert_alias –keystore keystore_name.keystore –trustcacerts –file certificate.crt - Adjust SSL settings from within the GlassFish administrative console. To adjust the settings, go to Configuration Network Config- Network Listeners http-listener-2 in order to open the secured HTTP listener page. Once it’s open, select the SSL tab, and enter the certificate nickname and keystore that match the ones you used in step 2.
- Restart your server, and then access your applications securely using this URL:
https://localhost:8181/your_application_context
![]() Note In the previous numbered list, keystore_name.keystore represents the name of a keystore, and trustedcarootcertificate.crt and certificate.crt represent the name of certificates.
Note In the previous numbered list, keystore_name.keystore represents the name of a keystore, and trustedcarootcertificate.crt and certificate.crt represent the name of certificates.
How It Works
GlassFish comes with a self-signed security certificate that is suitable for test environments. However, when utilizing GlassFish as a production application server solution, it is imperative that a certificate from a verified authority be put in place in order to secure application transport. This recipe demonstrates how to install a security certificate for use with SSL in order to achieve secure transport.
Before you can install a verified certificate, you need to obtain it. You will need to choose from one of the many certificate authorities and then send a certificate request, which includes the key from your application server. A keystore will need to be created in order to generate a certificate request. Issue the following command from the command line or terminal to create the keystore:
keytool –keysize 2048 –genkey –alias –keyalg RSA –dname "CN=yourdomain.org,O=company_name,L=city,S=state,C=country" – keypass glassfish_master_password –storepass glassfish_master_password –keystore choose_keystore_name.keystore
Once the keystore has been created, a certificate signing request that will be sent to the certificate authority can be generated. To generate the certificate signing request (CSR), issue the following command from your server:
keytool –certreq –alias –keystore chosen_keystore_name.keystore –storepass glassfish_master_password –keypass glassfish_master_password –file csrname.csr
![]() Note To change the GlassFish master password, issue the following command when your GlassFish domain is stopped: asadmin change-master-password –savemasterpassword=true.
Note To change the GlassFish master password, issue the following command when your GlassFish domain is stopped: asadmin change-master-password –savemasterpassword=true.
Once you submit your CSR to the certificate authority, the certificate authority will send back a valid security certificate that can be installed into your server. Follow the steps in the solution to this recipe to install the certificate into GlassFish. Once the certificate is installed, your server will be verified secure via the certificate authority, and users should see a message indicating as such (usually a green lock) in their browsers when visiting your secured sites.