
![]()
Concurrency and Batch Applications
The Java Enterprise platform has been missing a few key features since its inception. Those features include standard techniques for processing tasks concurrently, and standardization for batch application processing. In the release of Java EE 7, these two missing features have been addressed with the addition of the Java Concurrency Utilities and Batch Processing APIs.
Each of the two APIs is quite large, and they include proven solutions that have been used by various enterprise projects for years. Using Java SE concurrency utilities such as java.util.concurrent and java.lang.Thread in Java EE applications has been problematic in the past, since the application server container has no knowledge of such resources. Extensions of the java.util.concurrent API allows application servers and other EE containers to become aware of these concurrency resources. The extensions allow enterprise applications to appropriately utilize asynchronous operations via the use of java.util.concurrent.ExecutorService resources that are made available within the EE environment.
The new API for batch processing provides a fine-grained experience for developers, which enables them to produce and process batch applications in a variety of different ways. Enterprise applications no longer need to utilize customized classes for performing batch processing, allowing enterprise applications to adhere to an adopted standard.
The scope of these additional APIs is very large, and this chapter will not attempt to cover each feature. However, the recipes contained within should provide enough information to get a developer up-and-running using some of the most frequently required pieces of each API. For more in-depth information regarding the details of the Concurrency Utilities for Java EE, please refer to the JavaDoc located at http://concurrency-ee-spec.java.net/javadoc/.
19-1. Creating Resources for Processing Tasks Asynchronously in an Application Server
Problem
You would like to register a ManagedExecutorService resource within your application server environment.
Solution #1
Create a new ManagedExecutorService using the asadmin create-managed-executor-service utility. To utilize concurrent utilities such as reporter tasks, the application server must be configured to utilize a ManagedExecutorService. To create a ManagedExecutor Service in GlassFish, run the following command at the command prompt:
<path-to-glassfish>/bin/asadmin create-managed-executor-service concurrent/BatchExecutor
In the preceding command-line action, the name of the ManagedExecutorService that is being created is concurrent/BatchExecutor. However, this could be changed to better suit the application. To see all of the options available for the create-managed-executor-service command, issue the --help flag. The following shows the results of doing so:
bin/asadmin create-managed-executor-service --help
NAME
     create-managed-executor-service

SYNOPSIS
     Usage: create-managed-executor-service [--enabled=true] [--c
     ontextinfo=contextinfo] [--threadpriority=5] [--longrunningt
     asks=false] [--hungafterseconds=hungafterseconds] [--corepoo
     lsize=0] [--maximumpoolsize=2147483647] [--keepaliveseconds=
     60] [--threadlifetimeseconds=0] [--taskqueuecapacity=2147483
     647] [--description=description] [--property=property] [--ta
     rget=target] jndi_name

OPTIONS
     --enabled

     --contextinfo

     --threadpriority

     --longrunningtasks

     --hungafterseconds

     --corepoolsize

     --maximumpoolsize

     --keepaliveseconds

     --threadlifetimeseconds

     --taskqueuecapacity

     --description

     --property

     --target

OPERANDS
     jndi_name
Solution #2
Create a ManagedExecutorService using the GlassFish Server Administration Console. To do so, authenticate successfully into the administrative console, and navigate to the Concurrent Resources ![]() Managed Executor Services administration panel using the left-hand tree menu (see Figure 19-1).
Managed Executor Services administration panel using the left-hand tree menu (see Figure 19-1).
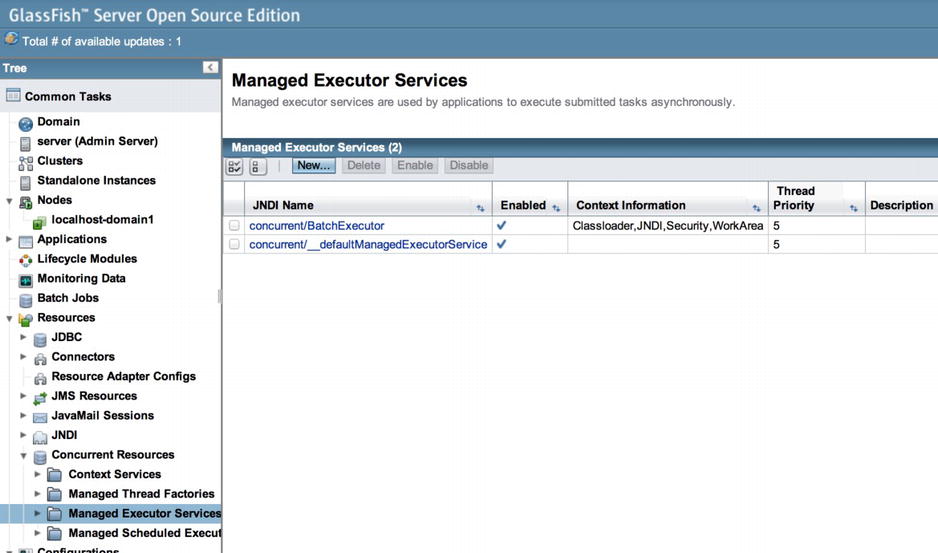
Figure 19-1. GlassFish Managed Executor Services panel
Once you’ve opened the panel, click the New button to create a new service. This will open the New Managed Executor Service panel, in which you will be required to populate a JNDI Name for your new service (see Figure 19-2).
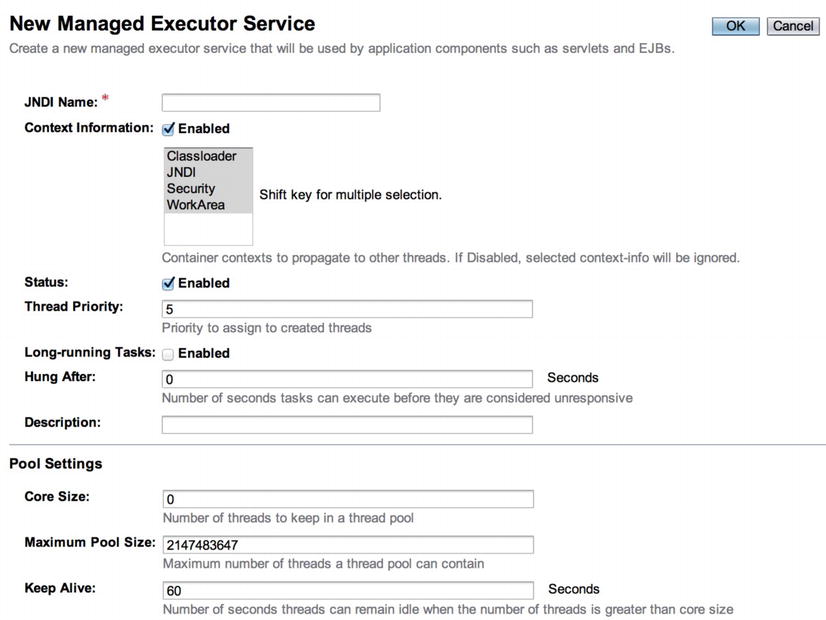
Figure 19-2. New Managed Executor Service panel
This panel offers quite a few options for creation of the service. However, the only option that is required is the JNDI Name, as all others are populated with default values. The JNDI name that is specified should follow the format of concurrent/YourExecutorServiceName, where YourExecutorServiceName is a custom name of your choice.
How It Works
In Java EE 7, the ManagedExecutorService was introduced, adding the ability to produce asynchronous tasks that are managed by an application server. Application server administrators can create ManagedExecutorService resources within an application server that can be utilized by one or more applications, much like a Java Message Service (JMS) Topic or Queue. To create a service, issue the asadmin create-managed-executor-service command at the command prompt, passing the name that you would like to use to identify the service. There are a bevy of options that can be used to customize the service in different ways. For instance, the service can be configured to let tasks run for a specified amount of time, pools can be configured, and so forth, allowing you to generate a ManagedExecutorService that will best suit the application requirements.
For those who would prefer to work within the GlassFish administration console, there have been a few new administration panels added to make creation and management of concurrent resources easier. The new Managed Executor Service panel can be used to create new application server ManagedExecutorService resources, as well as manage those that already exist.
19-2. Configuring and Creating a Reporter Task
Problem
You would like to create a long-running task that will communicate with a database and generate a report in the end.
Solution
Once the application server has been configured and the ManagedExecutorService has been created, an application can be written to utilize the newly created service. Within an application, you can choose to configure the application to make use of the ManagedExecutorService via XML, or a @Resource annotation can be used to inject the resource. To configure via XML, add a <resource-env-ref> element to the web.xml deployment descriptor. In this case, you need to configure a resource of type javax.enterprise.concurrent.ManagedExecutorService, as shown in the following excerpt from the web.xml:
<resource-env-ref>
 <description>
This executor is used for the application's reporter task. This executor has the following requirements:
Run Location: NA
Context Info: Local Namespace
 </description>
    <resource-env-ref-name>
        concurrent/BatchExecutor
    </resource-env-ref-name>
    <resource-env-ref-type>
        javax.enterprise.concurrent.ManagedExecutorService
    </resource-env-ref-type>
</resource-env-ref>
In the XML configuration, the resource has been assigned to a reference name of concurrent/BatchExecutor, but you could name the reference to best suit your application. If you would rather utilize an annotation, then the following @Resource annotation can be specified to inject a ManagedExecutorService into a class for use. You will see an example of this in use later on.
@Resource(name = "concurrent/BatchExecutor")
ManagedExecutorService mes;
Once the configuration is complete, you can create a report task class, which is a class that implements Runnable and is responsible for running the actual reports. The following class, org.javaeerecipes.chapter19.recipe19_02.ReporterTask, is an example of such as class.
import java.util.List;
import javax.ejb.EJB;
import org.javaeerecipes.jpa.entity.Book;
import org.javaeerecipes.jpa.entity.BookAuthor;
import org.javaeerecipes.jpa.session.BookAuthorFacade;
import org.javaeerecipes.jpa.session.BookFacade;

/**
 * Example of a Reporter Task
 * @author Juneau
 */
public class ReporterTask implements Runnable {

    String reportName;
    @EJB
    private BookAuthorFacade bookAuthorFacade;
    @EJB
    private BookFacade bookFacade;

    public ReporterTask(String reportName) {
        this.reportName = reportName;
    }

    public void run() {
// Run the named report
        if ("AuthorReport".equals(reportName)) {
            runAuthorReport();


        } else if ("BookReport".equals(reportName)) {
            runBookReport();
        }
    }

    /**
     * Prints a list of authors to the system log.
     */
    public void runAuthorReport() {
        List<BookAuthor> authors = bookAuthorFacade.findAuthor();
        System.out.println("Author Listing Report");
        System.out.println("=====================");

        for (BookAuthor author : authors) {
            System.out.println(author.getFirst() + " " + author.getLast());
        }
    }

    /**
     * Prints a list of books to a file
     */
    void runBookReport() {
        System.out.println("Querying the database");
        Path reportFile = Paths.get("BookReport.txt");

        try (BufferedWriter writer = Files.newBufferedWriter(
                reportFile, Charset.defaultCharset())) {
            Files.deleteIfExists(reportFile);
            reportFile = Files.createFile(reportFile);
            writer.append("Book Listing Report");
            writer.newLine();
            writer.append("===================");
            writer.newLine();
            List<Book> books = bookFacade.findAllBooks();
            for (Book book : books) {
                writer.append(book.getTitle());
                writer.newLine();
            }
            writer.flush();
        } catch (IOException exception) {
            System.out.println("Error writing to file");
        }


    }
}
Lastly, the report needs to be invoked by the ManagedExecutorService that was configured within the web.xml. In this example, the ManagedExecutorService is injected into a servlet, which is then used to invoke the report, as seen in the following code:
@WebServlet(name = "BookReportServlet", urlPatterns = {"/BookReportServlet"})
public class ReportServlet extends HttpServlet implements Servlet {

    @Resource(name = "concurrent/BatchExecutor")
    ManagedExecutorService mes;

    protected void processRequest(HttpServletRequest request, HttpServletResponse response)
            throws ServletException, IOException {
        response.setContentType("text/html;charset=UTF-8");
        PrintWriter out = response.getWriter();
        try {

            out.println("<html>");
            out.println("<head>");
            out.println("<title>Book Report Invoker</title>");
            out.println("</head>");
            out.println("<body>");
            out.println("<h2>This servlet initiates the book report task.  Please look " +
                    "in the server log to see the results.</h2> <br />" +
                    " Updating the web page is not run asynchronously, however, " +
                    " the report generation will process independently.");
            out.println("<br/><br/>");
            ReporterTask reporterTask = new ReporterTask("BookReport");
            Future reportFuture = mes.submit(reporterTask);
            while( !reportFuture.isDone() )
                out.println("Running...<BR>");
            if (reportFuture.isDone()){
                out.println("Report Complete");
            }
            out.println("</body>");
            out.println("</html>");
        } finally {
            out.close();
        }
    }
...
}
When the servlet is visited, the reporter task will be initiated and it will begin to produce results.
How It Works
After the ManagedExecutorService has been created, it can be utilized by one or more applications to perform concurrent operations. An application must be either configured via XML to allow access to the ManagedExecutorService resource in the application server container, or the resource can be injected via the use of the @Resource annotation. In the example for this recipe, each of these options is demonstrated. For the purposes of the example, it is assumed that the @Resource annotation is utilized to inject the service into the servlet.
To run a task concurrently using the service, you must create the task in a separate class that implements java.util.Runnable so that it can be invoked as a separate process, much like a standard Java Thread. In the example, a class named ReporterTask implements Runnable, and within the run method, the reporter task performs the tasks that we wish to run in an asynchronous manner. In this example, a couple of methods are invoked from within the run method. The Runnable class that has been generated can then be passed to the ManagedExecutorService to be run concurrently while other tasks are being performed by the application. To make use of the ManagedExecutorService, register it with the application via XML or by resource injection. In the example for this recipe, resource injection is utilized, making the ManagedExecutorService available from within the Java servlet. To inject the resource, specify the name of it to the @Resource annotation.
@Resource(name = "concurrent/BatchExecutor")
ManagedExecutorService mes;
The ManagedExecutorService can then be invoked by calling the submit method, and passing an instance of the Runnable task that we’d like to submit for processing. In this case, the ReporterTask class is instantiated, and an instance of it is then passed to the service, returning a java.util.concurrent.Future object.
ReporterTask reporterTask = new ReporterTask("BookReport");
Future reportFuture = mes.submit(reporterTask);
Once submitted, the Future object that was returned can be periodically checked to see if it is still running or if it has been completed by calling its isDone method. It can be cancelled by calling the cancel method, and a canceled task can be checked by calling its isCanceled method.
The reporter task is a long-running task that queries the database to obtain data for generation of a report. Having the ability to run such a task asynchronously fills a gap in the Java enterprise ecosystem that developers have been dealing with in enterprise solutions since the inception of Java EE.
19-3. Running More Than One Task Concurrently
Problem
You require the ability to run two or more tasks concurrently within your application. For instance, the application you are writing needs the ability to connect a database and retrieve data from two or more tables to obtain results at the same time. You wish to have the results aggregated before returning them to the user.
Solution
Create a builder task that can be used to run two different tasks in parallel. Each of the tasks can retrieve the data from the different sources, and in the end, the data will be merged together and aggregated to formulate the result. To utilize a builder task, the application server environment must first be configured with a ManagedExecutorService, as per Recipe 19-1. Once the resource has been configured, an application can be configured to make use of the resource via XML or annotation. To utilize XML configuration, add a <resource-env-ref> element to the web.xml deployment descriptor. In this case, you need to configure a resource of type javax.enterprise.concurrent.ManagedExecutorService, as shown in the excerpt from the web.xml in Recipe 19-2, and repeated as follows:
<resource-env-ref>
 <description>
This executor is used for the application's builder tasks. This executor has the following requirements:
Run Location: Local
Context Info: Local Namespace, Security
 </description>
    <resource-env-ref-name>
        concurrent/BuilderExecutor
    </resource-env-ref-name>
    <resource-env-ref-type>
        javax.enterprise.concurrent.ManagedExecutorService
    </resource-env-ref-type>
</resource-env>
In this example, the ManagedExecutorService resource in the application is configured to work with a resource that has been registered with the application server container and identified by the JNDI name of concurrent/BuilderExecutor. If you would rather utilize an annotation, then the following @Resource annotation can be specified to inject a ManagedExecutorService into a class for use within the Runnable.
@Resource(name = "concurrent/BuilderExecutor")
ManagedExecutorService mes;
Once the application has been configured to work with the ManagedExecutorService resource, you can create task classes for each of the different tasks that you wish to run. Each task class must implement the javax.enterprise.concurrent.ManagedTask interfaces. The following code is from the file org.javaeerecipes.chapter19.recipe19_03.AuthorTask.java, and it shows what a task class should look like.
public class AuthorTask implements Callable<AuthorInfo>, ManagedTask {
    // The ID of the request to report on demand.
    BigDecimal authorId;
    AuthorInfo authorInfo;
    Map<String, String> execProps;

    public AuthorTask(BigDecimal id) {
        this.authorId = id;
        execProps = new HashMap<>();

        execProps.put(ManagedTask.IDENTITY_NAME, getIdentityName());
    }

    public AuthorInfo call() {
// Find the entity bean and return it to the client.
        return authorInfo;
    }

    public String getIdentityName() {
        return "AuthorTask: AuthorID=" + authorId;
    }

    public Map<String, String> getExecutionProperties() {
        return execProps;
    }

    public String getIdentityDescription(Locale locale) {
        // Use a resource bundle...
        return "AuthorTask asynchronous EJB invoker";
    }

    @Override
    public ManagedTaskListener getManagedTaskListener() {
        return new CustomManagedTaskListener();
    }


}
One or more of such task classes can be implemented, and then they can be processed via the builder task using the ManagedExecutorService resource that has been registered with the application server container. The following servlet makes use of a ManagedExecutorService to coordinate the invocation of two task classes. In this case, the task class names are AuthorTask and AuthorTaskTwo.
@WebServlet(name = "BuilderServlet", urlPatterns = {"/builderServlet"})
public class BuilderServlet extends HttpServlet implements Servlet {
    // Retrieve our executor instance.

    @Resource(name = "concurrent/BuilderExecutor")
    ManagedExecutorService mes;
    AuthorInfo authorInfoHome;
    BookInfo bookInfoHome;

    protected void processRequest(HttpServletRequest req, HttpServletResponse resp) throws ServletException, IOException {
        try {
            PrintWriter out = resp.getWriter();
            // Create the task instances
            ArrayList<Callable<AuthorInfo>> builderTasks = new ArrayList<Callable<AuthorInfo>>();
            builderTasks.add(new AuthorTask(BigDecimal.ONE));
            builderTasks.add(new AuthorTaskTwo(BigDecimal.ONE));

            // Submit the tasks and wait.
            List<Future<AuthorInfo>> taskResults = mes.invokeAll(builderTasks);
            ArrayList<AuthorInfo> results = new ArrayList<AuthorInfo>();
            for(Future<AuthorInfo> result: taskResults){
                results.add(result.get());
                out.write("Processing Results...");
            }
        } catch (InterruptedException|ExecutionException ex) {
            Logger.getLogger(BuilderServlet.class.getName()).log(Level.SEVERE, null, ex);
        }
    }
...
}
How It Works
After the ManagedExecutorService has been created, it can be utilized by one or more applications to perform concurrent operations. An application must be either configured via XML to allow access to the ManagedExecutorService resource in the application server container, or the resource can be injected via the use of the @Resource annotation. In the example for this recipe, each of these options is demonstrated. For the purposes of the example using the servlet, it is assumed that the @Resource annotation is utilized to inject the service into the servlet and no XML configuration has been made.
To coordinate the processing of tasks in an asynchronous manner via a ManagedExecutorService, the tasks that need to be processed should be contained in separate classes or multiple instances of the same task class. Each of the task classes should implement the java.util.concurrent.Callable and javax.enterprise.concurrent.ManagedTask interfaces. A task class should include a constructor that enables a caller to pass arguments that are required to instantiate the object, and should implement a call method, which returns the information that is needed to construct the report to the client. Two or more such task classes can then be invoked via the ManagedExecutorService in order to process all results into the required format.
To assemble the tasks for processing, create an ArrayList<Callable>, and add instances of each task to the array. In the example, the array is named builderTasks, and instances of two different task types are added to that array.
ArrayList<Callable<AuthorInfo>> builderTasks = new ArrayList<Callable<AuthorInfo>>();
builderTasks.add(new AuthorTask(BigDecimal.ONE));
builderTasks.add(new AuthorTaskTwo(BigDecimal.ONE));
Next, pass the array that has been constructed to the ManagedExecutorService, returning a List<Future<object>>, which can then be used to process the results.
List<Future<AuthorInfo>> results = mes.invokeAll(builderTasks);
AuthorInfo authorInfo = (AuthorInfo) results.get(0).get();
// Process the results
Utilizing this technique, a series of tasks can be concurrently processed, returning results that can be later used to formulate a response. In this example, a report is constructed by calling two task classes and returning the results of queried information. This same technique can be applied to an array of different tasks, allowing an application to process the results of multiple task invocations in one central location.
19-4. Utilizing Transactions Within a Task
Problem
You would like to manage a transaction within an application task that will be processed using a ManagedExecutorService resource.
Solution
Make use of the javax.transaction.UserTransaction to create and manage a transaction. The following example demonstrates how to make use of the UserTransaction interface to demarcate transactions within a task class that will be processed by a ManagedExecutorService.
public class UserTransactionTask implements Runnable {

    @Resource
    SessionContext ctx;

    @EJB
    private BookAuthorFacade bookAuthorFacade;
    UserTransaction ut = ctx.getUserTransaction();

    public void run() {
        try {
            // Start a transaction ut.begin();
            ut.begin();
            List<BookAuthor> authors = bookAuthorFacade.findAuthor();
            for (BookAuthor author : authors) {
                // do something
            }
            ut.commit();
        } catch (NotSupportedException | SystemException | RollbackException
                | HeuristicMixedException | HeuristicRollbackException ex) {
            Logger.getLogger(UserTransactionTask.class.getName()).log(Level.SEVERE, null, ex);
        }
    }
}
The previous class can then be processed by the ManagedExecutorService by implementing a solution similar to the following.
@WebServlet(name = "UserTransactionServlet", urlPatterns = {"/userTransactionServlet"})
public class UserTransactionServlet extends HttpServlet implements Servlet {

    @Resource(name = "concurrent/BatchExecutor")
    ManagedExecutorService mes;

    protected void processRequest(HttpServletRequest request, HttpServletResponse response)
            throws ServletException, IOException {
        response.setContentType("text/html;charset=UTF-8");
        PrintWriter out = response.getWriter();
        try {

            // servlet output...
            UserTransactionTask utTask = new UserTransactionTask();
            Future utFuture = mes.submit(utTask);
            while( !utFuture.isDone() )
                out.println("Running...<BR>");
            if (utFuture.isDone()){
                out.println("Report Complete");
            }
            out.println("</body>");
            out.println("</html>");
        } finally {
            out.close();
        }
    }
...
How It Works
In some cases, an application may require transaction coordination within a task that will be processed via a ManagedExecutorService. Transactions can be carried out within these tasks via utilization of the javax.transaction.UserTransaction interface. The UserTransaction can be obtained by calling the SessionContext.getUserTransaction() method. The SessionContext resource can be injected into a bean using the @Resource annotation.
Once the UserTransaction has been obtained, the transaction can begin by calling the UserTransaction begin method. The transaction can be ended by calling the UserTransaction commit method. The transaction encompasses any tasks that are performed after the call to begin, and before the call to commit. If one of the tasks within the transaction fails, then all work performed within the transaction is halted and values go back to what they were prior to the beginning of the transaction.
19-5. Running Concurrent Tasks at Scheduled Times
Problem
The application that you are utilizing needs to have the ability to periodically perform a task on a timed interval.
Solution
Use the ManagedScheduleExecutorService to create a scheduled task within your application. Before an application can use the service, it must be created within the application server container. To create a ManagedScheduleExecutorService instance within GlassFish, issue the following command from the command line:
bin/asadmin create-managed-scheduled-executor-service concurrent/name-of-service
In this command, name-of-service can be whatever name you choose. The create-managed-scheduled-executor-service command has many options that can be specified. To see and learn more about each option, invoke the command help by issuing the --help flag after the command, rather than providing the name of the service to create. Optionally, you could create the service using an application server resource, such as the GlassFish administration console.
Once the service has been created within the container, it can be utilized by an application. To utilize this type of service, the environment must be configured via XML or annotation. To utilize XML configuration, add a <resource-env-ref> element to the web.xml deployment descriptor. In this case, you need to configure a resource of type javax.enterprise.concurrent.ManagedScheduledExecutorService, as shown in the excerpt from the following web.xml:
<resource-env-ref>
 <description>Prints alerts to server log, if warranted, on a periodic basis</description>
<resource-env-ref-name>
concurrent/__defaultManagedScheduledExecutorService
</resource-env-ref-name>
 <resource-env-ref-type>
javax.enterprise.concurrent.ManagedScheduledExecutorService
 </resource-env-ref-type>
</resource-env-ref>
If you wish to use annotations rather than XML, the @Resource annotation can be used in client code to inject the ManagedScheduledExecutorService, as shown in the following lines. In this case, the injected resource references a ManagedScheduledExecutorService that is identified by the name concurrent/__defaultManagedScheduledExecutorService.
@Resource(name="concurrent/__defaultManagedScheduledExecutorService")
ManagedScheduledExecutorService mes;
To write the task that you wish to have scheduled, create a Java class that implements Runnable. As such, the class will contain a run method, which will be invoked each time the scheduled task is initiated. The following example demonstrates how to construct a task that can be used for logging. In this example, the BookAuthor entity is queried on a periodic basis to determine if new authors have been added to the database.
public class ScheduledLoggerExample implements Runnable {

    CreateConnection createConn = null;

    @Override
    public void run() {
        queryAuthors();
    }

    public void queryAuthors(){
        createConn = new CreateConnection();
        String qry = "select object(o) from BookAuthor o";
        createConn.loadProperties();
        try (Connection conn = createConn.getConnection();
                Statement stmt = conn.createStatement();
                ResultSet rs = stmt.executeQuery(qry);) {
            while (rs.next()) {
           // if new author, then alert
            }
        } catch (SQLException e) {
            e.printStackTrace();
        }
    }
}
To periodically invoke the task, utilize the ManagedScheduledExecutorService resource. The following JSF managed bean class demonstrates how to invoke this type of service.
@ManagedBean
public class ScheduledTaskClient {
    Future alertHandle = null;

    @Resource(name="concurrent/__defaultManagedScheduledExecutorService")
    ManagedScheduledExecutorService mes;


    public void alertScheduler() {

        ScheduledAuthorAlert ae = new ScheduledAuthorAlert();
        alertHandle = mes.scheduleAtFixedRate(
                ae, 5L, 5L, TimeUnit.MINUTES);
        FacesMessage facesMsg = new FacesMessage(FacesMessage.SEVERITY_INFO,
                "Task Scheduled", "Task Scheduled");
                FacesContext.getCurrentInstance().addMessage(null, facesMsg);

    }

}
How It Works
To schedule a task to run at specific times, utilize the javax.concurrent.ManagedScheduledExecutorService interface. This interface extends the java.util.concurrent.ScheduledExecutorService and javax.enterprise.concurrent.ManagedExecutorService interfaces. The ManagedScheduledExecutorService can be used to execute a Runnable task according to a specified schedule.
As mentioned previously, a ManagedScheduledExecutorService can be used to schedule Runnable tasks. That is, any class that implements java.lang.Runnable can be invoked via the service. The code that is contained within the task class’s run method is invoked each time the task is initiated. In the example for this recipe, the run method executes another method within the class that is used to query an entity and perform some work against the results.
To make use of a ManagedScheduledExecutorService, one can be created within the application server container. This can be done by issuing the asadmin create-managed-scheduled-executor-service command, as demonstrated in the example for this recipe. However, any Java EE 7–compliant application server should contain a default ManagedScheduledExecutorService for use. Once the resource has been created in the application server, an application can make use of it. To enable an application to access the service, XML configuration within the web.xml deployment descriptor can be used, or a @Resource annotation can be used to inject the resource. In the example for this recipe, both techniques are demonstrated. However, in the class that is used to initiate the example task, the @Resource annotation is used to inject the application server’s default ManagedScheduledExecutorService that can be identified by the name of concurrent/__defaultManagedScheduledExecutorService.
@Resource(name=" concurrent/__defaultManagedScheduledExecutorService ")
    ManagedScheduledExecutorService mes;
To schedule the task, create an instance of the task class, and then pass the instance to one of the ManagedScheduledExecutorService scheduler methods that are made available via the ScheduleExecutorService interface. The methods that can be used to schedule tasks are shown in Table 19-1.
Table 19-1. ScheduleExecutorService Methods
| Method | Description |
|---|---|
| schedule(Callable<V> callable,long delay, TimeUnit unit) | Creates and executes a ScheduledFeature object. The object becomes available after the specified delay period. |
| schedule(Runnable command,long delay, TimeUnit unit) | Creates and executes a one-time task that becomes available after the specified delay. |
| scheduleAtFixedRate(Runnable command,long initialDelay, long period,TimeUnit unit) | Creates and executes a periodic task that becomes available after the initial specified delay period. Subsequent executions are then scheduled in increments of the specified period after the initial delay. |
| scheduleWithFixedDelay(Runnablecommand, long initialDelay,long delay, TimeUnit unit) | Creates and executes a periodic task that becomes available after the initial delay period. Subsequent executions are then scheduled with the specified delay period in between each execution. |
In the example for this recipe, the scheduleAtFixedRate method is called, passing the task class, along with the initial delay period of 5 minutes, and then the task is executed every 5 minutes thereafter.
19-6. Creating Thread Instances
Problem
Your application requires the ability to perform tasks in the background while other tasks are executing.
Solution
Create thread instances to run tasks in the background by making use of a ManagedThreadFactory resource. Before an application can use the service, it must be created within the application server container. To create a ManagedThreadFactory instance within GlassFish, issue the following command from the command line:
asadmin create-managed-thread-factory concurrent/myThreadFactory
In this command, name-of-service can be whatever name you choose. The create-managed-thread-factory command has many options that can be specified. To see and learn more about each option, invoke the command help by issuing the --help flag after the command, rather than providing the name of the service to create.
To utilize a ManagedThreadFactory, the environment must be configured via XML or annotation. To utilize XML configuration, add a <resource-env-ref> element to the web.xml deployment descriptor. In this case, you need to configure a resource of type javax.enterprise.concurrent.ManagedThreadFactory, as shown in the excerpt from the following web.xml:
<resource-env-ref>
 <description>
</description>
<resource-env-ref-name>
concurrent/AcmeThreadFactory
</resource-env-ref-name>
 <resource-env-ref-type>
javax.enterprise.concurrent.ManagedThreadFactory
 </resource-env-ref-type>
</resource-env-ref>
To utilize annotations rather than XML configuration, the ManagedThreadFactory can be injected using an annotation such as the following:
@Resource(name="concurrent/AcmeThreadFactory");
ManagedThreadFactory threadFactory;
In this example, a ManagedThreadFactory will be injected into an EJB, so that a logging task can be used to print output to the server log when the EJB is created or destroyed. The following code demonstrates how to create a task that can be utilized by the ManagedThreadFactory:
public class MessagePrinter implements Runnable {

    @Override
    public void run() {
        printMessage();
    }

    public void printMessage(){
        System.out.println("Here we are performing some work...");
    }
}
To initiate the threading, call the ManagedThreadFactory, which can be injected into a using class via the @Resource annotation. The ManageThreadFactory newThread method can then be invoked to spawn a new thread, passing the Runnable class instance for which the thread should process. In the following servlet context listener example, when a thread context is initialized, then a Runnable class that was listed in the previous code listing, MessagePrinter, is instantiated and passed to the ManagedThreadFactory to spawn a new thread.
public class ServletCtxListener implements ServletContextListener {
    Thread printerThread = null;

    @Resource(name ="concurrent/AcmeThreadFactory")
    ManagedThreadFactory threadFactory;

    public void contextInitialized(ServletContextEvent scEvent) {

        MessagePrinter printer = new MessagePrinter();
        printerThread = threadFactory.newThread(printer);
        printerThread.start();
    }

    public void contextDestroyed(ServletContextEvent scEvent) {
        synchronized (printerThread) {
            printerThread.interrupt();
        }
    }
}
How It Works
Until the release of Java EE 7, multithreaded enterprise applications were very customized. In fact, until the EE 7 release, there was no formal framework to utilize for spawning threads within an enterprise application. In this latest release that includes the Concurrency utilities, thread processing has been formalized. To utilize threading within an enterprise application, you should create ManagedThreadFactory resource(s) within the application server container, and utilize those resources within application(s), as needed.
To create a ManagedThreadFactory resource within the GlassFish application server, invoke the asadmin create-managed-thread-factory command from the command prompt. At a minimum, the desired name for the resource should be included with the invocation of the command. However, there are a number of different options that can be specified to customize the resource. To learn more about those options, please see the online documentation at https://concurrency-ee-spec.java.net/javadoc/.
As mentioned in the example, an application can make use of a ManagedThreadFactory resource by configuring XML within the web.xml deployment descriptor, or by injecting via the @Resource annotation within the classes that need to make use of the resource. Once that resource has been injected, calls can be made against it to spawn new threads using the newThread method. The newThread method returns a Thread instance, which can then be utilized as needed, by calling the Thread instance methods, as needed. In the solution to this recipe, the thread is started by calling the thread’s start method, and when the context is destroyed, then the thread’s interrupt method is invoked.
The addition of a formal threading framework into Java EE is much welcomed. By adhering to the use of ManagedThreadFactory API, your enterprise applications can be made multithreaded using an accepted standard solution.
19-7. Creating an Item-Oriented Batch Process
Problem
You would like to create a job that runs in the background and executes a task.
Solution
Make use of the Batch Applications for the Java Platform API, introduced to Java EE 7 via JSR 352, to create a job that handles item-oriented processing. Batch processing that is item-oriented is also known as “chunk” processing. In this example, a batch process is created to read text from a file, process that text accordingly, and then write out the processed text. To begin, construct an XML file to define the job. The XML file for this example will be called acmeFileProcessor.xml. We will break down the lines of this file, as well as discuss the different options for writing job XML, in the “How it Works” section. For now, let’s take a look at what a job process looks like. The following lines are from the acmeFileProcessor.xml file.
<?xml version="1.0" encoding="UTF-8"?>

<job id="myJob" xmlns="http://batch.jsr352/jsl">
    <step id="readingStep" >
        <chunk item-count="2">
            <reader ref="acmeReader"></reader>
            <processor ref="acmeProcessor"></processor>
        </chunk>
    </step>
    <step id="writingStep" >
        <chunk item-count="1">
            <writer ref="acmeWriter"></writer>
        </chunk>
    </step>
</job>
There are three tasks being performed in this particular job: acmeReader, acmeProcessor, and acmeWriter. These three tasks can be associated with Java class implementations within the batch.xml file, which is located within the META-INF directory. The following code shows what the batch.xml looks like.
<?xml version="1.0" encoding="UTF-8"?>
<batch-artifacts xmlns="http://jcp.org.batch/jsl">
    <ref id="acmeReader" class="org.javaeerecipes.chapter19.recipe19_07.AcmeReader"/>
    <ref id="acmeProcessor" class="org.javaeerecipes.chapter19.recipe19_07.AcmeProcessor"/>
    <ref id="acmeWriter" class="org.javaeerecipes.chapter19.recipe19_07.AcmeWriter"/>
</batch-artifacts>
Next, let’s take a look at each of these class implementations. We will begin by looking at the following AcmeReader class implementation. This class is responsible for reading a file and creating a new WidgetReportItem object for each line of text.
package org.javaeerecipes.chapter19.recipe19_07;

import java.nio.charset.Charset;
import java.nio.file.Files;
import java.nio.file.Path;
import java.nio.file.Paths;
import java.util.List;
import javax.batch.api.AbstractItemReader;

/**
 * Example of a file reading task
 *
 * @author Juneau
 */
public class AcmeReader extends AbstractItemReader<WidgetReportItem> {

    public AcmeReader() {
    }

    /**
     * Read lines of report and store each into a WidgetReportItem object. Once
     * all lines have been read then return null to trigger the end of file.
     * @return
     * @throws Exception
     */
    @Override
    public WidgetReportItem readItem() throws Exception {
        Path file = Paths.get("widgetFile.txt");
        List<String> fileLines;
        Charset charset = Charset.forName("US-ASCII");
        fileLines = Files.readAllLines(file, charset);
        for(String line:fileLines){
            return new WidgetReportItem(line);
        }
        return null;

    }
}
Next, let’s take a look at the AcmeProcessor class. This class is responsible for processing each WidgetReportItem accordingly. In this case, if the line of text that is contained in the object has the text “Two” in it, then it will be added to a WidgetOutputItem object (see the following code for WidgetReportItem and WidgetOutputItem).
package org.javaeerecipes.chapter19.recipe19_07;

import javax.batch.api.ItemProcessor;

/**
 *
 * @author Juneau
 */
public class AcmeProcessor implements ItemProcessor<WidgetReportItem, WidgetOutputItem> {

    public AcmeProcessor(){}

    /**
     * Write out all lines that contain the text "Two"
     * @param item
     * @return
     * @throws Exception
     */
    @Override
    public WidgetOutputItem processItem(WidgetReportItem item) throws Exception {
        if(item.getLineText().contains("Two")){
            return new WidgetOutputItem(item.getLineText());
        } else {
            return null;
        }
    }

}
Lastly, let’s see what the AcmeWriter class looks like. This class is responsible for writing the WidgetOutputItem objects that have been processed by AcmeProcessor.
package org.javaeerecipes.chapter19.recipe19_07;

import java.util.List;
import javax.batch.api.AbstractItemWriter;

/**
 *
 * @author Juneau
 */
public class AcmeWriter extends AbstractItemWriter<WidgetOutputItem> {

    @Override
    public void writeItems(List<WidgetOutputItem> list) throws Exception {
        for(WidgetOutputItem item:list){
            System.out.println("Write to file:" + item.getLineText());
        }
    }

}
The WidgetReportItem and WidgetOutputItem objects are merely containers that hold a String of text. The following is the implementation for WidgetReportItem; other than the name, the WidgetOutputItem object is identical.
package org.javaeerecipes.chapter19.recipe19_07;

public class WidgetReportItem {
    private String lineText;

    public WidgetReportItem(String line){
        this.lineText = line;
    }

    /**
     * @return the lineText
     */
    public String getLineText() {
        return lineText;
    }

    /**
     * @param lineText the lineText to set
     */
    public void setLineText(String lineText) {
        this.lineText = lineText;
    }
}
When this batch job is executed, the text file is read, processed, and then specific lines of text are written to the system log. The read and process tasks are performed as part of the first step, and then the write is processed as the second step.
How It Works
Prior to the inclusion of Batch Applications for Java EE, organizations and individuals had to write their own custom procedure for processing batch jobs. Utilizing the newly added API, developers can create batch jobs using a combination of XML for defining a job, and Java for programming the implementation. In the solution for this recipe, a simple batch job reads text from a file, processes it using a comparison, and then writes out the processed text. The example batch program is simplistic, but the API makes it easy to write very complex jobs.
Let’s begin the explanation by first taking a brief look at the API from a high level. A job consists of one or more steps, and each step has exactly one ItemReader, ItemWriter, and ItemProcessor. A JobOperator is responsible for launching a job, and a JobRepository is used to maintain metadata regarding the currently running job. Jobs are defined via XML, and the <Job> element is at the root of the job definition. Thus, a <Job> is the foundational element, which consists of one or more <step> elements, and also defines other specifics of the job, such as the job name and if it is restartable or not. Each <step> of a job consists of one or more chunks or batchlets. In this recipe, which covers item-oriented processes, each step has just one chunk, although in general steps could encompass one or more chunks. To learn more about batchlets, please see the specification or online documentation at http://javaee-spec.java.net/nonav/javadocs/javax/batch/api/Batchlet.html.
As expected, each chunk of a step is defined within the XML using a <chunk> element. A <chunk> element defines the reader, writer, and processor pattern of a batch job. A chunk runs within the scope of a transaction, and it is restartable at a checkpoint if it does not complete. The <reader> element is a child element of <chunk>, and it is used to specify the reader for that chunk. The <reader> element can accept zero or more name/value pair properties using a <properties> element. The <processor> element is also a child element of <chunk>, which specifies the processor element for that chunk. Like a <reader> element, a <processor> element can accept zero or more name/value pair properties using a <properties> element. The <writer> element is a child element of <chunk> as well, which specifies the writer for the chunk step. Again, like the reader and processor, the <writer> element can accept zero or more name/value pair properties using a <properties> element.
The XML configuration for a job resides in an XML file that should be named the same as the batch job to which it belongs. This file should reside within a folder named batch-jobs, which in turn resides in the META-INF folder. An XML file named batch.xml should also reside within the META-INF folder. This file contains the mapping for the item reader, writer, and processor elements using <ref> elements and mapping the item names to a Java implementation class.
<batch-artifacts xmlns="http://jcp.org.batch/jsl">
    <ref id="acmeReader" class="org.javaeerecipes.chapter19.recipe19_07.AcmeReader"/>
    <ref id="acmeProcessor" class="org.javaeerecipes.chapter19.recipe19_07.AcmeProcessor"/>
    <ref id="acmeWriter" class="org.javaeerecipes.chapter19.recipe19_07.AcmeWriter"/>
</batch-artifacts>
The implementation classes should either extend abstract classes (reader and writer), or implement an interface (processor). The ItemReader implementation class, in this case AcmeReader, extends the AbstractItemReader , and accepts an object into which the read items will be stored. In the example for this recipe, that object class is named WidgetReportItem. As such, the class should implement the readItem method, which is responsible for performing the reading. The method should return the object to which the items are read, or return a null when there are no more items to read.
public class AcmeReader extends AbstractItemReader<WidgetReportItem> {
...
@Override
    public WidgetReportItem readItem() throws Exception {
        Path file = Paths.get("widgetFile.txt");
        List<String> fileLines;
        Charset charset = Charset.forName("US-ASCII");
        fileLines = Files.readAllLines(file, charset);
        for(String line:fileLines){
            return new WidgetReportItem(line);
        }
        return null;

    }
...
The ItemProcessor class implementation, in this case AcmeProcessor, is responsible for performing processing for the chunk, and it should implement the ItemProcessor interface, accepting both the object containing the read items, and an object to which the processed items will be stored. The ItemProcessor implementation class should implement a processItem method, which is responsible for performing the processing.
The ItemWriter class implementation, in this case AcmeWriter, is responsible for performing the writing for the chunk. The class implementation should extend the AbstractItemWriter class and accept the object to which the processed items will be written. This implementation must contain the writeItems method, which is responsible for performing the writing.
As mentioned in the introduction to this chapter, the Batch Applications for Java EE API is very detailed, and this recipe barely scratches the surface of how to write batch jobs. You are encouraged to learn more about the API by reading through the specification for JSR-352.