
![]()
Programming for Touch
One of the most exciting capabilities that our modern mobile device browser landscape gives us is the ability to program for touch. By leveraging these touch capabilities, we can create better and more natural experiences for our users. Unfortunately, programming for touch can be difficult, and there are a number of browser incompatibilities. In this chapter we will discuss the core concepts, the APIs available, which browsers they are supported in, and how to write code that works on all the most recent devices as well as on the desktop. We will finish the chapter off with a sample that is of very practical use and shows off touch well.
Before we discuss how we can create rich touch experiences for our users, we have to determine what devices we can target. Even though the APIs are often quite different, you should be able to create good touch experiences for at least the following devices:
- iOS (2.0+, which include iPhones, iPod Touches and iPads),
- Android (2.1+),
- BlackBerry (7+ has support but in most cases version 10 is likely what you would want to target),
- Firefox OS,
- Windows Phone 8 and Windows 8 devices with touch screens (like the Microsoft Surface).
I feel I need to note the conspicuous absence of Windows Phone 7 from this list since those who develop on Microsoft technologies like ASP.NET MVC are more likely to own a Windows Phone 7 device than the general populace. Windows Phone 7 has only rudimentary touch support and you will not be able to do anything with touch on these devices other than the basic built-in mouse emulation (more on that below).
As you can see from this list, almost all modern smartphones support nice touch capabilities. This is very exciting. The only problem is that the browsers have different APIs. This is even more difficult if you want to build something that uses either touch or mouse. Touch browsers emulate certain mouse events, which means touch screens by default generally handle mouse events well (though not hover); but browsers by default do not do the reverse. If you only program for touch, a mouse user will likely not be able to interact with what you built. So we need to be able to handle all types of input.
Let’s start by talking about the individual APIs and discuss which devices support which APIs before we think about how to use the various APIs in tandem.
The mouse click event is supported across all the touch-input mobile device browsers listed above. If you think about it, the reason is obvious. If mobile browsers did not emulate this event, all existing websites that use the standard mouse click event would be broken on mobile phones. This would have broken most of the Internet’s JavaScript. Even though this emulation keeps the web from breaking, most mobile browsers have a built-in 300ms time delay for this event to allow the browser time to determine if a touch event was intended instead. This lag can make a site feel sluggish, so it’s often a good idea to also use touch events instead of just click events. But at least the browser manufacturers didn’t break backward compatibility on the Web. Though the mouse emulation keeps the Web working, this is not an event that will be important for touch programming.
Another set of mouse events that are emulated in mobile, mouseless browsers are the various mouse* direction events (the asterisk here and throughout the chapter marks a wildcard, so it is a shorthand for referring to several different events that all start with the word “mouse”), including mouseup, mousedown, mousemove universally but also mouseenter and mouseleave in Internet Explorer. Like the click event, on most mobile devices these mouse events also have the 300ms delay so are not ideal for creating a good touch experience on the Web. Even though desktop browsers may need these events, they will not be useful for touch programming.
Apple added touch* events in iOS 2, and these events have become the standard event mechanism for all webkit browsers (mobile Safari, Android browser, Chrome for Android, BlackBerry 10 and the latest webkit-based Opera browsers) as well as Firefox. This means that for the vast majority of smartphone users, these are the core touch events we will use. There are four touch event types: touchstart (when the touch starts), touchmove (when the touch moves), touchend (when the touch has ended) and touchcancel (when the system cancels the touch, which it could do for any number of reasons that may differ between devices, like if a user drags the touch point off the device or the device interrupts the user to invoke another action). Unlike the emulated mouse events, these do not have the built-in 300ms delay, making them nice and responsive.
Event listeners for touch events are attached just like normal events. It would look something like this.
var element = document.getElementById('anElementId'),

element.addEventListener('touchstart', function () {
  //do touch logic
});
The touch event object is different than the mouse event object and contains new touch-specific changes. Most importantly, touch events are multi-touch capable and the event contains an array of touch objects that represent all the touches to the device. Each touch is given a unique identifier which will remain unchanged during the lifetime of the touch, though the index of the touch in the array of touches could change due to other touches ending and being removed from the array.
The touch event also has rotation and scale information. The rotation’s initial value is 0 and stays 0 if only one touch is active. Once a second touch is registered, rotation is measured in positive (clockwise) or negative (counter-clockwise) degrees from the start location of the event. Rotation would be useful for implementing a touch interface that rotates an element on the page.
The scale’s initial value is 1 and stays 1 if only one touch is active. Once a second touch is registered, the scale either decreases if the two touches are moving closer to each other or increases if the touches are moving further away. This value is measured from the beginning of the touch event, and increases or decreases depending on the direction of the touches. Scale would be an appropriate value to use to implement pinch and zoom in a touch interface.
Since these events are the core events for all touch programming for webkit-based browsers and Firefox, these will be used extensively and explained in more depth below. They will also be used in a sample in the next chapter on Advanced Touch Programming.
Apple added gesture* events in iOS 2 along with touch* events but these have not been implemented in other browsers. The three gesture events are gesturestart, gesturechange, and gestureend. They are a higher-level encapsulation than the touch events and just give you rotation and scale values. Because they are unique to iOS and give you nothing that touch* events don’t already give you, we will not be spending any more time on these events.
Microsoft added pointer* events in Internet Explorer 10 and are what you would use to develop touch interactions for Internet Explorer 10 on Windows 8 and Windows Phone 8. Pointer* events are conceptually very different from webkit touch* events because they are intended to encapsulate interaction by mouse, pen and touch. In Internet Explorer parlance each contact with these inputs is considered a pointer, so the events are called “pointer events.” They are prefixed in Internet Explorer 10, so they will all include “MS” at the beginning but are still simply pointer events. In Internet Explorer 11 they have been unprefixed. Since Internet Explorer 11 is still relatively new and version 10 requires the prefixed version, we will use that throughout in our samples and discussion. Available events include:
- MSPointerDown (when the pointer interacts with the target with a virtual “button”, which is either a mouse button, a pen touch or a finger touch)
- MSPointerUp (when the pointer stops interacting with its virtual “button”)
- MSPointerEnter (when a pointing device enters the hit area of the target)
- MSPointerLeave (when the pointer has left the bounds of the target)
- MSPointerMove (when the pointer changes state within the target, such as position)
- MSPointerOut (when the pointer has left the bounds of the target, similar to MSPointerLeave)
- MSPointerOver (when a pointer has moved into the boundaries of a target but has not touched the target, like hovering)
- MSPointerCancel (when the system has determined to cancel the event)
As you can see, the available events are both more extensive and a bit more overwhelming. From a API standpoint, pointer* events are also different than webkit touch events in that each pointer raises a separate event instead of all touch points being in an array on the event object of a single event. But like webkit touch events, each pointer is given its own unique pointer ID, which it keeps throughout its lifetime and will be very helpful in some cases for distinguishing pointer events from each other.
Because this is the only way to do touch-based programming in Internet Explorer 10 and 11, we will be using these extensively, and these will be explained in more depth below when we get to the samples. I should also note that Google, Mozilla, and Opera are all considering supporting pointer events, so in the future these events may have much broader applicability.
Microsoft added some built-in gesture events for Internet Explorer 10 that are extensions of and work with pointer* events. The gestures include MSGestureTap, MSGestureHold, MSGestureStart, MSGestureChange, MSGestureEnd, and MSIntertiaStart. Unfortunately, the setup takes a bit more code than all the previous events.
var domElement = document.getElementById('element'),

var gesture = new MSGesture();
gesture.target = domElement;

domElement.addEventListener('MSGestureStart', function(evt) {
    if (evt.type == "MSPointerDown") {
      gesture.addPointer(evt.pointerId);
      return;
    }
});

domElement.addEventListener('MSGestureTap', function(evt) {
    //do gesture stuff, happens after the gesture object is registered to the event.
});
As you can see, these gestures require a separate MSGesture object. At the beginning of a user’s gesture action a MSPointerDown event fires, at which point the gesture is hooked up with the event’s pointerId. After this point other event listeners for the gesture events will fire when appropriate. As you can see, this is a bit more complicated than setting up gesture events for iOS. The main impediment to using them though is that they only work on Internet Explorer.
That being said, if you are going to be implementing gestures across devices, the only way to get rotation and scale values in Internet Explorer 10 is to use the MSGestureChange event. As the touch points rotate, the rotation value in on the MSGestureChange event object will have something other than its default value of 0, a negative decimal value if rotating left, a positive rotation value if rotating right. The rotation value is expressed in radians and is the amount of rotation since the last MSGestureChange event, not since the beginning of the gesture. As for scale, the distance between the touch points change, the scale value on the MSGestureChange event object will have something other than its default value of 1, a decimal value slightly less than 1 indicating the distance is decreasing or a decimal value slightly more to indicate that the distance is increasing. Like the rotation value, this is the change since the last change, not since the beginning of the gesture.
Gesture and Rotation Differences
It is important to call out at this point that not only are MSGesture * and touch* incompatible, but their rotation and scale values are incompatible as well. Both rotation and scale are measured from the beginning of the interaction in touch* events. For MSGestureChange events, these values are measured since the MSGestureChange event, not the first. Also, rotation is expressed in degrees for touch* events and radians for MSGesture* events. Though managing these differences is not difficult, it ought to be mentioned to avoid the confusion this might create later.
If you want to normalize the two models so that they act the same (important if you want to write something that works in all touchable browsers), you can do so like the following. Here is a minimal example of combining touchmove and MSGestureChange events to get consistent rotation and scale values.
var theElement, totalScale = 1, totalRotation = 0;

window.onload = function () {

  theElement = document.getElementById('theElement'),

  theElement.addEventListener('MSPointerUp', function (evt) {
    totalScale = 1, totalRotation = 0; //Need to reset the counters
  });

  theElement.addEventListener('touchend', function (evt) {
    totalScale = 1, totalRotation = 0; //Need to reset the counters
  });

  theElement.addEventListener('touchmove', function (evt) {
    evt.preventDefault();
    var info = normalizeRotationAndScaleForTouch('touch', evt.rotation, evt.scale);
    //code that uses the info
  });

  //Note that we need to wrap this in a feature test so we don’t have an error on platforms
  //  that don't support the MSGesture object.
  var gesture;

  if (window.MSGesture != undefined) {
    gesture = new MSGesture();
    gesture.target = theElement;
  }
  var eventListener = function (evt) {
    if (evt.type == "MSPointerDown")  // add pointer on MSPointerDown event
    {
      gesture.addPointer(evt.pointerId);
      return;
    }

    var info = normalizeRotationAndScaleForTouch('pointer', evt.rotation, evt.scale);
    //code that uses the info
  }

  theElement.addEventListener('MSGestureChange', eventListener, false);
  theElement.addEventListener('MSPointerDown', eventListener, false);
}

function normalizeRotationAndScaleForTouch(type, rotation, scale) {
  if (type === 'touch') {
    totalScale = scale;
    totalRotation = rotation;
  }
  else {
    totalScale = totalScale * scale;
    //this multiplication converts radians to degrees
    totalRotation = totalRotation + (rotation * 57.2957795);
  }

  return {
    scale: totalScale,
    rotation: totalRotation
  };
}
It is unfortunate that the browser implementations of rotation and scale are so different because it requires workarounds for things that could otherwise be rather straightforward. Unfortunately, we have several other differences to discuss.
Before we write some samples using the touch* and MSPointer* events above, we need to discuss cross-browser compatibility issues around knowing where you clicked. The target element is available through the target value on the event so that is easy to determine; but what if you want to know where within the element you clicked? This is more complicated than it should be.
Assuming we want to write something that works with mouse input as well as either touch* or MSPointer* events, the following x/y coordinate locations (or a subset depending on the browser/event type) are given in the event objects: x/y, clientX/clientY, layerX/layerY, offsetX/offsetY, pageX/pageY and screenX/screenY. In theory, these would be consistent across the browsers; in reality, this is not the case. When I noticed discrepancies, I ran a test. I placed an element about 2000 pixels down on a page and 20 pixels from the left of the screen and 20 pixels from the top. It has a 1 pixel border. On my iPhone, it looked like Figure 10-1.
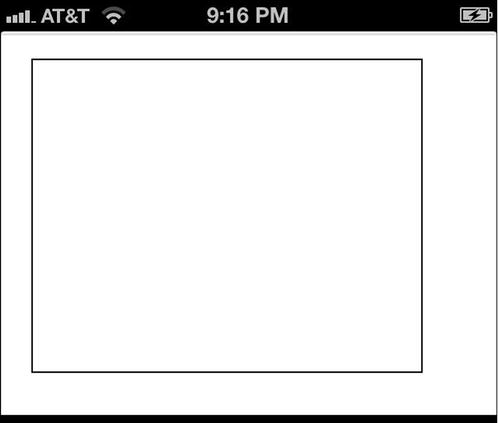
Figure 10-1. Our sample touch element
For desktop browsers, I positioned the browser window about 300 pixels from the left of the screen. I then clicked/touched this element very close to the top left-hand corner of the element and gathered the following results in Table 10-1.
Table 10-1. How Different Browsers Calculate x and y Positions
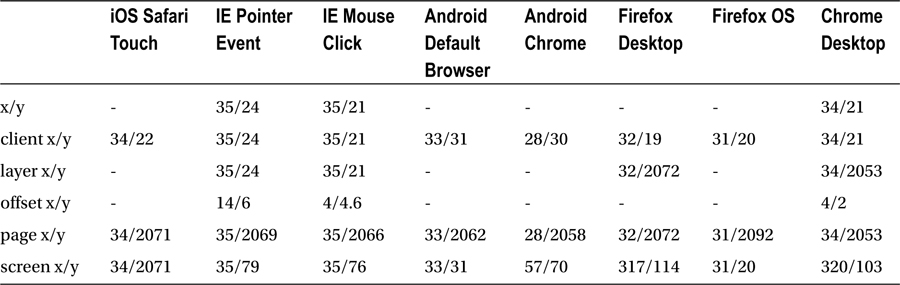
Let’s go through these results and see which would make the best candidate: x/y, layer x/y and offset x/y coordinates are missing in most cases, so clearly none of these will work.
Client x/y measures the distance from the left and top edges of the client, which in the case of mobile devices is the edge of the browser-rendering surface. This does not take into account the browser chrome, which varies in size from browser to browser and this accounts for some of the differences. This property seems to behave consistently across all devices and would be a good candidate if you want to know the distance from the edge of the rendering surface. The above might make you think that it gives us a good starting point for knowing where we clicked/touched in an element, but the values are only so close because the element happens to be a consistent distance from the top and the left. Scroll the page up a bit and touch, and the values are no longer helpful because it measures the distance from the edge of the client, not the edge of the target element.
Page x/y is the distance from the left and top edge of the page, which will generally be the same as the left edge of the screen but different from the top unless the element clicked/touched is at the top of the page and there has been no scrolling. But if the page is scrolled horizontally or vertically, page x/y will reflect the scrolled distance. In my sample page the DOM element was scrolled down around 2000 pixels, which is why the y values are around 2000.
Screen x/y values generally measure the distance from the element to the top of the physical screen. My desktop browser examples were both taken with the browser about 300 pixels from the left of the screen and 100 pixels from the top, so they also behave correctly even though they look higher. Unfortunately Safari on iOS miscalculates this value but in most cases the screen position is going to be irrelevant, so the bug is of little consequence.
If we want to know the x/y coordinate within the element, the offset x/y value that only a few of our browsers give us is what we want. In lieu of this event value, we can calculate the value we need. The target object for all of our events has an offsetLeft and offsetTop value, which represents the x and y distance of the element from the left and top respectively and this seems to work in all browsers. So we can take our page x/y value and subtract our target elements left/top values to get the actual x/y coordinate inside the element that we clicked. The function would look like this.
function getPositionFromTarget(evt, target) {

  return {
    y: evt.pageY - target.offsetTop,
    x: evt.pageX - target.offsetLeft
  };
}
In this case the variable evt is the mouse or touch event, in which both have the page x/y value, and the target is the target of the event. Like I said, it is more complicated than it should be, but at least the problem is solvable after a little investigation.
Touch Screens, Touch Events, and Default Behavior
Before we build something, I should explain a little more about the event model that touch devices use, how the touch* and MSPointer* models discussed above behave differently, and what effect that has on us when writing our touch code. As mentioned above, touch screens emulate mouse events so that they don’t break the Web. The browser makers add the 300ms delay to allow multiple touches to happen (like in the case of a double-tab to zoom, a common browser action) before they fire the mouse click event. Because of this, touch events fire before mouse events so these touches can be captured. Let’s see this in action. Let’s attach the events we care about to an element and see what happens.
element = document.getElementById('anElement'),

element.addEventListener('mousedown', function () { console.log('mousedown'), });
element.addEventListener('mousemove', function () { console.log('mousemove'), });
element.addEventListener('mouseup', function () { console.log('mouseup'), });
element.addEventListener('click', function () { console.log('click'), });
element.addEventListener('touchstart', function () { console.log('touchstart'), });
element.addEventListener('touchmove', function () { console.log('touchmove'), });
element.addEventListener('touchend', function () { console.log('touchend'), });
element.addEventListener('touchcancel', function () { console.log('touchcancel'), });
element.addEventListener('MSPointerDown', function () { console.log('MSPointerDown'), });
element.addEventListener('MSPointerUp', function () { console.log('MSPointerUp'), });
element.addEventListener('MSPointerEnter', function () { console.log('MSPointerEnter'), });
element.addEventListener('MSPointerCancel', function () { console.log('MSPointerCancel'), });
element.addEventListener('MSPointerLeave', function () { console.log('MSPointerLeave'), });
element.addEventListener('MSPointerMove', function () { console.log('MSPointerMove'), });
element.addEventListener('MSPointerOut', function () { console.log('MSPointerOut'), });
element.addEventListener('MSPointerLeave', function () { console.log('MSPointerLeave'), });
element.addEventListener('MSPointerOver', function () { console.log('MSPointerOver'), });
On my iPhone 4S running iOS 6, if I tap on the element I get the following events in this order:
touchstart
touchend
mousemove
mousedown
mouseup
click
Note that the touch events come first before the mouse and click events are emulated. If I attempt to scroll by swiping down on the element, I get something different.
touchstart
touchmove
touchmove
...
touchend
In this case the browser has prevented the mouse emulation because it detects that I want to scroll the screen, not “click” on the element. If you want to tap on an element and prevent the mouse emulation yourself, you can call the preventDefault method on the event object in the touchstart handler. If you have a click event handler and a touchstart handler attached to the element because you want to support both desktop and touch screen, calling preventDefault will keep the click event from firing. The approach taken with touch events is quite clever, because it allows you to attach behavior to both touch and click events so desktop and touch browsers can both function, but allows you to cancel the click action if the touch action executes. Canceling default behavior will also keep the mobile browser from its default behavior of scrolling the screen on a touch move, something we will need in our sample below.
The touch event model is very different in Internet Explorer 10. With the same event handlers, a tap produces the following:
mousemove
MSPointerOver
MSPointerDown
mousedown
MSPointerUp
mouseup
click
MSPointerOut
By looking at the pairings, you can see which older mouse events correspond to which pointer event. If I try to cancel the other events by calling preventDefault on the event object like above, I get interesting results.
mousemove
MSPointerOver
MSPointerDown
MSPointerUp
click
MSPointerOut
That the initial mousemove still fires is not surprising since it occurs before the pointer events can fire. But after the first preventDefault is called, the other mouse events are not fired. Also note that the click event is not cancelled, unlike the behavior we saw with touch events. Because we cannot cancel the older events, we should not let click and mouse events coexist with pointer events on any element so as to avoid duplicate behavior. This implementation detail of Internet Explorer 10 is unfortunate, as it will require more work.
Another bit of unfortunate behavior is that a CSS property needs to be applied to the element to cancel scrolling on pointer movement.
-ms-touch-action: none;
Since the pointer event model does not play well with the older emulated events, we need to have a way of determining if the click event is something we should avoid attaching. Fortunately, this is easy.
if (window.navigator.msPointerEnabled) {
  //attach pointer events
}
else {
  //attach click or mouse events
}
We will show all of this in the sample below.
Building a Simple Touch Sample
For the rest of this chapter, we are going to work on a couple very simple widgets to show you how we can make basic touch interaction work. We will include mouse interaction as well just in case you want to see how to target desktops as well as touch screens.
What we want to do is use an HTML5 Canvas element and draw a dot on the canvas wherever we click or touch. If you haven’t used Canvas, don’t worry, I will explain everything as we go.
To get started, we create a page and add a canvas tag similar to the following.
<!DOCTYPE html>
<html>
  <head>
    <title>A Simple Touch Sample</title>
  </head>
  <body>
    <p>Touch it!</p>
    <canvas id="theCanvas" style="border: solid 1px #111;" height="250" width="250">
    </canvas>
  </body>
</html>
This will give us a small canvas with a border so we can see it. The page will look something like Figure 10-2.
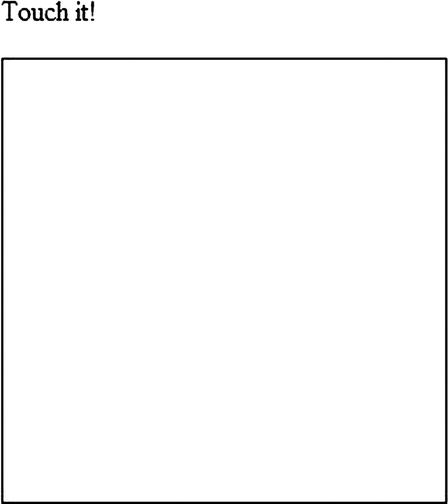
Figure 10-2. A simple canvas
Another piece of setup that we will need for all of our interactions is to attach the event handlers. We will do this in the window onload event. This is the code to set this up. If you are following along, feel free to add all this JavaScript directly into the page or include it in a separate file.
function load() {
  //attach events here
}

window.addEventListener('load', load);
Now that we have our foundation ready, we can write the real code.
Our goal is to draw a circle on the canvas wherever the user clicks or touches. Here is a very short introduction to drawing on HTML5 canvas.
To draw on a canvas, the first thing you need to do is get a reference to the canvas and get the 2d rendering context from that canvas element. We will do this in the load event.
var canvas, context;

function load() {
  canvas = document.getElementById('theCanvas'),
  context = canvas.getContext('2d'),

  //attach other events here
}

window.addEventListener('load', load);
The context object from the getContext method is of type CanvasRenderingContext2D. The way I like to think of the canvas and the context is to think of the canvas as the painter’s canvas and the context as the brush. When programming for canvas, you don’t issue drawing commands to the canvas. You are drawing on the canvas. You issue commands to the drawing instrument, the context, and the brush that will create whatever you tell it to create.
Let’s write the method that will draw the circle on the canvas.
function draw(x, y) {
  context.fillStyle = '#F00';

  var radius = 6;
  var startRadian = 0;
  var endRadian = Math.PI * 2;

  context.beginPath();
  context.arc(x, y, radius, startRadian, endRadian);
  context.fill();
}
There are several things that need to be explained here, but this is all the canvas code we will need to draw our little circles. Circles in a canvas are drawn with a path. A path can include multiple lines straight lines and can also include arcs, which is what we will need to draw a circle. Paths in canvas can either be filled, stroked, or both. By calling the stroke command, the outline of the path is drawn. By calling the fill command, the path is filled. If both are called, both are executed. Both fill and stroke have styles, which is how you set the color. On the first line of our method, I set the fill style to the RGB value of red.
A little further down we begin our path. We immediately draw an arc to create our circle. There is no circle command for canvas, so if you want a circle, you have to draw one using an arc. The arc method takes x and y to specify the center of the circle, the radius of the circle (the distance from the center of the circle to the edge), the start radian and the end radian. For those unfamiliar with radians, they are an alternative to specifying sections along the circumference of the circle; in other words, it is another way of specifying what some might use degrees for. A circle has two Pi radians and the start point for an arc is on the right. So if the arc command was started at 0 and ended at one Pi and then filled, it would look like Figure 10-3.

Figure 10-3. A half-filled circle
But we want the circle filled all the way, so we use two Pi radians. After creating the arc, we call the fill method that fills in the path, and we are done! You can see the result in Figure 10-4. We have our drawing function.
Figure 10-4. A circle
Starting Implementation Using Mouse Events
Now let’s hook up our first event, the mouse event. As you can see below, we also need our function from before to find our position within the target. In the case of mouse events, we pass in the event object itself and the target separately. You will see why I am separating these below.
function load() {
  canvas = document.getElementById('theCanvas'),
  context = canvas.getContext('2d'),

  canvas.addEventListener('click', function (evt) {
    var position = getPositionFromTarget(evt, evt.target);
    draw(position.x, position.y);
  });
}

function getPositionFromTarget(evt, target) {

  return {
    y: evt.pageY - target.offsetTop,
    x: evt.pageX - target.offsetLeft
  };
}
And what’s our result? Here in Figure 10-5 is our canvas after a few clicks.
Figure 10-5. Our Canvas after a few clicks
Starting Implementation Using Touch Events
With that framework in place, hooking up a touch event is fairly simple. You may recall from our discussion on the touch event API above that the sum total of touches is in an array of touches on the event object. We will either need to retrieve the first and draw it, or draw all of them. Since making this multi-touch is simple, let’s draw all of the touches.
canvas.addEventListener('touchstart', function (evt) {
  evt.preventDefault();
  var i, position;
  for (i = 0; i < evt.touches.length; i++) {
    position = getPositionFromTarget(evt.touches[i], evt.touches[i].target);
    draw(position.x, position.y);
  }
});
It is important in our case to remember to call preventDefault on the event object. As mentioned above, emulated mouse events will fire after touch events. If we are handling both, we need to call preventDefault on the event object to prevent the mouse events from firing if the touch events fire.
On the touch event object there are two other arrays of touches, changedTouches and targetTouches. The changedTouches value contains an array of all the touches that changed since the last event. The targetTouches array contains a list of all the touches that started on the target element and are still on the target element. We will be using neither now though later we will use the changedTouches array.
Starting Implementation Using Pointer Events
That was easy enough. Let’s use pointer events. Unlike touch events, these do not come in an array and act more like the mouse event, except that multiple can happen simultaneously. As we discussed above, mouse and click events do not work well with pointer events, so we should check to see if they are enabled for the browser.
if (window.navigator.msPointerEnabled) {
  canvas.addEventListener('MSPointerDown', function (evt) {
    var position = getPositionFromTarget(evt, evt.target);
    draw(position.x, position.y);
  });
}
else {
  canvas.addEventListener('click', function (evt) {
    var position = getPositionFromTarget(evt, evt.target);
    draw(position.x, position.y);
  });
}
There is one more addition we need to make. We need to apply the -ms-touch-action: none value to the element to prevent any accidental scrolling or pinch and zoom.222.
<canvas id="theCanvas" style="border: solid 1px #111;-ms-touch-action: none;"
  height="250" width="250">
</canvas>
Before we change this sample app into something more useful, I want to refactor it a bit to improve the performance. In general, when using Canvas it is best to draw when the browser is ready to draw instead of drawing when a touch event happens. This can help performance (and is also a common practice in game frameworks) because drawing can potentially be an expensive operation. To do this, I create an array for the touches and the event handlers now add the position to that array. As an example, here is the updated click event handler.
canvas.addEventListener('click', function (evt) {
  var position = getPositionFromTarget(evt, evt.target);
  touches.push(position);
});
If we are not drawing when we record an event, we need to know when to draw. Modern browsers now support an API for this called requestAnimationFrame. This method is called by the browser whenever it is ready to paint the screen. Since this is a relatively new feature, it is best to get browser-prefixed versions or use a timeout if the unprefixed version is not available. A very simple implementation would look like this.
var requestAnimFrame = window.requestAnimationFrame ||
  window.mozRequestAnimationFrame ||
  window.webkitRequestAnimationFrame ||
  window.msRequestAnimationFrame ||
  function(callback){
    window.setTimeout(callback, 1000 / 60);
  };

function draw() {
  context.clearRect(0, 0, canvas.width, canvas.height);
  var i;
  for (i = 0; i < touches.length; i++) {
    var touch = touches[i];
    drawCircle(touch.x, touch.y);
  }

  requestAnimFrame(draw);
}

requestAnimFrame(function () {
  draw();
});
The requestAnimationFrame function is intended to be called recursively. In this case we get the proper function for the browser, define a draw function that loops through all the touches and draws them, and then we start the requestAnimationFrame recursive loop.
Another change you should notice is the new call to clearRect at the beginning of the draw loop. At the beginning of the drawing operation it clears the canvas before drawing all of the circles. Now that the circles are drawn repeatedly, over time the circles lose their shape because they are drawn on top of themselves over and over, and the muted colors in the anti-aliased edges of the circles pile up on each other, eventually leading to a blocky-shaped circle. To avoid this, we clear the circles each time before drawing. Now we have completed our simple touch demo.
Let’s turn this from a simple demo into a useful tool. You may not have realized it, but we have just created the foundation for a signature capture element that works on desktops and touch devices. Now let’s take it all the way. We will start by getting the mouse working; and to do that we need to make two big changes. First, we need to move away from the click event and use the mousedown, mousemove, and mouseup events to simulate putting down a pen, writing, and picking it up again. Second we need to stop drawing circles and switch to lines.
Here are our new mouse events.
var isWriting = false;

canvas.addEventListener('mousedown', function (evt) {
  var position = getPositionFromTarget(evt, evt.target);
  touches.push([]);
  addTouch(position);
  isWriting = true;
});

canvas.addEventListener('mousemove', function (evt) {
  if (isWriting) {
    var position = getPositionFromTarget(evt, evt.target);
    addTouch(position);
  }
});

canvas.addEventListener('mouseup', function (evt) {
  var position = getPositionFromTarget(evt, evt.target);
  addTouch(position);
  isWriting = false;
});

function addTouch(position) {
  var touchArray = touches[touches.length - 1];
  touchArray.push(position);
}
Handwriting involves discreet units of lines and curves, which we will call “segments.” For example, when someone signs their name, they will usually pick up the pen at least once during the process to separate the first and the last name, or to dot a letter. So we are going to store our positions in segments, which are arrays of individual points. When the touch/pointer/mouse starts, a new segment will be started. As movement occurs, those positions will be recorded. When the touch/pointer/mouse sequence ends, that segment will be finished. In the code above, on mousedown a new array to hold that segment of touches is added to the touches array. When touches are added they are added to this new array. If the cycle begins again, a new array is created. We also keep a variable called “isWriting” around to know if we should be writing or not in mousemove.
Now we need to change our draw logic. Our new draw loop looks like the following:
function draw() {
  context.clearRect(0, 0, canvas.width, canvas.height);

  var i;
  for (i = 0; i < touches.length; i++) {
    drawSegment(touches[i]);
  }

  requestAnimFrame(draw);
}

function drawSegment(segment) {
  var i, firstTouch = true;
  for (i = 0; i < segment.length; i++) {
    var touch = segment[i];

    if (firstTouch) {
      firstTouch = false;
      context.beginPath();
      context.moveTo(touch.x, touch.y);
      continue;
    }

    context.lineTo(touch.x, touch.y);
  }

  context.strokeStyle = '#000';
  context.stroke();
}
First we loop through the segments and draw each one. Each segment will constitute its own path, so the first touch of the segment begins the path and the context is moved to that location. Thereafter the context draws a new line to each location. When all the lines have been drawn, the line is stroked black so we can see it.
The touch and pointer APIs are multi-touch but a signature widget would not normally be, so we will constrain our code to only handle one touch at a time. Here is my implementation using touch events.
var currentTouchId;

canvas.addEventListener('touchstart', function (evt) {
  evt.preventDefault();
  currentTouchId = evt.touches[0].identifier;
  touches.push([]);

  position = getPositionFromTarget(evt.touches[0], evt.touches[0].target);
  addTouch(position);
});

canvas.addEventListener('touchmove', function (evt) {
  evt.preventDefault();

  var i, position;
  for (i = 0; i < evt.changedTouches.length; i++) {
    if (evt.changedTouches[i].identifier !== currentTouchId)
      continue;
    position = getPositionFromTarget(evt.changedTouches[i], evt.changedTouches[i].target);
    addTouch(position);
  }
});
We do not need the touchend event in this case. As long as the first touch stays in contact with the element, it will remain the first in the array. When all the touches are removed and a new touch is started, this new touch will reestablish the current touch ID and will be the new primary touch for writing.
Next we need to implement pointer events. Pointer events are not stored in an array like touch events are, so we can’t depend on that array like we did in our last implementation. Fortunately, the differences are minor. Here is the code.
canvas.addEventListener('MSPointerDown', function (evt) {
  if (currentTouchId)
    return; //there is already an active touch, don’t start a new one

  currentTouchId = evt.pointerId;
  touches.push([]);
  var position = getPositionFromTarget(evt, evt.target);
  addTouch(position);
});

canvas.addEventListener('MSPointerMove', function (evt) {
  if (evt.pointerId !== currentTouchId)
    return;

  var position = getPositionFromTarget(evt, evt.target);
  addTouch(position);
});

canvas.addEventListener('MSPointerUp', function (evt) {
  //delete the touch id so we can start a new touch
  currentTouchId = undefined;
});
In this case we need the currentTouchId to be undefined when the first touch sequence is finished, so we handle the MSPointerUp event and delete it there.
Now that we can take someone’s signature, we need to save this to the server. Let’s start with the client-side code to do this. We need to add a button and attach an event handler when someone clicks it.
var saveButton = document.getElementById('save'),
saveButton.addEventListener('click', function () {
  saveCanvas();
});
The saveCanvas method can be implemented as follows:
function saveCanvas() {
  var imageData = canvas.toDataURL('image/jpeg', 1);

  var formData = new FormData();
  formData.append('fileData', imageData);

  var xhr = new XMLHttpRequest();

  xhr.addEventListener('load', function () { alert('uploaded!'), });

  xhr.open('POST', "/touch/upload", true);
  xhr.send(formData);
}
The raw data on the canvas can be retrieved as an array of bytes or as a base64 encoded string. I find it a bit easier to save to the server as a string, so I use the toDataURL method on the canvas object to get the string. I then send that string via Ajax to the server using the XMLHttpRequest object. The following is our server-side implementation.
[HttpPost]
public ActionResult Upload(string fileData)
{
  string dataWithoutJpegMarker = fileData.Replace("data:image/jpeg;base64,", String.Empty);
  byte[] filebytes = Convert.FromBase64String(dataWithoutJpegMarker);
  string writePath = Path.Combine(Server.MapPath("∼/upload"), Guid.NewGuid().ToString() + ".jpg");
  using (FileStream fs = new FileStream(writePath,
                                  FileMode.OpenOrCreate,
                                  FileAccess.Write,
                                  FileShare.None))
  {
      fs.Write(filebytes, 0, filebytes.Length);
  }

  return new EmptyResult();
}
When a canvas base64 encodes a file, it puts a marker at the beginning of the file identifying what type it is. When saved to disk, we don’t need that marker. All we need is the raw base64 encoded string. So we take that string, remove the marker, convert it to bytes, and save it to disk.
The final result of all this looks something like what you see in Figure 10-6. I have written my initials, although you could use something like this to draw anything, from a signature to a smiley face.

Figure 10-6. My initials, written in my browser on a canvas
Summary
As you can see from the above, programming for touch can be complicated. Despite this, you should learn how the APIs work because touch is the primary means of interacting with our mobile devices today, and there is no reason to assume that will change. We have seen one working, practical example of using touch that will work across a wide range of modern devices. The next chapter will delve further into touch, and you will learn how to implement gestures and how to build more touch into your mobile websites.