
![]()
Sending E-mail
One of the most important tools used by businesses today is e-mail. It provides a cheap and effective means of communication, and the whole world would struggle to function without it. If you want your application to communicate with outside users, send alerts, or perform some sort of mass communication, e-mail is the perfect tool.
In this chapter, you’ll learn how to
- Send e-mails and alerts from the server
- Automate Microsoft Outlook
- Create draft messages by using the default e-mail program
In addition to teaching you about sending e-mail, this chapter also teaches you how to call web services from your Silverlight or HTML Client applications. In terms of the HelpDesk application, you’ll learn how to automatically send alerts to users when an engineer closes the user’s issue. You’ll also find out how to send e-mails from screens, add file attachments, and integrate with Microsoft Outlook.
Sending e-mail from LightSwitch might be more difficult than you first imagine. The challenge is that you can’t send e-mail directly from the LightSwitch client. The Silverlight platform doesn’t include the System.Net.Mail methods that would allow you to send e-mail from the client. E-mail support isn’t much better in the HTMLClient because JavaScript doesn’t include built-in e-mail support.
The solution to this problem is to write server-side code that sends the e-mail and to trigger this logic from the client. Because LightSwitch’s middle tier uses ASP.NET, you can write code that uses the System.Net.Mail namespace from the server. If you prefer to send e-mail from the Silverlight client, you can automate Microsoft Outlook by using COM. Another way to send mail is to construct HTML hyperlinks that open the default e-mail client and pre-populate the message body. A slight disadvantage of this technique is that you can send e-mails only one at a time, rather than multiple e-mails in one go.
The final technique relies on calling a web service, and the advantage of this technique is that it’s not just limited to sending e-mail. You can adapt the code that’s shown in this chapter to call other types of web services, such as services that send SMS messages or services to retrieve addresses or stock prices.
Table 15-1 summarizes the options that you can use according to your application type. This chapter will show you how to implement all of these techniques.
Table 15-1. E-mailing Techniques You Can Use, Listed by Application Type
| Technique | Silverlight Desktop Application | Silverlight/HTML Client Web Application |
|---|---|---|
| Send SMTP mail via server | ✓ | ✓ |
| Automate Microsoft Outlook | ✓ | |
| Use mailto links | ✓ | ✓ |
| Call Web Services | ✓ | ✓ |
Sending E-mail by Using Server-Side Code
There’s no built-in way to directly call a server method from the Silverlight LightSwitch client, so an effective work-around is to use the methods that you’ll find in the save pipeline.
To use the System.Net.Mail objects to send an e-mail from the server, you’ll need to apply your code to an entity event. These events occur when the save pipeline creates, inserts, deletes, or validates a record. (See Chapter 4, Figure 4-10 for further details.) If you want to send an e-mail when data changes in your application, the process is somewhat straightforward. For instance, if the status of an issue changes from open to closed, you can send a message that alerts the user by adding code to the Issue table’s Updated method.
If you want to send an e-mail through a process that’s disconnected from data, the procedure is more involved. An example of this could be a button that sends a message to a user, without saving any of the other data on the screen. One way to implement this functionality is to create an operation table. This is designed as a temporary table that gives you access to data source events and allows you to call custom server-side code. Having to create a table just to call some server-side code can be quite convoluted. Later in this chapter, you’ll learn how to use a different technique that relies on web service calls.
Figure 15-1 illustrates how the two “save pipeline” techniques work.
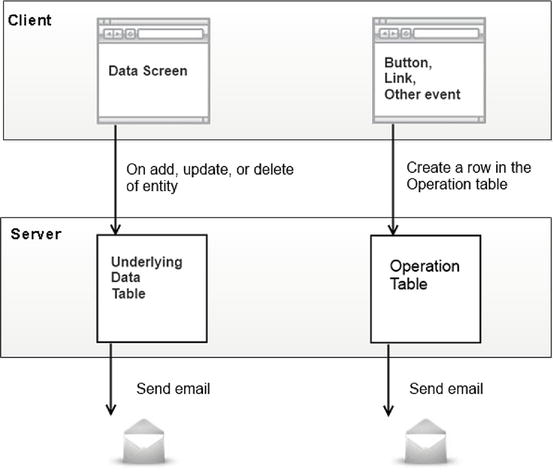
Figure 15-1. Sending an e-mail by using server-side code
Sending E-mail When Data Changes
Let’s begin by looking at how to send a message when an engineer closes an issue. This method requires you to write code in your Issue entity’s Updated method.
To carry out this example, open the Issue table in the table designer. Click on the “Write Code” button, and select the Updated method. Now enter the code that’s shown in Listing 15-1.
Listing 15-1. Sending E-mail When Users Update Data
VB:
File:HelpDeskVBServerUserCodeApplicationDataService.vb

Imports System.Net.Mail

Private Sub Issues_Updated(entity As Issue)

   ' 1 Test if the issue has changed to a closed status
   If entity.Details.Properties.IssueStatus.OriginalValue IsNot Nothing AndAlso
       (Not entity.Details.Properties.IssueStatus.OriginalValue.StatusDescription
           = "Closed") AndAlso
        entity.IssueStatus IsNot Nothing AndAlso
        (entity.IssueStatus.StatusDescription = "Closed") Then

        Dim message As New MailMessage()
        message.From = New MailAddress("[email protected]")
        message.To.Add(entity.User.Email)
        message.Subject = "Issue Updated"
        message.Body =
           "The status of your Issue has changed. Issue ID " & entity.Id

        Dim client As New SmtpClient("relay.yourmailserver.net", 25)

        'Set the details below if you need to send credentials
        'client.Credentials =
            ' new System.Net.NetworkCredential("yourUsername", "yourPassword")
        'client.UseDefaultCredentials = false
        client.Send(message)

    End If

End Sub

C#:
File:HelpDeskCSServerUserCodeApplicationDataService.cs

using System.Net.Mail;

partial void Issues_Updated(Issue entity)
{
    //1 Test if the issue has changed to a closed status
    if (entity.Details.Properties.IssueStatus.OriginalValue !=null &&
        entity.Details.Properties.IssueStatus.OriginalValue.StatusDescription
           != "Closed" &&
        entity.IssueStatus != null &&
        entity.IssueStatus.StatusDescription == "Closed")
    {
        MailMessage message = new MailMessage();
        message.From = new MailAddress("[email protected]");
        message.To.Add(entity.User.Email);
        message.Subject = "Issue Updated";
        message.Body =
            "The status of your Issue has changed. Issue ID " +
             entity.Id.ToString();

        SmtpClient client = new SmtpClient("relay.yourmailserver.net", 25);

        //Set the details below if you need to send credentials
        //client.Credentials = new System.Net.NetworkCredential(
        //     "yourusername", "yourpassword");
        //client.UseDefaultCredentials = false;
        client.Send(message);
    }
}
The first part of the code checks if the user has changed the issue status to closed ![]() . It does this by checking that the original status isn’t “closed,” and then tests whether or not the new status is “closed.” Next, the code uses the following objects in the System.Net.Mail namespace to send the e-mail message:
. It does this by checking that the original status isn’t “closed,” and then tests whether or not the new status is “closed.” Next, the code uses the following objects in the System.Net.Mail namespace to send the e-mail message:
-
MailMessage
 : This object represents an e-mail message. It allows you to set e-mail properties like the recipient address, subject, and message body. This code retrieves the e-mail address of the user that’s been assigned to the issue
  , and it appends the issue id to the message body
  .
. -
SmtpClient
 : This class represents the object that sends the e-mail. You must initialize this object with the SMTP Server URL and port number. You can optionally set authentication credentials if your server requires this. For the SMTP Server setting, you can supply either a server name or an IP address. The method that allows you to send the e-mail is called Send
  . There’s also a method called SendAsync that allows you to send your message asynchronously.
The MailMessage object includes several extra properties that you can set. For example, you can CC additional recipients by using a property called CC. Table 15-2 shows a full list of properties that you can use.
Table 15-2. MailMessage Object Properties
| Name | Description |
|---|---|
| Attachments | Gets the collection used for storing file attachments |
| Bcc | Gets a collection of blind carbon copy (BCC) recipients |
| CC | Gets a collection of carbon copy (CC) recipients |
| DeliveryNotificationOptions | Gets or sets the delivery notifications |
| From | Gets or sets the from address |
| IsBodyHtml | Gets or sets a value that indicates whether the message body is in HTML format |
| Priority | Gets or sets the message priority |
| ReplyToList | Gets or sets the list of reply to addresses |
| Sender | Gets or sets the sender’s e-mail address |
![]() Tip If the attempt to send your e-mail fails, there are a few simple things that you can check. First, are there any firewalls or antivirus applications that are blocking your SMTP traffic? Some antivirus programs protect against mass-mailing worms by blocking all outgoing SMTP traffic. Second, e-mail servers such as Microsoft Exchange might require you to configure relay settings in order for you to make a connection.
Tip If the attempt to send your e-mail fails, there are a few simple things that you can check. First, are there any firewalls or antivirus applications that are blocking your SMTP traffic? Some antivirus programs protect against mass-mailing worms by blocking all outgoing SMTP traffic. Second, e-mail servers such as Microsoft Exchange might require you to configure relay settings in order for you to make a connection.
Making Your E-mail Code Reusable
If you want to send e-mail from several places in your application, a helper class saves you from having to duplicate your code. To create a helper class, switch your LightSwitch project to File View and create a new class in your Server project. A good place to create this class is in your UserCode folder. Name your class SMTPMailHelper, and add the code that’s shown in Listing 15-2.
Listing 15-2. SMTP Mail Helper Class and Method
VB:
File:HelpDeskVBServerUserCodeSMTPMailHelper.vb

Imports System.Net
Imports System.Net.Mail
Imports System.IO

Public Module SmtpMailHelper
   Const SMTPServer As String = "relay.yourmailserver.net"
   Const SMTPUserId As String = "myUsername"
   Const SMTPPassword As String = "myPassword"
   Const SMTPPort As Integer = 25

   Public Sub SendMail(sendFrom As String,
    sendTo As String,
    subject As String,
    body As String,
    attachment As Byte(),
    filename As String)

      Dim fromAddress As New MailAddress(sendFrom)
      Dim toAddress As New MailAddress(sendTo)
      Dim mail As New MailMessage()

      mail.From = fromAddress
      mail.To.Add(toAddress)
      mail.Subject = subject
      mail.Body = body
      If body.ToLower().Contains("<html>") Then
         mail.IsBodyHtml = True
      End If

      Dim smtp As New SmtpClient(SMTPServer, SMTPPort)

      If attachment IsNot Nothing AndAlso
         Not String.IsNullOrEmpty(filename) Then
            Using ms As New MemoryStream(attachment)
               mail.Attachments.Add(New Attachment(ms, filename))
               smtp.Send(mail)
            End Using
      Else
         smtp.Send(mail)
      End If

   End Sub

End Module

C#:
File:HelpDeskCSServerUserCodeSMTPMailHelper.cs

using System.Net;
using System.Net.Mail;
using System.Configuration;
using System.IO;

namespace LightSwitchApplication.UserCode
{
   public static class SmtpMailHelper
   {
      const string SMTPServer = "relay.yourmailserver.net";
      const string SMTPUserId = "myUsername";
      const string SMTPPassword = "myPassword";
      const int SMTPPort = 25;

      public static void SendMail(string sendFrom,
        string sendTo,
        string subject,
        string body,
        byte[] attachment,
        string filename)
      {
         MailAddress fromAddress = new MailAddress(sendFrom);
         MailAddress toAddress = new MailAddress(sendTo);
         MailMessage mail = new MailMessage();

         mail.From = fromAddress;
         mail.To.Add(toAddress);
         mail.Subject = subject;
         mail.Body = body;
         if (body.ToLower().Contains("<html>"))
         {
            mail.IsBodyHtml = true;
         }

         SmtpClient smtp = new SmtpClient(SMTPServer, SMTPPort);

         if (attachment != null && !string.IsNullOrEmpty(filename))
         {
            using (MemoryStream ms = new MemoryStream(attachment))
            {
               mail.Attachments.Add(new Attachment(ms, filename));
               smtp.Send(mail);
            }
         }
         else
         {
            smtp.Send(mail);
         }
      }
   }
}
This class defines a method called SendMail ![]() that contains the logic that sends an SMTP mail message. You’ll find out how to call this method in Listing 15-4.
that contains the logic that sends an SMTP mail message. You’ll find out how to call this method in Listing 15-4.
This first part of this code creates a new message by creating a new instance of a MailMessage object ![]() . It then sets the value of the sender, recipient, subject, and e-mail body properties.
. It then sets the value of the sender, recipient, subject, and e-mail body properties.
The next part of the code checks if the message body contains an HTML tag ![]() . If so, it sets the format of your e-mail message to HTML
. If so, it sets the format of your e-mail message to HTML ![]() . This line of code allows you to author HTML e-mails, simply by including an HTML tag at the start of your message body. The advantage of HTML is that it allows you to apply additional formatting, such as font sizes, boldification, and coloration to your e-mail message.
. This line of code allows you to author HTML e-mails, simply by including an HTML tag at the start of your message body. The advantage of HTML is that it allows you to apply additional formatting, such as font sizes, boldification, and coloration to your e-mail message.
The code then checks if you’ve supplied a file name and attachment ![]() . If you have done so, it attaches the file to your e-mail message. The final part of this code sends your message by calling the SmtpClient object’s Send method.
. If you have done so, it attaches the file to your e-mail message. The final part of this code sends your message by calling the SmtpClient object’s Send method.
If you want to use this code in multiple LightSwitch projects, you can reuse the helper class by compiling it into a separate DLL and adding a reference to it in your Server project.
![]() Tip If you choose to use the SMTP service that’s provided by Google’s Gmail, here are some tips to make your code work. First, you should set the DeliveryMethod attribute of your SmtpClient to SmtpDeliveryMethod.Network. Second, make sure to set the SmtpClient credentials property with the credentials of your Gmail account. At the time of this writing, the port number that Google uses is 465 rather than the standard SMTP port of 25.
Tip If you choose to use the SMTP service that’s provided by Google’s Gmail, here are some tips to make your code work. First, you should set the DeliveryMethod attribute of your SmtpClient to SmtpDeliveryMethod.Network. Second, make sure to set the SmtpClient credentials property with the credentials of your Gmail account. At the time of this writing, the port number that Google uses is 465 rather than the standard SMTP port of 25.
Using Configuration Settings to Save Credentials
The code in Listing 15-2 hard-codes the e-mail settings such as the SMTP server, authentication credentials, and port number. These details can change over time, so it makes good sense to save these settings in a place that you can easily modify after deployment. One option is to store these settings is in a user-defined table. The AppOption table that you saw in Chapter 7 is specifically designed for this purpose. But because you’ve already seen plenty of examples of how to retrieve data from tables, you’ll now see a different approach for storing configuration settings. This method uses custom Application Settings that are defined in your Server project. After you deploy your application, you can set these values by editing your application’s Web.config file. You’ll find the Web.config file in the root of your published application.
To create these Application Settings, right-click your Server project and open the properties window for your project. Switch to the Settings tab, and create a set of application-scoped settings to store your e-mail credentials, as shown in Figure 15-2.
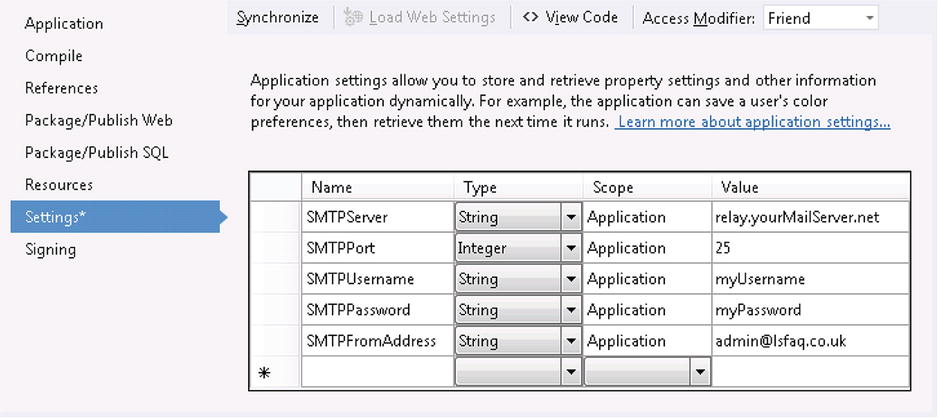
Figure 15-2. Creating configuration settings in the server project
You can now modify the code in your helper class to use these configuration settings. Listing 15-3 highlights the changes that you would make to your SmtpMailHelper class.
Listing 15-3. Configuration Settings Code
VB:
File:HelpDeskVBServerUserCodeSMTPMailHelper.vb

Imports System.Configuration

Private ReadOnly SMTPServer As String = My.Settings.SMTPServer
Private ReadOnly SMTPUserId As String = My.Settings.SMTPUsername
Private ReadOnly SMTPPassword As String = My.Settings.SMTPPassword
Private ReadOnly SMTPPort As Integer = My.Settings.SMTPPort

C#:
File:HelpDeskCSServerUserCodeSMTPMailHelper.cs

using System.Configuration;

private static readonly string SMTPServer =
        LightSwitchApplication.Properties.Settings.Default.SMTPServer;
private static readonly string SMTPUserId =
        LightSwitchApplication.Properties.Settings.Default.SMTPUsername;
private static readonly string SMTPPassword =
        LightSwitchApplication.Properties.Settings.Default.SMTPPassword;
private static readonly int SMTPPort =
        LightSwitchApplication.Properties.Settings.Default.SMTPPort;
This code uses the functionality that’s provided by .NET’s System.Configuration namespace to retrieve the application setting values. Unlike C#, VB makes it slightly easier for you to access your configuration settings by exposing your values through an object called My.Settings.
![]() Caution If you modify your “application setting” values by editing the web.config file in an application that you’ve deployed in IIS, IIS will restart your application. There’ll be a performance hit as your application restarts, and if you’ve written any custom server code that uses session objects, you’ll lose that data (unless you’ve chosen to persist your session data in SQL Server or State Server).
Caution If you modify your “application setting” values by editing the web.config file in an application that you’ve deployed in IIS, IIS will restart your application. There’ll be a performance hit as your application restarts, and if you’ve written any custom server code that uses session objects, you’ll lose that data (unless you’ve chosen to persist your session data in SQL Server or State Server).
Triggering Server E-mail from an Onscreen Button on the Client
If you want to send an e-mail from a client method that’s unrelated to data, the way to do this is to create an “operation table” that allows you to mimic the steps that you performed in the earlier example. This would allow you to create a button or a link on your screen that triggers an e-mail.
The first step is to create the table that’s shown in Figure 15-3. This table contains the fields that are needed to send an e-mail, such as the recipient e-mail address, e-mail body, and subject.
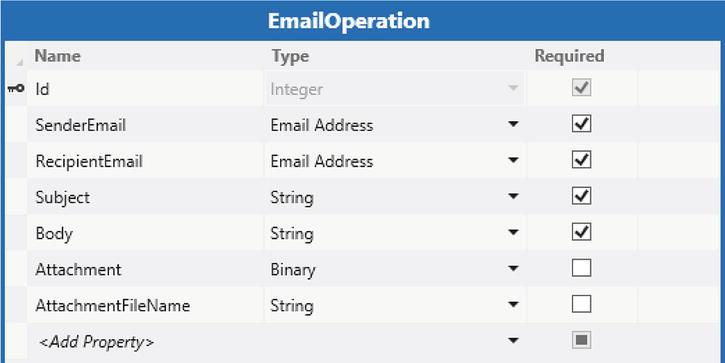
Figure 15-3. The layout of the EmailOperation table
When you insert a row into this table, the code in the Inserting method sends the e-mail, just like the previous example. You can therefore send a message by simply adding rows to this table. Listing 15-4 shows the code that you’ll need to add to the Inserting method for this table. This code takes advantage of the SmtpMailHelper class that you created in Listing 15-2.
Listing 15-4. Sending E-mail by Inserting Records into the EmailOperation Table
VB:
File:HelpDeskVBServerUserCodeApplicationDataService.vb

Private Sub EmailOperations_Inserting(entity As EmailOperation)

   SmtpMailHelper.SendMail(
      entity.SenderEmail,
      entity.RecipientEmail,
      entity.Subject,
      entity.Body,
      entity.Attachment,
      entity.AttachmentFileName)
End Sub

C#:
File:HelpDeskCSServerUserCodeApplicationDataService.cs

partial void EmailOperations_Inserting (EmailOperation entity)
{
    LightSwitchApplication.UserCode.SmtpMailHelper.SendMail(
    entity.SenderEmail,
    entity.RecipientEmail,
    entity.Subject,
    entity.Body
    entity.Attachment,
    entity.AttachmentFileName);
}
Triggering Server Email from the Silverlight Client
Once you’ve added your entity code, the next step is to create a screen that allows your users to send e-mails. This section shows you how to add e-mail composition controls to a user detail screen in your Silverlight client to allow engineers to send messages to users. Here are the steps that you’ll need to carry out:
- Create a Detail Screen that’s based on the User table. Name your screen UserDetail.
- Use the “Add Data” button to add two local string properties. Name these properties SubjectProperty and BodyProperty.
- Add a new group beneath the root control of your screen, and set the control type to Group Box. Drag SubjectProperty and BodyProperty into this group. Set the display name of your Group Box control to “Contact the User.” Open the properties sheet for your BodyProperty and set the lines property to a value greater than 1. This allows the user to enter multiline text.
- Right-click your Group Box control, and choose the option to “Add Button.” When the Add Button dialog appears, select the “Write My Own Method” radio button and name your method SendEmail. Figure 15-4 shows what your screen now looks like.
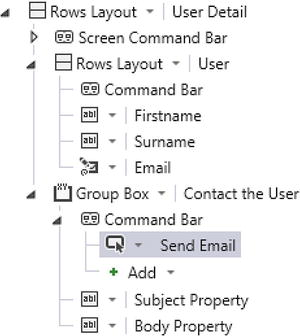
Figure 15-4. Screen layout
Select the SendEmail method from the screen members list, and choose the right-click option to “Edit Execute Code.” Now add the code that’s shown in Listing 15-5.
Listing 15-5. Button Code for Sending E-mail
VB:
File:HelpDeskVBClientUserCodeUserDetail.vb

Private Sub SendEmail_Execute()

   Using tempWorkspace As New DataWorkspace()
      Dim newEmail =
          tempWorkspace.ApplicationData.EmailOperations.AddNew()
      With newEmail
         .RecipientEmail = User.Email
         .SenderEmail = "[email protected]"
         .Subject = SubjectProperty
         .Body = BodyProperty
      End With

      Try
         tempWorkspace.ApplicationData.SaveChanges()

         ' If you want, you can write some code here to create a record in an audit table
         newEmail.Delete()
         tempWorkspace.ApplicationData.SaveChanges()
         ShowMessageBox("Your email has been sent")

      Catch ex As Exception
         ShowMessageBox(ex.Message)
      End Try

   End Using
End Sub

C#:
File:HelpDeskCSClientUserCodeUserDetail.cs

partial void SendEmail_Execute()
{
    using (var tempWorkspace = new DataWorkspace())
    {
        EmailOperation newEmail =
           tempWorkspace.ApplicationData.EmailOperations.AddNew();

        newEmail.RecipientEmail = User.Email;
        newEmail.SenderEmail = "[email protected]";
        newEmail.Subject = SubjectProperty;
        newEmail.Body = BodyProperty;

        try
        {
            tempWorkspace.ApplicationData.SaveChanges();

            //If you want, you can write some code here to create a record in an audit table
            newEmail.Delete();
            tempWorkspace.ApplicationData.SaveChanges();
            this.ShowMessageBox("Your email has been sent");

        }
        catch (Exception ex)
        {
            this.ShowMessageBox(ex.Message);
        }
    }
}
The first part of this code creates a temporary data workspace ![]() and uses it to create a new EmailOperation record
and uses it to create a new EmailOperation record ![]() . This temporary data workspace allows your code to save the EmailOperation record, without saving any of the other data on the screen. The next section of code sets the e-mail properties, which include the subject, body text, and sender and recipient addresses.
. This temporary data workspace allows your code to save the EmailOperation record, without saving any of the other data on the screen. The next section of code sets the e-mail properties, which include the subject, body text, and sender and recipient addresses.
The code then calls the SaveChanges method on the temporary workspace ![]() . This, in turn, triggers the EmailOperations_Inserting method (shown in Listing 15-4), which performs the actual sending of the e-mail. At the end of the procedure, the code deletes the record from the EmailOperation table
. This, in turn, triggers the EmailOperations_Inserting method (shown in Listing 15-4), which performs the actual sending of the e-mail. At the end of the procedure, the code deletes the record from the EmailOperation table ![]() . But if you want to maintain an audit trail of sent items, you could add some extra code here to create a record in an audit table. Figure 15-5 shows how the final screen appears at runtime.
. But if you want to maintain an audit trail of sent items, you could add some extra code here to create a record in an audit table. Figure 15-5 shows how the final screen appears at runtime.
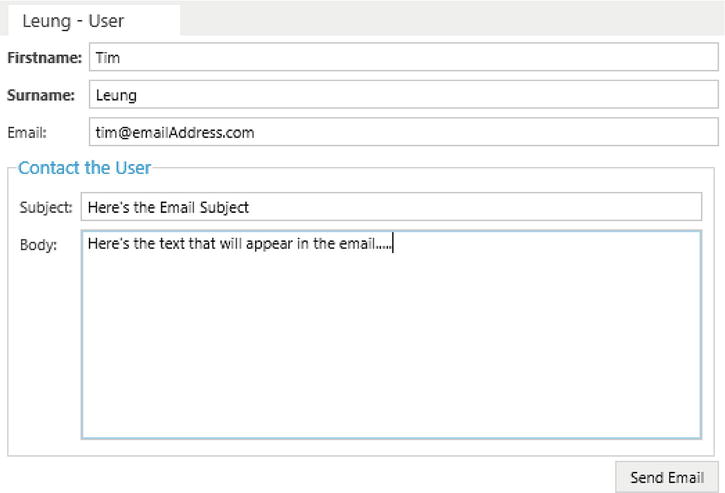
Figure 15-5. E-mail composition screen at runtime
Triggering server e-mail from the HTML Client
If you want to use this technique in an HTML client application, the screen design process is very similar. This section shows you a couple of HTML screen design methods that you’ve not yet seen. It shows you how to use the JavaScript API to create a new data workspace and to add records, and it also describes a “best-practices” pattern that allows you to call asynchronous methods. To create this example, open your HTML client project and carry out the following steps:
- Create an “Add/Edit Details Screen” that’s based on the User table, and name your screen AddEditUser.
- Use the “Add Data” button to add two local string properties. Name these properties SubjectProperty and BodyProperty. Uncheck the “Is Required” check box for both properties.
- Add a Tab beneath the root control of your screen. Set the display name of your Tab control to “Contact User.” Drag SubjectProperty and BodyProperty into this tab. Change the control type of BodyProperty to a TextArea to allow the user to enter multiline text. Set the “Display Name” of SubjectProperty and BodyProperty to Subject and Body, respectively.
- Add a new button beneath BodyProperty, and name it SendEmail. When the Add Button dialog appears, select the “Write my own method” radio button and name your method SendEmail. Figure 15-6 shows how your screen now looks.
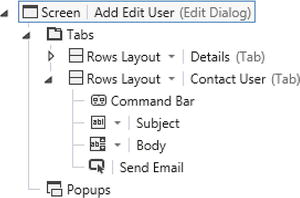
Figure 15-6. Screen design view of the “Contact the User” section
Right-click your SendEmail method, click on the “Edit Execute Code” item, and enter the code that’s shown in Listing 15-6.
Listing 15-6. Sending an E-mail in the HTML Client
File:HelpDeskVBHTMLClientUserCodeAddEditUser.js

myapp.AddEditUser.SendEmail_execute = function (screen) {

    var tempWorkspace = new msls.application.DataWorkspace();
    var newEmail = new myapp.EmailOperation(
        tempWorkspace.ApplicationData.EmailOperations);

    newEmail.RecipientEmail = screen.User.Email;
    newEmail.SenderEmail = "[email protected]";
    newEmail.Subject = screen.SubjectProperty;
    newEmail.Body = screen.BodyProperty;

    return tempWorkspace.ApplicationData.saveChanges().then(function () {
        newEmail.deleteEntity();
        return tempWorkspace.ApplicationData.saveChanges().then(function () {
            msls.showMessageBox("Your email has been sent");
        });
    });
}
The first part of this code uses the JavaScript API to add a new record to the EmailOperation table. It creates a temporary data workspace ![]() so that you can save your EmailOperation record, without saving any other data changes in the user’s session. The next section contains the actual code that creates a new EmailOperation record
so that you can save your EmailOperation record, without saving any other data changes in the user’s session. The next section contains the actual code that creates a new EmailOperation record ![]() in the temporary data workspace, and sets the e-mail properties that includes the subject, body text, and sender and recipient addresses
in the temporary data workspace, and sets the e-mail properties that includes the subject, body text, and sender and recipient addresses ![]() .
.
A key feature of this function is that it returns a promise object to the LightSwitch runtime ![]() . Chapter 8 introduced the concept of promise objects, and showed you how to use promise objects to execute long running queries. The promise object allows LightSwitch to keep track of the asynchronous saveChanges operation. If the process appears to take a long time, LightSwitch automatically shows a progress indicator and blocks the user from doing anything else on the screen until the method completes. Importantly, using a promise object also allows LightSwitch to manage and return any errors to the user.
. Chapter 8 introduced the concept of promise objects, and showed you how to use promise objects to execute long running queries. The promise object allows LightSwitch to keep track of the asynchronous saveChanges operation. If the process appears to take a long time, LightSwitch automatically shows a progress indicator and blocks the user from doing anything else on the screen until the method completes. Importantly, using a promise object also allows LightSwitch to manage and return any errors to the user.
The promise object’s then method allows you to specify the code that runs when the saveChanges operation succeeds. Although this example doesn’t show it, the then method allows you to specify code that runs if the saveChanges operation fails. If the saveChanges method succeeds, the code deletes the newEmail entity and calls the saveChanges method again to commit the deletion ![]() . The second call to saveChanges also returns a promise, and highlights a useful coding practice—that is, the ability to create chains of promises, by returning promises from child methods.
. The second call to saveChanges also returns a promise, and highlights a useful coding practice—that is, the ability to create chains of promises, by returning promises from child methods.
To illustrate why it’s important to use this pattern, consider the following scenario. Let’s say that you modify your code by replacing line ![]() with a straight call to saveChanges like so: tempWorkspace.ApplicationData.saveChanges();. Delete the code beneath that deletes the entity and calls saveChanges a second time, but keep the code that displays the confirmation message by calling the msls.showMessageBox method. Finally, delete the line of code above that sets the newEmail.Subject property (this property is defined as mandatory at the table level), and run your application. You’ll find that the call to SaveChanges won’t work because the record fails validation. But by not returning a promise object, the user incorrectly sees the dialog that’s shown in Figure 15-7 rather than a validation warning. LightSwitch won’t show any errors to the user and won’t show any indication whatsoever that the operation has failed. For this reason, it’s important to apply the pattern that’s shown in this listing whenever you call asynchronous methods to allow the LightSwitch runtime to properly manage errors and to show the progress of an operation to the user.
with a straight call to saveChanges like so: tempWorkspace.ApplicationData.saveChanges();. Delete the code beneath that deletes the entity and calls saveChanges a second time, but keep the code that displays the confirmation message by calling the msls.showMessageBox method. Finally, delete the line of code above that sets the newEmail.Subject property (this property is defined as mandatory at the table level), and run your application. You’ll find that the call to SaveChanges won’t work because the record fails validation. But by not returning a promise object, the user incorrectly sees the dialog that’s shown in Figure 15-7 rather than a validation warning. LightSwitch won’t show any errors to the user and won’t show any indication whatsoever that the operation has failed. For this reason, it’s important to apply the pattern that’s shown in this listing whenever you call asynchronous methods to allow the LightSwitch runtime to properly manage errors and to show the progress of an operation to the user.

Figure 15-7. Sending an e-mail from the HTML Client
Sending E-mails with File Attachments
The SendMail helper method that you created in Listing 15-2 allows you to include e-mail attachments. This section shows you how to modify the Silverlight UserDetail screen to allow users to add file attachments. This example uses the Silverlight File Open dialog. You’ll remember from Chapter 7 that Silverlight file dialogs don’t work well in browser applications. You can use a custom control to overcome this obstacle, and this section shows you how. Here are the steps to create this example:
- Open your UserDetail screen.
- Click on the “Add Data” button, and add a local string property called FileUploadButton. Make sure to uncheck the “Is Required” check box.
- Drag your FileUploadButton property from the Screen Member list onto your screen. LightSwitch automatically creates a TextBox control for this property. Use the drop-down list to change the control type from a TextBox to a Custom Control.
- Open the property sheet for the FileUploadButton control, and click on the “change” link to open the Add Custom Control dialog. Set the control type to System.Windows.Controls.Button. You can refer to Chapter 11 if you want to find out more about this process.
- Click on the “Write Code” button, and select the UserDetail_InitializeDataWorkspace method. Now enter the code that’s shown in Listing 15-7.
Listing 15-7. Screen Code to Send E-mail Attachments
VB:
File:HelpDeskVBClientUserCodeUserDetail.vb

Imports System.Runtime.InteropServices.Automation
Imports Microsoft.LightSwitch.Threading

Private Sub UserDetail_InitializeDataWorkspace(
   saveChangesTo As List(Of Microsoft.LightSwitch.IDataService))

   AddHandler Me.FindControl("FileUploadButton").ControlAvailable,
      Sub(sender As Object, e As ControlAvailableEventArgs)

         CType(e.Control, Button).Content = "Send Message With Attachment"

         AddHandler CType(e.Control, Button).Click,
            Sub(sender2 As Object, e2 As RoutedEventArgs)

               Dim dlg As New OpenFileDialog()
               If dlg.ShowDialog().GetValueOrDefault(False) = True Then
                  Dim data As Byte()
                     Using stream As FileStream = dlg.File.OpenRead()
                        data = New Byte(stream.Length - 1) {}
                        stream.Read(data, 0, data.Length)
                     End Using

                     Dim filename = dlg.File.Name

                     'send the email here
                     Me.Details.Dispatcher.BeginInvoke(
                        Sub()

                           Using dw As New DataWorkspace()

                              Dim newEmail =
                                 dw.ApplicationData.EmailOperations.AddNew()
                              With newEmail
                                 .RecipientEmail = User.Email
                                  .SenderEmail = "[email protected]"
                                  .Subject = SubjectProperty
                                  .Body = BodyProperty
                                  .Attachment = data
                                  .AttachmentFileName = filename
                              End With

                              Try
                                 dw.ApplicationData.SaveChanges()
                                 ' If you want, you can write some code here to
                                 ' create a record in an audit table
                                 newEmail.Delete()
                                 dw.ApplicationData.SaveChanges()
                              Catch ex As Exception
                                 ShowMessageBox(ex.Message)
                              End Try
                           End Using

                        End Sub
                     )

               End If
            End Sub
        End Sub
End Sub

C#:
File:HelpDeskCSClientUserCodeUserDetail.cs

using Microsoft.LightSwitch.Threading;
using System.Windows.Controls;
using System.Windows;

partial void UserDetail_InitializeDataWorkspace(
   List<IDataService> saveChangesTo)
{
    var control = this.FindControl("FileUploadButton");

    control.ControlAvailable +=
    (object sender, ControlAvailableEventArgs e) =>
    {
        var fileButton = (Button)e.Control;
        fileButton.Content = "Send Message With Attachment";

        fileButton.Click +=
            (object sender2, RoutedEventArgs e2) =>
            {
                OpenFileDialog dlg = new OpenFileDialog();
                if (dlg.ShowDialog().GetValueOrDefault(false) == true)
                {
                    byte[] data;
                    using (FileStream stream = dlg.File.OpenRead())
                    {
                        data = new byte[stream.Length];
                        stream.Read(data, 0, data.Length);
                    }

                    string filename = dlg.File.Name;
                    //send the email here
                    this.Details.Dispatcher.BeginInvoke(() =>
                    {
                        using (var dw = new DataWorkspace())
                        {
                            EmailOperation newEmail =
                               dw.ApplicationData.EmailOperations.AddNew();
                            newEmail.RecipientEmail = User.Email;
                            newEmail.SenderEmail = "[email protected]";
                            newEmail.Subject = SubjectProperty;
                            newEmail.Body = BodyProperty;
                            newEmail.Attachment = data;
                            newEmail.AttachmentFileName = filename;

                            try
                            {
                                dw.ApplicationData.SaveChanges();
                                //If you want, you can write some code here to
                                //create a record in an audit table
                                newEmail.Delete();
                                dw.ApplicationData.SaveChanges();
                            }
                            catch (Exception ex)
                            {
                                this.ShowMessageBox(ex.Message);
                            }
                        }
                    });
                };
        };
    };
}
Chapter 7 showed you how to open Silverlight file dialogs from a button on a desktop application’s screen. LightSwitch executes command code on the screen’s logic thread, but the code that opens the file dialog needs to run on the UI thread. This is because file dialogs are UI elements that interact with the user. In a desktop application, you can open the Silverlight file dialogs by invoking your code on the UI thread. But for browser applications that don’t run with “elevated trust,” this technique won’t work. However, in the case of a custom Silverlight button, LightSwitch executes the code that handles the click event on the UI thread. This characteristic allows you to open Silverlight file dialogs by adding your code to the method that handles your custom button’s click event.
The code in this listing accesses the underlying Silverlight custom button by obtaining an IContentItem reference and handling the ControlAvailable event ![]() . Once the code obtains a reference to the Silverlight button, it sets the button’s text
. Once the code obtains a reference to the Silverlight button, it sets the button’s text ![]() and adds the code that handles the button’s click event
and adds the code that handles the button’s click event ![]() .
.
The code that handles the button’s click event opens the Silverlight file open dialog ![]() and reads the content of the selected file into a byte array. The next part of the code creates a new record in the EmailOperation table, and calls the SaveChanges method to call the code that sends the e-mail. Because SaveChanges is a data operation that could take a long time to complete, the code invokes this logic on the screen’s logic thread
and reads the content of the selected file into a byte array. The next part of the code creates a new record in the EmailOperation table, and calls the SaveChanges method to call the code that sends the e-mail. Because SaveChanges is a data operation that could take a long time to complete, the code invokes this logic on the screen’s logic thread ![]() to prevent the process from locking up the UI.
to prevent the process from locking up the UI.
Creating Mail in a Pickup Folder
If you’re unable to send e-mail by using the preceding techniques (for example, if you’re unable to establish an SMTP connection on port 25), another option is to configure a pickup folder. Most SMTP servers, including Microsoft Exchange, allow you to configure such a folder. Rather than directly sending your e-mail, you would create a plain-text message in the pickup folder. The mail service then processes any file that you save here as an outbound e-mail. The snippet in Listing 15-8 illustrates the format that you should use to create files in this folder.
Listing 15-8. Mail Pickup Text File Format
to:[email protected]
from: [email protected]
subject:This is where you put the email subject.
this is the body of the email.
Sending Mail via Outlook by Using COM Automation
Another option for desktop applications is to automate Microsoft Outlook. This technique is entirely client based, and unlike the previous example, it requires no server-side coding. The obvious requirement is that Microsoft Outlook must be installed on the end-user computers, so this technique might be more suitable for corporate environments where you can more easily mandate the software that’s installed on the clients.
To send e-mail from Outlook, add the helper class that’s shown in Listing 15-9 to your client project.
Listing 15-9. Client-Side COM Code to Create an Outlook Message
VB:
File:HelpDeskVBClientUserCodeOutlookMailHelper.vb

Option Strict Off

Imports System.Runtime.InteropServices.Automation

Public Module OutlookMailHelper
   Const olMailItem As Integer = 0
   Const olFormatPlain As Integer = 1
   Const olFormatHTML As Integer = 2

   Public Sub CreateEmail(toAddress As String,
      subject As String, body As String)
      Try
         Dim outlook As Object = Nothing

         If AutomationFactory.IsAvailable Then
            Try
               'Get the reference to the open Outlook App
                outlook = AutomationFactory.GetObject("Outlook.Application")
            Catch ex As Exception
                'Outlook isn't open, therefore try and open it
                 outlook =
                    AutomationFactory.CreateObject("Outlook.Application")
            End Try

            If outlook IsNot Nothing Then

               Dim mail = outlook.CreateItem(olMailItem)
               If body.ToLower().Contains("<html>") Then
                  mail.BodyFormat = olFormatHTML
                  mail.HTMLBody = body
               Else
                  mail.BodyFormat = olFormatPlain
                  mail.Body = body
               End If

               mail.Recipients.Add(toAddress)
               mail.Subject = subject

               mail.Save()
               mail.Display()
               'uncomment this code to send the email immediately
               'mail.Send()
            End If

         End If
      Catch ex As Exception
         Throw New InvalidOperationException("Failed to create email.", ex)
      End Try
   End Sub
End Module

C#:
File:HelpDeskCSClientUserCodeOutlookMailHelper.cs

using System;
using System.Runtime.InteropServices.Automation;

namespace LightSwitchApplication.UserCode
{
    public static class OutlookMailHelper
    {
        const int olMailItem = 0;
        const int olFormatPlain = 1;
        const int olFormatHTML = 2;

        public static void CreateEmail(
           string toAddress, string subject, string body)
        {
            try
            {
                dynamic outlook = null;

                if (AutomationFactory.IsAvailable)
                {
                    Try
                    {
                        //Get the reference to the open Outlook App
                        outlook =
                           AutomationFactory.GetObject("Outlook.Application");
                    }
                    catch (Exception ex)
                    {
                        //Outlook isn't open, therefore try and open it
                       outlook =
                         AutomationFactory.CreateObject("Outlook.Application");
                    }

                    if (outlook != null)
                    {
                        //Create the email
                        dynamic mail = outlook.CreateItem(olMailItem);
                        if (body.ToLower().Contains("<html>"))
                        {
                            mail.BodyFormat = olFormatHTML;
                            mail.HTMLBody = body;
                        }
                        else
                        {
                            mail.BodyFormat = olFormatPlain;
                            mail.Body = body;
                        }
                        mail.Recipients.Add(toAddress);
                        mail.Subject = subject;

                        mail.Save();
                        mail.Display();
                        //uncomment this code to send the email immediately
                        //mail.Send()
                    }
                }

            }
            catch (Exception ex)
            {
                throw new InvalidOperationException(
                   "Failed to create email.", ex);
            }
        }
    }

}
This class defines a method called CreateEmail ![]() . This is the method that you would call to create an Outlook message. COM automation works only in desktop applications, so the first part of the code checks that your application is indeed running on a desktop
. This is the method that you would call to create an Outlook message. COM automation works only in desktop applications, so the first part of the code checks that your application is indeed running on a desktop ![]() .
.
The next part of the code obtains a reference to the Outlook application ![]() . If Outlook is already open, it uses COM’s GetObject method to obtain a reference to the existing Outlook application. Otherwise, it uses the CreateObject method to create a new instance of Outlook.
. If Outlook is already open, it uses COM’s GetObject method to obtain a reference to the existing Outlook application. Otherwise, it uses the CreateObject method to create a new instance of Outlook.
The next part of the code calls the Outlook API’s CreateItem method to create a new mail message ![]() . Just like the SMTP helper method that you created in Listing 15-2, this code tests for the existence of an HTML tag
. Just like the SMTP helper method that you created in Listing 15-2, this code tests for the existence of an HTML tag ![]() . If it finds this tag, the code sets the format of your mail message to HTML. The next section of code sets the message body, subject, and recipient address. Finally, the code saves the e-mail message
. If it finds this tag, the code sets the format of your mail message to HTML. The next section of code sets the message body, subject, and recipient address. Finally, the code saves the e-mail message ![]() and calls the Display method to open the message in a new Outlook message window
and calls the Display method to open the message in a new Outlook message window ![]() .
.
At this point, the user can review the message and manually click on the message window’s send button to complete the send. If you want to send the e-mail without any user intervention, you can do this by deleting the call to the Display method, and call the message object’s Send method instead.
The final step that remains is to call your CreateEmail method from a screen. To show you how to do this, open your UserDetail screen and add a button called SendWithOutlook. Now add the code that’s shown in Listing 15-10.
Listing 15-10. Screen Code to Create an Outlook Message
VB:
File:HelpDeskVBServerUserCodeUserDetail.vb

Imports System.Runtime.InteropServices.Automation

Private Sub SendWithOutlook_Execute()
   OutlookMailHelper.CreateEmail(User.Email,
   SubjectProperty, BodyProperty)
End Sub

Private Sub SendWithOutlook_CanExecute(ByRef result As Boolean)
   result = AutomationFactory.IsAvailable
End Sub

C#:
File:HelpDeskCSServerUserCodeUserDetail.cs

using System.Runtime.InteropServices.Automation;

partial void SendWithOutlook_Execute()
{
    LightSwitchApplication.UserCode.OutlookMailHelper.CreateEmail(
        User.Email,
        SubjectProperty,
        BodyProperty);
}

partial void SendWithOutlook_CanExecute(ref bool result)
{
    result = AutomationFactory.IsAvailable;
}
The code in the SendWithOutlook method calls the CreateEmail method and supplies the e-mail address, subject, and message body values that the user has entered on the screen ![]() . This code also implements the SendWithOutlook_CanExecute method
. This code also implements the SendWithOutlook_CanExecute method ![]() . The purpose of this code is to disable the SendWithOutlook button if the application isn’t running on the desktop. You’ll find out more about CanExecute methods in Chapter 17. Figure 15-8 shows how your screen looks at runtime.
. The purpose of this code is to disable the SendWithOutlook button if the application isn’t running on the desktop. You’ll find out more about CanExecute methods in Chapter 17. Figure 15-8 shows how your screen looks at runtime.
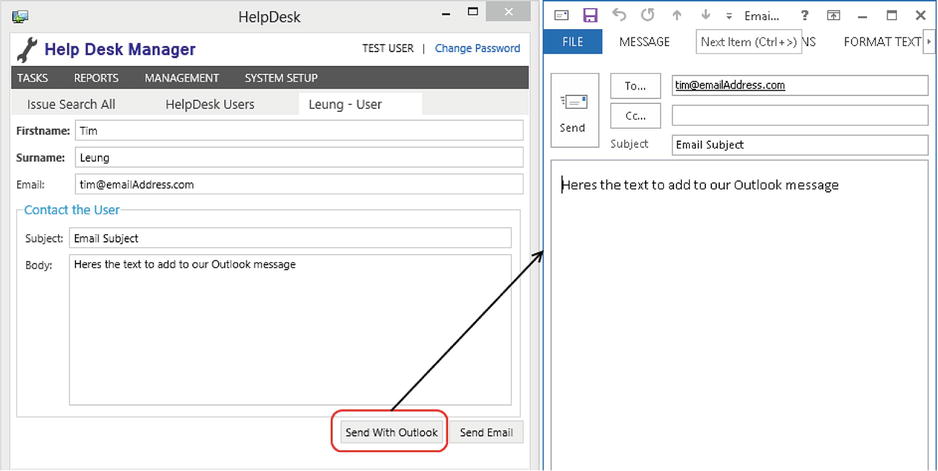
Figure 15-8. Clicking the “Send With Outlook” button opens Outlook
![]() Tip Although this chapter focuses on how to send e-mail, you can automate Outlook in many other ways. By using similar code, you can create powerful applications that create Outlook appointments, contacts, or tasks via your LightSwitch application.
Tip Although this chapter focuses on how to send e-mail, you can automate Outlook in many other ways. By using similar code, you can create powerful applications that create Outlook appointments, contacts, or tasks via your LightSwitch application.
Opening the Default Mail Program
This section shows you how to open the default mail client by creating a mailto hyperlink. You can use this technique in both desktop and browser applications. It works by opening the user’s default e-mail program (if one exists). This might be Outlook, Outlook Express, Windows Live Mail, or any other e-mail client that the user has installed.
You can set the recipient e-mail address, subject, and body of your message by supplying arguments to the mailto hyperlink. It’s very likely that you’ve encountered these links when browsing the Web, and web developers will be familiar with this technique. The syntax of a simple mailto link is as follows:
mailto:[email protected]
If you want to send an e-mail to multiple recipients, you can specify a comma-separated list of e-mail addresses in the following way:
mailto:[email protected],[email protected]
After the recipient details, you can use the ? character to supply additional arguments. For example, you can use the following syntax to specify an e-mail subject:
mailto:[email protected],[email protected]?subject=Email
Subject
If you want to supply multiple arguments, separate the arguments by using the & symbol. Here’s an example link that specifies both an e-mail subject and body:
mailto:[email protected], [email protected]?
    subject=Email Subject&Body=Here is the body of the email.
Table 15-4 shows the list of available parameters.
Table 15-4. mailto Parameters
| Function | mailto Parameter |
|---|---|
| Set the e-mail subject | subject |
| CC a recipient (copy) | cc |
| BCC as recipient (blind carbon copy) | bcc |
| Set the body text | body |
Using mailto in a Silverlight Client
Once you’ve built a mailto hyperlink, you can call it from a Silverlight application’s screen command.
To see this in action, switch your project to File View and add a reference to the System.Windows.Browser.dll assembly in your Client project. Open the UserDetail screen, and add the code that’s shown in Listing 15-11.
Listing 15-11. Sending E-mail by Using a mailto Hyperlink
VB:
File:HelpDeskVBClientUserCodeUserDetail.vb

Public Sub OpenDefaultMailClient(
   ByVal toAddress As String,
   ByVal subject As String,
   ByVal body As String)

   subject = System.Uri.EscapeDataString(subject)
   body = System.Uri.EscapeDataString(body)

   Dim url As String = String.Format(
      "mailto:{0}?subject={1}&body={2}", toAddress, subject, body)
   Dim uri As Uri = New Uri(url)

   If AutomationFactory.IsAvailable Then
      Dim shell = AutomationFactory.CreateObject("Shell.Application")
      'shell.ShellExecute(url) if Option Strict is Off
      CompilerServices.Versioned.CallByName(
         shell, "ShellExecute", CallType.Method, url)
    Else
       Microsoft.LightSwitch.Threading.Dispatchers.Main.BeginInvoke(
          Sub()
             System.Windows.Browser.HtmlPage.Window.Navigate(
                uri, "_blank")
          End Sub
        )
    End If
End Sub

C#:
File:HelpDeskCSClientUserCodeUserDetail.cs

public static void OpenDefaultMailClient (
    string toAddress, string subject, string body)
{
    subject = Uri.EscapeDataString(subject);
    body = Uri.EscapeDataString(body);

    string url = string.Format(
        "mailto:{0}?subject={1}&body={2}", toAddress, subject, body);
    Uri uri = new Uri(url);

    if (AutomationFactory.IsAvailable)
    {
        var shell = AutomationFactory.CreateObject("Shell.Application");
        shell.ShellExecute(url);
    }
    else
    {
        Microsoft.LightSwitch.Threading.Dispatchers.Main.BeginInvoke(() =>
        {
            System.Windows.Browser.HtmlPage.Window.Navigate(
               uri, "_blank");
        });
    }
}
This code defines a method called OpenDefaultMailClient ![]() that allows you to open the mail client that’s installed on the client. If you want to call this code from multiple places, you can create a helper class in your Client project, and create the OpenDefaultMailClient method as a shared/static method within this class, just like the OutlookMailHelper class from Listing 15-9.
that allows you to open the mail client that’s installed on the client. If you want to call this code from multiple places, you can create a helper class in your Client project, and create the OpenDefaultMailClient method as a shared/static method within this class, just like the OutlookMailHelper class from Listing 15-9.
The OpenDefaultMailClient method allows you to supply the subject, body, and recipient address to add to your message.
When you send e-mails using this technique, you need to encode any special characters that might appear in your hyperlink. For example, the & symbol needs to be replaced with %25 because & is the character that separates the arguments in the mailto string. The code toward the top of the method encodes the Subject and Body values by calling the Uri.EscapeDataString method ![]() . The next part of the code builds the content of the mailto link
. The next part of the code builds the content of the mailto link ![]() .
.
The next line of code checks where your application is running ![]() . If it’s running on the desktop, the code uses the shell command to open the default e-mail client
. If it’s running on the desktop, the code uses the shell command to open the default e-mail client ![]() . Otherwise, it uses the HtmlPage object from the System.Windows.Browser namespace instead
. Otherwise, it uses the HtmlPage object from the System.Windows.Browser namespace instead ![]() . This code needs to be invoked on the main UI thread.
. This code needs to be invoked on the main UI thread.
The final step is to call your OpenDefaultMailClient method from a screen. To do this, add a button to your UserDetail screen and name it SendByDefaultClient. Once you’ve created this button, add the code that’s shown in Listing 15-12.
Listing 15-12. Screen Code to Use the Default Client
VB:
File:HelpDeskVBClientUserCodeUserDetail.vb

Private Sub SendByDefaultClient_Execute()
    OpenDefaultMailClient(User.Email,
    SubjectProperty, BodyProperty)
End Sub

C#:
File:HelpDeskCSClientUserCodeUserDetail.cs

partial void SendByDefaultClient_Execute()
{
    OpenDefaultMailClient(
        User.Email,
        SubjectProperty,
        BodyProperty);
}
This code in the SendByDefaultClient method calls the OpenDefaultMailClient method, and supplies the e-mail address, subject, and message body values that are shown on the screen ![]() . This completes this code sample, and you can now run your screen.
. This completes this code sample, and you can now run your screen.
Using mailto in the HTML Client
The mailto technique also works in HTML client applications. In this section, you’ll find out how to apply this method to a screen that’s designed to show information about your application, such as version numbers and contact details. First, create a Browse Data Screen and leave the screen data drop-down set to “None.” Name your screen About, and add a new button to your screen. When the “Add Button” dialog appears, select the radio option to “Write my own method” and name your method EmailAdministrator. Figure 15-9 shows how your screen now looks.

Figure 15-9. Screen at design time
Now right-click your EmailAdministrator method, click on the “Edit Execute Code” option, and add the JavaScript that’s shown in Listing 15-13.
Listing 15-13. Sending E-mail by Using a mailto Hyperlink
File:HelpDeskVBHTMLClientUserCodeAbout.js

myapp.About.EmailAdministrator_execute = function (screen) {
    var emailTo = "[email protected]";
    var subject = "Helpdesk Mobile App Enquiry";
    var body  = "I have an enquiry about the Helpdesk App.";

    var url = "mailto:" + emailTo +
        "?subject=" + encodeURIComponent(subject) +
        "&body=" + encodeURIComponent(body);

    document.location.href = url;
};
The first part of this code creates variables to store the recipient ![]() , subject, and body values of your e-mail. In practice, you could set these values from data or local properties. The next part of the code builds the mailto URL. Notice how it calls JavaScript’s encodeURLComponent function
, subject, and body values of your e-mail. In practice, you could set these values from data or local properties. The next part of the code builds the mailto URL. Notice how it calls JavaScript’s encodeURLComponent function ![]() to encode any special characters in the subject or body parts of your URL. Although there aren’t any special characters in this example, the listing includes the encodeURLComponent call to demonstrate how to carry out this task. The final piece of this code opens the URL by setting the address of the current browser page to the mailto address
to encode any special characters in the subject or body parts of your URL. Although there aren’t any special characters in this example, the listing includes the encodeURLComponent call to demonstrate how to carry out this task. The final piece of this code opens the URL by setting the address of the current browser page to the mailto address ![]() .
.
Figure 15-10 shows how the screen looks on an Android device, and illustrates how the Android mail client opens when you click on the “Email Administrator” button. It’s useful to note that this technique may not work on all mobile devices or browsers, so it’s important to test your application on your intended device.
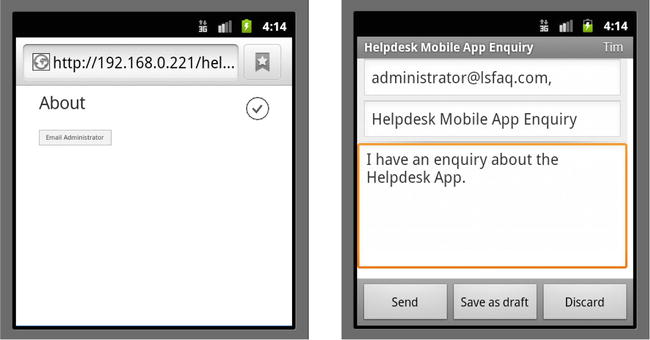
Figure 15-10. Opening mailto links on a mobile Android device
Calling External Resources from LightSwitch Clients
Sending e-mail is really just one example of calling an external resource from a LightSwitch client. In reality, there are many other reasons why you’d want to consume external web-based resources. Examples include calling SMS gateways to send text messages, looking up online stock quotes, calling mapping services, or looking up addresses based on postal codes.
Consuming these types of services usually requires you to make some sort of web service call. This section shows you how to accomplish this by making an AJAX call from an HTML application or consuming a web service from a Silverlight application. In keeping with the theme of this chapter and to provide examples that you can easily re-create, this section remains on the topic of sending e-mail.
Using AJAX from the HTML Client
The first part of this section shows you how to make AJAX (Asynchronous JavaScript and XML) calls from HTML client applications. This technique allows you to call many different types of web resources and create much more versatile applications. To demonstrate this technique, this example shows you how to create an ASP.NET handler that sends an e-mail. This handler allows you to supply e-mail address, subject, and body values. Once you’ve added your handler, the second part of this example shows you how to call it from your LightSwitch application.
To create the server-side part of this example, switch your project to “File View.” Navigate to your Server project, right-click your Web project, and add a new “Generic Handler.” Name your handler SendMail.ashx. This creates a code file that includes a method stub for the ProcessRequest method. Modify the code in this method, as shown in Listing 15-14.
Listing 15-14. SendMail Handler Code
VB:
File:HelpDeskVBServerWebSendMail.ashx.vb

Sub ProcessRequest(ByVal context As HttpContext) Implements
  IHttpHandler.ProcessRequest
   '1  Is the user authenticated? Does he belong in the Manager Role?
   'context.User.Identity.IsAuthenticated
   'context.User.IsInRole("Manager")

   If context.Request.Params("emailTo") IsNot Nothing AndAlso
      context.Request.Params("subject") IsNot Nothing AndAlso
      context.Request.Params("body") IsNot Nothing Then
        Try
           Dim senderEmail As String = "[email protected]"
           SmtpMailHelper.SendMail(senderEmail,
              context.Request.Params("emailTo").ToString(),
              context.Request.Params("subject").ToString(),
              context.Request.Params("body").ToString(), Nothing, Nothing)
           context.Response.Write("Email Sent")
        Catch ex As Exception
           context.Response.Write(ex.Message)
        End Try
    Else
        context.Response.Write("EmailTo, Subject, and Body required")
    End If
End Sub

C#:
File:HelpDeskCSServerWebSendMail.ashx.cs

public void ProcessRequest(HttpContext context)
{
   //1 Is the user authenticated? Does he belong in the Manager Role?
   //context.User.Identity.IsAuthenticated
   //context.User.IsInRole("Manager")

    if (context.Request.Params["emailTo"] != null &&
        context.Request.Params["subject"] != null &&
        context.Request.Params["body"] != null)
    {
        try
        {
            string senderEmail = "[email protected]";
            LightSwitchApplication.UserCode.SmtpMailHelper.SendMail(
                senderEmail,
                context.Request.Params["emailTo"].ToString(),
                context.Request.Params["subject"].ToString(),
                context.Request.Params["body"].ToString(), null, null);
            context.Response.Write("Email Sent");
        }
        catch (Exception ex)
        {
            context.Response.Write(ex.Message);
        }
    }
    else
    {
        context.Response.Write("EmailTo, Subject, and Body required");
    }
}
This code uses the SMTPMailHelper class that’s shown in Listing 15-2, so you’ll need to create this class if you haven’t done so already.
The first part of this code includes a comment that contains the syntax that allows you to find out whether the user is authenticated or belongs in a user-defined role called “Manager” ![]() . It’s a good idea to include some access-control checks, and you’ll find more about this in Chapters 16 and 17. The next part of the code checks that the request includes the recipient e-mail address, subject, and body
. It’s a good idea to include some access-control checks, and you’ll find more about this in Chapters 16 and 17. The next part of the code checks that the request includes the recipient e-mail address, subject, and body ![]() . If any of this data is missing, the code returns a message to the caller. Otherwise, the code sends the e-mail by calling the SMTPMailHelper class’s SendMail method
. If any of this data is missing, the code returns a message to the caller. Otherwise, the code sends the e-mail by calling the SMTPMailHelper class’s SendMail method ![]() . If an error occurs, the catch block
. If an error occurs, the catch block ![]() returns the error to the caller.
returns the error to the caller.
This completes the server side code. To create the client-side code that carries out the AJAX request, open the AddEditUser screen that you created earlier. Right-click your SendEmail method, click on the “Edit Execute Code” option, and replace the code from the earlier example with the code that’s shown in Listing 15-15.
Listing 15-15. Calling the SendEmail Handler Page via AJAX
File:HelpDeskVBHTMLClientUserCodeAddEditUser.js

myapp.AddEditUser.SendEmail_execute = function (screen) {

    return new msls.promiseOperation(function (operation) {
        var emailTo = screen.User.Email;
        var mailUrl = "../Web/SendMail.ashx" +
            "?emailTo=" + emailTo +
            "&subject=" + encodeURIComponent(screen.SubjectProperty) +
            "&body=" + encodeURIComponent(screen.BodyProperty);

        $.ajax({
            type: 'post',
            data: {},
            url: mailUrl,
            success: function success(result) {
                operation.complete();
                msls.showMessageBox(result);
            } ,
            error: function err(jqXHR, textStatus, errorThrown) {
                operation.error(errorThrown);
            }
        });
    });
}
The function that’s shown in this listing returns a promise object. It does this by wrapping the logic in a call to the msls.promiseOperation method ![]() . The promise object enables the LightSwitch runtime to place the screen into a “busy” mode, as shown in the screenshot on the left in Figure 15-11. If you didn’t wrap your code inside a call to msls.promiseOperation, your application wouldn’t show any progress indication.
. The promise object enables the LightSwitch runtime to place the screen into a “busy” mode, as shown in the screenshot on the left in Figure 15-11. If you didn’t wrap your code inside a call to msls.promiseOperation, your application wouldn’t show any progress indication.
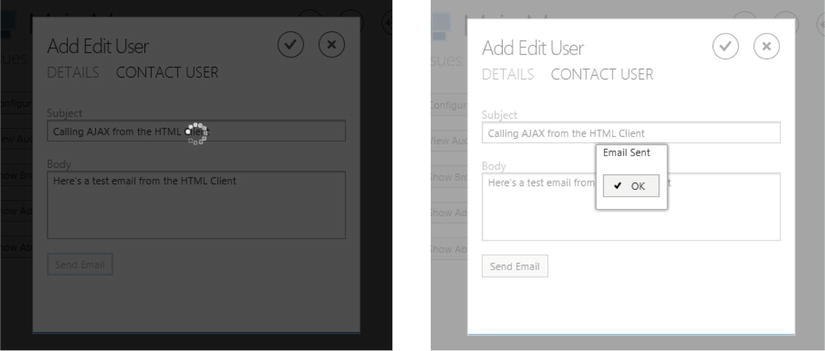
Figure 15-11. Sending an e-mail via an AJAX call
The next part of this code creates the URL that points to your e-mail handler and sets the emailTo, subject, and body arguments ![]() . The next line of code calls this URL by calling jQuery’s ajax method. This method allows you to supply a function that runs when the AJAX request succeeds. The code in this function calls the operation parameter’s complete method
. The next line of code calls this URL by calling jQuery’s ajax method. This method allows you to supply a function that runs when the AJAX request succeeds. The code in this function calls the operation parameter’s complete method ![]() , and then and calls the showMessageBox
, and then and calls the showMessageBox ![]() method to show the result from the server. If the server returns a “404 not found,” or if the process encounters some other type of error, you can handle this condition by supplying an error function to your jQuery’s ajax call
method to show the result from the server. If the server returns a “404 not found,” or if the process encounters some other type of error, you can handle this condition by supplying an error function to your jQuery’s ajax call ![]() . The definition of this function contains three parameters. In the event of an error, the third parameter, errorThrown, allows you to access the textual part of the HTTP status such as “Internal Server Error” or “Not found.” The code in the error function calls the operation parameter’s error method
. The definition of this function contains three parameters. In the event of an error, the third parameter, errorThrown, allows you to access the textual part of the HTTP status such as “Internal Server Error” or “Not found.” The code in the error function calls the operation parameter’s error method ![]() to allow the LightSwitch runtime to manage the error condition.
to allow the LightSwitch runtime to manage the error condition.
Note that your code must call either the operation.complete or operation.error method. If you don’t do this, LightSwitch never closes the blacked-out “busy” screen and prevents your user from carrying out any further actions in your application.
This example shows you the general pattern that allows you to make an AJAX call. To find out more, take a look at the ajax method documentation that you’ll find on the jQuery web site http://api.jquery.com/jQuery.ajax/.
Calling Web Services from the Silverlight Client
Calling web services from your Silverlight client allows you to extend the capabilities of your application. In addition to calling services that other companies or developers have created, you can also call web services to execute custom server-side code that you’ve written yourself. To demonstrate how this works, this section shows you how to create a WCF web service that sends e-mail. You’ll then learn how to consume this service from your Silverlight client.
It’s important to note that in the case of browser applications, Silverlight’s default security policy prevents it from communicating with web services that are hosted on servers other than the server from which your application originated from. To save you from having to make additional configuration changes to run your code, the following example shows you how to add a WCF web service to your application’s existing ASP.NET middle tier.
Hosting a WCF Service in your LightSwitch server
To develop this example in Visual Studio, you’ll need to set up your project to use IIS Express. LightSwitch does this automatically for any projects that you’ve upgraded. So if you’ve not done so, you’ll need to install “Visual Studio 2012 Update 2” and select the right-click “Upgrade” option that you’ll find in Solution Explorer. To add a WCF web service to your existing application, switch your project to “File View” and right-click your Server project. Click Add ![]() New Item, and select the “WCF Service” option, as shown in Figure 15-12. Name your service MailService.svc.
New Item, and select the “WCF Service” option, as shown in Figure 15-12. Name your service MailService.svc.
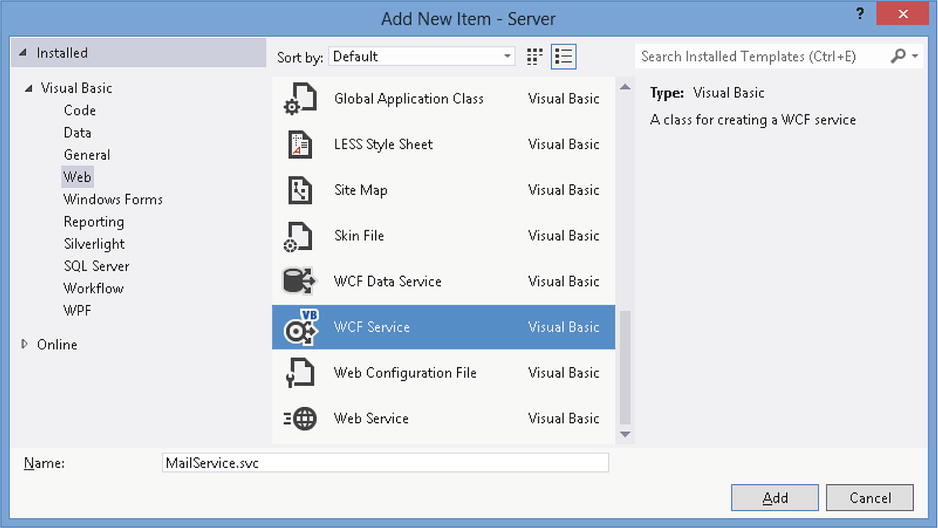
Figure 15-12. Adding a new WCF Web Service
After you add a WCF Service, Visual Studio creates two files: IMailService.vb and MailService.svc.vb for VB, or IMailService.cs and MailService.svc.cs for C#. The IMailService file defines your service’s interface, and the MailService file contains the implementation. Open your IMailService file, and modify it as shown in Listing 15-16.
Listing 15-16. Defining the Interface for Your Web Service
VB:
File:HelpDeskVBServerIMailService.vb

Imports System.ServiceModel

<ServiceContract()>
Public Interface IMailService

   <OperationContract()>
   Function SendMail(
      emailTo As String, subject As String, body As String) As String

End Interface

C#:
File:HelpDeskCSServerIMailService.cs

using System.ServiceModel;

namespace LightSwitchApplication
{
    [ServiceContract]
    public interface IMailService
    {
        [OperationContract]
        string SendMail(
           string emailTo, string subject, string body);
    }
}
Next, open your MailService.svc file, and add the implementation code that’s shown in Listing 15-17.
Listing 15-17. Implementing Your Web Service Method
VB:
File:HelpDeskVBServerMailService.svc.vb

Imports System.ServiceModel.Activation

<AspNetCompatibilityRequirements(
    RequirementsMode:=AspNetCompatibilityRequirementsMode.Required)> _
Public Class MailService
   Implements IMailService

   Public Function SendMail (
      emailTo As String, subject As String, body As String
         ) As String Implements IMailService.SendMail
      Try
         Dim senderEmail As String = "[email protected]"
         SmtpMailHelper.SendMail(
            senderEmail, emailTo, subject, body,
            Nothing, Nothing) ' optional - add email attachment here...
         Return ("Email Sent")
      Catch ex As Exception
         Return ex.Message
      End Try
    End Function

End Class

C#:
File:HelpDeskCSServerMailService.svc.cs

using System;
using System.ServiceModel.Activation;

namespace LightSwitchApplication
{
    [AspNetCompatibilityRequirements(
        RequirementsMode = AspNetCompatibilityRequirementsMode.Allowed)]
    public class MailService : IMailService
    {
        public string SendMail(
           string emailTo, string subject, string body)
       {
            try
            {
                string senderEmail = "[email protected]";
                LightSwitchApplication.UserCode.SmtpMailHelper.SendMail(
                   senderEmail, emailTo, subject, body,
                   null, null); // optional - add email attachment here...
                return ("Email Sent");
            }
            catch (Exception ex)
            {
                return ex.Message;
            }
        }
    }
}
The first part of this code sets the AspNetCompatibilityRequirements mode to allowed ![]() . By setting this attribute, you’ll be able to test your web service by calling it from a web browser. You’ll need to add an import or using statement for System.ServiceModel.Activation in order to apply this attribute. The next part of this code calls the SendMail helper method
. By setting this attribute, you’ll be able to test your web service by calling it from a web browser. You’ll need to add an import or using statement for System.ServiceModel.Activation in order to apply this attribute. The next part of this code calls the SendMail helper method ![]() that you created at the start of this chapter.
that you created at the start of this chapter.
Next, you’ll need to modify some of the settings beneath the system.serviceModel section of your web.config file as shown in Listing 15-18.
Listing 15-18. Changes to the web.config File
File:HelpDeskVBServerWeb.config

<system.serviceModel>

  <serviceHostingEnvironment
    aspNetCompatibilityEnabled="true"
    multipleSiteBindingsEnabled="true" />
  <behaviors>
    <serviceBehaviors>
      <behavior>
        <dataContractSerializer maxItemsInObjectGraph="6553600" />
        <serviceMetadata httpGetEnabled="true" />
      </behavior>
    </serviceBehaviors>
  </behaviors>
  <bindings>
    <webHttpBinding>
      <binding maxReceivedMessageSize="6553600" >
      </binding>
    </webHttpBinding>
    <basicHttpBinding>
      <binding name="MailServiceBinding" >
        <security mode="TransportCredentialOnly">
          <transport clientCredentialType="Windows" />
        </security>
      </binding>
    </basicHttpBinding>
  </bindings>

  <services>
    <service name="LightSwitchApplication.MailService">
      <endpoint address="MailService.svc"
          binding="basicHttpBinding"
          bindingConfiguration="MailServiceBinding"
          contract="LightSwitchApplication.IMailService" />
    </service>
  </services>

</system.serviceModel>
First, you’ll need to enable metadata publishing ![]() by setting the httpGetEnabled attribute to true. This allows you to add a reference to your web service from Visual Studio at a later stage. The other changes that you’ll need to make to this file are to define a binding
by setting the httpGetEnabled attribute to true. This allows you to add a reference to your web service from Visual Studio at a later stage. The other changes that you’ll need to make to this file are to define a binding ![]() and endpoint
and endpoint ![]() . The binding that you create here specifies Windows authentication, so you’ll need to confirm that you’ve enabled Windows Authentication in your project. Figure 15-13 shows the section in the property sheet for your server project that allows you to set this. If your project isn’t set to use IIS Express, you’ll find a right-click option on your server project that allows you to enable IIS Express.
. The binding that you create here specifies Windows authentication, so you’ll need to confirm that you’ve enabled Windows Authentication in your project. Figure 15-13 shows the section in the property sheet for your server project that allows you to set this. If your project isn’t set to use IIS Express, you’ll find a right-click option on your server project that allows you to enable IIS Express.
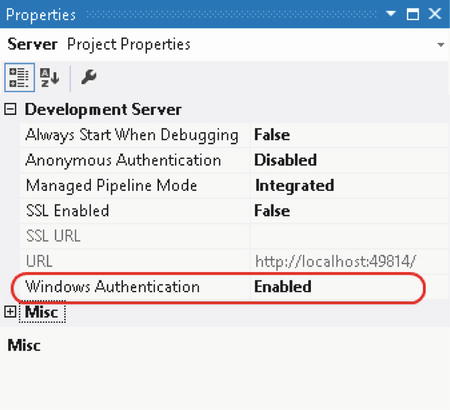
Figure 15-13. Configuring development server authentication settings
Now run your LightSwitch application by pressing F5, and stop it when it loads. After you stop your application, IIS Express should still be running in the background. Click the IIS Express icon that appears on the Windows taskbar (next to the clock) to find out the root URL of your application. (See Figure 15-14.)
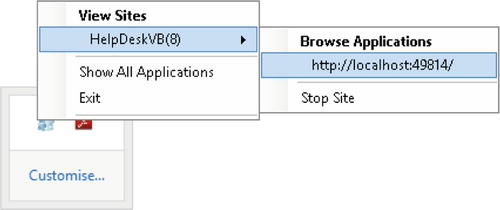
Figure 15-14. Adding a new WCF Web Service
Now create a web address by appending MailService.svc to the end of your root URL (for example, http://localhost:49814/MailService.svc), and open your address in a web browser. If you see the page that’s shown in Figure 15-15, you’ve successfully created your service. If not, you’ll probably see an error page that contains exception details. You can use the exception details to fix your code, although any errors that you might encounter will typically be due to incorrect security or service settings that you’ve defined in your web.config file.
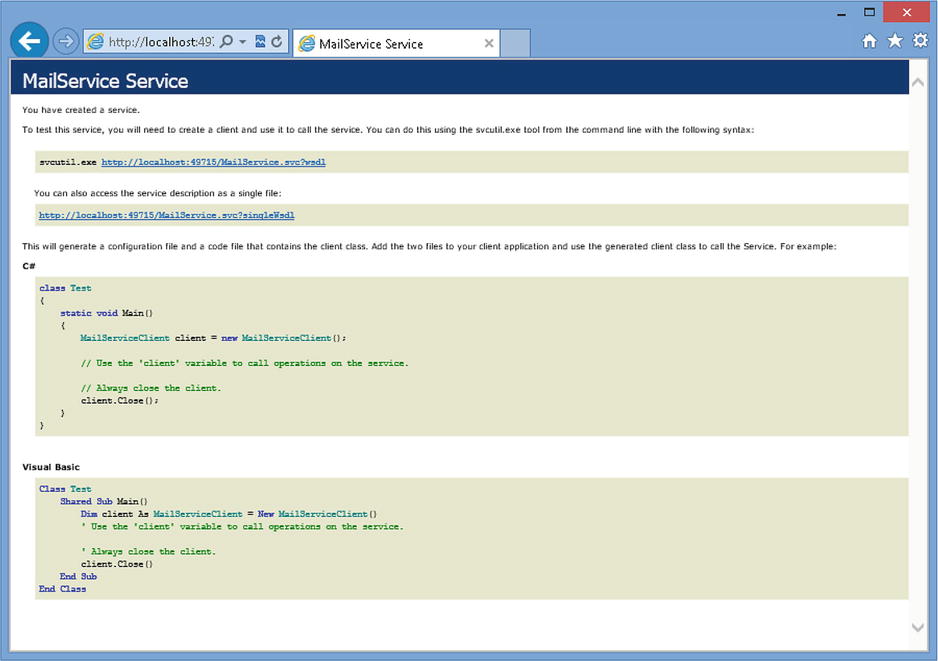
Figure 15-15. Opening your service in a web browser
Consuming a Web Service from your LightSwitch Client
Now that you’ve created your web service, here’s how to call it from your Silverlight client. Switch your project to “File View,” right-click your Client project, and select the “Add Service Reference” option. When the “Add Service Reference” dialog opens, enter the URL to your web service and click on the Go button. This populates the Services and Operations boxes that are shown in Figure 15-16. Set the value of the Namespace text box to MailService, and click on the OK button.
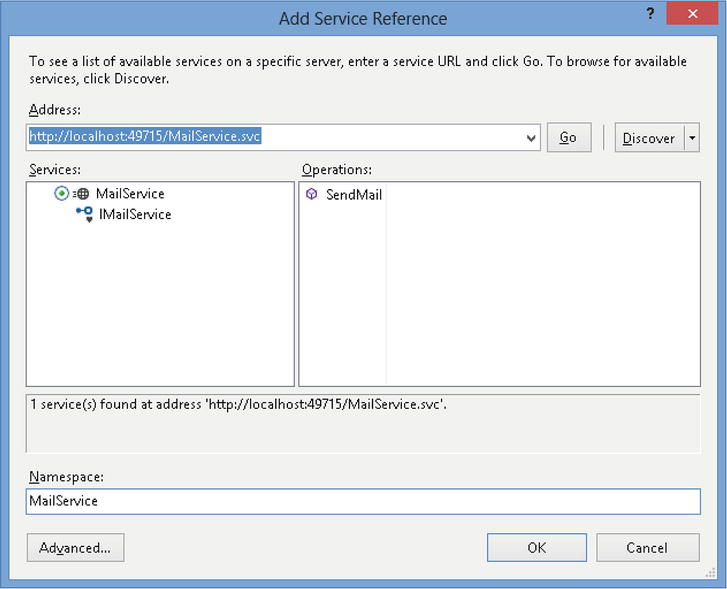
Figure 15-16. Adding a Web Service Reference
Switch your project to “Logical View,” and open the UserDetail screen that you created earlier. Create a new button called SendWithWebService, and add the code that’s shown in Listing 15-19.
Listing 15-19. Screen Code to Send an E-mail via a Web Service Call
VB:
File:HelpDeskVBClientUserCodeUserDetail.vb

Imports Microsoft.LightSwitch.Threading
Imports System.ServiceModel

Private Sub SendWithWebService_Execute()

   Microsoft.LightSwitch.Threading.Dispatchers.Main.BeginInvoke(
      Sub()
         Dim serverUrl As Uri = System.Windows.Application.Current.Host.Source

         Details.Dispatcher.BeginInvoke(
            Sub()
               'serverUrl.AbsoluteUri returns a URL like this:
               '    http://localhost:49715/Client/Web/HelpDesk.Client.xap
               Dim rootUrl =
                     serverUrl.AbsoluteUri.Substring(
                     0, serverUrl.AbsoluteUri.IndexOf("/Client/Web/"))

                Dim binding = New System.ServiceModel.BasicHttpBinding()

                'example endPoint url:
                '  endPointhttp://localhost:49715/MailService.svc
                Dim endPoint =
                   New EndpointAddress(rootUrl + "/MailService.svc ")

                Dim proxy As MailService.MailServiceClient =
                   New MailService.MailServiceClient(binding, endPoint)

                AddHandler proxy.SendMailCompleted,
                   Sub(sender As Object, e As MailService.SendMailCompletedEventArgs)
                      Me.Details.Dispatcher.BeginInvoke(
                         Sub()
                            ShowMessageBox(e.Result.ToString())
                         End Sub
                      )
                    End Sub

                 proxy.SendMailAsync(User.Email, SubjectProperty, BodyProperty)

              End Sub
           )
      End Sub
   )
End Sub

C#:
File:HelpDeskCSClientUserCodeUserDetail.cs

using System.ServiceModel;
using Microsoft.LightSwitch.Threading;

partial void SendWithWebService_Execute()
{
    Microsoft.LightSwitch.Threading.Dispatchers.Main.BeginInvoke(() =>
    {
        Uri serverUrl = System.Windows.Application.Current.Host.Source;

        this.Details.Dispatcher.BeginInvoke(() =>
        {
            //serverUrl.AbsoluteUri returns a URL like this:
            //    http://localhost:49715/Client/Web/HelpDesk.Client.xap
            string rootUrl =
               serverUrl.AbsoluteUri.Substring(
                  0, serverUrl.AbsoluteUri.IndexOf("/Client/Web/"));

            var binding = new System.ServiceModel.BasicHttpBinding();

            //example endPoint url:
            //   http://localhost:49715/MailService.svc/MailService.svc
            var endPoint =
               new EndpointAddress(rootUrl + "/MailService.svc/MailService.svc");

            MailService.MailServiceClient proxy =
                new MailService.MailServiceClient(binding, endPoint);

            proxy.SendMailCompleted +=
                (object sender, MailService.SendMailCompletedEventArgs e) =>
                {
                    this.Details.Dispatcher.BeginInvoke(() =>
                    {
                        this.ShowMessageBox(e.Result.ToString());
                    });
                };

            proxy.SendMailAsync(User.Email, SubjectProperty, BodyProperty);

        });
        }
    );
}
To simplify the process of deployment, this code sets your web service’s endpoint address in code. This means that if you deploy your application and later move it to a different server, there’ll be no need for you to reconfigure your client. The code accomplishes this by finding the address of your XAP file ![]() and stripping off the trailing part of the address that contains Client/Web/HelpDesk.Client.xap
and stripping off the trailing part of the address that contains Client/Web/HelpDesk.Client.xap ![]() . It then uses the root part of the URL to build an address that points to your MailService.svc endpoint
. It then uses the root part of the URL to build an address that points to your MailService.svc endpoint ![]() . The next line declares a proxy to your web service
. The next line declares a proxy to your web service ![]() . If your code fails to connect to your web service at runtime, try creating your proxy by calling the non-overloaded constructor (for example, New MailService.MailServiceClient()). This applies the endpoint address that you specified in the “Add Service Reference” dialog, and it can help you diagnose the problem that prevents you from establishing a connection. The next block of code contains the logic that handles the completion of your web service call
. If your code fails to connect to your web service at runtime, try creating your proxy by calling the non-overloaded constructor (for example, New MailService.MailServiceClient()). This applies the endpoint address that you specified in the “Add Service Reference” dialog, and it can help you diagnose the problem that prevents you from establishing a connection. The next block of code contains the logic that handles the completion of your web service call ![]() . Finally, the line toward the end of the method contains the code that asynchronously calls your web service’s SendMail method
. Finally, the line toward the end of the method contains the code that asynchronously calls your web service’s SendMail method ![]() .
.
This completes your screen, and you can now run your application. When you open the user detail screen and click on the “Send With Web Service” button, your application will send your e-mail by calling your web service method.
EXERCISE 15.1 – CALLING WEB SERVICES
There are many public web services that you can call. Try finding some by Googling “Free WebService.” Alternatively, you can visit http://www.webservicex.net/ws/default.aspx to find a list of open web services. There, you’ll find web services that allow you to convert currencies, find out the weather, verify addresses, and many more. Find a web service that interests you, and try to call the service from your client application. Just like the example in this section, you’ll need to add a service reference and write code in your client application to consume the service.
Summary
This chapter showed you several ways to add e-mail support to your LightSwitch application. You’ve learned how to send e-mail alerts when data changes, how to allow users to send e-mails from screens, create e-mails with file attachments, and integrate with Microsoft Outlook. You’ve also learned how to send e-mail by calling web services.
This chapter began by showing you how to send SMTP messages from the server. This approach uses the methods in the System.Net.Mail namespace, and the advantage of server-side e-mail is that it works for both web and desktop applications. Microsoft Outlook integration, for example, works only in desktop applications. The data source events in the save pipeline enable you to send e-mail when your application creates, updates, or deletes entities. This allows you to send e-mail messages based conditionally on data changes or data values. The SmtpClient and MailMessage objects in the System.Net.Mail namespace provide the mechanism that sends the actual e-mail. If you want to apply custom fonts and colors to your message, you can accomplish this by composing your e-mail content in HTML format. To maximize code reusability, you can create an SMTP helper class that enables you to call your e-mail logic from multiple places.
If you don’t want to send e-mail only when data changes, you can create an EmailOperation table for the sole purpose of sending e-mails. The EmailOperation table contains fields such as recipient address, subject, and body. Any row that you add to this table triggers an e-mail by using the data that you’ve entered into the table. The code sample shows you how to add a row to this table by using a temporary data workspace. This allows you to send ad-hoc e-mails from your screens, without forcing the user to save other changes that they’ve made on the screen.
The MailMessage object allows you to add file attachments to your e-mail. If you’ve created a Silverlight browser application, security restrictions prevent you from adding button code that opens the Silverlight file dialogs. You can work around this restriction by adding a custom “button” control and adding the logic that opens the file dialog in the code that handles the button’s click event.
If your users use Microsoft Outlook and you’ve created a desktop application, automating Outlook is another option that you can choose. You’ve seen sample code that shows you how to create an Outlook message from a LightSwitch screen by using COM automation.
If Microsoft Outlook is not available, an alternative is to create a mailto hyperlink. This technique allows you to compose a draft message that includes the “to address,” subject, and body. You can then add a command on your LightSwitch screen that opens the message in the user’s default mail program. This might be Outlook, Outlook Express, Windows Live Mail, or any other e-mail client that the user has installed.
In the last part of this chapter, you’ve found out how to send an e-mail by calling a web service from your LightSwitch client. The benefit of this approach is that you can easily adapt the code in this section to call other web-based resources, such as SMS gateways or mapping services.
From an HTML client application, you can use jQuery’s ajax method to call external web resources. By wrapping the asynchronous AJAX call in a promise object, you can take advantage of LightSwitch’s progress indication and error-handling capabilities.
Finally, you’ve seen how to add a WCF web service to your LightSwitch application’s logic tier. The WCF service in this chapter sends an e-mail, but once again, you could adapt the code in this section to carry out different tasks. An advantage of adding a web service to your application’s logic tier is that you can consume the service from a Silverlight browser application, without having to make tricky changes to your security settings. To call your web service from a Silverlight client, you’d switch your project to File View and add a “Service Reference” to your service’s endpoint. Once you do this, you can write .NET code in your client project that consumes your web service.