Introduction
It’s possible to see many things in life as a journey, and writing a business application is no exception. On this particular journey, your goal is to build an application that fully works and meets the expectations of your users. Let’s imagine, for a moment, that the tool that builds your application represents your journey’s mode of transport. Using this analogy, I like to think of LightSwitch as a high-speed train because it allows you to reach your destination a lot faster than usual.
Speaking of trains, journeys are much more comfortable today than they were in the past. Modern carriages are Wi-Fi enabled and include tables and electrical sockets that you can plug your laptop into. There are even touch-screen displays that you can use to watch television or to view a map that shows you exactly where you are, and how much further there is to go. The ride itself is smooth enough for you to leave your hot coffee on the table without fear of it spilling. Everything is much cleaner than in the age of steam; and you never risk getting a hot cinder in your eye if you open a window!
The fascinating thing is that your railway journey might follow exactly the same route as it would have 150 years ago. However, the experience itself is quicker, cleaner, and more convenient. Just like the railways, LightSwitch has evolved during its short lifespan. The improvements in the latest version help to keep it fresh, relevant, and purposeful.
When LightSwitch first came out, it created applications based on Microsoft Silverlight. Today, you can support mobile and touch-screen tablet devices by extending your application to include an HTML front end. A big benefit of this approach is that you can reuse all of your existing data and business logic. This technical change is the railway equivalent of swapping all the carriages on a train for modern replacements.
Likewise, the first version of LightSwitch employed RIA services as the communication channel between the client and server. Today’s LightSwitch uses the OData protocol instead. Applying the railway analogy once more, this is like replacing the railway tracks with smoother rails. If LightSwitch doesn’t totally meet your requirements, you can easily integrate your application with other systems and platforms—like completing the final leg of the journey by car, bus, or foot.
The point of this analogy is to highlight one of the beauties of LightSwitch. It’s possible for LightSwitch to evolve and improve because it’s built in a modular way that allows individual pieces to be replaced. This modular architecture ensures that LightSwitch will remain relevant for a long time to come.
You can also consider this book as a journey—a tour that shows you how to build a LightSwitch application from start to finish. As with most journeys, there’ll be highlights and features along the way. I’m really pleased that you’ve chosen to take the LightSwitch journey. It’s sure to save you time and make your life easier; so I’m certain it’ll be a journey that you won’t regret taking!
Who This Book Is For
This book is designed for readers who want to build data-driven business applications quickly. You don’t need to have any prior knowledge of LightSwitch, but it helps if you know a little about .NET and database development in general.
How This Book Is Organized
If learning LightSwitch seems like an enormous task, don’t worry! You might have heard of the Pareto Principle, which also goes by the name of the 80/20 rule. This rule states that in most situations, 20% of something causes 80% of the results.
If you apply the Pareto Principle to this book, it suggests that you can accomplish 80% of what you want to accomplish by reading less than four chapters! And, in fact, the first three chapters highlight the key topics that are all you need to build an application that’s almost 80% complete.
By the end of Chapter 3, you’ll understand how to create data tables and attach to external data. You’ll know how to build a Silverlight web or desktop application that includes screens and navigation controls. You’ll see how to open child records from a parent record and how to assign parent records to child records by using controls like the autocomplete box (a picker control that’s similar to a drop-down box). In short, you’ll know how to build a working business application with enough functionality to perform most basic tasks.
The next part of the book shows you how to write code and queries. After that, you’ll learn how to create screens that contain advanced features and support mobile devices by adding an HTML client.
Unless you want to create an application that’s completely isolated from other systems, it’s useful to know how you can attach to unusual data sources and how to share your LightSwitch data with other applications. You’ll discover how to do this through RIA services and OData.
You can extend your Silverlight applications through custom controls and extensions, and you’ll find an entire section of the book devoted to this topic.
The remaining chapters of the book show you how to build reports, integrate with e-mail systems, and deploy your application.
The Sample Application
Most of the chapters include code samples that refer to a HelpDesk application. The purpose of this application is to relate the technical content in the book to a real-life scenario that you can understand.
The HelpDesk application is typical of the applications that you can build with LightSwitch. Its features are simple enough to understand, yet complex enough to show off the more advanced features of LightSwitch. It is designed to help companies manage problems, and it’s especially suitable for departments that deal with technical support issues. It allows users to record the actions they carry out to resolve a problem, while giving managers an overview of all current issues.
Figure 1 shows a screen from this application and illustrates some of the features that you’ll learn about in this book.
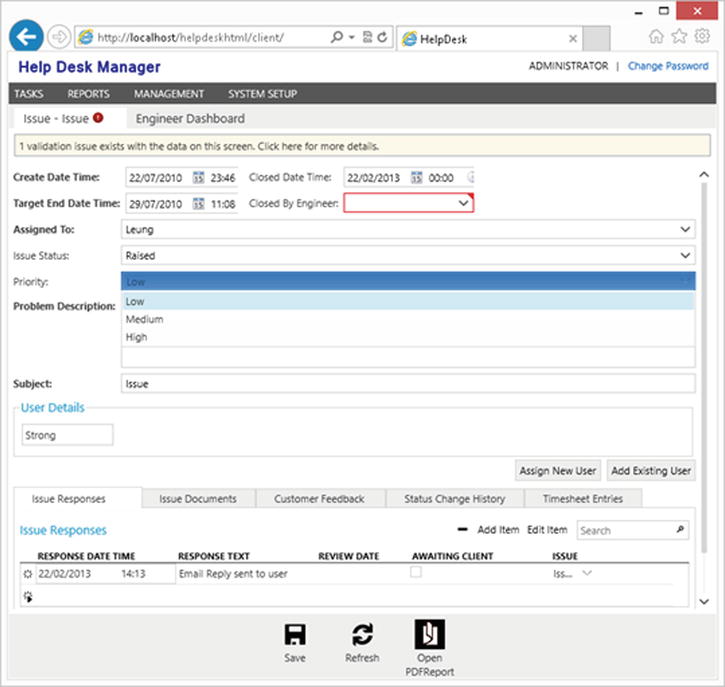
Figure 1. A typical screen from the HelpDesk manager
Figure 1 shows the data-entry screen through which users can enter help desk issues. They can set the user that the issue relates to and allocate an engineer to the record. The data-entry screen allows users to respond to the issue, attach documents, register feedback, and record the time that engineers spend on the task. To help you re-create this application, you can find a summary of the application’s tables in Appendix E.
Code Samples
LightSwitch supports C#, VB.NET, and JavaScript. This book includes code samples in all three languages. To make life simple, LightSwitch hides much of the complexity that’s associated with application design. When you want to write some code, you do this by clicking on a write code button that LightSwitch shows in its graphical designers. The write code button shows a list of events that you can handle. When you select one of the options in the list, LightSwitch opens a code editor window that you can use to author your code.
When you’re starting out with LightSwitch, it isn’t always obvious where your code is stored. To add some clarity, each code listing includes a file location, as shown in Listing 1.
Listing 1. Hello World Example
VB:
File: HelpDeskVBServerUserCodeApplicationData.vb

Imports System.Text.RegularExpressions

'REM VB Code appears here
Dim message = "Hello World"

C#:
File: HelpDeskCSServerUserCodeApplicationData.cs

using System.Text.RegularExpressions;

//REM C# Code appears here
var message = "Hello World";
For both the VB and C# examples in Listing 1, the File heading specifies the file name and path. In this example, HelpDeskVB and HelpDeskCS refer to the name of your LightSwitch application. The name Server refers to the Server project. This piece of information is useful because it informs you that the code runs on the server rather than the client. (You’ll learn all about this in Chapter 1.) The next part of the file heading, UserCode, indicates a subfolder in the Server project. Finally, ApplicationData.vb and ApplicationData.cs refer to the name of the VB or C# file that the listing shows.
If a piece of code requires you to reference a .NET namespace, the code listing will show the necessary Imports (VB.NET) or using (C#) statement. Be sure to add these statements to the top of your code file.
Many of the code samples include numeric symbols to help you locate specific lines in a code listing. For example, line ![]() defines a comment, whereas line
defines a comment, whereas line ![]() declares a variable. There’s obviously no need to enter these numeric symbols when you re-create this code for real!
declares a variable. There’s obviously no need to enter these numeric symbols when you re-create this code for real!
As in all books, the length of a code line can exceed the width of this book. In most cases, I’ve put line breaks in places that still allow the code to compile. But in some circumstances, this isn’t always possible. Notable examples include namespace declarations in XAML files and VB.NET keywords like inherits and implements. If your application doesn’t compile, it’s worth checking your code for extraneous line breaks.
Tips/Notes/Cautions
This book includes callouts with tips, notes, and cautions. Tips are helpful hints or pieces of information that may be particularly interesting. Notes provide you with nonessential, yet interesting additional information about a particular topic. Cautions alert you to anything that might be detrimental to your work or could cause damage.
Exercises
Some readers prefer to learn kinesthetically (that is, in a touchy-feely way). If you fall into this category, you can try the exercises that you’ll find throughout this book. These exercises provide you with ideas to try out in LightSwitch to help you further understand the content that’s described in the book.
Comments and Errata
Although my editors and I have tried to be as accurate as possible, mistakes do sometimes happen (particularly with a book of this length). If you have any feedback or want to report any bugs, please visit the official page for this book at the Apress website:
http://www.apress.com/9781430250715
This page also shows any mistakes that we’ve found following the publication of this book.