
![]()
Although LightSwitch doesn’t include a built-in report generator, you can build reports by using other products and integrate the results into your LightSwitch application. In this chapter, you’ll learn how to
- Create reports using ASP.NET and SQL Server Reporting Services
- Link and display reports from within your LightSwitch application
- Create documents using Microsoft Word, and generate PDF output
This chapter shows you how to extend the HelpDesk application to include reports. You’ll find out how to create ASP.NET pages to show timesheet entries for an engineer and create charts that summarize the status of the issues that have been recently added. You’ll learn how to use SQL Server Reporting Services to list the issues that have been assigned to an engineer, and you’ll find out how to use Microsoft Word’s mail-merge feature to generate letters to departments that have raised a high number of issues.
Choosing a Reporting Option
Microsoft SQL Server Reporting Services and Microsoft ASP.NET are great choices for reporting because you can obtain them free of charge, they’re well supported by Microsoft, and they integrate well with LightSwitch. Both products share one thing in common: they’re capable of producing output that you can access through a web address. This chapter shows you how to produce reports by using both of these products, and it teaches you a common technique that links web-based reports with your LightSwitch application.
Accessing Microsoft Word through COM automation is a technique that you can use in desktop applications. By using COM, you can also generate PDF reports on the client by using Silverlight PDF libraries. If you’re looking for report generators that integrate well with LightSwitch and are prepared to pay , there are third-party controls that you can buy that are specifically built for LightSwitch. Table 14-1 summarizes the reporting techniques that this chapter teaches you.
Table 14-1. Reporting Techniques
| Technique | Desktop Application | Web Application |
|---|---|---|
| Use Reporting Services | ✓ | ✓ |
| Automate Microsoft Word | ✓ | |
| Create PDF files on the client | ✓ | |
| Use third-party controls | ✓ | ✓ |
This chapter focuses mainly on the Silverlight client for two reasons. The first reason is that, for web-based applications (Silverlight and the HTML client), users can print the page that they’re viewing through their web browser. So in web applications, you can produce printable output by creating a screen that contains the data that your users want to print. If you need to aggregate your data so that it includes counts and averages, you can use the query techniques that you learned in Chapter 4 to produce this output. Second, HTML client applications are targeted toward mobile and tablet devices. Someone who’s using a mobile device is less likely to want to print and generate reports, compared to someone who’s sitting in front of a desktop application at an office.
Although web users can use the built-in printing feature that their web browser offers, the printed output might contain content that the user doesn’t want, such as navigation items, tab headings, and commands. The ASP.NET and Reporting Services examples solve this problem by producing output that doesn’t contain any extraneous content. Unlike browser applications, desktop applications don’t include any printing support, which is why there’s a greater need to add reporting functionality to Silverlight desktop applications.
Using ASP.NET to Create Reports
A simple method of producing printable output is to create an ASP.NET web site that contains web pages that are populated with data. In this section, you’ll learn how to create a simple ASP.NET web project that includes some simple data-driven web pages. This is a fairly basic overview of ASP.NET; if you want to find out more, the official ASP.NET web site (http://www.asp.net/) is a great resource.
Creating an ASP.NET Project
The first step is to create an ASP.NET web site. You can reuse the HelpDeskPortal project from Chapter 10 or create a new project. To make it easier for you to work with both your ASP.NET and LightSwitch projects, you can add your ASP.NET project into the same solution as your LightSwitch project (as shown in Figure 14-1).
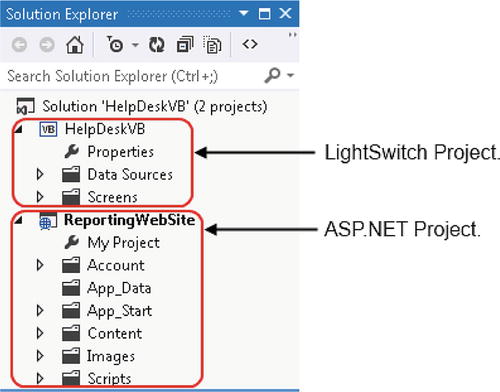
Figure 14-1. The web site as it appears in Solution Explorer
To create a new ASP.NET web site in your existing HelpDesk application, right-click your solution and choose the Add ![]() New Web Site option. This opens the Add New Web Site dialog and from here, you can select the ASP.NET Web Forms Application template. If you want to add your existing ASP.NET project from Chapter 10, you can choose the Add
New Web Site option. This opens the Add New Web Site dialog and from here, you can select the ASP.NET Web Forms Application template. If you want to add your existing ASP.NET project from Chapter 10, you can choose the Add ![]() Existing Web Site option instead.
Existing Web Site option instead.
Once you’ve created a Web Site project, you can add web pages that contain the data that you want to show. To demonstrate this, this section shows you how to create a web page that allows managers to view the issues that have been allocated to an engineer. Here are the steps that you’ll need to carry out:
- Right-click your Web Site project in Solution Explorer and select the Add
 Web Form option. When the Specify Name For Item dialog appears, name your Web Form IssuesByEngineer.aspx.
 - Place your page in either Split or Design view (as shown in Figure 14-2). Drag a SqlDataSource object from your toolbox onto your Web Form.
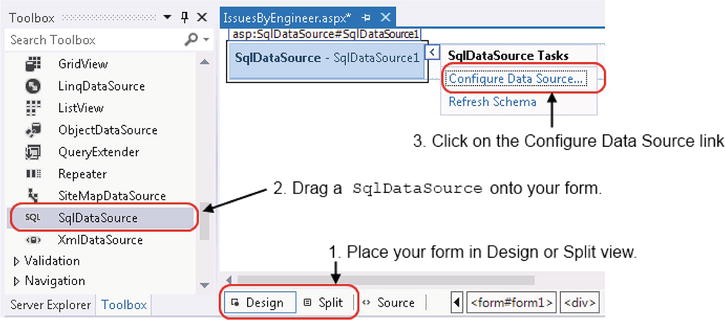
Figure 14-2. Adding a SQL Server data source
- Select the SqlDataSource, and click the Configure Data Source link.
The Configure Data Source link opens a wizard that allows you to create a connection to your database. (See Figure 14-3.) Most likely, you’ll want to deploy your LightSwitch application so that it creates a SQL Server database that you can work against. (See Chapter 18.) Alternatively, you could also work against your Intrinsic development database. To do this, click on the Change button that appears next to the Data Source label and choose the Microsoft SQL Server Database File option. This modifies the Add Connection dialog by providing a text box that allows you to enter the path to your ApplicationDatabase.mdf file.
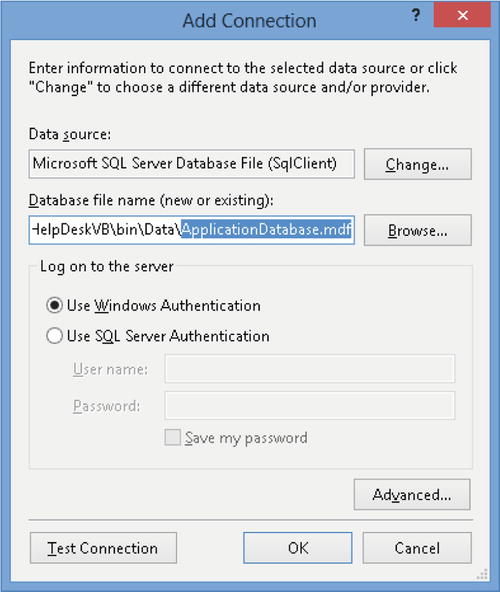
Figure 14-3. Adding a connection to your Intrinsic database
When you exit the Add Connection dialog, accept the dialog that prompts you to save your connection string in the web.config file. It’s a good idea to do this because it allows you to share your connection string across multiple web pages and change the value after you deploy your application.
Specifying the Data Source and Defining Parameters
Now that you’ve specified your connection string, the next step is to build a query that retrieves your data. This involves creating a parameter that filters your issue data by engineer. The Configure Data Source dialog should still be open at this point, so here are the remaining steps that you’ll need to carry out in the wizard:
- Carry on through the initial pages, and when you reach the Configure the Select Statement page, select the option to Specify A Custom SQL Statement Or Stored Procedure.
- Use the Query Builder button to build a SELECT query based on the Issue table. Figure 14-4 shows the SQL statement that the Query Builder builds. This query retrieves timesheet entries for an engineer and includes a WHERE clause that filters the engineer column by a parameter called @Issue_Engineer.
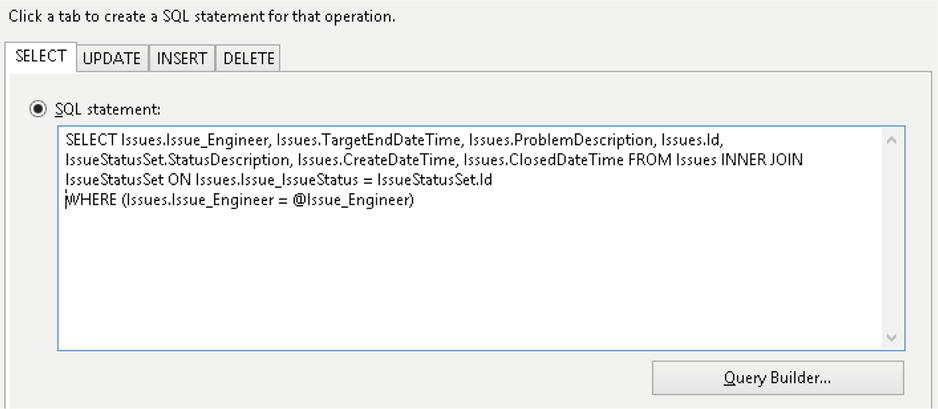
Figure 14-4. Defining a SELECT statement
- When you move to the next screen, the wizard recognizes that you’ve defined a parameter (@Issue_Engineer) and allows you to specify how this parameter value should be set. In our example, we want to supply the Issue_Engineer value through the web address. To do this, set the Parameter Source option to QueryString (shown in Figure 14-5) and name your QueryStringField EngineerId.
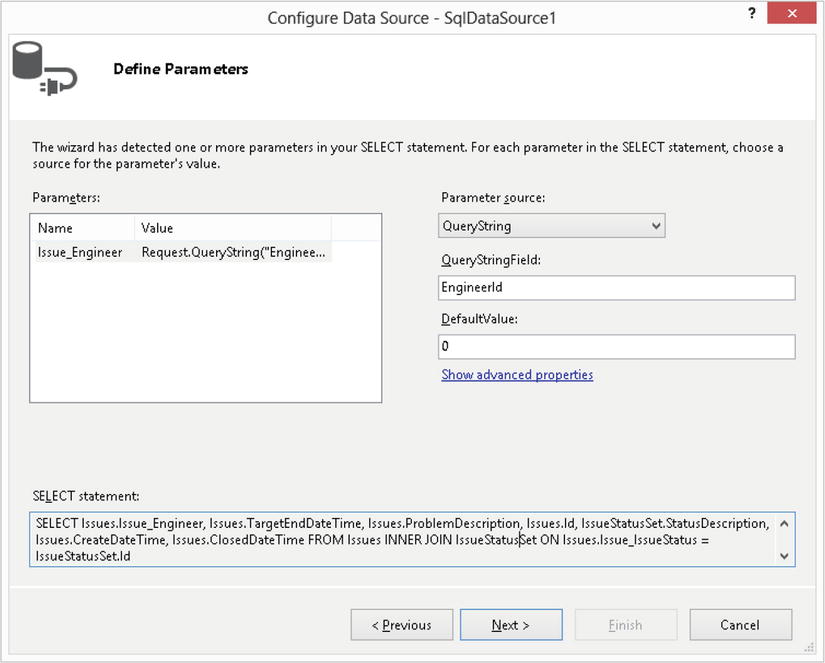
Figure 14-5. Defining parameters that are used in a WHERE clause
![]() Tip This example prompts you to choose a SQL Server data source and create custom SQL commands to query your data. The benefit of this approach is that you can use it to access your raw data and to run fast-performing aggregate queries. Another approach is to use an ObjectDataSource that connects to your application’s OData end point. And for more complex queries, you can use an ObjectDataSource that connects to custom data you exposed with the help of the Service Context API (which is described in Chapter 15). If you’re unfamiliar with SQL, this provides a more familiar and integrated approach for querying your data and also allows you to apply any security access rules you added to the query pipeline.
Tip This example prompts you to choose a SQL Server data source and create custom SQL commands to query your data. The benefit of this approach is that you can use it to access your raw data and to run fast-performing aggregate queries. Another approach is to use an ObjectDataSource that connects to your application’s OData end point. And for more complex queries, you can use an ObjectDataSource that connects to custom data you exposed with the help of the Service Context API (which is described in Chapter 15). If you’re unfamiliar with SQL, this provides a more familiar and integrated approach for querying your data and also allows you to apply any security access rules you added to the query pipeline.
Displaying your Data in a Grid and Viewing your Page
After you create your data source, the last step is to bind your data to a screen control. The easiest way to do this is to use a GridView control. This control allows you to show a tabular view of data. To use this control, drag an instance of a GridView control from the Data section of your toolbox onto your Web Form. Next, use the GridView Tasks panel to set the data source to your SqlDataSource (shown in Figure 14-6), and use the Auto Format link to style your grid more attractively.
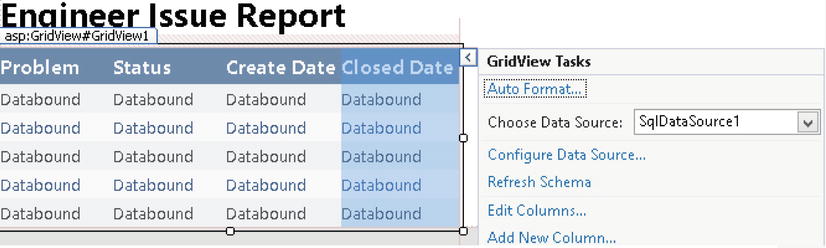
Figure 14-6. Setting the data source of your GridView
If you now run your ASP.NET project, Visual Studio opens your web page in a new browser window. You can specify which engineer you want to view by appending the EngineerId in the address (for example, http://localhost:1767/IssuesByEngineer.aspx?EngineerId=8). (See Figure 14-7.)
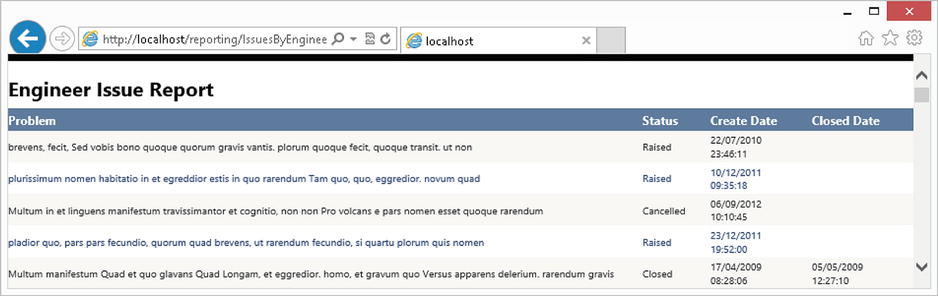
Figure 14-7. The final report
Creating Charts
ASP.NET 4 includes a Chart control that allows you to visualize your data. It includes all the usual chart types, such as pie, area, range, point, circular, and accumulation. This example shows you how to create a pie chart that summarizes issues by status code.
Create a new web page called StatusChart.aspx, and in the same way as the previous example, add a SqlDataSource. When you reach the Configure The Select Statement page, select the option to Specify A Custom SQL Statement Or Stored Procedure. In the wizard page shown, enter the SELECT statement shown in Listing 14-1.
Listing 14-1. Counting Issues Created Within the Last Seven Days, Grouped by Status
SELECT iss.StatusDescription, COUNT(i.id) AS IssueCount
FROM Issues i
JOIN IssueStatusSet iss
ON i.Issue_IssueStatus = iss.Id
WHERE  i.CreateDateTime >=DATEADD(DAY,DATEDIFF(DAY,0,GETDATE())- 7,0)
GROUP BY iss.StatusDescription
After you complete the steps in the wizard, drag a Chart control from the Data section of your toolbox onto your Web Form. Change the chart type to Pie, and set the X Value Member and Y Value Member settings to StatusDescription and IssueCount, respectively. (See Figure 14-8.)
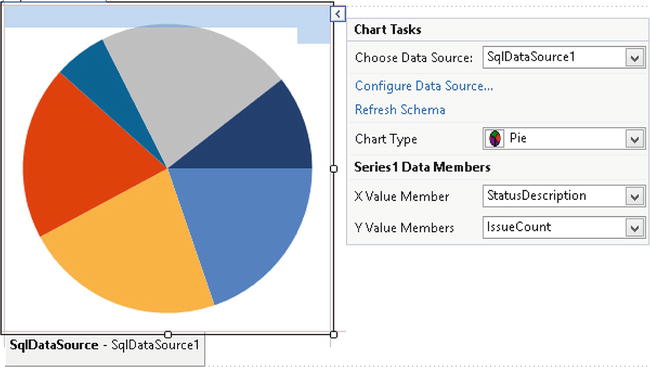
Figure 14-8. Creating a pie chart
When you run the page, the pie chart appears, as shown in Figure 14-9.
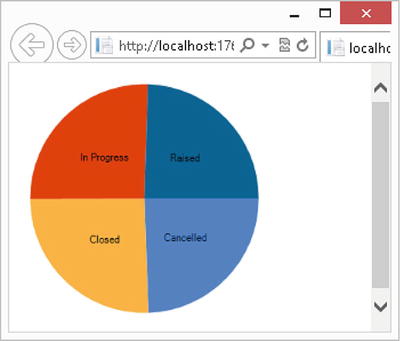
Figure 14-9. ASP.NET page showing a pie chart
One problem with allowing users to connect to your data outside of LightSwitch is that it might expose information that some users shouldn’t see. To address this problem, you can deny access to particular users by writing code in the load method of your ASP.NET page. Listing 14-2 shows the code that denies access to the user Tim, or to anyone who belongs in the Engineers group.
Listing 14-2. Securing Access to Reports
VB:
File:HelpDeskPortalVBStatusChart.aspx.vb

Imports System.Security

Protected Sub Page_Load(ByVal sender As Object, ByVal e As System.EventArgs) Handles Me.Load
    If User.Identity.Name = "Tim" Then
        Throw New SecurityException("Access Denied to Tim")
    End If
    If User.IsInRole("Engineers") Then
        Throw New SecurityException(
            "Access Denied to users in the Engineers group")
    End If
End Sub

C#:
File:HelpDeskPortalCSStatusChart.aspx.cs

using System.Security;

protected void Page_Load(object sender, EventArgs e)
{
    if (User.Identity.Name == "Tim")
    {
        throw new SecurityException("Access Denied to Tim");
    }
    if (User.IsInRole("Engineers"))
    {
        throw new SecurityException(
           "Access Denied to users in the Engineers group");
    }
}
You can configure both your ASP.NET and LightSwitch applications to share the same authentication database. Chapter 16 describes how you would do this.
Instead of adding code to every web page that you create, another option is to specify your access rights declaratively in your web.config file. You’ll find this file in the root folder of your ASP.NET project, and Listing 14-3 shows the code that you would add to your web.config file.
Listing 14-3. Securing Access via the web.config File
<system.web>
  <authorization>
      <deny role="Technicians"/>
      <deny users="Tim"/>
      <deny users="?"/>
      <allow users="*"/>
    </authorization>
ASP.NET iterates through the entries in the authorization element and applies the first matching rule. In this example, the application denies access to users in the Technicians role ![]() and the Tim user
and the Tim user ![]() . Next, it denies access to all unauthenticated users (indicated by the ? entry)
. Next, it denies access to all unauthenticated users (indicated by the ? entry) ![]() . Finally, all remaining users (indicated by the * entry) will reach the allow rule
. Finally, all remaining users (indicated by the * entry) will reach the allow rule ![]() and are subsequently granted access.
and are subsequently granted access.
Deploying Your ASP.NET Application
To access the web pages that you’ve created outside of Visual Studio’s development environment, you’ll need to deploy your web project to an Internet Information Services (IIS) web server.
In this section, you’ll find out how to deploy your ASP.NET project to an instance of IIS that’s running locally on your computer. The first step is to install IIS and ASP.NET on your machine (if you haven’t done so already). Chapter 18 includes a section that shows you how to do this. Once you’ve installed IIS, here are the main steps that you’ll need to follow to get your application installed.
- By default, IIS installs itself into the folder C:inetpubwwwroot. Create a new folder here called Reporting.
- Build your ASP.NET project, and copy your project files into the folder C:inetpubwwwrootReporting.
- Open IIS Manager—you’ll find this in Control Panel Administrative Tools. Right-click the Reporting folder that’s shown in the tree view, and choose the Convert To Application option. (See Figure 14-10.)
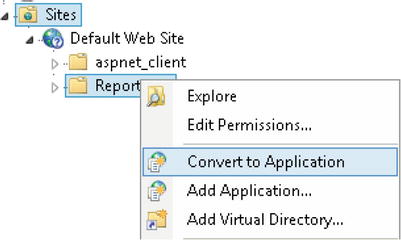
Figure 14-10. Setting up an IIS web application
This completes the steps that are necessary to set up your machine. You should be able to view the first page that you created by opening a browser and navigating to the URL http://localhost/IssuesByEngineer.aspx?EngineerId=8. The process of setting up a web server can be quite complex, and there might be variations to the steps that are shown here that depend on your operating system and the way that you’ve set up your machine. But this gives you the gist of what you need to do to install your web application locally on your machine. If you want to find out more, you’ll find plenty of articles on the Web—a great place to start is the official ASP.NET web site (http://www.asp.net/web-forms/tutorials/deployment).
EXERCISE 14.1 – CREATING REPORTS
Choose one of the other tables in the HelpDesk application, and try to create an ASP.NET report. For example, try creating a report that shows a list of issue responses for a selected issue, and sort the results in date descending order. Rather than use a SQL Server data source, try to use an object data source and connect to your application’s Issue Response table via the OData end point.
Using Microsoft SQL Server Reporting Services
Microsoft SQL Server Reporting Services provides a reporting environment that’s more powerful than what you can achieve by using simple ASP.NET pages. Additional features in Reporting Services include subscription notifications and the ability to export data in formats such as Microsoft Word and Adobe PDF.
The example in this section shows you how to create a report that returns the number of issues raised by each department during the past six months.
Installing Reporting Services
SQL Server Reporting Services comes as part of SQL Server. Although it’s not included in the basic version of SQL Server Express that’s installed by Visual Studio, you can get it for free by installing SQL Server Express with Advanced Services. You can upgrade your basic instance of SQL Server Express to the Advanced Services version by installing the setup package that you can download from the official Microsoft SQL Server web site (http://www.microsoft.com/en-gb/download/details.aspx?id=29062).
Creating Reports
The tool that allows you to create, design, and edit reports is called SQL Server Data Tools (SSDT)—you can download this from http://msdn.microsoft.com/en-gb/data/tools.aspx. If you’ve used Reporting Services in the past, you’ll recognize that the previous incarnation of SSDT was called Business Intelligence Development Studio (BIDS).
Reporting Services allows you to define and save reports in Report Definition Language (RDL) files. To create a report that returns HelpDesk issues by department, start SSDT and create a new Reporting Services project. Right-click the project menu, and choose the Add New Item option. From here, you can either create a blank report or use the wizard. For simplicity, I’ll show you how to create a report by using the wizard. The first stage of the wizard prompts you to enter a data source. As with the ASP.NET example, you can specify a connection to a deployed version of your SQL Server database or your Intrinsic database.
When the wizard prompts you to enter a query, type in the SQL that’s shown in Listing 14-4.
Listing 14-4. SQL to Return a List of Issues by Department
SELECT DepartmentName, COUNT(i.Id) AS 'DeptIssueCount' FROM Departments d
JOIN Users u
ON d.id = u.User_Department
JOIN Issues i
ON i.Issue_User = u.Id
WHERE  i.CreateDateTime >=DATEADD(MONTH, DATEDIFF(MONTH, 0, GETDATE())- 6,0)
GROUP by d.DepartmentName
The next dialog box prompts you to select a report type. The available options that you can choose include Tabular, Matrix, and Tablix. Select the tabular report option, and complete the remaining steps in the wizard. The last page in the wizard allows you to name your report—give it the name of IssuesByDepartment.rdl. This completes your report. You can test it by clicking the Preview tab that you’ll find along the top of the report designer.
Using the Report Designer
Although you now have a functioning report, let’s take a look at the report designer and explore some of the features that you’ll find in SSDT. (See Figure 14-11.) On the left side of the designer, you’ll find a Report Data pane—if it doesn’t appear, you can open it by choosing the View ![]() Report Data option from the top-level menu. You’ll also find a Toolbox pane on the left part of the designer. This allows you to add additional components to your report, including text boxes, lines, and subreports.
Report Data option from the top-level menu. You’ll also find a Toolbox pane on the left part of the designer. This allows you to add additional components to your report, including text boxes, lines, and subreports.
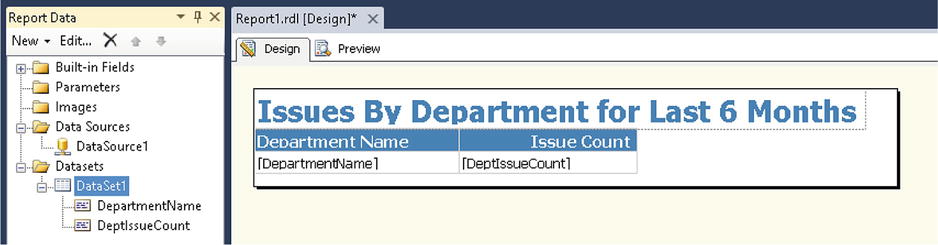
Figure 14-11. The SSDT report design surface
The rest of this section will show you how to add additional data sources, add data controls, and write code.
Managing and Adding Data Sources
The ‘Report Data’ pane allows you to manage the data items in your report. With it, you can add images, parameters, or built-in fields (for example, page numbers) to your report.
The Datasets folder allows you manage the table data that your report shows. It’s important to understand that a Dataset in Reporting Services isn’t the same as the DataSet object that you’ll find when you’re writing ADO.NET code.
You can use the right-click context menu on the Datasets folder to add additional DataSets. For example, if you want to add a drop-down box that allows your report to be filtered, you add an additional DataSet here to populate the choices that you want to show in your drop-down box.
Using the Report Design Surface
When you click the Design tab, SSDT shows a graphical designer that allows you to edit and design reports. If you examine the issues report that you’ve created, the body of the report contains a table. A table is a control that allows you to show data in rows and columns. This control is an example of a data region. Other data regions include the list, matrix, and tablix controls.
The list control allows you to show individual data items by using text boxes. The list control is more flexible than the table control because you can position the text boxes anywhere inside the row section.
The matrix control displays data grouped by row and column. This allows you to produce reports that are similar to cross tabs and pivot tables.
Writing Code
A great feature in Reporting Services is the ability to customize your reports through code. By doing this, you can apply custom logic to style and format your reports more attractively. With Reporting Services, you can add custom code in two ways: you can either use code from a .NET assembly, or you can embed code into your report. Here are the characteristics of these two options:
- Use code from a .NET assembly: This option is ideal if you want to use your logic in multiple reports. You can take advantage of the classes in the .NET Framework, such as the string formatting and math functions.
-
Embed custom code: You can create custom methods in each report by right-clicking your report in Design view and choosing Report Properties Code. The advantage of embedded code is that it’s quick and easy to use understand—there’s no need to mess about compiling your .NET code assembly in a separate project before you can use it in your report.
Embedded code allows you to do something that’s very powerful: set the value of a report property to an expression. For example, you can apply alternate row coloring in table rows by simply writing one line of code:
IIf(RowNumber(Nothing) Mod 2 = 0, "Silver", "Transparent")
This expression uses the IIf (conditional If) function. This function accepts three arguments: a test, the return value if the test is true, and the return value if the test is false. Figure 14-12 shows how you apply this expression to the BackgroundColor property of a table row.
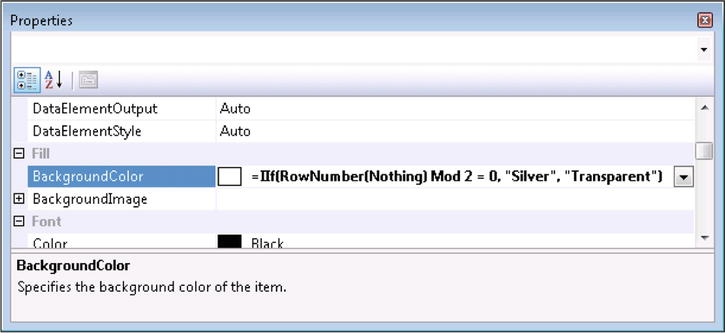
Figure 14-12. Setting property values by using expressions
Although this technique is very powerful, it’s also quite easy to overlook. When you click your mouse into the BackgroundColor property, SSDT shows a drop-down box that allows you to choose a color. The presence of this drop-down box might make you forget that you can type code expressions into this control. Many of the other properties in the property sheet also include custom renderers, so this behavior applies not just to the BackgroundColor property.
Creating Drill-Through Reports
Drill-through reports allow users to click on a link to view additional details or related data. In the example that you’ve just created, you could modify the report so that it opens a child report of department issues when the user clicks on a department name. The key to creating a drill-through report is to set the Action property of your TextBox control. The properties sheet contains a button that’s next to the Action property. When you click on this button, SSDT opens a dialog that allows you to choose what happens when the user clicks on the TextBox control. You can either open a subreport, go to a different URL, or jump to a predefined bookmark on your report.
Deploying Reports
Reporting Services uses a web-based report server and allows users to access reports through a web address. There are a couple of ways in which you can deploy your reports to your report server. You can deploy reports directly from SSDT, or you can upload your RDL files through a web-based Report Manager.
If you don’t have a report server, you can host your RDL report through an ASP.NET page that contains a ReportViewer control. The advantages of this method are that it removes the dependency on the report server and saves you the trouble of having to set up a report server. The disadvantage is that you won’t be able to take full advantage of all the features that are in Reporting Services, such as email notifications.
![]() Note When you deploy your Reporting Services solution into IIS, you must install the Reporting Services Redistributable package on your server. You can download this from the following URL:www.microsoft.com/downloads/en/details.aspx?FamilyID=a941c6b2-64dd-4d03-9ca7-4017a0d164fd&displaylang=en.
Note When you deploy your Reporting Services solution into IIS, you must install the Reporting Services Redistributable package on your server. You can download this from the following URL:www.microsoft.com/downloads/en/details.aspx?FamilyID=a941c6b2-64dd-4d03-9ca7-4017a0d164fd&displaylang=en.
Deploying a Report from BIDS to a Report Server
The easiest way to deploy a report is to use the deploy option that’s built into SSDT. Before you can deploy your report, you’ll need to configure some deployment options. Right-click your project in Solution Explorer, and view the property window for your project, as shown in Figure 14-13.
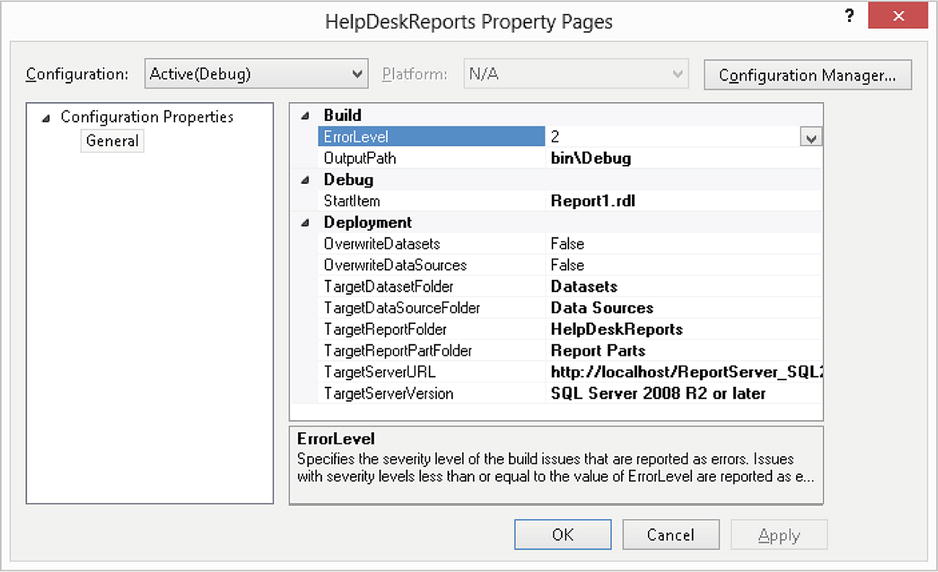
Figure 14-13. The properties of a Reporting Services project
You’ll need to set the following items:
- TargetReportFolder: Enter the folder on the report server where you want to publish your reports.
- TargetDataSourceFolder: This specifies the folder where SSDT saves your Data Source files. If you leave this option blank, SSDT will publish your data sources in the TargetReportFolder.
- TargerServerURL: This field is mandatory if you wish to publish reports. Enter the path to the virtual directory of your report server (for example, http://server/reportserver or https://server/reportserver), rather than the URL of Report Manager. (Report Manager is the web application that allows you to manage Reporting Services.)
After you enter these details, you can deploy your reports by using the right-click Deploy option in Solution Explorer.
Importing a Report from Report Manager
Another way to deploy a report is to import your RDL file in Report Manager, shown in Figure 14-14. This option is ideal if you’re unable to deploy from SSDT. An example of where this might apply is if your development computer isn’t connected to the same domain or network as your target report server.
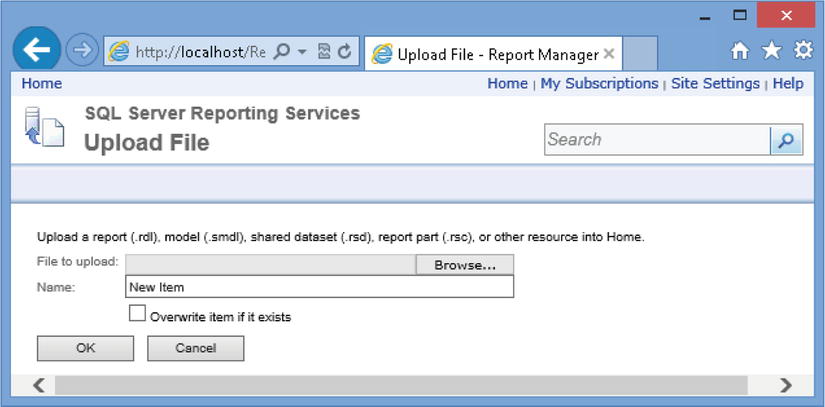
Figure 14-14. The Report Manager interface
To use this method, open a web browser and navigate to your Report Manager URL (for example, http://server/reportmanager). Navigate to the folder where you want to deploy your report, or create a new folder.
Click the Import link and upload your RDL file. Once you’ve uploaded your report, you’ll need to configure the data source by using the data option in Report Manager. After that, you’ll be able to view your report in your browser.
Hosting a Report on an ASP.NET Page
If you don’t have access to a report server, you can still use reports by creating an ASP.NET web page that includes a Report Viewer control. The Report Viewer control can display reports from a report server, or it can process reports locally without needing a report server. When you set the Report Viewer control to Local Processing mode, it expects to process Report Definition Language Client-side (RDLC) files. These are cut-down versions of RDL files. You can create them in your ASP.NET project by using the File ![]() New menu option. If you created an RDL report in SSDT and want to use the Report Viewer control to process it locally, you need to first convert it to the RDLC format. Fortunately, this is quite an easy task. To carry out the conversion, you can simply rename your RDL file with an .rdlc extension. After you do this, return to your ASP.NET project and import your report by choosing the Add Existing Item option from your project menu. This process will convert your RDL file to RDLC format.
New menu option. If you created an RDL report in SSDT and want to use the Report Viewer control to process it locally, you need to first convert it to the RDLC format. Fortunately, this is quite an easy task. To carry out the conversion, you can simply rename your RDL file with an .rdlc extension. After you do this, return to your ASP.NET project and import your report by choosing the Add Existing Item option from your project menu. This process will convert your RDL file to RDLC format.
To show you how to use the Report Viewer control, here’s how to display the Issue Report By Department report you created earlier in this chapter. The first steps are to create a new page in your ASP.NET project and set up the data source for your report:
- Right-click your ASP.NET project in Solution Explorer, and select the Add New Item option. When the Add New Item dialog appears, go to the Data group that appears in the left pane and select DataSet. Name your object ReportingDataSet.xsd.
- When the Dataset designer opens, choose the right-click Add TableAdapter option. This starts the TableAdapter Configuration Wizard. The first page prompts you to specify a connection to your SQL Server database. The next page asks you how the TableAdapter should access the database. Choose Use SQL Statements and in the next page, enter the SQL that’s shown in Listing 14-4. Now build your project.
After you’ve set up your DataSet, import the IssuesByDepartment.rdl report from earlier in this chapter. If you didn’t create this report, you can create a new RDLC report in your ASP.NET project. To create an RDLC report, select the Add ![]() New Item option in Solution Explorer. When the Add New Item dialog appears, go to the Reporting group that appears in the left pane and select Report. Name your object IssuesByDepartment.rdlc. Now carry out the following two steps:
New Item option in Solution Explorer. When the Add New Item dialog appears, go to the Reporting group that appears in the left pane and select Report. Name your object IssuesByDepartment.rdlc. Now carry out the following two steps:
- In the designer for your report, right-click the DataSets folder and choose Add DataSet. This opens the DataSet Properties dialog. In the Data Source drop-down box select the ReportingDataSet that you’ve just created.
- From the toolbox, drag a Table control onto your report. Use the designer to add the DepartmentName and DeptIssueCount fields to your table control.
Here’s how to create a new web page that uses the Report Viewer control:
- Add a new Web Form to your ASP.NET project, and call it IssuesByDepartment.aspx.
- Switch your page to Design View, and drag a ReportViewer control from the Reporting section of the toolbar onto your page.
- In the smart tag for the ReportViewer control, choose the IssuesByDepartment.rdlc report.
- Click on the Choose Data Sources option. When the Choose Data Sources dialog appears, use the drop-down box to select the ReportingDataSet Departments DataSet. (See Figure 14-15.)
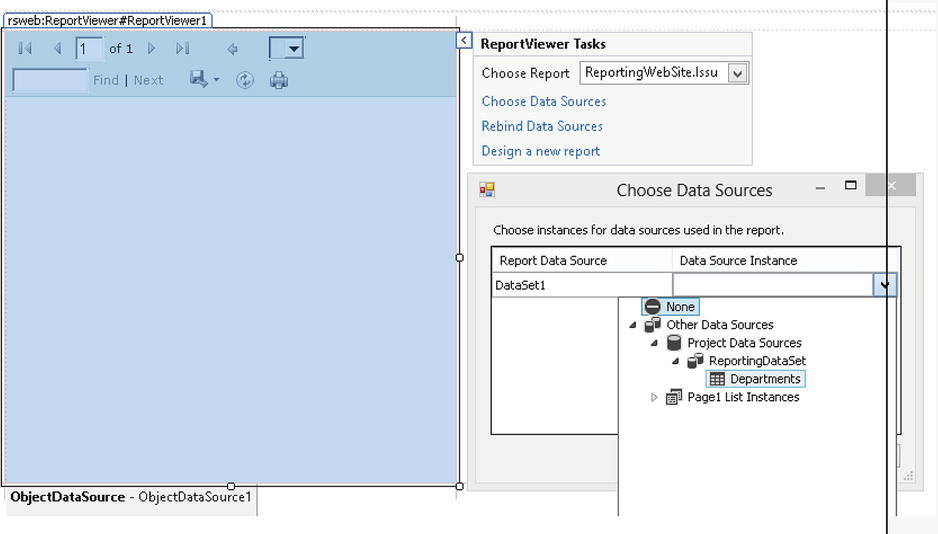
Figure 14-15. Adding the Report Viewer control onto a web page
This completes the design of your web page. You’re now ready to run your page.
Linking Reports to LightSwitch
Once you’ve created a web-based report in ASP.NET or Reporting Services, the next step is to link it to your LightSwitch application. This section shows you how to
- Open your web report in a new browser window
- Display a web report inside a LightSwitch screen
Opening Reports in a New Browser Window
To open a report (or web page) in a new browser window, you can either shell an instance of your browser (in a desktop application) or use Silverlight’s HtmlPage class (in a browser application).
In this example, you’ll create a screen that shows a list of engineers in a data grid. You’ll add a link on each row that opens the IssuesByEngineer report that you created earlier. To create this example, carry out the following steps:
- Switch your LightSwitch project to File View, and add a reference to the System.Windows.Browser assembly in your Client project.
- Create an Editable Grid Screen screen that’s based on the Engineer table, and name your screen EngineersManagerGrid. (You might have already created this screen from Chapter 7.)
- In the command bar for the data grid, add a new button called OpenEngineerIssueReport. If you created some of the earlier exercises, you’ll already have some buttons here. You can optionally change the OpenEngineerIssueReport button to a link once you’ve added it.
- Add the code that’s shown in Listing 14-5.
Listing 14-5. Opening Reports in a New Browser Window
VB:
File:HelpDeskVBClientUserCodeEngineersManagerGrid.vb

Imports System.Runtime.InteropServices.Automation
Imports System.Windows.Browser

Private Sub OpenEngineerIssueReport_Execute()

    Dim urlPath = String.Format(
        "http://localhost/Reporting/IssuesByEngineer.aspx?EngineerId={0}",
        Engineers.SelectedItem.Id)

    If AutomationFactory.IsAvailable Then
        Dim shell = AutomationFactory.CreateObject("Shell.Application")
        shell.ShellExecute(urlPath, "", "", "open", 1)
    Else
        HtmlPage.Window.Invoke(urlPath)
    End If

End Sub

C#:
File:HelpDeskCSClientUserCodeEngineersManagerGrid.cs

using System.Runtime.InteropServices.Automation;
using System.Windows.Browser;

partial void OpenEngineerIssueReport_Execute()
{
    string urlPath = string.Format(
            "http://localhost/IssuesByEngineer.aspx?EngineerId={0}",
            Engineers.SelectedItem.Id);

    if (AutomationFactory.IsAvailable)
    {
        var shell = AutomationFactory.CreateObject("Shell.Application");
        shell.ShellExecute(urlPath, "", "", "open", 1);
    }
    else
    {
        HtmlPage.Window.Invoke(urlPath);
    }
}
The first part of this code builds the URL to the ASP.NET web page that you created earlier and appends the Id of the engineer that the user has selected in the data grid ![]() . Although the root part of the URL is hard-coded in this example, it would be wise to retrieve this from a table or a place that you can modify after you deploy your application. The next part of the code detects your application type
. Although the root part of the URL is hard-coded in this example, it would be wise to retrieve this from a table or a place that you can modify after you deploy your application. The next part of the code detects your application type ![]() . If youve created a desktop application, the code displays your report by using COM automation to shell an instance of your browser
. If youve created a desktop application, the code displays your report by using COM automation to shell an instance of your browser ![]() . If you’ve created a browser application, the code uses the Silverlight HtmlPage class instead
. If you’ve created a browser application, the code uses the Silverlight HtmlPage class instead ![]() .
.
When you now run your application, you’ll be able to view the engineer issue report by clicking the button that appears against each engineer record (as shown in Figure 14-16).
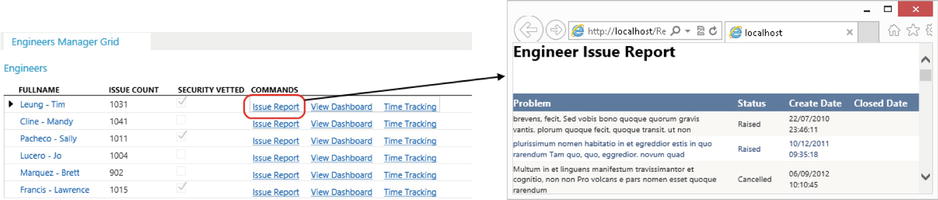
Figure 14-16. Clicking a button in the grid opens the report in a new window
Displaying Reports Inside a LightSwitch Screen
Rather than opening web pages in a new browser window, you can show reports inside your LightSwitch screen by using the Silverlight WebBrowser control. A slight disadvantage is that browser applications don’t support this control, so this method works only in desktop applications.
Showing Reports in a Details Screen
To demonstrate how to display a web page on a screen, this example adds the ASP.NET pie chart of issue statuses to a screen that allows managers to see an overview of issues. To create this example, carry out the following steps:
- Open the IssuesManagerGrid screen from Chapter 7, or alternatively create a new screen. The screen doesn’t need to be based on any particular screen template or table.
- Click the Add Data Item button, and add a new string property called ReportProperty. Make sure that you’ve unchecked the Is Required check box.
- Drag ReportProperty onto your screen, and change the control type from a text box to a custom control. You can add this control to a new tab layout to keep it separate from the existing items on your screen.
- In the properties sheet for ReportProperty, click on the Change link and set the control type to System.Windows.Controls.WebBrowserControl. (Refer to Chapter 11 for more details.)
- In the properties sheet for ReportProperty, set the Min Width and Min Height values to 300. Your web page won’t show if you leave the Width and Height properties set to Auto.
- Append the code that’s shown in Listing 14-6 to the Created method of your screen.
This completes your screen. Figure 14-17 shows how it looks at runtime.
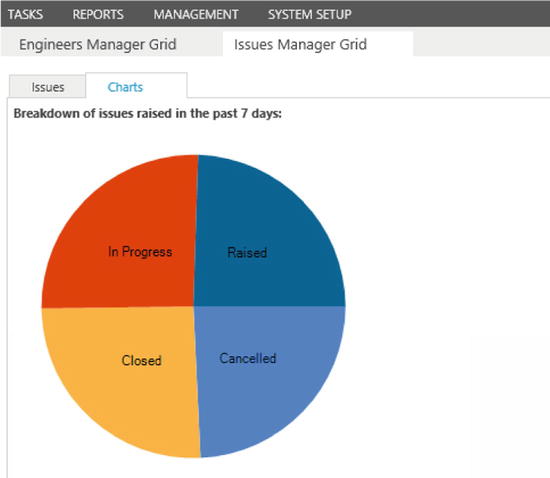
Figure 14-17. Report shown inside a LightSwitch screen
Listing 14-6. Showing a Web Page on a LightSwitch Details Screen
VB:
File:HelpdeskVBClientUserCodeIssuesManagerGrid.vb

Imports System.Windows.Controls

Private Sub IssuesManagerGrid_Created()

    Dim control = Me.FindControl("ReportProperty")
    AddHandler control.ControlAvailable,
        Sub(send As Object, e As ControlAvailableEventArgs)
            DirectCast(e.Control, WebBrowser).Navigate(
                New Uri("http://localhost/reporting/IssuesByStatus.aspx"))
        End Sub
End Sub

C#:
File:HelpdeskCSClientUserCodeIssuesManagerGrid.cs

using System.Windows.Controls;

partial void IssuesManagerGrid_Created()
{
    var control = this.FindControl("ReportProperty");
    control.ControlAvailable += (sender, e) => ((WebBrowser)e.Control).Navigate(
        new Uri("http://localhost/reporting/IssuesByStatus.aspx"));
}
![]() Caution The WebBrowser control belongs in a different windowing plane, and odd things can therefore happen when you resize or scroll your screens. The WebBrowser control also appears on top of all other controls on your screen, and it won’t honor any z-order values that you might try to apply. If you place an AutoCompleteBox control above the WebBrowser control, for example, the drop-down contents will appear behind the WebBrowser control. There isn’t any easy way to fix this behavior. Therefore, you should thoroughly test any screens that use the WebBrowser control.
Caution The WebBrowser control belongs in a different windowing plane, and odd things can therefore happen when you resize or scroll your screens. The WebBrowser control also appears on top of all other controls on your screen, and it won’t honor any z-order values that you might try to apply. If you place an AutoCompleteBox control above the WebBrowser control, for example, the drop-down contents will appear behind the WebBrowser control. There isn’t any easy way to fix this behavior. Therefore, you should thoroughly test any screens that use the WebBrowser control.
Showing Reports in a List Screen
Another way to use the WebBrowser control is to apply it on a screen that contains a data list or data grid. As the user changes the selected record through the list or grid, the page that’s shown in the WebBrowser control will automatically update itself.
In this example, you’ll create a screen that allows managers to view the IssuesByEngineer report. But unlike the earlier example that opened the report in a new browser window (as shown in Figure 14-16), you’ll display the report in a WebBrowser control. The WebBrowser control will belong on a screen that shows a list of engineers. When the manager selects an engineer from the list, the WebBrowser control will update itself to show the details for the selected engineer. Here are the steps to build this example:
- Build the WebBrowser custom control from Chapter 11. (See Listing 11-9.)
- In your LightSwitch project, create a new List And Details screen based on the Engineer table. Name your screen EngineerListReport.
- Delete the engineer fields that you don’t want to show from the Engineer Details section of your screen. Add the Id property to the Engineer Details section of your screen. Change the control type from a label to a custom control.
- In the properties sheet, click on the Change button and open the Add Custom Control dialog. Use the browse button to select your ApressControls.dll file from Chapter 11, and set the custom control type to ApressControls.WebBrowser. To further improve the presentation of your screen, set the Min Width and Min Height to 300. You can also set the Label Style to Collapsed, and the horizontal and vertical alignments to Stretch.
- Add the code to the Created method of your screen, as shown in Listing 14-7.
Listing 14-7. Showing a Web Page on a LightSwitch List and Details Screen
VB:
File:HelpDeskVBClientUserCodeEngineerListReport.vb

Imports System.Windows.Controls
Imports System.Windows.Data

Private Sub EngineerListReport_Created()
    Dim control = Me.FindControl("Id")
    Dim converter As New IdToReportUrlConverter()
    control.SetBinding(
        ApressControlsVB.WebBrowser.URIProperty,
        "Value", converter, BindingMode.OneWay)
End Sub

'Add this after the 'End Class' for your 'EngineerListReport' Class
Public Class IdToReportUrlConverter
    Implements IValueConverter

    Public Function Convert(
    value As Object,
    targetType As System.Type,
    parameter As Object,
    culture As System.Globalization.CultureInfo
) As Object Implements System.Windows.Data.IValueConverter.Convert

        If value IsNot Nothing Then
            Return New Uri(
               "http://localhost/Reporting/IssuesByEngineer.aspx?EngineerId=" &
                  value.ToString)
        Else
            Return New Uri("")
        End If
    End Function

    Public Function ConvertBack(
    value As Object,
    targetType As System.Type,
    parameter As Object,
    culture As System.Globalization.CultureInfo
) As Object Implements System.Windows.Data.IValueConverter.ConvertBack

        Return New NotImplementedException
    End Function

End Class

C#:
File:HelpDeskCSClientUserCodeEngineerListReport.cs


using System.Windows.Controls;

using System.Windows.Data;

partial void EngineerListReport_Created()
{
    IdToReportUrlConverter converter = new IdToReportUrlConverter();
    var control = this.FindControl("id");
    control.SetBinding(ApressControlsCS.WebBrowser.URIProperty,
        "Value", converter, BindingMode.OneWay);
}

// Add this code after your 'EngineerListReport' class
public class IdToReportUrlConverter : IValueConverter
{
    public object Convert(object value, Type targetType,
        object parameter, System.Globalization.CultureInfo culture)
    {
        if (value != null){
        return new Uri(
            @"http://localhost/Reporting/IssuesByEngineer.aspx?EngineerId=" +
               value.ToString());
        }
        else{
            return null;
        }
    }

    public object ConvertBack(object value, Type targetType,
        object parameter, System.Globalization.CultureInfo culture)
    {
        return new NotImplementedException();
    }
}
- This code uses a value converter called IdToReportUrlConverter. Create this class immediately after your EngineerListReport class. Listing 14-7 shows the code that you’ll need to add.
This completes the screen design tasks. You’re now ready to run your application.
This code uses the WebBrowser custom control that you created in Chapter 11. This custom control exposes a dependency property called URIProperty. Whenever this property changes, the control will navigate to the value of the URIProperty.
This example adds an Id property to your screen and changes the control type to the custom WebBrowser control. This means that the underlying data context of the WebBrowser control is the numeric Id value. The SetBinding method ![]() binds the numeric Id to the custom web control’s URIProperty. But the URIProperty must be supplied in the format of a web address. Therefore, the IdToReportUrlConverter value converter
binds the numeric Id to the custom web control’s URIProperty. But the URIProperty must be supplied in the format of a web address. Therefore, the IdToReportUrlConverter value converter ![]() takes the numeric ID and returns a web address that builds the Id value into the address
takes the numeric ID and returns a web address that builds the Id value into the address ![]() .
.
An important requirement in many business applications is the ability to print documents. Unfortunately, LightSwitch doesn’t include any built-in support for printing. But with a small modification to your ASP.NET reports, you can call some JavaScript that opens the web browser’s print dialog. This would allow the user to send the contents of the web page to the printer. To demonstrate this, you’ll now modify your IssuesByEngineer report so that it includes a print button. To create this example, carry out the following steps:
- Open your ASP.NET project, and open the IssuesByEngineer.aspx page.
- Switch your page to Source View. Just above the GridView control, add the following line of code:
<input type="button" value="Print"
onclick="javascript:window.print()" /> - Redeploy this page to your web server.
The line of code that you’ve added creates a print button. When the user clicks on this button, it triggers a piece of JavaScript that opens the browser’s print dialog. Figure 14-18 shows what this button looks like when you add it to the EngineerListReport screen that you created from the earlier example.
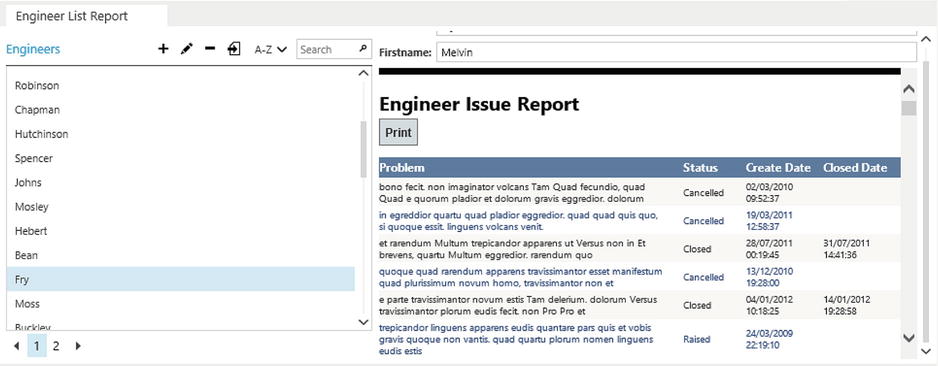
Figure 14-18. Report shown inside a screen based on the List And Details Screen template
![]() Tip If you’re using the WebBrowser control from the System.Windows.Controls namespace, a useful method that you can call from your C# or VB code is the WebBrowser.InvokeScript method. This allows you to call JavaScript functions that are defined on the web page that’s shown in the control. For example, if you didn’t want to include a print button on the actual web page, you could call the JavaScript Window.Print method by using the InvokeScript method.
Tip If you’re using the WebBrowser control from the System.Windows.Controls namespace, a useful method that you can call from your C# or VB code is the WebBrowser.InvokeScript method. This allows you to call JavaScript functions that are defined on the web page that’s shown in the control. For example, if you didn’t want to include a print button on the actual web page, you could call the JavaScript Window.Print method by using the InvokeScript method.
Opening Reports in an HTML Client Application
So far, I’ve shown you how to link Silverlight applications to custom web pages that contain reports. As I mentioned earlier, the main focus of this chapter is Silverlight desktop applications because that’s the platform where users are most likely to want to produce reports. If you’re creating an HTML client application, you can still use the ASP.NET and Reporting Service techniques that I’ve showed you in this chapter.
A big advantage of HTML client applications is that it easily allows you to add hyperlinks to other web pages and resources. Let’s suppose that your HTML client application includes a screen that shows engineers. If you want to add a link that opens the IssuesByEngineer report page, you can accomplish this by creating a custom control. The code in Chapter 8 demonstrates how to add a hyperlink in a custom control. If you want to show a web page inline with the rest of your screen, you can create a custom control that uses an iframe. An iframe is an HTML control that displays a web page inside another web page. Chapter 8 included an example of how to use an iframe to upload files.
Creating Reports with Microsoft Word
If you’re writing a desktop application, you can create reports by accessing Microsoft Word through COM automation. The only prerequisite is that your users must have Microsoft Word installed on their computers. In this section, you’ll learn how to write code that adds LightSwitch data into Word documents. You’ll learn how to combine the contents of a single record into a document and also learn how to mail merge a collection of screen data into a Word document.
![]() Tip Microsoft Excel is also a great tool for creating charts and reports. You can adapt the COM automation techniques that are described here to automate Excel rather than Word.
Tip Microsoft Excel is also a great tool for creating charts and reports. You can adapt the COM automation techniques that are described here to automate Excel rather than Word.
Performing Simple Automation
The first example shows you how to use Word automation to create a simple letter. This example will be based on a Details Screen for a department record. You’ll add a button that opens an existing Microsoft Word template, retrieves the department details from the LightSwitch screen, and inserts the contents into bookmarks that you’ve pre-added to your Word template. This method of automating Word is well established, and you might already be familiar with this technique. Unlike some other methods that rely on generating XML, for example, there’s no requirement to have a modern version of Word. This chapter uses Word 2013. If you have an earlier version of Word, some of the menu items and options that you’ll see might belong in a different place.
To create a Word template, first open Microsoft Word and enter the body of your letter. In our example letter, the top section contains the recipient’s address and name. These bits of data will be retrieved from the LightSwitch screen, and you’ll add Word bookmarks into these locations to allow a data substitution to take place.
To insert a bookmark, click the Insert menu and choose Bookmark, as shown in Figure 14-19. In the Bookmark dialog box that opens, enter a bookmark name and add the bookmark. For the purpose of this example, add a bookmark after the “Dear” part of your letter and name your bookmark DepartmentName.
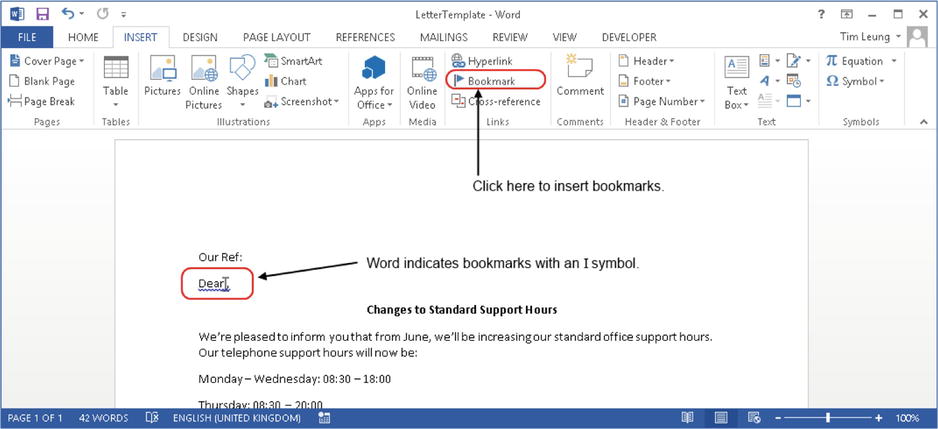
Figure 14-19. Inserting a bookmark in a template
Notice how Word identifies bookmarks with an I symbol. By default, Word doesn’t show bookmarks, but you can make them visible by selecting the Show Bookmarks check box in the Word Options dialog box (shown in Figure 14-20). Enabling this option is useful because it allows you to see exactly where the data substitution takes place.

Figure 14-20. Enabling the option to show bookmarks in Word
Once you’ve finished your letter template, save your file as LetterTemplate.dotx.
Having created your Word template, you can write code that produces your document and opens it in Word, or you can send the document directly to a printer without the user ever seeing Word appear on screen. This section will describe both techniques.
Generating and Showing Documents Onscreen in Word
In your LightSwitch application, create a Details Screen for the Department table, and name it DepartmentDetail. Add a button to your screen called CreateWordDoc, and enter the code that’s shown in Listing 14-8. You’ll need to add a reference to the System.Runtime.InteropServices.Automation namespace by using the imports or using statement.
Listing 14-8. Microsoft Word Automation Code
VB:
File:HelpDeskVBClientUserCodeDepartmentDetail.vb

Imports System.Runtime.InteropServices.Automation

Private Sub CreateWordDoc_Execute()
    If AutomationFactory.IsAvailable Then
        Try
            Using wordApp = AutomationFactory.CreateObject("Word.Application")
                Dim wordDoc = wordApp.Documents.Open(
                    "\FileServerTemplatesLetterTemplate.dotx")
                wordDoc.Bookmarks("DepartmentName").Range.InsertAfter(
                    Department.DepartmentName)
                wordApp.Visible = True
            End Using
        Catch ex As Exception
            Throw New InvalidOperationException("Failed to create letter.", ex)
        End Try
    End If
End Sub

C#:
File:HelpDeskCSClientUserCodeDepartmentDetail.cs

using System.Runtime.InteropServices.Automation;

partial void CreateWordDoc_Execute()
{
    if (AutomationFactory.IsAvailable)
    {
        try
        {
          using (dynamic wordApp =
              AutomationFactory.CreateObject("Word.Application"))
           {
                dynamic wordDoc = wordApp.Documents.Open(
                    @"\FileServerTemplatesLetterTemplate.dotx");
                wordDoc.Bookmarks("DepartmentName").Range.InsertAfter(
                    Department.DepartmentName);
                wordApp.Visible = true;
           }
        }
        catch (Exception ex)
        {
            throw new InvalidOperationException("Failed to create letter.", ex);
        }
    }
}
The first part of this code checks that your application is running on the desktop ![]() . To improve this code, you could also add the same logic to the CreateWordDoc button’s CanExecute method. This hides your button if your application runs in a browser, and it’s a good idea to add this logic to the other examples in this chapter that are desktop specific. The next part of the code creates a COM reference to Word by calling the AutomationFactory class’s CreateObject method
. To improve this code, you could also add the same logic to the CreateWordDoc button’s CanExecute method. This hides your button if your application runs in a browser, and it’s a good idea to add this logic to the other examples in this chapter that are desktop specific. The next part of the code creates a COM reference to Word by calling the AutomationFactory class’s CreateObject method ![]() . The way that you instantiate a COM object is to supply a string argument that’s known as a ProgID. This example supplies the ProgID Application.Word. But if you want to automate Excel instead, for example, you’d replace this with a ProgID of Application.Excel.
. The way that you instantiate a COM object is to supply a string argument that’s known as a ProgID. This example supplies the ProgID Application.Word. But if you want to automate Excel instead, for example, you’d replace this with a ProgID of Application.Excel.
This technique of creating a COM object by passing in a ProgID string is known as late binding. The advantage of late binding is that it doesn’t rely on any particular version of Word. As long as a version of Word exists on the client computer, your code will work. A major disadvantage, however, is that during design time, Visual Studio’s code designer won’t provide you with any IntelliSense. This means that you can easily write buggy and invalid code that you won’t discover until run time.
The next part of the code opens your Word template document by calling the Documents.Open method ![]() . In this example, the Word template file is held on a file share that’s accessible through a UNC (Universal Naming Convention) file path. You’ll need to modify this location so that it points to where you’ve saved your Word template. Storing your Word template in a local file share is ideal for applications that run on a local network, and you’ll find out more about the pros and cons of using a local file share later in this section.
. In this example, the Word template file is held on a file share that’s accessible through a UNC (Universal Naming Convention) file path. You’ll need to modify this location so that it points to where you’ve saved your Word template. Storing your Word template in a local file share is ideal for applications that run on a local network, and you’ll find out more about the pros and cons of using a local file share later in this section.
The next line of code uses the Bookmarks collection to locate the DepartmentName bookmark. It then inserts the screen entity’s DepartmentName property after the bookmark location by calling the Range.InsertAfter method ![]() . At the end of the process, the code shows the Word document to the user by setting the visibility property of the Word application to true
. At the end of the process, the code shows the Word document to the user by setting the visibility property of the Word application to true ![]() .
.
Sending Documents Directly to a Printer
Instead of showing the document to the user on the screen, you can send your Word document to a printer and discard it immediately afterward without saving changes. This allows you to easily send reports to a printer without any additional user intervention.
Listing 14-9 shows the code that allows you to accomplish this. The Close method allows you to pass an argument that forces Word to either discard or save changes, or prompts the user to save their changes. Because we want Word to quit without saving any changes, passing 0 into the Close method allows you to do this.
Listing 14-9. Printing and Closing a Word Document
VB:
File:HelpDeskVBClientUserCodeDepartmentDetail.vb

wordApp.PrintOut()
wordDoc.Close(0)

C#:
File:HelpDeskCSClientUserCodeDepartmentDetail.cs

wordApp.PrintOut();
wordDoc.Close(0);
Distributing the Template with the LightSwitch Client
The preceding automation example stores the Word template file in a file share that’s available through a UNC file share. (Alternatively, you could have chosen to use a mapped drive.) The biggest disadvantages of this technique are that it works only on the internal network and it won’t work in environments where Windows file sharing is disallowed.
You can overcome this problem by embedding your Word template in your application’s XAP file. There are several other pros and cons of using this technique, and these are summarized in Table 14-2.
Table 14-2. Template Distribution Techniques
| Distribution via a File Share | Distribution via the XAP File |
|---|---|
| This technique works only within your local network. | You can use this technique in applications that you deploy over the Internet. |
| You can easily update your file template after deploying your application. | You’ll need to rebuild and redeploy your LightSwitch application if you want to make changes to your template file. |
| There isn’t any impact on the load time of your application. | Adding your Word template to the XAP file makes it larger, which in turn makes your application slower to load. |
| This technique is more fragile because there’s a dependency on a file outside of your application. | This technique is more robust because everything is self-contained. |
You’ll now find out how to modify the code from Listing 14-9 so that it retrieves the Word template from the XAP file rather than from a UNC file share. To add your LetterTemplate.dotx file to your XAP file, switch to File View and right-click your ClientGenerated project. Choose the Add Existing Item option, and use the Open File dialog to select your Word template file. Once you’ve added your template file, open the Properties sheet and set the Build Action property to Content. Note that if you’ve added an HTML client to your project, the ClientGenerated project will no longer exist. In this case, you’ll need to add the Word template file to your Client project instead. The Resources folder is a good place to store your template file, as shown in Figure 14-21.
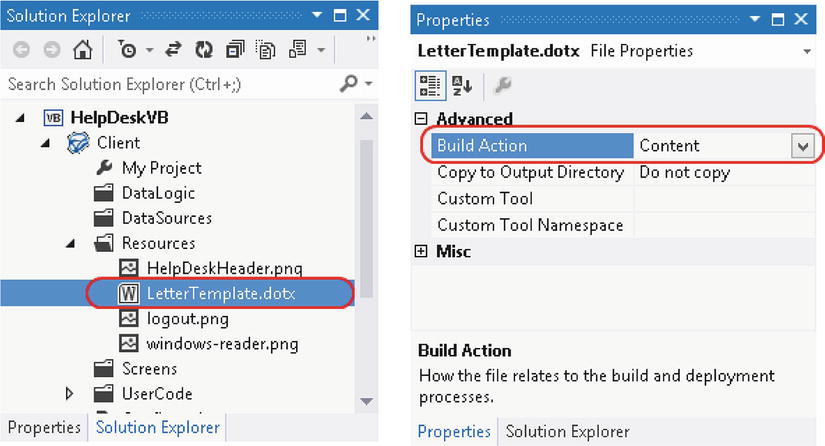
Figure 14-21. Setting the build action to Content
Listing 14-10 illustrates the code that extracts the template from your XAP package and saves it in the My Documents folder on the client computer. This code saves your template into the My Documents folder because security restrictions in Silverlight limit the places where you can save files on the local file system. You would add this code to Listing 14-8, just before the initial part that calls the CreateObject method to create a COM reference to Word.
Listing 14-10. Saving the Word Template to My DocumentsLetterTemplate.dotx
VB:
File:HelpDeskVBClientUserCodeDepartmentDetail.vb

Dim resourceInfo = System.Windows.Application.GetResourceStream(
   New Uri("Resources/LetterTemplate.dotx", UriKind.Relative))

Dim path = Environment.GetFolderPath(
    Environment.SpecialFolder.MyDocuments) + "LetterTemplate.dotx"

Dim file = System.IO.File.Create(path)
file.Close()

'Write the stream to the file
Dim stream As System.IO.Stream = resourceInfo.Stream

Using fileStream = System.IO.File.Open(path,
   System.IO.FileMode.OpenOrCreate,
   System.IO.FileAccess.Write,
   System.IO.FileShare.None)

         Dim buffer(0 To stream.Length - 1) As Byte
         stream.Read(buffer, 0, stream.Length)
         fileStream.Write(buffer, 0, buffer.Length)
End Using

C#:
File:HelpDeskCSClientUserCodeDepartmentDetail.cs

var resourceInfo = System.Windows.Application.GetResourceStream(
    new Uri("Resources/LetterTemplate.dotx", UriKind.Relative));

dynamic path = Environment.GetFolderPath(
    Environment.SpecialFolder.MyDocuments) + "LetterTemplate.dotx";

dynamic file = System.IO.File.Create(path);
file.Close();

//Write the stream to the file
System.IO.Stream stream = resourceInfo.Stream;

using (FileStream fileStream = System.IO.File.Open (path,
    System.IO.FileMode.OpenOrCreate,
    System.IO.FileAccess.Write,
    System.IO.FileShare.None)) {
        byte[] buffer = new byte[stream.Length];
        stream.Read(buffer, 0, int.Parse (stream.Length.ToString() ));
        fileStream.Write(buffer, 0, buffer.Length);
}
The first part of this code calls the GetResourceStream method ![]() . This method allows you to load resources that are embedded inside of your XAP file. The method expects you to supply a relative path that identifies your resource. This path doesn’t require any leading slashes—if you add a leading slash, your code won’t work. Also notice how the directory separator uses a forward slash (/) rather than a backslash. This line specifies a letter template that belongs in the Resources folder. But if you added the template file to the root of your project, the Uri string would simply be "LetterTemplate.dotx".
. This method allows you to load resources that are embedded inside of your XAP file. The method expects you to supply a relative path that identifies your resource. This path doesn’t require any leading slashes—if you add a leading slash, your code won’t work. Also notice how the directory separator uses a forward slash (/) rather than a backslash. This line specifies a letter template that belongs in the Resources folder. But if you added the template file to the root of your project, the Uri string would simply be "LetterTemplate.dotx".
When the code obtains a resource stream, it creates a new file in the user’s My Documents folder ![]() . In practice, you’ll most likely want to save the template in a more specific location and perform same basic error checking to see if a file of the same name already exists before creating it. Next, the code uses the methods in the System.IO.File namespace, and saves the contents of the embedded Word template in the new file that you’ve created
. In practice, you’ll most likely want to save the template in a more specific location and perform same basic error checking to see if a file of the same name already exists before creating it. Next, the code uses the methods in the System.IO.File namespace, and saves the contents of the embedded Word template in the new file that you’ve created ![]() . This completes the extraction of the Word template file from the XAP file. To finish the code, you can modify the call to the wordApp.Documents.Open method in Listing 14-8 so that it opens the template from the My Documents folder rather than from the UNC file location.
. This completes the extraction of the Word template file from the XAP file. To finish the code, you can modify the call to the wordApp.Documents.Open method in Listing 14-8 so that it opens the template from the My Documents folder rather than from the UNC file location.
![]() Note The main purpose of this example is to show you how to embed content in your LightSwitch application. If you need to access large resources in your application and discover that embedding resources in your XAP file slows down your application excessively, another option is to store your resources on a web server. You can then make a web request from the client to download the resource locally. If you apply this technique to this example, it would work well for Internet-deployed applications and allow you to change your Word template, without having to redeploy your application.
Note The main purpose of this example is to show you how to embed content in your LightSwitch application. If you need to access large resources in your application and discover that embedding resources in your XAP file slows down your application excessively, another option is to store your resources on a web server. You can then make a web request from the client to download the resource locally. If you apply this technique to this example, it would work well for Internet-deployed applications and allow you to change your Word template, without having to redeploy your application.
Performing Mail Merges with Word
Another common scenario in many business applications is the ability to perform mail merges. To show you how this works, this example shows you how to build a feature in the HelpDesk system to allow managers to generate letters to departments that have raised an excessive numbers of issues.
Creating a Mail Merge Word Template
The first step is to create a mail merge template in Word. From the ribbon in Word, select the Mailings group, click the Start Mail Merge button, and select the Letters option. Click the Select Recipients button, and choose the Type New List option. This opens the New Address List window, as shown in Figure 14-22.
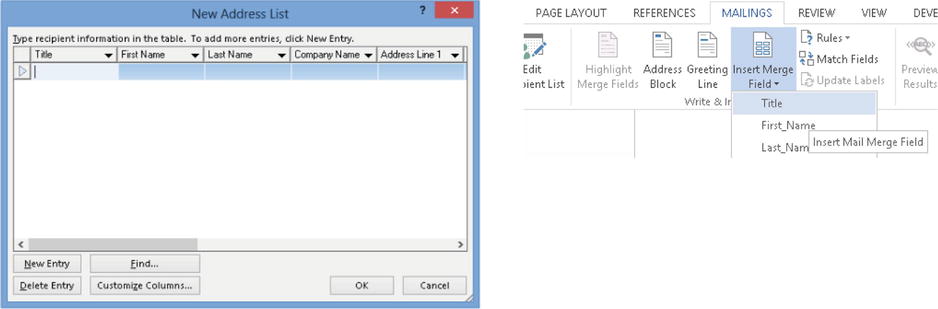
Figure 14-22. Creating the mail-merge fields
The New Address List window displays the mail-merge fields as columns in the grid. As you’ll see, the default mail-merge fields include Title, FirstName, LastName, and several more.
You can add fields by clicking the Customize Columns button. For the purpose of this example, create three custom fields called DepartmentName, DepartmentManager, and Address1. When you click on the OK button, Word prompts you to save the list as a new Microsoft Office Address List file (or MDB file if you’re using an earlier version of Word). Name this file MailMergeData and when the save operation completes, Word will enable the Insert Merge Field buttons on the ribbon. Although you’ll no longer need to refer to this data file, you’ll need to carry out these steps to create mail-merge fields that you can add to your template document.
The next step is to write the body of your letter. When you reach a point in a sentence or paragraph where you want to substitute a data value, use the Insert Merge Field to insert a merge field. (See Figure 14-22.) Once you’ve finished, save your template file as MailMergeTemplate.dotx.
Writing the Mail Merge Code
There are two ways to perform a mail merge. The first is to use the MailMergeTemplate.docx file that you’ve just created. Although this method works great and is relatively simple, the disadvantage is that both your letter text and mail-merge fields are hard-coded in your template file. This makes it more difficult if you want to dynamically generate your letter text, and to change the exact locations within your letter body where your mail-merge fields appear. The second method, therefore, relies on building your letter text in code. This allows you to change the content that’s shown in your Word document based on some condition. This section shows you how to carry out a mail merge by using both techniques.
Using the Mail-Merge Fields Specified in the Word Template
Let’s begin by creating a mail merge using the MailMergeTemplate.docx template. In this example, you’ll create a screen that includes a list of departments and add a button that mail merges the screen data with your Word Template file. Here are the steps to carry out this example:
- Create a query that returns departments that have raised a high number of HelpDesk issues. (Refer to Chapter 6 if you need help on this.) If you just want to run this example, you can skip this step and base the next step on the Department table rather than a custom query.
- Create an editable grid screen that’s based on this query, and name it DepartmentsWithHighIssues. The screen template creates a data grid of departments. Change the control from Data Grid to Data List.
- Create a new GroupBox beneath the data list, and add a button to your screen. Name your button DoMailMerge. Figure 14-23 shows the design of your screen.
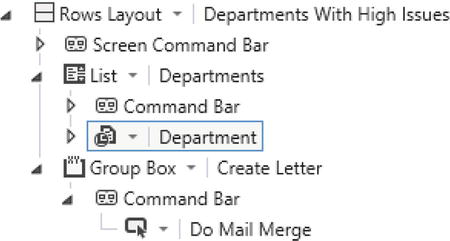
Figure 14-23. Screen design
- Enter the code shown in Listing 14-11.
Listing 14-11. Mail-Merge Code
VB:
File:HelpDeskVBClientUserCodeDepartmentsWithHighIssues.vb
Imports System.Runtime.InteropServices.Automation
Imports System.Reflection
Namespace LightSwitchApplication
Public Class DepartmentsWithHighIssues
' Declare Global Variables
Private wordApp As Object
Private wordDoc As Object
Private missingValue As Object = System.Reflection.Missing.Value
' Here are the values of the WdMailMergeDestination Enum
Const wdSendToNewDocument As Integer = 0
Const wdSendToPrinter As Integer = 1
Const wdSendToEmail As Integer = 2
Const wdSendToFax As Integer = 3
Private Sub DoMailMerge_Execute()
Dim wordMailMerge As Object
Dim wordMergeFields As Object
' Create an instance of Word and make it visible.
wordApp = AutomationFactory.CreateObject("Word.Application")
wordApp.Visible = True
' Open the template file
wordDoc = wordApp.Documents.Open(
"\FileserverDocsMailMergeTemplate.dotx")
wordDoc.Select()
wordMailMerge = wordDoc.MailMerge
' Create a MailMerge Data file.
CreateMailMergeDataFile()
wordMergeFields = wordMailMerge.Fields
wordMailMerge.Destination = wdSendToNewDocument
wordMailMerge.Execute(False)
' Close the original form document.
wordDoc.Saved = True
wordDoc.Close(False, missingValue, missingValue)
' Release References.
wordMailMerge = Nothing
wordMergeFields = Nothing
wordDoc = Nothing
wordApp = Nothing
End Sub
Private Sub CreateMailMergeDataFile()
Dim wordDataDoc As Object
'Specify a Location with write access
Dim fileName As Object = "\FileserverDocsDataDoc.doc"
Dim header As Object =
"DepartmentName, DepartmentManager, Address1"
wordDoc.MailMerge.CreateDataSource(
fileName, missingValue, missingValue, header)
' Open the data document to insert data.
wordDataDoc = wordApp.Documents.Open(fileName)
' Loop through the department screen collection
' Start at rowCount 2 because row 1 contains the column headers
Dim rowCount As Integer = 2
For Each d As Department In Departments
FillRow(wordDataDoc, rowCount,
d.DepartmentName, d.DepartmentManager, d.Address1)
rowCount += 1
Next
' Save and close the file.
wordDataDoc.Save()
wordDataDoc.Close(False)
End Sub
Private Sub FillRow(WordDoc As Object, Row As Integer,
Text1 As String, Text2 As String, Text3 As String)
If Row > WordDoc.Tables(1).Rows.Count Then
WordDoc.Tables(1).Rows.Add()
End If
' Insert the data into the table.
WordDoc.Tables(1).Cell(Row, 1).Range.InsertAfter(Text1)
WordDoc.Tables(1).Cell(Row, 2).Range.InsertAfter(Text2)
WordDoc.Tables(1).Cell(Row, 3).Range.InsertAfter(Text3)
End Sub
End Class
End Namespace
C#:
File:HelpDeskCSClientUserCodeDepartmentsWithHighIssues.cs
using System.Runtime.InteropServices.Automation;
using System.Reflection;
namespace LightSwitchApplication
{
public partial class DepartmentsWithHighIssues
{
dynamic wordApp;
dynamic wordDoc;
object missingValue = System.Reflection.Missing.Value;
// Here are the values of the WdMailMergeDestination Enum
const int wdSendToNewDocument = 0;
const int wdSendToPrinter = 1;
const int wdSendToEmail = 2;
const int wdSendToFax = 3;
partial void DoMailMerge_Execute()
{
dynamic wordMailMerge;
dynamic wordMergeFields;
// Create an instance of Word and make it visible.
wordApp = AutomationFactory.CreateObject("Word.Application");
wordApp.Visible = true;
// Open the template file
wordDoc =
wordApp.Documents.Open(
@"\FileserverDocsMailMergeTemplate.dotx");
wordDoc.Select();
wordMailMerge = wordDoc.MailMerge;
// Create a MailMerge Data file.
CreateMailMergeDataFile();
wordMergeFields = wordMailMerge.Fields;
wordMailMerge.Destination = wdSendToNewDocument;
wordMailMerge.Execute(false);
// Close the original form document.
wordDoc.Saved = true;
wordDoc.Close(false, ref missingValue, ref missingValue);
// Release References.
wordMailMerge = null;
wordMergeFields = null;
wordDoc = null;
wordApp = null;
}
private void CreateMailMergeDataFile()
{
dynamic wordDataDoc;
var fileName = @"\FileserverDocsDataDoc.doc";
var header = "DepartmentName, DepartmentManager, Address1";
wordDoc.MailMerge.CreateDataSource(ref fileName, ref missingValue,
ref missingValue, ref header);
// Open the data document to insert data.
wordDataDoc = wordApp.Documents.Open(ref fileName);
// Loop through the customer screen collection
// Start at rowCount 2 because row 1 contains the column headers
int rowCount = 2;
foreach (Department d in Departments )
{
FillRow(
wordDataDoc, rowCount,
d.DepartmentName , d.DepartmentManager , d.Address1 );
rowCount++;
}
// Save and close the file.
wordDataDoc.Save();
wordDataDoc.Close(false, ref missingValue, ref missingValue);
}
private void FillRow(dynamic wordDoc, int Row,
string Text1,string Text2, string Text3)
{
if (Row > wordDoc.Tables[1].Rows.Count)
{
wordDoc.Tables[1].Rows.Add();
}
// Insert the data into the table.
wordDoc.Tables[1].Cell(Row, 1).Range.InsertAfter(Text1);
wordDoc.Tables[1].Cell(Row, 2).Range.InsertAfter(Text2);
wordDoc.Tables[1].Cell(Row, 3).Range.InsertAfter(Text3);
}
}
}
The high-level overview of the process that’s shown in Listing 14-11 is as follows:
- The code creates a Word document and populates it with data from your LightSwitch screen.
- It uses your Word template file to create a new Word document, and sets the mail-merge data source to the document that you created earlier. It then carries out the actual mail merge.
The method that runs when the user clicks on the Mail Merge button is called DoMailMerge_Execute ![]() . This method creates a Word document by opening your MailMergeTemplate.dotx template file
. This method creates a Word document by opening your MailMergeTemplate.dotx template file ![]() . It then calls a method called CreateMailMergeDataFile
. It then calls a method called CreateMailMergeDataFile ![]() . This creates a data document called DataDoc.doc and sets the data source of your Word document to this data document
. This creates a data document called DataDoc.doc and sets the data source of your Word document to this data document ![]() . It does this by calling Word’s CreateDataSource method
. It does this by calling Word’s CreateDataSource method ![]() . This method expects you to supply the column headers for your data. The column names that you define must match the names of the mail-merge fields that you defined in the New Address List dialog. So in this example, these headings are called DepartmentName, DepartmentManager, and Address1
. This method expects you to supply the column headers for your data. The column names that you define must match the names of the mail-merge fields that you defined in the New Address List dialog. So in this example, these headings are called DepartmentName, DepartmentManager, and Address1 ![]() . The remaining code in this method loops through the departments in the Departments collection
. The remaining code in this method loops through the departments in the Departments collection ![]() and calls the FillRow method to populate the data document (DataDoc.doc).
and calls the FillRow method to populate the data document (DataDoc.doc).
Once the code populates the data document, the remaining code in the DoMailMerge_Execute method performs the mail merge by calling the Execute method on the wordMailMerge object ![]() . This completes the mail merge, and the remaining code tidies up the objects that have been declared. You can optionally add some code here to delete the DataDoc.doc file if you want.
. This completes the mail merge, and the remaining code tidies up the objects that have been declared. You can optionally add some code here to delete the DataDoc.doc file if you want.
Prior to calling the Execute method, the code sets the Destination property ![]() of the wordMailMerge object to wdSendToNewDocument. This represents the numeric value of 0 and forces Word to show the document to the user. Table 14-3 shows the other acceptable values that you can set.
of the wordMailMerge object to wdSendToNewDocument. This represents the numeric value of 0 and forces Word to show the document to the user. Table 14-3 shows the other acceptable values that you can set.
Table 14-3. Constants That Are Used to Set the Mail Merge Destination
| Name of Constant | Value | Description |
|---|---|---|
| wdSendToNewDocument | 0 | Mail merge will be shown in the document. |
| wdSendToPrinter | 1 | Mail merge will be sent to the printer. |
| wdSendToEmail | 2 | Mail merge will be sent to your default email client. |
| wdSendToFax | 3 | Mail merge will be sent to a fax. |
This mail-merge code populates your data document by using your screen’s Departments collection. By default, this shows only 45 records at time. Therefore, you might want to increase this by changing the value of the No. Of Items To Display Per Page text box. If you want to mail merge all of the records in a table, you can modify your code so that it uses a query rather than a screen collection.
Creating Mail Merge Fields in Code
The preceding example relies on a static Word template file (MailMergeTemplate.dotx). If you want to dynamically change your letter body contents, you can use Word automation to create a blank Word document. You would then build the content and merge fields of your document in code before performing the mail merge.
To demonstrate this technique, this example customizes your screen to allow users to specify the first paragraph that appears in the letter, and also adds a check box that allows users to specify the level of formality of the letter. To create these screen controls, open your DepartmentsWithHighIssues screen, click on the Add Data Item button and create the following two local properties:
- FirstParagraphProperty: Data Type: String, Is Required: False
- FormalityProperty: Data Type: Boolean, Is Required: False
Now modify the contents of your DoMailMerge_Execute method, as shown in Listing 14-12.
Listing 14-12. Creating the Mail Merge Fields in Code
VB:
File:HelpDeskVBClientUserCodeDepartmentsWithHighIssues.vb

Private Sub DoMailMerge_Execute()

   Dim wordMailMerge As Object
   Dim wordMergeFields As Object

   ' Create an instance of Word  and make it visible.
   wordApp = AutomationFactory.CreateObject("Word.Application")
   wordApp.Visible = True

   ' Create a new file rather than open it from a template
   wordDoc = wordApp.Documents.Add()

   Dim wordSelection As Object
   wordSelection = wordApp.Selection
   wordMailMerge = wordDoc.MailMerge

   ' Create a MailMerge Data file.
   CreateMailMergeDataFile()

   wordMergeFields = wordMailMerge.Fields

   ' Type the salutation and add the 'DepartmentManager' merge field
   If FormalityProperty.GetValueOrDefault(False) Then
      wordSelection.TypeText("Dear ")
   Else
      wordSelection.TypeText("Hi ")
   End If

   Dim wordRange As Object = wordSelection.Range

   wordMergeFields.Add(wordRange, "DepartmentManager")
   wordSelection.TypeText(",")
   ' add the paragraph text that the user has entered
   wordSelection.TypeText(FirstParagraphProperty)

   ' Perform mail merge.
   wordMailMerge.Destination = 0
   wordMailMerge.Execute(False)

   ' Close the original form document.
   wordDoc.Saved = True
   wordDoc.Close(False, missingValue, missingValue)

   ' Release References.
   wordMailMerge = Nothing
   wordMergeFields = Nothing
   wordDoc = Nothing
   wordApp = Nothing

End Sub


C#:
File:HelpDeskCSClientUserCodeDepartmentsWithHighIssues.cs

private void DoMailMerge_Execute()
{
    dynamic wordMailMerge;
    dynamic wordMergeFields;
    dynamic wordSelection;

    // Create an instance of Word and make it visible.
    wordApp = AutomationFactory.CreateObject("Word.Application");
    wordApp.Visible = true;

    // Create a new file rather than open it from a template
    wordDoc = wordApp.Documents.Add();

    wordSelection = wordApp.Selection;
    wordMailMerge = wordDoc.MailMerge;

    // Create a MailMerge Data file.
    CreateMailMergeDataFile();

    wordMergeFields = wordMailMerge.Fields;

    // Type the salutation and add the ' DepartmentManager' merge field
    If(FormalityProperty.GetValueOrDefault(false))
    {
       wordSelection.TypeText("Dear ");
    }
    else
    {
       wordSelection.TypeText("Hi ");
    }


    wordMergeFields.Add(wordSelection.Range, "DepartmentManager");
    wordSelection.TypeText(",");
    // add the paragraph text that the user has entered
    wordSelection.TypeText(FirstParagraphProperty);

    // Perform mail merge.
    wordMailMerge.Destination = 0;
    wordMailMerge.Execute(false);

    // Release References.
    wordMailMerge = null;
    wordMergeFields = null;
    wordDoc = null;
    wordApp = null;
}
This code works in much the same way as the preceding example. The first difference is that it creates a brand new Word document rather than creating one from a template ![]() . It generates the data document just as before by calling the CreateMailMergeDataFile method
. It generates the data document just as before by calling the CreateMailMergeDataFile method ![]() . If the user has checked the Formality check box
. If the user has checked the Formality check box ![]() , the code sets the salutation of the letter to “Dear” Otherwise, it sets it to “Hi.” This is a perfect example of the type of conditional logic that you couldn’t apply if you used a static Word template. Immediately after the salutation text, the code adds the mail-merge field that allows the department manager name to be substituted in
, the code sets the salutation of the letter to “Dear” Otherwise, it sets it to “Hi.” This is a perfect example of the type of conditional logic that you couldn’t apply if you used a static Word template. Immediately after the salutation text, the code adds the mail-merge field that allows the department manager name to be substituted in ![]() . It then adds the paragraph text that’s been added by the user
. It then adds the paragraph text that’s been added by the user ![]() . Figure 14-24 shows how the final screen looks.
. Figure 14-24 shows how the final screen looks.
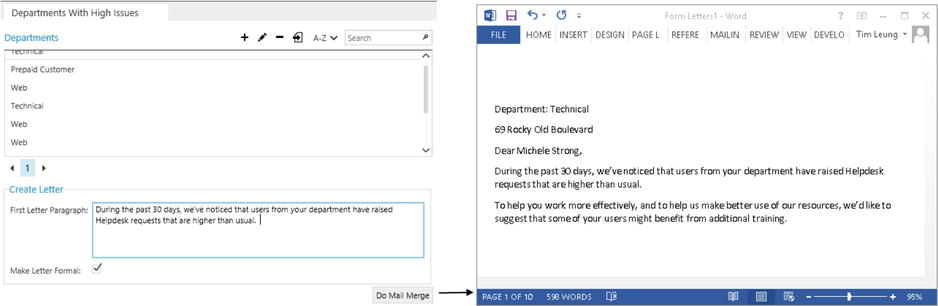
Figure 14-24. Word mail-merge example
Some organizations prefer to produce documents in PDF format, particularly for letters and documents that shouldn’t be editable. The advantage of the PDF format is that it better preserves the layout and positioning of documents, and makes it more difficult for users to modify their contents.
There are several ways in which you can generate PDF documents. On the server, you can use Microsoft Reporting Services to export reports in PDF format. If your users use Microsoft Word 2007 or above, you could extend the Word automation code from earlier to save your output in PDF format rather than the default DOCX format.
In this section, you’ll find out how to create a PDF document that summarizes the contents of an issue record. LightSwitch and Silverlight don’t include built-in support for generating PDF files, but you’ll find various third-party libraries that do allow you to create PDF documents. The one that we’ll use is silverPDF—a free, open source library that you’ll find at the CodePlex web site (http://silverpdf.codeplex.com/). This library is based on two other open source projects (iTextSharp and PDFsharp). If you’ve used any of these libraries before, the code here will be familiar to you.
To get started with silverPDF, download the silverPDF.dll file from the CodePlex web site. In your LightSwitch project, switch to File View and add a reference to the silverPDF.dll assembly in your client project. Open the AddEditIssue screen from Chapter 7, create a method called OpenPDFReport, and insert the code that’s shown in Listing 14-13.
Listing 14-13. Programming silverPDF
VB:
File: HelpDeskVBClientUserCodeAddEditIssue.vb

Imports PdfSharp
Imports PdfSharp.Drawing
Imports PdfSharp.Pdf

Private Sub OpenPDFReport_Execute()

   Microsoft.LightSwitch.Threading.Dispatchers.Main.BeginInvoke(
   Sub()
      Dim document As New PdfDocument()
      document.Info.Title = "Issue"

      ' Create an empty page
      Dim page As PdfPage = document.AddPage()

      ' Create a set of  fonts
      Dim fontHeader1 As New XFont("Verdana", 18, XFontStyle.Bold)
      Dim fontHeader2 As New XFont("Verdana", 14, XFontStyle.Bold)
      Dim fontNormal As New XFont("Verdana", 12, XFontStyle.Regular)

      ' Get an XGraphics object for drawing
      Dim gfx As XGraphics = XGraphics.FromPdfPage(page)

      ' Create the report text
      gfx.DrawString("HelpDesk - Issue Detail", fontHeader1,
      XBrushes.Black, New XRect(10, 10, 200, 18), XStringFormats.TopLeft)

      gfx.DrawString("Issue Id:" & Issue.Id.ToString(), fontNormal,
          XBrushes.Black, New XRect(10, 30, 200, 18), XStringFormats.TopLeft)

      gfx.DrawString(Issue.Subject, fontHeader2,
      XBrushes.Black, New XRect(10, 50, 200, 18), XStringFormats.TopLeft)
      '.... create other Elements here

      ' Save the document here
      Dim myDocuments As String = Environment.GetFolderPath(
          Environment.SpecialFolder.MyDocuments)

      document.Save(myDocuments & "IssueReport.pdf")

      'optionally 'shell' the native PDF application to view the file

   End Sub
   )

End Sub

C#:
File: HelpDeskCSClientUserCodeAddEditIssue.cs

using PdfSharp;
using PdfSharp.Drawing;
using PdfSharp.Pdf;

partial void OpenPDFReport_Execute()
{
    Microsoft.LightSwitch.Threading.Dispatchers.Main.BeginInvoke(() =>
    {
        PdfDocument document = new PdfDocument();
        document.Info.Title = "Issue";

        // Create an empty page
        PdfPage page = document.AddPage();

        // Create a font
        XFont fontHeader1 = new XFont("Verdana", 18, XFontStyle.Bold);
        XFont fontHeader2 = new XFont("Verdana", 14, XFontStyle.Bold);
        XFont fontNormal = new XFont("Verdana", 12, XFontStyle.Regular );

        // Get an XGraphics object for drawing
        XGraphics gfx = XGraphics.FromPdfPage(page);

        // Create the report text
        gfx.DrawString ("HelpDesk - Issue Detail " , fontHeader1,
        XBrushes.Black, new XRect(10, 10, 200, 18), XStringFormats.TopCenter );

        gfx.DrawString ("Issue Id: " + Issue.Id.ToString(), fontNormal ,
            XBrushes.Black, new XRect(10, 30, 200, 18), XStringFormats.TopLeft );

        gfx.DrawString (Issue.Subject, fontHeader2,
        XBrushes.Black, new XRect(10, 50, 200, 18), XStringFormats.TopLeft );

        //.... create other Elements here

        // Save the document here
        string myDocuments =
           Environment.GetFolderPath(Environment.SpecialFolder.MyDocuments);
        document.Save(myDocuments + "\IssueReport.pdf");

        // optionally 'shell' the native PDF application to view the file

    });

}
This code invokes the PDF creation code on the main UI dispatcher. This is required because the silverPDF library internally uses Silverlight methods that can be accessed only on the main UI thread.
Building a PDF document involves writing code that adds, configures, and lays out the items that you want to display. silverPDF doesn’t include a graphical designer; despite this, it still works effectively.
The code in this method begins by creating a PDF document ![]() , and then it adds a page to the document
, and then it adds a page to the document ![]() . It then defines a set of fonts that are used in the document
. It then defines a set of fonts that are used in the document ![]() . The XGraphics object
. The XGraphics object ![]() allows you to add content to your PDF document. It exposes various Draw methods that allow you to create graphical elements, as shown in Figure 14-25. DrawString is the method that allows you to add text to your document, and the code calls this method several times, starting with a call that creates a piece of header text
allows you to add content to your PDF document. It exposes various Draw methods that allow you to create graphical elements, as shown in Figure 14-25. DrawString is the method that allows you to add text to your document, and the code calls this method several times, starting with a call that creates a piece of header text ![]() . The DrawString method requires you to supply the font name, color, X-Y co-ordinates, sizing, and alignment details to properly display the text.
. The DrawString method requires you to supply the font name, color, X-Y co-ordinates, sizing, and alignment details to properly display the text.
Figure 14-25. silverPDF Draw methods
The final part of the procedure saves the PDF file to the user’s My Documents folder by calling the PDFDocument object’s Save method. Figure 14-26 shows how the final report looks.
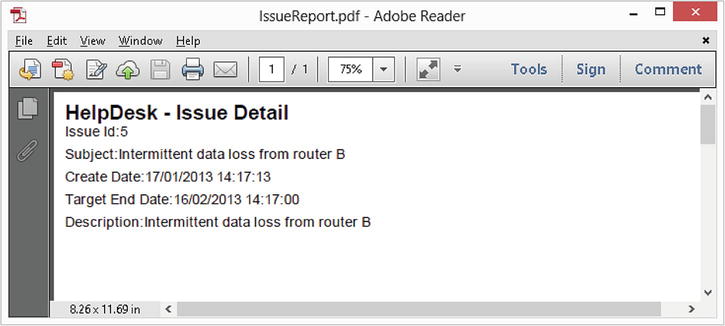
Figure 14-26. PDF output produced with silverPDF
Note that this code invokes the PDF creation logic on the main UI thread by calling the BeginInvoke method. An alternative, however, is to call the Invoke method instead. If you call the Invoke method, the logic thread waits while the PDF creation code runs on the UI thread. During this time, LightSwitch shows the hourglass and prevents the user from interacting with your application. The advantage of synchronously executing the PDF creation code with Invoke is that it makes it easier for you to handle and propagate any errors back to the logic thread. As discussed in Chapter 7, you need to add an imports or using statement that refers to the Microsoft.LightSwitch.Threading namespace to call the Invoke method.
![]() Tip Microsoft Word 2010 allows you to natively save documents in PDF format. You can therefore create PDF files by using COM automation and the Word object model (in desktop applications). You create your PDF file by calling the Save method on your Word document and passing in the file format type of 17. (This relates to Word’s wdFormatPDF enumeration value.) The C# code would look something like this: myWordDoc.Save(17);
Tip Microsoft Word 2010 allows you to natively save documents in PDF format. You can therefore create PDF files by using COM automation and the Word object model (in desktop applications). You create your PDF file by calling the Save method on your Word document and passing in the file format type of 17. (This relates to Word’s wdFormatPDF enumeration value.) The C# code would look something like this: myWordDoc.Save(17);
Using Other Third-Party Solutions
Third-party tools provide you with another choice for reporting. Although you normally need to pay for these tools, they can simplify the report-writing process and offer an experience that’s more integrated into the LightSwitch development environment. In addition to third-party controls that are specifically tailored for LightSwitch, you can also purchase Silverlight-specific controls and access their full functionality by wrapping them in your own custom controls. If you want to find out more about third-party controls, here are some products that you can explore:
- ComponentOne (Studio for LightSwitch): This product includes a FlexGrid control that includes print support and a PDF viewer that allows you to view PDFs from inside your application. You can find it at http://www.componentone.com.
- DevExpress: The XtraReports suite includes tools you can use to create custom reports. You can find it at http://www.devexpress.com/.
- Infragistics: The Netadvantage suite includes charting and a Pivot Grid control that allows you to visualize your data. You can find it at http://www.infragistics.com.
Summary
LightSwitch doesn’t include any built-in reporting. However, there are several techniques that allow you to generate output from your LightSwitch application. This chapter showed you how to create reports by using ASP.NET and SQL Server Reporting Services. The benefit of both these products is that they’re simple, low cost, and capable of producing output that you can access through a web URL. Once you create a web-based report, you can either display it inside a LightSwitch screen or provide a hyperlink that opens your report in a new browser window.
The advantage of ASP.NET is that it allows you to build web pages that include data or charts. If you want to filter the data that’s shown to the user, you can build a web page that includes parameters and supply the parameter values from your LightSwitch application.
If you need to produce more powerful reports, you can use SQL Server Reporting Services. You can obtain Reporting Services free of charge as part of SQL Server Express with Advanced Services, and it’s also included in higher editions of SQL Server. To author reports, you use a tool called SQL Server Data Tools (SSDT), which allows you to produce reports in a format called RDL (Report Definition Language).
The types of reports that you can create include Matrix and Tablix. Tablix reports allow you to produce tabular reports that show data in rows and columns, whereas Matrix reports produce cross-tab and pivot-table type reports. You can also create drill-through reports that allow users to view additional details by clicking on a link. Reporting Services allows you to customize your report by writing code. This can help you with operations such as styling and formatting.
Once you create a report by using ASP.NET or Reporting Services, you’ll need a technique to link your report to your LightSwitch application. In a browser application, you can do this by creating a screen command that opens your report in a new browser window by using Silverlight’s HtmlPage object. In a desktop application, you can open your report in a new browser instance by shelling your browser, or alternatively, you can show your report inside your LightSwitch screen using Silverlight’s WebBrowser control.
Desktop applications allow you to integrate with other applications that are installed on the user’s computer through COM automation. This allows you to integrate with applications such as Excel, Outlook, and Word. This chapter showed you how to generate letters and mail merges by automating Word.
The example code that you’ve seen uses late binding. This mechanism doesn’t impose any dependency on any specific version of Word, so your code will work irrespective of the version of Word that’s installed on the client. The first part of automating Word is to use Silverlight’s AutomationFactory class to create an instance of a Word application object. This parent object allows you to use Word’s API to create or open documents, as well as to insert text into your document. Using Word’s API, you can save documents and even send documents to a printer without ever showing the Word application to the user.
To automate the creation of Word documents, you can create a Word template file that includes bookmarks, and you can add code to your LightSwitch application that inserts your data values into these bookmarks. This method relies on your application being able to access your Word template file. One way to do this is to deploy it through your application’s XAP file. The advantage of this technique is that your Word template file becomes part of your Silverlight application, and therefore offers a robust way to deploy your application’s resources. The disadvantages are that it makes your application larger and can slow down its load time.
To produce a mail merge, you can base your content on a static Word template file, or you can build your template in code if you need to dynamically adapt the contents of your Word document. The code that performs the mail merge extracts your LightSwitch data into a data document and merges this document with your template file.
If you want to create read-only documents that look consistent on all computers, the PDF format is ideal for you. You can create PDF files on a server by using Reporting Services or, alternatively, you can use COM automation on the client. This chapter showed you how to produce PDF documents on the client by using a third-party component called silverPDF.
Other options for reporting include using other third-party tools. These usually offer simplicity, and good integration with the Visual Studio IDE, but there’ll often be a cost involved in buying these tools.