
![]()
It’s entirely possible to create functional applications without writing any code. But to go further, you’ll need to understand the event model and data Application Programming Interfaces (APIs) that LightSwitch exposes.
In this chapter, you will learn how to
- Access data with code and understand the event model
- Work with the save pipeline
- Understand transactions and concurrency
This chapter extends the HelpDesk application and shows you how to add features that are possible only through code. For example, you’ll find out how to allow administrators to configure the system for first-time use by autocreating issue status records. You’ll also find out how to allow managers to close multiple issues or to purge all issue records in the database by clicking on a button.
The system maintains a history of issue status changes by recording the old status, the new status, and the date that the change occurred. You’ll learn how to create this feature by using change sets and writing code in the save pipeline.
For compliance purposes, the system can also audit changes by creating records in a separate SQL Server database. You’ll learn how to carry out this process inside a transaction. If the auditing fails, the data changes that the user made in LightSwitch will be rolled back.
![]() Note This chapter focuses on writing .NET data-access code for Silverlight applications. HTML client applications (discussed in Chapter 8) rely on a JavaScript data-access model that looks very similar to the .NET API that’s covered in this chapter.
Note This chapter focuses on writing .NET data-access code for Silverlight applications. HTML client applications (discussed in Chapter 8) rely on a JavaScript data-access model that looks very similar to the .NET API that’s covered in this chapter.
Performing Application Tasks in Code
Let’s begin this chapter by looking at the Application object. This object allows you to carry out application-specific functions in code. It allows you to open screens, access active screens, work with user data, and create data workspaces.
You can reference the Application object in both client-side and server-side code. Because screens are part of the client and don’t exist on the server, the properties and methods that the Application object exposes will depend on where you call it.
Figure 4-1 shows the IntelliSense options that Visual Studio shows when you write screen code, compared to those that it shows when you write code in the common or server projects.
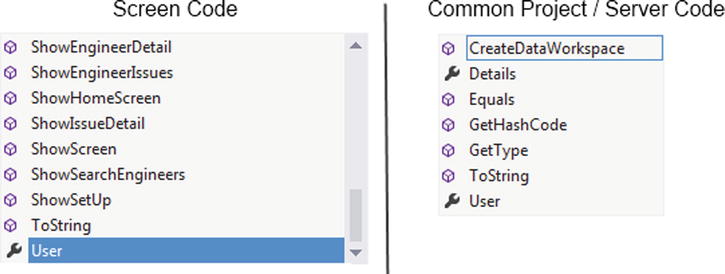
Figure 4-1. The Application object properties and methods
LightSwitch automatically generates a Show method for each screen in your application. You can open your screens in code by calling these methods. Figure 4-1 shows some example Show methods in the Screen Code section.
The ShowDefaultScreen method allows you to pass in any entity and opens the entity by using the default screen. Another method that exists is the ShowScreen method. This allows you to open a screen by passing in a screen definition (an IScreenDefinition object). However, in general, you’d use the strongly typed Show methods that LightSwitch exposes for each screen.
The Application object also exposes a collection called ActiveScreens. This collection contains a reference to each screen that’s currently open in your application. As an example of how you would use this collection, you could create a button on your screen to refresh all other screens that are currently open. Chapter 7 shows you the code that does this, and you’ll also find additional code samples that show you how to use the Application object to open screens.
LightSwitch provides an API that allows you to access your data, and Figure 4-2 illustrates the objects that make up this API. These objects allow you to create, retrieve, update, and delete records in code. This section contains examples that show you how to carry out these tasks.
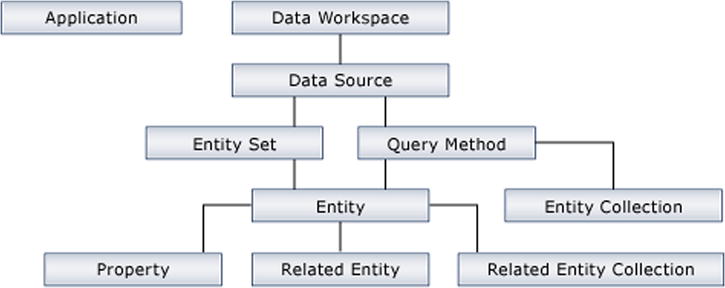
Figure 4-2. Data access objects
Creating Records
In this first example, you’ll find out how to add records in code. You’ll create a screen that contains a button. When a user runs your application and clicks on this button, the code behind the button prepopulates the IssueStatus table with data. This feature allows an administrator to initialize your application with data during first use.
To create this example, add a new screen called Setup. In the Add New Screen dialog, choose the New Data Screen template; from the Screen Data drop-down menu, choose None. Add a Rows Layout control to your screen, and add a new button. To create a button, right-click your Rows Layout control and select the Add Button option. (See Figure 4-3.) When the Add Button dialog appears, choose the Write My Own Method option, and name your method SetupData.
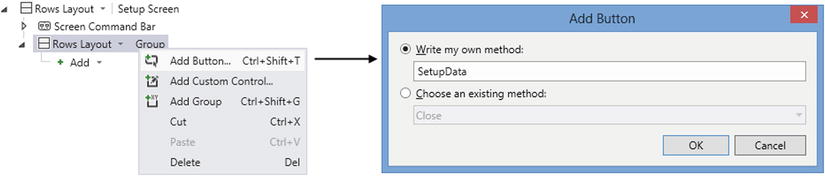
Figure 4-3. The Add Button dialog
When you click the OK button in the Add Button dialog, LightSwitch adds a SetupData method to your Screen Member list. Select this method and right-click the Edit Execute Code option to open the code editor. Now enter the code that’s shown in Listing 4-1.
Listing 4-1. Creating a New Record
VB:
File: HelpDeskVBClientUserCodeSetup.vb
Dim statusRaised =
    Me.DataWorkspace.ApplicationData.IssueStatusSet.AddNew()
statusRaised.StatusDescription = "Raised"
Me.DataWorkspace.ApplicationData.SaveChanges()

C#:
File:HelpDeskCSClientUserCodeSetup.cs

var statusRaised =
   this.DataWorkspace.ApplicationData.IssueStatusSet.AddNew();
statusRaised.StatusDescription = "Raised";
this.DataWorkspace.ApplicationData.SaveChanges();
Let’s take a closer look at this code. LightSwitch generates entity types for each entity in your application. These types represent a single row in a table. For each entity type, LightSwitch also creates properties you can use to get and set the value of each field in the table.
The IssueStatus class is an example of an entity type thatLightSwitch automatically generates for you.
The first line of code ![]() refers to a DataWorkspace. This is an object that allows you to access the data sources in your project.
refers to a DataWorkspace. This is an object that allows you to access the data sources in your project.
LightSwitch creates a Data Source class for each data source in your project, and the names of these classes match the data source names that you see in Solution Explorer. (See Figure 4-4.) Therefore, the ApplicationData object ![]() refers to your intrinsic database. SecurityData is a special data source that allows you to work with your application’s users, and you’ll find out more about this later on.
refers to your intrinsic database. SecurityData is a special data source that allows you to work with your application’s users, and you’ll find out more about this later on.
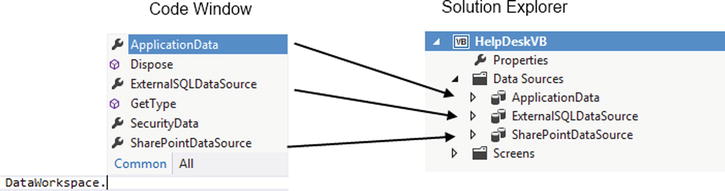
Figure 4-4. Data sources
You can use the Data Source class to access entity sets. LightSwitch generates Entity Set classes for each table in every data source. An Entity Set object represents a set of data on the server. By using the static AddNew method, you can create a new instance of an entity—in this case, a new issue status.
Once you’ve created an Issue Status object, you can set the description property by using the code shown in ![]() . The final part of the code commits the record to the database by calling the data source’s SaveChanges method
. The final part of the code commits the record to the database by calling the data source’s SaveChanges method ![]() . Note that this code references your screen’s data workspace, and because of this, the SaveChanges method will save all other data changes that a user might have made on your screen.
. Note that this code references your screen’s data workspace, and because of this, the SaveChanges method will save all other data changes that a user might have made on your screen.
![]() Note The source code for this book includes a screen called Setup that extends the code in Listing 4-1. The extra code encapsulates this logic in a method, and includes additional code that checks that the status code doesn’t exist before adding it.
Note The source code for this book includes a screen called Setup that extends the code in Listing 4-1. The extra code encapsulates this logic in a method, and includes additional code that checks that the status code doesn’t exist before adding it.
Finding Single Records by ID Value
The Data Source object provides two query methods, called _Single and _SingleOrDefault, for each entity in your data source. (See Figure 4-5 .) These methods return a single record by ID or primary key value.
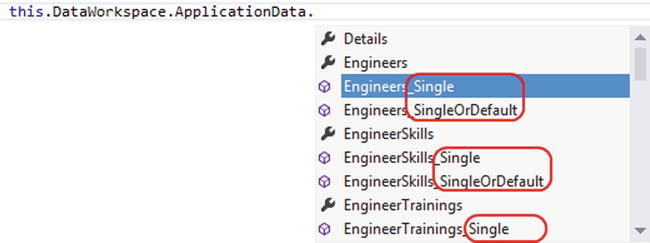
Figure 4-5. Returning a single record
The difference between Single and SingleOrDefault is that Single throws an exception if the record doesn’t exist. SingleOrDefault returns null rather than throwing an exception.
Updating Records
This example shows you how to update records in code by adding a button a user can click to set the status of all issues in the database to “closed.”
Open your Setup screen, and add a button called CloseAllIssues. Open this method in the code editor, and enter the code that’s shown in Listing 4-2.
Listing 4-2. Retrieving and Updating Records
VB:
File:HelpDeskVBClientUserCodeSetup.vb

Private Sub CloseAllIssues_Execute()

    Dim statusClosed =
       DataWorkspace.ApplicationData.IssueStatusSet_SingleOrDefault(1)

    For Each issue As Issue In
          Me.DataWorkspace.ApplicationData.Issues
        issue.IssueStatus = statusClosed
    Next
    Me.DataWorkspace.ApplicationData.SaveChanges()

End Sub

C#:
File:HelpDeskCSClientUserCodeSetup.cs

partial void CloseAllIssues_Execute()
{
    var statusClosed =
        DataWorkspace.ApplicationData.IssueStatusSet_SingleOrDefault(1);

    foreach (Issue issue in
        this.DataWorkspace.ApplicationData.Issues)
    {
        issue.IssueStatus =
            statusClosed;
    }
    this.DataWorkspace.ApplicationData.SaveChanges();

}
The first part of this code uses the SingleOrDefault method to return an instance of an IssueStatus object that represents a closed state ![]() . The code assumes that the issue status record in the database with an Id of 1 represents a closed issue status. You might choose instead to retrieve the issue status by its description, and you can do this by writing a query. (See Chapter 6.)
. The code assumes that the issue status record in the database with an Id of 1 represents a closed issue status. You might choose instead to retrieve the issue status by its description, and you can do this by writing a query. (See Chapter 6.)
The next part of this code loops over the Issues entity set ![]() . This allows you to access each issue record in your database and to set the IssueStatus to “closed”
. This allows you to access each issue record in your database and to set the IssueStatus to “closed” ![]() . In most cases, you’ll likely want to work with a smaller subset of data rather than the entire issue table, and you can do this by using a query. You can access queries by name. For example, if you create a query called OldIssues that returns issues that are older than 30 days, you can access this query through the Data Source object by using the syntax DataWorkspace.ApplicationData.OldIssues. This returns an entity collection of issues that you can enumerate, and you can work with the child items in the same way. Chapter 6 shows you exactly how to create such a query.
. In most cases, you’ll likely want to work with a smaller subset of data rather than the entire issue table, and you can do this by using a query. You can access queries by name. For example, if you create a query called OldIssues that returns issues that are older than 30 days, you can access this query through the Data Source object by using the syntax DataWorkspace.ApplicationData.OldIssues. This returns an entity collection of issues that you can enumerate, and you can work with the child items in the same way. Chapter 6 shows you exactly how to create such a query.
Deleting Records
The final example in this section shows you how to delete records in code. It shows you how to create a delete button that allows a user to delete all of the issue records in your database.
Open your Setup screen, and add a button called DeleteAllIssues. Open this method in the code editor, and enter the code that’s shown in Listing 4-3.
Listing 4-3. Deleting Records
VB:
File:HelpDeskVBClientUserCodeSetup.vb

For Each issue As Issue In
  Me.DataWorkspace.ApplicationData.Issues
    issue.Delete()
Next
Me.DataWorkspace.ApplicationData.SaveChanges()

C#:
File:HelpDeskCSClientUserCodeSetup.cs

foreach (Issue issue in
    this.DataWorkspace.ApplicationData.Issues){
        issue.Delete();
}
this.DataWorkspace.ApplicationData.SaveChanges();
Just like the previous example, this code loops over all the issue records in your database ![]() . But rather than update the issue status, the code calls the Delete method on the Issue entity
. But rather than update the issue status, the code calls the Delete method on the Issue entity ![]() . As usual, the code finishes with a call to the Data Source object’s SaveChanges method
. As usual, the code finishes with a call to the Data Source object’s SaveChanges method ![]() .
.
The main purpose of this code is to illustrate the Delete method and it’s important to note the overall process that’s shown in this example isn’t the most efficient. The screen code pulls the issue records onto the client just to carry out the deletion. So, in practice, you’ll find that this code will run slowly. A Rich Internet Application (RIA) service can help you improve performance, and Chapter 9 covers this in further detail.
Working with Properties and Nullable Data Types
Entity types allow you to refer to data properties in code. For example, issue.StatusDescription is the kind of syntax that would allow you to reference an issue’s status description.
The data type of each property matches the data type that you’ve defined in the table designer. If you’ve unchecked the required check box for a property in the table designer, LightSwitch defines the property using a nullable data type (except for String and Binary, which are reference types and are able to accept a null value).
Figure 4-6 shows the additional members that you’ll see with nullable properties. These include Value, HasValue, and GetValueOrDefault.
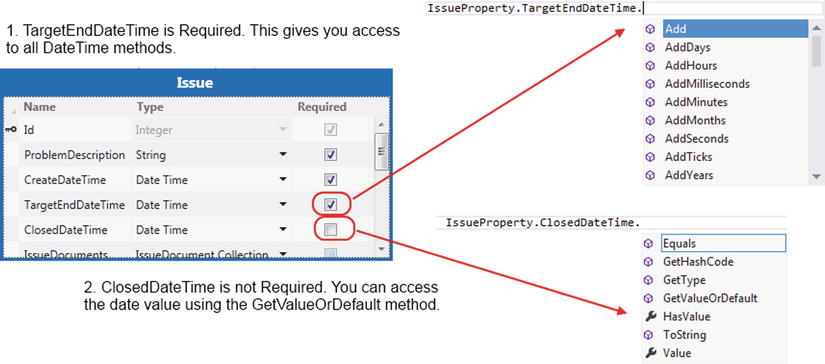
Figure 4-6. Nullable data types in IntelliSense
If you try to access the value of a nullable property that’s set to null, LightSwitch throws an exception. It’s therefore much safer to access nullable properties using the GetValueOrDefault method.
![]() Note If you receive a compilation error along the lines of Cannot implicitly convert type decimal to decimal, it is likely to be caused by nullable variables. The GetValueOrDefault method can help you fix these errors.
Note If you receive a compilation error along the lines of Cannot implicitly convert type decimal to decimal, it is likely to be caused by nullable variables. The GetValueOrDefault method can help you fix these errors.
Working with User Details
There are a couple of places where you can access user-related details in LightSwitch. As mentioned earlier, the Application object provides access to the currently logged-on user. The code in Listing 4-4 shows you the syntax that allows you to retrieve the logged-on user.
Listing 4-4. Accessing the Currently Logged-On User
VB:
Me.Application.User

C#:
this.Application.User;
LightSwitch allows you to manage users and permissions through a built-in data source called SecurityData. The underlying data store that LightSwitch uses is the ASP.NET membership provider.
The SecurityData data source allows you to access membership and security features, such as the ChangePassword and IsValidPassword methods. You use the ChangePassword method to change the password for a user by supplying the user name, old password, and new password values. The IsValidPassword method accepts a password string and returns a Boolean result that indicates whether the password is sufficiently strong enough.
You can also access role and permission details by using the Role, Permission, and RolePermission collections. Figure 4-7 illustrates some of the methods that you’ll see through the IntelliSense window. You can find some practical examples of how to use this code in Chapter 17.

Figure 4-7. IntelliSense options that relate to the user
You’ll probably spend a lot of time in the screen designer, so now’s a good time to learn about the data objects that you can find there.
When you create a screen, LightSwitch adds a data object to the Screen Member list (the left hand part of the screen designer). The object that it adds depends on the screen template that you’ve chosen. This is shown in Figure 4-8.
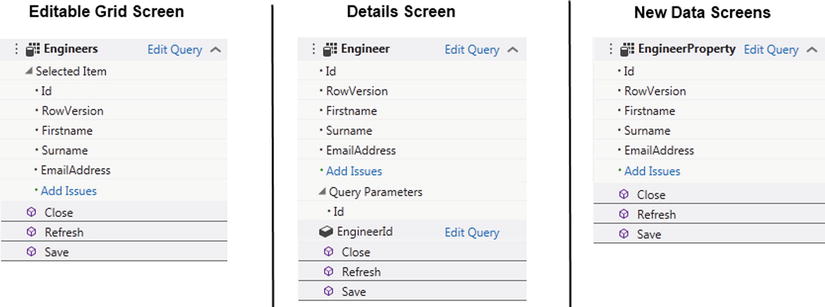
Figure 4-8. Screen Member list
When you create a screen that contains a data grid, LightSwitch adds a query to your screen. In Figure 4-8, this query is called Engineers. Notice that LightSwitch uses the plural name Engineers—this is because the query returns one or more engineers. LightSwitch determines this name using the plural name value that you’ve defined in the table designer.
When you create a details screen, LightSwitch adds an object called Engineer. Once again, this is a query, but unlike the previous example, it returns only a single engineer.
If you create a new data screen, LightSwitch adds a property to your screen. In this example, it names the property EngineerProperty.
The important distinction is that although the details screen and new data screen are both designed to show a single record, details screens are based on a query, whereas new data screens are not. This distinction is important because an engineer query is very different from an engineer property. The distinction is apparent both visually through the designer and in code.
Working with Screen Events
LightSwitch exposes various screen events that you can handle. For example, if you want to perform some additional logic when your user saves a screen, you can do so by writing code in the Saving method.
To handle these events, click the Write Code button that appears in the toolbar of your screen designer. This produces a drop-down list of methods, which can vary depending on the screen template type that you’ve chosen. (See Figure 4-9.) When you click on one of these methods, Visual Studio opens the method in the code editor window.
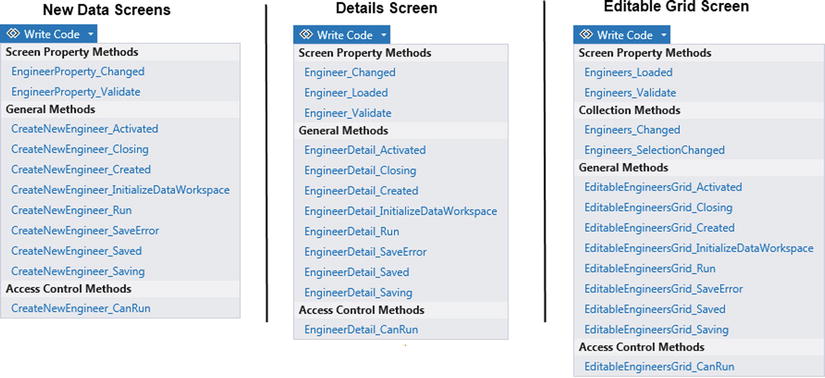
Figure 4-9. Screen events
As the figure shows, the available methods are grouped into sections, and I’ll now describe the methods that you’ll find in each section.
General methods
The LightSwitch client triggers general events throughout the life cycle of a screen. You can handle these events in order to write custom code that executes when your screen loads, closes, or carries out a save.
The InitializeDataWorkspace method allows you to write custom code just before the client initializes your screen (and data workspace). You’ll see examples of why you would want to do this in Chapter 7.
You can use the Saving method to run your own code just before the client saves the data on the screen. When you click on the Write Code button and select the Saving method, LightSwitch creates a method stub and opens the code editor window. This method stub includes a parameter called handled. If you set this to true, LightSwitch will not perform the save operation. This allows you to carry out your own custom save logic. The “Handling Conflicts in Code” sample later in this chapter demonstrates this concept.
The client fires the Closing event just before it closes a screen. The Closing method includes a parameter called cancel. If you set this to true, LightSwitch prevents the screen from closing.
Access control methods
The LightSwitch client fires the CanRun method just before it opens a screen. This allows you to write security code that controls who can view a screen. You’ll find example code in Chapter 17.
With some imagination, you can write code in the CanRun method to carry out tasks that are outside the intended security purpose of this method. For example, you can create a dummy screen so that LightSwitch creates an entry in your application’s navigation panel. This gives you an entry point into the dummy screen’s CanRun method and allows you to execute Silverlight code outside the context of your screen object. In Chapter 17, the “Opening Screens Conditionally at Login” example demonstrates this technique.
Collection methods
The LightSwitch client fires Collection events when the data in a collection changes. The typical events that you’ll handle are the Changed and SelectionChanged events.
LightSwitch fires the SelectionChanged event when the selected item in a collection changes. You can use this event to write code that runs when a user selects a different row in the DataGrid or List control. The Changed event allows you to write code that runs when a user adds or deletes a row from the DataGrid or List control.
If you want to use these methods, you must select the collection from the left hand side of the screen designer before clicking the Write Code button. If you don’t, the collection methods will not be shown in the drop-down list of available methods.
Screen property methods
Screen property methods are executed during the life cycle of a property. They allow you to write custom code when a property loads, changes, or is validated.
For example, you can add code to the loaded method of an issue details screen that shows an alert if the issue is overdue.
EXERCISE 4.1 – HANDLING EVENTS
Open the Engineer Detail screen that you created in Exercise 3.1. Select the Root node of your screen, and click the Write Code button. Notice the methods that appear in the Write Code button. Now select the Engineer property in the Screen Member list, click the Write Code button, and examine the extra methods that appear. Select the Engineer_Loaded method, and take a look at the code that LightSwitch autogenerates for you. Notice how LightSwitch executes code to update the screen’s display name whenever the Engineer property loads or changes, or whenever the user saves the screen. Now open the Search screen that you created in Exercise 3.3. In the screen designer, select the Engineers collection and click on the Write Code button. Notice the collection methods that appear in the Write Code button.
Working with the Save Pipeline
The screen methods you’ve just seen are executed by your Silverlight client. In this section, you’ll learn about the methods LightSwitch executes on the server. The key component that allows you to execute server side code is the save pipeline. This includes various interception points where you can inject custom code.
When the user triggers a save operation, the client serializes the change set and passes it to the data source’s save method. The change set then enters the save pipeline. Figure 4-10 shows you the full process.
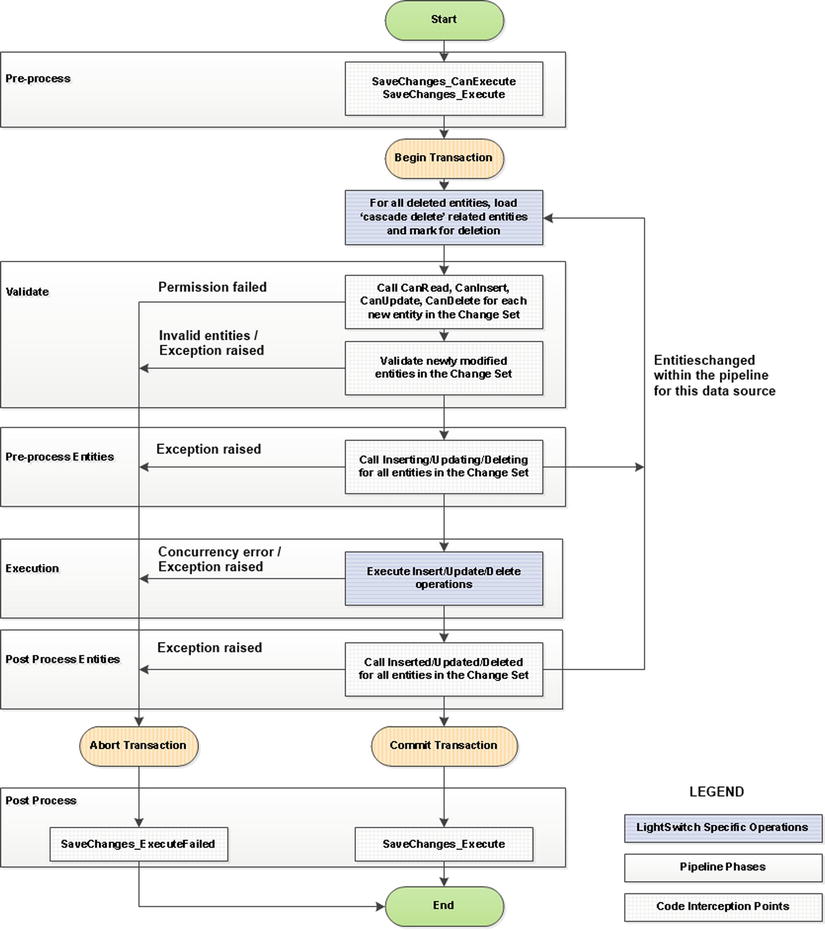
Figure 4-10. The phases in the save pipeline
Some of the reasons why you might want to write code in the save pipeline include
- Performing permission checks and, optionally, preventing changes from being saved
- Carrying out validation
- Carrying out additional tasks after a successful save (for example, auditing)
You’ll see code examples of these tasks later in this book.
To access the methods in the save pipeline, open a table in the table designer and click on the Write Code button. As you hover the mouse over the methods that are shown (as demonstrated in Figure 4-11), the tooltip shows you where LightSwitch executes the code. The events that run on the server belong to the save pipeline.
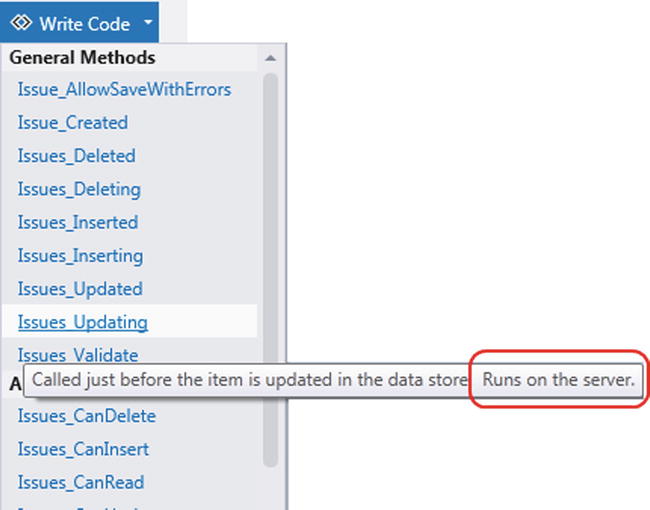
Figure 4-11. Writing code in the save pipeline
As you can see in Figure 4-11, you can execute methods when an entity is created, inserted, deleted, or validated.
If an error occurs during the save operation, LightSwitch raises the SaveChanges_ExecuteFailed event. You can capture this exception and handle it on the client if necessary.
If you change any entities inside the save pipeline, execution returns to the start of the pipeline, and LightSwitch will rerun the validation methods.
If the processing succeeds, any changes that are made to entities in the original change set are serialized and returned to the client. This allows the client to retrieve the ID values or any other changes that have been made during processing.
It’s important to note that any entities that you’ve added in the save pipeline are not returned to the client. To retrieve items that have been added, you’ll need to handle the Screen_Saved event and manually call code to refresh the data. You can perform a refresh by calling the refresh method on the screen’s visual collection—for example, Issues.Refresh() on an issues grid screen. An alternative is to refresh the entire screen by calling the screen’s refresh method—Me.Refresh() in VB.NET or this.Refresh() in C#.
![]() Tip When you’re writing code in the save pipeline, you can use the methods in the Entity Functions class. This class contains useful functions that allow you to calculate date differences and perform aggregate calculations, such as standard deviation, variances, and averages. You’ll find this class in the System.Data.Objects namespace. To use this class, you’ll need to add a reference to the System.Data.Entity dynamic-link library (DLL) in your server project.
Tip When you’re writing code in the save pipeline, you can use the methods in the Entity Functions class. This class contains useful functions that allow you to calculate date differences and perform aggregate calculations, such as standard deviation, variances, and averages. You’ll find this class in the System.Data.Objects namespace. To use this class, you’ll need to add a reference to the System.Data.Entity dynamic-link library (DLL) in your server project.
Calling Server-Side Code from the Client
You can run server-side code only by calling the save operation on a data source. This is awkward because, at times, you might want to trigger a server-side operation from the client. For example, you might want to create a screen button that backs up a database, calls a web service, or sends an email.
One technique for triggering server-side code is to create a dummy table that exists purely for the purpose of running server code. Chapter 15 shows you how to use this technique to send email from the server.
When a user works with a screen, LightSwitch keeps track of data changes and can revert a record back to its initial state. It does this through the magic of change sets.
The good news is that you can access LightSwitch’s change sets in code, which allows you to carry out clever things in your application. For example, you can determine the data items that have changed, retrieve their original values, or discard any specific changes that a user makes.
Retrieving Original Values
To show you how to use a change set to retrieve the original value of a record, here’s a demonstration of how to create audit records whenever a user changes an issue record. You’ll learn how to write code in the save pipeline that audits the change by recording the new and original status of an issue and the time that the change took place.
Let’s begin by creating a table that stores the status history. Create a table called IssueStatusChange, and create a property called ChangeDate. Now create two (zero-or-one)-to-many relationships between the IssueStatus and IssueStatusChange tables. Name your navigation properties OldStatus and NewStatus.
Next, create a (zero-or-one)-to-many relationship between the Issue and IssueStatusChange tables. Figure 4-12 shows how your table looks in the designer.
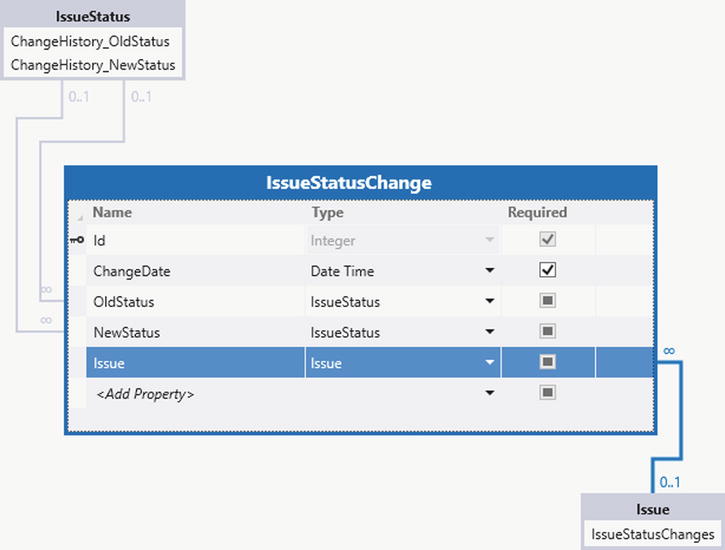
Figure 4-12. Issue change table
Open the Issue table in the table designer, and click on the Write Code button. Select the Issues_Updated method, and enter the code that’s shown in Listing 4-5.
Listing 4-5. Retrieving Original Values in Code
VB:
File: HelpDeskVBServerUserCodeApplicationDataService.vb
Private Sub Issues_Updated(entity As Issue)
Dim issueHistory As IssueStatusChange =
Me.DataWorkspace.ApplicationData.IssueStatusChanges.AddNew()
issueHistory.OldStatus =
entity.Details.Properties.IssueStatus.OriginalValue
issueHistory.NewStatus = entity.IssueStatus
issueHistory.Issue = entity
issueHistory.ChangeDate = DateTime.UtcNow
End Sub
C#:
File: HelpDeskCSServerUserCodeApplicationDataService.cspartial void Issues_Updated(Issue entity)
{
IssueStatusChange issueHistory =
this.DataWorkspace.ApplicationData.
IssueStatusChanges.AddNew();
issueHistory.OldStatus =
entity.Details.Properties.IssueStatus.OriginalValue;
issueHistory.NewStatus = entity.IssueStatus;
issueHistory.Issue = entity;
issueHistory.ChangeDate = DateTime.UtcNow;
}
Now run your application and modify an existing issue. When you do this, the code adds a record to the IssueStatusChange table.
The first thing to notice is the file location of the code file that LightSwitch creates when you click on the Write Code button ![]() . LightSwitch creates your code file in the server project because the code relates to logic in the server-side save pipeline. Because the Issues table belongs in your Intrinsic database, LightSwitch names the file ApplicationDataService (after the name of your data source).
. LightSwitch creates your code file in the server project because the code relates to logic in the server-side save pipeline. Because the Issues table belongs in your Intrinsic database, LightSwitch names the file ApplicationDataService (after the name of your data source).
The signature of the updated method includes a parameter called entity ![]() . This allows you to reference the item that’s currently being saved.
. This allows you to reference the item that’s currently being saved.
The key part of this code is shown in ![]() . The Details member of the entity object allows youto retrieve additional information about the entity, which allows you to find the original value of the IssueStatus property.
. The Details member of the entity object allows youto retrieve additional information about the entity, which allows you to find the original value of the IssueStatus property.
The final part of the code ![]() records the change time using UTC (Coordinated Universal Time). It’s good practice to use UTC, particularly if you want to calculate time differences later on. It means that you don’t need to consider the effects of Daylight Savings Time whenever you carry out calculations.
records the change time using UTC (Coordinated Universal Time). It’s good practice to use UTC, particularly if you want to calculate time differences later on. It means that you don’t need to consider the effects of Daylight Savings Time whenever you carry out calculations.
Notice that you don’t need to call SaveChanges at the end of this code. As the save pipeline diagram (in Figure 4-10) shows, execution returns to the start of the save pipeline whenever you add entities from within the pipeline. If you trigger this code from a screen that shows issues and change records, remember that your application won’t show the newly added change records when you save the screen. You’ll have to call one of the Refresh methods, as explained earlier.
Discarding Items That Have Changed
You use change sets to determine which data items have changed and to write code that reverts data values back to their original state. The ability to do this is very powerful. You can make your application react to changes in data, or simplify the workflow of some process by creating tasks based on some data condition.
To put this into practice, the next example shows you how to write code that discards the changes that a user makes. Let’s imagine that youve created an Issue details screen that allows users to edit issues and their related issue response records. By writing code that accesses the change set, you can add an Undo button that discards any changes that a user makes to the issue record but retain any changes to the child issue response records.
To create this example, add a new table to your application, name it IssueResponse, and create a one-to-many relationship between the Issue and IssueResponse tables. Appendix E shows the full definition of the IssueResponse table.
Create a details screen for your Issue table, and name it IssueDetail. In the Add New Screen dialog, select the IssueReponses check box in the Additional Data To Include section. Once Visual Studio opens the screen designer, select the Screen Command Bar section, and use the Add drop-down box to add a new button. When the Add Button dialog appears, choose the option to add a new method, and name your method DiscardIssueRespChanges. Open this method in the code editor, and enter the code that’s shown in Listing 4-6.
Finally, use the Search Data Screen template to create a new screen that’s based on the Issue table. Configure this screen so that it opens the selected issue in your IssueDetail screen.
Listing 4-6. Discarding Screen Changes
VB:

File:HelpDeskVBClientUserCodeIssueDetail.vb

Private Sub DiscardIssueRespChanges_Execute()
    For Each resp As IssueResponse In _
       DataWorkspace.ApplicationData.Details.GetChanges()
         .OfType(Of IssueResponse)()
            resp.Details.DiscardChanges()
    Next
End Sub

C#:

File:HelpDeskCSClientUserCodeIssueDetail.cs

partial void DiscardIssueRespChanges_Execute()
{
    foreach (IssueResponse resp in
    DataWorkspace.ApplicationData.Details.GetChanges().
       OfType<IssueResponse>())
    {
        resp.Details.DiscardChanges();
    }
}
The GetChanges method ![]() returns a collection of entities that have been modified. By specifying the type IssueResponse
returns a collection of entities that have been modified. By specifying the type IssueResponse ![]() , you can find just the issue response records that have changed. This allows you to loop through a collection of issue responses and to undo the changes by calling the DiscardChanges method
, you can find just the issue response records that have changed. This allows you to loop through a collection of issue responses and to undo the changes by calling the DiscardChanges method ![]() .
.
Because LightSwitch makes it easy for you to carry out complex tasks in screen code, it’s useful to consider exactly what you’re trying to do before you write screen code. For example, it’s relatively simple to write business logic in the Saving method that prevents a user from modifying closed issues by discarding their changes. However, this type of logic really should be added to methods that run on the server-side save pipeline. This is because server code is more reusable (you can call it from multiple screens and clients) and isn’t susceptible to malicious users bypassing your business logic by accessing your data directly via the OData end point.
Managing Transactions in LightSwitch
Many computer systems rely on transactions to maintain data integrity and consistency. One of the key characteristics of a transaction is atomicity. Often known as the “all or nothing” rule, this means that operations in a transaction must either all succeed or all fail. The typical example of a transaction involves a bank payment. If you move $100 from your checking account into a savings account, two distinct data operations occur. The first operation subtracts $100 from your checking account, and the second operation adds $100 into your savings account. Both operations must succeed, or both must fail. What must never happen is for one operation to succeed and the other to fail.
There’s no reason why LightSwitch shouldn’t process your data with the same care as this banking example. So you’ll be pleased to know that LightSwitch maintains the integrity of your data by supporting the use of transactions. In this section, you’ll find out exactly how transactions work in LightSwitch.
![]() Note LightSwitch supports transactions against the intrinsic data source, attached SQL Server databases, and transaction-aware RIA services. It won’t apply transactions against SharePoint or non-transaction-aware data sources.
Note LightSwitch supports transactions against the intrinsic data source, attached SQL Server databases, and transaction-aware RIA services. It won’t apply transactions against SharePoint or non-transaction-aware data sources.
Applying Transactions on Screens
The thought of using transactions might sound complicated, but in reality, this couldn’t be further from the truth. If you create a screen that uses data from the intrinsic or attached SQL Server data sources, LightSwitch performs the save operation inside a transaction. The good news is that LightSwitch does this automatically for you, without you needing to do anything at all.
To illustrate this behavior, let’s consider the issue details screen that you created earlier on. Let’s suppose that a user edits an issue and creates an issue response record. If LightSwitch fails to create the issue response record, it won’t apply the data changes to the issue record. In other words, LightSwitch applies all data changes on a screen atomically.
This is how it works technically. When the user clicks on the save button on a screen, the client calls the server’s SaveChanges operation and supplies a change set. This call to SaveChanges starts the save pipeline process. The server creates a new data workspace and loads the change set that it receives from the client. It creates a SQL Server connection and starts a SQL Server transaction. During this process, LightSwitch applies a transaction isolation level of RepeatableRead. This means that other processes can’t modify the data that’s being read until the transaction completes. At the end of the save pipeline process, LightSwitch commits the SQL Server transaction if all the data operations succeed. If not, it rolls back the transaction.
This design imposes a restriction that you must be aware of when you’re creating screens. The restriction is that, by default, LightSwitch prevents users from updating multiple data sources on the same screen. To illustrate this behavior, Figure 4-13 shows a screen that includes issue data from the Intrinsic database and the audit data from the external SQL Server data source. If LightSwitch were to allow users to update two data sources on the same screen, it would need to update both data sources independently by calling the SaveChanges operation for both data sources. Because LightSwitch can’t guarantee the transactional integrity of the screen as a whole, it prevents users from updating multiple data sources on the same screen. It does this by allowing users to modify the data only in a single data source and rendering any controls that are bound to other data sources as read-only.
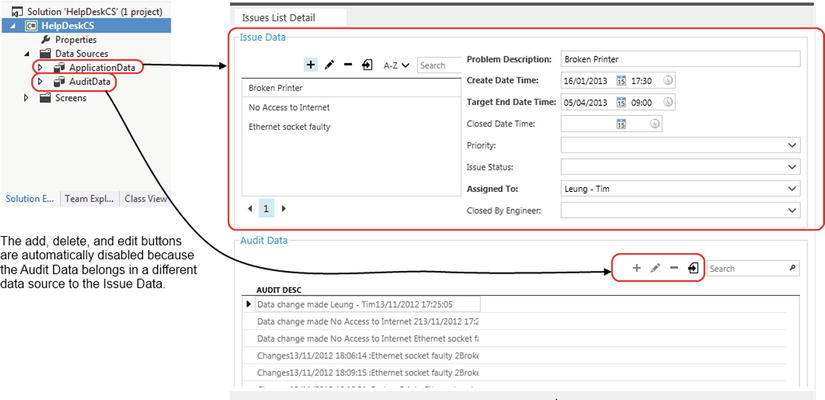
Figure 4-13. Screen sections are read-only when multiple data sources are used
Creating Transactions in the Save Pipeline
Although LightSwitch configures your screens to stop users from updating multiple data sources, it doesn’t completely prohibit you from writing functionality that spans data sources. The restriction that prevents you from working with multiple data sources applies only at the screen. Once the code execution reaches the save pipeline, you can work with as many data sources as you like. To demonstrate this, the following example shows you how to work with multiple data sources in the save pipeline, and also shows you how to enlist data operations from multiple data sources into a single transaction.
This example shows you how to create an audit record in a second (SQL Server) data source called AuditDataSource when a user saves an engineer record in the Intrinsic database. If the update to the intrinsic database fails, the audit record must not be created (and vice versa). Figure 4-14 shows the schema of the audit table.
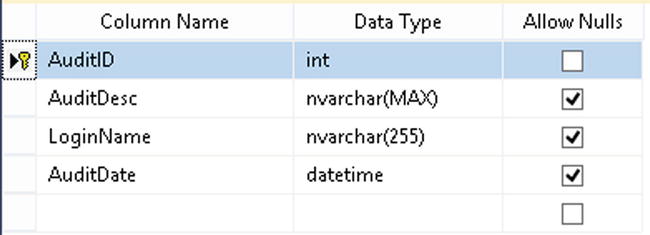
Figure 4-14. Schema of the AuditDetail table
If you need some help creating an external database and table, SQL Server Books Online (BOL) is a great place to look. Here are links to the sections in BOL that will help you:
- Creating a database:
http://msdn.microsoft.com/en-us/library/ms186312.aspx - Creating a table:
http://msdn.microsoft.com/en-us/library/ms188264.aspx
After you create your database and AuditDetail table, you’ll need to attach it to your LightSwitch project, using the instructions from Chapter 2. Next, switch your project to File View and add a reference to the System.Transactions.dll in your server project.
Now open the Engineer table in the table designer and write code in the Executing and Executed methods as shown in Listing 4-7.
Listing 4-7. Creating Your Own Transaction Scope
VB:
File: HelpDeskVBServerUserCodeApplicationDataService.vb

Imports System.Transactions
Imports System.Text

Namespace LightSwitchApplication

   Public Class ApplicationDataService

      Dim transaction As TransactionScope

      Private Sub SaveChanges_Executing()

         Dim transactionOptions = New TransactionOptions()
         transactionOptions.IsolationLevel = IsolationLevel.ReadCommitted

         'Create an audit record as part of the transaction
         Me.transaction = New TransactionScope(
            TransactionScopeOption.Required, transactionOptions)

         Dim auditDesc As StringBuilder =
            New StringBuilder("Changes " + DateTime.Now.ToString() + " :")
         For Each changedEntity In
            Me.DataWorkspace.ApplicationData.Details.GetChanges()

              auditDesc.AppendLine(changedEntity.Details.Entity.ToString())
         Next

         Using dataworkspace2 = Me.Application.CreateDataWorkspace()
            Dim auditRecord = dataworkspace2.AuditDataSource.AuditDetails.AddNew
            auditRecord.AuditDesc = auditDesc.ToString()
                dataworkspace2.AuditDataSource.SaveChanges()
         End Using

      End Sub

      Private Sub SaveChanges_Executed()
         'Commit the transaction
         Me.transaction.Complete()
         Me.transaction.Dispose()
      End Sub

      Private Sub SaveChanges_ExecuteFailed(exception As System.Exception)
         'Rollback the transaction on an error
         Me.transaction.Dispose()
      End Sub

   End Class

End Namespace

C#:
File: HelpDeskCSServerUserCodeApplicationDataService.cs

using System.Text;
using System.Transactions;

namespace LightSwitchApplication
{
    partial  class ApplicationDataService
    {
        TransactionScope transaction;

        partial void SaveChanges_Executing()
        {
            TransactionOptions transactionOptions = new TransactionOptions();
            transactionOptions.IsolationLevel = IsolationLevel.ReadCommitted;

            //Create an audit record as part of the transaction
            this.transaction = new TransactionScope(
                TransactionScopeOption.Required, transactionOptions);

            StringBuilder auditDesc =
                new StringBuilder("Changes " + DateTime.Now.ToString() + " :");
            foreach (var changedEntity in
                this.DataWorkspace.ApplicationData.Details.GetChanges())
            {
                auditDesc.AppendLine (changedEntity.Details.Entity.ToString());
            }

            using (var dataworkspace2 = this.Application.CreateDataWorkspace())
            {
                AuditDetail auditRecord =
                    dataworkspace2.AuditData.AuditDetails.AddNew();
                auditRecord.AuditDesc = auditDesc.ToString();
                dataworkspace2.AuditData.SaveChanges();
            }
        }

        partial void SaveChanges_Executed()
        {
            //Commit the transaction
            this.transaction.Complete();
            this.transaction.Dispose();
        }

        partial void SaveChanges_ExecuteFailed(System.Exception exception)
        {
            //Rollback the transaction on an error
            this.transaction.Dispose();
        }
    }
}
This code works by creating an ambient transaction in the Executing phase of the save pipeline and committing it in the Executed phase. Ambient transactions were introduced in .NET 2.0 and help simplify the task of working with transactions. Operations that are based on transaction-aware providers can enlist in ambient transactions. Therefore, you could also add transaction-aware RIA service data sources into your transactional logic.
The code first declares a class-level TransactionScope object ![]() , and then sets it to a new instance of a TransactionScope object
, and then sets it to a new instance of a TransactionScope object ![]() in the SaveChanges_Executing method. The TransactionScope constructor allows you to pass in a TransactionOption object. This object allows you to set the transaction isolation level.
in the SaveChanges_Executing method. The TransactionScope constructor allows you to pass in a TransactionOption object. This object allows you to set the transaction isolation level.
The next piece of code builds up a string that summarizes the changes that have been made to the issue ![]() . Next, it creates a new data workspace and uses this to create a record in the audit table
. Next, it creates a new data workspace and uses this to create a record in the audit table ![]() .
.
If the data changes in the Intrinsic database succeeds, the code commits the transaction in the SaveChanges_Executed method ![]() . Otherwise, it disposes of the transaction scope in the SaveChanges_ExecuteFailed method, thus rolling back the transaction
. Otherwise, it disposes of the transaction scope in the SaveChanges_ExecuteFailed method, thus rolling back the transaction ![]() . This means that the audit record that was created in the SaveChanges_Executing method will not be persisted to the data store, along with any other data changes that were attempted in the save pipeline.
. This means that the audit record that was created in the SaveChanges_Executing method will not be persisted to the data store, along with any other data changes that were attempted in the save pipeline.
For this code to work, you’ll need to start the Distributed Transaction Coordinator service on your machine.
If two users modify the same record, LightSwitch prevents the second user from overwriting any changes made by the first user.
When this condition occurs, LightSwitch shows a data-conflict screen that allows the second user to resolve the conflict. For more-complex scenarios, you can even write your own code to resolve data conflicts.
Displaying a Data-Conflict Screen
LightSwitch checks for data conflicts whenever a user performs a save. If it detects a conflict, it displays a screen that allows the user to fix the data. (See Figure 4-15.)
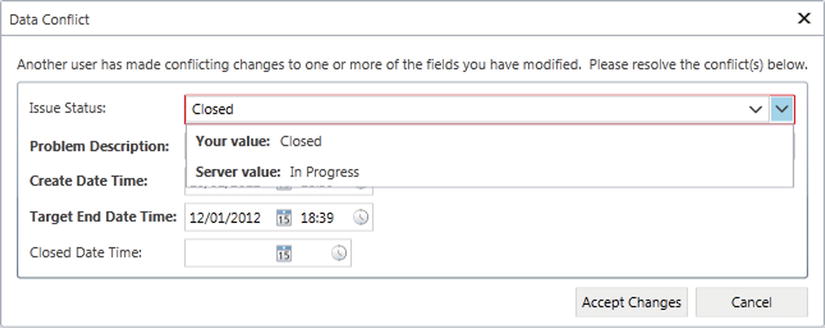
Figure 4-15. Autogenerated data-conflict screen
This screen shows the data when the record was first opened, the current data, and the proposed changes. This allows the user to make an informed choice before re-saving the record.
If you attempt to update a record that’s been deleted by another user, LightSwitch displays the error message that’s shown in Figure 4-16. In this case, it isn’t possible for LightSwitch to recover the deleted record.
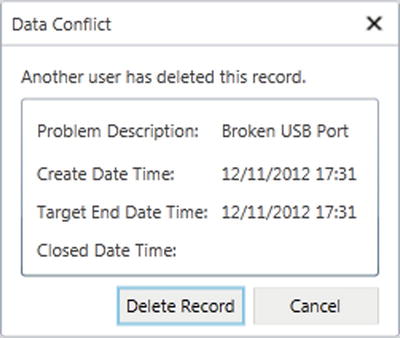
Figure 4-16. Dialog box shown to the user when a record is deleted
LightSwitch detects data conflicts by applying a row version number to each record. When the data service updates the database, it uses this to detect whether another user has modified the record by comparing the version numbers.
![]() Caution Because the data-conflict screens are autogenerated, the dialog that LightSwitch shows might contain data fields that you don’t want the user to see. If this concerns you, make sure to carry out data-conflict tests on your screens so that you can see exactly the fields that LightSwitch exposes on your data-conflict screen.
Caution Because the data-conflict screens are autogenerated, the dialog that LightSwitch shows might contain data fields that you don’t want the user to see. If this concerns you, make sure to carry out data-conflict tests on your screens so that you can see exactly the fields that LightSwitch exposes on your data-conflict screen.
EXERCISE 4.2 – VIEWING THE CONFLICT SCREEN
You can view the conflict screen by modifying the same record in two separate screens. Open the Engineer Search screen that you created in Exercise 3.3, and search for some engineers. Choose a record from the search results, and open it in the Details screen that you created in Exercise 3.1. Make a change to your record and save it. Without refreshing the results in your Search screen, edit the record in your Search screen and try saving your change. Examine the data-conflict screen that LightSwitch now shows you.
Aside from using LightSwitch’s built in data-conflict screen, you can also perform data-conflict resolution manually in code. In this example, you’ll build an issue details screen that’s designed for managers. It allows a manager to always update an issue, even if it overwrites another user’s changes.
To re-create this example, create a details screen for the Issue table and name it IssueDetailManager. When the screen designer opens, click on the Write Code button and select the saving method. Now enter the code that’s shown in Listing 4-8.
Listing 4-8. Resolving Conflicts in Code
VB:
File:HelpDeskVBClientUserCodeIssueDetailManager.vb

Private Sub IssueDetailManager_Saving(ByRef handled As Boolean)

   handled = True

   Try
      Me.DataWorkspace.ApplicationData.SaveChanges()
   Catch ex As ConcurrencyException

      For Each entityConflict In ex.EntitiesWithConflicts.OfType(Of Issue)()
         entityConflict.Details.EntityConflict.ResolveConflicts(
            Microsoft.LightSwitch.Details.ConflictResolution.ClientWins)
      Next

      Try
         Me.DataWorkspace.ApplicationData.SaveChanges()
         ShowMessageBox(
            "Your record was modified by another user. Your changes have
               been kept.")

      Catch ex2 As Exception
         ' A general exception has occurred
         ShowMessageBox(ex2.Message.ToString())
      End Try

   End Try

End Sub

C#:
File:HelpDeskCSClientUserCodeIssueDetailManager.cs

partial void IssueDetailManager_Saving(ref bool handled)
{
    handled = true;

    try
    {
        DataWorkspace.ApplicationData.SaveChanges();
    }
    catch (ConcurrencyException ex)
    {
        foreach (var entityConflict in ex.EntitiesWithConflicts.OfType<Issue>())
        {
            conflictingStatus.EntityConflict.ResolveConflicts(
               Microsoft.LightSwitch.Details.ConflictResolution.ClientWins);
        }

        try
        {
            this.DataWorkspace.ApplicationData.SaveChanges();
            this.ShowMessageBox(
              "Your record was modified by another user. Your changes have
                been kept.");
        }
        catch (Exception ex2)
        {
           // A general exception has occurred
            this.ShowMessageBox(ex2.Message.ToString());
         }
    }
}
When a data conflict occurs, the data service throws a ConcurrencyException. Handling this exception is the key to handling data conflicts in code.
The Saving method on the client includes a handled parameter. If you set this to true ![]() , LightSwitch doesn’t call the data service’s save operation. This allows you to manually call the SaveChanges method
, LightSwitch doesn’t call the data service’s save operation. This allows you to manually call the SaveChanges method ![]() and to catch the ConcurrencyException.
and to catch the ConcurrencyException.
When the data service raises a ConcurrencyException, it returns the conflicting data in a collection called EntitiesWithConflicts ![]() . LightSwitch represents conflicts by using an EntityConflict object. Figure 4-17 shows the methods that this object exposes.
. LightSwitch represents conflicts by using an EntityConflict object. Figure 4-17 shows the methods that this object exposes.
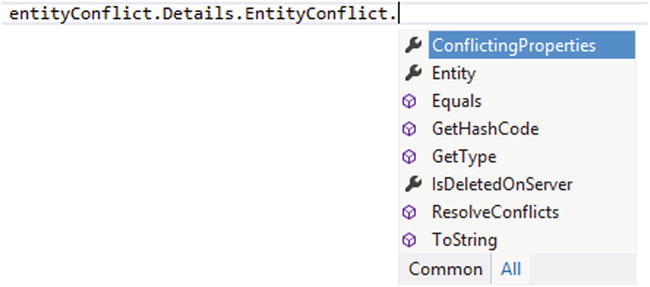
Figure 4-17. EntityConflict object
If you need to, you can also find the exact properties that are in conflict by examining the ConflictingProperties collection. The IsDeletedOnServer property returns true if another user has deleted the record.
The last part of the code resolves the conflict by calling the ResolveConflicts method ![]() . This method accepts the argument ConflictResolution.ClientWins or ConflictResolution.ServerWins. ClientWins overwrites the server copy with the out-of-date client version. ServerWins replaces the client version with the up-to-date server version.
. This method accepts the argument ConflictResolution.ClientWins or ConflictResolution.ServerWins. ClientWins overwrites the server copy with the out-of-date client version. ServerWins replaces the client version with the up-to-date server version.
To conclude this section, note that it isn’t possible to handle concurrency exceptions on the server by using a method such as SaveChanges_ExecuteFailed. This is because you can’t reinitiate a save from within the save pipeline. So even if you correct any data conflicts by writing code in the SaveChanges_ExecuteFailed method, there isn’t any way for you to save those changes.
![]() Caution Calling ResolveConflicts(ConflictResolution.ClientWins) will overwrite the server record in its entirety rather than just the properties that are in conflict. For example, if user A modifies the issue status and priority of an issue, and user B subsequently modifies just the issue status, ResolveConflicts(ConflictResolution.ClientWins) also overwrites the priority, even though the priority property is not in conflict.
Caution Calling ResolveConflicts(ConflictResolution.ClientWins) will overwrite the server record in its entirety rather than just the properties that are in conflict. For example, if user A modifies the issue status and priority of an issue, and user B subsequently modifies just the issue status, ResolveConflicts(ConflictResolution.ClientWins) also overwrites the priority, even though the priority property is not in conflict.
Summary
LightSwitch provides APIs that allow you to create, read, update, and delete data through code. It generates data-access objects with names that match the tables and fields that you’ve defined in your project. This makes it intuitive for you to access your data in code. LightSwitch exposes the nonrequired fields you defined using nullable data types. To prevent null value exceptions, use the GetValueOrDefault method to retrieve the property values.
When you write client-side screen code, you can use the Application object to access the logged-on user and to call methods to open and access screens.
Screens raise events during their life cycle. You can handle these events by choosing a method from the list that appears when you click the Write Code button. For example, you can write code in the CanRead method to apply access control, or write code in the Saved method to carry out additional tasks after a user saves a screen. If you’ve added a collection of data and want to handle the Changed or SelectionChanged events, make sure to select the collection before clicking the Write Code button. If you don’t, these methods won’t appear.
Each screen contains an independent view of the data in a data workspace. The data workspace contains a change set for each data source. When a user performs a save, the client passes the change set to the server and the processing continues via the server-side save pipeline.
There are various phases in this pipeline that allow you to inject custom code. You can access these events by clicking on the Write Code button in the table designer. The tooltip that appears against each method shows where LightSwitch executes the code. Events that execute on the server belong to the save pipeline.
For each data source, the operations that take place in the save pipeline happen inside a transaction (except when working against SharePoint data sources). If a user makes data changes in multiple tables, LightSwitch ensures that all changes succeed. In the event of any failure, LightSwitch rolls back all changes and ensures that no data is modified.
If a user attempts to make a change that overwrites a change that someone else has made, LightSwitch automatically detects the conflict and displays a conflict-resolution screen to the user. This allows the user to correct their data and to resubmit the change.