
![]()
Mastering Silverlight Screen Design
Chapter 3 introduced you to the basics of screen design. It showed you how to create screens, display data, and set up screen navigation. This chapter builds on what you’ve learned, and it shows you how to enrich your application by adding features you’ll commonly find in business applications.
In this chapter, you’ll learn how to
- Use local properties and set the value of data items in code
- Set query parameters and pass arguments into screens
- Make your UI react to data changes by handling the PropertyChanged event
This chapter shows you how to extend the HelpDesk application by adding rich screen features. You’ll find out how to create a custom search screen, and how to add a button that toggles the visibility of the search criteria options. If there are issues that are overdue, you’ll find how to highlight these details by changing the label color. You’ll also learn how to create a label that keeps a running count of the number of remaining characters that an engineer can enter when replying to an issue.
You'll also learn how to create a combined screen for creating and editing issues - this saves you from having to maintain two separate screens for this purpose. Other handy techniques that you'll learn include customizing data grid dialogs, creating nested autocomplete boxes, and bulk updating records. Finally, you'll find out how to create a screen that allows engineers to upload and download supporting documents.
Working with Screen Data
The first section of this chapter focuses on how to work with screen data. You’ll find out how to work with screen properties, and learn how to add a custom search screen to your application. This example teaches you how to bind a screen to a query and how to set query parameters.
The initial set of examples is based on the Engineer Dashboard screen, as shown in Figure 7-1.
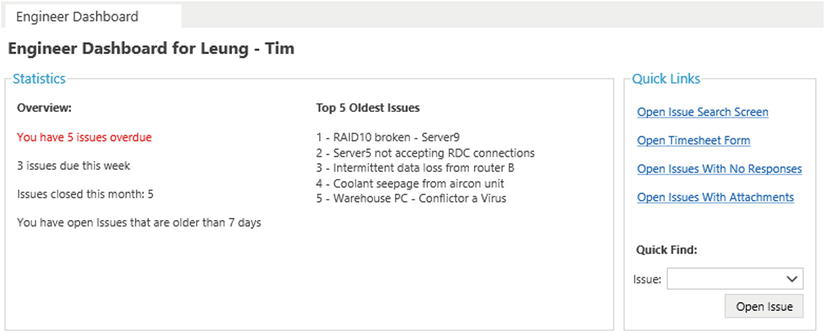
Figure 7-1. Engineer Dashboard screen
Displaying Custom Text and Information
The first part of the Statistics section shows the number of overdue cases. The technique you use to add custom text to a screen relies on local string properties, and you’ll now find out how to create these.
To create a string property that shows overdue issues, create a details screen that’s based on the Engineer entity and name your screen EngineerDashboard. Click the Add Data Item button, and add a new string property called IssuesOverdueLabel (as shown in Figure 7-2).
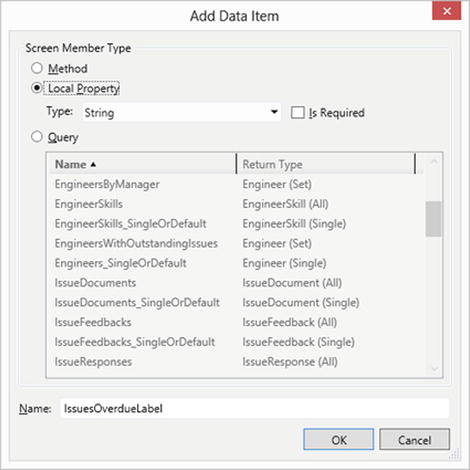
Figure 7-2. Adding a new data item
You can then set the text of this property by writing code in the InitializeDataWorkspace method. (See Listing 7-1.) This code uses the outstandingIssues query from Chapter 6 to return the issue count.
Listing 7-1. Building Text to Display on a Screen
VB:
File:HelpDeskVBClientUserCodeEngineerDashboard.vb

IssuesOverdueLabel = String.Format(
    "You have {0} issues overdue",
    outstandingIssues.Where(
        Function(item) item.TargetEndDateTime < Date.Today).
           Count().ToString()
)

C#:
File:HelpDeskCSClientUserCodeEngineerDashboard.cs

IssuesOverdueLabel = String.Format(
    "You have {0} issues overdue",
    outstandingIssues.Where(
        item => item.TargetEndDateTime < Date.Today).
           Count().ToString()
);
To display this text on your screen, simply drag the IssuesOverdueLabel property from the Screen Member list onto your Screen Content Tree. By default, LightSwitch renders IssuesOverdueLabel as a text box, so you need to change the control type to a label to render a read-only version of the data.
Local properties are a key part of screen design. Any content you want to add to a screen must be bound to a property, so you use local properties to work with data that’s disconnected from the main data on your screen.
Adding Data Controls to a Screen
The Engineer Dashboard screen includes a Quick Find feature engineers can use to quickly find and open issue records by using an autocomplete box. Therefore, you need to add an autocomplete box that’s not connected to the main data shown on your screen.
As with the string property example, you can add additional data controls by using the Add Data Item button. Because you want to add an autocomplete box that shows issues, select Issue from the type drop-down box and name your property IssueSelectionProperty.
To create the autocomplete box, simply drag IssueSelectionProperty from the Screen Member list onto your Screen Content Tree.
By default, the autocomplete box searches all records in the issue table. If you want to restrict the autocomplete box choices, create a query on the issue table and apply some filters. Add the query to your screen using the Add Data Item dialog and amend the Choices property of your autocomplete box using the Properties sheet.
To open the issue the user selects in a new screen, write code that calls the show method that relates to your issue details screen, and pass in the issue ID of the IssueSelectionProperty. You’ll see an example of how to do this later on. (See Listing 7-4.)
Setting Control Values and Default Values
You’ll often need to set the value that’s displayed on text boxes, date pickers, and other controls. In LightSwitch, you don’t set control values by accessing the Silverlight controls directly. If you recall the Model-View-ViewModel (MVVM) principles described in Chapter 1, controls are views that bind to the view model. So to set the value that’s shown on a control, you should update the value on the underlying property.
The new issue screen allows users to set a priority by using an autocomplete box. To default the priority to medium when the screen loads, add the code from Listing 7-2 to the InitializeDataWorkspace method of your screen.
Listing 7-2. Setting Control Values
VB:
File:HelpDeskVBClientUserCodeCreateNewIssue.vb

Me.IssueProperty.Priority =
   DataWorkspace.ApplicationData.Priorities.Where(
      Function(item) item.PriorityDesc = "Medium").
        FirstOrDefault()

C#:
File:HelpDeskCSClientUserCodeCreateNewIssue.cs

this.IssueProperty.Priority =
   DataWorkspace.ApplicationData.Priorities.Where(
      (item => item.PriorityDesc == "Medium").
        FirstOrDefault();
The properties you can access in code correspond to the items that the screen designer shows in the Screen Member list. (See Figure 7-3.)
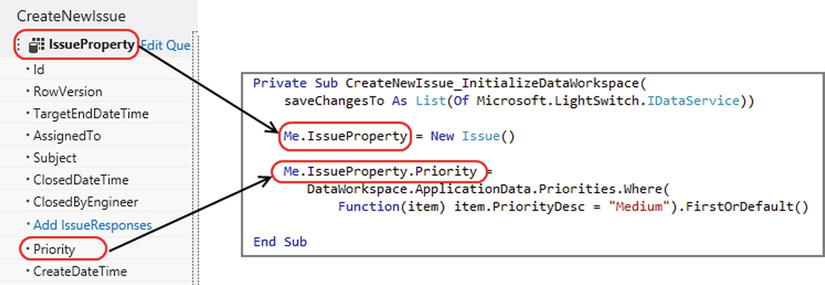
Figure 7-3. The names in code match the names in the screen designer
Notice that you cannot set the priority value by simply setting a string value of medium. Priority is a related item, so you need to assign an object that represents a medium priority to the IssueProperty.Priority property. The LINQ query shown in Listing 7-2 retrieves the medium priority by priority description, and it enables you to make this assignment.
Accessing grid and list values
If you need to reference the items shown in a data grid or data list, you can reference the underlying data collection in code. Just as before, the collection name you call in code matches the name you see in the Screen Member list. (See Figure 7-4.)
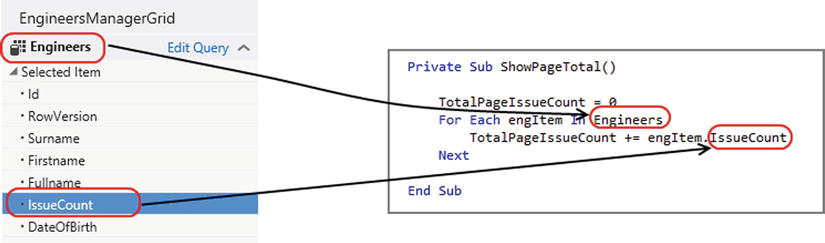
Figure 7-4. Accessing a screen collection property in code
LightSwitch exposes your data collections as visual collections (of type Microsoft.LightSwitch.Framework.Client.VisualCollection). This object contains the records LightSwitch currently shows in the data grid or list. An important point is that if you loop over the items in a visual collection, you’ll loop only through the items that are shown on the screen. The data items you can access are limited by the pagination options you configured.
Visual collections include some useful properties and methods you can use, such as adding new records and opening records in a modal window. These are shown in Table 7-1.
Table 7-1. Visual Collection Members
| Member | Description |
|---|---|
| SelectedItem | Gets or sets the record that is currently selected in the visual collection. |
| AddAndEditNew | Adds a new record to the visual collection, and opens a modal window to edit it. You can optionally supply a completeAction argument. This specifies a method to be run when the modal window is closed. |
| AddNew | Adds a new record to the visual collection. |
| EditSelected | Opens a modal window for the currently selected item. |
| DeleteSelected | Marks the currently selected record for deletion, and removes it from the visual collection. The actual deletion happens when the data workspace is saved. |
Setting the Screen Title in Code
The Engineer Dashboard screen shows a custom title rather than the engineer summary property. To set a screen title in code, you set the DisplayName property as shown in Listing 7-3.
Listing 7-3. Setting the Screen Title in Code
VB:
File:HelpDeskVBClientUserCodeEngineerDashboard.vb

Private Sub Engineer_Loaded(succeeded As Boolean)
    Me.DisplayName = "Engineer Dashboard"
End Sub

C#:
File:HelpDeskCSClientUserCodeEngineerDashboard.cs

partial void Engineer_Loaded(bool succeeded)
    this.DisplayName = "Engineer Dashboard";
End Sub
Figure 7-5 shows the screen tab title at runtime. LightSwitch also includes a method called SetDisplayNameFromEntity. You use this method to pass in an entity and to set the screen title using the summary property of the entity you supplied. By default, LightSwitch uses this method on any screens that you created based on the Details Screen template.

Figure 7-5. Setting the screen title in code
Creating an Advanced Search Screen
The HelpDesk application includes an advanced search screen engineers can use to search for issues by using multiple combinations of search criteria. This screen uses the IssueSearchAll query you created in Exercise 6.1. An important topic you’ll work with in this section is how to set query parameters.
Begin by creating an editable grid screen that uses the IssueSearchAll query, and name your screen IssueSearchAll. When you create a screen that uses a query with parameters, LightSwitch automatically creates properties and controls that allow the user to enter the parameter values.
You’ll notice that LightSwitch creates an EngineerId property and renders it as a text box onto the search screen. In terms of usability, be aware that your users won’t thank you for making them search for issues by the numeric engineer ID. A much better approach is to show the engineer names in an autocomplete box, and to bind the selected engineer ID to your query parameter.
To do this, create an autocomplete box in the same way as in the earlier example by adding a local engineer property called EngineerSelectionProperty. Now use the Properties sheet to set the Parameter Binding value to the ID value of EngineerSelectionProperty, as shown in Figure 7-6. You can now delete the autogenerated EngineerId property because it’s no longer needed.
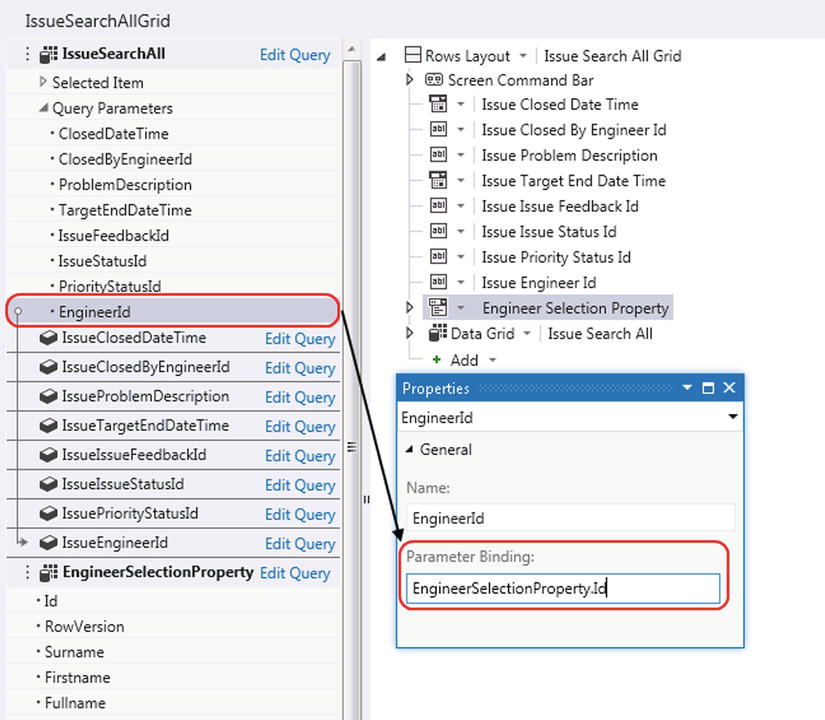
Figure 7-6. Setting parameter values
When you run this screen, you’ll be able to use the autocomplete box to filter the issues by engineer. (You’ll extend this screen in the “Hiding and Showing Controls” section later in this chapter.)
EXERCISE 7.1 – CREATING A SEARCH SCREEN
Extend your Search screen to allow users to find issues that were created between a user-specified start date and end date. To build this feature, you need to modify the IssueSearchAll query so that it includes StartDate and EndDate parameters. You need to create query filters to return issues where the create date is greater than or equal to the StartDate parameter, and less than or equal to the EndDate parameter. After you edit your query, modify your Search screen to allow users to enter the start and end dates. Write some screen-validation code to prevent users from entering a start date that’s greater than the end date. To make it easier for the user, write code that defaults the end date to five days after the start date if the end date is empty.
This next section focuses on managing screens. You’ll find out how to create commands that open screens, define screen parameters, and pass arguments to screens.
Opening Screens from Buttons or Links
In Chapter 3, you learned how to launch child screens by adding labels and setting their Target Screen properties. A disadvantage of this approach is that it’s tricky to alter the text shown on the label, and you can choose to open only details screens that match the entity shown on your label. I’ll now show you another approach you can use to open screens.
The Quick Links section in the Engineer Dashboard provides the user with quick access to other screens. These links are bound to screen commands. You use screen commands to add buttons or links to perform some action in code.
To create a new command, select a group container, such as a Rows Layout, right-click, and select the Add Button option. After you add the button, you can use the Properties sheet to change the control to a link. (See Figure 7-7.)
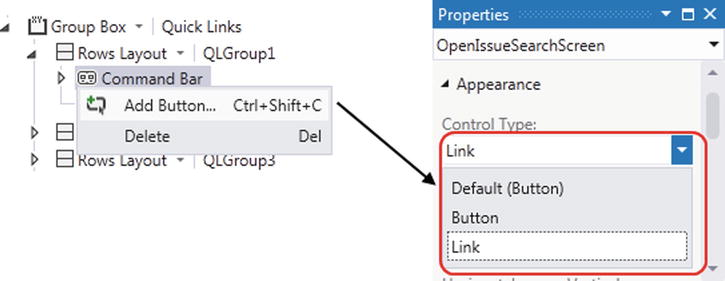
Figure 7-7. Creating a link
Although it’s fairly simple to add a button or link, the actual screen layout takes a bit of effort. Figure 7-8 shows you how this layout looks at design time compared with how it looks at runtime. Notice how the layout uses sets of groups, each containing one command. To make sure all your links line up, you need to verify that the horizontal alignment settings are all set to left rather than stretch.
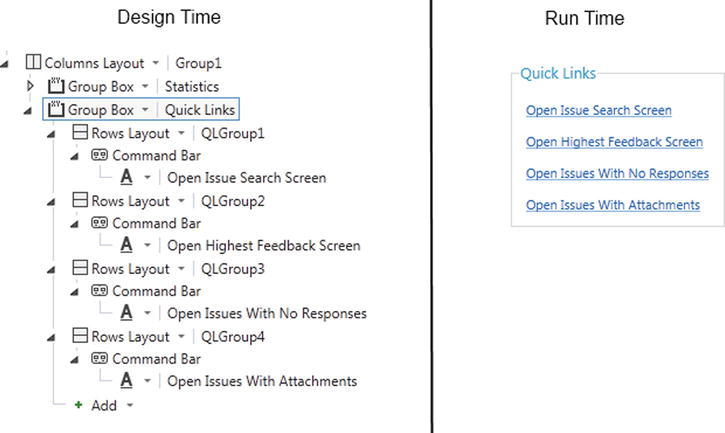
Figure 7-8. Laying out your screen
Laying out controls at design time is difficult because you can’t visualize how your screen will appear. As I mentioned in Chapter 3, the trick to effective layout design is to use the runtime screen designer. By doing so, you can change the appearance settings and immediately see the effect the change has on your running screen.
Once you create your command, you can double-click it to open the code window. Here, you can write code that uses the Application object’s Show methods to open your screens (as discussed in Chapter 4).
Another area where you’ll want to open screens is through a cell on a data grid. Chapter 3 showed you how to do this by using labels and specifying the link settings. The problem with this approach is that you can open only details screens that match the entities shown in the grid. Another problem is that the data grid binds the display text to a property, which means you can’t use static text.
The way around this problem is to use a grid row command. In the designer, expand the Command Bar group in the Data Grid Row, and click the Add button to add a new button. In this example, the grid row command is called ViewDashboard.
Figure 7-9 shows an engineer selection page that’s used by managers. It includes two links that appear on the right side of the grid to allow a manager to view the dashboard and time-tracking screens for an engineer.
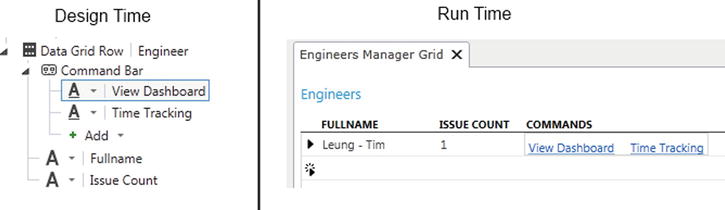
Figure 7-9. Adding command buttons on a grid
The code that opens the dashboard is shown in Listing 7-4. Notice how the code uses the SelectedItem property of the visual collection to return the ID of the engineer in the selected row.
Listing 7-4. Opening Screens from a Data Grid Command
VB:
File:HelpDeskVBClientUserCodeEngineersManagerGrid.vb

Private Sub ViewDashboard_Execute()
    Application.ShowEngineerDashboard(
        Engineers.SelectedItem.Id)
End Sub

C#:
File:HelpDeskCSClientUserCodeEngineersManagerGrid.cs

partial void ViewDashboard_Execute()
    this.Application.ShowEngineerDashboard(
        Engineers.SelectedItem.Id);
End Sub
Refreshing All Open Screens
The dashboard page includes a link to refresh all screens that are open in the application. The code that performs this refresh is shown in Listing 7-5.
Listing 7-5. Refreshing All Open Screens
VB:
File:HelpDeskVBClientUserCodeEngineerDashboard.vb

Dim screens = Me.Application.ActiveScreens()
For Each s In screens
Dim screen = s.Screen
    screen.Details.Dispatcher.BeginInvoke(
         Sub()
            screen.Refresh()
         End Sub)
Next

C#:
File:HelpDeskCSClientUserCodeEngineerDashboard.cs

var screens = this.Application.ActiveScreens;
foreach (var s in screens)
{
    var screen = s.Screen;
    screen.Details.Dispatcher.BeginInvoke(() =>
    {
        screen.Refresh();
    });
}
This code uses the Application object’s ActiveScreens ![]() collection to find all open screens. It then calls the Refresh method
collection to find all open screens. It then calls the Refresh method ![]() on each screen. The code needs to call the Refresh method on the same thread that owns the screen. The threading code in
on each screen. The code needs to call the Refresh method on the same thread that owns the screen. The threading code in ![]() invokes the logic on the correct thread, and you’ll learn more about this in the “Working with Threads” section.
invokes the logic on the correct thread, and you’ll learn more about this in the “Working with Threads” section.
Passing Arguments into Screens
You can use the screen designer to create screen parameters that accept arguments when you open a screen.
The first link in the Quick Links section opens the custom search screen you created earlier. This example shows you how to supply an engineer property to the Search screen when it opens. This allows you to default the engineer autocomplete box to the value that’s passed to it from the Engineer Dashboard screen.
To turn your Search screen’s engineer property into a parameter, select the engineer property and select the Is Parameter check box as shown in Figure 7-10.
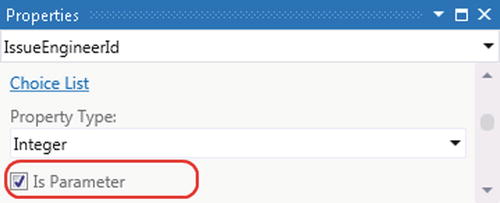
Figure 7-10. Defining screen parameters
To pass an engineer to the Search screen, you can simply call the screen’s show method and provide the engineer you want to use. The code in Listing 7-6 passes to the Search screen the engineer that’s represented by the dashboard screen’s engineer property.
Listing 7-6. Passing Screen Parameters
VB:
File:HelpDeskVBClientUserCodeEngineerDashboard.vb

Private Sub OpenIssueSearchScreen_Execute()
    Application.ShowIssueSearchAll (Me.Engineer.Id)
End Sub

C#:
File:HelpDeskCSClientUserCodeEngineerDashboard.cs

partial void OpenIssueSearchScreen_Execute(){
    this.Application.ShowIssueSearchAll (this.Engineer.Id);
}
If you defined multiple parameters, IntelliSense shows you the correct order in which to pass in the arguments.
Creating a Continuous New Data Screen
The screens you create with the New Data Screen template behave in a specific way. When a user saves her record, LightSwitch closes the screen and reopens the record by using the Details Screen for your entity.
In some circumstances, you might want to allow the user to immediately enter another record rather than show the newly created record in a details screen.
To make this change, open the code file for your New Data Screen and delete the two lines in the Saved method that closes the screen and reopens the entity in the details screen. (See Listing 7-7.) To allow the entry of another new record, add a line that creates an instance of a new entity.
Listing 7-7. Reset the New Data Screen After a Save
VB:
File:HelpDeskVBClientUserCodeCreateNewIssue.vb

Private Sub CreateNewIssue_Saved()
    'Delete the auto generated lines below
    'Me.Close(False)
    'Application.Current.ShowDefaultScreen(Me.IssueProperty)
    Me.IssueProperty = New Issue
End Sub

C#:

File:HelpDeskCSClientUserCodeCreateNewIssue.cs

partial void CreateNewIssue_Saved(){
    //Delete the auto generated lines below
    //this.Close(false);
    //Application.Current.ShowDefaultScreen(Me.IssueProperty);
    this.IssueProperty = new Issue();
}
Showing MessageBox and InputBox alerts
You use the ShowMessageBox method to show an alert or to prompt the user to confirm an action. Listing 7-8 demonstrates this method.
Listing 7-8. Displaying a Message Box
VB:
File:HelpDeskVBClientUserCodeSetup.vb

Private Sub ArchiveIssues_Execute()
    If Me.ShowMessageBox(
            "Are you sure you want delete all issues older than 12 months?",
            "Confirm Delete", MessageBoxOption.YesNo) =
            System.Windows.MessageBoxResult.Yes Then
        DeleteOldIssues()
    End If
End Sub

C#:
File:HelpDeskCSClientUserCodeSetup.cs

partial void ArchiveIssues_Execute()
{
    if (this.ShowMessageBox(
        "Are you sure you want delete all issues older than 12 months?",
        "Confirm Delete", MessageBoxOption.YesNo) ==
        System.Windows.MessageBoxResult.Yes)
    {
        DeleteOldIssues();
    }
}
This code refers to a button on a screen that allows a user to delete old issues. You use the ShowMessageBox method to pass in a message, a caption, and an argument that specify the buttons that are shown. You use the return value to control the logic flow in your application. So in this example, the code executes a user-defined method called DeleteOldIssues if the user clicks the message box’s Yes button.
If you want to display a dialog that allows the user to enter some text, you can use the ShowInputBox method rather than the ShowMessageBox method. Figure 7-11 illustrates what these dialog boxes look like at runtime.
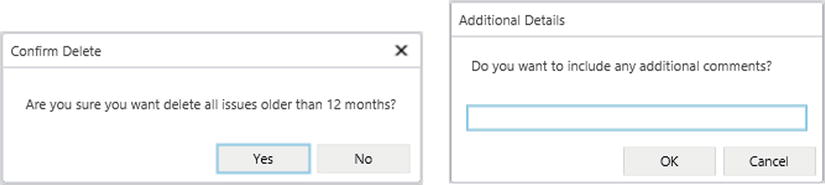
Figure 7-11. ShowMessageBox and ShowInputBox dialogs
Working with Controls
This section focuses on how to use controls in code. It includes information about how to toggle the visibility of controls, set the focus to a control, and obtain references in code to set other attributes and to handle events.
Finding Controls Using FindControl
The key to working with controls is to use the FindControl method. This returns an object of type IContentItemProxy, which represents LightSwitch’s View-Model object. The IContentItemProxy members you can access are shown in Table 7-2.
Table 7-2. IContentItemProxy Methods and Properties
| Methods/Properties | Description |
|---|---|
| Focus | LightSwitch sets the focus to the control when you call this method. |
| DisplayName | Allows you to change the display name of your control. LightSwitch uses the display name value to set the label text for your control. |
| IsEnabled | If you set this to false, LightSwitch disables the control. The control will still be visible, but it will be grayed out. |
| IsReadOnly | If you set this to true, the control becomes read-only and the user won’t be able to edit the contents of the control. |
| IsVisible | LightSwitch hides the control if you set this to false. |
| SetBinding | This method allows you to perform data binding. |
As you can see, there are some useful properties you can access, especially the IsVisible and IsEnabled properties.
A related method is the FindControlInCollection method. You use this to obtain an IContentItemProxy reference to a control that belongs inside a data grid (or any control that shows a collection of data, such as a list). You’ll see an example of how to use this method later on.
Setting the focus to a control
By using IContentItemProxy’s Focus method, you can set the focus to a specific control. Listing 7-9 shows you how to set the focus to the Problem Description field on a screen that allows users to enter new issues.
Listing 7-9. Setting the Focus to a Control
VB:
File:HelpDeskVBClientUserCodeCreateNewIssue.vb

Me.FindControl("ProblemDescription").Focus()

C#:
File:HelpDeskCSClientUserCodeCreateNewIssue.cs

this.FindControl("ProblemDescription").Focus();
The FindControl method requires you to pass in the name of the control, which you can find in the Properties sheet.
If your code doesn’t work, double-check the name you pass into this method. Because you can add multiple controls that bind to the same property on a screen, the control you want to use might not match the name of your property. For example, your control might be named ProblemDescription1 if you’ve added more than one problem description control to your screen.
Hiding and showing controls
The issue search screen contains multiple search fields. This example shows you how to tidy up this screen by adding a button that toggles the view between simple and advanced modes. In advanced mode, the screen shows a full set of filter options, whereas in simple mode, several of the filter options are hidden.
To create this example, open the IssueSearchAll screen you created earlier in this chapter and carry out the following steps:
- Create two Rows Layout controls called SimpleGroup and AdvancedGroup. In the Properties sheet for the AdvancedGroup layout, set the Is Visible property to false.
- Add a new button in the command bar of SimpleGroup, and name your button ToggleVisibility. Set the Display Text property of this button to Show Advanced Filters.
- Move the engineer and problem description controls into the simple group. Move the remaining controls into the advanced group. The layout of your screen should now appear as shown in Figure 7-12.
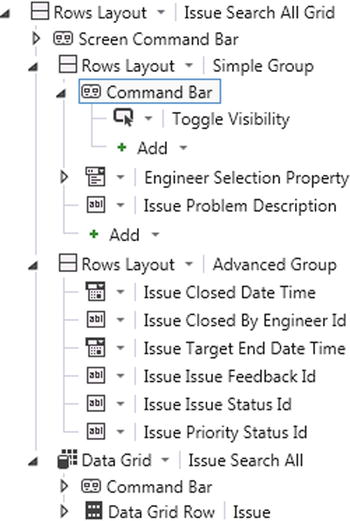
Figure 7-12. Hiding and showing controls
Add the code shown in Listing 7-10. Notice how it uses the FindControl method to toggle the visibility of the Rows Layout that contains the advanced controls ![]() and also sets the display text of the button depending on the mode that’s selected
and also sets the display text of the button depending on the mode that’s selected ![]() .
.
Listing 7-10. Hiding and Showing Controls
VB:
File:HelpDeskVBClientUserCodeIssueSearchAll.vb

Private Sub ToggleVisibility_Execute()
    Dim rowLayout = Me.FindControl("AdvancedGroup")
    rowLayout.IsVisible = Not (rowLayout.IsVisible)

    If rowLayout.IsVisible Then
        Me.FindControl("ToggleVisibility").DisplayName =
           "Show Simple Filters"
    Else
        Me.FindControl("ToggleVisibility").DisplayName =
           "Show Advanced Filters"
    End If
End Sub

C#:
File:HelpDeskCSClientUserCodeIssueSearchAll.cs

partial void ToggleVisibility_Execute()
{
    var rowLayout = this.FindControl("AdvancedGroup");
    rowLayout.IsVisible = !(rowLayout.IsVisible);

    if (rowLayout.IsVisible)
       {
        this.FindControl("ToggleVisibility").DisplayName =
           "Show Simple Filters";
       }
    else
       {
        this.FindControl("ToggleVisibility").DisplayName =
           "Show Advanced Filters";
       }
}
You’re now ready to run your screen, and Figure 7-13 shows how it looks at runtime. As the image shows, the ToggleVisibility button allows the user to hide and show the advanced search options.
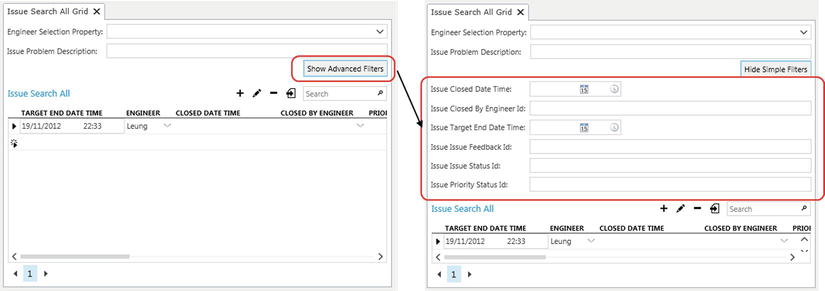
Figure 7-13. Clicking the button toggles the visibility of the Advanced group
![]() Caution For the sake of brevity, most of the code samples don’t contain the checks and exception handling you’d normally add to a production application. In this example, it’s a good idea to test that rowLayout isn’t null before setting its properties.
Caution For the sake of brevity, most of the code samples don’t contain the checks and exception handling you’d normally add to a production application. In this example, it’s a good idea to test that rowLayout isn’t null before setting its properties.
Making check boxes read-only
Check boxes have an annoying problem: they don’t honor the read-only setting you applied in the Properties sheet for your check box. To make them read-only, you need to write code.
This example features an editable grid screen that's based on the Engineer table, and shows you how to disable a check box called SecurityVetted. To create this example, add an editable grid screen, choose the engineer table from the screen data drop-down, and name your screen EngineersManagerGrid. Now add the code that's shown in Listing 7-11 to the InitializeDataWorkspace method of your screen.
Listing 7-11. Making Check Boxes Read-Only
VB:
File:HelpDeskVBClientUserCodeEngineersManagerGrid.vb

For Each eng In Engineers
    Me.FindControlInCollection(
        "SecurityVetted", eng).IsEnabled = False
Next

C#:
File:HelpDeskCSClientUserCodeEngineersManagerGrid.cs

foreach (Engineer eng in Engineers)
{
    this.FindControlInCollection(
        "SecurityVetted", eng).IsEnabled = false;
}
Because you need to make each check box in every row of your data grid read-only, the code begins by looping through the Engineers collection ![]() . It obtains an IContentItemProxy object for each engineer in the collection by calling the FindControlInCollection method and supplying an engineer object. It disables the check box by setting the IsEnabled property to false
. It obtains an IContentItemProxy object for each engineer in the collection by calling the FindControlInCollection method and supplying an engineer object. It disables the check box by setting the IsEnabled property to false ![]() .
.
Reference the Underlying Silverlight Control
As you’ll recall from Figure 7-1, the Engineer Dashboard screen displays the number of outstanding issues. If the number of outstanding issues exceeds 10, the label should be shown in red.
Although you can use the IContentItemProxy object to set the visibility, focus, and read-only state of a control, you cannot use it to access other control attributes. To do this, you need to reference the underlying Silverlight control.
Once again, this requires you to use the FindControl method to return an IContentItemProxy object. This provides you with two ways to access the Silverlight control. You can either handle the ControlAvailable event or data-bind your screen properties to dependency properties on your control by calling the SetBinding method. Chapter 9 shows you how to apply the SetBinding technique.
To use the ControlAvailable method, add the code in Listing 7-12 to the InitializeDataWorkspace method of your Engineer Dashboard screen.
Listing 7-12. Referencing a Control Using ControlAvailable
VB:
File:HelpDeskVBClientUserCodeEngineerDashboard.vb

AddHandler Me.FindControl("IssuesOverdueLabel").ControlAvailable,
    Sub(sender As Object, e As ControlAvailableEventArgs)
    Dim issueLabel = CType(e.Control,
        System.Windows.Controls.TextBlock)
    issueLabel.Foreground = New SolidColorBrush(Colors.Red)
End Sub

C#:
File:HelpDeskCSClientUserCodeEngineerDashboard.cs

using System.Windows.Media;

var control = this.FindControl("IssuesOverdueLabel");

control.ControlAvailable +=
(object sender, ControlAvailableEventArgs e) =>
{
    var issueLabel =
        (System.Windows.Controls.TextBlock)e.Control;
    issueLabel.Foreground = new SolidColorBrush(Colors.Red);
};
When you handle the ControlAvailable event, the ControlAvailableEventArgs parameter allows you to access the underlying Silverlight control.
Because you know that LightSwitch labels are rendered as a Silverlight Text Blocks, you can simply declare a variable and cast IssuesOverdueLabel to an object of type System.Windows.Controls.TextBlock ![]() . This allows you to access all of the text-block properties in code and to set the foreground color
. This allows you to access all of the text-block properties in code and to set the foreground color ![]() .
.
If you want to access a LightSwitch control in code but don’t know what the underlying Silverlight type is, you can handle the ControlAvailable event, set a breakpoint in this method, and query e.Control.GetType() in the immediate window.
As the name suggests, LightSwitch fires the ControlAvailable event when the control becomes available. This means that when you write code that handles this event, you won’t encounter the errors that might occur if you try to access the control too early.
Handling Silverlight Control Events
When you write code in the ControlAvailable method, you can also add event handlers to handle the events raised by the Silverlight control.
To give you an example of the sorts of events you can handle, Table 7-3 shows you some of the events that the Silverlight text-box control raises. There are many more events you can use; this table shows only a subset, but it gives you a flavor of the sort of events you can handle.
Table 7-3. Events Raised by the Silverlight Text-Box Control
| Event | Description |
|---|---|
| GotFocus | Occurs when the text box receives the focus. |
| KeyDown | Occurs when a user presses a keyboard key while the text box has focus. |
| KeyUp | Occurs when a user releases a keyboard key while the text box has focus. |
| LostFocus | Occurs when the text box loses focus. |
| SelectionChanged | Occurs when the text selection has changed. |
| TextChanged | Occurs when content changes in the text box. |
The Issue Response screen allows engineers to respond to users. The maximum response text allowed is 1000 characters.
This example shows you how to provide the user with a running count of the number of remaining characters as soon as they’re entered by the user.
To create this example, create a new screen based on the Issue Response table, add a new local integer property called ResponseTextCount, and enter the code shown in Listing 7-13.
Listing 7-13. Handling the Text Box KeyUp Event
VB:
File:HelpDeskVBClientUserCodeCreateNewIssueResponse.vb

Private Sub CreateNewIssueResponse_InitializeDataWorkspace(
   saveChangesTo As List(Of Microsoft.LightSwitch.IDataService))
    Me.IssueResponseProperty = New IssueResponse()

    Dim control = Me.FindControl("ResponseText")
    AddHandler control.ControlAvailable,
        AddressOf TextBoxAvailable

    ResponseTextCount = 1000

End Sub

Private Sub TextBoxAvailable(
   sender As Object, e As ControlAvailableEventArgs)
    AddHandler CType(e.Control,
        System.Windows.Controls.TextBox).KeyUp,
            AddressOf TextBoxKeyUp
End Sub

Private Sub TextBoxKeyUp(
    sender As Object, e As System.Windows.RoutedEventArgs)

    Dim textbox = CType(sender, System.Windows.Controls.TextBox)
    ResponseTextCount = 1000 - textbox.Text.Count()
End Sub

C#:
File:HelpDeskCSClientUserCodeCreateNewIssueResponse.cs

partial void CreateNewIssueResponse_InitializeDataWorkspace(
    List<IDataService> saveChangesTo)
{
    this.FindControl("ResponseText").ControlAvailable += TextBoxAvailable;
    ResponseTextCount = 1000;

}

private void TextBoxAvailable(object sender, ControlAvailableEventArgs e)
{
    ((System.Windows.Controls.TextBox)e.Control).KeyUp += TextBoxKeyUp;
}

private void TextBoxKeyUp(object sender, System.Windows.RoutedEventArgs e)
{
    var textbox = (System.Windows.Controls.TextBox)sender;
    ResponseTextCount = 1000 - textbox.Text.Count();
}
When the screen first loads, the code in the InitializeDataWorkspace method adds an event handler called TextBoxAvailable, which handles the ControlAvailable event of the ResponseText text box ![]() . This initial code also initializes the ResponseTextCount to 1000.
. This initial code also initializes the ResponseTextCount to 1000.
When the ResponseText control becomes available, the code adds an event handler called TextBoxKeyUp that handles the KeyUp event of the control ![]() .
.
The TextBoxKeyUp method runs whenever the user types a character into the response text text box, and it recalculates the number of remaining characters ![]() . Figure 7-14 shows how the screen appears at runtime.
. Figure 7-14 shows how the screen appears at runtime.
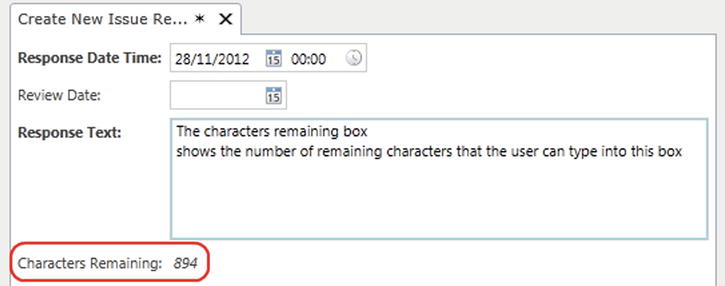
Figure 7-14. Screen that shows the number of remaining characters
You now know how to work with data, screens, and controls. This section combines the content that you learned so far and presents some practical examples of screen design.
Designing an Add/Edit Screen
As you now know, you can create screens to view data by using the Details Screen template. For adding data, you can add a screen that uses the New Data template. However, LightSwitch doesn’t include a screen template you can use to both edit and view data using the same screen.
In this example, you’ll find out how to create a combined Add and Edit screen. If you need to create screens that look consistent for adding and viewing data, this technique saves you from having to carry out the same customization in two places. It’ll also make your application more maintainable because there’ll be fewer screens to maintain in your application.
Here are the steps to build a combined add/edit screen:
- Create a details screen for the issue entity, and make it the default screen. Name your screen AddEditIssue.
- LightSwitch creates an ID property called IssueId. Make this optional by deselecting the Is Required check box.
- Click the Add Data Item button, and add a local property of data type issue. Name this IssueProperty.
- Delete the content on the screen that’s bound to the issue query.
- Re-create the screen controls by dragging the IssueProperty property onto the Screen Content Tree. By default, LightSwitch creates IssueProperty as an autocomplete box. Change the control type to Rows Layout.
Now add the following code to the query’s loaded method, as shown in Listing 7-14.
Listing 7-14. Issue Add and Edit Code
VB:
File:HelpDeskVBClientUserCodeAddEditIssue.vb

Private Sub Issue_Loaded(succeeded As Boolean)

    If Not Me.IssueId.HasValue Then
        Me.IssueProperty = New Issue()
    Else
        Me.IssueProperty = Me.Issue
    End If

    Me.SetDisplayNameFromEntity(Me.Issue)

End Sub

C#:
File:HelpDeskCSClientUserCodeAddEditIssue.cs

partial void Issue_Loaded(bool succeeded)
{
    if (!this.IssueId.HasValue)
    {
        this.IssueProperty = new Issue();
    }
    else
    {
        this.IssueProperty = this.Issue;
    }
    this.SetDisplayNameFromEntity(this.IssueProperty);
}
When you create a screen that uses the Details Screen template, LightSwitch creates a query that returns a single issue using the primary key value. It creates a screen parameter/property called IssueId.
If all of your screen controls are bound to this query, your screen won’t work in Add mode. Therefore, you need to create a local property called IssueProperty and bind the UI controls on your screen to this property.
You then need to make the IssueId screen parameter optional. If the code that opens the screen doesn’t supply an IssueId value, the code sets IssueProperty to an instance of a new issue ![]() and allows the user to enter a new issue.
and allows the user to enter a new issue.
If the code that opens the screen supplies an IssueId, the code sets IssueProperty to the issue that’s returned by the issue query ![]() .
.
Because you set this screen as the default screen, any issue you display using the summary control will use this screen.
The code in Listing 7-15 shows the code that’s used on the Engineer Dashboard screen to open the screen in Add mode.
Listing 7-15. Opening the Combination Screen to Add a New Record
VB:
File:HelpDeskVBClientUserCodeEngineerDashboard.vb

Private Sub OpenNewIssueScreen_Execute()
    Application.ShowAddEditIssue(Nothing)
End Sub

C#:
File:HelpDeskCSClientUserCodeEngineerDashboard.cs

partial void OpenNewIssueScreen_Execute()
{
    this.Application.ShowAddEditIssue(null);
}
![]() Tip If you find yourself repeating the same tasks during screen design, you can save yourself time in the long run by creating extensions. Chapter 13 shows you how to create a screen template extension you use to create add/edit screens without having to carry out the tasks that are shown here every time.
Tip If you find yourself repeating the same tasks during screen design, you can save yourself time in the long run by creating extensions. Chapter 13 shows you how to create a screen template extension you use to create add/edit screens without having to carry out the tasks that are shown here every time.
Customizing Data Grid Dialogs
The Data Grid control includes buttons that enable users to add and edit records. But the data entry screens that LightSwitch shows are autogenerated and can’t be modified. (See Figure 7-15.)
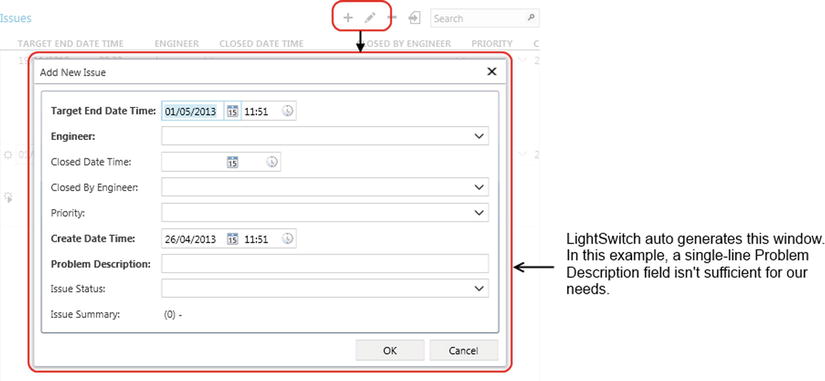
Figure 7-15. Data grid dialogs are not customizable
If you want to customize the data entry windows that open up from the data grid, remove the default Add and Edit buttons and build your own modal window.
In this example, you’ll customize the data grid on the issue search screen. You’ll modify the autogenerated window shown in Figure 7-15 to hide the issue closing details and make the Problem Description field multiline.
Here are the steps that you need to carry out to build a custom modal window screen:
- Open your issues search screen (IssueSearchAll).
- At the root level of the screen, add a new group and change the group type to Modal Window. Name this group IssueWindow.
- Add the data items you want to show by dragging them from the IssueSearchAll
 SelectedItem property onto your modal window. Make the Problem Description field multiline by setting the lines property to a value greater than 1.
 - Add an OK button to your modal window by right-clicking the modal window group and choosing the Add Button option. Name your button SaveItem. Now add a Cancel button and call it CancelItem.
- Hide the modal window’s Show button by deselecting the Show Button check box in the Properties sheet. You’ll be opening this modal window in code, so the default Show button isn’t necessary.
- Delete the data grid’s Add, Edit, and Delete buttons in the command bar of your data grid (if they exist).
- Add new Add, Edit, and Delete buttons in your data grid’s Command Bar section. (Name these methods AddItem, EditItem, and DeleteItem.) Create their Execute methods.
You screen should now look like Figure 7-16. Now add the code that’s shown in Listing 7-16.
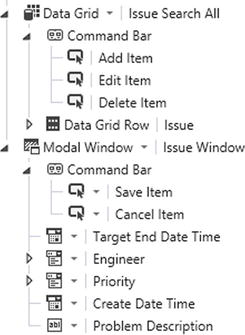
Figure 7-16. Creating the modal window
Listing 7-16. Controlling the Custom Modal Window
VB:
File:HelpDeskVBClientUserCodeIssueSearchAll.vb

Private Sub AddItem_Execute()
    Issues.AddNew()
    Me.OpenModalWindow("IssueWindow")
End Sub

Private Sub EditItem_Execute()
    Me.OpenModalWindow("IssueWindow")
End Sub

Private Sub SaveItem_Execute()
    Me.CloseModalWindow("IssueWindow")
End Sub

Private Sub CancelItem_Execute()
    CType(Issues.SelectedItem, Issue).Details.DiscardChanges()
    Me.CloseModalWindow("IssueWindow")
End Sub

C#:
File:HelpDeskCSClientUserCodeIssueSearchAll.cs

partial void AddItem_Execute()
{
    Issues.AddNew();
    this.OpenModalWindow("IssueWindow");
}

partial void EditItem_Execute()
{
    this.OpenModalWindow("IssueWindow");
}

partial void SaveItem_Execute()
{
    this.CloseModalWindow("IssueWindow");
}

partial void CancelItem_Execute()
{
   ((Issue)Issues.SelectedItem).Details.DiscardChanges();
    this.CloseModalWindow("IssueWindow");
}
LightSwitch includes two methods you use to work with modal windows (the OpenModalWindow and CloseModalWindow methods). Both of these methods require you to supply the name of the modal window you want to open or close.
The Add Item button creates a new issue by calling the visual collection’s AddNew method ![]() . Once you add a new issue, the new issue becomes the selected item. When the code opens your modal window
. Once you add a new issue, the new issue becomes the selected item. When the code opens your modal window ![]() , it’ll show the new record because the contents of the modal window are bound to the visual collection’s selected item.
, it’ll show the new record because the contents of the modal window are bound to the visual collection’s selected item.
The Edit button simply calls the OpenModalWindow method ![]() and displays the issue that’s currently selected in the data grid. Both the Save and Cancel buttons close the modal window by calling the CloseModalWindow method. The Cancel button calls the DiscardChanges method
and displays the issue that’s currently selected in the data grid. Both the Save and Cancel buttons close the modal window by calling the CloseModalWindow method. The Cancel button calls the DiscardChanges method ![]() to undo any changes that have been made to the issue. This method restores the issue to the state it was in when the screen was first loaded. Unfortunately, it isn’t simple to undo only the changes that the user made in the modal window without writing lots of extra code.
to undo any changes that have been made to the issue. This method restores the issue to the state it was in when the screen was first loaded. Unfortunately, it isn’t simple to undo only the changes that the user made in the modal window without writing lots of extra code.
Figure 7-17 shows how the screen looks at runtime. As you can see, this is big improvement over the autogenerated window. (See Figure 7-15.)
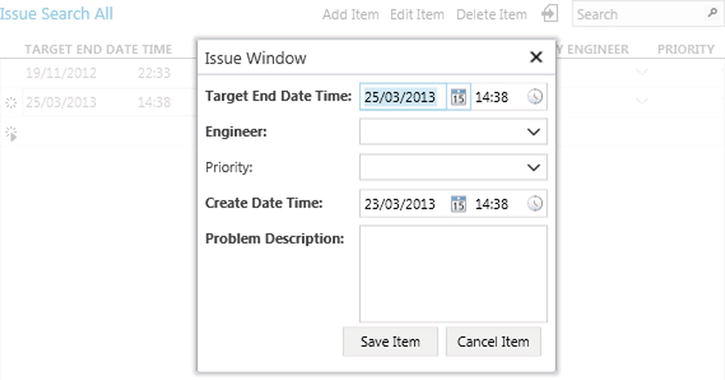
Figure 7-17. Customized data grid dialog
To extend this sample further, you can set the title of the modal window so that it shows the entity that’s being edited. To do this, you set the DisplayName property of the modal window by calling the FindControl method. You can also change the text buttons to image buttons by using the option in the Properties sheet.
Nesting Autocomplete Boxes
Another scenario you might encounter is the need to create sets of nested autocomplete boxes.
In this example, you’ll create an editable grid screen called IssuesByUser that allows managers to find issues filtered by user. This screen contains an autocomplete box that shows a list of departments. When the user selects a department, it populates a second autocomplete box that shows the users who belong in the department.
To carry out this example, you need to create a couple of queries. The first query returns a set of issues that are filtered by user. This query populates the main data grid that’s shown on the screen. The second query returns a list of users filtered by department. It’s used to populate the second autocomplete box.
Here are the steps you need to carry out to create these queries:
- Create a query called IssuesByUsers that filters the User Id property by an integer parameter called UserId.
- To allow the Users autocomplete box to be filtered by department, create a query called UsersByDepartment on the User table. Filter the Department Id property by a new parameter called DepartmentId. Both of these queries are shown in Figure 7-18.
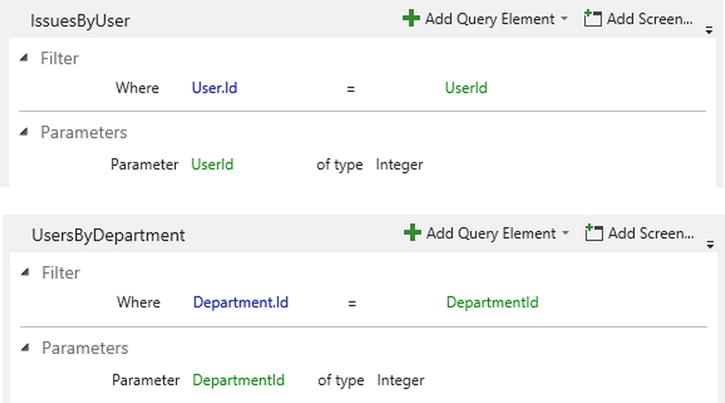
Figure 7-18. IssuesByUser and UsersByDepartment queries
Now create an editable screen based on the IssuesByUser query, and name your screen IssuesByUserGrid. Carry out the remaining steps in the screen designer:
- Add two autocomplete boxes to your screen by adding a local department property called DepartmentProperty and a local user property called UserProperty.
- Create autocomplete boxes by dragging these properties onto your screen.
- Click the Add Data Item button, and add the UsersByDepartment query you created earlier.
- Set the DepartmentId parameter value of your UsersByDepartment query to the value that’s selected in the department AutoCompleteBox. To do this, select the DepartmentId parameter and set the parameter binding to DepartmentProperty.Id.
- Select your Users autocomplete box, and view the Properties sheet. Use the Choices drop-down list to change the data source from Users to UsersByDepartment.
- Change the parameter binding of the IssuesByUser UserId parameter so that it points to UserProperty.Id rather than the default binding of IssueUserId that LightSwitch sets up for you.
When you run your screen, the Users autocomplete box will be filtered by the value that the user selects in the department autocomplete box, as shown in Figure 7-19. As you’ll notice, the presentation of this screen has been improved by placing the autocomplete boxes in a group and providing more friendly descriptions.
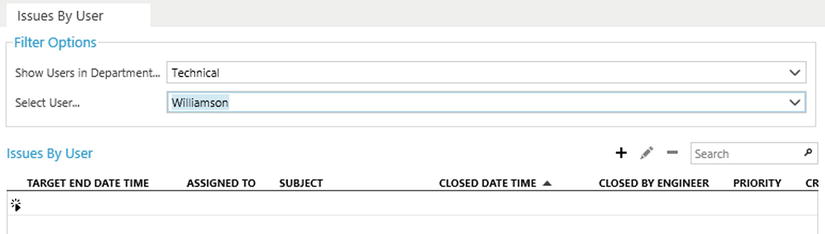
Figure 7-19. Nested autocomplete box at runtime
Bulk Updating Records by Using a Multiselect Grid
One of the limitations of the built-in data grid is that you can’t select multiple records. In this example, you’ll modify the IssuesManagerGrid so that it allows managers to close multiple issues.
To begin, you need to add a reference to the System.Windows.Controls.Data assembly. To do this, follow these steps:
- Switch your project to File View and right-click your Client project.
- Choose the Add Reference option, and select the System.Windows.Controls.Data assembly.
Now return to Logical View and carry out the following tasks:
- Create an editable grid screen based on the issue entity, and name it IssuesManagerGrid.
- Click the Add Data Item button, and add a new method called CancelSelectedIssues.
- Create a button by dragging the CancelSelectedIssues method onto a suitable place in your screen.
- Add the code that’s shown in Listing 7-17.
Listing 7-17. Bulk-Closing Multiple Records
VB:
File:HelpDeskVBClientUserCodeIssuesManagerGrid.vb

Private WithEvents _datagridControl As DataGrid = Nothing

Private Sub IssuesManagerGrid_Created()
    '  1 Replace grid with the name of your data grid control
    AddHandler Me.FindControl("grid").ControlAvailable,
        Sub(send As Object, e As ControlAvailableEventArgs)
             _datagridControl = TryCast(e.Control, DataGrid)
             _datagridControl.SelectionMode =
                 DataGridSelectionMode.Extended
        End Sub
End Sub

Private Sub CancelSelectedIssues_Execute()

    Dim closedStatus = DataWorkspace.ApplicationData.IssueStatusSet.Where(
        Function(i) i.StatusDescription = "Closed").FirstOrDefault

    Dim closedEng = DataWorkspace.ApplicationData.Engineers.Where(
        Function(e) e.LoginName=Application.User.Identity.Name).FirstOrDefault

    For Each item As Issue In _datagridControl.SelectedItems
        item.IssueStatus = closedStatus
        item.ClosedByEngineer = closedEng
        item.ClosedDateTime = Date.Now
    Next
End Sub


C#:
File:HelpDeskCSClientUserCodeIssuesManagerGrid.cs

using System.Windows.Controls;

private DataGrid _datagridControl = null;

partial void IssuesManagerGrid_Created()
{
    //1 Replace grid with the name of your data grid control
    this.FindControl("grid").ControlAvailable +=
        (object sender, ControlAvailableEventArgs e) =>
        {
            _datagridControl = ((DataGrid)e.Control);
            _datagridControl.SelectionMode =
                DataGridSelectionMode.Extended;
        };
}

partial void CancelSelectedIssues_Execute()
{

    var closedStatus = DataWorkspace.ApplicationData.IssueStatusSet.Where(
        i => i.StatusDescription == "Closed").FirstOrDefault();

    var closedEng = DataWorkspace.ApplicationData.Engineers.Where(
        e => e.LoginName == Application.User.Identity.Name).FirstOrDefault();

    foreach (Issue item in _datagridControl.SelectedItems)

    {
        item.IssueStatus = closedStatus;
        item.ClosedByEngineer = closedEng;
        item.ClosedDateTime = DateTime.Now;
    }
}
When the screen first loads, the code in the Created method adds an event handler that handles the ControlAvailable event of the data grid. The code uses the FindControl method ![]() to return a reference to the data grid. By default, this is called grid, so you might need to change this line of code if you named your data grid differently.
to return a reference to the data grid. By default, this is called grid, so you might need to change this line of code if you named your data grid differently.
When the data grid becomes available, the code sets the SelectionMode of the data grid to Extended ![]() . This setting allows the user to select multiple records.
. This setting allows the user to select multiple records.
When a user clicks the CancelSelectedIssues button, the code loops through the selected items ![]() on the grid and cancels the issues. The queries in this method retrieve the “closed state”
on the grid and cancels the issues. The queries in this method retrieve the “closed state” ![]() and “closed by engineer”
and “closed by engineer” ![]() entities that are needed to close the issue.
entities that are needed to close the issue.
The code in ![]() works on the assumption that you enabled authentication in your application. (See Chapter 16.) When you enable authentication, Application.User.Identity.Name returns the name of the logged-in user. The Engineer table is designed to store the login name of each engineer so that you can match engineer records with login names.
works on the assumption that you enabled authentication in your application. (See Chapter 16.) When you enable authentication, Application.User.Identity.Name returns the name of the logged-in user. The Engineer table is designed to store the login name of each engineer so that you can match engineer records with login names.
Figure 7-20 shows how the screen looks at runtime. Notice how you can select multiple rows by using the Ctrl key.
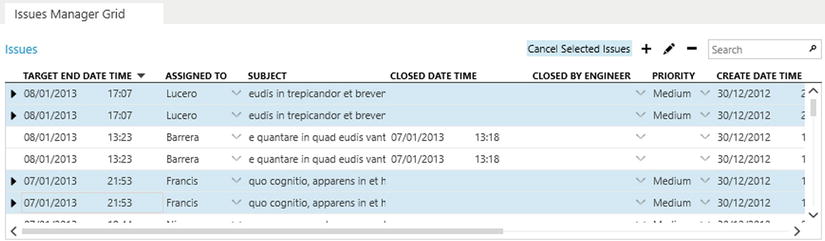
Figure 7-20. Multiselect screen at runtime
EXERCISE 7.2 – CUSTOMIZING SCREENS
This example allows users only to cancel selected issues. Try to adapt this screen so that it allows users to choose what to do with their selected records. For example, you could modify your screen to allow a user to bulk-update the target end date for all selected issues or to reassign all selected issues to a different engineer. To achieve this, add a button to your screen that opens a modal window control. Create check boxes to allow your user to choose how they want to update their selected records. If a user wants to set a new target end date, provide a date picker that allows the user to enter a new target end date. If the user wants to reassign the selected issues, provide an autocomplete box that allows the user to choose the new engineer. You can use local properties to create these controls. Finally, add a button to your modal window control to allow the user to apply his changes.
Assigning and Unassigning Self-Joined Data
The Engineer table includes a self-relationship that allows it to store the manager for each engineer (as shown in Figure 2-13 in Chapter 2). If you create a details screen for the Engineer table and include the Engineer subordinates data item, you end up with a screen that looks like Figure 7-21.
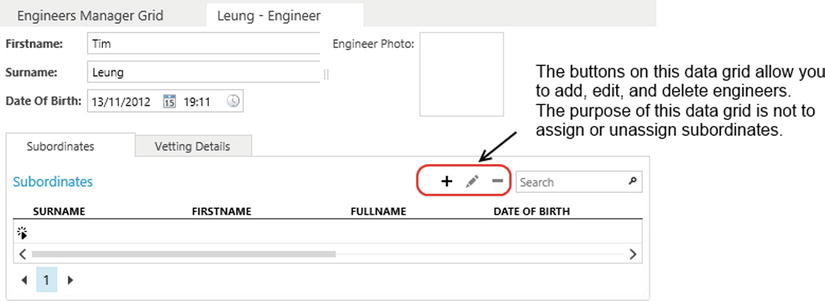
Figure 7-21. Default subordinate data grid
By default, LightSwitch renders the subordinate collection as a data grid. The big problem with this screen is that the add and delete buttons on the data grid carry out the adding and deleting of engineer records rather than of the assigning and unassigning of subordinates. To show you how to achieve the behavior you would expect, this example shows you a technique that allows users to assign and unassign subordinates.
Here are the steps to carry out to allow engineers to be assigned as subordinates:
- Create a details screen for the Engineer table, and add a local Engineer property called EngineerToAdd.
- Create an autocomplete box by dragging the EngineerToAdd property onto your screen.
- Create a method called AssignSubordinate, and add this as a button on your screen.
- Add the AssignSubordinate code, as shown in Listing 7-18.
Listing 7-18. Assigning and Unassigning Subordinates
VB:
File:HelpDeskVBClientUserCodeEngineerDetail.vb

Private Sub AssignSubordinate_Execute()
    Engineer.Subordinates.Add(EngineerToAdd)
    Subordinates.Refresh()
End Sub

Private Sub UnassignSubordinate_Execute()
    Engineer.Subordinates.Remove(Subordinates.SelectedItem)
    Subordinates.Refresh()
End Sub

C#:
File:HelpDeskCSClientUserCodeEngineerDetail.cs

partial void AssignSubordinate_Execute()
{
    Engineer.Subordinates.Add(EngineerToAdd);
    Subordinates.Refresh();
}

partial void UnassignSubordinate_Execute()
{
    Engineer.Subordinates.Remove(Subordinates.SelectedItem);
    this.Save();
    Subordinates.Refresh();
}
To allow engineers to be unassigned as subordinates, carry out the following tasks:
- Change the subordinate data grid to a data list. The default name that LightSwitch gives this collection is Subordinates.
- Create a method called UnassignSubordinate, and add this as a button to your screen.
- Add the UnassignSubordinate code, as shown in Listing 7-18.
The Assign Subordinate button adds the engineer who is selected in the autocomplete box to the engineer’s subordinate collection ![]() . (In practice, you’ll want to write some extra code to check that the user hasn’t left the autocomplete box blank.)
. (In practice, you’ll want to write some extra code to check that the user hasn’t left the autocomplete box blank.)
The Unassign Subordinate button removes the engineer who is selected in the subordinates data list from the engineer’s subordinate collection ![]() .
.
In both of these methods, you’ll find that assigning engineers to and unassigning engineers from the subordinates collection doesn’t automatically refresh the data list of subordinates. (Calling the refresh method on the subordinates collection won’t work either.) Although it might not be ideal, the simple way to address this problem is to save and refresh your screen ![]() . Because this saves all changes that have been made on the screen, you might want to add a confirmation message to check that the user wants to carry out the save.
. Because this saves all changes that have been made on the screen, you might want to add a confirmation message to check that the user wants to carry out the save.
When you now run your screen, you’ll be able to assign and unassign subordinates as shown in Figure 7-22.
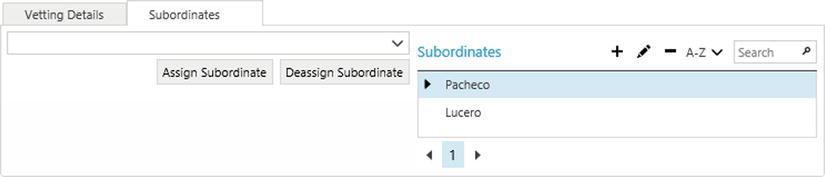
Figure 7-22. Subordinate allocation screen
Creating Screens to Work with Single Row Tables
Sometimes, you need to create a table that’s designed to store just a single row of data. Typical examples are tables designed to store configuration or application settings. The HelpDesk application includes a table called AppOptions. This table allows administrators to control auditing and specify reporting and email settings.
To create a screen that works with just the first record in the AppOptions table, create a new data screen for the AppOptions table and name it AppOptionsEdit. Now add the code in Listing 7-19 to the InitializeDataWorkspace method.
Listing 7-19. Creating a Screen That Works Only with the First Record
VB:
File:HelpDeskVBClientUserCodeAppOptionsEdit.vb

Private Sub AppOptionsEdit_InitializeDataWorkspace(
    saveChangesTo As List(Of Microsoft.LightSwitch.IDataService))
    Me.AppOptionProperty =
        DataWorkspace.ApplicationData.AppOptions.FirstOrDefault()
    If AppOptionProperty Is Nothing Then
        AppOptionProperty = New AppOption
    End If
End Sub

C#:
File:HelpDeskCSClientUserCodeAppOptionsEdit.cs

partial void AppOptionsEdit_InitializeDataWorkspace(
   List<IDataService> saveChangesTo)
{
    this.AppOptionProperty =
        DataWorkspace.ApplicationData.AppOptions.FirstOrDefault();

    if (AppOptionProperty == null){
        this.AppOptionProperty = new AppOption();
    }
}
By default, the New Data Screen template creates a screen with controls that are bound to a property called AppOptionProperty. The first part of the code ![]() sets the property to the first record in the table by calling the FirstOrDefault method. If the method returns null, the table is empty. In this circumstance, the code assigns a new instance of an AppOption entity to the AppOptionProperty
sets the property to the first record in the table by calling the FirstOrDefault method. If the method returns null, the table is empty. In this circumstance, the code assigns a new instance of an AppOption entity to the AppOptionProperty ![]() .
.
You’re now ready to run your application. Figure 7-23 shows how the screen looks at runtime.
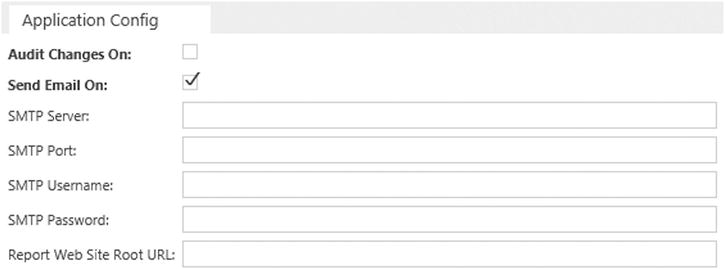
Figure 7-23. Application options screen
So far, you’ve seen a few examples of code that includes threading syntax. I’ll now explain how this works in more detail.
LightSwitch applications are multithreaded. This means that your application can perform multiple tasks at the same time, which results in better use of resources and a more responsive user interface.
Although each thread provides an independent execution path, threads are not completely isolated from one another. The threads in a LightSwitch application are able to share data and memory. This is the reason why multithreading is so useful. In a LightSwitch application, one thread can fetch data from the data service while another thread updates the UI as soon as the data arrives.
Threads can be categorized into two distinct types: UI threads and worker threads. UI threads are responsible for creating and controlling UI elements, whereas worker threads are generally responsible for carrying out long-running tasks such as fetching data.
Multithreaded applications start with a single thread (the main thread) that’s created by the operating system and CLR (the .NET Common Language Runtime). LightSwitch creates additional threads off of the main thread, and your application thus becomes multithreaded.
When you write user code in LightSwitch, you can execute it in one of three threads. Certain tasks will work only on a specific thread. So if your code attempts to run on the wrong thread, you’ll receive a runtime exception.
From a practical prospective, the key point to understand is that you must run code on the correct thread. .NET threading is a complex topic and beyond the scope of this book. But to help you choose the correct thread, here are three simple rules:
- UI Rule: Any code that interacts with the user must be executed on the UI thread. If you try to perform UI tasks on a worker thread, you’ll get an exception.
- Thread Affinity Rule: Silverlight objects and controls inherit from the DependencyObject class. By doing so, these objects have thread affinity. This means that only the thread that instantiates the object can subsequently access its members. If you try accessing these members from a different thread, you’ll get an exception.
- Worker Thread Rule: If you want to perform data access or long-running tasks, you should carry out this work on a worker thread. If you carry out this work on the UI thread, you’ll make your application unresponsive. This means that it’ll be slow to respond to keystrokes and mouse clicks, or it might freeze for long periods of time.
Figure 7-24 illustrates the threads that make up a LightSwitch application. Your application starts execution on a main UI thread. The main thread spawns an application thread. This thread is responsible for opening screens and for performing global logic that isn’t associated with any specific screen. The code in your Application class executes in this thread. You’ll find the code file in the folder ClientUsercode.
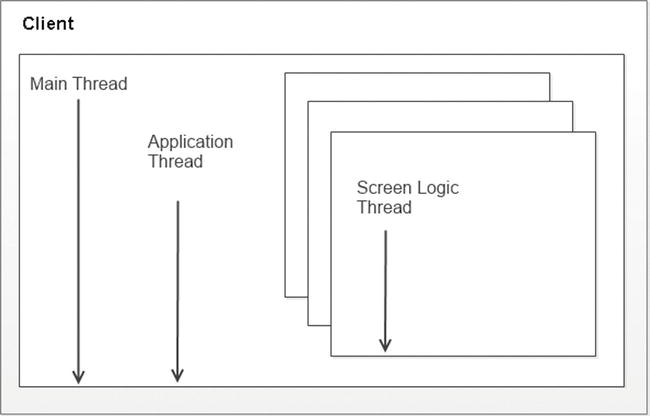
Figure 7-24. Threads in a LightSwitch application
Each screen in a LightSwitch application also has its own worker (or logic) thread. By default, LightSwitch executes any user code you write on the screen’s logic thread. For example, if you click the Write Code button and write some code in the screen’s created method, or if you write some custom code that handles the click of a button, that code will execute on the screen’s logic thread. This is good news because you don’t need to worry about inadvertently doing something that could freeze your UI.
If you need to run some code that updates your UI, you need to execute that code on the main UI thread. To do that, you use a Dispatcher object. The syntax you use to reference the three threads is as follows:
-
Main Dispatcher (UI thread):
Microsoft.LightSwitch.Threading Dispatchers.Main -
Screen Dispatcher (screen logic thread):
Screen.Details.Dispatcher
(Use the Me.Details.Dispatcher (VB) or this.Details.Dispatcher (C#) syntax in your screen code.) -
Application Dispatcher (application thread):
Application.Details.Dispatcher
The Dispatcher object includes a method called BeginInvoke. You use this method to supply the code you want to execute on the thread and execute it asynchronously. This means that the calling code carries on executing, and the code you want to invoke will be queued for execution.
By adding an imports (VB) or using statement to the Microsoft.LightSwitch.Threading namespace at the start of your screen code file, you can access an extension method through the Dispatcher object called Invoke. The difference between BeginInvoke and Invoke is that the Invoke method executes your code synchronously, and the calling thread will wait for the code to complete before it continues. By calling Invoke rather than BeginInvoke, you can block your application while your code runs, and LightSwitch displays an hourglass to the user during this process. The advantage of using Invoke is that in some scenarios, you might want your application to show a 'wait state' in order to provide a positive indication that your process is in progress. Also, Invoke makes it easier for you to handle any return values from the code that you invoke, and can simplify any error handling code that you want to write.
Finding Out Which Thread Your Code Is Executing On
When you’re debugging a piece of code, it’s useful to know what thread your code is executing on. You can find this out by querying the Dispatcher’s CheckAccess method in the Immediate Window (shown in Figure 7-25).
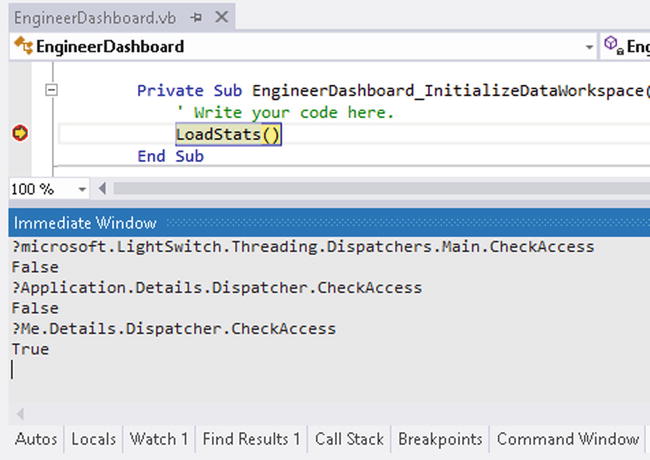
Figure 7-25. Checking what thread you code runs on
This figure illustrates a breakpoint on a line of code in the InitializeDataWorkspace method. This shows that when you query the CheckAccess method on the Main and Application dispatchers, the result is false. This indicates that the code isn’t executing on any of those two threads. When you query the CheckAccess method on the screen logic dispatcher, the result is true. This confirms that the code is executing on the logic thread.
Understanding When to Execute Code on a Different Thread
The section you just read highlights an important characteristic about threading—you must execute any code that updates your UI on the main UI thread. You also learned that, by default, LightSwitch executes any screen code that you write on the logic thread. Given these two conflicting conditions, you might imagine that for any display-related task, you need to manually invoke your code on the UI thread. Thankfully, this isn’t the case. In the vast majority of situations, LightSwitch takes care of updating your UI without you needing to write any custom threading code. This section shows you technically how this works.
Earlier in this chapter, you learned how to use the FindControl method to return an IContentItem object you use to set UI-related properties, such as DisplayName, IsVisible, and IsEnabled. An IContentItem object represents the View Model for a data item, and a screen consists of controls that data-bind to your View Model. So if you hide a control by setting the IsVisible property to false, you actually will not interact directly with the UI. Therefore, there’s no need for you to write any special code that involves the UI thread.
Another interesting characteristic about LightSwitch objects is that, in most cases, you can update property values from any thread. Take a look at the code shown in Listing 7-20. This listing illustrates code that’s been added to the initialize method of the Create New Issue screen from Listing 7-7.
Listing 7-20. Threading
VB:
File:HelpdeskVBClientUserCodeCreateNewIssue.vb

Me.IssueProperty = New Issue

Me.Details.Dispatcher.BeginInvoke(
    Sub()
       'This code executes on the screen logic thread
       Me.IssueProperty.ProblemDescription = "Desc. (screen logic thread)"
    End Sub)

Microsoft.LightSwitch.Threading.Dispatchers.Main.BeginInvoke(
    Sub()
       //This code executes on the UI thread
       Me.IssueProperty.ProblemDescription = "Desc. (main thread)"
    End Sub)

C#:
File:HelpDeskCSClientUserCodeCreateNewIssue.cs

this.IssueProperty = new Issue();

this.Details.Dispatcher.BeginInvoke(() =>
   {
       //This code executes on the screen logic thread
       this.IssueProperty.ProblemDescription = "Desc. (screen logic thread)" ;
   }
);

Microsoft.LightSwitch.Threading.Dispatchers.Main.BeginInvoke(() =>
   {
       //This code executes on the UI thread
       this.IssueProperty.ProblemDescription = "Desc. (main thread)";
    }
);
In this example, IssueProperty ![]() is a local screen property. The purpose of this code is to demonstrate that you can set the Problem Description property from either the UI or logic thread without LightSwitch throwing a “cross-thread access exception.” Let’s imagine you place a breakpoint in this code and use the Immediate Window to find out who owns this object, by issuing the following command:
is a local screen property. The purpose of this code is to demonstrate that you can set the Problem Description property from either the UI or logic thread without LightSwitch throwing a “cross-thread access exception.” Let’s imagine you place a breakpoint in this code and use the Immediate Window to find out who owns this object, by issuing the following command:
?Me.IssueProperty.Details.Dispatcher.ToString
The answer that the Immediate Window returns is this:
"Microsoft.LightSwitch.Threading.BackgroundDispatcher"
This basically tells you that the screen logic thread owns IssueProperty. Based on this result, you’d expect the assignment operator in ![]() to work. But the curious thing is this: why does LightSwitch allow you to update the IssueDescription property on the UI thread
to work. But the curious thing is this: why does LightSwitch allow you to update the IssueDescription property on the UI thread ![]() without throwing an exception?
without throwing an exception?
The answer is that many LightSwitch objects inherit from a class called DualDispatcherObject. (You’ll find this in the Microsoft.LightSwitch.Threading namespace.) An object that inherits from this class has affinity to not one, but two threads: the main thread and the screen logic thread. From a practical perspective, this means you can access these objects from either thread without causing an exception. However, the act of getting or setting a property behaves differently depending on the thread you use.
When you write code on the UI thread that tries to get the value of a property that hasn’t been loaded, LightSwitch begins to load the value asynchronously, and it returns the current uninitialized value (for example, null). When the property value finally loads, it raises the property changed event to notify listeners that the property value has changed. This behavior works very well for LightSwitch’s asynchronous UI data binding. If you run the same code that gets the property on the screen logic thread, LightSwitch blocks the execution of your code until the property loads.
Returning to the code in Listing 7-20, you’ll find that synchronously setting the value on the screen logic thread works as expected ![]() . Although setting the value on the UI thread
. Although setting the value on the UI thread ![]() appears to succeed and doesn’t throw an exception, you’ll discover that LightSwitch doesn’t actually set the value. Place a breakpoint on
appears to succeed and doesn’t throw an exception, you’ll discover that LightSwitch doesn’t actually set the value. Place a breakpoint on ![]() , and use the debugger to interrogate the value just after you step over that line of code—you’ll notice that the debugger returns null (or nothing).
, and use the debugger to interrogate the value just after you step over that line of code—you’ll notice that the debugger returns null (or nothing).
The reason for this is because the UI thread cannot directly mutate data because it could allow screen logic code to observe arbitrary changes in data. This would cause errors if the screen logic contains conditional logic and the condition changes between the time the condition was checked and the time the code dependent on that condition executes. To resolve this, the UI thread queues up the mutation on the screen logic thread. In comparison, LightSwitch applies the mutation synchronously in the code that uses the screen logic thread ![]() .
.
The main conclusion is that, in the most cases, LightSwitch carries out the tricky job of managing threading issues for you. It’s only when you’re doing some UI work that’s a bit out of the ordinary that you need to manually invoke the code on the UI thread. Here are some examples of where in this book you need to do this:
- Showing Silverlight file save and file open dialogs
- Generating PDF files
- Working with the Silverlight Web Browser control
If you forget to invoke your code on the UI thread or are unsure of when to do so, there’s no need to worry too much. You’ll soon find out because you’ll receive an error when you execute your code. You can use the exception LightSwitch returns to identify the threading problem and modify your code so that it executes on the correct thread.
In any advanced application, you’ll want some way to make your UI react to changes in your data.
LightSwitch entities implement the INotifyPropertyChanged interface and raise an event called PropertyChanged whenever the value of any property in the entity changes. To make your application react to data changes, you can handle this event and carry out any UI changes in an event handler.
Although you can achieve similar results by handling Silverlight’s LostFocus event, there are several advantages to using PropertyChanged. If you want to use the LostFocus technique to monitor multiple properties, you need to create an event handler for each control. By using the PropertyChanged method, you need to set up only one event handler and you can use that to detect changes in any number of properties.
Furthermore, the LostFocus method is more fragile because it assumes what your underlying Silverlight control will be. You could potentially break your application by changing the control type.
In the example that follows, you’ll create a new data screen based on the Engineer table. This table includes properties that relate to security clearance, such as
- SecurityVetted: Required, Boolean field.
- SecurityClearanceRef: String field.
- VettingExpiryDate: Date field.
By default, the screen hides the security reference and vetting expiry date text boxes. When the user selects the security vetted check box, your screen will reveal the hidden controls.
The PropertyChanged method works differently on screens that are based on the New Data Screen and Details Screen templates. This section begins by describing the technique on a New Data Screen template.
Using PropertyChanged on a New Data Screen Template
To handle the PropertyChanged event for an entity on a New Data Screen template, create a new screen based on the Engineer table and name it CreateNewEngineer. Move the security properties into a new Rows Layout control called SecurityGroup, as shown in Figure 7-26.
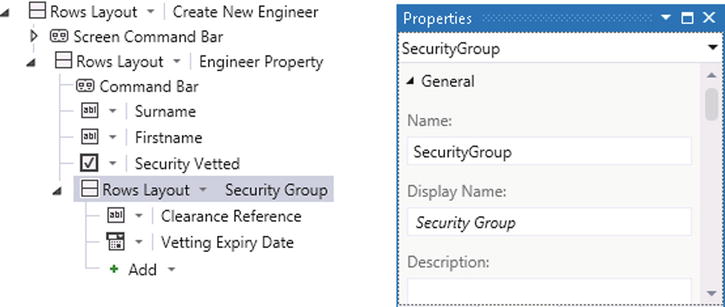
Figure 7-26. Layout of the new data screen
After creating your screen, enter the code as shown in Listing 7-21.
Listing 7-21. Using PropertyChanged on a New Data Screen
VB:
File:HelpDeskVBClientUserCodeCreateNewEngineer.vb

Imports System.ComponentModel

Private Sub CreateNewEngineer_Created()
    Microsoft.LightSwitch.Threading.Dispatchers.Main.BeginInvoke(
        Sub()
           AddHandler DirectCast(
             Me.EngineerProperty, INotifyPropertyChanged
           ).PropertyChanged, AddressOf EngineerFieldChanged
        End Sub)

    'Set the initial visibility here
    Me.FindControl("SecurityGroup").IsVisible =
        EngineerProperty.SecurityVetted
End Sub

Private Sub EngineerFieldChanged(
    sender As Object, e As PropertyChangedEventArgs)
    If e.PropertyName = "SecurityVetted" Then
        Me.FindControl("SecurityGroup").IsVisible =
           EngineerProperty.SecurityVetted
    End If
End Sub

C#:
File:HelpDeskCSClientUserCodeCreateNewEngineer.cs

using System.ComponentModel;

partial void CreateNewEngineer_Created()
{
    Microsoft.LightSwitch.Threading.Dispatchers.Main.BeginInvoke(() =>
    {
        ((INotifyPropertyChanged)this.EngineerProperty).PropertyChanged +=
            EngineerFieldChanged;
    });

    //Set the initial visibility here
    this.FindControl("SecurityGroup").IsVisible =
        EngineerProperty.SecurityVetted;
}


private void EngineerFieldChanged(object sender, PropertyChangedEventArgs e)
{
    if (e.PropertyName == "SecurityVetted")
    {
        this.FindControl("SecurityGroup").IsVisible =
            EngineerProperty.SecurityVetted;
    }
}
The created method adds an event handler called EngineerFieldChanged that handles the PropertyChanged event of the EngineerProperty ![]() . This event handler needs to be added using code that executes on the main UI thread. If you don’t do this, you’ll receive an error that says, “It is not valid to execute the operation on the current thread.”
. This event handler needs to be added using code that executes on the main UI thread. If you don’t do this, you’ll receive an error that says, “It is not valid to execute the operation on the current thread.”
The EngineerFieldChanged method includes a parameter of type PropertyChangedEventArgs. You can find out the name of the property that has changed by referring to the PropertyChangedEventArgs’s PropertyName property ![]() .
.
If the SecurityVetted property changes, the code calls the FindControl method ![]() to hide or show the group that contains the controls related to security vetting. Figure 7-27 shows how the final screen looks at runtime.
to hide or show the group that contains the controls related to security vetting. Figure 7-27 shows how the final screen looks at runtime.

Figure 7-27. Selecting the SecurityVetted check box unhides the security vetting group
Using PropertyChanged on a Details Screen
The code you use on a Details Screen template is different from the code you use on a New Data Screen template.
The reason for this is because a details screen uses a query that returns a single record filtered by the primary key value, whereas a new data screen contains a local property rather than a query. To monitor PropertyChanged on a details screen, you need to create a local property you can monitor.
In this example, you’ll create a details screen that carries out the same function as before. The layout of this screen is identical to the layout shown in the New Data Screen example. Once you create the screen, add the code shown in Listing 7-22.
Listing 7-22. Using PropertyChanged on a Details Screen
VB:
File:HelpDeskVBClientUserCodeEngineerDetail.vb

Imports System.ComponentModel

Private monitoredEngineer As Engineer

Private Sub EngineerDetail_InitializeDataWorkspace(
   saveChangesTo As List(Of Microsoft.LightSwitch.IDataService))
    ' Write your code here.
    Microsoft.LightSwitch.Threading.Dispatchers.Main.BeginInvoke(
      Sub()
          AddHandler Me.Details.Properties.Engineer.Loader.ExecuteCompleted,
              AddressOf Me.EngineerLoaderExecuted
      End Sub)
End Sub

Private Sub EngineerLoaderExecuted(
    sender As Object, e As Microsoft.LightSwitch.ExecuteCompletedEventArgs)

    If monitoredEngineer IsNot Me.Engineer Then
        If monitoredEngineer IsNot Nothing Then
            RemoveHandler TryCast(monitoredEngineer,
                INotifyPropertyChanged).PropertyChanged,
                    AddressOf Me.EngineerChanged
        End If

        monitoredEngineer = Me.Engineer

        If monitoredEngineer IsNot Nothing Then
            AddHandler TryCast(
               monitoredEngineer, INotifyPropertyChanged).PropertyChanged,
                  AddressOf Me.EngineerChanged

            'Set the initial visibility here
            Me.FindControl("SecurityGroup").IsVisible =
                monitoredEngineer.SecurityVetted

        End If
    End If
End Sub

Private Sub EngineerChanged(
   sender As Object, e As PropertyChangedEventArgs)
    If e.PropertyName = "SecurityVetted" Then
        Me.FindControl("SecurityGroup").IsVisible =
            monitoredEngineer.SecurityVetted
    End If
End Sub


C#:
File:HelpDeskCSClientUserCodeEngineerDetail.cs

using System.ComponentModel;
private Engineer monitoredEngineer;

partial void EngineerDetail_InitializeDataWorkspace(
    List<IDataService> saveChangesTo)
{
    Microsoft.LightSwitch.Threading.Dispatchers.Main.BeginInvoke(() =>
    {
        this.Details.Properties.Engineer.Loader.ExecuteCompleted +=
            this.EngineerLoaderExecuted;
    });
}

private void EngineerLoaderExecuted(
    object sender, Microsoft.LightSwitch.ExecuteCompletedEventArgs e)
{

    if (monitoredEngineer != this.Engineer)
    {
        if (monitoredEngineer != null)
        {
            (monitoredEngineer as INotifyPropertyChanged).PropertyChanged -=
                this.EngineerChanged;
        }

        monitoredEngineer = this.Engineer;
        if (monitoredEngineer != null)
        {
            (monitoredEngineer as INotifyPropertyChanged).PropertyChanged +=
                this.EngineerChanged;

            //set the initial visibility here
            this.FindControl("SecurityGroup").IsVisible =
                monitoredEngineer.SecurityVetted;
        }
    }
}

private void EngineerChanged(
    object sender, PropertyChangedEventArgs e)
{
    if (e.PropertyName == "SecurityVetted")
    {
        this.FindControl("SecurityGroup").IsVisible =
            monitoredEngineer.SecurityVetted;
    }
}
This code adds an event handler in the InitializeDataWorkspace method that handles the ExecuteCompleted event of the query loader ![]() . When the loader finishes executing the query, the code saves the engineer in a local property called monitoredEngineer
. When the loader finishes executing the query, the code saves the engineer in a local property called monitoredEngineer ![]() .
.
You can then handle the PropertyChanged event on the monitorEngineer property to detect any changes that have been made to the engineer. Just as before, the code that hides or shows the security vetting group uses the value of the SecurityVetted property ![]() .
.
You can use the LightSwitch table designer to define properties with a data type of binary. By using this data type, you can allow users to store and retrieve files. However, LightSwitch doesn’t include a built-in control that allows users to upload and download files. Instead, you need to write your own code that uses the Silverlight File Open and Save File dialog boxes.
Uploading Files
To demonstrate how to upload a file, create a new data screen that uses the IssueDocument table. Create a new button on your screen, and call your method UploadFileToDatabase. Add the code as shown in Listing 7-23.
Listing 7-23. Uploading a File
VB:
File:HelpDeskVBClientUserCodeCreateNewIssueDocument.vb

Imports System.Windows.Controls
Imports Microsoft.LightSwitch.Threading

Private Sub UploadFileToDatabase_Execute()

    '1 Invoke the method on the main UI thread
    Dispatchers.Main.Invoke(
        Sub()

            Dim openDialog As New Controls.OpenFileDialog
            openDialog.Filter = "All files|*.*"
            'Use this syntax to only allow Word/Excel files
            'openDialog.Filter = "Word Files|*.doc|Excel Files |*.xls"

            If openDialog.ShowDialog = True Then
                Using fileData As System.IO.FileStream =
                    openDialog.File.OpenRead

                    Dim fileLen As Long = fileData.Length

                    If (fileLen > 0) Then
                        Dim fileBArray(fileLen - 1) As Byte
                        fileData.Read(fileBArray, 0, fileLen)
                        fileData.Close()

                        Me.IssueDocumentProperty.IssueFile = fileBArray
                        Me.IssueDocumentProperty.FileExtension =
                            openDialog.File.Extension.ToString()
                        Me.IssueDocumentProperty.DocumentName =
                            openDialog.File.Name

                    End If

                End Using
            End If

        End Sub)

End Sub

C#:
File:HelpDeskCSClientUserCodeCreateNewIssueDocument.cs

using System.Windows.Controls;
using Microsoft.LightSwitch.Threading;

partial void UploadFileToDatabase_Execute()
{
    //1 Invoke the method on the main UI thread
    Dispatchers.Main.Invoke(() =>
    {
        OpenFileDialog openDialog = new OpenFileDialog();
        openDialog.Filter = "Supported files|*.*";
        //Use this syntax to only allow Word/Excel files
        //opendlg.Filter = "Word Files|*.doc|Excel Files |*.xls";

        if (openDialog.ShowDialog() == true)
        {
            using (System.IO.FileStream fileData =
                openDialog.File.OpenRead())
            {
                int fileLen = (int)fileData.Length;

                if ((fileLen > 0))
                {
                    byte[] fileBArray = new byte[fileLen];
                    fileData.Read(fileBArray, 0, fileLen);
                    fileData.Close();

                    this.IssueDocumentProperty.IssueFile = fileBArray;
                    this.IssueDocumentProperty.FileExtension =
                        openDialog.File.Extension.ToString();
                    this.IssueDocumentProperty.DocumentName =
                        openDialog.File.Name;
                }
            }
        }

    });
}
Whenever you use the Silverlight File Open or File Save dialog, the code that invokes the dialog must be executed on the main UI thread ![]() . This is because you’re carrying out a UI task, and the logic must therefore run on the main UI thread.
. This is because you’re carrying out a UI task, and the logic must therefore run on the main UI thread.
The File Open dialog ![]() allows the user to choose a file. The code then reads the file data into a byte array by using a FileStream object
allows the user to choose a file. The code then reads the file data into a byte array by using a FileStream object ![]() , and it assigns the data to the IssueFile property
, and it assigns the data to the IssueFile property ![]() . The code then saves the file name and file extension of the document in the same block of code.
. The code then saves the file name and file extension of the document in the same block of code.
You can set the File Open dialog’s Filter property to limit the file types that the user can select. This example allows the user to select all files by setting the *.* filter, but you could supply a list of pipe-delimited file extensions and descriptions to apply the filter (as shown in the commented-out line of code).
Note that this code works only in desktop applications—it won’t work in a browser application. If you try running this code in a browser application, you’ll get the security exception “Dialogs must be user-initiated.” This is because the button code runs on the screen logic thread, and by subsequently invoking the File Open dialog on the main UI thread, Silverlight loses the fact the action was indeed “user-initiated.” Desktop applications don’t suffer from this problem because the elevated trust of a desktop Silverlight application allows you to open the file dialog from any code.
In a browser application, the code that launches file dialogs must be at the top of the call stack. If you want to use the Silverlight file dialogs in a browser application, you can do this by creating a custom button control and handling the button’s click event. Chapter 11 shows you how to use custom controls, and Chapter 15 shows you how to use the File Open dialog in a browser application to allow users to choose and send email file attachments. If you want to make this example work in a browser application, you can adapt the code you find in Chapter 15.
![]() Note If you’re creating commands that work only in desktop applications, it’s a good idea to disable your command in browser applications by writing code in your command’s CanExecute method (UploadFileToDatabase_CanExecute in this example). Chapter 17 describes this process in more detail.
Note If you’re creating commands that work only in desktop applications, it’s a good idea to disable your command in browser applications by writing code in your command’s CanExecute method (UploadFileToDatabase_CanExecute in this example). Chapter 17 describes this process in more detail.
Downloading and Saving Files
Users need some way of downloading the issue documents that have been uploaded. You’ll now find out how to allow users to retrieve a file and save it locally using the Silverlight File Save dialog. To create this example, create a details screen based on the IssueDocument table and name your screen IssueDocumentDetails.
Create a new button on your screen, and call your method SaveFileFromDatabase. Add the code as shown in Listing 7-24.
Listing 7-24. Downloading a File
VB:
File:HelpDeskVBClientUserCodeIssueDocumentDetails.vb

Imports System.Windows.Controls
Imports Microsoft.LightSwitch.Threading

Private Sub SaveFileFromDatabase_Execute()

    '1 Invoke the method on the main UI thread
    Dispatchers.Main.Invoke(
        Sub()
            Dim ms As System.IO.MemoryStream =
                New System.IO.MemoryStream(IssueDocument.IssueFile)

            Dispatchers.Main.Invoke(
                Sub()
                    Dim saveDialog As New Controls.SaveFileDialog

                    If saveDialog.ShowDialog = True Then
                        Using fileStream As Stream = saveDialog.OpenFile
                            ms.WriteTo(fileStream)
                        End Using
                    End If
                End Sub)
        End Sub)

End Sub

C#:
File:HelpDeskCSClientUserCodeIssueDocumentDetails.cs

using System.Windows.Controls;
using Microsoft.LightSwitch.Threading;

partial void SaveFileFromDatabase_Execute()
{
    //1 Invoke the method on the main UI thread
    Dispatchers.Main.Invoke(() =>
    {
        System.IO.MemoryStream ms =
            new System.IO.MemoryStream(IssueDocument.IssueFile);

        Dispatchers.Main.Invoke(() =>
        {
            SaveFileDialog saveDialog = new SaveFileDialog();

            if (saveDialog.ShowDialog() == true)
            {
                using (Stream fileStream = saveDialog.OpenFile())
                {
                    ms.WriteTo(fileStream);
                }
            }
        });
    });
}
Just as before, the code needs to be executed on the main UI thread for the Save File dialog to work ![]() . The Save dialog prompts the user to enter a file name and location
. The Save dialog prompts the user to enter a file name and location ![]() , and the final part of the code writes the data to the file using a MemoryStream object
, and the final part of the code writes the data to the file using a MemoryStream object ![]() .
.
Opening Files in Their Application
Instead of prompting users with a Save File dialog, you can display the standard dialog that prompts users to download the file and to open it using the default application.
Let’s imagine that a user wants to retrieve a Word document from the IssueDocument table. In this example, you’ll add a button to a LightSwitch screen that starts Microsoft Word and opens the document. Once again, this example works only in desktop applications.
The process you’ll carry out is as follows:
- Save the file to an interim file location.
- Use the shell execute method to start Word and open the file that was saved above.
The first part of the process saves your file into a temporary location. There are some important points to consider when a user tries to save a file from a LightSwitch application. The security restrictions that Silverlight imposes means that you can’t save files wherever you want. The limitations that it applies depends on the method you chose to save your file. These are described in Table 7-4.
Table 7-4. Ways to Save a File Using LightSwitch
| Method | Description |
|---|---|
| Use the classes in the System.IO namespace | You can save files only in special locations. These include the My Documents, My Music, My Pictures, and My Videos folders of the current user. |
| Use the Silverlight SaveFileDialog dialog | You can save files to any location for which the user has read/write permissions. |
| Use isolated storage | This is a virtual file system that’s provided by Silverlight. |
If you want to save a file to a temporary location without any user intervention, you can choose from two options. You can create your file in the My Documents folder, or you can create the file in isolated storage.
Isolated storage is a virtual file system that Silverlight provides. The isolated storage location is a hidden folder that exists on the user’s machine. This makes it an ideal place to save temporary files.
However, the disadvantage of using isolated storage is that Silverlight imposes a default storage quota, and administrators can also apply a more stringent quota. Therefore, there’s no guarantee there’ll be space for you to save your file.
This example shows you how to save your temporary file in the My Documents folder, but if you want to use isolated storage instead, the following MSDN web page shows you how (http://msdn.microsoft.com/en-GB/library/cc265154). Here’s a brief summary of how to use isolated storage. You begin by using the IsolatedStorageFile class from the System.IO.IsolatedStorage namespace. This provides a static method called GetUserStoreForApplication you use to obtain the store for your application. You can then use an IsolatedStorageFileStream object to write your data to a file in isolated storage.
To create this example, open the IssueDocumentDetails screen and create a new method and button called OpenFileFromDatabase. Add the code that’s shown in Listing 7-25.
Listing 7-25. Opening Files in Their Applications
VB:
File:HelpDeskVBClientUserCodeIssueDocumentDetails.vb

Imports System.Windows.Controls
Imports Microsoft.LightSwitch.Threading
Imports System.Runtime.InteropServices.Automation

Private Sub OpenFileFromDatabase_Execute()

   Try
      If (AutomationFactory.IsAvailable) Then
         'here's where we'll save the file
         Dim fullFilePath As String =
            System.IO.Path.Combine(
               Environment.GetFolderPath(
                  Environment.SpecialFolder.MyDocuments),
                     IssueDocument.DocumentName)

         Dim fileData As Byte() = IssueDocument.IssueFile.ToArray()

         If (fileData IsNot Nothing) Then
            Using fs As New FileStream(
                  fullFilePath, FileMode.OpenOrCreate, FileAccess.Write)
               fs.Write(fileData, 0, fileData.Length)
               fs.Close()
            End Using
         End If

         Dim shell = AutomationFactory.CreateObject("Shell.Application")
         shell.ShellExecute(fullFilePath)

      End If
   Catch ex As Exception
       Me.ShowMessageBox(ex.ToString())
   End Try

End Sub

C#:
File:HelpDeskCSClientUserCodeIssueDocumentDetails.cs

using System.Runtime.InteropServices.Automation;

partial void OpenFileFromDatabase_Execute()
{
    try
    {
        if ((AutomationFactory.IsAvailable))
        {
            //this is where we'll save the file
            string fullFilePath = System.IO.Path.Combine(
                Environment.GetFolderPath(Environment.SpecialFolder.MyDocuments),
                IssueDocument.DocumentName);

            byte[] fileData = IssueDocument.IssueFile.ToArray();

            if ((fileData != null))
            {
                using (FileStream fs =
                    new FileStream(
                        fullFilePath, FileMode.OpenOrCreate, FileAccess.Write))
                {
                    fs.Write(fileData, 0, fileData.Length);
                    fs.Close();
                }
            }

            dynamic shell = AutomationFactory.CreateObject("Shell.Application");
            shell.ShellExecute(fullFilePath);
        }
    }
    catch (Exception ex)
    {
        this.ShowMessageBox(ex.ToString());
    }
}
The first part of this code builds the path where you’ll save your file ![]() . It then saves your data into this file
. It then saves your data into this file ![]() and opens it using the Shell command
and opens it using the Shell command ![]() .
.
Summary
This chapter showed you how to enrich your Silverlight applications by employing advanced screen design techniques.
When you’re building a LightSwitch application, you can’t just add UI controls to a screen. A screen consists of controls that data-bind to properties. To display a new control that’s unrelated to the main data on your screen, you have to first add a local property that backs your control. You can use the Add Data Item dialog to do this. In addition to adding local properties with this dialog, you also can add queries and methods. Adding a query to your screen allows you to show additional collections of data on your screen. You also can use queries to customize the choices that an autocomplete box or modal window picker shows. Another important feature of local properties is that you can set them up as parameters. This allows you to pass values to a screen when it opens.
Chapter 4 showed you the screen events you can handle. You use these events to run code when a screen opens, closes, or performs a save operation. If you want to run code when a change in data occurs, you can do this by handling the PropertyChanged event for your entity.
By using the LightSwitch API, you can access entity and property values by name. When you change the value of a property in code, LightSwitch automatically refreshes all controls bound to your property. With the FindControl method, you can access a specific control in code. This method returns an IContentItemProxy object that you can use to set the visibility and read-only properties of a control. Once you obtain a reference to an IContentItemProxy, you can add an event handler for the ControlAvailable event. The code that handles the ControlAvailable event allows you to access the underlying Silverlight control and add additional event handlers to handle the events that the Silverlight control raises. This allows you, for example, to handle a text box’s KeyUp event.
LightSwitch applications are multithreaded. This improves your application’s performance because it allows a screen logic thread to perform data operations, while a main UI thread deals with updating your user interface. In general, you don’t need to worry too much about executing code on a specific thread. But on the rare occasions where this is necessary, you can achieve this by using a dispatcher object.
This chapter contains plenty of screen design examples. These examples include how to create a combined add/edit screen, how to create a custom search screen, and how to create a screen for managing single-row tables. You also saw demonstrations of how to create nested autocomplete boxes, how to work with recursive data, and how to allow users to upload and download files.
A combined data entry and edit screen saves you from having to create and maintain two separate screens. To create such a screen, you begin with a Details Screen template and use the default query to populate a local property. You then bind your screen controls to the local property.
By default, the data entry screens that open from the data grid are autogenerated and can’t be modified. You can overcome this limitation by creating your own modal windows and attaching them to commands on your data grid. To allow users to select multiple rows in a data grid, you write code that sets the data grid’s DataGridSelectionMode property to Extended.
Nested autocomplete boxes (ACBs) make it easier for users to find or enter data. For example, you could limit user choices in an ACB to the department that’s been selected in a parent ACB. To do this, you set the data source of your users’ ACB to a parameterized query that’s bound to your parent ACB.
Finally, you learned how to upload and download files by using Silverlight’s OpenFileDialog and SaveFileDialog controls. In a desktop application, you can allow users to open files in their native applications. To accomplish this, you save the file locally and use the Windows Shell command to open the file.