![]()
Authenticating Your Users
The next two chapters show you how to secure your application. You’ll begin by learning about authentication —the process that determines the identity of your user. Once you identify your user, you can control the screens that they can see, and functions that they can perform, in your application. You’ll find out how to implement this type of access control in Chapter 17.
In this chapter, you’ll learn how to
- Choose an authentication method that suits your application type
- Apply Windows or Forms authentication in your LightSwitch application
- Share authentication credentials with other applications
By the end of this chapter, you’ll understand how to enable authentication in the HelpDesk application. You’ll also find out how to force users to enter a user name and password at login by enabling Forms authentication.
Choosing an Authentication Method
LightSwitch supports two authentication methods: Windows and Forms. When you enable Windows authentication, LightSwitch identifies the logged-in user by examining the credentials that they’ve used to log in to their Windows computer.
Forms authentication identifies a user by forcing them to enter a user name and password when the application starts up.
Your application type helps you choose the most appropriate type of authentication. Table 16-1 summarizes the recommended options.
Table 16-1. Recommended Authentication Methods by Application Type
| Application Type | None | Windows | Forms |
|---|---|---|---|
| Two-Tier Desktop App – Deployed on an Internal Network | ✓ | ✓ | |
| Three-Tier Desktop or Web App – Deployed on an Internal Network | ✓ | ✓ | |
| Three-Tier Desktop or Web App – Deployed on the Internet or Azure | ✓ |
The most secure choice for a two-tier desktop application is Windows authentication. In a two-tier application, the connection string to your membership database is stored in clear text inside your application’s web.config file, which is held on the client’s machine. If a malicious user discovers this connection string, they could tamper with your membership data outside of LightSwitch.
If you want to make your application available via the Internet (or you want to deploy to Azure), Windows authentication isn’t really a viable choice. Forms authentication is the recommended choice in this scenario.
In a three-tier local network deployment (with the LightSwitch server components hosted in IIS), you have a choice of either Windows or Forms authentication. Table 16-2 summarizes some of the features of these two authentication types and explains when you should use each type.
Table 16-2. When to Use Each Type of Authentication
| Windows | Forms |
|---|---|
| Use Windows authentication if all your users belong in the same domain | Use Forms authentication if you don’t have a Windows domain—for example, if you’re using a workgroup or Novell network. |
| Use Windows authentication if you don’t want to have an extra login screen. With Windows authentication, your users won’t need to enter a user name and password when they run your application. | Use Forms authentication if you want your users to enter a user name and password when they run your application. You might choose to do this to enforce an extra layer of security. |
| Forms authentication is ideal if you want to share authentication details with other applications, perhaps with an existing ASP.NET web site. |
Disabling Authentication
The Access Control tab in the properties of your application allows you to manage authentication. By default, LightSwitch disables authentication in all new projects that you create. (See Figure 16-1.)
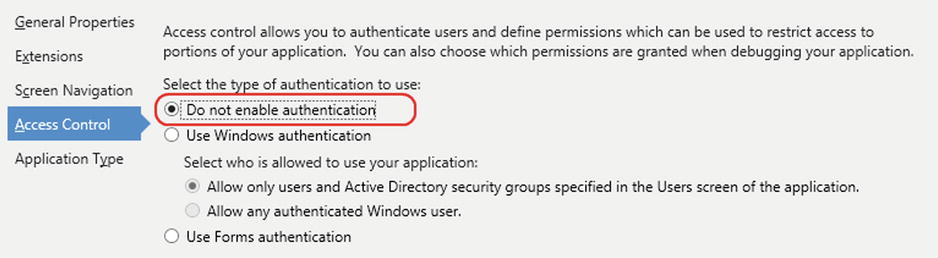
Figure 16-1. Default authentication option
You would leave authentication disabled if you have no need to know who your users are. This choice is suitable if you want to give users open access to your application and have no need to control access to specific parts of your application.
Enabling Windows Authentication
To enable Windows authentication, select the Use Windows Authentication radio button. (See Figure 16-2.) This enables an additional set of radio buttons that allows you to choose who can run your application.

Figure 16-2. Allow any authenticated Windows user
The first option requires you to enter each Windows user who wants to access your application. You would do this at runtime by using the Users screen. (See Figure 16-3.)

Figure 16-3. Specifying users through the users screen at runtime
The second option (Allow Any Authenticated Windows User) allows all users who have been authenticated by Windows to run your application. This option is ideal if you want to identify your users without going through the time-consuming process of adding each user to your application. If you enable this option, you can still restrict the tasks that individual users can carry out in your application by specifying their login names in the Users screen. Chapter 17 covers this in greater depth.
When you deploy your application, you’ll need to designate an application administrator by using the publish wizard. Chapter 18 shows you the specific steps that you would follow to set up an application administrator.
![]() Tip Instead of requiring the administrative user to enter Active Directory users into your application by hand, make their life easier and create a utility to import them automatically.
Tip Instead of requiring the administrative user to enter Active Directory users into your application by hand, make their life easier and create a utility to import them automatically.
The Active Directory sample that’s written by the LightSwitch team provides sample code that you can use to integrate with Active Directory. You can find it at the following web site: http://code.msdn.microsoft.com/windowsdesktop/LightSwitch-Active-5092eaa8
When you choose Use Forms Authentication (shown in Figure 16-4), your application prompts the user for a user name and password at startup. Forms authentication uses a set of application-defined identities that are created by your application administrator.
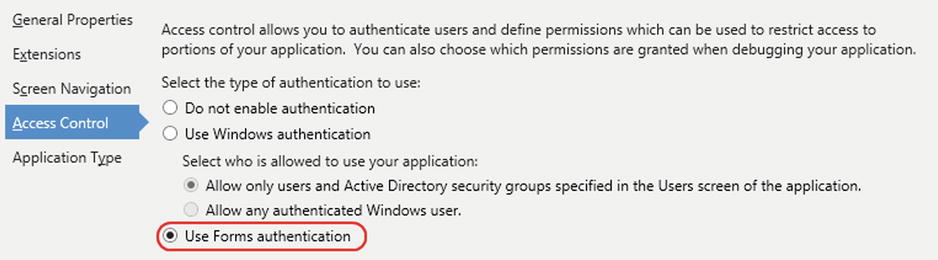
Figure 16-4. Enabling Forms Authentication
There are a couple of security considerations that you should to be aware of. Forms authentication can be regarded as a less secure option, because your users’ user names and passwords are stored in a database table rather than being securely maintained by Windows. Although LightSwitch stores the cryptographic hash of the passwords rather than the clear-text values, this might still be considered a security risk.
Second, the user name and password details that a user enters at logon are transmitted in clear text across the network. An attacker who snoops the network might discover the user names and passwords that are being used. Enabling HTTPS on your server helps to mitigate this risk.
The application administrator creates the user names and passwords at runtime by using the Users screen, which was shown in Figure 16-3. The administrator can also use this screen to delete users or reset passwords.
If users want to change their password, they can do so by using an option that’s shown by LightSwitch. (See Figure 16-5.) The location of the control that opens the Change Password dialog depends on the shell that you’ve chosen. In the Standard shell, the control appears in the bottom right part of the application.
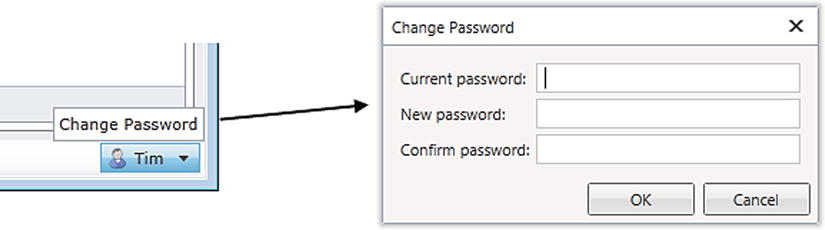
Figure 16-5. Changing a password
![]() Caution If you enable Forms authentication, you should configure Secure Sockets Layer (SSL) when you deploy your application. (See Chapter 18.) This secures any user login credentials that are transmitted over the network.
Caution If you enable Forms authentication, you should configure Secure Sockets Layer (SSL) when you deploy your application. (See Chapter 18.) This secures any user login credentials that are transmitted over the network.
EXERCISE 16.1 – ENABLING AUTHENTICATION
Enable authentication in your application, and explore the authentication options that you can set through the Properties window of your application. Note that if you turn on Forms authentication, you won’t be prompted for a user name and password when you debug your application. You’ll always be logged on as a debug user called TestUser.
Understanding Where User Details Are Stored
When you enable authentication, LightSwitch uses the ASP.NET membership provider to manage your users. This provider stores your users in a table called aspnet_Users in your Intrinsic database. Figure 16-6 shows a screenshot of this table that’s taken from SQL Server Management Studio. The primary key field is called UserId and is of data type GUID. The user names that you specify are stored in a field called UserName.

Figure 16-6. aspnet_Users table
The provider stores any roles that you define in a table called aspnet_Roles. This is shown in Figure 16-7.

Figure 16-7. aspnet_Roles table
The user-to-role settings are stored in a table called aspnet_UsersInRoles. The set of tables used by the membership provider and the relationships between them are shown in Figure 16-8.
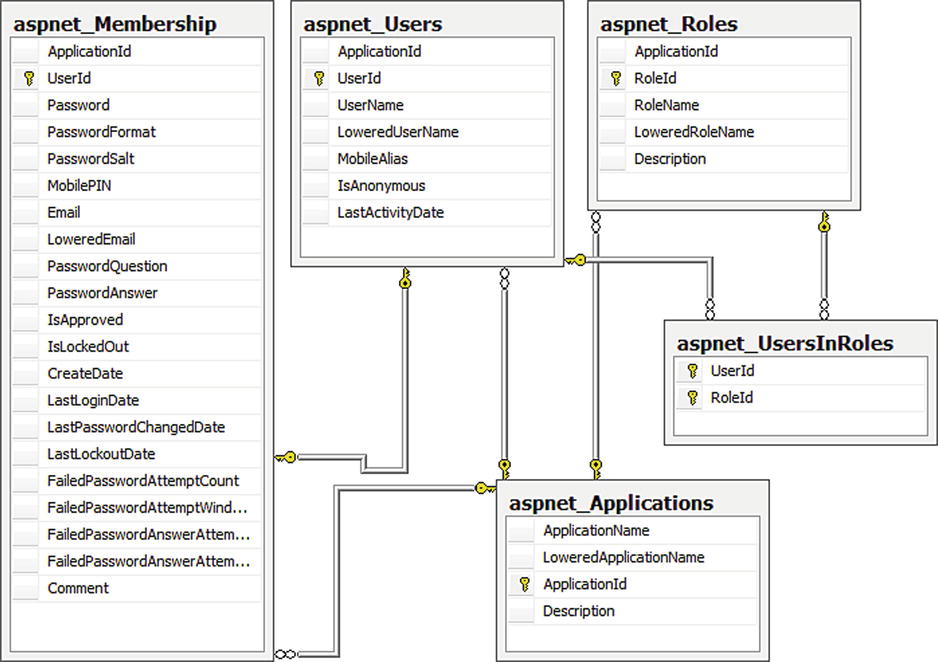
Figure 16-8. Tables used by the membership provider and their relationships
It’s useful to understand the tables that the membership provider uses because this knowledge can help you to create and retrieve user accounts outside of LightSwitch. If you’re familiar with SQL Server, you can manually create users by calling the aspnet_Membership_CreateUser and aspnet_Profile_SetProperties stored procedures.
Changing the Password Complexity Rules
When you enable Forms authentication, the membership provider enforces a password-complexity rule that helps to keep your application secure. By default, passwords must be eight characters in length and contain a non-alphanumeric character. An example of a valid (but absurdly weak) password is pass@word1.
The default rule provides a good level of security, but some users might find it too restrictive and you might prefer to weaken the rule. Alternatively, you might even want to strengthen the password-complexity rule to force users to use passwords that are even more complex.
After you deploy your application, you can change the password-complexity rule by modifying a setting in your web.config file. When you deploy your application in Internet Information Services (IIS), you’ll find the web.config file in the root folder of your LightSwitch application. As mentioned earlier, Forms authentication isn’t recommended for two-tier applications; therefore, this section applies only to three-tier IIS deployments.
Once you find your web.config file, open it in a text editor and search for the ASPNetSQLMembershipProvider element. The membership provider controls the password complexity through the minRequiredPasswordLength and minRequiredNonalphanumericCharacters attributes (shown in Figure 16-9). If these two attributes don’t exist, you can simply add them in.
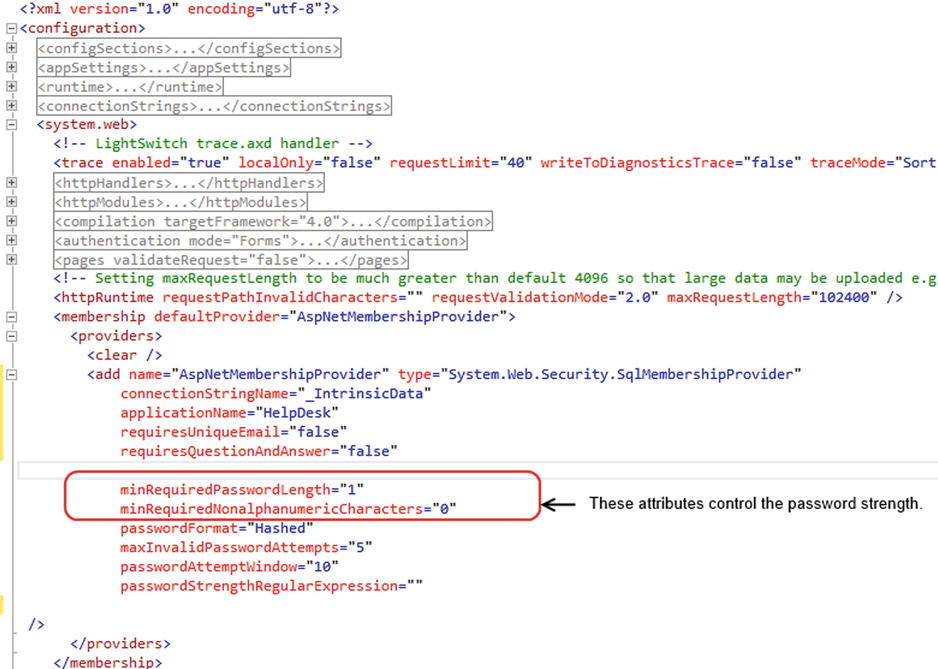
Figure 16-9. Changing the password-complexity rules in the web.config file
Changing Password-Encryption Settings
By default, LightSwitch saves the hashes of the user passwords rather than the clear-text password. This is controlled by the passwordFormat attribute in the AspNetSqlMembershipProvider element of your web.config file (which you also can see in Figure 16-9). There are three choices that you can enter here:
- Hashed
- Encrypted
- Clear
Hashed is the default value and the most secure. When you choose this option, LightSwitch uses a one-way hash algorithm and a randomly generated salt value to encrypt the passwords that it stores in the database. When a user enters a user name and password at logon, LightSwitch hashes the password that is entered and compares it to the value that’s stored in the database.
It’s impossible for you to retrieve the plain-text password values when passwordFormat is set to Hashed. If you want your user passwords to be stored in plain text inside your aspnet_users table, change the passwordFormat setting to Clear. This is obviously less secure because anyone who can access the aspnet_users table can see all your passwords.
Although this is less secure, there are a couple of reasons why you might choose this option:
- You might want to build some mechanism outside of LightSwitch to remind users of their actual password.
- During the initial setup of your application, you might want to pre-load users and known passwords by manually populating the aspnet_users table. Maintaining clear-text passwords simplifies this process and saves you from having to create some additional process to work out the hash or encrypted value.
Sharing Forms Authentication Data with ASP.NET
Let’s imagine that you have an existing ASP.NET web site that uses Forms authentication. Because your web site already contains a set of users, you might want to share these existing credentials with your LightSwitch application. You can set up your LightSwitch application to share Forms authentication details with existing ASP.NET web sites by modifying your web.config file.
To do this, deploy your LightSwitch application to IIS and open the web.config file in a text editor. (See Chapter 18 for more help on deployment.) You’ll need to make the following changes to this file:
- Create a new connection string that points to the authentication database that your existing ASP.NET application uses.
- Update the membership, role, and profile provider strings to reference the connection string that you’ve created.
- Ensure that the same ApplicationName is specified in the provider strings in both your LightSwitch and ASP.NET applications.
- Specify the same machine key setting for both of your applications.
To create a new connection string that references the authentication database that your existing ASP.NET application uses, search for the connectionStrings element. Beneath the _IntrinsicData connection string that’s created by LightSwitch, create a new connection string that points to your existing authentication database (highlighted in Figure 16-10). The new connection string in this example is called _AuthData.
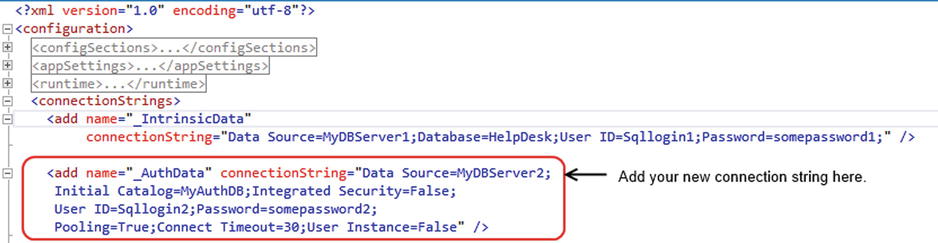
Figure 16-10. Creating a new connection string in your LightSwtich application’s web.config file
Now search for the AspNetMembershipProvider, AspNetRoleProvider, and AspNetProfileProvider entries in the web.config file of your LightSwitch application. By default, the connectionStringName setting for each entry is set to _IntrinsicData by default. Change this to _AuthData (as shown in Figure 16-11).
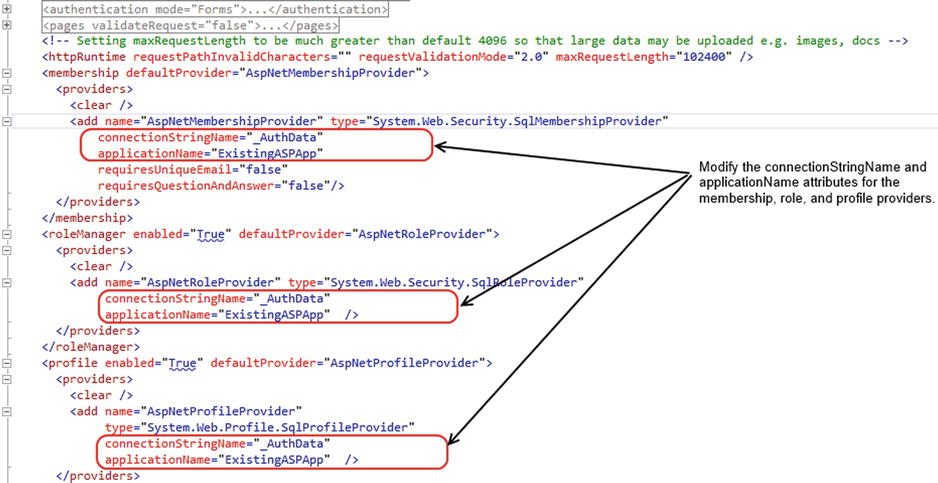
Figure 16-11. Modify the connection string and application name settings
Open the web.config file for your existing ASP.NET application, and search for the AspNetMembershipProvider entry. Find the applicationName that this uses. In this example, let’s assume that the applicationName value is set to ExistingASPApp.
Make sure that the three provider strings in the web.config file for your LightSwitch application specify the applicationName of ExistingASPApp.
You need to have the same machine key defined in both of your applications. Because passwords are hashed (or encrypted), identical machine keys allow both applications to encrypt and decrypt passwords in the same exact way.
If a machine key isn’t specified in the web.config file of your existing application, you’ll need to generate a new key. IIS Manager includes a feature that generates machine keys for you. (See Figure 16-12.) Alternatively, you can search the Web to find online web sites that can generate keys for you. Once you’ve decided on a key, add the machine key entry to the <system.web> section in both of your web.config files. Figure 16-13 shows how this looks.
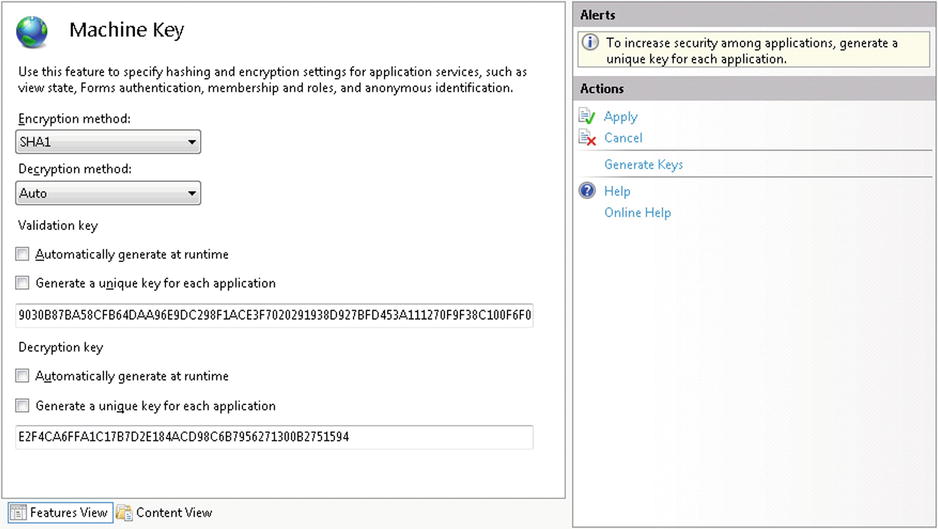
Figure 16-12. The Machine Key dialog in IIS7 Manager
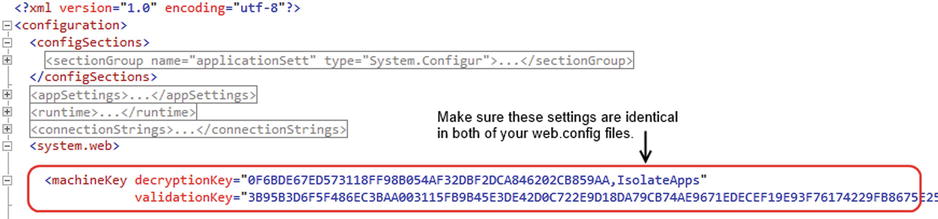
Figure 16-13. Add identical key values to both of your web.config files
Allowing Users to Log Out of Web Applications
Silverlight LightSwitch browser applications don’t include a Logout button, so the only way for a user to log out of a Forms authenticated application is to close their browser.
This behavior isn’t convenient for someone who wants to quit their session and log in as a different user. This example shows you how to add a Logout button to save your users the trouble of closing and reopening their browser.
This technique uses an ASP.NET page to kill the current session, and reloads the web page that hosts your LightSwitch application.
First of all, you’ll need to deploy your application into IIS. (Refer to Chapter 18 for details.) Create a new text file in the web-site folder that contains your LightSwitch application. Now add the content that’s shown in Listing 16-1, and rename your file to LogOff.aspx.
Listing 16-1. Logoff.aspx Code-Behind
VB:
File:HelpDeskVBServerLogoff.aspx
<%@ Page Language="vb" %>
<%
System.Web.Security.FormsAuthentication.SignOut()
Response.Redirect("default.htm")
%>

C#:
File:HelpDeskCSServerLogoff.aspx
<%@ Page Language="C#" %>
<%
System.Web.Security.FormsAuthentication.SignOut();
Response.Redirect("default.htm");
%>
To call this web page, create a button called Logout on your Engineer Dashboard screen and add the code shown in Listing 16-2. You can use the Properties sheet to set an icon for your button. For the code to work, you’ll need to switch to File view and add a reference to the System.Windows.Browser assembly in your Client project. You’ll also need to include the imports or using statements shown in the listing.
Listing 16-2. Execution Code for the Logout Button
VB:
File: HelpDeskVBClientUserCodeEngineerDashboard.vb

Imports Microsoft.LightSwitch.Threading
Imports System.Windows.Browser
Imports Microsoft.LightSwitch.Security

Private Sub Logout_Execute()
   Dispatchers.Main.Invoke(
      Sub()
         HtmlPage.Window.Navigate(
            New Uri("LogOff.aspx", UriKind.Relative))
      End Sub)
End Sub

Private Sub Logout_CanExecute(ByRef result As Boolean)

   Dim logoutCanExecute As Boolean
   Dispatchers.Main.Invoke(
      Sub()
         logoutCanExecute =
            (System.Windows.Application.Current.IsRunningOutOfBrowser =
                 False) AndAlso
             (Application.Current.User.AuthenticationType =
                 AuthenticationType.Forms)
       End Sub)

    result = logoutCanExecute

End Sub

C#:
File: HelpDeskCSClientUserCodeEngineerDashboard.cs
using Microsoft.LightSwitch.Threading;
using System.Windows.Browser;
using Microsoft.LightSwitch.Security;

partial void Logout_Execute()
{
    Dispatchers.Main.Invoke(() =>
    {
        HtmlPage.Window.Navigate(
            new Uri("LogOff.aspx", UriKind.Relative));
    });
}

partial void Logout_CanExecute(ref bool result)
{
   bool logoutCanExecute = false;
   Dispatchers.Main.Invoke(() =>
   {
      logoutCanExecute =
         (System.Windows.Application.Current.IsRunningOutOfBrowser == false)
            && (Application.Current.User.AuthenticationType ==
                AuthenticationType.Forms);
    });

    result = logoutCanExecute;
}
The code in the Logout_Execute method navigates the user to the LogOff.aspx page ![]() . This page contains the logic that signs out the user. The code in the Logout_CanExecute method
. This page contains the logic that signs out the user. The code in the Logout_CanExecute method ![]() hides the Logout button if you haven’t enabled Forms authentication or if your application isn’t running in a browser.
hides the Logout button if you haven’t enabled Forms authentication or if your application isn’t running in a browser.
When the user now runs your application, they’ll be able to log out of your application by clicking on the Logout button. (See Figure 16-14.)
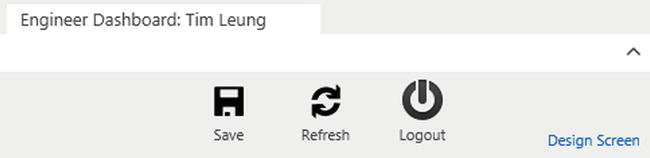
Figure 16-14. Logout button on the command bar
If you want to show a logout command that appears throughout your application, you can attach the logout code to a navigation menu rather than to a button. To do this, you would create a dummy screen and add code to its _CanRun method. The “Opening Screens Conditionally at Login” section in Chapter 17 demonstrates this technique.
Summary
Authentication allows you to determine the identity of your user, and thus control what the user can do in your application.
There are two types of authentication that you can use: Forms authentication and Windows authentication. Windows authentication is the most secure method for a two-tier desktop application.
Windows authentication uses the credentials that your user uses to log into their Windows computer. The advantage of using Windows authentication is that your users don’t need to supply additional credentials when they start your application.
Forms authentication is perfect for Internet applications or for environments that don't have a Windows domain. If you enable Forms authentication, LightSwitch prompts the user to supply a user name and password at login.
For both types of authentication, the administrator enters the user data through a screen that's provided by LightSwitch.
LightSwitch uses the ASP.NET membership provider to manage your users. This stores your user data using tables that belong in your Intrinsic database.
If you choose Forms authentication, your passwords must be eight characters in length and contain a non-alphanumeric character. You can change this rule by amending your web.config file. This file also allows you to change how the membership provider encrypts the password values in your database.
You can share your Forms authentication credentials with other LightSwitch or ASP.NET applications by modifying your web.config file. This would permit users to log in to different applications using the same user name and password. To set this up, you would need to amend the user, role, and profile providers in all systems to use the same authentication database and machine key.
Silverlight LightSwitch web applications don’t include a Logout button. If you want to add this ability, you can create a web page that logs off your user and then create a command in your LightSwitch application that calls this web page.