
![]()
Securing Your Content
The trouble is, you think you have time.
—Gautama Buddha
How much information should your users discover and have access to, and how do you prevent unintentional disclosure of all the other information? This involves security decisions identifying which content to expose and which to keep secret. In this chapter, I provide guidance on analyzing and identifying your security requirements to prevent unauthorized discovery of content and breaches of information, particularly as it relates to your organization’s intellectual property. I also describe how SharePoint implements security to protect and control access to content. Finally, I provide an overview of the Active Directory Rights Management Service (AD RMS) and how it uses encryption to protect content beyond access control.
After reading this chapter, you will know how to
- Describe security concepts and the need to protect information.
- Create a threat model.
- Analyze and identify security requirements.
- Describe and configure SharePoint groups and permissions.
- Configure web application policies and permission levels.
- Understand Active Directory Rights Management Service (AD RMS).
Overview of Security
Not everything should be discoverable by everyone. Some information is sensitive for a variety of reasons, and the disclosure of that information can be damaging. I included this chapter on security in the part of the book that covers discovering content because it completes the picture of content discovery. Part of planning for how your content should be discovered involves planning who should discover the content—and for whom should the content not be exposed.
Connecting users to the information they need is important, a goal to strive toward as you design your search and social computing solutions. But that is only part of the picture, because not every user needs access to every piece of information in an organization.
Even in a highly transparent organization, it is best to hold back or filter some information from a general audience rather than making it directly accessible to every user. Not every member of an organization shares the same context or the same perspective, and so the different users might not interpret the information in the same manner. There are practically a limitless number of reasons and scenarios to secure content, many of which directly relate to the type of content. The following lists examples of several types of content requiring some degree of security to limit its audience from discovering and accessing its information:
- Employment information and other personal employee information
- Intellectual property and proprietary competitive information
- Financial information and other data considered within the insider trading domain
- Business strategy and marketing plans
Another reason is that people might simply feel more comfortable securing their content. Regardless of the reason, you implement security at the content level by managing permissions. Two important concepts for you to understand when planning permissions to secure content are authentication and authorization.
- Authentication concerns the process of confirming the requestor’s identity, such as logging in with an account.
- Authorization concerns the process of confirming a requestor has permission or the rights to take some action, such as permission to access a document.
The two work hand-in-hand, since authorization can only be effective when you are certain you are authorizing the correct account. Figure 12-1 illustrates the difference between authentication and authorization.
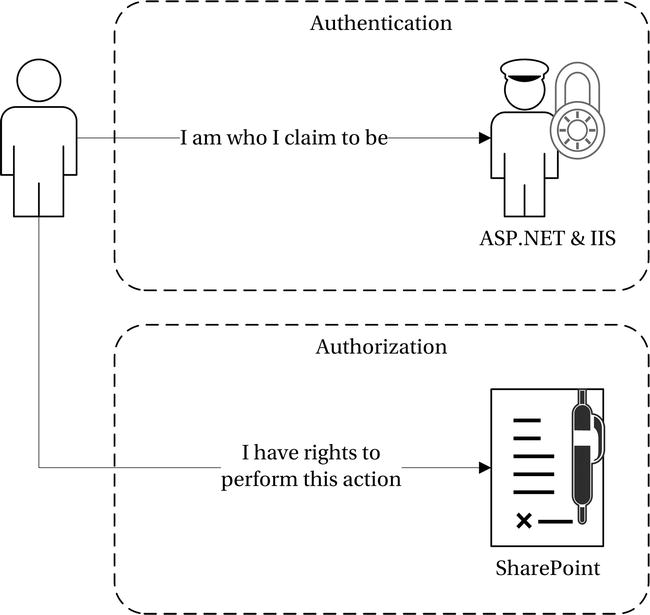
Figure 12-1. Authentication vs. authorization
SharePoint does not perform any authentication. You specify an authentication provider to validate a user’s identity, such as the Windows authentication provider that Internet Information Services (IIS) will use to authenticate a user, or a custom ASP.NET forms authentication provider. Once a user is authenticated, the user’s credentials are passed to SharePoint. SharePoint handles any authorization within the application, and you manage this by restricting permissions to content and granting permissions to users.
![]() Tip As you plan your security solution, design it with a defense-in-depth strategy. This strategy uses layered defenses so that if any one layer is breached and compromised, another layer will limit the exposure and prevent a wider attack. For example, instead of relying on a single firewall, consider using multiple firewalls, and then add other defensive layers with hardened servers and complex service account passwords.
Tip As you plan your security solution, design it with a defense-in-depth strategy. This strategy uses layered defenses so that if any one layer is breached and compromised, another layer will limit the exposure and prevent a wider attack. For example, instead of relying on a single firewall, consider using multiple firewalls, and then add other defensive layers with hardened servers and complex service account passwords.
One challenge with security is that it can sometimes feel chaotic. An attacker can come from practically anywhere and only needs to find a vulnerability in one of the access points. You might feel pulled in every direction, running wild, chasing all sorts of potential threats. What you need is a systematic process to prioritize and focus your security efforts. One such process is to create and use a threat model.
Threat Modeling
A threat model helps you to focus and prioritize your security efforts by modeling possible threats against the risk, cost, and probability of a security breach. Once you design how you want to rank and model potential threats, you will have a systematic process to prioritize your security efforts.
Not all content holds the same value for an organization. As I noted earlier in this book, some content is transitory and will only provide value for a short time, while other content serves as official records, preserving evidence for a transaction or decision.
- Determine the value of an asset to protect.
- Consider the risk and probability of unintentional information disclosure.
- Calculate the costs associated with unintentional information disclosure.
- Evaluate the exposure and attractiveness of the asset to an adversary.
- Estimate the discoverability of an exploit or the asset’s existence.
When I perform a threat model assessment, I usually use an Excel spreadsheet where I list all of the potential threats down the rows. I then list the ranking factors I noted in the previous list across the columns and apply a weight for each factor. Finally, I specify a relative value for each threat and have Excel calculate the overall rating for each threat. You can either sort or highlight the highest priority threats (those most valuable assets with the highest risk for attack).
![]() Note Microsoft provides a threat modeling tool to help you analyze the security of a system. You can download the tool at www.microsoft.com/download/details.aspx?id=2955.
Note Microsoft provides a threat modeling tool to help you analyze the security of a system. You can download the tool at www.microsoft.com/download/details.aspx?id=2955.
It is important for you to consider all the possible threats and vulnerabilities in your system, not just the obvious. Your threat model will be incomplete otherwise. Part of your threat model should consider the different users of the system and how they access the system. A large portion of your threat model for a SharePoint farm should consider the intended content you will be storing within the farm, content such as official records, financial information, and intellectual property.
IDENTIFYING YOUR INTELLECTUAL PROPERTY
Intellectual property (IP) is a work or invention resulting from creativity, often produced through research and development. A unit of information containing intellectual property is often valuable to an organization and something to protect because it will be damaging to an organization if the information is disclosed to the wrong party. Usually, intellectual property provides a competitive advantage to an organization.
This valuable and sensitive content warrants special attention in your threat model. Identify and list any intellectual property assets within your organization, and then ensure your users apply the appropriate security policies to protect this content.
Analyzing Your Information Security Requirements
First and foremost, you need to decide what information consists of a secret and what you can make available for general knowledge. Too much security, where everyone locks down their content to a limited audience, only leads to information silos. The risk here, of course, is that other knowledge workers will not be able to discover and benefit from the knowledge contained in a limited workgroup.
If you created a content inventory, as I discussed in Chapter 3, you will have a sense of what kinds of content the different sites store. This can help you determine how secure or how open the content should be. You can also use content classifications to guide decisions about the appropriate level of security based on an organization-wide classification scheme such as Sensitivity or Security Level.
![]() Note Please see Chapter 6, where I discuss content classifications in more detail.
Note Please see Chapter 6, where I discuss content classifications in more detail.
As you analyze your information security requirements, you also need to consider the security of the SharePoint farm itself. If an attacker is able to compromise a farm, he or she will be able to thwart the security you apply within the farm. You can secure your farm using a defense-in-depth strategy and limiting the available attack surface. Some farm security strategies I consider include:
- Disabling unnecessary services
- Not installing extraneous software or components
- Blocking unused ports
- Deploying firewalls and proxy servers to segregate the SharePoint and database servers
![]() Note For more information and guidance on planning security hardening for SharePoint 2013 servers and farms, please see the TechNet article at http://technet.microsoft.com/cc262849.
Note For more information and guidance on planning security hardening for SharePoint 2013 servers and farms, please see the TechNet article at http://technet.microsoft.com/cc262849.
You can also limit the surface available for attack by disposing any unused or no longer needed content. I discuss and provide guidance on content retention and disposition in Chapter 15, but I wanted to point it out here because once you dispose of content, it is no longer at risk for a security attack. There are plenty of reasons to dispose of content in a timely manner, and avoiding security breaches is one.
A good portion of your security requirements will relate to who may access particular content and what rights a user will possess to take actions against the content. In SharePoint, these access controls are managed through SharePoint permissions and SharePoint site groups.
Configuring SharePoint Groups and Permissions
You can grant permissions to a SharePoint group and add the user to that group, or you can grant the permissions directly to the user in a site. I prefer to add users to SharePoint groups and only assign permissions to the group because this makes it easier to update and manage any permissions in the future.
By default, a SharePoint site is created with three SharePoint groups: site owners, site members, and site visitors. You can add user accounts directly to these groups and the accounts will be granted the permissions applied to the group. Alternatively, you can add an Active Directory security group to the SharePoint group membership if you prefer to manage group membership through Active Directory. The default SharePoint site groups hold the following permissions:
- Site Owners: Group members are granted full control over the site, including granting permissions to other users.
- Site Members: Group members are granted contributor access to the site, where they can add, edit, and delete items in lists and libraries.
- Site Visitors: Group members are granted read access to the site.
Navigate to the Site Settings page, and then click People and Groups to manage the group membership. Select a group from the left navigation menu and click the New tab for the group to display the drop-down menu shown in Figure 12-2. In the Share modal window, add the name or e-mail address for each user you want to add to the group’s membership. You can also add “Everyone” to the group to grant the group’s permissions to all authenticated users. Click the Share button to complete adding the users to the SharePoint site group.

Figure 12-2. The SharePoint site group’s Add Users button
![]() Note For an example walking through the steps of creating a custom SharePoint site group, please see Chapter 11, where I explain how to create a custom group for eDiscovery Case Managers.
Note For an example walking through the steps of creating a custom SharePoint site group, please see Chapter 11, where I explain how to create a custom group for eDiscovery Case Managers.
You can view the permissions assigned to a site group by clicking the View Group Permissions menu option on the group’s Settings drop-down menu, as shown in Figure 12-3. This allows you to view the group’s permission level assignments for the site and any subsite in the site collection.
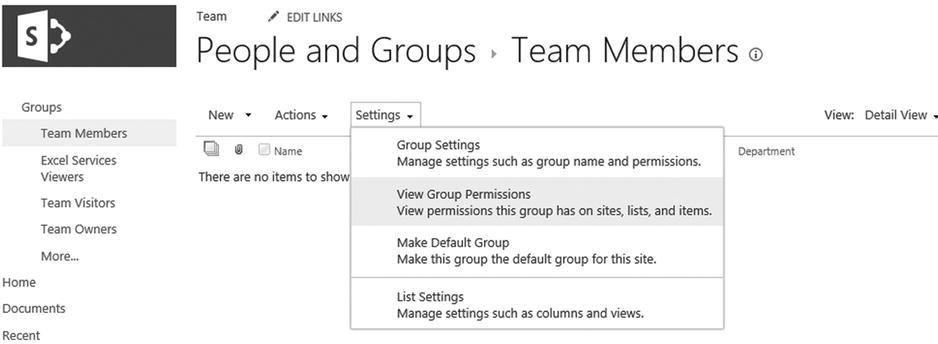
Figure 12-3. The People And Groups settings page
When you create a new SharePoint site group, you assign the permission level to the group. If you need to assign a different permission level to the site group, you can modify the permission level settings on the Site Permissions page. To modify a group’s permission level, follow these steps:
- Navigate to the Site Settings page.
- In the Users and Permissions section, click Site Permissions to navigate to the Permissions page shown in Figure 12-4.
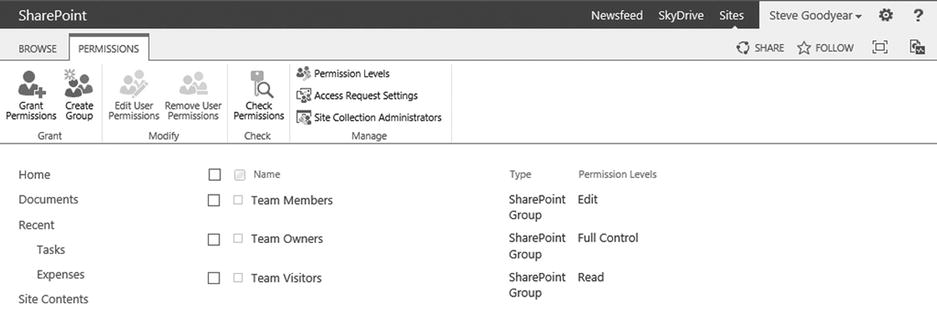
Figure 12-4. The Permissions page
- Click the check box for the group you wish to edit the permissions for and click the Edit User Permissions button in the ribbon.
- On the Edit Permissions page, select the desired permissions you want to grant to the group and click OK.
By default, SharePoint offers the following permissions levels to choose from:
- Full Control: Can manage permissions and administer the entire site and its content
- Design: Can view, add, update, delete, approve, and customize
- Edit: Can add, edit, and delete lists; can view, add, update, and delete items
- Contribute: Can view, add, update, and delete items
- Read: Can view pages and list items and download documents
- View Only: Can view pages, list items, and documents
These six sets of permissions are referred to as permission levels. Permission levels group individual permission rights for a user or group. In most cases, these defaults will suffice. However, at times you may have a requirement to grant a different combination of permission rights for a user, such as a subset of the permission rights in an existing permission level. In those cases, you can create a custom permission level.
![]() Tip It is always better to create a custom permission level rather than edit an existing permission level. Users will expect the default permission levels to behave a certain way. As such, users will not anticipate you changing the individual permission rights for one of those default permission levels, an unexpected change that could then cause a security or usability issue.
Tip It is always better to create a custom permission level rather than edit an existing permission level. Users will expect the default permission levels to behave a certain way. As such, users will not anticipate you changing the individual permission rights for one of those default permission levels, an unexpected change that could then cause a security or usability issue.
To create a custom permission level, follow these steps:
- Navigate to the Site Permissions page shown in Figure 12-4.
- Click the Permission Levels button in the ribbon.
- On the Permission Levels page, click the Add A Permission Level button.
- On the Add A Permission Level page shown in Figure 12-5, specify a name and description for the custom permission level and select the desired permissions to include. Finally, click Create.
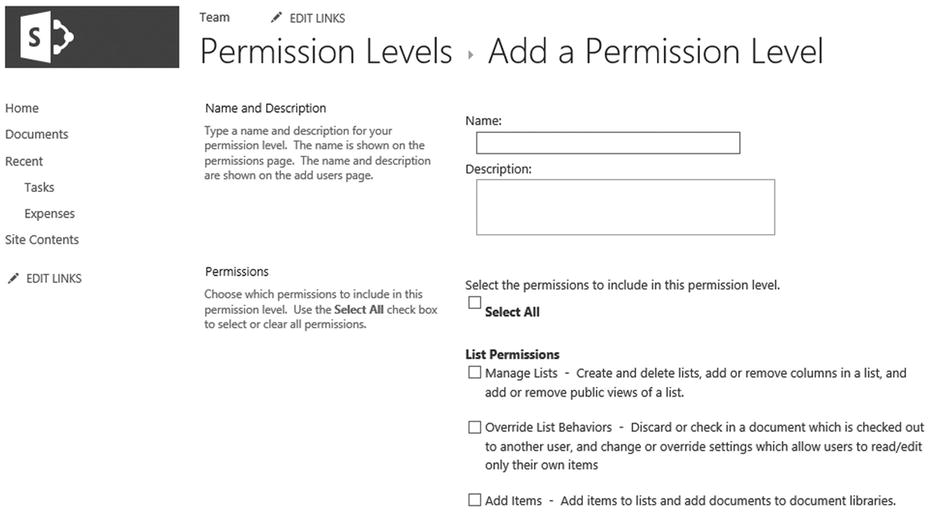
Figure 12-5. The Add A Permission Level page
SharePoint offers the following individual permission rights that you can include in a custom permission level. This list shows how granular you can configure and set permissions for a SharePoint site group to grant users and fulfill a variety of permission requirements.
- Manage Lists
- Override List Behaviors
- Add Items
- Edit Items
- Delete Items
- View Items
- Approve Items
- Open Items
- View Versions
- Delete Versions
- Create Alerts
- View Application Pages
- Manage Permissions
- View Web Analytics Data
- Create Sub-sites
- Manage Web Site
- Add and Customize Pages
- Apply Themes and Borders
- Apply Style Sheets
- Create Groups
- Browse Directories
- Use Self-Service Site Creation
- View Pages
- Enumerate Permissions
- Browse User Information
- Manage Alerts
- Use Remote Interfaces
- Use Client Integration Features
- Open
- Edit Personal User Information
- Manage Personal Views
- Add/Remove Personal Web Parts
- Update Personal Web Parts
Some requirements involve granting users permission to every site collection in a web application. One option is to grant these permissions on each individual site collection, which can quickly become a management headache. For this reason, the SharePoint team added the ability to set a user policy to grant permissions for an entire web application.
Configuring Web Application User Policies
You may also wish to deny certain permission rights for users or groups and apply this restriction globally on a web application. You can set this using a user policy as well. To apply a user policy to a web application, follow these steps:
- Navigate to the SharePoint Central Administration and click Manage Web Applications.
- On the Manage Web Applications, select the web application for which you wish to apply a user policy.
- Click the User Policy button in the ribbon.
- On the Policy for Web Application page, click the Add Users button.
- If desired, specify a zone for the user policy. Click Next.
- On the Add Users page shown in Figure 12-6, specify the users and choose the permissions to grant or deny. Click Finish.
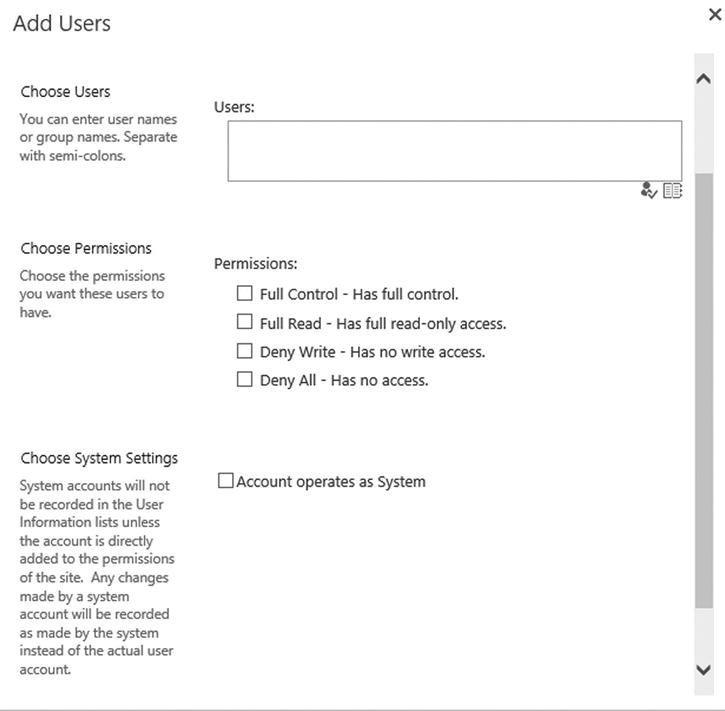
Figure 12-6. The Add Users page for a web application User Policy
By default, SharePoint offers four Permission Policy Levels:
- Full Control: Has full control
- Full Read: Has full read-only access
- Deny Write: Has no write access
- Deny All: Has no access
You may have requirements that need a special combination of permission rights to grant or deny to users on an entire web application. To create a custom permission policy, follow these steps:
- Navigate to the Manage Web Applications page in SharePoint Central Administration.
- Select the desired web application and click the Permission Policy button in the ribbon.
- Click the Add Permission Policy Level button on the Manage Permission Policy levels page.
- Specify the desired settings on the Add Permission Policy Level page shown in Figure 12-7. Click Save.
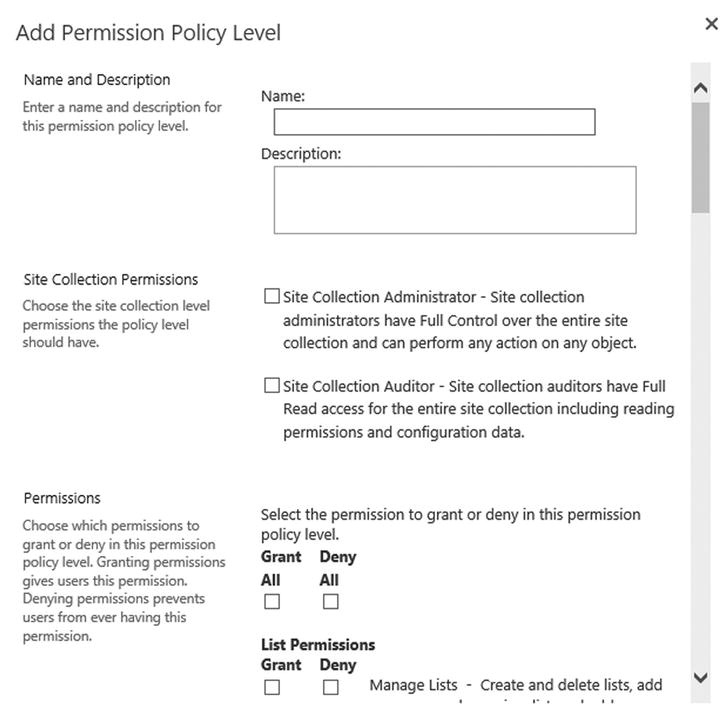
Figure 12-7. The Add Permission Policy Level page
Notice that you can create a permission policy level to grant Site Collection Administrator or Site Collection Auditor permissions. The administrator is the same as the Full Control default permission policy level. The auditor option allows you to grant full read access to the entire site collection for every site collection in the web application. This can be a useful option for managing eDiscovery or auditing permissions.
Each permission right offers the ability to grant or deny the permission. Creating a custom permission policy level and denying the desired permission level offers an effective solution to remove functionality from an entire web application for specified users whenever you want to prevent certain functionality.
Understanding Rights Management Service (RMS)
An Access Control List (ACL) stores the permission entries that determine which users can access a resource and what actions they can take on the shared copy. However, once a user executes his or her permission to access and download a piece of content, the access controls no longer enforce any restrictions on the content. One security risk with this security model is when a user downloads a file and then forwards it to another user who may not have permission granted to the original location.
The risk for this type of accidental or intentional disclosure of sensitive information drives the need for security that can protect a secret contained in a document beyond the initial access. Rights Management Service (RMS) mitigates this risk by providing an extra layer of security for a document using encryption technology. RMS encrypts a document, leaving it in an unreadable state.
When a user accesses a rights managed document, the Rights Management Service’s client component contacts the Rights Management Service to identify what rights to grant the user. Figure 12-8 illustrates how RMS adds an additional layer of security in the content request process.

Figure 12-8. Added layer of Rights Management Service in the content access process
There are several reasons you might want to protect content with the added layer of Rights Management Service, including:
- Enforce a limited audience for a piece of content.
- Expire a piece of content after a specific duration.
- Prevent printing, copying, and taking screenshots of a piece of content.
The different scenarios you can implement using the Rights Management Service stem from different combinations of permission rights settings. You can grant or restrict the following permission rights for a piece of content:
- Full Control: Grants users every right listed, plus the right to change permission rights for the protected content.
- View: Allows users to open and read the protected content.
- Edit: Allows users to edit and change the protected content.
- Save: Allows users to save a protected file.
- Extract: Allows users to make a copy of any part of the protected content and paste it into another application.
- Export: Allows users to save the protected content in another file format using the Save As command.
- Print: Allows users to print the protected content.
- Allow Macros: Allows users to run macros against the protected content.
- Forward: Allows e-mail recipients to forward a protected message and to add or remove recipients.
- Reply: Allows e-mail recipients to reply to the sender of a protected message.
- Reply All: Allows e-mail recipients to reply to all recipients of a protected message.
- View Rights: Allows users to view the permission rights associated with the protected content.
![]() Note For more information about the Active Directory Rights Management Service (AD RMS), please see the TechNet article at http://technet.microsoft.com/hh831364.
Note For more information about the Active Directory Rights Management Service (AD RMS), please see the TechNet article at http://technet.microsoft.com/hh831364.
SharePoint is aware of the Rights Management Service and detects protected content when a user saves it to a library. Before saving a protected document, SharePoint will access the Rights Management Service and decrypt the document; it will then encrypt the content again before streaming any downloads to users. The reason it stores content without the Rights Management encryption applied is to optimize the search indexing process, otherwise the index crawler would have to decrypt each document every time it crawled content in a SharePoint farm.
To enable SharePoint to work with the Rights Management Service, navigate to SharePoint Central Administration and configure the settings in the following steps.
- Click the Security link in the left navigation menu to navigate to the Security page.
- Click the Configure Information Rights Management link in the Information Policy section to navigate to the Information Rights Management page.
- On Information Rights Management page, select to use the default RMS server, as shown in Figure 12-9. Alternatively, you can specify a RMS server. Click OK.
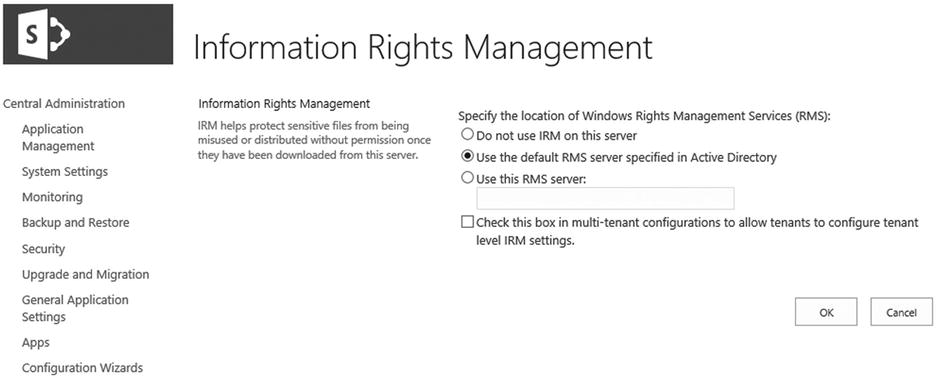
Figure 12-9. The Information Rights Management settings page
![]() Note For more information about Rights Management Service in SharePoint 2013, please see the TechNet article at http://technet.microsoft.com/cc179103.
Note For more information about Rights Management Service in SharePoint 2013, please see the TechNet article at http://technet.microsoft.com/cc179103.
Inside Story: Notes from the Field
Securing a piece of content prevents others who lack permission from discovering it or its contents. In most cases, this is the desired behavior for the application. Users who have rights to access and read content are able to discover and consume the available information, and users who lack the necessary rights will most likely be oblivious to the content’s existence since SharePoint security trims the item from search and site pages based on what a user has permission to view. But what about a user who needs to conduct research across the organization but who does not warrant holding permissions to every piece of content?
Usually, having SharePoint filter out search results a user does not have permission to access (also known as security trimming) improves the user experience, because users do not want to click on a result that interests them, only to discover they do not have permission to view it. Just from the very nature of showing a search result can expose a security hole, even without providing access to the content itself. SharePoint search results include the title, a summary, and often even a preview of the content, which can disclose sensitive information if the result is not security trimmed. For example, if I conduct a search for “layoffs 2013” and see an Excel spreadsheet in the search results, I could learn some details about an upcoming event that the organization did not yet want to disclose.
Nevertheless, if SharePoint filters out the results users do not yet have permission to view, then a researcher cannot discover the content until he or she becomes aware of its existence and then requests permissions to access it. This can affect productivity and even lead an organization to make incorrect decisions based on limited information.
![]() Note For more information about SharePoint search, please see Chapter 9.
Note For more information about SharePoint search, please see Chapter 9.
I had this requirement come up once when I was consulting with a mining company. This firm has a large corpus of information about its different mining operations, as well as any potential mining sites it researched or conducted feasibility studies for. Sites can be attractive for a variety of reasons, but there are times when the market prices for a particular mineral or resource does not warrant the costs with establishing a mine at the time. When the market shifts and the prices rise, then a particular site may become more attractive. Therefore, the mining company collects and saves all its research for future feasibility studies, whether it purchases rights to a site or not.
The challenge is that people may turnover or transfer to new divisions, or the firm may acquire new information by acquiring a new firm. All of this information represents a significant portion of the firm’s intellectual property and competitive advantage; thus, they need to secure the content and limit its audience to provide access strictly on a need-to-know basis.
Geologists and other researchers for a site needed a reliable way to discover the content and knowledge the firm already has about a site to avoid duplicating efforts or overlooking an opportunity. Here I identified the security-related discovery requirement: a researcher’s access level cannot prevent them from discovering that the organization possesses some knowledge (a piece of content or some other unit of information) relating to a topic (the search query).
I implemented the solution for this requirement by customizing the security trimming behavior in the search results. Rather than trim the result, I displayed a custom result informing the user that the submitted query matched a search result in some way, but that the user did not have permission to view the result. I suppressed any information about the content, including its title or description, and simply listed a contact who could grant permission to the piece of content.
Although this exposes some security information because it reveals that a result does exist for a particular query, it does not disclose any details about the content, offering a compromise where researchers can discover content otherwise hidden from them while following the principle of least privilege.
THE PRINCIPLE OF LEAST PRIVILEGE
Jerry Saltzer and Mike Schroeder first defined the principle of least privilege in a co-authored 1974 IEEE paper on computer security titled “The Protection of Information in Computer Systems.” They define the principle as, “Every program and every user of the system should operate using the least set of privileges necessary to complete the job.”
Operating using the absolute least privileges required for a task reduces the available surface for attack. If an attacker compromises a user’s account, the attack will at least be contained as much as possible because, ideally, the user account will not have wide and unlimited access to network resources.
Wrapping Up
Information you make available to your organization’s users typically consists of knowledge beneficial to everyone, contributing to everyone’s productivity, and the disclosure of which to a wider audience will not be damaging. This availability of information allows others to collaborate and build on each other’s ideas, extending the organization’s knowledge and wisdom. For other more sensitive information, you can prevent its discovery and disclosure to a wider audience by securing it. In this chapter, I provided guidance on how to determine the security needs for a piece of content by building a threat model and analyzing security requirements. I also discussed how to configure security settings in SharePoint and how to utilize Rights Management Service.
Securing content specifies which users can discover a piece of content and which users cannot. The security requirements might change over time as the content itself progresses through its life cycle, particularly as you archive the content or declare it as an official record. The chapters in the next part of this book focus on those topics related to capturing and archiving records, including their retention and disposition. I begin in the next chapter by first looking at how to design the organization hierarchy or content classification index for your records repository, a taxonomy known as a file plan.