
![]()
Faster Canvas Picking
If you’re writing a 2D game in HTML5, chances are that you’ll want the user to have the ability to pick an object on the screen. More specifically, at some point, the user will need to select some item on the screen, or in your game, which may represent part of the world. We call this “picking” as the user is selecting what object they are interacting with. Consider, for instance, your standard social time-management game. The user is presented with a 2.5D play area where bitmaps (or “sprites”) are rendered with some perspective distortion on the screen. For the more advanced users, you can quickly saturate the play area with these sprites, often stacking many of them together, only leaving a few pixels visible between overlapping objects. In this environment, determining the picking result of a mouse click is quite difficult. The canvas API doesn’t provide any form of pixel-based selection and the large number of objects makes it difficult to brute-force the technique. This section will cover how to address performance and accuracy problems in canvas picking using a few old-school techniques that most of us have forgotten about.
Creating Pickable Objects
For the sake of simplicity, I’ll first introduce the most basic form of 2D picking I can, which is simply doing a point-to-rectangle test for each object in the scene. This type of brute force technique will yield accurate results, but not the most precise results (I will cover how to get “precise” picking later), especially where two sprites are overlapping. But before we tackle that topic, let’s first start off with a few definitions of objects we’ll use throughout this section, the SpritePrototype and SpriteInstance.
As with most 2D canvas games, your world will not be populated with millions of unique bitmaps, but rather millions of objects where large groups of them share similar bitmaps between them. As such, it makes no sense to load a given image into memory for each sprite that uses it; you’d have duplicate versions of the images, for each instance of the sprite that exists, sitting around in main memory, which could quickly become a problem.
A much more performant solution is to simply load your images a single time and create references to them as each instance is created. You effectively cache the prototype images into a large array, which can be referenced by the individual instances later. The sample SpriteProto class that follows is pretty simplistic. It contains a filename field, alongside width and height (important later for picking, or in the future when using atlases; see http://en.wikipedia.org/wiki/Texture_atlas for more information). The most interesting part of this class is the load function, which given a filename will invoke JavaScript to load the image into memory. Once loaded, a SpriteProto object will then retain a handle to the loaded image in the imgHandle member (see Listing 5-1).
Listing 5-1. The SpriteProto definition
function SpriteProto(){
    this.filename="";
    this.imgHandle=null;
    this.size={w:0,h:0};
    this.load= function(filename,w,h)
    {
        var targetSpriteProto = this;
        this.size.w = w;
        this.size.h = h;
        var img = new Image();
        img.onload = function(){
            targetSpriteProto.imgHandle = img;
        }
        img.src = filename;
    }
}
For most game build-chains, you’ll generally create some sort of designer or artist-centric view of the world ahead of time. That is, before this level is actually loaded by the user, you have a pretty good idea what assets will be needed to load, simulate, and display this level. As such, you don’t define a complex asset dependency hierarchy here, but rather brute-force the loading of your basic proto-sprites so that they can be used by object instances later. During your initialization, you fill the globally accessible protoSprites array using the loadProtos function (see Listing 5-2).
Listing 5-2. Loading a set of prototype images
var protoSprites = new Array();
//--------------
function loadProtos()
{
    //technically, this should be an atlas definition!
    var imgs=[
        {nm:"0.png",w:66,h:42},
        {nm:"1.png",w:66,h:52},
        {nm:"2.png",w:66,h:46},
        {nm:"3.png",w:70,h:65}
        ];
    for(var i =0; i < imgs.length; i++)
    {
        var sp = new SpriteProto();
        sp.load(imgs[i].nm,imgs[i].w,imgs[i].h);
        protoSprites.push(sp);
    }
}
Note that for your purposes, you don’t just list the path to the image, but also the width and height of the bitmap in pixels. These image-specific bounding conditions are important for gross-level picking that we’ll discuss a bit later in the bounding boxes section.
Representing Objects
Now that you have your images loaded and in a form you can reference, you need to generate the actual objects that will populate your canvas and be targets for picking. To this end, you create a new SpriteInstance class.
You’d expect the basic two parameters of this class, position and size, which you will use for picking later. You also add a few other parameters: a unique ID value, alongside a ZIndex, which is useful for sorting during rendering, and collision resolution. And of course, you need a reference to what ProtoSprite object you’ll be using to render (see Listing 5-3).
Listing 5-3. Definition of a SpriteInstance
function SpriteInstance(){
    this.id=0;              //the unique ID for this object
    this.zIndex=50;         //needed for rendering and picking resolution, range [0,numObjects]
    this.pos={x:0,y:0};
    this.size={w:0,h:0};
    this.spriteHandle=null; //what sprite we’ll use to render
For your simple uses, you need to populate the world with pickable objects, and to do so, you simply flood the given canvas with randomly placed objects. Note that you store the generated sprites in a global array for other systems to access later on (see Listing 5-4).
Listing 5-4. Populating the scene with randomly located SpriteInstances
var spriteInstances = new Array(); //global list of active sprites
//--------------
function generateInstances()
{
    var numSprites = 4096; //magic number
    for(var i = 0; i < numSprites; i++)
    {
        var sp = new SpriteInstance();
        sp.id = i;
        sp.zIndex = i; //just to keep my sanity...
        sp.pos.x = Math.floor(Math.random() * (500)); //random point on canvas
        sp.pos.y = Math.floor(Math.random() * (500));
                        //choose a random sprite to render this with
        var idx = Math.floor(Math.random() * (protoSprites.length));
        sp.spriteHandle = protoSprites[idx];
        sp.size = sp.spriteHandle.size;

        spriteInstances.push(sp);
    }
}
When you’d like to draw the sprites, you simply iterate over each instance, fetch its corresponding spriteHandle, and use that to draw to the canvas with the correct position data (see Listing 5-5).
Listing 5-5. Drawing the sprites in the scene
function drawSprites()
{
    //note that zIndex = i here, so this rendering is correct according to depth
    for(var i =0; i < spriteInstances.length;i++)
    {
        var sp = spriteInstances[i];
        var ps = sp.spriteHandle;
        ctx.drawImage(ps.imgHandle,sp.pos.x, sp.pos.y);
    }
}
See Figure 5-1 for an example of this code in action. Note that this is NOT the way you should be doing rendering in your production code. Real games have various types of restrictions and orderings for depth from their sprites. It's a complex dance between artist-generated content and runtime performance achieved by sorting of sprites. This simple example avoids all this, since a discussion of that size is beyond the scope of this chapter.
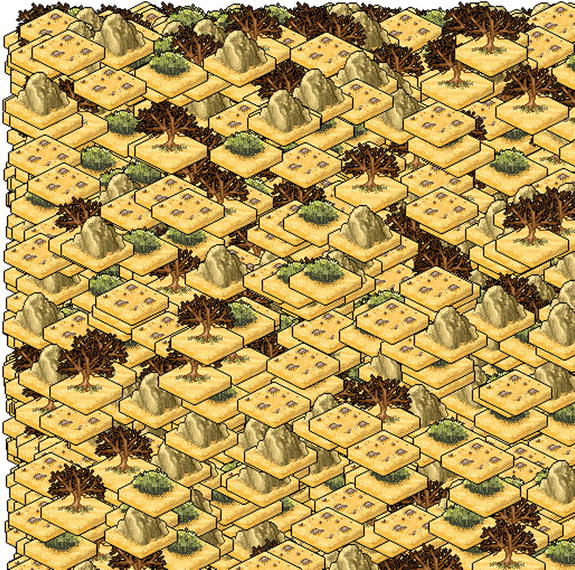
Figure 5-1. The results of rendering sprites onto the canvas
Basic Picking with Bounding Boxes
Since your SpriteInstance object supports both position and size information, the most straightforward way to determine what sprite has been picked is to test the given point against the bounding box of the sprite. In this simplistic model of picking, all that’s needed is a simple loop over all the sprites in the scene, and to test which of their bounding-boxes intersect with the given x,y point on the canvas (given from the mouse); see Listing 5-6.
Listing 5-6. Find the desired sprite by looping through all instances, and determining which one contains the XY pair. Note that this function returns the FIRST instance it finds
function findClickedSprite(x,y)
{

 //loop through all sprites
 for(var i =0; i < spriteInstances.length; i++)
 {
  var sp = spriteInstances[i];
  //pick is not intersecting with this sprite
  if( x < sp.pos.x || x > sp.pos.x + sp.size.w ||   y < sp.pos.y || y > sp.pos.y + sp.size.h)
   return sp;
}
return null;
}
In Listing 5-6, you’re completely ignoring z-ordering and complex depth stacking, and just returning the first sprite that contains this selection point. Don’t worry; we’ll get to that later.
Caveats
As mentioned, the brute-force, bounding-box method of picking is quite effective for scenes with low object count. However, once the number of objects in your scene increases, this technique will quickly reveal performance problems, especially on underpowered devices. Another particular issue is scene depth complexity—that is, how many overlapping sprites you have. Once you start adopting more aggressive versions of depth complexity, you’ll quickly find that this method is unacceptable to user input and expectations, and you’ll need a more fine-grain solution.
Let’s say you’re building a complex app and you have thousands of images in flight when a user clicks. You’ll quickly see that the performance burden lies in the inner loop of the sprite-to-point collision test, and although a simple bounding-box test will be the quickest to implement, you still end up touching a lot of items that aren't even remotely near the point in question.
The solution to this is to introduce a spatial acceleration structure to your canvas. This data structure organizes/separates your sprites spatially, such that you speed up spatial tests by only referencing items that are reasonably co-located. There’s lots of variants for SAS (for example, scene graphs, bounding volume hierarchies, quadtrees, and octrees), each having a unique set of pros, cons, and trade-offs, the analysis of which is outside the scope of this section.
For your purpose, you will use a very simplistic 2D binning algorithm, which will divide your canvas into a grid of cells (of fixed sizes); each cell will contain a list of objects that touch that cell, allowing a sprite to be listed in multiple cells (see Figure 5-2).
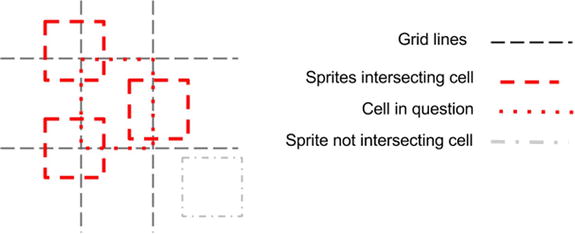
Figure 5-2. Given a 2D grid, you can determine what sprites overlap with what cells. Later, when a pick event occurs, you can determine what cell the point resides in, and reduce the number of per-sprite checks you need to perform
Your BucketGrid class will effectively create a 2D array of arrays, such that when a sprite is spawned, you calculate what grid cells it overlaps, and add a pointer to this instance to each of those cell’s lists; see Listing 5-7.
Listing 5-7. Definition of a BucketGrid
function BucketGrid(){
    this.tileSize=32;
    this.numXTiles=0;
    this.numYTiles=0;
    this.tileData=null;

    this.init=function()
    {
        this.tileData = new Array();
        this.tileSize = 16;
        this.numXTiles= 512/this.tileSize;
        this.numYTiles= 512/this.tileSize;

        this.tileData.length = this.numXTiles*this.numYTiles;
        for(var k =0; k < this.tileData.length;k++)
            this.tileData[k] = new Array();
    }
Marking a sprite instance on the grid is pretty simple. You just run some math on the corners of the sprite to calculate the min/max boundaries of it, and what tiles those boundaries fall into; and for each grid cell, you add the sprite to the containing list (see Listing 5-8).
Listing 5-8. Given a sprite, mark which grid cells it overlaps in
this.markInstanceInAccelGrid=function(sp)
{
    var gridminX = Math.floor(sp.pos.x / this.tileSize);
    var gridmaxX = Math.floor((sp.pos.x + sp.size.w) / this.tileSize);
    var gridminY = Math.floor(sp.pos.y / this.tileSize);
    var gridmaxY = Math.floor((sp.pos.y + sp.size.h) / this.tileSize);

    if(gridmaxX >= this.numXTiles) gridmaxX = this.numXTiles-1;
    if(gridmaxY >= this.numYTiles) gridmaxY = this.numYTiles-1;

    for(var y = gridminY; y <=gridmaxY; y++)
    {
        var idx = y*this.numXTiles;
        for(var x = gridminX; x <=gridmaxX; x++)
        {
            this.tileData[idx+x].push(sp);
        }
    }
};
This makes finding entities extremely quick, because you've already pre-sorted the environment. When a mouse-click comes in, you simply find the bucket it resides in, and return the list of entities for that bucket, which you've already calculated.
this.getEntsForPoint=function(x,y)
    {
        var gridminX = Math.floor(x / this.tileSize);
        var gridminY = Math.floor(y / this.tileSize);
        var idx = gridminX + gridminY*this.numXTiles;
        var ents = this.tileData[idx];
        return ents;
    };
}
This makes modification to your existing code very nice and tidy:
function findClickedSprite(x,y)
{

 //loop through all target sprites
var tgtents = acclGrid.getEntsForPoint(x,y);
 for(var i =0; i < tgtents.length; i++)
 {
  var sp = tgtents[i];
  //pick is not intersecting with this sprite
  if( x < sp.pos.x || x > sp.pos.x + sp.size.w ||   y < sp.pos.y || y > sp.pos.y + sp.size.h)
   return sp;
}
return null;
}
The acceleration grid reduces performance overhead by reducing the number of times the inner loopis called; regardless of how many sprites you have universally, this bucketing will only care about what sprites reside in a grid cell. An easy trade-off in bang-for-the-buck; you didn't have to derail yourself by worrying how JavaScript is handling the math for convex hulls or the array-access times for pixel-perfect picking (both covered later in this chapter). It’s a simple technique that can be used for static and dynamic environments.
Note that to use the grid, an entity needs to be responsible for updating its markings on the grid. For your simple purpose, you only need to update the entity spawning code to mark the location of the object in the grid (see Listing 5-9).
Listing 5-9. Inserting the BucketGrid into the existing code
//--------------
var protoSprites = new Array();
var spriteInstances = new Array();
var acclGrid = new BucketGrid();
//--------------
function generateInstances()
{
    acclGrid.init();

    var numSprites = 4096; //magic number
    for(var i = 0; i < numSprites; i++)
    {
        //.......

        spriteInstances.push(sp);
        acclGrid.markInstanceInAccelGrid(sp);
    }
}
Caveats
This type of spatial acceleration structure is always in demand for games. It’s primary goal is to reduce the number of potential intersections to a defined list that is always smaller than the entire set. And to be clear, your BucketGrid structure did nothing to increase the precision of your picking, but only increased the performance of your picking. We will discuss precision issues more in the following sections.
One large issue to keep an eye on is that as your game evolves, your spatial structure will need to adapt to take into account objects that move, objects that have been scaled/rotated, etc. Without proper gardening, it’s easy to generate bugs with object spawn/update/die lifecycles. In these cases, it may be wise to generate versions of spatial grids, each one specialized to the objects that need it. For example, a static 2D binning grid is fine for static objects, but dynamic ones may need a more aggressive quadtree hierarchy, or perhaps a k-dimensional tree.
Take care of your spatial grid, and it’ll remain a strong data structure for your games.
For games that utilize picking for desktop applications, pixel-perfect response to a mouse click is crucial. Multiple images can be overlaid against each other, and each one can have varied alpha footprints which in no way match their conservative bounding box estimates. As such, to do a pixel-perfect pick of an object on the screen, you’ll need to be able to determine what pixel from what image was clicked on and what object instance that image belongs to.
In order to do this in HTML5, you need to introduce two separate data structures, a sprite prototype, which represents a single loaded image sprite, and a sprite instance, which represents an instance of the prototype on the canvas—that is, you assume that a single image is used multiple times on a canvas.
- The process for pixel-perfect picking is really straightforward. You need to load an image, somehow get access to its pixel data, and keep that around in memory for access later.
- As objects are created and drawn to screen, you need a reference back to what image it’s using.
- When the user clicks, you need to find what objects intersect with that click, and then per-object, check if the click has hit a transparent or opaque section of the image representing that object.
Step 3 is where the real magic happens: being able to check for intersection against transparent or opaque pixels allows your game to overlay images on top of each other, and you can still determine, at pixel granularity, which image/object was selected (see Figure 5-3).
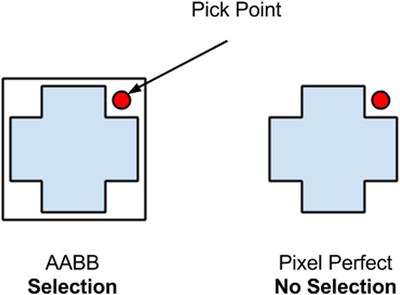
Figure 5-3. Valid areas for bounding-box picking vs. pixel-perfect picking. Since the bounding-box for an object is larger than its discrete bounds, a selection does not need to be pixel perfect
Loading Pixel Data
The cornerstone of your picking process is assuming that your images contain alpha values, and that you can access those pixels during a pick operation to determine if the selected point is in a transparent or opaque part of the image, which you generally assume is loaded this way:
var img = new Image();
img.onload = function(){alert(‘loaded!”);}
img.src = filename;
The problem here is that in JavaScript you don’t directly handle the pixel data; it’s handled behind the scenes on your behalf.
To get the data then, you need to do some extra work. You could start by writing a JavaScript PNG decoder, but that would be massive overkill, considering PNGs support lossless compression, meaning you’d have to implement the entire DEFLATE codec by hand. Since you’re really only concerned with the alpha values of an image, you could store the alpha channel in a separate .RAW file that you fetch in parallel; however, this would increase the transfer and asset size of the app.
For the sake of your purpose, you ignore those two options, and instead decide to keep the code footprint and transfer sizes low by using the canvas element to fetch the data. To do this, you create an off-screen canvas, render your image to it, and fetch the pixels of the canvas object back to memory (see Listing 5-10).
Listing 5-10. Fetching the image data by using an off-screen canvas
var offScreenCanvas= document.createElement('canvas'),
var fetch_ctx = offScreenCanvas.getContext('2d'),

// set a max size for our offscreen fetch canvas
offScreenCanvas.width = 128;
offScreenCanvas.height = 128;
function fetchImageData(imgObject, imgwidth,imgheight)
{
    fetch_ctx.clearRect(0,0,128,128);
    fetch_ctx.drawImage(imgObject, 0, 0);
    var last = Date.now();
    //CLM note this keeps an additional in-memory copy
    var imgDat = fetch_ctx.getImageData(0,0, imgwidth, imgheight);
    var current = Date.now();
    var delta = (current - last)
    console.log("getImageData " + delta  + "ms");

    return imgDat;
}
![]() Note For some odd security reason, you aren’t able to use getImageData to fetch the pixels for an image file that isn’t being served off the same origin as the code. As such, if you try the code in Listing 5-10 by simply loading your file in a browser, it will fail. You need to serve the code from some simple web server and browse to it appropriately. The pixel-perfect picking example in the source code comes supplied with a simple Python script to create a web server to load the example from. For more information on this type of thing, try searching for “Same Origin Policy getImageData.”
Note For some odd security reason, you aren’t able to use getImageData to fetch the pixels for an image file that isn’t being served off the same origin as the code. As such, if you try the code in Listing 5-10 by simply loading your file in a browser, it will fail. You need to serve the code from some simple web server and browse to it appropriately. The pixel-perfect picking example in the source code comes supplied with a simple Python script to create a web server to load the example from. For more information on this type of thing, try searching for “Same Origin Policy getImageData.”
This allows you to transfer a smaller asset footprint, keep using your PNGs/ GIFs or whatever other compression footprint you want, and still get the RGBA data available in main memory during load time (see Listing 5-11).
Listing 5-11. Updating the SpriteProto definition to handle pixel data
function SpriteProto(){
    this.filename="";
    this.imgHandle=null;
    this.imgData=null;
    this.size={w:0,h:0};
    this.load= function(filename,w,h)
    {
        var targetSpriteProto = this;
        this.size.w = w;
        this.size.h = h;
        var img = new Image();
        img.onload = function(){
            targetSpriteProto.imgHandle = img;
            targetSpriteProto.imgData = fetchImageData(targetSpriteProto.imgHandle,w,h);
        }
        img.src = filename;
    }
}
Testing a Mouse Click
Now that you have your per-sprite image data, as well as in-game instances of referencing that data, you can continue with the process of determining which of those objects intersect a given point on the screen, taking into account pixel transparency.
Firstly, the findClickedSprite function will loop through all the sprite instances in memory and do a bounding box test against the picking point; you assume that array lookup is a performance limiting action in JavaScript, and this bounding-box test allows an early out for items that don’t potentially intersect with the pick position.
Once you find a sprite instance whose bounding box intersects with the picking point, you grab the sprite prototype and translate the canvas-relative mouse position to a sprite-instance-relative position that you use to test against.
![]() Note that you’re still utilizing the bounding-box picking style covered earlier. Per-pixel picking is quite an intensive inner-loop operation: the lookup and calculation of pixel data will easily cause performance problems. As such, using a bounding-box specific test first allows you to create a list of “potential” selected sprites (omitting objects that don’t intersect with the target in any way) which you can then continue forward with to do pixel-perfect testing on.
Note that you’re still utilizing the bounding-box picking style covered earlier. Per-pixel picking is quite an intensive inner-loop operation: the lookup and calculation of pixel data will easily cause performance problems. As such, using a bounding-box specific test first allows you to create a list of “potential” selected sprites (omitting objects that don’t intersect with the target in any way) which you can then continue forward with to do pixel-perfect testing on.
These values are passed to a function on the sprite prototype to determine if the target pixel is transparent or not. If you’re clicking an opaque pixel for this sprite, you set this as the selected sprite (see Listing 5-12).
Listing 5-12. Updating the findClickedSprite function to take into account pixel-based picking
function findClickedSprite(x,y)
{
    var pickedSprite = null;
    var tgtents = spriteInstances;
    //loop through all sprites
    for(var i =0; i < tgtents.length; i++)
    {
        var sp = tgtents[i];
        //pick is not intersecting with this sprite
        if(    x < sp.pos.x || x > sp.pos.x + sp.size.w ||
            y < sp.pos.y || y > sp.pos.y + sp.size.h)
            continue;

        var ps = sp.spriteHandle;
        //get local coords and find the alpha of the pixel
        var lclx = x - sp.pos.x;
        var lcly = y - sp.pos.y;
        if(!ps.isPixelTransparent(lclx,lcly))
        {
            pickedSprite = sp;
        }
    }
}
Again, in this particular example, you’re somewhat naive about z-index collisions and visible ordering to the user. The fix for this is somewhat simplistic: if you’ve found a pick collision, you test the zIndex of the new sprite with the zIndex of the existing picked sprite to see which one is closer to 0 (which represents closer to the camera), as shown in Listing 5-13.
Listing 5-13. Updating the picking logic to take into account zIndex depth
if(!ps.isPixelTransparent(lclx,lcly))
{
    //do depth test (if applicable)
    if(pickedSprite && sp.zIndex < pickedSprite.zIndex)
        continue;
    pickedSprite = sp;
}
The isPixelTransparent function for the proto-sprite does very simple logic. It effectively fetches the pixel of the image in RGBA (that is, Red, Green, Blue, Alpha) form, and tests if the alpha channel of that pixel is greater than some threshold. The threshold is important, as most artists can add gradient falloffs, drop shadows, and other items which increase the visual of the item, but shouldn't be considered for picking purposes; see Listing 5-14.
Listing 5-14. isPixelTransparent is an important function which determines if a given pixel should be considered for collision or not
function SpriteProto(){
    //other stuff here
    this.isPixelTransparent=function(lclx,lcly)
    {
        var alphaThreshold = 50;
        var idx = (lclx*4) + lcly * (this.imgData.width*4);

        var alpha = this.imgData.data[idx + 3];

        //test against a threshold
        return alpha < alphaThreshold;
    };
}
Results and Caveats
The results, as shown in Figure 5-4, are quite nice. You can select the right object out of a very complex pixel coverage area.
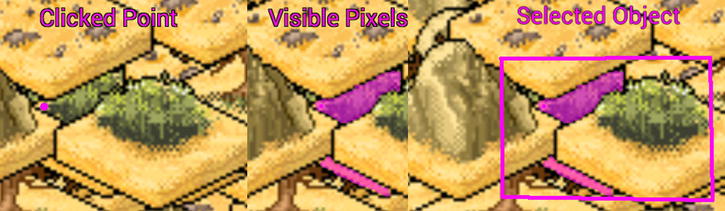
Figure 5-4. The results of a pixel-perfect picking. Users can select sprites which may be complex or hidden under other objects in Z-ordering
While this method works, and produces pixel-perfect results, it presents two primary issues.
- Image data, which is normally stored in your JavaScript layer behind the scenes, now has to be duplicated in your scripts. As such, this results in a larger memory footprint, often more than double the size since your in-memory copy is uncompressed.
- It’s currently unclear how an array look-up affects performance in JavaScript under the hood. In C++ you have the ability to avoid CPU addressing issues like L2 Cache optimization for array traversal, which is completely missing in JavaScript. On my 12-core work machine, a single pick against 4096 images takes around ∼2ms. I’d imagine on a phone it would be significantly longer.
And finally, it’s unclear if you really need pixel-perfect picking for every part of your game. For instance, the user may benefit from a more loosely defined picking area that allows an extension of the valid picking area beyond the pixel boundaries around the object, in an attempt to reduce user picking frustration.
While pixel-perfect picking represents the most resolution-specific solution you can produce for selecting objects, it has a large downside of increased memory footprint and potential performance burden for slower devices. For example, if you had a 1024x1024 image, that may only be 64k in PNG form, but once you fetch it to main memory, it’s now 4MB. There’s really no (good) way around this, since the getImageData function on canvas returns RGBA data uncompressed; even if you pass in a grayscale image, you’d get the full pixel footprint.
Ideally, it would be great to get a lower-memory representation of the image without having to store the whole thing in memory. And to that end, I’m going to introduce the concept of using convex hulls for picking.
Effectively, a convex hull is a minimum representation of the shape of your sprite, without curving inward towards itself (i.e. being concave). See Figure 5-5 for a representation of a convex hull versus a traditional bounding box.
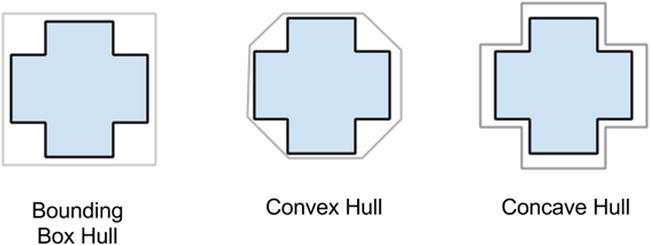
Figure 5-5. Visualizing the difference between a bounding box (which is always some form of rectangle), a convex hull (which is not allowed to “curve inward” on itself) and a concave hull (which allows itself to curve towards the source object boundaries)
Convex hulls have been used for years in game development as a rough estimation of shape for 2D and 3D objects; they’re especially useful in physics engines, where calculating the intersection of concave objects is roughly 2x slower than intersection of convex ones. Figure 5-6 shows a convex hull of one of the example sprites.
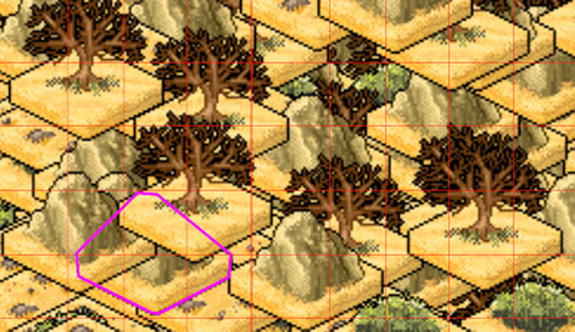
Figure 5-6. A convex hull in action. Advanced data structures can accelerate your picking code, while in some cases sacrificing resolution perfection
Once the mouse selection is pressed, you’ll test the mouse-point against the convex hull of sprite instances to determine if it’s inside or outside a target object.
You will lose some resolution on this process; that is, your results won’t be pixel-perfect any longer, but there’s a whole separate discussion about how precise your picking code needs to be, especially on mobile, where pixels are (generally) smaller than peoples’ fingers. Figure 5-7 illustrates the difference in precision for the different selection methods.
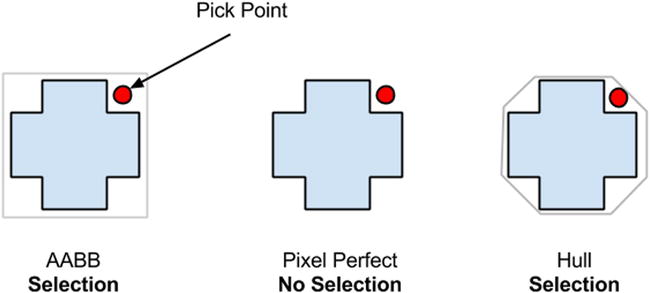
Figure 5-7. Bounding box, pixel-perfect, and convex hull regions for the same image. Notice that convex hulls are smaller than bounding boxes, but larger than pixel-perfect. This trade-off allows it to be both semi-fast and semi-accurate when needed
Generating a convex hull should be done offline, ahead of time, so that you can reduce the loading time for your HTML5 game. As such, I threw together a simple C++ app that loads a sprite, calculates its convex hull, and outputs JSON data that you include in the HTML file. Your mileage may vary.
I’ll spare you walking through the C++ details here, as the code itself is simple. It opens an image and calculates for each scan-line the min/max pixels that represent alpha boundaries (see Figure 5-8). From there, it uses a modified QHull algorithm (which you can get at www.qhull.org) to determine what the maximum convex hull is for the set of spatial points.
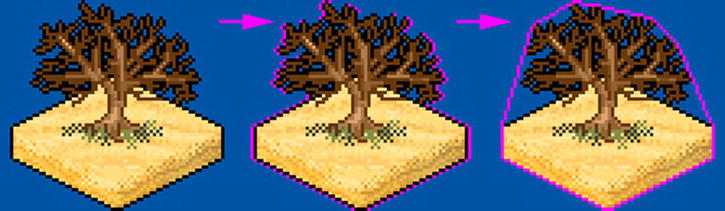
Figure 5-8. Hull generation process. Per scan-line, you find the min-max pixels for that row and toss those at a convex hull generator
The hull points are dumped to individual files, which for simplicity, I've manually added the hull data to the HTML file.
var cHullData=[

{"name":"0.png", "hull":[{"x":0,"y":16}, {"x":1,"y":15}, {"x":31,"y":0}, {"x":34,"y":0}, {"x":64,"y":15}, {"x":65,"y":16}, {"x":65,"y":25}, {"x":64,"y":26}, {"x":34,"y":41}, {"x":31,"y":41}, {"x":1,"y":26}, {"x":0,"y":25}, {"x":0,"y":16}]},

//See source code for the full list of hulls defined by our tool
Once again, it’s worth pointing out that this method of spitting out per-file information may not be the correct way to handle the issue of getting hull information into your data chain (your mileage may vary). It’s merely provided as an example to help you understand the process and determine the right integration paths that best suit your needs.
Doing Picking Against the Convex Hull
To transition from per-pixel picking to hull picking, you need to make a few small changes. Firstly, a sprite prototype needs to load the hull data, rather than fetching the image pixel data. This is an easy task, as the hull building app will spit out the image name for a hull, so that when an image loads, you can look up the proper hull for the image (see Listing 5-15).
Listing 5-15. Updating the SpriteProto definition to support convex-hull picking
function SpriteProto(){
//...

this.load= function(filename,w,h)
    {
        var targetSpriteProto = this;
        this.size.w = w;
        this.size.h = h;
        var img = new Image();
        img.onload = function(){

            targetSpriteProto.imgHandle = img;
            for(var u =0; u < cHullData.length; u++)
            {
                var thull = cHullData[u];
                if(thull.name == filename)
                {
                    targetSpriteProto.hullData = cHullData[u].hull;
                    break;
                }
            }
        }
        img.src = filename;
    };
})
To determine if a mouse click (i.e. point) is inside your new convex polygon hull, you utilize a method of point-in-polygon testing known as ray casting, which performs its test by casting a line through the 2D polygon, through the point in question (see Figure 5-9 for an example). For each line that your ray intersects, you toggle a Boolean value to determine if you’re in or out of the polygon; see Listing 5-16.
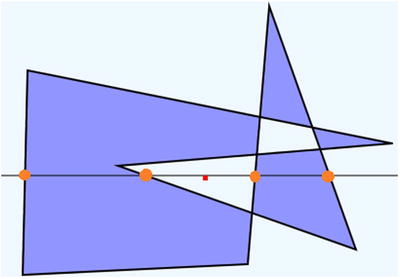
Figure 5-9. An example of ray casting to determine if a point is in a polygon. The line runs through the polygon an even number of times, signaling that the point is not inside the polygon boundaries
Listing 5-16. isPixelContained will determine if a given point resides inside the convex hull for this sprite
function SpriteProto(){
//...
//--------------
    this.isPixelContained=function(lclx,lcly)
    {
        var inPoly = false;
        var numPoints = this.hullData.length;
        var j = numPoints-2;
        var latLng={x:lclx,y:lcly};
        //from http://www.ecse.rpi.edu/Homepages/wrf/Research/Short_Notes/pnpoly.html
        for(var i=0; i < numPoints; i++)
        {

            var vertex1 = this.hullData[i];
            var vertex2 = this.hullData[j];

            if ((vertex1.x < latLng.x && vertex2.x >= latLng.x) || (vertex2.x < latLng.x && vertex1.x >= latLng.x) )
            {
                if (vertex1.y + (latLng.x - vertex1.x) / (vertex2.x - vertex1.x) * (vertex2.y - vertex1.y) < latLng.y)
                {
                    inPoly = !inPoly;
                }
            }
            j=i;
        }
        return inPoly;

    }
} // end of SpriteProto function
Caveats
As mentioned, this method will reduce the overall memory footprint for your data significantly (compared to per-pixel testing), and on some platforms can have the added benefit of faster execution for a given pick operation.
The real “gotcha” with convex hulls is that it takes a bit of management in order to properly fit into your asset build pipeline the correct way. This poses a particularly large issue for those games using texture atlases, as you’ll need to calculate the convex hull of each sprite before inserting it into the atlas.
Moving Forward
This chapter has discussed a set of techniques which, when used independently, can decrease processing time for picking and increase precision at the same time.
Industrial strength implementations of this type of code, however, will find the right and smart way to combine these techniques for the best results. Before you ship this technique in your title, consider some of the following modifications:
- For example, having a separate spatial grid for dynamic vs. static objects will help create early-out logic for frequently updating objects that tend to complicate your binning selection.
- Only allow visible objects to be pickable. It doesn’t help your performance to check objects which are off-screen and not visible to the user, especially in large levels, where the majority of objects are outside the view bounds.
- Per sprite, define what type of picking collision it should use. Some images are fine with box-only picking; for others, convex hull should be enough; and for the rare few that need it, use pixel-perfect solutions.
- Don’t forget that as your scene changes, so does the complexity of picking. For example, a tall building may hide multiple objects behind it, which may not need to be selectable any longer. Updating your scene representation to take this into account is ideal.
- Animated images complicate picking quite easily. Your art chain will need some way to output pixel/hull/bounding information per frame of animation and update your sprite representation to produce picking information for the current frame of the animation.
- Transforms and scales of bitmaps also complicate things. Most of the simplistic logic presented in this article quickly becomes error-prone when you rotate and scale bitmaps.
- One of the most annoying results of picking is pick complexity, or rather when the user clicks on objectA, meaning to get to objectB below it. If this is a common complaint, consider adding code paths to allow a multi-click within a tolerance (so if the user clicks the same location twice) to select the second or third stacked object. (In this article I only discussed returning the CLOSEST object to the pick.)