
![]()
Introduction to WebSockets for Game Developers
It is a bit hard to imagine, but the Web wasn’t always as dynamic as it is today. Before I discuss WebSockets, let’s take a trip down memory lane.
Before Asynchronous JavaScript and XML (AJAX) and its cornerstone, XMLHttpRequest (XHR), gained widespread industry adoption, web application updates could only be achieved by refreshing a page. AJAX came of age in the early 2000s and represented the first wave of interactive tools, giving developers the ability to make applications feel more like their desktop counterparts. An AJAX call could be fired off to retrieve the current stock price, update shipping costs, or validate form fields, all without a full-page reload. In addition to AJAX, this need for dynamic data started to be served by what is commonly referred to as Comet or AJAX push. Comet simulates real-time interactivity by keeping a connection open forever, or at least for a reasonably long time. There are various methods of doing this, including having a hidden persistent inline frame (Iframe) (“forever frame”), long polling, or using Java or Flash plug-ins.
When Comet first became popular, circa 2006, many browsers had a maximum of two concurrent connections, so development was tricky if you wanted to emulate real-time events but needed to draw from many sources. In the quest for page load speed, most modern browsers have significantly raised their concurrent connection limits. This is not to say that you have carte blanche with Comet; it still has the overhead of being transported through HTTP, so there are a lot of extraneous HTTP header data being generated each time, even though the destination URL doesn’t change.
The WebSocket protocol is a fully bidirectional data transport mechanism over a Transmission Control Protocol (TCP) connection, and it can traverse proxies. The Internet Engineering Task Force (IETF) codified its standard, RFC 6455, in 2011. WebSockets can be seen as an evolution of the tools used to deliver and respond to real-time events. AJAX and Comet implement a more traditional request-response model that is somewhat symmetrical, whereas a WebSocket, after establishing the connection, is more asymmetrical—basically, “don’t call us, we’ll call you.” WebSocket connectivity is present in most modern browsers and mobile platforms.
As applications such as online games become less tolerant of latency, overhead becomes a problem. WebSockets are great for gaming because it provides a means of achieving real-time multiplayer interaction with greatly reduced overhead.
Setting Up a WebSocket Connection
A WebSocket connection begins with a handshake from the client to the server. The client initiates it over HTTP with a randomly selected Base64-encoded Sec-WebSocket-Key and other data on the desired connection. This all happens under the hood. A sample client connection request is shown in Listing 11-1.
Listing 11-1. A Sample Client Connection Request
GET /chat HTTP/1.1
Host: server.example.com
Upgrade: websocket
Connection: Upgrade
Sec-WebSocket-Key: x3JJHMbDL1EzLkh9GBhXDw==
Sec-WebSocket-Version: 12
Origin: http://example.com
The server takes the Sec-WebSocket-Key and appends the WebSocket “magic string” (258EAFA5-E914-47DA-95CA-C5AB0DC85B11, per the Request for Comments [RFC]), and then SHA-1 and Base64 encode the output. The result is returned in the server response as the Sec-WebSocket-Accept value. This response also marks the last time data will traverse HTTP, as shown in the sample response in Listing 11-2.
Listing 11-2. A Sample Response
HTTP/1.1 101 Switching Protocols
Upgrade: websocket
Connection: Upgrade
Sec-WebSocket-Accept: HSmrc0sMlYUkAGmm5OPpG2HaGWk=
Sec-WebSocket-Protocol: chat
Figure 11-1 illustrates the WebSocket handshake.
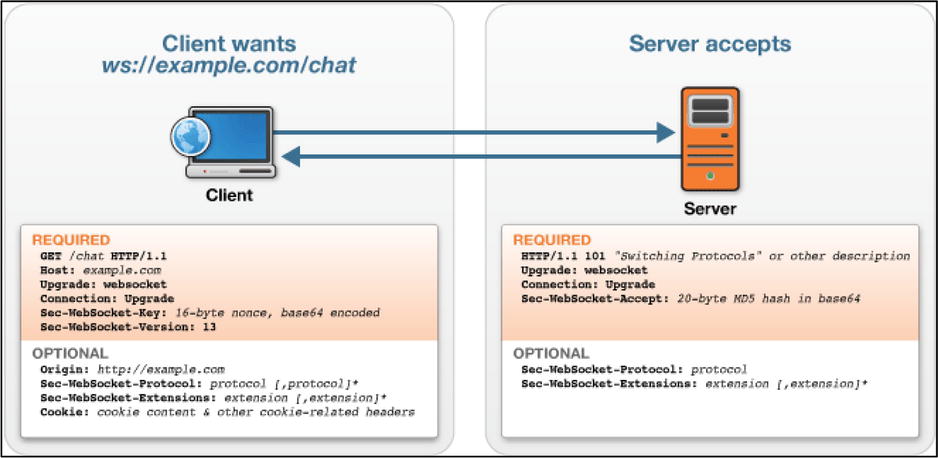
Figure 11-1. WebSocket handshake
After the handshake is successfully completed, all messages traverse the TCP connection in frames. Frames contain a small amount of information, including the type of data, some metadata, and the data payload. Messages can be split among multiple frames. The data from client to server are slightly transformed, using a masking key that is randomly generated on each push. If the data are not masked, the server terminates the connection. Data from the server to the client are not masked, but they would also cause the connection to be terminated if they were. The point is not to make the data cryptographically indecipherable, but rather to make the output unpredictable and to avoid proxy poisoning.
In addition to data frames, there are several frame types that are mostly initiated in server or browser code. These control frames include Close, Ping, and Pong. Ping and Pong frames are used for “heartbeat” behavior (testing that the connection is still live). A Ping frame must be answered with a Pong frame so long as the connection is open. Pong frames do not need to be answered, and they can be sent without a preceding Ping. Unless you are building a new WebSocket library, you do not have to worry about generating your own control frames. A library will generally have its own algorithm to determine when to generate Pings or Pongs and when to close a connection if a Ping goes unanswered.
The WebSocket API
The WebSocket interface is simple yet powerful; there are only six functions. The first two, send and close, are used to send a message and close a connection. The other four—onopen, onmessage, onerror, and onclose—are callbacks to be executed when a socket is opened, a message is received, an error is generated, and a socket is closed, respectively. A small application-programming interface (API) is easier to learn and build on, and its size allows you to list the signatures in just a couple of dozen lines of code, as shown in Listing 11-3.
Listing 11-3. WebSocket Interface Functions
enum BinaryType { "blob", "arraybuffer" };
[Constructor(DOMString url, optional (DOMString or DOMString[]) protocols)]
interface WebSocket : EventTarget {
  readonly attribute DOMString url;

  // ready state
  const unsigned short CONNECTING = 0;
  const unsigned short OPEN = 1;
  const unsigned short CLOSING = 2;
  const unsigned short CLOSED = 3;
  readonly attribute unsigned short readyState;
  readonly attribute unsigned long bufferedAmount;

  // networking
           attribute EventHandler onopen;
           attribute EventHandler onerror;
           attribute EventHandler onclose;
  readonly attribute DOMString extensions;
  readonly attribute DOMString protocol;
  void close([Clamp] optional unsigned short code, optional DOMString reason);

  // messaging
           attribute EventHandler onmessage;
           attribute BinaryType binaryType;
  void send(DOMString data);
  void send(Blob data);
  void send(ArrayBuffer data);
  void send(ArrayBufferView data);
};
You can demonstrate that ease of use by creating a simple echo server. Once it is running, the server will send back whatever data you send it. For the server side of things, you will be using Python. It was chosen because the server-side code is concise and easy to understand. To begin, you will need to have Python (http://python.org) installed on your machine. You will be using the Python web framework Tornado because of its great WebSocket support.
If you don’t already have Tornado installed, you can do so with the following command, run from any directory:
sudo easy_install tornado
Start the server by executing python tornado-demo.py in the same directory as the file; navigate to http://localhost:8888 to see it in action. You do not have to understand fully the Python in Listing 11-4 to see that it closely mirrors the JavaScript WebSocket API. You do some setup when the socket is opened, send a message immediately back to the client when you receive it, and close the connection when the client requests it.
Listing 11-4. Python Example: Open Socket, Send Message, Close Connection
class WebSocketHandler(tornado.websocket.WebSocketHandler):
    def open(self, *args):
        self.id = self.get_argument("Id")
        self.stream.set_nodelay(True)
        clients[self.id] = {"id": self.id, "object": self}

    def on_message(self, message):
        # Print to console when message received
        # Write same message to client
        print "Client %s sent a message : %s" % (self.id, message)
        self.write_message(message)

    def on_close(self):
        if self.id in clients:
            del clients[self.id]
On the client, you begin by instantiating a WebSocket connection. The universally unique identifier (UUID) allows each client to have his or her own ID and to receive only the messages targeted to the client. Other libraries, which you will investigate later in the chapter, do this bookkeeping for you. After the WebSocket object is created, you define the handlers that respond to events, as shown in Listing 11-5 and Figure 11-2.
Listing 11-5. Create the WebSocket Object, Define Event Handlers
var ws = new WebSocket("ws://localhost:8888/ws?Id="+Math.uuid());

ws.onopen = function() {
    messageContainer.innerHTML += "Preparing to send message";
    ws.send("The time is now "+ new Date());
    messageContainer.innerHTML += "Sent message."
};

ws.onmessage = function (evt) {
    var received_msg = evt.data;
    messageContainer.innerHTML += "Message received: "+received_msg;
};

ws.onclose = function() {
    messageContainer.innerHTML += "Connection is closed...";
};
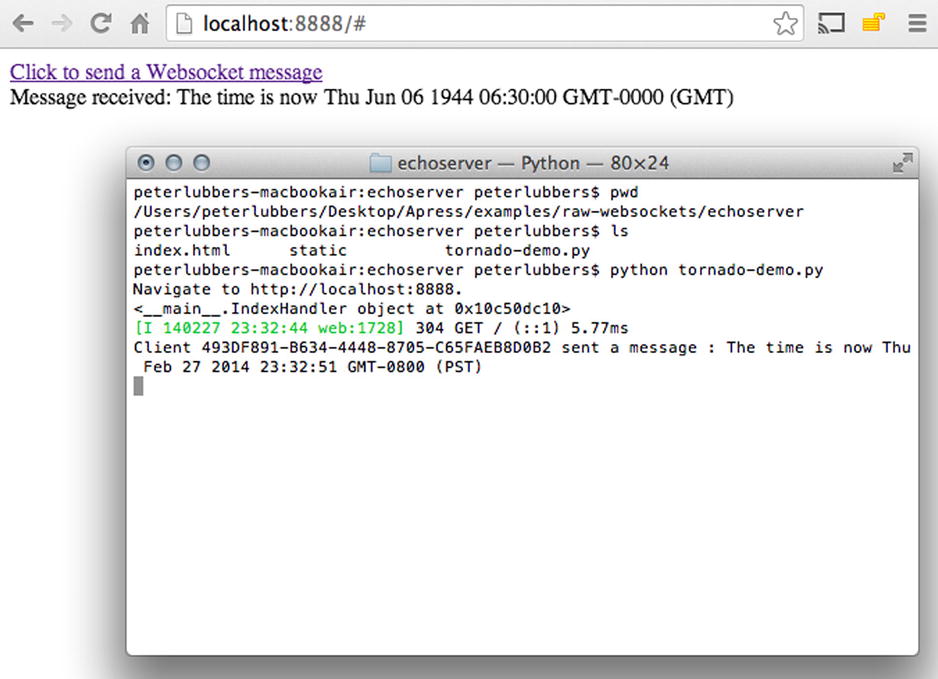
Figure 11-2. Running the WebSocket echo server
As mentioned earlier, WebSockets are bidirectional pipes. A WebSocket does not examine the content of the inbound and outbound streams; it only ensures that the data reach their destination on each end. This is not a problem if the data received are merely being echoed or lightly processed. For anything more complex, you will send discrete packets of information to the server. Not only does this allow you to process the information better, but it also eliminates errors caused by receiving information in the wrong order, a significant benefit.
Luckily, JavaScript already has a built-in type that you can use to send data, an Object. To send and receive JavaScript Object Notation (JSON) data on the client, you have to serialize and deserialize it, that is, convert a JSON object to a string and vice versa, with JSON.stringify and JSON.parse.
In the onopen function in Listing 11-6, you create an object and then serialize it to JSON. You need to do this because the WebSocket protocol has no concept of structured data.
Listing 11-6. The onopen Function
ws.onopen = function() {
    messageContainer.innerHTML += "Preparing to send message";
    var message = {date: new Date()};
    ws.send(JSON.stringify(message));
    messageContainer.innerHTML += "Sent message."
};
Upon receipt of a message, you parse the JSON and print out each key and its value, as shown in Listing 11-7.
Listing 11-7. Parsing and Printing JSON Key Values
ws.onmessage = function (evt) {
    var received_msg = evt.data;
    var json = JSON.parse(received_msg);
    messageContainer.innerHTML = "Message received:
";
    for (var key in json) {
        messageContainer.innerHTML += "key: "+json[key]+"
";
    }
};
Socket.IO is a cross-platform library for Node.js that provides a Websocket-like API for real-time communication in web applications. The library is a mature and de facto standard in the JavaScript community for implementing solutions, using WebSockets. Socket.IO is described as a WebSocket-like API for two reasons:
- Socket.IO is a superset of WebSockets.
- WebSockets are one of many transport methods an application can use for communication.
In addition to WebSockets, readily available in modern browsers, Socket.IO has fallback transport methods for older browsers and mobile operating systems:
- Adobe Flash Sockets
- AJAX long polling
- AJAX multipart streaming
- Forever Iframe
- JSON with padding (JSONP) polling
The availability of all these techniques means that even Internet Explorer 5.5, which was released in 1999, can use Socket.IO. It is (hopefully) unlikely that users will have a browser that old, but Socket.IO allows you to learn a single API, target the best of the breed, and let things degrade naturally.
Getting Started
Provided that you already have a Node.js install on your machine (for more information, see http://nodejs.org), you can install Socket.IO with node-packaged modules (npm), using the following command:
npm install socket.io
Echo Server
Let’s revisit the echo server example that you completed earlier in the chapter, but this time reimplemented, using Socket.IO. As you can see in Listing 11-8, the Socket.IO code on the client is strikingly similar to that of your previous, raw WebSocket example.
Listing 11-8. Socket.IO Client Code
var socket = io.connect('http://0.0.0.0:3000'),
socket.on('connect', function() {
    messageContainer.innerHTML += "Socket connected to server<br/>";

});
socket.on('message', function (msg) {
    messageContainer.innerHTML +=  "Message received: " + msg +"<br/>";
});
socket.on('disconnect', function() {
    messageContainer.innerHTML = "Connection is closed...";
});

var sendSocketMessage = function() {
    socket.send("The time is now "+ new Date());
    messageContainer.innerHTML += "Sent message.<br/>";
}
Instead of instantiating a WebSocket object directly, you are getting a Socket.IO instance with the io.connect command. The names of the events that are triggered when a socket is opened or closed have changed to connect and disconnect. In sendSocketMessage, you send a message on the socket with code that is almost indistinguishable from that of the earlier WebSocket example.
The full app.js file for setting up an echo server is in Listing 11-9.
Listing 11-9. The Full app.js File
var app = require('http').createServer(handler)
  , io = require('socket.io').listen(app)
  , fs = require('fs')

app.listen(3000);

function handler (req, res) {
  fs.readFile(__dirname + '/public/index.html',
  function (err, data) {
    if (err) {
      res.writeHead(500);
      return res.end('Error loading index.html'),
    }

    res.writeHead(200);
    res.end(data);
  });
}

io.sockets.on('connection', function (socket) {
  socket.on('message', function (data) {
    socket.send(data);
  });
});
After being bound to an application (app) instance to listen for new connections, the io object attaches a function to any inbound socket to echo back received input. You may have noticed that the form
socket.on ('<name of event>', function(args) { })
is present in both your front-end and back-end code. It also doesn’t require a confusing ws:// or wss:// protocol. Fewer APIs to learn makes for happier developers.
You can run the Node.js example by executing this code:
npm install
node app
Using Events
In the previous section, I briefly covered events, mostly adhering to the general WebSocket API. In this section, you will work with events further in the completion of a full-fledged application. In this example, we want something that is both easy to code and not obscured by a bunch of Canvas or Web Graphics Library (WebGL) code, so you will use a simple quiz game, with an associated chat box.
When the user navigates to the app, you establish a socket connection and register events for your app to handle. Three custom events, question, answer, and chat, receive questions, send and receive answers, and send and receive chat messages, respectively. The code resides in the app.js file, in the examples/socket.io/quizgame directory. Each event has its own handler function, as shown in Listings 11-10 and 11-11.
Listing 11-10. The Custom Events’ Handler Functions
App.prototype.setupClient = function() {
  this.socket = io.connect();
  this.socket.on('message', this.handleMessage);
  this.socket.on('question', this.displayQuestion);
  this.socket.on('answer', this.displayAnswer);
  this.socket.on('chat', this.displayChatMessage);
   $('#sendMessage').click(this.sendChatMessage);
  this.time = new Date().getTime();
}
The code for sending a chat message is shown in Listing 11-11.
Listing 11-11. Sending a chat Message
App.prototype.sendChatMessage = function() {
  var text = $('#message').get(0).value;
  if (text == "") return;
  $('#message').get(0).value=""
  app.socket.emit('chat', {message: text});
  app.displayChatMessage({message: text});
}
When the server receives an answer message, it determines a result and then adjusts the score accordingly. For the score, you can use the get and set functions on the socket, as shown in Listing 11-12; these let you store arbitrary data that you want to retain for the lifetime of the socket.
Listing 11-12. The get and set Functions
socket.on('answer', function(msg) {
    // Score answer
    var currentScore;
    var result = scoreAnswer(msg);
    socket.get('score', function(err, score) {
      currentScore = score;
    });
    // Emit message only to this client.
    socket.emit('answer', {
        message:result.message,
        score:(currentScore + result.points)
    });
    socket.set('score', currentScore + result.points);
  });
Finally, you have a bit of code for retrieving a question at random, masking its answer, and sending it to all connected sockets, as shown in Listing 11-13. The quiz game start screen is displayed in Figure 11-3.
Listing 11-13. Sending a Random Question to All Connected Sockets
var sendQuestion = function (questionId) {
   var q = _.clone(findQuestionById(questionId))
   q.correctAnswer = -1;

   io.sockets.emit('question', q);
}
setInterval(function() {
    sendQuestion(getRandomQuestion());
}, 10000);
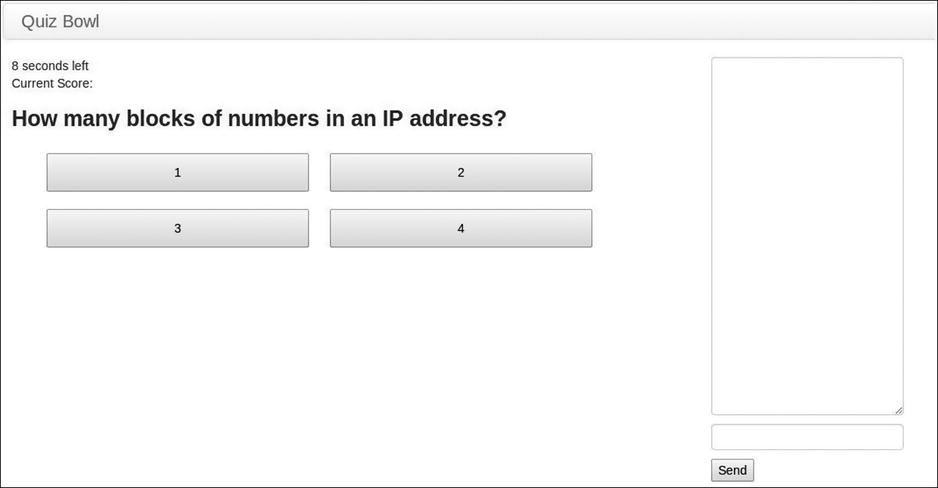
Figure 11-3. Quiz game start screen
For this quiz game, you used a single URL to address events for question, answer, and chat messages and general messages, but you could easily have used a separate socket for each event type. There are several other tweaks and enhancements that are beyond the scope of this chapter and whose investigation will remain a follow-up exercise for the reader (for more details, see http://socket.io).
When it comes to networking, there are many cases in which what works on a small scale, perhaps between a few local clients on the same computer or local network, fails miserably when attempted on a larger scale. In the following sections, you will explore how to reduce the overhead of passing data to a large number of clients, using various methods.
Reducing the Size of Data Transmitted
In the previous examples, you used either raw text or JSON to transmit data. JSON is great because it is humanly readable, relatively lightweight, and natively supported by JavaScript. However, for a highly connected online game, JSON may not be lightweight enough. The general premise is that the less data transmitted, the faster they transmit and decode. BSON and MessagePack seek to improve transmission rates by discarding one of JSON’s key features: readability.
Binary JSON (BSON) is an exchange format used in the MongoDB database to store data. As the name implies, BSON documents are binary encoded. Many of the core concepts from JSON apply, such as being able to embed complex data structures inside documents (documents inside documents and arrays inside arrays), but BSON adds some new data types that do not exist in the JSON specification. Unlike JSON, BSON has discrete data and raw binary data types.
All numeric types in JSON are stored as 64 bit floating-point numbers. That is fantastic for very large or small numbers in scientific calculations but is overkill for most games. For an unsigned integer, that’s a range of 0–18,446,744,073,709,551,615, far too high for most game scores and other numbers, which will be 32 bit or less. So, why use twice the precision that you need?
BSON reduces the numeric overhead by having multiple sizes that it can store. Table 11-1 shows BSON’s numeric types.
Table 11-1. Chart Adapted from bsonspec.org/#/specification
Type |
Bytes |
Range (Signed and Unsigned) |
|---|---|---|
Byte |
1B (8 bits) |
128–127 |
0–255 |
||
Int32 |
4B (32 bit) |
−2,147,483,648–2,147,483,647 |
0–4,294,967,295 |
||
Int64 |
8B (64 bit signed int) |
−9,223,372,036,854,775,808–9,223,372,036,854,775,807 |
0–18,446,744,073,709,551,615 |
||
Double |
8B (64 bit IEEE floating point) |
4.9E-324–1.7976931348623157E308 |
If you were developing a side-scrolling game, the number types (and their probable data types) of concern are as follows:
- Location of the player in the world (two int32s)
- Location of enemies and obstacles in the world (two int32s per object)
- Current level (byte)
- Remaining time (int32)
- Player’s score (int32)
Let’s assume there’s one enemy in the world, with the aforementioned objects. Using JSON, you’d be transmitting 56B of numeric data per update; using BSON, the total would be just 25B. That’s a savings of 55 percent per update.
JSON is supported in every major JavaScript implementation. BSON doesn’t lag far behind, with an official JavaScript driver, along with several others for popular languages maintained by MongoDB and third-party drivers. A full listing of implementations can be found at http://bsonspec.org/#/implementation. The JavaScript implementation used for the examples is located at https://github.com/marcello3d/node-buffalo.
MessagePack
MessagePack expands on the number packing of BSON by providing five integer types, storing 1B, 2B, 3B, 5B, or 9B, respectively, and two floating-point types, storing 5B or 9B each. Using the same parameters as the BSON example, MessagePack further reduces the amount of data required to represent the numbers to 21B ; this is a 16 percent improvement over BSON and a 63 percent savings versus JSON:
- http://wiki.msgpack.org/display/MSGPACK/Format+specification#Formatspecification-Integers
- http://msgpack.org
So, why not just use MessagePack in all cases if it seems to be faster than JSON and BSON? Microbenchmarks are usually limited in scope and cannot be predictive of all situations. Which method you should choose depends on the conditions of your environment, such as the databases you are using. You generally cannot go wrong with either binary format.
Intelligently Processing and Distributing Packets
Reducing the amount of data transmitted by sending it in a more efficient data exchange format is one way to increase data processing. An equally effective alternative is simply to send less data. In the following sections, I will discuss several ways to send fewer packets over the wire.
Send Mostly Deltas and Infrequent Worldviews
You can prevent cheating by using a “dumb” client/authoritative server model, in which the clients do minimal local calculations and merely display what the server sends them (for more information, see the section “Dumb Clients/Authoritative Server”). This tactic has the added benefit of allowing the server to optimize further the data that need to be sent to clients.
The amount of “world” that the client can view is generally a subset of the full world. Sending only the parts of the world and enemies with which the player can directly interact reduces the data that must be transmitted.
Another way to reduce the transmitted data is to have the server send less frequent worldviews and more frequent deltas of player and enemy properties.
Autonomous Clients/Echo Server
This kind of setup, in which the clients do everything locally and report their changes to the server, is by far the easiest client-server combination with which to start. However, it is the one that is the most prone to cheating. When you hear about cheating in an online game, it is likely that a client was able to change something maliciously and have that state blindly pushed by the server to all the other clients. This also increases the load on the server, because all actions have to be received and sent to all the clients by it. Assuming that each client sends one update per second, then as the number of clients increases, so, too, does the number of updates, and by a large margin, as seen in Table 11-2.
Table 11-2. Number of Clients vs. Number of Updates
Number of Clients |
Updates Sent to Server |
Updates Sent by Server |
|---|---|---|
1 |
1 |
1 |
2 |
2 |
4 |
10 |
10 |
100 |
100 |
100 |
100,000 |
That update rate is very close to being n^2. Combine this with the ever-present threat of cheating and variable network latency, and chaos is sure to ensue.
Dumb Clients/Authoritative Server
An alternative to having the server dutifully serve whatever the clients report without question is to have an authoritative server with “dumb” clients. This approach makes cheating less of a problem, while reducing network traffic. Clients receive routine updates from the server, indicating game state. Player commands are issued as requests to the server. If it deems a request possible, the server updates its state and sends it to the clients. If a request is impossible or invalid—for instance, holding down the spacebar to send “rapid-fire” events—the server will drop it. The server will also combine updates so that it can send out fewer of them.
Its parameters similar to those in Table 11-2, , Table 11-3 demonstrates how an authoritative server dramatically reduces load.
Table 11-3. Reducing Load via an Authoritative Server
Number of Clients |
Updates Sent to Server |
Updates Sent by Server |
|---|---|---|
1 |
1 |
1 |
2 |
2 |
2 |
10 |
10 |
10 |
100 |
100 |
100 |
In the two examples presented here, I talked about the two extremes and chose to view them through the lens of network load. There are many intermediate variants that take into account the individual needs of the game being designed. A good place to start is the still relevant Valve paper “Source Multiplayer Networking” (https://developer.valvesoftware.com/wiki/Source_Multiplayer_Networking). Also of interest would be anything on multiplayer networking from the Association for Computing Machinery Digital Library (ACM DL) or the Institute of Electrical and Electronics Engineers (IEEE).
Case Studies
So far, you have only looked at WebSockets in the abstract. In the following sections, you will examine source code from games that use WebSockets.
GRITS is a multiplayer, top-down battle game designed by Google engineers to act as an example implementation of an HTML5-based game leveraging best-of-breed HTML5 technology, such as Canvas, WebSockets, Google App Engine, and Google+ integration.
GRITS employs one of the concepts introduced earlier, the authoritative server (see the section “Dumb Clients/Authoritative Server”). Here, clients send requests for specific actions to the server, the server pushes its state tothe clients, and the clients see this as the source of truth, overriding any local data. Listing 11-14 displays the setup of GRITS’s socket for handling directional input when using an Android device.
Listing 11-14. GRITS’s Directional Input Socket for Android
var controller_endpoint = '/'+game_id+'!'+id;
console.log('STARTING TO LISTEN ON WASD CHANNEL', controller_endpoint);
io.of(controller_endpoint).on('connection', function(wasdSocket) {
  ref = {};
  console.log('CONTROLLER CONNECTED TO WASD CHANNEL', controller_endpoint);
  wasdSocket.on('disconnect', function(msg) {
    console.log('RECEIVED DISCONNECT FOR WASD CHANNEL', controller_endpoint);
  });
  wasdSocket.on('message', function(msg) {
    // console.log('GOT WASD CONTROLLER MESSAGE', msg,
    //        'ON WASD CHANNEL', controller_endpoint);
    wasdSocket.send('ack ' + msg);
    if (msg.slice(0,4) == 'init') {
      ref = JSON.parse(msg.slice(4));
      return;
    }
    if (!ref['player_name']) {
      console.log('disconnecting', controller_endpoint,
      'wasd controller; received msg', msg, 'while ref has no player_name:', ref);
      wasdSocket.disconnect();
      return;
    }
    W = (msg[0] == 'Y'),
    A = (msg[1] == 'Y'),
    S = (msg[2] == 'Y'),
    D = (msg[3] == 'Y'),
    socket.q_wasd({from: ref['player_name'].slice(1), W: W, A: A, S: S, D: D});
  });
});
Readers are encouraged to watch the Google IO talk by Colt McAnlis on GRITS at https://developers.google.com/events/io/2012/sessions/gooio2012/210. The previous snippet comes from https://code.google.com/p/gritsgame/source/browse/src/games-server/main.js.
Rawkets is a proof-of-concept, online, multiplayer game developed by Rob Hawkes, the head of developer relations at Pusher and former technical evangelist at Mozilla. The game explores HTML5 Canvas, WebGL, and WebSockets. Rawkets is reminiscent of the classic arcade game Asteroids. A simple line-art ship represents the players; they can move about the world and shoot at other players.
You can peruse the Rawkets code at https://github.com/robhawkes/rawkets. Rawkets uses PHP for some of its code. PHP is outside the scope of this chapter, so I will leave it as an exercise for the reader to work out how to install a LAMP (Linux, Apache, MySQL, PHP [or Perl]) server and get the code running.
Rawkets uses many of the techniques described earlier in this chapter. The interesting portions of code lie in the main.js file at https://github.com/robhawkes/rawkets/blob/422026f0fcd31db7645281568cf5b6d1d7668932/server/main.js.
Listing 11-15 provides all the specific message types in Rawkets. A unit of data for a Rawkets game takes this general form.
Listing 11-15. All Message Types in Rawkets, in the File main.js
{type: <MESSAGE TYPE ID>, arg1: value1, arg2: value2, ...}

/**
 * Message protocols
 */
var MESSAGE_TYPE_PING = 1;
var MESSAGE_TYPE_UPDATE_PING = 2;
var MESSAGE_TYPE_NEW_PLAYER = 3;
var MESSAGE_TYPE_SET_COLOUR = 4;
var MESSAGE_TYPE_UPDATE_PLAYER = 5;
var MESSAGE_TYPE_REMOVE_PLAYER = 6;
var MESSAGE_TYPE_AUTHENTICATION_PASSED = 7;
var MESSAGE_TYPE_AUTHENTICATION_FAILED = 8;
var MESSAGE_TYPE_AUTHENTICATE = 9;
var MESSAGE_TYPE_ERROR = 10;
var MESSAGE_TYPE_ADD_BULLET = 11;
var MESSAGE_TYPE_UPDATE_BULLET = 12;
var MESSAGE_TYPE_REMOVE_BULLET = 13;
var MESSAGE_TYPE_KILL_PLAYER = 14;
var MESSAGE_TYPE_UPDATE_KILLS = 15;
var MESSAGE_TYPE_REVIVE_PLAYER = 16;

socket = ws.createServer();
serverStart = new Date().getTime();

players = [];
bullets = [];

// On incoming connection from client
socket.on("connection", function(client) {

    socket.broadcast(formatMessage(MESSAGE_TYPE_REMOVE_BULLET, {i: bulletId}));
    socket.broadcast(formatMessage(MESSAGE_TYPE_KILL_PLAYER, {i: player.id}));
    socket.broadcast(formatMessage(MESSAGE_TYPE_UPDATE_KILLS, {i: bulletPlayer.id, k: bulletPlayer.killCount}));
    socket.broadcast(formatMessage(MESSAGE_TYPE_UPDATE_BULLET, {i: bullet.id, x: bullet.x, y: bullet.y}));

    // omitted code
});
The helper function formatMessage converts the arguments into a JavaScript object and binary encodes it before passing it to the socket to broadcast to other clients:
function formatMessage(type, args) {
        var msg = {type: type};

        for (var arg in args) {
                // Don't overwrite the message type
                if (arg != "type")
                        msg[arg] = args[arg];
        };

        //return JSON.stringify(msg);
        return BISON.encode(msg);
};
BiSON is similar in many respects to BSON and MessagePack; BiSON is more lightweight than JSON and can more efficiently store types. However, BiSON lacks the mindshare of BSON and MessagePack. You can read more about BiSON on its project page at https://github.com/BonsaiDen/BiSON.js.
Off-the-Shelf Solutions and WebSocket-likeProducts
When creating a game, you are not limited to pure WebSockets or a solution like Socket.io. There are several technologies either similar to or based on WebSockets that can be used to create games.
Firebase (www.firebase.com) provides a real-time API for syncing and accessing data. Firebase has client libraries and bindings for most mobile and web platforms, while offering the option of a Representational state transfer (REST) API if your favorite language or framework is not supported. Firebase is somewhat like WebSockets plus a data store wrapped up in the same package.
Firebase stores data in a JSON-like format, and it allows you to access the data through one of several options:
- A client library
- Vanilla REST calls
- A browser
Everything that you store is addressable by its object path. For instance, consider a player object stored at the root http://MyGame.firebaseIO-demo.com and represented by the following code:
ud7h3if: {
    name: 'John',
    vitals: {
        health: 80,
        attack: 20,
        weapons: ['pistol', 'rifle', 'machete']
    }
}
You could display the object by navigating to http://MyGame.firebaseIO-demo.com/ud7h3if, or perhaps only the vitals or weapons by going to http://MyGame.firebaseIO-demo.com/ud7h3if/vitals or http://MyGame.firebaseIO-demo.com/ud7h3if/vitals/weapons, respectively.
Unlike WebSockets, in which you listen for message and connectivity events, Firebase events all deal with the underlying object model. They are
- value
- child added
- child changed
- child removed
- child moved
Because each property is individually addressable, on http://MyGame.firebaseIO-demo.com/ud7h3if/vitals/weapons, you could trigger the child added or child removed handler functions when the player picks up or drops a weapon or to monitor changes in health. All Firebase clients maintain a copy of the data and fire any attached callbacks locally before the data are synced to the other clients. This system of eventual consistency means that some clients may be in a transitional state for some time until all the data have been propagated. Firebase will merge updates from clients as needed.
As a result, Firebase is great for turn-based games or even some light real-time games, but it doesn’t offer enough control for games such as GRITS or Rawkets.
Pusher
Pusher is a software as a service (SaaS) provider of a hosted WebSocket API. Pusher includes fallbacks for noncompliant browsers and libraries (both client and server) in many languages to give the developer a single API to learn. Letting someone else deal with the WebSocket code frees you to offload those responsibilities to Pusher and just work on integration. Many programming languages do have some sort of WebSocket API, but they generally aren’t as mature as Socket.io. If your application is not written in Node.js, you have to worry about finding a library or server that supports even a fraction of what Socket.io does. Pusher gives you the best of both worlds: a mature and fully featured solution and no responsibility to maintain a separate socket server.
Channels are how Pusher implements its publish/subscribe (pub/sub) model. Channels roughly correspond to Socket.io rooms and can be public or private. Private-channel members are authenticated by an endpoint on the application server as part of the subscription process. Pusher also keeps a presence channel that lets an application inquire about the channel’s currently subscribed members. The beauty of Pusher’s channel model is that there is only one API to learn. Public, private, and presence channels are differentiated only by the default events to which they subscribe and whether they require authentication.
Events are user- or system-defined states that trigger server or client code when that state is attained. All channels are bound with events that are triggered when there is a successful new subscription or a subscription error. Presence channels add events that are triggered when members are added or removed.
Pusher has a free tier and several paid tiers. The lower tiers can fit most small applications but don’t offer secure sockets layer (SSL) encryption.
You can read more about Pusher on its web site: http://pusher.com.
Kaazing’s commercial WebSocket platform offers the infrastructure and protocol libraries that make it easier to build real-time, in-game experiences, such as peer-to-peer, chat, virtual-goods shopping, auctions, and game-state notifications for players who are away from the game. Kaazing also provides hosted, cloud-based WebSocket servers to take the hassle out of deployment. You can read more about Kaazing and gaming at http://kaazing.com/industries/online-gaming.
Conclusion
In this chapter, I gave a brief overview of WebSockets and how they work. I presented several examples using WebSockets and noted how you could reduce the amount of data going across the wire. I closed with some examples from third-party games and a consideration of alternatives to hosting your own WebSocket server.
In the next chapter, you will learn how to add multiplayer support to a game to increase the range of experiences that a player can have by introducing the elements of human psychology and social interaction to the game agents.