
![]()
Applying Old-School Video Game Techniques in Modern Web Games
In computer graphics, frames are processed and painted on the screen by what some people refer to as the “animation,” “main,” “game,” or “update” loop. Personally, I prefer to call it “main,” “game,” or “update loop” for the sole reason that it’s standard practice in the industry to use this routine to perform other tasks besides painting pixels on the screen.
A good example of this is the accuracy of physics calculations. If your update loop is called 60 times per second, it means that the variables in your physics formulas will get updated every 16.67 ms (1000 ms/60 FPS). If you work with small objects and rapid movements, the movements and calculations won’t be as accurate and realistic than if you work with a higher framerate.
The reason why I mention this is because, while the framerate may be higher than the refresh rate of the monitor that is displaying the images, the three variables are not dependent on each other. To put it simply, the number of times your update loop is being called per second is completely independent from the number of times you’re refreshing the pixels on the screen, which is also independent from the refresh rate of the monitor itself. For example, the update loop could be called 1000 times per second, but the images could only be refreshed (on purpose, by the program) every 33.3 ms (30 FPS) and at a maximum of 16.67 ms (60 FPS), which is dictated by the refresh rate of the monitor. In the same way, a game could be running at 3 FPS but the monitor would still refresh images at 60 Hz. The only caveat is that the framerate that you’re using to display images on the screen can never be faster than the number of times the update loop is called per second (unless you keep them separate, which in my experience is never a good idea, at least with web games).
Nevertheless, games such as Bungie’s Halo were designed to run at 30 FPS, while others such as Epic’s Unreal Tournament or id Software’s Quake III Arena worked better if they ran at more than 60 FPS (for example, in Q3A, a higher framerate made bullets and model movements more accurate). As with most things, it always depends on what you’re trying to achieve and how you’ve developed the software.
However, we haven’t always depended on calculating time differences in order to perform animations. In the early days of game development, developers tied their update loops to the clock speed of CPUs, which is why later on some computers had a “Turbo” button that could be pressed to reduce the clock speed and make applications such as games run at the speed for which they were designed.
The reason why computer graphics developers and game developers are so obsessed with the framerate is because it dictates two extremely important pieces of information. The first one is the processing budget that you need to work within, and the other is the accuracy and precision of certain calculations.
The processing budget dictates how much processing time is available until the next frame is called. You need to consider that if your game is running and displaying graphics at 60 FPS, you have 16.67 ms to handle the following:
- Pixels being painted on the screen
- Calling the next tick on the physics engine
- Updating variables, game state, and other objects
If for some reason you’re unable to process all those things in that amount of time, you will be skipping a frame, which could incur jerkiness or slowdowns in the animations. Which is why, for example, some developers choose to display graphics at 30 FPS. Instead of having just 16.67 ms, they have 33.3 ms to take care of everything, leaving some leeway to handle more demanding scenes or calculations. Others may choose to call the update loop at 120 FPS to have increased precision in physics calculations, but to display graphics at a constant 30 FPS.
So, the question arises, what happens if you want to be able to display graphics at a constant 60 FPS with no stuttering or slowdowns? That is, you want to be able to process all these things in less than 16.67 ms, leaving some leeway for when your optimization efforts are not enough.
The truth is that optimization of update loops has been, and will most likely always be, a hot topic of discussion. There will always be some sort of limitation, restriction, or problem that you’ll need to work out to make your games run better, or that allows you to create richer and more exciting experiences for your users. There is always room to make things faster, and sometimes the gains can be enough to make us say, “Wow, now there’s enough processing power to add this new feature I’ve wanted to add” or “Hey, this can now run on my smartphone!” So in my experience, they are always worth pursuing.
In the past, game developers had to work with even tougher constraints. Not only were processors slower, but graphics and storage capabilities were extremely limited as well, which is why they had to come up with incredibly clever “performance hacks” to make their games better. Competition has been, and will most likely be in years to come, fierce. For this reason, I propose that you study how “old” games were made.
High-Performance Update Loops
Unlike in other languages such as C or C++, creating a recursive function without an exit condition will create a UI-blocking infinite loop, exhausting the computer’s memory; therefore, it’s necessary to use another method.
In the past, there were two methods that allowed you to accomplish this: setTimeout and setInterval. Both functions work similarly, by accepting two parameters: a function or string with the code that you want to execute, and another with the delay (in milliseconds). For example, two possible implementations of update loops using JavaScript follow. The first one, shown in Listing 8-1, uses setTimeout.
Listing 8-1. Using setTimeout
// Define the amount of times the loop is going to get called
var maxCount = 3;

// Call the function for the first time
update(0);

function update(current) {

    // Execute the function 3 times
    if (current < maxCount) {

        console.log('this is a test!'),

        setTimeout(function() {

               // Increase the value of current by one
            update(current + 1);

               // Execute every 500 ms.
        }, 500);

    }

}
Listing 8-2 uses setInterval.
Listing 8-2. Using setInterval
// Define the amount of times the loop is going to get called,
// initialise the counter and define an empty variable for our timer.
var maxCount = 3,
    current = 0, //
    intervalId = null;

function update() {

    // Execute the function 3 times
    if (current < maxCount) {

        // Do Something
         // Increase the value of the counter by one
        current += 1;

    } else {

           // If the function has been called 3 times, stop the timer.
         clearInterval(intervalId);

    }

}

// Define the interval and save the timerId to a variable. Call every 500 ms.
intervalId = setInterval(update, 500);
The second parameter of both functions is the delay. Common reason would dictate that if you want to make the loop run as many times as possible per second, you could set it to zero. Unfortunately, that’d produce a similar result to doing an infinite while loop. For this reason, the delay (referred to as DOM_MIN_TIMEOUT_VALUE in the spec) used to be clamped to a minimum value of 10 ms.
However, both methods suffered (and still do) from a very serious problem: if the window or tab is inactive, or (in the case of a mobile application) if you switch to another application, both functions will continue to be called at 10 ms, consuming valuable processing and battery power.
In modern browsers, both setTimeout and setInterval have a DOM_MIN_TIMEOUT_VALUE of 4 ms. They also include a new function that not only behaves similarly to setTimeout and setInterval, but that also solves the “inactive window” problem. This function is defined in the document “Timing control for script-based animations” (http://www.w3.org/TR/animation-timing/) and it’s called requestAnimationFrame.
Calling requestAnimationFrame
One of the best features of requestAnimationFrame is that it will be scheduled to run before the web browser performs a repaint, which in most browsers happens approximately 60 times per second (that is, 60 FPS). This basically means that requestAnimationFrame cannot be called more times than the number of repaints in the browser. When the browser window (or tab) goes inactive, the number of times that the function is called per second will be reduced automatically to a minimum.
Browsers as recent as IE9 didn’t support requestAnimationFrame, but luckily there’s a very easy way to polyfill it (which means creating a way to make it work similarly in older browsers) by using a RequestAnimationFrame Polyfill, as shown in Listing 8-3.
Listing 8-3. Using a RequestAnimationFrame Polyfill
// handle multiple browsers for requestAnimationFrame()
window.requestAnimFrame = (function () {
    return window.requestAnimationFrame ||
            window.webkitRequestAnimationFrame ||
            window.mozRequestAnimationFrame ||
            window.oRequestAnimationFrame ||
            // if all else fails, use setTimeout
            function (callback) {

                  // shoot for 60 fps
                return window.setTimeout(callback, 1000 / 60);

            };
})();
Therefore, you can implement an update loop as shown in Listing 8-4.
Listing 8-4. Implementing an Update Loop
 // Define the amount of times the loop is going to get called
var maxCount = 3;

// Call update() for the first time
update(0);

function update(current) {

    // Execute the function 3 times
    if (current < maxCount) {

        // Do Something

         // Call requestAnimFrame
        requestAnimFrame(function() {

            // Increase the value of current by one
            update(current + 1);

        });
    }

}
As mentioned, requestAnimationFrame is capped at 60 FPS (or rather, it’s limited by the refresh rate of your web browser), but as you have probably noticed there’s no way to specify a delay. So what happens if you want to display graphics at less than 60 FPS?
One possible solution to this problem involves calculating the delta between two timestamps. If the delta is bigger that a given interval, which would basically dictate the framerate, you can draw the frame, leaving you with enough processing power to perform more complex (and time-consuming) calculations.
Luckily, when you specify the callback to requestAnimationFrame, it will attempt to pass an additional parameter with a timestamp that is relative to when the page has finished loading; that is, instead of being a DOMHighResTimeStamp, it will attempt to pass a DOMTimeStamp. You can use this to your advantage by creating an update loop that displays graphics at 30 FPS, as shown in Listing 8-5.
Listing 8-5. An Update Loop that Displays Graphics at 30 FPS
var fps = 30,              // Define the maximum number of FPS
    interval = 1000 / fps, // Calculate the interval in milliseconds
    delta = 0,             // Variable initialisation
    previousTs = 0;        // Variable initialisation

// Call the update loop for the first time
requestAnimationFrame(update);

function update(ts) {

    // Calculate the delta between the previous timestamp and the new one
    delta = ts - previousTs;

    // Performing a calculation here means that it will be
    // executed every 16.67 ms. at 60 frames per second

    // Paint routine
    if (delta > interval) {

        // This bit will be executed only if it's bigger than the
        // interval and therefore will be executed every 33.33 ms.
        // at 30 frames per second (or the value of the "fps" variable)

        // Set the previous timestamp, which will be used
        // in the "next" loop.
        // Subtract the difference between the delta and the interval
        // to account for the time that it took the computer to
        // process the function.

        previousTs = ts - (delta % interval);

    }

    // Call requestAnimationFrame again
    requestAnimationFrame(update);

}
However, in some games (such as card, match-3, or strategy games) there are periods of time where the scene doesn’t suffer any modifications, so it’s not necessary to redraw it. That’s why the International Association of Responsible Game Developers recommends, “Just because you can, it doesn’t mean you should constantly consume the resources of the user’s system.” (This is obviously made up and meant to be sarcastic.)
Knowing this, you can make an extremely small addition to your code that will result in memory and processing savings when you don’t need to redraw the scene. The optimization consists of creating a special flag that you’ll call shouldRepaint that will dictate whether you need to repaint the scene, as shown in Listing 8-6.
Listing 8-6. Special Flag shouldRepaint
var fps = 30,              // Define the maximum number of FPS
    interval = 1000 / fps, // Calculate the interval in milliseconds
    delta = 0,             // Variable initialisation
    previousTs = 0,        // Variable initialisation
    shouldRepaint = true;  // Set the repaint flag to true by default

// Call the update loop for the first time
requestAnimationFrame(update);

function update(ts) {

    // Calculate the delta between the previous timestamp and the new one
    delta = ts - previousTs;

    // Performing a calculation here means that it will be
    // executed every 16.67 ms. at 60 frames per second

    // Check whether or not something needs to be repainted in the scene

    // Only execute the paint routine if the delta is bigger
    // than the interval and the shouldRepaint flag is set to true
    if (delta > interval && shouldRepaint) {

        // This bit will be executed only if it's bigger than the
        // interval and therefore will be executed every 33.33 ms.
        // at 30 frames per second (or the value of the "fps" variable)

        // Set the previous timestamp, which will be used
        // in the "next" loop.
        // Subtract the difference between the delta and the interval
        // to account for the time that it took the computer to
        // process the function.

        previousTs = ts - (delta % interval);

    }

    // Call requestAnimationFrame again
    requestAnimationFrame(update);

}
Bottlenecks in an Update Loop
Most commonly, when it comes to performance, the biggest bottlenecks in an update loop can be found in two places. The first one is the painting routine because painting pixels on the screen is an extremely expensive process, as you'll remember from the last chapter. The second one is the physics calculations.
The reason why you have spent a considerable amount of time learning the definition of framerate and how to define a proper update loop is because both will aid you in the implementation of a rock-solid and extremely performant update routine that separates the paint process from other calculations.
That being said, let’s shift focus to the topic at hand. Minimizing or completely eliminating the impact of a performance bottleneck is not an easy task. Many times it requires several days of intense profiling or searching (or even inventing) the right algorithm. Keep in mind that micro-optimizations will only result in micro-improvements. Real performance gains can only be made when you tackle the elephant in the room: the slowest and most CPU/GPU demanding parts of the routine.
Back in the day, computers came with CGA cards, which included a color depth of 4-bits (16 different colors) at a maximum of 640×200 pixels, and 16 kilobytes of video memory. Even though they were revolutionary at the time, they lacked the necessary features to support scrolling in hardware, which meant that scenes had to be redrawn in software, frame by frame. Additional limitations of processing power meant that making side-scrolling games was practically impossible.
In order to overcome this limitation, John D. Carmack (one of the Founders of ID Software and creator of games such as Wolfestein, Doom, and the Quake series) invented a technique called Adaptive Tile Refresh (ATR) that combined the “extra” space in EGA cards and used them as double-buffers in combination with an extremely popular technique that we nowadays refer to as dirty rectangles.
Dirty Rectangles
From web browsers to video streaming algorithms to videogames, the use of dirty rectangles has been and continues to be one of the most efficient graphical algorithms that can be used to repaint small changes within a bigger image. Best of all, the algorithm itself is quite simple to understand and implement.
The concept behind dirty rectangles is that usually on certain types of applications there is no need to repaint the entire image when there is a small variation (such as a character moving, or an object appearing or disappearing). In order to deal with this problem, you can think of an image as a grid. When something changes, you flag the affected cells as modified; when it’s time to repaint, you only have to repaint the flagged cells. Obviously, the reason why there is a possibility of using algorithms like dirty rectangles in HTML5 Canvas applications is because the canvas object works in immediate mode; whatever you draw on the screen will stay there until you draw something else on top of it, or you clear the screen.
One possible way to implement this algorithm consists of subdividing the screen into many columns and rows, and then when all of them are drawn on the screen, you mark them as “unmodified.” When some other object within the screen moves, you need to calculate which of the cells are affected and mark them as “modified” or add them to a list of “modified cells.” When the update loop is triggered again, the only thing you have to do is to cycle the list of modified cells and re-draw those cells. Figure 8-1 explains how this would work in practice.
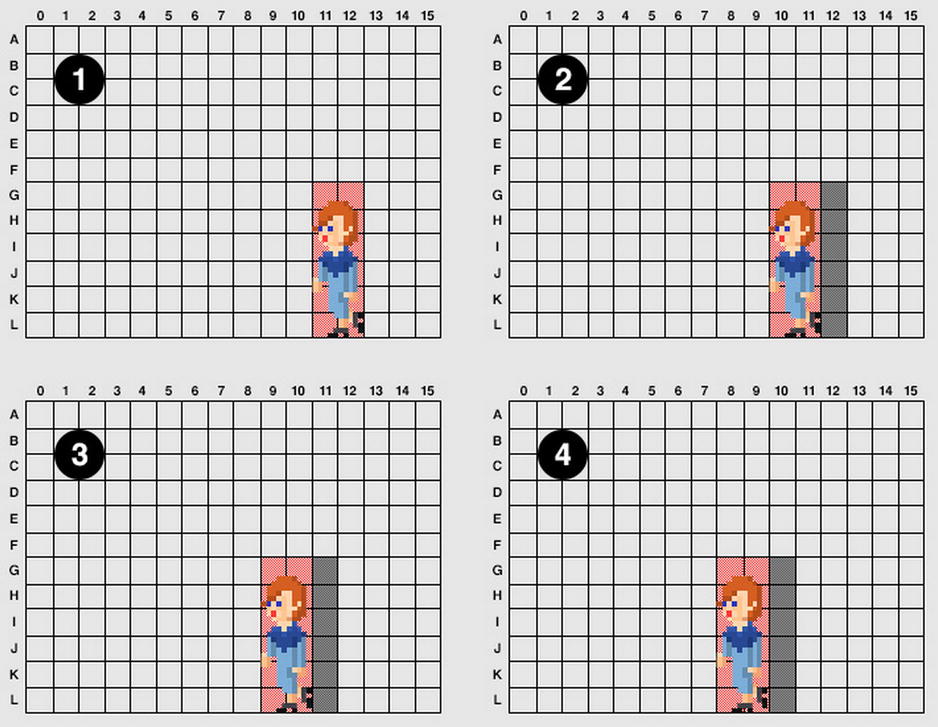
Figure 8-1. As the character moves, only the tiles that the character was on top of are being repainted
In order to show how this concept works in a practical application, you’re going to develop a very simple application that draws a somewhat complex background and a small red dot that you’ll be able to control using the arrow keys or keys W, A, S, and D. See Listing 8-7.
Listing 8-7. Canvas Application Demo
window.addEventListener('keydown', function(e) {

        switch(e.keyCode) {
            case 65: // A
                console.log('Go left!'),
                break;
            case 68: // D
                console.log('Go right!'),
                break;
            case 87: // W
                console.log('Go up!'),
                break;
            case 83: // S
                console.log('Go down!'),
                break;
        }
}
Listing 8-8 shows how to display and control the small red circle using your keyboard.
Listing 8-8. Display and Controlling the Small Red Dot
;(function() {

    var fps = 30, // Define the maximum number of FPS
        interval = 1000 / fps, // Calculate the interval in milliseconds
        delta = 0, // Variable initialisation
        previousTs = 0,// Variable initialisation
        shouldRepaint = true, // Set the repaint flag to true by default
        Grid = [], // Initialize an array where we're going to be storing the grid values
        gridCols = 15, // Setup the number of columns of the grid
        gridRows = 10, // Setup the number of rows of the grid
        viewportWidth = 640, // Setup the width of the viewport (the canvas)
        viewportHeight = 480, // Setup the height of the viewport (the canvas)
        cellWidth = (viewportWidth / gridCols) >> 0, // The width of each cell is calculated dynamically with the width of the canvas. Floor the result.
        cellHeight = (viewportHeight / gridRows) >> 0, // The height of each cell is calculated dynamically with the height of the canvas. Floor the result.
        playerRadius = 10, // Our player is going to be a circle. Set the radius.
        playerPositionX = (cellWidth * gridCols) - playerRadius, // Position the player within the map
        playerPositionY = (cellHeight * gridRows) - playerRadius, // Position the player within the map
        playerVelocityX = 0, // Velocity of the player's movements in the X axis
        playerVelocityY = 0, // Velocity of the player's movements in the Y axis
        playerVelocityLimit = 2, // Limit the acceleration
        canvas = document.querySelector('canvas'), // Grab a reference to the canvas object...
        ctx = canvas.getContext('2d'), // ...and its context
        i = 0, // Declare counters for the for loop we'll be using below
        j = 0; // Declare counters for the for loop we'll be using below

    // Set the size of the canvas
    canvas.width = viewportWidth;
    canvas.height = viewportHeight;

    // Initialise the grid. By default, it will be empty,
    // so we'll need to "paint" all the cells
    for ( ; i < gridRows ; ++i ) {

        for ( j = 0 ; j < gridCols ; ++j ) {

            if (Grid[i] === undefined) {
                Grid[i] = [];
            }

            // Flag all the cells as "modified"
            Grid[i][j] = 1;

        }

    }

    // Call the update loop for the first time
    requestAnimationFrame(update);

    // Listen for keydown
    window.addEventListener('keydown', function(e) {

        var diff = 0.2;

        switch(e.keyCode) {
            case 37: // Left
            case 65: // A
                playerVelocityX -= diff;
                break;
            case 39: // Right
            case 68: // D
                playerVelocityX += diff;
                break;
            case 38: // Up
            case 87: // W
                playerVelocityY -= diff;
                break;
            case 40: // Down
            case 83: // S
                playerVelocityY += diff;
                break;
        }

        // Make sure the acceleration in the X axis is limited
        if (Math.abs(playerVelocityX) > playerVelocityLimit) {
            playerVelocityX = (playerVelocityX < 0) ? (playerVelocityLimit * -1) : playerVelocityLimit;
        }

        // Make sure the acceleration in the Y axis is limited
        if (Math.abs(playerVelocityY) > playerVelocityLimit) {
            playerVelocityY = (playerVelocityY < 0) ? (playerVelocityLimit * -1) : playerVelocityLimit;
        }

    }, false);

    function update(ts) {

        // Calculate the delta between the previous timestamp and the new one
        delta = ts - previousTs;

        // Performing a calculation here means that it will be
        // executed every 16.67 ms. at 60 frames per second

        // Check whether or not something needs to be repainted in the scene

        // if the velocity of the player is different than 0,
 // we'll need to repaint the frame
        if (playerVelocityX !== 0 || playerVelocityY !== 0) {
            playerPositionX += playerVelocityX;
            playerPositionY += playerVelocityY;

            shouldRepaint = true;
        }

        // Only execute the paint routine if the delta is bigger
        // than the interval and the shouldRepaint flag is set to true
        if (delta > interval && shouldRepaint) {

            // This bit will be executed only if it's bigger than the
            // interval and therefore will be executed every 33.33 ms.
            // at 30 frames per second (or the value of the "fps" variable)

            // Paint the "background"
            var i = 0,
                j = 0;

            for ( ; i < gridRows ; ++i ) {

                for ( j = 0 ; j < gridCols ; ++j ) {

                    if (Grid[i][j] === 1) {

                        paintCell(ctx,
                                  j * cellWidth,
                                  i * cellHeight,
                                  cellWidth,
                                  cellHeight);

                        // Set that position as painted
                        Grid[i][j] = 0;

                    }

                }

            }

            // Paint the "player"
            paintPlayer(ctx, playerPositionX, playerPositionY);

            // There's no need to go through all this logic on every frame
            shouldRepaint = false;

            // Set the previous timestamp, which will be used
            // in the "next" loop.
            // Subtract the difference between the delta and the interval
            // to account for the time that it took the computer to
            // process the function.

            previousTs = ts - (delta % interval);

        }

        // Call requestAnimationFrame again
        requestAnimationFrame(update);

    }

    function paintCell(ctx, x, y, w, h) {

        // Set the colour to blue
        ctx.strokeStyle = '#00F';

        // Instead of drawing straight lines, draw dashed lines instead
        w -= (cellWidth / 2);
        h -= (cellWidth / 2);

        ctx.beginPath();
        ctx.moveTo(x, y);
        ctx.lineTo(x + w, y + h);
        ctx.stroke();

        // Set the colour to gray
        ctx.strokeStyle = '#ccc';

        // Draw an outline
        w += (cellWidth / 2);
        h += (cellWidth / 2);

        ctx.strokeRect(x, y, w, h);

    }

    function paintPlayer(ctx, x, y) {

        // Set the colour to a dark red
        ctx.fillStyle = '#CC0000';

        // Draw the circle
        ctx.beginPath();
        ctx.arc(x, y, playerRadius, 0, 2 * Math.PI);
        ctx.fill();

    }

}());
However, you will notice that whenever you move the dot, it leaves a trail. The reason why this happens is because you’re not “cleaning up after yourself” by repainting the cells. In order to take care of this problem, first of all you need to figure out where you are—that is, upon which cells the circle is sitting.
A naive solution to the problem would consist of cycling every cell asking, “Is the circle on top of me?” but that would be an extremely time- and resourcing-consuming operation. Luckily, there’s a much simpler solution that consists in dividing the position in the X-axis by the width of the cell, and flooring the result. Keep in mind that you’ll need to do the same with Y-axis, by dividing it by the height of the cell.
You can try this concept by making a very small modification to the paintPlayer() function, as shown in Listing 8-9.
Listing 8-9. Modifying the paintPlayer() Function
function paintPlayer(ctx, x, y) {

    var col = (x / cellWidth) >> 0,
        row = (y / cellHeight) >> 0;

    // Set the colour to a semi-transparent blue
    ctx.fillStyle = 'rgba(0, 0, 255, 0.05)';
    ctx.fillRect((col * cellWidth),
                 (row * cellHeight),
                 cellWidth,
                 cellHeight);

    // Set the colour to a dark red
    ctx.fillStyle = '#CC0000';

    // Draw the circle
    ctx.beginPath();
    ctx.arc(x, y, playerRadius, 0, 2 * Math.PI);
    ctx.fill();

}
But if you try this example in a web browser, you’ll find situations like the ones in Figure 8-2 where even though the circle is on top a cell, the cell is not being painted. The reason why this happens is because the X and Y are being calculated from the center of the circle, and you’re not taking the radius of the circle into account.
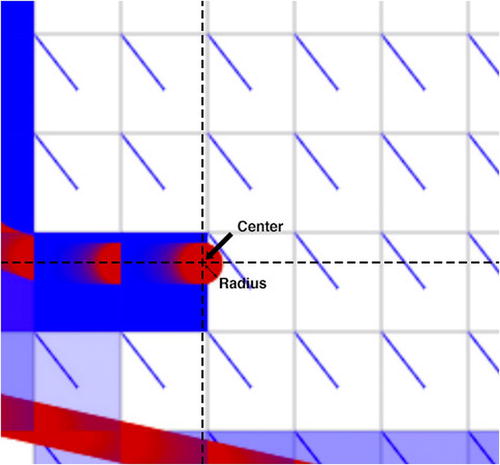
Figure 8-2. While the circle seems to be on top of a new cell, the cell remains white instead of changing to blue (which means that it’s marked as “dirty”)
One easy way to handle the problem is to create a bounding rectangle—that is, to turn the sphere into a box, as seen in Figure 8-3.
Figure 8-3. How to calculate the bounding box of a circle properly
Additionally, you need to keep in mind what happens when the circle is bigger than four cells. In Listing 8-10, you increase the radius of the sphere from 10 pixels to 60, which means that it occupies a total area of nine cells. In order to get the area of the bounding rectangle, you just need to calculate the top left corner and bottom right corner.
Listing 8-10. Increasing the Radius
function paintPlayer(ctx, x, y) {

    var l = ((x - playerRadius) / cellWidth) >> 0,  // Grab the left corner
        r = ((x + playerRadius) / cellWidth) >> 0,  // Grab the right corner
        t = ((y - playerRadius) / cellHeight) >> 0, // Grab the top corner
        b = ((y + playerRadius) / cellHeight) >> 0, // Grab the bottom ccorner
        i = l,
        j = t;

    // Set the colour to a semi-transparent blue
    ctx.fillStyle = 'rgba(0, 0, 255, 0.05)';

    // Cycle between left-right and top-bottom, adding 1 for error correction
    for ( ; i < r + 1 ; ++i ) {

        for ( j = t ; j < b + 1 ; ++j ) {

            // Paint the square
            ctx.fillRect((i * cellWidth),
                         (j * cellHeight),
                         cellWidth,
                         cellHeight);

        }

    }

    // Set the colour to a dark red
    ctx.fillStyle = '#CC0000';

    // Draw the circle
    ctx.beginPath();
    ctx.arc(x, y, playerRadius, 0, 2 * Math.PI);
    ctx.fill();

}
Now that you can reliably detect which cells the circle’s movements are affecting, you can proceed with the full implementation of the dirty rectangles algorithm.
In Listing 8-10, you implemented a routine within the update loop that checked whether the cells had to be repainted or not. So, instead of painting a square, all you need to do now is to set those cells as “modified.” The flag check on the loop will take care of the rest. Listing 8-11 shows the relevant part to modify.
Listing 8-11. Setting Cells as Modified
function paintPlayer(ctx, x, y) {

    var l = ((x - playerRadius) / cellWidth) >> 0,  // Grab the left corner
        r = ((x + playerRadius) / cellWidth) >> 0,  // Grab the right corner
        t = ((y - playerRadius) / cellHeight) >> 0, // Grab the top corner
        b = ((y + playerRadius) / cellHeight) >> 0, // Grab the bottom corner
        i = t,
        j = l;

    // Adding 1 more row/col for error correction
    // Also, make sure that they are not bigger than gridCols and gridRows
    r = ((r + 1) > gridCols) ? r : (r + 1);
    b = ((b + 1) > gridRows) ? b : (b + 1);

    // Set the colour to a semi-transparent blue
    ctx.fillStyle = 'rgba(0, 0, 255, 0.05)';

    // Cycle between left-right and top-bottom
    for ( ; i < b ; ++i ) {

        for ( j = l ; j < r ; ++j ) {

            Grid[i][j] = 1;

        }

    }

    // Set the colour to a dark red
    ctx.fillStyle = '#CC0000';

    // Draw the circle
    ctx.beginPath();
    ctx.arc(x, y, playerRadius, 0, 2 * Math.PI);
    ctx.fill();

}
While this new code has been massively improved as compared to the last example, you will quickly notice that there are two bottlenecks in your update loop. The first one is caused by the loop that checks each cell’s flag, and the other loop is found within the paintPlayer() function. On small grids you wouldn’t even notice the bottleneck, but imagine what would happen if your grid were to be substantially larger, which leads to the next topic wit hin this chapter.
So far, your grids are not very big, so for now the performance seems to be good. However, how would this work with a bigger grid?
A beginner might attempt to improve the performance by doing something like the code in Listing 8-12.
Listing 8-12. Improving Grid Performance
var i = 0;

for ( ; i < gridRows ; ++i ) {

    for ( j = 0 ; j < gridCols ; ++j ) {

        if (withinScreen()) {

            if (Grid[i] === undefined) {
                Grid[i] = [];
            }

            // Flag all the cells as "modified"
            Grid[i][j] = 1;

        }

    }

}
While this approach might improve the performance, you will realize later what happens when the values of gridRows and gridCols surpass 1,000,000, 100,000, or as little as 10,000. In such cases, you would quickly notice that the real problem lies in the loops themselves, which are cycling the entire range of values between zero and gridRows/gridCols.
From Mario Bros to Megaman, Sonic the Hedgehog, or SimCity 2000, having a performant grid-rendering algorithm is a must-have in any game with a sufficiently large grid of values. Luckily, you have already figured out the “hardest” part of the problem, which is how to discover which cells are dirty and should be repainted; the rest is accounting for the missing stuff, such as the initialization loop, or how values are accessed in the rendering routine.
But let’s see how you can make this even better. You’re going to start by displaying a simple grid, as shown in Listing 8-13.
Listing 8-13. Displaying a Simple Grid
;(function() {

    var fps = 30, // Define the maximum number of FPS
        interval = 1000 / fps, // Calculate the interval in milliseconds
        delta = 0, // Variable initialisation
        previousTs = 0, // Variable initialisation
        shouldRepaint = true, // Set the repaint flag to true by default
        Grid = [], // Initialize an array where we're going to be storing the grid values
        gridCols = 1000, // Setup the number of columns of the grid
        gridRows = 1000, // Setup the number of rows of the grid
        viewportWidth = 640, // Setup the width of the viewport (the canvas)
        viewportHeight = 480, // Setup the height of the viewport (the canvas)
        cellWidth = 60,
        cellHeight = 30,
        canvas = document.querySelector('canvas'), // Grab a reference to the canvas object...
        ctx = canvas.getContext('2d'), // ...and its context
        i = 0, // Declare counters for the for loop we'll be using below
        j = 0; // Declare counters for the for loop we'll be using below

    // Set the size of the canvas
    canvas.width = viewportWidth;
    canvas.height = viewportHeight;

    // Initialize the grid. By default, it will be empty,
    // so we'll need to "paint" all the cells
    for ( ; i < gridRows ; ++i ) {

        for ( j = 0 ; j < gridCols ; ++j ) {

            if (Grid[i] === undefined) {
                Grid[i] = [];
            }

            // Flag all the cells as "modified"
            Grid[i][j] = 1;

        }

    }

    // Call the update loop for the first time
    requestAnimationFrame(update);

    function update(ts) {

        // Calculate the delta between the previous timestamp and the new one
        delta = ts - previousTs;

        // Performing a calculation here means that it will be
        // executed every 16.67 ms. at 60 frames per second

        // Check whether or not something needs to be repainted in the scene

        // Only execute the paint routine if the delta is bigger
        // than the interval and the shouldRepaint flag is set to true
        if (delta > interval && shouldRepaint) {

            // This bit will be executed only if it's bigger than the
            // interval and therefore will be executed every 33.33 ms.
            // at 30 frames per second (or the value of the "fps" variable)

            // Paint the "background"
            var i = 0,
                j = 0;

            for ( ; i < gridRows ; ++i ) {

                for ( j = 0 ; j < gridCols ; ++j ) {

                    if (Grid[i][j] === 1) {

                        paintCell(ctx,
                                  j * cellWidth,
                                  i * cellHeight,
                                  cellWidth,
                                  cellHeight);

                           // Print the current values of i and j for each cell
                        ctx.fillStyle = '#000';
                        ctx.font = '10px Arial';
                        ctx.textAlign = 'center';
                        ctx.fillText(i + ' ' + j,
                                     j * cellWidth,
                                     i * cellHeight);

                        // Set that position as painted
                        Grid[i][j] = 0;

                    }

                }

            }

            // There's no need to go through all this logic on every frame
            shouldRepaint = false;

            // Set the previous timestamp, which will be used
            // in the "next" loop.
            // Subtract the difference between the delta and the interval
            // to account for the time that it took the computer to
            // process the function.

            previousTs = ts - (delta % interval);

        }

        // Call requestAnimationFrame again
        requestAnimationFrame(update);

    }

    function paintCell(ctx, x, y, w, h) {

        // Set the background colour to white
        ctx.fillStyle = '#fff';

        // Draw the background
        ctx.fillRect(x, y, w, h);

        // Set the border colour to gray
        ctx.strokeStyle = '#ccc';

        // Draw an outline
        ctx.strokeRect(x, y, w, h);

    }

}());
If again you run this in a web browser, you will quickly notice that this one will take considerable more time to initialize and render, but at the same time note that you have increased the number of rows and cells to 1,000. At this point, the reason why things are so slow is obvious: you’re trying to cycle through every single one of the 1,000,000 cells.
To find out quickly how much time both processes (grid initialization and rendering) are taking, you can use the console.time(<string>) and console.timeEnd(<string>) functions, as shown in Listing 8-14.
Listing 8-14. Timing the Grid Initialization and Rendering Processes
// Initialize the grid. By default, it will be empty,
// so we'll need to "paint" all the cells
console.time("Grid Initialisation");
for ( ; i < gridRows ; ++i ) {

    for ( j = 0 ; j < gridCols ; ++j ) {

        if (Grid[i] === undefined) {
            Grid[i] = [];
        }

        // Flag all the cells as "modified"
        Grid[i][j] = 1;

    }

}
console.timeEnd("Grid Initialisation");
For example, on my computer the console reported the values shown in Figure 8-4.
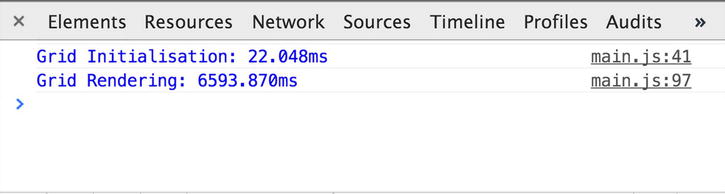
Figure 8-4. A quick snapshot of how long it’s taking the program to initialise and paint the grid
As you can see in Figure 8-4, the initialization took approximately 22 ms, which is a lot of time but it’s not worrying. The rendering, however, took more than 6.5 seconds. And keep in mind that that’s on every frame.
I previously mentioned that an easy optimization would be to call only the paintCell() function if the current cell was within the viewport, so let’s do that. All you need to do is to modify the code in Listing 8-14 to check that the cell is within function, which gets you the code in Listing 8-15.
Listing 8-15. Checking that a Cell Is Within a Function
console.time("Grid Rendering");
for ( ; i < gridRows ; ++i ) {

    for ( j = 0 ; j < gridCols ; ++j ) {

        if (Grid[i][j] === 1) {

            if ((j * cellWidth) >= 0 && (j * cellWidth) < viewportWidth &&
                (i * cellHeight) >= 0 && (i * cellHeight) < viewportHeight) {
                paintCell(ctx,
                          j * cellWidth,
                          i * cellHeight,
                          cellWidth,
                          cellHeight);

                // Print the current values of i and j for each cell
                ctx.fillStyle = '#000';
                ctx.font = '10px Arial';
                ctx.textAlign = 'center';
                ctx.fillText(i + ' ' + j,
                             j * cellWidth,
                             i * cellHeight);

                // Set that position as painted
                Grid[i][j] = 0;
            }

        }

    }

}
console.timeEnd("Grid Rendering");
Run this example and open the console. Note that you have made a remarkable improvement to the performance. For my part, I sped up the rendering routine from ∼6.5 seconds to a mere ∼8.5 ms.! See Figure 8-5.
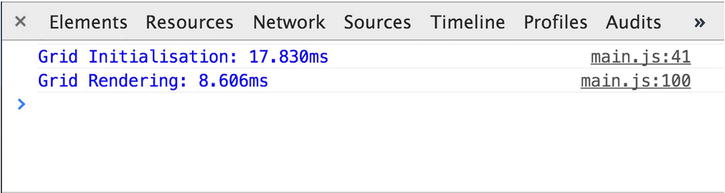
Figure 8-5. The modification resulted in a dramatic improvement to the grid rendering routine
While this looks like a massive improvement (and it is) and you could stop here, you still have a long way to go until you reach a point where you can render your grid at 60 or 30 FPS. To make things even harder, let’s increase the number of rows and columns to 100,000. Or better yet, let’s go for the gold, and do it with 1,000,000 rows and columns for a grand total of 1,000,000,000,000 (trillion) cells. (Note: While it’s highly unlikely that you’ll ever need to store and render a trillion cells, it’s nevertheless a nice exercise.)
So far, you know that your rendering routine will only paint the cells that can be displayed within the viewport. If that’s the case, why is it taking so long? Where are those ∼8.5 ms. coming from?
Let’s do a detailed walkthrough of the update routine to understand what’s going on. Start with the first few lines, shown in Listing 8-16.
Listing 8-16. Analyzing the Update Routine
function update(ts) {

    // Calculate the delta between the previous timestamp and the new one
    delta = ts - previousTs;
Declare the update() function, which takes a timestamp as a parameter, and refresh the value of the delta variable that is used later on to see if it’s bigger than the interval (which is the number of milliseconds given by doing the operation 1000 ms/# FPS, which in this case is 30 FPS); see Listing 8-17.
Listing 8-17. Declaring the update() function
// Check whether or not something needs to be repainted in the scene

// Only execute the paint routine if the delta is bigger
// than the interval and the shouldRepaint flag is set to true
if (delta > interval && shouldRepaint) {
As mentioned, if the delta is bigger than the interval and the shouldRepaint flag is set to true, you’re going to execute the code block in Listing 8-18.
Listing 8-18. Executing the Code Block when the Delta Is Bigger than the interval and the shouldRepaint Flag Is Set to True
// This bit will be executed only if it's bigger than the
// interval and therefore will be executed every 33.33 ms.
// at 30 frames per second (or the value of the "fps" variable)

// Paint the "background"
var i = 0,
    j = 0;

console.time("Grid Rendering");
You then declare two counters that you’ll be using in two for() loops, as shown in Listing 8-19.
Listing 8-19. Declaring Two Counters that to Use in the Two for() Loops
for ( ; i < gridRows ; ++i ) {

    for ( j = 0 ; j < gridCols ; ++j ) {

        if (Grid[i][j] === 1) {

             // Only render the cell if it's within the viewport
            if ((j * cellWidth) >= 0 && (j * cellWidth) < viewportWidth &&
                (i * cellHeight) >= 0 && (i * cellHeight) < viewportHeight) {

                paintCell(ctx,
                          j * cellWidth,
                          i * cellHeight,
                          cellWidth,
                          cellHeight);

                // Print the current values of i and j for each cell
                ctx.fillStyle = '#000';
                ctx.font = '10px Arial';
                ctx.textAlign = 'center';
                ctx.fillText(i + ' ' + j,
                             j * cellWidth,
                             i * cellHeight);

                // Set that position as painted
                Grid[i][j] = 0;
            }

        }

    }

}
console.timeEnd("Grid Rendering");

// There's no need to go through all this logic on every frame
shouldRepaint = false;
Currently, the value of gridCols and gridRows is 1000. This basically means that your for() loops are iterating through every single one of the cells, checking if they are within the viewport one by one. Surely there must be a way to make things faster. And obviously, there is.
As you can see in Figure 8-6, both loops are also processing all of the cells that are outside the visible area. If you’re not going to be displaying the cell, then it’s not necessary to process it in the for() loop.
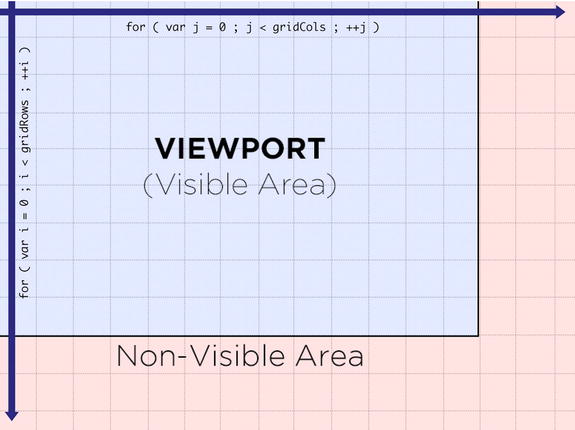
Figure 8-6. The visible area of the viewport vs. the non-visible area
As seen in Listing 8-20, one way to force your rendering routing to paint only the visible area of the viewport is to limit both loops to the dimensions of the viewport. In essence, the idea is to see what cell is being shown on the bottom right hand corner of the viewport, which will reveal what column and what row are the last ones.
Listing 8-20. Limiting Loops to the Dimensions of the Viewport
// Paint the "background"
var i = 0,
    j = 0,
    lastRow = (canvas.height / cellHeight) >> 0, // Grab the last row
    lastCol = (canvas.width / cellWidth) >> 0;   // Grab the last column

console.time("Grid Rendering");
for ( ; i < lastRow ; ++i ) {

    for ( j = 0 ; j < lastCol ; ++j ) {

        // ...

    }

}
console.timeEnd("Grid Rendering");
Additionally, you need to find a way to do something similar with the initialization routine, or to make it even more efficient; you can add a check within the update loop that if the cell is not initialized, you set a default value (see Listing 8-21).
Listing 8-21. Adding a Check to the Update Loop
console.time("Grid Rendering");
for ( ; i < lastRow ; ++i ) {

    for ( j = 0 ; j < lastCol ; ++j ) {

        // Handle the initialisation of new cells, in case they are not created
        if (Grid[i] === undefined) {

            // Has the row been declared?
            Grid[i] = [];

        }

        // Has the column been declared?
        if (Grid[i][j] === undefined) {

            // Flag all the cells as "modified" by default
            Grid[i][j] = 1;

        }

        // ..
    }

}
console.timeEnd("Grid Rendering");
And what’s even better is that if you open the console, you’ll notice that both initialization and rendering are now being done in just ∼3 ms (see Figure 8-7).
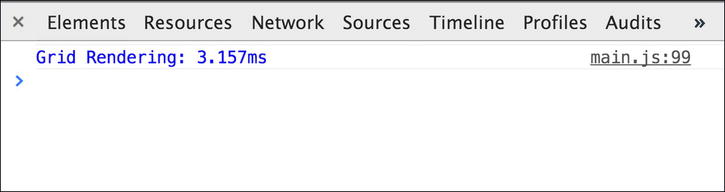
Figure 8-7. A massive improvement in the performance of your rendering routine
Now that you can potentially initialize and render a trillion cells efficiently, you need to add a way to scroll through the grid. One way to approach this problem is to add scrollX and scrollY variables that allow you to offset the starting and ending points of the loop, then you can add an event listener that would allow you to increase or decrease the values of scrollX and scrollY, as seen in Listing 8-22.
Listing 8-22. Adding Variables to Allow You to Offset the Starting and Ending Points of a Loop
var scrollX = 0, // Offset in the X axis
    scrollY = 0; // Offset in the Y axis

// Listen for keypresses
window.addEventListener('keydown', function(e) {

    switch (e.keyCode) {
        case 37: // Left
        case 65: // A

            // Make sure that we can't scroll past our minimum value (0)
            if (scrollX > 0) {
                scrollX -= 10;
            }

            break;
        case 39: // Right
        case 68: // D

            // Make sure that we can't scroll past our maximum value
            // (Width of the Cell * Number of Columns)
            if (scrollX < (cellWidth * gridCols)) {
                scrollX += 10;
            }

            break;
        case 38: // Up
        case 87: // W

            // Make sure that we can't scroll past our minimum value (0)
            if (scrollY > 0) {
                scrollY -= 10;
            }

            break;
        case 40: // Down
        case 83: // S

            // Make sure that we can't scroll past our maximum value
            // (Height of the Cell * Number of Rows)
            if (scrollX < (cellHeight * gridRows)) {
                scrollY += 10;
            }

            break;
    }

}, false);
Now that you have worked out a method to scroll around the map by offsetting things in the X-axis and Y-axis, let’s see how you can adapt that to your current code. If you go back to the last code that you used in your update loop, you‘ll notice that the starting row and column is hard-coded to 0, meaning that it will ignore the value of the offset. As a reference, here’s what you were doing before:
// Paint the "background"
var i = 0,
    j = 0,
    lastRow = (canvas.height / cellHeight) >> 0, // Grab the last row
    lastCol = (canvas.width / cellWidth) >> 0;   // Grab the last column
“Fixing” the lastRow and lastCol values is easy enough, all you need to do add the values of scrollX and scrollY in the following way:
lastRow = ((canvas.height + scrollY) / cellHeight) >> 0, // Grab the last row
lastCol = ((canvas.width + scrollX) / cellWidth) >> 0;   // Grab the last column
But what about the starting values for i and j? In that case, you can divide the value of scrollX and scrollY by cellWidth and cellHeight, like this:
i = (scrollY / cellHeight) >> 0,
j = (scrollX / cellWidth) >> 0;
However, you also need to keep in mind that as you modify the offset, you might have to show cells that weren’t showing up before, which means that you’ll need to mark them as “modified” so that in the next loop they get redrawn, as shown in Listing 8-23.
Listing 8-23. Marking Cells as Modified
// Listen for keypresses
window.addEventListener('keydown', function(e) {

    switch (e.keyCode) {
        case 37: // Left
        case 65: // A

            // Make sure that we can't scroll past our minimum value (0)
            if (scrollX > 0) {
                scrollX -= 10;
            }

            break;
        case 39: // Right
        case 68: // D

            // Make sure that we can't scroll past our maximum value
            // (Width of the Cell * Number of Columns)
            if (scrollX < (cellWidth * gridCols)) {
                scrollX += 10;
            }

            break;
        case 38: // Up
        case 87: // W

            // Make sure that we can't scroll past our minimum value (0)
            if (scrollY > 0) {
                scrollY -= 10;
            }

            break;
        case 40: // Down
        case 83: // S

            // Make sure that we can't scroll past our maximum value
            // (Height of the Cell * Number of Rows)
            if (scrollX < (cellHeight * gridRows)) {
                scrollY += 10;
            }

            break;
    }

    // Set those cells as "modified", therefore we need to redraw them
    var i = (scrollY / cellHeight) >> 0,
        j = (scrollX / cellWidth) >> 0,
        lastRow = ((canvas.height + scrollY) / cellHeight) >> 0, // Grab the last row
        lastCol = ((canvas.width + scrollX) / cellWidth) >> 0;   // Grab the last column

    for ( ; i < lastRow ; ++i ) {

        for ( j = ((scrollX / cellWidth) >> 0) ; j < lastCol ; ++j ) {

            // Handle the initialisation of new cells, in case they are not created
            if (Grid[i] === undefined) {

                // Has the row been declared?
                Grid[i] = [];

            }

            Grid[i][j] = 1;

        }

    }

    shouldRepaint = true;

}, false);
One other thing that you need to keep in mind is that when you draw the cells, you’ll need to take scrollX and scrollY into account, which means that the following code
paintCell(ctx,
          j * cellWidth,
          i * cellHeight,
          cellWidth,
          cellHeight);

// Print the current values of i and j for each cell
ctx.fillStyle = '#000';
ctx.font = '10px Arial';
ctx.textAlign = 'center';
ctx.fillText(i + ' ' + j,
             j * cellWidth,
             i * cellHeight);
will now look like this (notice the addition of the scrollX/scrollY variables):
paintCell(ctx,
          (j * cellWidth) - scrollX,
          (i * cellHeight) - scrollY,
          cellWidth,
          cellHeight);

// Print the current values of i and j for each cell
ctx.fillStyle = '#000';
ctx.font = '10px Arial';
ctx.textAlign = 'center';
ctx.fillText(i + ' ' + j,
             (j * cellWidth) - scrollX,
             (i * cellHeight) - scrollY);
The results speak for themselves. See Figure 8-8.
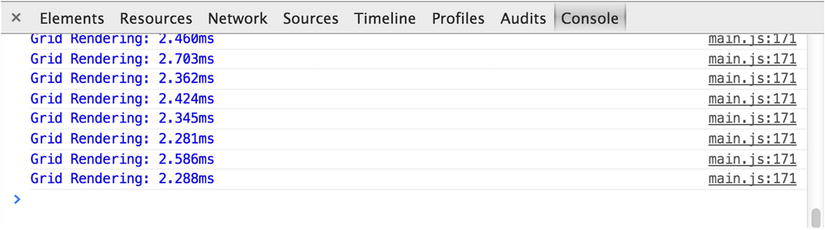
Figure 8-8. Results of Listing 8-23 and Modifications
You can find the fully animated player example, complete with a dirty rectangles-enabled rendering routine, in the chapter folder.
One of the main benefits of using grids is that they are extremely easy to use, and have an almost infinite number of potential applications. This is especially true in video game development. They can be used to draw arcade games, platformers, board games, RTSs, and RPGs or to do complex collision detection, among many other uses.
Nevertheless, sometimes you may find yourself trying to solve a similar situation in a scenario that doesn’t use grids at all. In such case, you might find the next technique to be extremely useful.
Displaying Animations in Extremely Large Viewports
So far you’ve learned how to efficiently cycle and paint massive grids, but this begs the question: What happens if you need to do something similar on an extremely large screen? Consider the example shown in Figure 8-9.
Figure 8-9. Just a big image being painted on a canvas object
The background image being used in Figure 8-9 has a size of 1920 x 1080, which means that it would take most devices a fair amount of time to paint it on the screen. For example, on my computer (a fairly high-end Retina MacBook Pro with 16GB of RAM and a 1024MB video card), it took Chrome 22.113 ms to paint that image within the canvas. You already know that if you want to render the program at 60 FPS, you need to execute the update loop in less than 16.67 ms (1000 milliseconds/60 frames per second), so this basically means that you won’t be able to repaint the scene at 60 FPS.
You can try it yourself to see how much time it’d take your computer to render an image that big. The example in Listing 8-24 loads a massive image and attempts to paint it on the canvas every 33.33 ms.
Listing 8-24. Painting a Large Image
;(function() {

    var fps = 30, // Define the maximum number of FPS
        interval = 1000 / fps, // Calculate the interval in milliseconds
        delta = 0, // Variable initialisation
        previousTs = 0; // Variable initialisation
        shouldRepaint = true, // Set the repaint flag to true by default
        viewportWidth = 640, // Setup the width of the viewport (the canvas)
        viewportHeight = 480, // Setup the height of the viewport (the canvas)
        canvas = document.querySelector('canvas'), // Grab a reference to the canvas object...
        ctx = canvas.getContext('2d'), // ...and its context
        backgroundTexture = new Image(); // Declare a new image object that we'll be using to store our background texture

    // Set the default size of the canvas (it will be resized when the background image is loaded)
    canvas.width = viewportWidth;
    canvas.height = viewportHeight;

    // Load the background texture
    backgroundTexture.src = 'texture.jpg';
    backgroundTexture.addEventListener('load', function() {

        // Resize the canvas to the size of the image
        canvas.width = backgroundTexture.width;
        canvas.height = backgroundTexture.height;

        // Call requestAnimationFrame as soon as we make sure the image is loaded
        requestAnimationFrame(update);

    }, false);

    function update(ts) {

        // Calculate the delta between the previous timestamp and the new one
        delta = ts - previousTs;

        // Performing a calculation here means that it will be
        // executed every 16.67 ms. at 60 frames per second

        // Check whether or not something needs to be repainted in the scene

        // Only execute the paint routine if the delta is bigger
        // than the interval and the shouldRepaint flag is set to true
        if (delta > interval && shouldRepaint) {

            // This bit will be executed only if it's bigger than the
            // interval and therefore will be executed every 33.33 ms.
            // at 30 frames per second (or the value of the "fps" variable)

            console.time("Painting Scene");

            // Paint the image on the canvas
            ctx.drawImage(backgroundTexture,
                          0,
                          0);

            console.timeEnd("Painting Scene");

            // There's no need to go through all this logic on every frame
            shouldRepaint = false;

            // Set the previous timestamp, which will be used
            // in the "next" loop.
            // Subtract the difference between the delta and the interval
            // to account for the time that it took the computer to
            // process the function.

            previousTs = ts - (delta % interval);

        }

        // Call requestAnimationFrame again
        requestAnimationFrame(update);

    }

}());
Obviously, in order to repaint this background 60 times per second you would need one of two possible options, either a faster machine or a better painting algorithm.
But what if you were using a much slower device (such as a smartphone)? While many people would consider that to be impossible, it’s always nice to have one more trick up your sleeve.
Let’s suppose that besides the background, you also wanted to display a bouncing ball on your canvas. In that case, there are two potential solutions. The first solution consists of handling the background and the animations in two different viewports; therefore you would only need to clean and update the foreground canvas, leaving the background canvas unchanged, as explained in Figure 8-10. While it’s certainly not very elegant, this solution is fit for used in a scenario where the background won’t be suffering any modifications. In such case, the background canvas doesn’t even need to be a canvas at all; it could be any other markup element that allows you to display an image (such as a <div>).
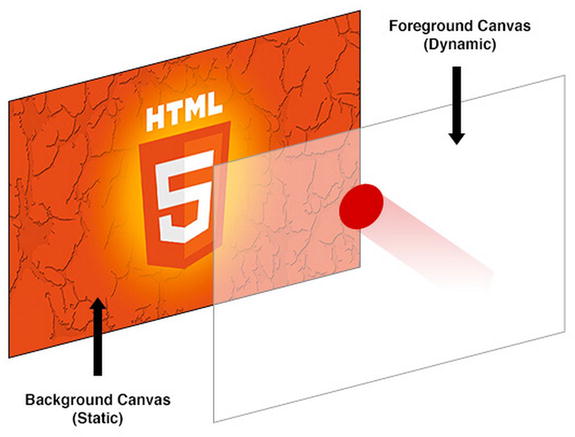
Figure 8-10. One easy method to avoid having to repaint the big image on every frame is to keep it “static” and completely separate from the actual, dynamic canvas where you’ll be painting the animation
Like in the “Dirty Rectangles” section, the second solution consists of only repainting the portion of the image that was overwritten by the moving object (in this case, the ball). The biggest advantage of this second approach is that it will allow you to not only paint the ball, but also to replace small bits of the background as well. A good example is a background of a forest where some of the trees are moving while the rest of the image remains static.
Usually, there are two ways to handle this scenario. The first approach, which is the one you’ve been using so far, consists of painting an image directly into the canvas in your DOM tree. Then, in order to grab a portion of the image, you would just need to use a reference to your image object. But what happens if your background is composed of more than one image? For example, let’s suppose that your background is composed of three different images, one that has a sky texture, another one that has clouds, and another one with trees (the trees, for example, could be generated and placed procedurally). In such a case, one of the best approaches is to work with an in-memory canvas that allows you to compose the full background in an in-memory Canvas, and then treat that canvas as a regular image, as displayed in Figure 8-11.
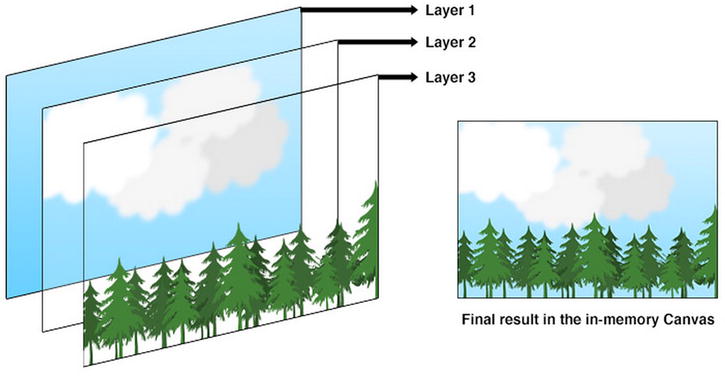
Figure 8-11. If you have three different images, you can merge them together in memory and handle them as a single, unified, layer
In order to show how this would work, let’s start by defining some variables that you’ll be using to demonstrate how to implement the bouncing ball example (see Listing 8-25).
Listing 8-25. Defining Variables to Implement the Bouncing Ball Example
var ballRadius = 20,                   // Set the radius of the ball
    ballVelocityX = 15,                // Velocity of the ball in the X axis
    ballVelocityY = 15,                // Velocity of the ball in the Y axis
    ballPositionX = canvas.width / 2,  // Position of the ball in the X axis
    ballPositionY = canvas.height / 2; // Position of the ball in the Y axis
Now you’re going to create a paintBall() function that paints the ball in the canvas; see Listing 8-26.
Listing 8-26. paintball() Function
function paintBall(ctx, r, x, y) {

    // Set the background colour to yellow
    ctx.fillStyle = '#ff0';

    // Draw the circle
    ctx.beginPath();
    ctx.arc(x, y, r, 0, 2 * Math.PI);
    ctx.fill();

    // Make sure to trigger a repaint
    shouldRepaint = true;

}
And finally, you’re going to integrate the function within your update loop, as shown in Listing 8-27.
Listing 8-27. Integrating the paintBall() Function in the Update Loop
function update(ts) {

    // Calculate the delta between the previous timestamp and the new one
    delta = ts - previousTs;

    // Performing a calculation here means that it will be
    // executed every 16.67 ms. at 60 frames per second

    // Check whether or not something needs to be repainted in the scene

    // Only execute the paint routine if the delta is bigger
    // than the interval and the shouldRepaint flag is set to true
    if (delta > interval && shouldRepaint) {

        // This bit will be executed only if it's bigger than the
        // interval and therefore will be executed every 33.33 ms.
        // at 30 frames per second (or the value of the "fps" variable)

        // There's no need to go through all this logic on every frame
        shouldRepaint = false;

        console.time("Painting Scene");

        // Paint the image on the canvas
        ctx.drawImage(backgroundTexture,
                      0,
                      0);

        // If the position of the ball in the X axis minus its radius
        // multipled by 2 is less than 0, or it's bigger than the width
        // of the canvas, invert the velocity
        if (ballPositionX - (ballRadius * 2) < 0 ||
            ballPositionX + (ballRadius * 2) > canvas.width) {
            ballVelocityX *= -1;
        }

        // If the position of the ball in the Y axis minus its radius
        // multipled by 2 is less than 0, or it's bigger than the width
        // of the canvas, invert the velocity
        if (ballPositionY - (ballRadius * 2) < 0 ||
            ballPositionY + (ballRadius * 2) > canvas.height) {
            ballVelocityY *= -1;
        }

        // Add the velocity to the position in the X and Y axis
        ballPositionX += ballVelocityX;
        ballPositionY += ballVelocityY;

        // Paint the ball
        paintBall(ctx, ballRadius, ballPositionX, ballPositionY);

        console.timeEnd("Painting Scene");

        // Set the previous timestamp, which will be used
        // in the "next" loop.
        // Subtract the difference between the delta and the interval
        // to account for the time that it took the computer to
        // process the function.

        previousTs = ts - (delta % interval);

    }

    // Call requestAnimationFrame again
    requestAnimationFrame(update);

}
So far, the background is being rendered on every frame; if you place it outside the update loop (therefore, it will only be painted once), you will notice that something like what you see in Figure 8-12.

Figure 8-12. As the yellow ball moves around the canvas and bounces against its limits, it leaves a trail
Like in previous “Dirty Rectangles” section, the reason why this happens is because you’re not cleaning up after yourself when you draw the ball in a new position. Luckily, there’s an easy and highly efficient way to solve this problem, which consists of grabbing the previous portion of the image that was covered by the ball.
The magic behind this approach is provided by an alternative use of the drawImage() method of the Canvas object. So far, when you’ve used drawImage(), you just specified three parameters: the image object itself, and the coordinates in the X- and Y-axis. However, this method also accepts two additional uses:
- One method allows you to scale up or down the image by specifying the target width and height, like this:
drawImage(imageObject,
          sourceX,
          sourceY,
          newWidth,
newHeight); - The final method allows you to draw a portion of the image object by specifying
drawImage(imageObject,
sourceX,
sourceY,
sourceWidth,
sourceHeight,
destinationX,
destinationY,
destinationWidth,
destinationHeight);
Therefore, this will allow you to do the following, as shown in Listing 8-28.
Listing 8-28. Applying the drawImage() Method of the Canvas Object
// Before changing the values of ballPositionX and ballPositionY:
// Redraw the previous portion of the background that
// was overdraw by the ball
ctx.drawImage(backgroundTexture,
              ballPositionX - ballRadius,
              ballPositionY - ballRadius,
              (ballRadius * 2),
              (ballRadius * 2),
              ballPositionX - ballRadius,
              ballPositionY - ballRadius,
              (ballRadius * 2),
              (ballRadius * 2));

// Add the velocity to the position in the X and Y axis
ballPositionX += ballVelocityX;
ballPositionY += ballVelocityY;

// Paint the ball
paintBall(ctx, ballRadius, ballPositionX, ballPositionY);
But what if you wanted to somehow display an animation in your background? One possible way to approach this task would be to use the technique described in the next section of this chapter.
A very particular problem in video game development is how to display animations over large areas. As you have seen earlier in this chapter, it’s neither practical nor efficient to create a spritesheet of a large sprite because of the cost associated with having to repaint the entire background. Another big problem with the spritesheet-based approach is the massive memory requirements to store it.
In the past, game development companies such as Maxis or LucasArts relied on a technique called color cycling (also known as palette shifting) to display animations in backgrounds in games such as SimCity 2000 or The Secret of Monkey Island.
As the name implies, the technique consists of cycling colors of certain pixels through a given palette to give the impression that something is moving on the background. In order to implement it, you’ll be using a texture similar to that shown in Figure 8-13.
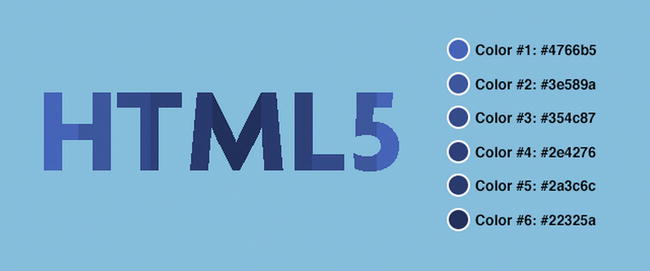
Figure 8-13. The word “HTML5” seems to be painted with five different colors, which you’ll use as your palette
In order to implement color cycling using the texture shown in Figure 8-13, the portion of the texture that will be changing is painted with six particular colors. Usually, color cycling requires a custom file that not only allows you to store color information, but also additional metadata. The metadata is used to indicate which pixels are grouped together, in what order, what palette to use, and how that palette should be cycled. For example, in Figure 8-14, each number corresponds to a given color in your palette.
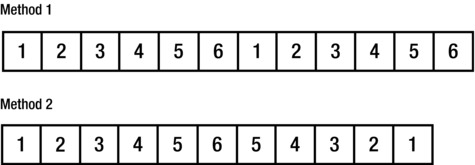
Figure 8-14. In this figure, each number corresponds to a given colour in your palette
For the sake of simplicity (discussing the creation of a custom image format is outside the scope of this chapter), you’re going to generate the metadata dynamically by cycling through every pixel of your texture. As such, it needs to be said that one of the biggest downsides with this technique is that it’s only fit to be used with 8-bit images (256 colors). Another word of caution is that, as you need to dynamically discover and change the palette, your approach will be considerably slower than with using a custom image format.
You’re going to start by defining four variables:
- backgroundTexture = new Image() will be used to store your image
- pixelGroups = {} will be used to group pixels of a same color together
- colourIndexes = ['4766b5', '3e589a', '354c87', '2e4276', '2a3c6c', '22325a'] will be your palette, as shown in Figure 8-13
- currentColourOrder = colourIndexes.slice(0) will be used to cycle through all the colors in your palette
Then, as soon as your image is loaded, you’ll need to read all the pixels of the image to group them together in the pixelGroups variable, like this:
// Load the background texture
backgroundTexture.src = 'texture.gif';
backgroundTexture.addEventListener('load', function() {

    var i = 0,
        j = 0,
        backgroundTextureData = null;
In order to read the colors of a given pixel, you’ll need to resort to using a method of the Canvas object called getImageData(), but before doing that, you’ll need to paint the texture in the canvas first, as shown in Listing 8-29.
Listing 8-29. Painting the Texture in the Canvas Object
// Paint the image on the canvas for the first time)
ctx.drawImage(backgroundTexture,
              0,
              0);

 // Grab the image data using the getImageData() method
backgroundTextureData = ctx.getImageData(0, 0, backgroundTexture.width, backgroundTexture.height);
backgroundTextureData = backgroundTextureData.data;

// Resize the canvas to the size of the image
canvas.width = backgroundTexture.width;
canvas.height = backgroundTexture.height;
Here comes the interesting part; you’ll need to cycle through each pixel of the image to get the color data, as shown in Listing 8-30.
Listing 8-30. Cycling Through each Pixel
// Group pixels by colour
// (keep in mind that there's a much faster way to cycle through
// all these pixels using typed arrays, I'm keeping it "simple" for
// the sake of clarity
for ( ; i < backgroundTexture.height ; ++i ) {

    for ( j = 0 ; j < backgroundTexture.width ; ++j ) {

        var red = backgroundTextureData[((backgroundTexture.width * i) + j) * 4],
            green = backgroundTextureData[((backgroundTexture.width * i) + j) * 4 + 1],
            blue = backgroundTextureData[((backgroundTexture.width * i) + j) * 4 + 2],
            hex = numberToHexadecimalValue(red) + numberToHexadecimalValue(green) + numberToHexadecimalValue(blue);

        if (pixelGroups[hex] === undefined) {
            pixelGroups[hex] = [];
        }

        pixelGroups[hex].push({ x: i, y: j });

    }

}
What you’re really doing here is using the hex code of the color as a key, and then you’re storing each pixel as a small object with x and y coordinates. This will be extremely useful later on when you need to cycle through it. Finally, you’ll need to paint the texture on the canvas again, and call the update loop, as shown in Listing 8-31.
Listing 8-31. Painting the texture in the Canvas object and calling the Updalet Loop
    // Paint the image on the canvas again
    ctx.drawImage(backgroundTexture,
                  0,
                  0);

    // Call requestAnimationFrame as soon as we make sure the image is loaded
    requestAnimationFrame(update);

}, false);
Within your update loop, you’re going to shift the colors by one, placing the first item as the last one, as shown in Listing 8-32.
Listing 8-32. Shifting Colors in the Update Loop
// Shift the order by one item (grab the first value and put it last)
var firstValue = currentColourOrder[0];

// Remove the first value of the order array
currentColourOrder.splice(0, 1);

// And place it last
currentColourOrder.push(firstValue);
Once you’ve done that, you’ll need to replace the pixels in the last order, with the new colors. In order to do this, you’re going to prepare a utility function called paintPixels() that does just that, as shown in Listing 8-33.
Listing 8-33. paintPixels() Function
function paintPixels(newColour, pixels) {

    var i = 0;

    for ( ; i < pixels.length ; ++i ) {

        ctx.fillStyle = '#' + newColour;

        ctx.fillRect(pixels[i].y,
                     pixels[i].x,
                     1,
                     1);

    }

}
As you can see, the paintPixels() function accepts two arguments, the first one with the new color, and the second one with the array of pixels that need to be repainted. All you need to do now is to cycle the new order and call the function, as shown in Listing 8-34.
Listing 8-34. Calling the paintPixels() Function
for ( ; i < currentColourOrder.length ; ++i ) {

    paintPixels(currentColourOrder[i], pixelGroups[colourIndexes[i]]);

}
This entire example can be found within the chapter folder.
Conclusion
In this chapter, I’ve only covered a handful of the performance-improvement techniques used in old-school video games. It was my intention not only to share some of these things with the readers of this book, but, as an author, also to inspire you to think outside the box when you believe that something can’t be done.