
![]()
Creating a Two-Dimensional Map Editor
This chapter expands on the techniques covered in Chapter 6. You will get the most from this chapter if you have worked through that one first.
To address issues with your map and layer format, you must first approach the problem from an asset-creation standpoint. In this chapter, I will introduce you to the basics of creating a map editor, using the autotiles feature6.
The basic features of a graphic editor are
- zoom, scroll
- save/load image
- palette
- brush
The graphics editor allows you to compare the appearance of a map with and without autotiling. The graphics editor can be used in production for editing maps created by users, and you can create a game based on its architecture.
Figure 22-1 shows how the map editor will look at the end of this chapter. Figure 22-2 shows how it will look after running the final application code in Chapter 6.
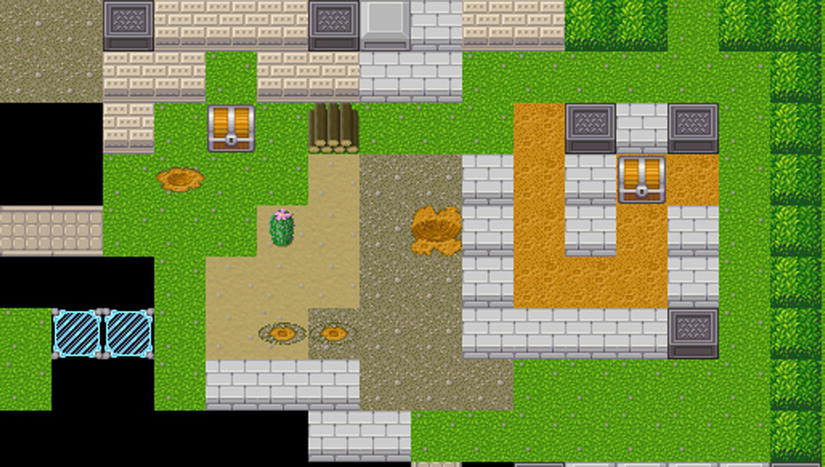
Figure 22-1. Autotiles off

Figure 22-2. Autotiles on
List of Tiles
Different tiles can exhibit different behaviors and render differently in the game, and you need one class for each tile type. A basic implementation has only a constructor and no custom methods for rendering or behavior. Each tile can be found either by name or by ID. Tile.id is an autogenerated, 0-based integer that will be used in map serialization. Specific types of tiles are described in Chapter 6.
You will use the extendTile function to implement inheritance, as is the case in object-oriented programming. This function will help you spawn different types of tiles, and each can have a specific rendering algorithm or logic to determine which sprite you need to draw:
function extendTile(Type, obj) {
        var newClass = function Tile(name, obj) {
                this.name = name;
                if (obj) for (var key in obj)
                        if (obj.hasOwnProperty(key))
                                this[key] = obj[key];
        }
        var proto = new Type();
        for (var key in obj)
                if (obj.hasOwnProperty(key))
                        proto[key] = obj[key];
        newClass.prototype = proto;
        return newClass;
}
Now, you use extendTile to generate basic tiles. This example is for a dual-layered structure made up of SurfaceTile and ObjectTile; object tiles are placed on top of the surface tiles:
var Tile = extendTile(function() {}, {})
var SurfaceTile = extendTile(Tile, {type: 0, layer: 0})
var ObjectTile = extendTile(Tile, {type: 1, layer: 1})
The TileListis going to be used for tile storage. You can add new tiles, get them by name or JD, and add new properties to already created tiles, using the apply method:
var TileList = function() {
        this.byId = []
        this.byName = {}
}

TileList.prototype = {
        defaultSurface : null, defaultObject: null,
        add : function(tile) {
                // if tile exists, dont add it
                if (this.byName[tile.name]) return
                tile.id = this.byId.length;
                this.byId.push(tile);
                return this.byName[tile.name] = tile;
        },
        get : function(id) { return this.byId[id] || this.byName[id] || null; },
        apply : function(names, obj) {
                for (var i=0;i<names.length;i++) {
                        var t = this.byName[names[i]]
                        for (var key in obj) if (obj.hasOwnProperty(key)) t[key] = obj[key];
                }
        },
        addMany : function(Type, names, obj) {
                for (var i=0;i<names.length;i++)
                        this.add(new Type(names[i], obj))
        }
}}
List of Sprites
Let the side of a square tile be 32 = 25 pixels. Before the editor starts, you need to load all necessary sprites; otherwise, the first attempt to paint the window will fail:
var TILE_SIZE = 32, TILE_SIZE_BITS = 5;
The format of objects added to SpriteListis as follows:
function Sprite(name, source, x, y) {
        this.name = name; this.source = source;this.x = x;this.y = y;
}

Sprite.prototype = {}

var SpriteList = function() {
        this.byId = []
        this.byName = {}
}
Later, you will use sprite collections for generating tiles, depending on the tile types, and you will generate the proper sprite names, depending on the type and name of each tile (see the section “Basic Tileset Configuration”). addSpriteSheetmakes a list of sprites from a graphic file and a list of sprite names:
SpriteList.prototype = {
        loaded: 0, total: 0,
        onComplete: null,
        add: function(sprite) {
                sprite.id = this.byId.length
                this.byId.push(sprite);
                this.byName[sprite.name] = sprite;
        },
The next function loads sprite file names and a corresponding two-dimensional array of names; to skip a row, use “”. This function is used later, in the default configuration (see the section “Basic Tileset Configuration”). You arrange all the tile images into a number of files. Each file contains a grid with 32 × 32 cells that hold a number of images. For each file with images, you will call that function. The function OnComplete will be called after all images are loaded:
        addSpriteSheet: function(filename, names) {
                var self = this;
                var img = new Image();
                img.onload = function() {
                        self.loaded++;
                        if (self.loaded == self.total && self.onComplete) //Are all images loaded?
                                self.onComplete();
                }
                this.total++;
                img.src = filename;
                         // Parsing 2-dimension array of names and generating sprites objects
                for (var i=0; i<names.length; i++)
                        for (var j=0;j<names[i].length;j++) {
                                var name = names[i][j];
                                if (name != "") {
                                        this.add(new Sprite(name, img, j*TILE_SIZE, i*TILE_SIZE));
                                }
                        }
        }
}
Basic Tileset Configuration
Why bother to creating tiles and sprites separately? Most tile editors use integers to enumerate the tiles and store a maplike array of integers. In real life, however, sad things happen. One moment your artist friend makes you a pretty tileset (see Figure 22-3), and the next, she completely reorders the tiles while adding new ones (see Figure 22-4). This is why you must create a configuration that allows for easy migration. Also, people who make modifications to your game will be grateful if you implement it in this manner.
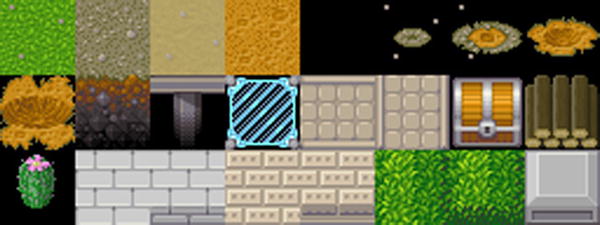
Figure 22-3. Pretty tileset

Figure 22-4. Tileset version 2; unexpected changes
You need a separate object to describe the concrete game configuration—the lists of sprites and tiles and the correspondence between them. Depending on the game, each tile can be rendered in a unique way and can have a unique behavior. Moreover, one game can have a number of configurations, basic and modified. Each configuration has init and afterInit methods. Each modification will add some new way of rendering; in a real game, it can add a new behavior, too. This approach is especially useful for modifying the game, and the game’s fans will appreciate it.
Figure 22-3 displays an 8 × 3 tileset. Grass, gravel, sand, and dirt appear beneath all other tiles on the canvas. Let’s assign them the SurfaceTile type. Brick, wall, bush, block, and metal are solids. They will have shadows. There are versions of brick, bush, and wall that appear without the bottom wall; you will use it when there is a solid tile underneath them. Abyss is transparent and doesn’t have a sprite. Deep_default and deep_bridge are versions of abyss that appear only if there is something on top of that tile. All other tiles have the type ObjectTile, and to make less code in configuration, they can be described as “all sprites that were not used.” By default, the map will be filled with grass.
In a basic configuration, however, none of this matters. You have two types: ObjectTile and SurfaceTile. You are creating five surface tiles, and each sprite that is not used will create an ObjectTile in the addUseless method (see the section “Binding Sprites to Tiles”). The abyss tile will have a unique way of rendering in one of the modifications, so you create it only if it was not created in the init method of other configurations.
ObjectTile and SurfaceTile are still almost empty, but functionality is added to them later in rendering and in other steps:
var BasicConfig = {
init: function(game) {
        var tiles = game.tiles, sprites = game.sprites
        tiles.defaultObject = tiles.add(new ObjectTile("nothing"));
        tiles.addMany(SurfaceTile, ["grass", "gravel", "sand", "dirt"]);
        tiles.defaultSurface = tiles.get("grass")
        sprites.addSpriteSheet("img/tiles.png", [
                ["grass",        "gravel",       "sand",       "dirt",     "hole1",     "hole2", "hole3",  "hole4" ],
                ["deep_default", "deep_bridge", "forcefield", "bridge_h", "bridge_v",  "chest", "lumber", "cactus"],
                ["brick-plain",  "brick",       "wall-plain", "wall",     "bush-plain","bush",  "block",  "metal" ]
        ]);
        sprites.addSpriteSheet("img/horses.png", [ ["horse1", "horse2", "horse3"] ])
},
As mentioned earlier, afterInit is used for adding new behaviors and modding (modifying). Define abyss if the other mods didn’t do it in their init function:
afterInit: function(game) {
        var tiles = game.tiles, sprites = game.sprites
        //abyss can be created in a mod!
        tiles.add(new SurfaceTile("abyss"));
        tiles.bind(sprites);
} }
Binding Sprites to Tiles
After you configure sprites and tiles, you need to bind all sprites to tiles with the same name and create tiles for sprites that were not used. Because some types of tiles can bind multiple sprites, you will add the bind method in Tile class and override it later.
All sprites that are not used in the configuration will be added as object tiles by the addUseless method:
Tile.prototype.bind = function(sprites) {
        this.sprite = sprites.get(this.name);
        if (sprites.hasOwnProperty(this.name)) {
                var sprite = tile.sprite = sprites.get(this.name);
                sprite.timesUsed++;
        }
}
Every time you bind a sprite to a tile, timesUsed will be increased. In the end, sprites that are not used will create an ObjectTile for themselves:
Sprite.prototype.timesUsed = 0;
SpriteList.prototype.get = function(name) {
        if (this.byName.hasOwnProperty(name)) {
                var sprite = this.byName[name];
                sprite.timesUsed++;
                return sprite;
        }
}
In this example, you use this mechanism to generate object sprites. You assume that all unused object sprites can be put on top of the surface layer; in practice, this is reasonable only when you have several surface objects and many other ones:
TileList.prototype.addUseless = function(TileType, sprites) {
        var list = sprites.byName;
        var names = [];
        for (var key in list)
                if (list.hasOwnProperty(key) && list[key].timesUsed == 0)
                        names.push(list[key].name);
        this.addMany(TileType, names);
        for (var i=0;i<names.length;i++) {
                this.byName[names[i]].sprite = list[names[i]];
        }
}
TileList.prototype.bind = function(sprites) {
        var list = this.byId;
        for (var i=0;i<list.length;i++)
                list[i].bind(sprites);
}
Map Field and Its Serialization to JSON
Your map field has two layers: surface and objects. Actually, there is no specific reason for the two-layer limit; it’s just the case on which we’re working in this chapter, based on the author’s experience with dynamic multiplayer worlds. As discussed previously, the code can be expanded as you like without too much effort.
Sometimes, dynamic tile indexes prevent the hacking of a multiplayer game. If the order of the tiles in the list is always random, a hacker would have to track all those dynamic IDs.
Serialization is the difficult part here, because between saving the map and loading it after application restart, the configuration can change, and that changes all tile indexes. This is not a problem if you store the names of the tiles that you were using for specific indexes. Later, you can load and save the map from localStorage. Note that you can’t add functions to objects that will be saved, because you are going to use JavaScript Object Notation (JSON) format:
function createTwoDimArray(dim1, dim2, def) {
        var res = [];
        for (var j=0;j<dim1; j++) {
                var a = [];
                for (var i=0;i<dim2; i++)
                        a.push(def);
                res.push(a);
        }
        return res;
}
MapFieldis a basic object for rendering the entire field, based on simple two-dimensional arrays and created for each type of tile (surface and object):
function MapField(tiles, cols, rows) {
        this.tiles = tiles;
        this.cols = cols;
        this.rows = rows;
        this.surface = createTwoDimArray(rows, cols, tiles.defaultSurface);
        this.objects = createTwoDimArray(rows, cols, tiles.defaultObject);
}

MapField.prototype = {
        rows: 0,
        cols: 0,
        checkBounds: function(col, row) {
                return col>=0 && col < this.cols && row>=0 && row < this.rows;
        },
        getSurface: function(col, row) {
                return this.checkBounds(col, row) && this.surface[row][col] || this.tiles.defaultSurface
        },
        getObject: function(col, row) {
                return this.checkBounds(col, row) && this.objects[row][col] || this.tiles.defaultObject
        },
        setSurface: function(col, row, value) {
                this.checkBounds(col, row) && (this.surface[row][col]=value)
        },
        setObject: function(col, row, value) {
                this.checkBounds(col, row) && (this.objects[row][col]=value)
        },
Load and save methods can be used to exploit client-side data storage, for instance, localStorage:
        load: function(data) { //load previously saved data
                var rows = this.rows = data.rows;
                var cols = this.cols = data.cols;
                var list = [];
                for (var i=0;i<data.tiles.length;i++)
                        list.push(this.tiles.byName[data.tiles[i]])
                this.surface = [];
                this.objects = [];
                for (var i=0;i<rows;i++) {
                        this.surface.push([]);
                        for (var j=0;j<cols;j++)
                                this.surface[i].push(list[data.surface[i][j]] || this.tiles.defaultSurface)
                        this.objects.push([]);
                        for (var j=0;j<cols;j++)
                                this.objects[i].push(list[data.objects[i][j]] || this.tiles.defaultObject)
                }
        },
        save: function() {
                data = { tiles:[], surface: [], objects: [] }
                var rows = data.rows = this.rows
                var cols = data.cols = this.cols
                var list = this.tiles.byId
                for (var i=0;i<list.length;i++)
                        data.tiles.push(list[i].name)
                for (var i=0;i<rows;i++) {
                        data.surface.push([]);
                        for (var j=0;j<cols;j++)
                                data.surface[i].push(this.surface[i][j].id)
                        data.objects.push([]);
                        for (var j=0;j<cols;j++)
                                data.objects[i].push(this.objects[i][j].id)
                }
                return data
        }
}
To render a world, you need a camera, which contains the transformation information from display coordinates to world coordinates. Coordinates describe a transform on a map (centerX, centerY) that corresponds to the center of the screen and a scale. The clientRect function constructs a rectangle on the map that corresponds to the display rectangle: (rect.x, rect.y) to (0, 0), (rect.x + rect.w, rect.y + rect.h) to (displayWidth, displayHeight). The following code implements the camera and clientRect functions:
function Rect(x, y, w, h) {
        this.x = x
        this.y = y
        this.w = w
        this.h = h
}

Rect.prototype = {
        contains: function(x, y) {
                return this.x <= x && x < this.x + this.w && this.y <= y && y < this.y + this.h
        }
}

var Camera = function(map, canvas) {
        this.canvas = canvas; this.map = map
        this.centerX = this.mapWidth() >> 1
        this.centerY = this.mapHeight()>> 1
}

Camera.prototype = {
        mapWidth: function() { return this.map.cols * TILE_SIZE },
        mapHeight: function() { return this.map.rows * TILE_SIZE },
        displayWidth: function() { return this.canvas.width },
        displayHeight: function() { return this.canvas.height },
        context: function() { return this.canvas.getContext("2d") },
        centerX: 0,
        centerY: 0,
        scale: 1,
        map: null,
        canvas: null,
        clientRect: function() {
                var dw = this.displayWidth(), dh = this.displayHeight();
                var dw2 = dw >> 1, dh2 = dh >> 1
                // (0, 0) in display corresponds to (rect.x, rect.y)
                // (displayWidth, displayHeight) to (rect.x+rect.w, rect.y+r.h)
                return new Rect(this.centerX - dw2*this.scale, this.centerY - dh2*this.scale, dw*this.scale, dh*this.scale);
        },
        moveBy: function(dx, dy) {
                //move center by display coordinates
                this.centerX = Math.min(Math.max(this.centerX - dx * this.scale, 0), this.mapWidth());
                this.centerY = Math.min(Math.max(this.centerY - dy * this.scale, 0), this.mapHeight());
        },
        point: function(x, y) {
                //from display to world coordinates
                x -= this.displayWidth()>>1;
                y -= this.displayHeight()>>1;
                x *= this.scale
                y *= this.scale
                x += this.centerX;
                y += this.centerY;
                return {x:x, y:y}
        },
        round: function() {
                this.centerX = Math.round(this.centerX);
                this.centerY = Math.round(this.centerY);
        }
}
After all that logic, at last you can draw something. The renderer object’s drawing is shaped not only by the camera; the renderer also stores something in cache to make the rendering process faster. Nevertheless, you will not use caching in this baseline implementation. If you like, you can set up two canvases, and one renderer will work with two cameras. The renderer calculates the rectangle of tiles on the map that needs to be drawn and processes every tile twice during the cycle.
The process of drawing autotiles can be described by two methods: auto determines the magic number, which depends on the neighboring cells, and render takes that magic number and renders the tile. If the rendering process starts to slow down the application, magic numbers can be stored in cache and recalculated whenever the tile is changed. For C/C++ applications the time required to calculate the magic number is comparable to the actual rendering time. Both methods depend on a tile, so let’s add them as functions to Tile and override this later:
var Renderer = function(map, sprites) {
        this.map = map
        this.tiles = map.tiles
        this.sprites = sprites
}

Renderer.prototype = {
        //renderer is different from camera, cause render can store cache on some info, not dependent on a camera
        render: function(camera) {
                var displayWidth = camera.displayWidth()
                var displayHeight = camera.displayHeight()

                //get view rect on map
                var r = camera.clientRect();
                var map = this.map

                var context = this.context = camera.context()
                context.fillStyle = "black"
                context.fillRect(0, 0, displayWidth, displayHeight);

                // scale && translate Standard operations
                context.save()
                context.scale(1.0/camera.scale, 1.0/camera.scale);
                context.translate(-r.x, -r.y);

                //clipping rect for tiles We want to make visible only those tiles which are on screen
                var minI = r.x >> TILE_SIZE_BITS, maxI = (r.x+r.w) >> TILE_SIZE_BITS;
                var minJ = r.y >> TILE_SIZE_BITS, maxJ = (r.y+r.h) >> TILE_SIZE_BITS;
                minI = Math.max(minI, 0); maxI = Math.min(maxI, map.cols-1);
                minJ = Math.max(minJ, 0); maxJ = Math.min(maxJ, map.rows-1);

                //for each visible tile
                for (var j=minJ; j<=maxJ; j++)
                        for (var i=minI; i<=maxI; i++) {
                                //draw surface, if tile has sprite
                                var tile = map.getSurface(i, j)
                                var autotile = tile.auto(map, i, j)
                                tile.render(this, autotile, i*TILE_SIZE, j*TILE_SIZE)

                                tile = map.getObject(i, j)
                                autotile = tile.auto(map, i, j)
                                tile.render(this, autotile, i*TILE_SIZE, j*TILE_SIZE)
                        }
                context.restore();
        }
}

Tile.prototype.render = function(renderer, autotile, x, y) {
        var sprite = this.sprite
        if (!sprite) return
        renderer.context.drawImage(sprite.source, sprite.x, sprite.y, TILE_SIZE, TILE_SIZE, x, y, TILE_SIZE, TILE_SIZE);
}

Tile.prototype.auto = function(map, i, j) {
}
Figure 22-5 shows how it will look if you create all the described objects and connect a camera to the canvas.

Figure 22-5. Autotiles off
Editor
Editor is a special class that contains methods for all editor tools. There are two tools: the brush places a selected tile on the map, and the cursor scrolls the map and picks objects. In this demo, cursor picking is not used, but you can override this if action is required. There is also a special case: if you use brush with a surface tile, the object is removed from the cell.
Recall your coding a serialization algorithm for MapField (see the section “Map Field and Its Serialization to JSON”). Now, it’s time to use the map. The load and save functions store the map in localStorage. For each site, the domain browser stores a series of key-value objects. Your map is stored under the key mapData:
function Editor(map) { this.map = map; this.tiles = map.tiles }

Editor.prototype = {
        selected: null,
        modified: false,
        brushAt: function(point) {
                var x = point.x >> TILE_SIZE_BITS, y = point.y >> TILE_SIZE_BITS;
                var tile = this.selected
                if (tile) {
                        if (tile.layer == 0) {
                                //if tile is surface, delete the object and place the tile
                                this.map.setSurface(x, y, tile)
                                this.map.setObject(x, y, this.tiles.defaultObject)
                        }
                        else
                                this.map.setObject(x, y, tile)
                        this.modified = true
                }
        },
        cursorAt: function(point) {
//no action. Reserved for the game.
        },
You need to use localStoage in order not to lose your work each time the page is updated. Of coure, you can also provide a back end here:
        load: function() {
                if (localStorage['mapdata']) {
                        this.map.load(JSON.parse(localStorage['mapdata']));
                        this.modified = false
                }
        },
        save: function() {
                if (this.modified) {
                        localStorage['mapdata'] = JSON.stringify(this.map.save());
                        this.modified = false
                }
        }
}
Now, it’s time to implement a window that will allow you to select a tile from a palette for a brush (see Figure 22-6). Let’s call the corresponding class BuilderWnd.

Figure 22-6. Builder window
The number of columns in the grid is calculated using the formula Math.floor(canvas.width / TILE_SIZE). That way, if someone resizes the canvas, the number of columns will change automatically.
There are several ways to divide and take the integer part in JavaScript. Math.floor(X / Y) does it; X/Y | 0 works, too, but when Y is a power of 2, it’s better to use right bit shift. It works because any bitwise operation removes the fractional part of a number. Similarly, you can use left bit shift if you need to remove the fractional part and multiply by a power of 2, using one operator.
The rendering algorithm draws a corresponding sprite for each tile in the tileset, in the same order. The tile number ID has the coordinates col = id % cols, row =Math.floor (id / cols) in the grid. Each column and row has a side TILE_SIZE.
Mouse events are the real problem. event.pageX and event.pageY contain absolute coordinates, and so to determine the canvas coordinates, you have to subtract offsets of each parent in the document object model (DOM):
function BuilderWnd(editor, sprites, canvas) {
        this.editor = editor; this.tiles = editor.tiles; this.sprites = sprites; this.canvas = canvas;
        this.initMouseEvents(canvas); this.redraw();
}

BuilderWnd.prototype = {
        click: function(x, y) {
                var index = (y >> TILE_SIZE_BITS) * this.cols + (x >> TILE_SIZE_BITS)
                this.editor.selected = index >= 0 && index < this.tiles.byId.length? this.tiles.byId[index]: null
        },
        initMouseEvents: function(canvas) {
                var self = this;
                $(canvas).mousedown(function(e) {
                        var x = e.pageX;
                        var y = e.pageY;
                        var t = e.target;
                        while (t != document.body) {
                                x -= t.offsetLeft;
                                y -= t.offsetTop;
                                t = t.parentNode;
                        }
                        self.click(x, y);
                        self.redraw();
                        e.preventDefault();
                        e.stopPropagation();
                });
        },
        redraw: function() {
                var canvas = this.canvas

                canvas.width = canvas.parentNode.clientWidth;
                canvas.height = canvas.parentNode.clientHeight;
                this.cols = canvas.width >> TILE_SIZE_BITS
                this.rows = canvas.height >> TILE_SIZE_BITS

                var context = canvas.getContext("2d")
                context.fillStyle = "black"
                context.fillRect(0, 0, canvas.width, canvas.height)
                var tiles = this.tiles
                for (var i=0;i<tiles.byId.length; i++) {
                        var x = (i%this.cols) * TILE_SIZE
                        var y = (i/this.cols|0) * TILE_SIZE
                        var sprite = tiles.byId[i].sprite
                        if (sprite)
                                context.drawImage(sprite.source, sprite.x, sprite.y, TILE_SIZE, TILE_SIZE, x, y, TILE_SIZE, TILE_SIZE)
                }
                var name = "undefined";
                if (this.editor.selected) {
                        var sel = this.editor.selected
                        name = sel.name

                        var x = (sel.id%this.cols) * TILE_SIZE
                        var y = (sel.id/this.cols|0) * TILE_SIZE
                        //stroke width 1.0 => line center must be X.5
                        context.strokeStyle = "white"
                        context.lineWidth = 1.0
                        context.strokeRect(x + 0.5, y + 0.5, TILE_SIZE-1, TILE_SIZE-1)
                }

                context.fillStyle = "white";
                context.textAlign = "right";
                context.font = "bold 11px Tahoma, Arial";
                context.fillText(name, canvas.width - 10, canvas.height - 10);
        }
}
You’re almost there! You can’t edit a big map if it can be scrolled. You have to take care of the press and release events of mouse buttons to separate map scrolling (drag) from selecting an object (to be used later). This is the same problem as with coordinates in the previous window. However, this time the canvas will have only one parent—there is no need of cycles.
To separate scrolling from picking, use this strategy: while the mouse cursor is no more than 5 pixels from the place where the button was pressed, it’s picking. In the case of a window resize, you resize the canvas, too:
function MainWnd(renderer, camera, editor) {
        this.renderer = renderer;
        this.camera = camera;
        this.canvas = camera.canvas;
        this.map = camera.map;
        this.editor = editor;

        this.initMouseEvents(this.canvas)
        this.initResize(this.canvas)
}
MainWnd.prototype = {
        tool: 0,
        redraw: function() {
                this.renderer.render(this.camera);
        },
        initMouseEvents: function(canvas) {
                var pressed = false, drag = false;
                var startX = 0, startY = 0;
                var camera = this.camera, editor = this.editor
                var self = this;

                function doDrag(x, y) {
                        if (!drag && (Math.abs(x-startX)>=5 || Math.abs(y-startY)>=5)) {
                                //more than 5 pixels mouse move => drag the map!
                                drag = true;
                        }
                        if (drag) {
                                var dx = x - startX, dy = y - startY;
                                startX = x;        startY = y;
                                camera.moveBy(dx, dy);
                        }
                        return drag;
                }

                function mouseDown(mx, my) {
                        pressed = true; drag = false;
                        startX = mx; startY = my;
                        if (this.tool == 1)
                                editor.brushAt(camera.point(mx, my));
                        self.redraw();
                }
                function mouseMove(mx, my) {
                        if (!pressed) return;
                        //move mouse with pressed key => drag map or draw with pencil
                        if (self.tool == 0) {
                                doDrag(mx, my);
                        } else if (self.tool == 1) {
                                editor.brushAt(camera.point(mx, my));
                        }
                        self.redraw();
                }
                function mouseUp(mx, my) {
                        if (!pressed) return;
                        pressed = false;
                        if (self.tool == 0) {
                                //if map is not dragged, then click at object
                                if (!doDrag(mx, my))
                                        editor.cursorAt(camera.point(mx, my));
                        } else if (self.tool == 1) {
                                editor.brushAt(camera.point(mx, my));
                        }
                        editor.save();
                        self.redraw();

                        //after map drag with zoom != 1.0, camera coordinates can be not integers, lets fix it!
                        camera.round();
                }

                $(canvas).mousedown(function(e){
                        mouseDown(e.pageX - e.target.offsetLeft, e.pageY - e.target.offsetTop);
                });
                $(canvas).mousemove(function(e){
                        mouseMove(e.pageX - e.target.offsetLeft, e.pageY - e.target.offsetTop);
                });
                $(canvas).mouseup(function(e){
                        mouseUp(e.pageX - e.target.offsetLeft, e.pageY - e.target.offsetTop);
                });
        },

        initResize: function(canvas) {
                var self = this;
                var resize = function() {
                        canvas.width = window.innerWidth-20;
                        canvas.height = window.innerHeight-20;
                        self.redraw();
                }
                $(window).resize(resize);
                resize();
        }
}
Now, let’s make this look like a serious enterprise application. Go to the jQuery user interface library (jQuery UI) web site (http://jqueryui.com), and download latest version. Make sure that you include the dialog widget. (Start is the author’s preferred theme.) Also, don’t forget about jQuery itself. This pretty line creates all the stuff you implemented: window.app = new App([BasicConfig]);. There are three placeholders in the code below: one for modifications, one for configurations, and one for active configurations. Every autotile algorithm will be added as a modification. The result is shown in Figure 22-7.
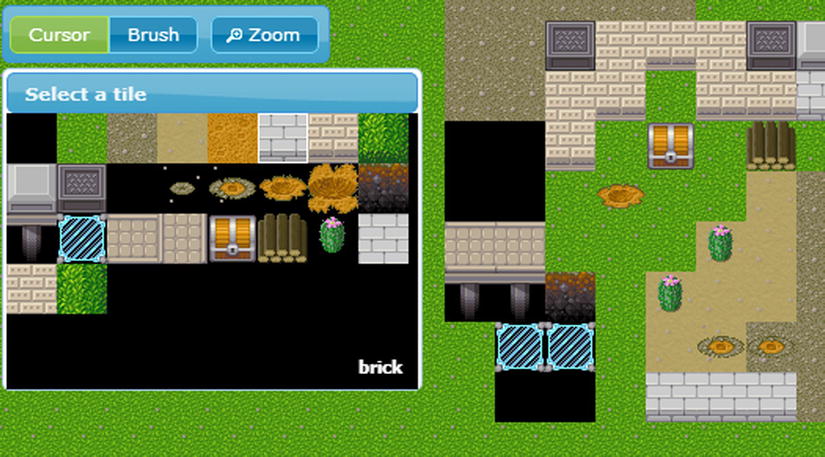
Figure 22-7. Map editor, autotiles off
<html>
<head>
    <meta http-equiv="Content-Type" content="text/html; charset=UTF-8"/>
    <meta name="viewport" content="width=device-width, initial-scale=1, maximum-scale=1, user-scalable=0"/>
        <link href="css/start/jquery-ui-1.10.3.custom.css" rel="stylesheet">
        <script src="lib/jquery-1.10.2.min.js"></script>
        <script src="lib/jquery-ui-1.10.3.custom.min.js"></script>
        <!-- GAME -->
        <script src="core/tilelist.js"></script>
        <script src="core/tileeventlist.js"></script>
        <script src="core/map.js"></script>
        <script src="core/sprite.js"></script>
        <script src="core/editor.js"></script>
        <script src="core/renderer.js"></script>
        <script src="core/binder.js"></script>
        <!-- PLACEHOLDER FOR MODS -->
        <!-- PLACEHOLDER FOR CONFIGS -->
        <!-- UI -->
        <script src="core/builder.js"></script>
        <script src="core/main.js"></script>
        <!-- Application -->
        <script src="core/app.js"></script>
        <script>
$(function() {
        initUI();
        window.app = new App([BasicConfig /* PLACEHOLDER FOR ACTIVE CONFIGS */]);
});

function initUI() {
        $( "#action-zoom" ).button({
          icons: {
                primary: "ui-icon-zoomin"
          }
        }).click(function(){
                if (app.camera.scale == 1.0)
                        app.camera.scale = 1.5;
                else app.camera.scale = 1.0;
                app.redraw();
                return false;
        });

        $( "#tool-cursor" ).click(function() {
                app.main.tool = 0;return false;
        }).next().next().click(function() {
                app.main.tool = 1;return false;
        }).parent().buttonset();

        $("#builder-dialog").dialog({dialogClass: "build_dialog", width:320, height:300, minWidth:240, minHeight: 200, position: [20, 60], resize: function() { app.builder.redraw(); }});
}
</script>
<style>
  #toolbar { padding: 4px; display: inline-block;position: absolute; left: 20px; top: 20px; }
  body {
                font-family: "Trebuchet MS", "Helvetica", "Arial",  "Verdana", "sans-serif";
                font-size: 62.5%;
        }
  #builder { }
  .build_dialog .ui-dialog-content { padding: 0; overflow: hidden }
  .build_dialog .ui-dialog-titlebar-close { display:none }
</style>
</head>
<body>
<canvas id="screen" border="0"></canvas>
<div id="toolbar" class="ui-widget-header ui-corner-all">
  <span id="tool">
    <input type="radio" id="tool-cursor" name="tool" checked="checked" /><label for="tool-cursor">Cursor</label>
    <input type="radio" id="tool-brush" name="tool" /><label for="tool-brush">Brush</label>
  </span>
  <button id="action-zoom">Zoom</button>
</div>

<div id="builder-dialog" title="Select a tile">
  <canvas id="builder"></canvas>
</div>
</body>

</html>
Conclusion
In this chapter, you created a two-dimensional map editor from scratch for tile-based map fields. This application is not far from actual game production. You have made a lot of progress, and now you know how to generate maps consisting of several layers (though you used two layers only), attach sprites, and make a correspondence between object types and sprites. You have learned a simple way of organizing a camera. The final result is a miniapplication for map editing, which you can use for enriching your games.
Here are some suggestions on how to make this editor of real value in your game application:
- Separate the map into chunks, render them separately, and cache chunks that were not changed in the offscreen buffer.
- Unload chunks that are too far from the camera-view rectangle. That way, the editor will work with big maps.
- Load chunks by network. Multiplayer sandbox game—yay!
- Add a touch events handler.
- Add game logic, for example, redstone logic, from Minecraft. To do this, you will need a new layer that can store data for tiles containing advanced logic. For redstone, it should be power level; for switches, you will need on/off enumeration.
- Add entities and simple physics for colliding with solid tiles—RPG Maker, yay!
- Create hexagonal autotiles.
- Euclidean space is boring—use hyperspace to create a hyperrogue game!
- Go in three dimensions, and make a voxel-based game.
- Make an 80286 computer with redstone.
- Using your knowledge from Chapter 6, make an HTML5 massively multiplayer online (MMO) game.
- Deploy your application on a cloud server (for example, Heroku).
- Conquer the world with your multiplayer sandbox of awesomeness!
- And . . . may the Force be with you!