
![]()
Playing Around with the Gamepad API
There is a great focus on making HTML5 games for mobile devices, which is good, of course, but core progamers are usually visualized as having a gamepad in their hands. So why not use it and deliver the full experience of a game using the Full Screen, Mouse Lock, and Gamepad APIs? The last API provides the ability to use a console’s controller to play HTML5 games—how cool is that? With the W3C specification presently being written, we will have an API that is easy to implement, does not require any plug-ins to run in your browser, and is as simple as just plugging in your device and playing the game right away.
Please remember that the Gamepad API is still in the early stages of development. The document describing its implementation indicated Editor’s Draft status at the World Wide Web Consortium. This means that the API can change in the process, so the implementations and demos working right now may not work in the future when the specification is closed and published as an official document. Though experimental, you can dive into it right now and see how it will work in the future, and that’s just what you will be doing in this chapter. You’ll be using it at your own risk, so it’s not the best idea to use it for a big commercial project just yet, but it’s perfect for a demo and as a way to impress your game development friends. Plus you’ll have an advantage over the competition when it is fully supported.
Browser Support
It is important to know about browser support of the Gamepad API, as you’ll be testing it yourself in one browser or another. For now, only two browsers support the API implementation: Mozilla Firefox and Google Chrome.
The first one, Firefox, had a special build done by Ted Mielczarek where the API could be tested, even though it wasn’t available officially. After some work had been done, gamepad support was delivered in version 24 and above of the Firefox browser. It was not available by default—you still had to set special flags in the config file. If you’re using Firefox 24-27, simply enter about:config in your browser address bar. You will get the warning shown in Figure 10-1.
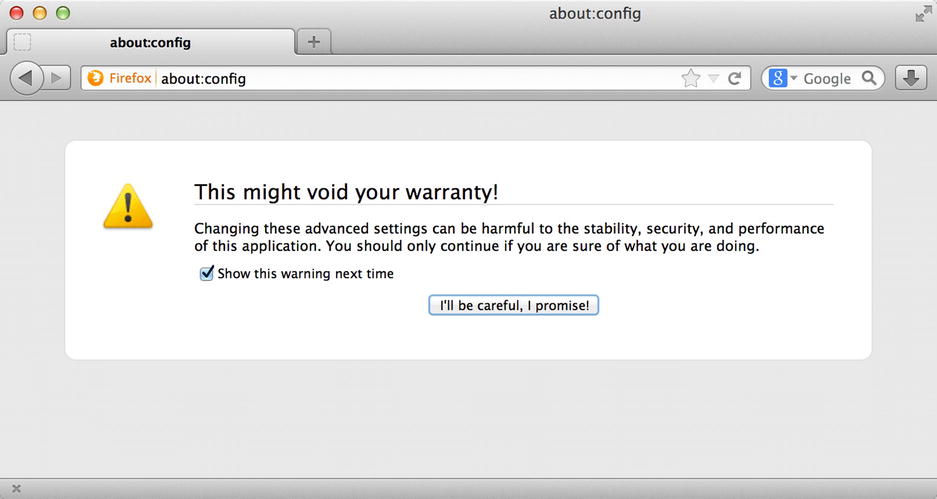
Figure 10-1. Warning message shown when setting special flags within Firefox to enable gamepad support
Click the button to see the list of available options. Search for the word “gamepad” to find the two values in which you’re interested: dom.gamepad.enabled and dom.gamepad.non_standard_events.enabled (see Figure 10-2). Double-click both of them to enable gamepad support in your browser.
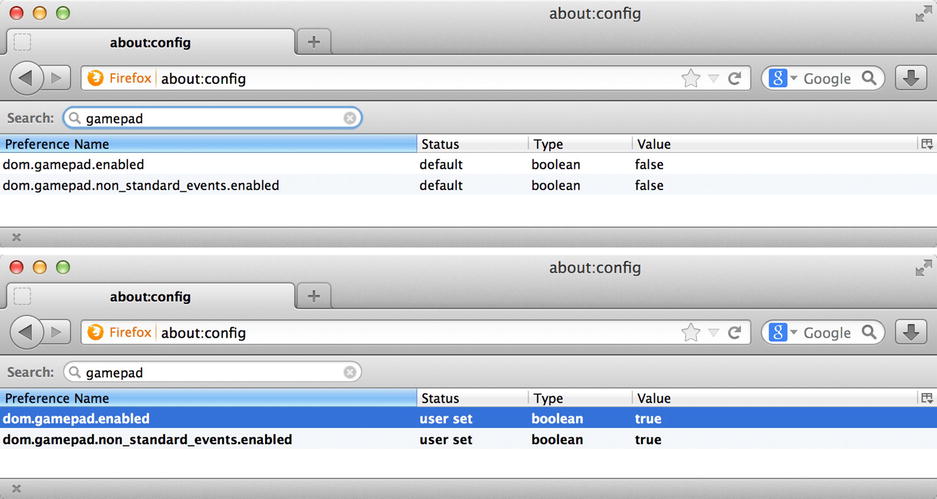
Figure 10-2. Enabling gamepad support in Firefox
The first setting will actually enable gamepad support and the second setting will give you access to events that are not yet in the specification draft: gamepadbuttonup, gamepadbuttondown, and gamepadaxismove. It won’t be necessary to enable gamepad support in the near future as the Firefox browser from version 28 on will have this enabled by default.
A second browser, Chrome, supports the Gamepad API from version 21 and above out of the box. This means that you don’t have to search for any flags in your browser settings. You can just plug in your device and it will work right away.
Both browsers support the Gamepad API on the Windows, Mac, and Linux platforms. Other browsers, like Opera, Safari, and Internet Explorer, have not implemented the API to date, but this may change in the near future.
When you want to test the Gamepad API, it’s important to know which devices are supported. There are plenty of gamepads out there, and some have a better chance of working with the API than others. The best devices to use are the wired XBox (older ones from XBox 360 and the newer ones from XBox One) and the Play Station (PS3 and PS4) controllers, both on Windows; although I’ve tested the wireless XBox 360 and PS3 on Mac OS X and they all worked just fine. The easiest way to see if it works is to visit a test web site with Gamepad API support and just plug in the device to test it out.
Gamepad API Implementation
Now you know the browsers that have implemented Gamepad API and the supported devices that you can use, so let’s dive into code! The first thing to do will be to plug in the device and then detect its presence. The XBox wireless device, for example, has a receiver that you plug into the USB port. After connecting the gamepad with the receiver, you will be able to detect it in your browser.
Usually when you work on more complicated projects there’s a strict structure of folders, such as separate ones for JavaScript, CSS, and images. As you want to have a working demo quickly cooked up, let’s just put everything in a single HTML file.
Use you favorite text editor to create new text file and name it index.html. Populate it with the following HTML code to have the starting structure of your basic test web site:
<!DOCTYPE html>
<html>
<head>
    <meta charset="utf-8">
    <title>Gamepad API Test</title>
</head>
<body>
<p>Check the browser's JavaScript console for output.</p>
<script>
    /* The JavaScript code we'll write goes here */
</script>
</body>
</html>
All of the code you will be writing should be added between the <script> tags where the comment is right now. You’re going to have a working demo to actually see the output of the buttons pressed in the browser’s JavaScript console (see Figure 10-3).
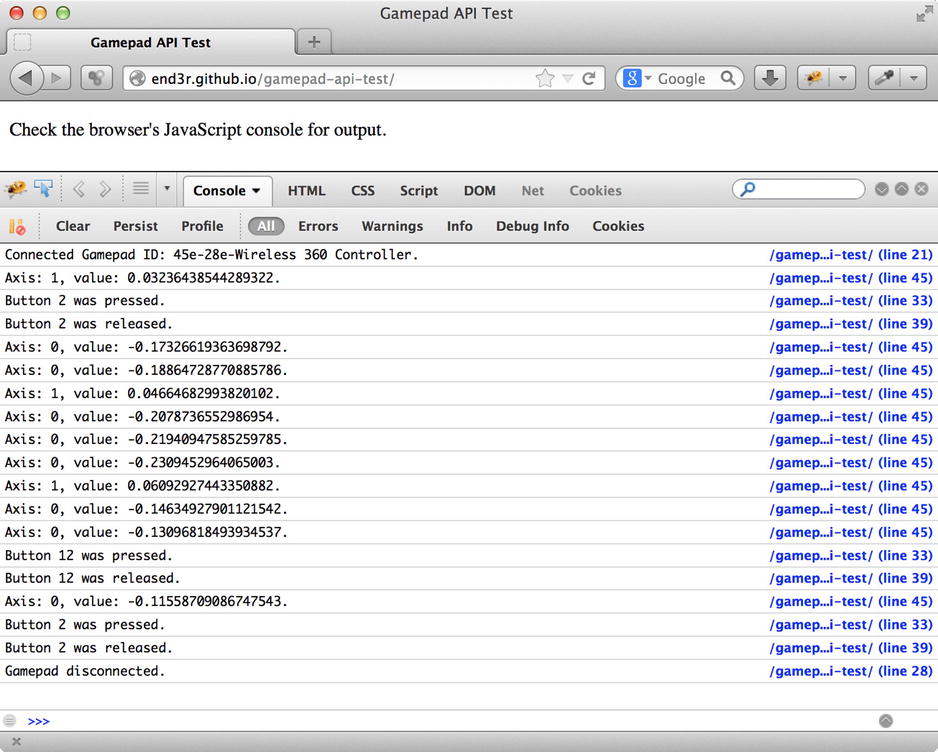
Figure 10-3. Browser’s JavaScript console output
There’s a special object that is exposed with the list of all connected gamepads, so theoretically you’ll be able to connect more than one and play the game with your friends sitting beside you. Now let’s see how to do it. You will first create a JavaScript object that will store the information about the connected gamepads:
var gamepadAPI = {
    controllers: {},
    active: false
};
Thanks to this code, you will have access to the connected gamepads and will set the Boolean variable saying that at least one device is active. To do this, you will set up an event listener called gamepadconnected:
window.addEventListener("gamepadconnected", function(e) {
    var controller = e.gamepad;
    gamepadAPI.controllers[e.gamepad.index] = controller;
    gamepadAPI.active = true;
});
The event will be fired, and the function inside will be executed as soon as any device compatible with the Gamepad API is connected. You’re assigning the gamepad object to the controller variable and then adding it to the controller’s table under the unique index where all of the connected gamepads reside. The last line is about setting the Boolean variable to let you know that the gamepad is actually active and that you are ready to read the input from the player.
You can print out the gamepad unique ID in the JavaScript console if you write it down in your index.html file inside the <script> tags:
window.addEventListener("gamepadconnected", function(e) {
    var gamepadID = e.gamepad.id;
    console.log("Connected Gamepad ID: "+gamepadID+".");
});
You can extract any data from the gamepad object and do whatever you want with it.
Prefixes
For some time, as in the CSS world, there was an issue with vendor prefixes. When using an API, one had to use the names of the methods or attributes with the prefix that was unique to the browser in which it was executed. When Firefox implemented the Gamepad API from the unfinished draft, the event gamepaddisconnected had to be prefixed for that browser as follows:
window.addEventListener('MozGamepadConnected', gamepadConnectedFunction);
The same goes for the Chrome browser. Thus if you wanted to support it, you had to use WebkitGamepadConnected. To have the Gamepad API code working in both browsers, you had to check to see if any of those methods existed. Also, don’t forget about the unprefixed version: GamepadConnected. Tricky, right? To see if a browser supports the Gamepad API, you had to use something like this:
var gamepadSupportAvailable = navigator.mozGamepads || navigator.webkitGamepads || navigator.gamepads;
When you launch the code in Firefox, the attribute with the moz prefix will be used; for Chrome, it will be webkit. For future-proof code when the API is fully implemented, the attribute without any prefix will be used.
Now let’s think about other browser vendors that would implement their own support in the meantime: o prefix for Opera and ms for Internet Explorer. That’s a mess! The good thing is that the prefixes are being dropped, so now the code will work without them and you won’t have to remember all of those crazy hacks to check for support. Now that’s a relief!
You know how to detect the gamepad connection, so now let’s manage the state when it gets disconnected. Usually, it would be good to have alternative controls, for example, the keyboard. Of course, you can just show a box saying that the user has to reconnect their device in order to play the game if you really need it.
Here’s the code to manage the state of a disconnecting a device:
window.addEventListener("gamepaddisconnected", function(e) {
  delete gamepadAPI.controllers[e.gamepad.index];
  if(!gamepadAPI.controllers.length) {
    gamepadAPI.active = false;
  }
  console.log('Gamepad disconnected.'),
});
You’re adding an event listener to the event named gamepaddisconnected. Thanks to this step, when the device is no longer available, you will delete the row containing your gamepad object with all of its data. If this was the last available device, you will also set the active variable to false. You can do other things here, or just use the gamepadAPI.active variable anywhere in your code to control the game depending on whether the device is connected or not.
To know what button was pressed, you can listen for a particular event: gamepadbuttondown. This will provide the information that you want.
window.addEventListener("gamepadbuttondown", function(e) {
  gamepadAPI.buttonPressed(e);
});
If you define a function called buttonPressed, you can see which button was pressed.
buttonPressed: function(event) {
    var button = event.button;
    console.log("Button "+button+" was pressed.");
}
There’s also the gamepadbuttonup event, which tells you that the given button was released. You can change the buttonPressed function to reflect that and then fire at those two events.
buttonPressed: function(event, pressed) {
    var button = event.button;
    if(pressed) {
        console.log("Button "+button+" was pressed.");
    }
    else {
        console.log("Button "+button+" was released.");
    }
}
Now all you have to do is to bind this function to those two events.
window.addEventListener("gamepadbuttondown", function(e) {
  gamepadAPI.buttonPressed(e, true);
});
window.addEventListener("gamepadbuttonup", function(e) {
  gamepadAPI.buttonPressed(e, false);
});
You have the buttons covered, but what about the analog sticks? They are different from buttons, as buttons have only two possible values, 1 or 0, as they are either pressed or not. It’s more complicated, however, with analog sticks as they can have different pressure applied at different angles. For example, if you move your left analog stick halfway to the bottom-left corner, you’ll end up with the top-down axis holding a value of 0.5 and the left-right one with a value of -0.5. Let’s see how to handle this.
window.addEventListener("gamepadaxismove", function(e){
    gamepadAPI.axisPressed(e);
});

axisPressed: function(event) {
    var axis = event.axis,
        value = event.value;
    console.log("Axis: "+axis+", value: "+value+".");
}
First comes the event listener for gamepadaxismove, and then the function that is executed. You just take the axis that was moved by the player on the device and its value. This can be applied to any game logic, for example steering a tank or other vehicle.
Axis Threshold
Be aware that analog sticks are not perfect—some of them will not return to 0.0 states, whether it’s because of the materials used or simply a problem of a little dirt. They can stay with 0.02 values, and it’s important to take that into account. For example, you can move your tank’s turret right only when the value from the left-right axis exceeds 0.5, so it’s between 0.5 and 1. The values from 0 to 0.5 will be ignored and the turret will be moved only when you exceed the 0.5 threshold.
It might be difficult to put all of a game’s logic inside a single function responsible for managing the buttons. Fortunately, there is another solution: querying the gamepad object directly. I already covered this at the beginning of the implementation part, remember?
window.addEventListener("gamepadconnected", function(e) {
    var controller = e.gamepad;
    gamepadAPI.controllers[e.gamepad.index] = controller;
    gamepadAPI.active = true;
});
Earlier, I said that you can extract any data from the gamepad object and do whatever you want with it, so let’s do it! You will put the code responsible for querying the gamepad object for any buttons that are pressed in a game loop. That way, you will have the actual data about whether the button is pressed or not in every frame, or what was the exact value of the axis used. Here’s the code used in the main menu of the game Hungry Fridge, which was put into the update loop to allow the player to start the game on a gamepad button press:
if(gamepadAPI.active) {
    for(c in gamepadAPI.controllers) {
        var controller = gamepadAPI.controllers[c];
        for(var b=0, len=controller.buttons.length; b<len; b++) {
            if(controller.buttons[b]) {
                if(b == 1) {
                    startGame();
                }
            }
        }
    }
}
The first line is just checking if a gamepad is connected. The second line loops through connected gamepads. On the third line, you’re assigning a given gamepad object to a variable that will be used later. The fourth line is another loop, this time going through all of the available buttons in your controller. The fifth line verifies if the button you’re actually checking is pressed. The sixth line is checking if the button is the one from the right face of the controller; that is, you’re asking for B (XBox 360) or O (PS3) in particular. If it’s the button you’re looking for and it’s being pressed, then you’re starting a new game.
Gamepad Differences
When looping through the buttons, remember that different controllers may have different key mappings, so the button[12] can be a top d-pad on an XBox 360 controller but something totally different on another controller. There are plenty of controllers available, and the Gamepad API specification is not officially released yet, so remember this when you’re implementing gamepad keys in your game.
Hooking Up to the Event
There could be even easier solution if you want to use only a few buttons in your game. You can, for example, hook up your own function inside the buttonPressed one and check for the specific button press. Let’s assume you will have a GAME object with your game’s logic.
var GAME = {};
You can define startNewGame function that will do just that—start a new game.
GAME.startNewGame = function(){
    alert("New game started!");
}
Now you can modify the buttonPressed function and add those lines that will check for a specific button being pressed.
if(button == 1) { // button[1] is B or O
    GAME.startNewGame();
}
This is how the function looks like after the addition:
buttonPressed: function(event, pressed) {
    var button = event.button;
    if(pressed) {
        console.log("Button "+button+" was pressed.");
        if(button == 1) { // button[1] is B or O
          GAME.startNewGame();
        }
    }
    else {
        console.log("Button "+button+" was released.");
    }
},
Thanks to this, when the gamepad is connected, pressing the given button will start the game.
Listing 10-1 shows what your gamepad test code looks like when complete.
Listing 10-1. Finished Gamepad API
<!DOCTYPE html>
<html>
<head>
  <meta charset="utf-8">
  <title>Gamepad API Test</title>
</head>
<body>
<p>Check the browser's JavaScript console for output.</p>
<script>
/* Here goes the JavaScript code we'll write */

/* Completed Gamepad API object: */
var gamepadAPI = {
    controllers: {},
    active: false,
    gamepadConnected: function(event) {
        var controller = event.gamepad;
        var controllerID = event.gamepad.id;
        gamepadAPI.controllers[event.gamepad.index] = controller;
        gamepadAPI.active = true;
        console.log("Connected Gamepad ID: "+controllerID+".");
    },
    gamepadDisconnected: function(event) {
        delete gamepadAPI.controllers[event.gamepad.index];
        if(!gamepadAPI.controllers.length) {
            gamepadAPI.active = false;
        }
        console.log('Gamepad disconnected.'),
    },
    buttonPressed: function(event, pressed) {
        var button = event.button;
        if(pressed) {
            console.log("Button "+button+" was pressed.");
            if(button == 1) { // button[1] is B or O
              GAME.startNewGame();
            }
        }
        else {
            console.log("Button "+button+" was released.");
        }
    },
    axisPressed: function(event) {
        var axis = event.axis;
        var value = event.value;
        console.log("Axis: "+axis+", value: "+value+".");
    }
};

/* Here are all the event listeners: */
window.addEventListener("gamepadconnected", function(e) {
    gamepadAPI.gamepadConnected(e);
});
window.addEventListener("gamepaddisconnected", function(e) {
    gamepadAPI.gamepadDisconnected(e);
});
window.addEventListener("gamepadbuttondown", function(e) {
    gamepadAPI.buttonPressed(e, true);
});
window.addEventListener("gamepadbuttonup", function(e) {
    gamepadAPI.buttonPressed(e, false);
});
window.addEventListener("gamepadaxismove", function(e){
    gamepadAPI.axisPressed(e);
});

/* Let's create a GAME object for our game */
var GAME = {};

/* Here's the function that will start our game */
GAME.startNewGame = function(){
  alert("New game started!");
}

</script>
</body>
</html>
That’s it; you have created a fully working test case. Connecting the gamepad and pressing the buttons will print the output in the browser’s JavaScript console. You can now add this to your game or start implementing new game on top of this.
Demo Time: Hungry Fridge
Hungry Fridge is an HTML5 game that was created especially for this chapter to show the capabilities of the Gamepad API in action. It was also submitted to the GitHub Game Off II competition. (It’s always better to merge few tasks into one if it’s possible.) The full source code for Hungry Fridge is open sourced and available on GitHub. The game was created under the brand of Enclave Games. It was coded by Andrzej Mazur, and Ewa Mazur did the graphic design. The code for the game was created using Phaser game framework, which is also free and open source.
The game is very simple: you’re a refrigerator, and you have to eat food to survive. It gets trickier when you consider two different approaches to the game controls, depending on whether you’re playing on a mobile device or a desktop. The Hungry Fridge start screen is shown in Figure 10-4.

Figure 10-4. The Hungry Fridge start screen
On a mobile device, you just have to tap the food to get as many points as possible. The only difficulty comes when there are two different types of food from which you can choose only one at a time. The type of food you have to tap is changes dynamically, so you have to think and act quickly. The good food (cabbage, carrot, and apple) is marked with a green overlay, and the bad food (pizza, beer, and hamburger) is marked with a red overlay. When the background glows green, you have to tap only on the good food; when it glows red, you have to tap only on the bad food (see Figure 10-5).

Figure 10-5. The good food vs. bad food interface in the Hungry Fridge
If you launch the game in a desktop browser and connect your gamepad, you’ll get a chance to play Super Turbo Hungry Fridge. In this mode, you’ll have full control over the fridge, which is actually an armored vehicle with a turret that you can move around and shoot, as shown in Figure 10-6. All of this is covered in the Gamepad API; that is, driving the vehicle around, rotating its turret, and shooting its canon. Thanks to the Gamepad API, this feels a lot better and is a lot more fun to play. It’s very close to the console gaming experience, but you’re using HTML5 in your browser without any plug-ins!
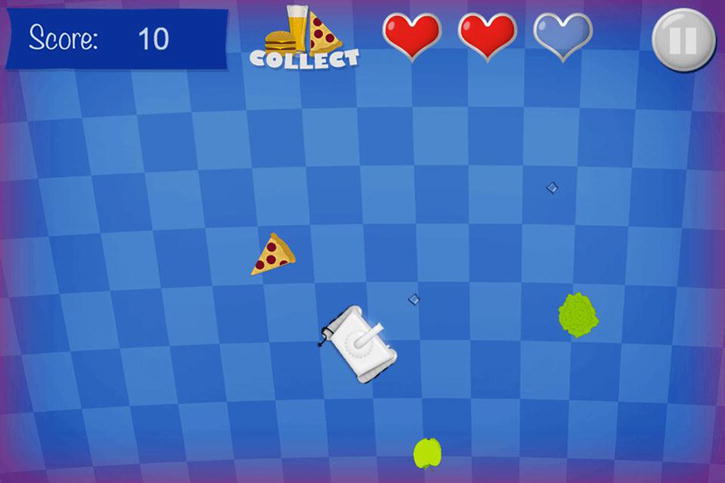
Figure 10-6. The Super Turbo Hungry Fridge screen
This is obviously out of scope of this chapter, but you can see the full source code of Hungry Fridge on GitHub and fiddle with it however you like. You can freely fork, modify, and benefit from the source code of the game—especially if you want to see the Gamepad API in action and eventually implement some of the code in your own game.
Conclusion
I hope that after reading this chapter and trying the brief examples, you will want to test the material out by creating a game with Gamepad API support or implement this support in an existing game. You’ve learned how to listen for gamepad-specific events, how to detect the controller connection, how your program should react upon disconnecting a controller, and how to tell the difference between buttons and analog sticks.
I also covered an example game, Hungry Fridge, which uses the Gamepad API implementation described in the chapter. This gives you a base of knowledge about the Gamepad API that you can use right away, even though the specification hasn’t been officially published. All you have to do is to try it out yourself. Good luck and have fun!