
![]()
Mobile Web Game Techniques with Canvas 2D API
When we consider mobile HTML5 games, we usually compare them with native games. One might think that native games are always superior to browser games or that browser games can never touch native games in performance. But check out the top 10 games in the native app market. Often you will find that many of the top-selling games do not use 3D graphics, particle effects, and so on. It seems that we are able to create similar kinds of mobile games in the browser with HTML5.
However, there are two big problems around mobile HTML5 games. One is speed, and the other is compatibility with devices.
Needless to say, HTML5 games execute in the browser. This really means that HTML5 games are working on an emulator or virtual machine, which is called a browser, and of course this is an obvious drawback for performance. Modern browsers are optimized much like a modern virtual machine, but remain much slower than native apps. We have to take pains to create mobile games that perform very well without creating them in native code.
In addition, unfortunately we have to face compatibility issues with various browsers. As you’ll see later in this chapter, there are often slight differences, especially between Android legacy browsers, because of their special customizations. For example, it is possible that browser makers customized their browser to make better scores on benchmarks, and they may have achieved it—along with adding lots of small compatibility bugs. Unlike server-side programs, client HTML5 games are recommended to work on not only your own device but also all existing devices and devices that will appear in the future.
After reading the above, you might feel bad about mobile HTML5. However, the advantages of creating mobile HTML5 games exceed the disadvantages. For example, imagine that you are playing a game like SimCity. If you want to let a friend see your town, all you can do is just post a screen shot. Your friends might say, “Cool,” but that’s all. But, if the game was working on browsers, your friends could see not only the picture, but also the dynamic game screen as soon as they tap your link. The game would be working inside the native Twitter client app without any installation! Native apps could never achieve such a trick.
So how do you create mobile browser games easily for such a wonderful future? You use Canvas!
Why Canvas?
Actually, there are two alternatives to get a native-like expression; one is Canvas, and the other is CSS. Which is the better way to gain speed and avoid compatibility issues? In this chapter, I conclude that Canvas is superior to CSS. Although CSS has a lot of features, its compatibility is catastrophic, especially on Android Legacy Browsers. If you want to support Android, I do not recommend using CSS even if you have a lot of patience. Additionally, it is very difficult to gain speed using CSS when you want to make many sprites move randomly. CSS is not suitable for these types of games.
Compared to CSS, Canvas has few issues. The APIs of Canvas 2D are simple, so there are few differences between devices (although there are still problems.) Additionally, Canvas has the responsibility of all drawing on browsers. This means there is the disadvantage that you have to write tons of code if you want to create animation on your web site, but the advantage is that you can improve your code to detail with techniques and know-how.
On the other hand, CSS has original features such as CSS filters, CSS animations, CSS transforms, and so on. It is good idea to make games using Canvas and CSS together. In addition, the evolution of modern browsers is significant. If the market share of the Chrome browser for Android increases, CSS compatibility and speed will be improved. But as long as you are trying to make good games on mobile HTML5, you must understand the effective ways to create games using Canvas. You’ll learn a lot about the Canvas 2D API in this chapter.
The Basis of Canvas
In short, Canvas is a kind of img element with the feature of reading and writing pixel by pixel. You can draw curved lines, text, images, and so on, as you like. Generally you draw the Canvas properly in every frame using JavaScript.
Bitmap Images and Vector Images
The style of managing every pixel in Canvas is known as using bitmap images. Bitmap images are the kind of images you would edit with tools like Photoshop.
The opposite is vector images. These are produced using tools such as Illustrator or Flash. Bitmap images are based on pixels, so when scaled there is a loss of clarity, while vector images can be scaled by any amount without degrading quality because they are based on paths, which are points, line styles, and so on. Vector images are not fit for picture-like complex images.
Although Canvas is bitmap image-based, aiming for drawing pixel by pixel, Canvas contains APIs for both bitmap graphics and vector graphics. So, despite common misunderstanding, you can make animations similar to Flash animations using the Canvas 2D API.
A Bitmap API Example
There are two kinds of Bitmap APIs. One draws images, and the other deals with pixel data. Listings 16-1 and 16-2 provide example code for dealing with bitmap images.
Listing 16-1. DrawImage
onload = function() {
  var img = document.createElement("img");
  img.onload = function() {
    var canvas = document.createElement("canvas");
    canvas.width = canvas.height = 300;
    document.body.appendChild(canvas);
    var ctx = canvas.getContext("2d");
    ctx.drawImage(img, 0, 0);
    (function tick() {
      ctx.drawImage(canvas, 0, 0, 300, 300, 10, 10, 280, 280);
      setTimeout(tick, 500);
    })();
  };
  img.src = "lenna.jpg";
};
Listing 16-2. Get/PutImageData
onload = function() {
  var img = document.createElement("img");
  img.onload = function() {
    var canvas = document.createElement("canvas");
    canvas.width = canvas.height = 300;
    document.body.appendChild(canvas);
    var ctx = canvas.getContext("2d");
    ctx.drawImage(img, 0, 0);

    var imageData = ctx.getImageData(0, 0, 300, 300);
    var data = imageData.data;
    for(var i = 0; i < data.length; i += 4) {
      var c = (data[i] * 0.299 + data[i + 1] * 0.587 + data[i + 2] * 0.114) | 0;
      data[i] = data[i + 1] = data[i + 2] = c;
    }
    ctx.putImageData(imageData, 0, 0);
  };
  img.src = "lenna.jpg";
};
In Figure 16-1, you can see the kaleidoscopic image by self-copying a scaled-down image.
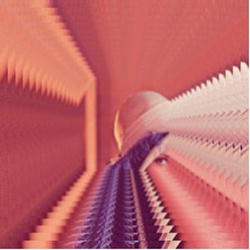
Figure 16-1. DrawImage output
In Figure 16-2 you can see the gray-scaled image.

Figure 16-2. ImageData output
In an example, the putImageData and getImagedata API are powerful, but it can be hard to use them in games dynamically because their speed is quite slow. I will show you alternative ways to transform color without these APIs later in this chapter.
The Path API is for drawing many types of shapes, such as lines, circles, and polygons, on a HTML5 canvas. A path is a series of points with drawing instructions between those points. Some helper APIs also exist to draw a rectangle or circle easily. Listing 16-3 shows code that writes a character using Paths (see Figure 16-3).
Listing 16-3. Path Methods
onload = function() {
  var canvas = document.createElement("canvas");
  canvas.width = canvas.height = 300;
  document.body.appendChild(canvas);
  var ctx = canvas.getContext("2d");
  ctx.beginPath(); ctx.moveTo(40.35, 18.6);
  ctx.quadraticCurveTo(44.9, 15.6, 44.9, 10.7);
  ctx.quadraticCurveTo(44.9, 5.9, 41.4, 2.95);
  ctx.quadraticCurveTo(37.85, 0, 31.75, 0);
  ctx.lineTo(0, 0); ctx.lineTo(0, 38.55); ctx.lineTo(31.35, 38.55);
  ctx.quadraticCurveTo(46.5, 38.55, 46.45, 28.15);
  ctx.quadraticCurveTo(46.45, 21.75, 40.35, 18.6);
  ctx.moveTo(31.85, 15.65);
  ctx.lineTo(7.55, 15.65); ctx.lineTo(7.55, 6.75); ctx.lineTo(32.1, 6.75);
  ctx.quadraticCurveTo(37.55, 6.75, 37.55, 11.15);
  ctx.quadraticCurveTo(37.55, 13.2, 36.05, 14.45);
  ctx.quadraticCurveTo(34.5, 15.7, 31.85, 15.65);
  ctx.moveTo(31.35, 31.8);
  ctx.lineTo(7.55, 31.8); ctx.lineTo(7.55, 22.45); ctx.lineTo(32, 22.45);
  ctx.quadraticCurveTo(38.9, 22.45, 38.9, 27.35);
  ctx.quadraticCurveTo(38.9, 29.35, 36.9, 30.6);
  ctx.quadraticCurveTo(34.95, 31.8, 31.35, 31.8);
  ctx.fill();
};

Figure 16-3. Path methods output
As you can see, the code using a Path might be very complex and hard to maintain. If you want to use a Path inside your game, you should prepare shapes as some data structures and parse data structures dynamically. Later in this chapter, I will show you an effective way to achieve dynamic parsing.
Affine Transformations
Canvas has several other useful transform APIs, such as clipping, drawing text, and an affine transformation. An affine transformation uses parallel and linear translation. Using affine transformations, you can transform shapes and images on a HTML5 canvas. An affine transformation is of special importance when you create Canvas-based games.
You should understand the basics of matrix math if you utilize affine transformations extensively, but there are some helper APIs to make for easier usage: translate, rotate, and scale. You can stack the effects. There are few disadvantages to using transformations; you can use them freely.
Listing 16-4 shows an image that is rotated 30 degree, scaled 1/2, and translated (100px, 100px) in the transformed coordinates (see Figure 16-4). Affine transformations are the only way to transform images like this.
Listing 16-4. Simple Transform
onload = function() {
  var img = document.createElement("img");
  img.onload = function() {
    var canvas = document.createElement("canvas");
    canvas.width = canvas.height = 300;
    document.body.appendChild(canvas);
    var ctx = canvas.getContext("2d");
    ctx.rotate(30 * Math.PI / 180);
    ctx.scale(0.5, 0.5);
    ctx.translate(100, 100);
    ctx.drawImage(img, 0, 0);
  };
  img.src = "lenna.jpg";
};
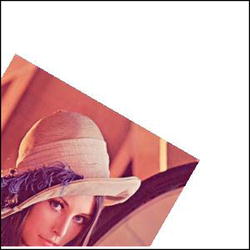
Figure 16-4. Simple transform output
Generally, when you scale, rotate, and translate images with the anchor point at (ax, ay), you should transform in the order corresponding to translate, rotate, scale, and translate(-ax, -ay), as shown in Listing 16-5 and Figure 16-5.
Listing 16-5. Transform Example
onload = function() {
  var img = document.createElement("img");
  img.onload = function() {
    var canvas = document.createElement("canvas");
    canvas.width = canvas.height = 300;
    document.body.appendChild(canvas);
    var ctx = canvas.getContext("2d");
    var r = 0;
    (function tick() {
      ctx.save();
      ctx.translate(150 + Math.cos(r) * 100, 150 + Math.sin(r) * 100);
      ctx.rotate(r);
      ctx.scale(0.1, 0.1);
      ctx.translate(-img.width / 2, -img.height / 2);
      ctx.drawImage(img, 0, 0);
      ctx.restore();
      r += 7 * Math.PI / 180;
      setTimeout(tick, 100);
    })();
  };
  img.src = "lenna.jpg";
};
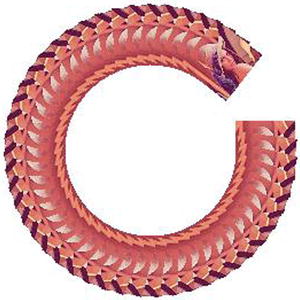
Figure 16-5. Transform example output
When you clear the current transformation, use setTransform(1, 0, 0, 1, 0, 0); or save/restore API.
How to Gain Speed
Unfortunately, mobile devices such as smartphones or tablets are far less performant than a PC. To speed up drawing a canvas, you have to struggle with specific optimization techniques. The most effective way is completely different depending on game types, so I will show you some typical techniques for mobile games.
Depending on game type, generally the most used API is drawImage. Browser implementations also focus on speeding this API up; for example, modern browsers have GPU support for drawImage. Currently drawImage typically has great performance. Due to its frequency of use, the optimizations of drawImage have led to great impact, which is quite important for almost all games.
drawImage has best performance when it draws an image with the same scale as original image. It is a good idea to avoid scaling because it has a performance impact. If you need to draw an image with scaling, you should consider caching the scaled image with in-memory canvas, which I will describe later in the “In-Memory Canvas” section.
It also has less performance with anti-aliasing, even if the image is the same scale. One might think that performance impact never happens with images of the same scale, but it can happen if you locate the image at a nonintegral floating-point position. JavaScript has only floating-point types describing numbers. There is no integer type inside JavaScript like C, so this happens easily. To fix it, just make the value integer . . . but never use Math.floor to do this. Math.floor is a built-in function of JavaScript to make numbers integer, but it is much slower than JavaScript implicit converting such as bit operations. Listing 16-6 shows how to make numbers integer.
Listing 16-6. ToInt
ctx.drawImage(img, x | 0, y | 0);
Some browsers have support to disable anti-aliasing. This is not standardized yet, so please be careful about compatibility of browsers. Listing 16-7 shows how to disable anti-aliasing
Listing 16-7. ImageSmoothingEnable
ctx.webkitImageSmoothingEnabled = false;
In-Memory Canvas (Offscreen Canvas)
Many games draw the same shapes constantly. You can speed this up a lot if the frequency is expected to be more than once. drawImage takes a Canvas element as the first argument, like img, so you can use the canvas as a cache. The canvas used as a cache is not attached to the DOM; it’s just created as an element. We call this kind of canvas “in-memory canvas” or “offscreen canvas.” See Listing 16-8 for an example.
Listing 16-8. In-Memory Canvas
var cache = document.createElement("canvas");
Once you make this canvas and draw shapes used frequently, you just draw the canvas afterwards.
Listing 16-9 shows how to use in-memory canvas. First, prepare the scaled image as cache, and then draw the cache to gain speed. See Figure 16-6 for an example.
Listing 16-9. In-Memory Canvas Example
onload = function() {
  var img = document.createElement("img");
  img.onload = function() {
    var canvas = document.createElement("canvas");
    canvas.width = canvas.height = 300;
    document.body.appendChild(canvas);
    var ctx = canvas.getContext("2d");
    ctx.fillRect(0, 0, 300, 300);

    var cache = document.createElement("canvas");
    cache.width = img.width / 10;
    cache.height = img.height / 10;
    cache.getContext("2d").drawImage(img, 0, 0, img.width, img.height, 0, 0, cache.width, cache.height);

    (function tick() {
      ctx.drawImage(cache, Math.random() * 300 - cache.width / 2, Math.random() * 300 - cache.height / 2);
      setTimeout(tick, 20);
    })();
  };
  img.src = "lenna.jpg";
};
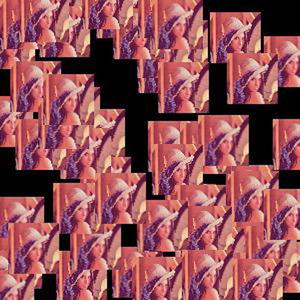
Figure 16-6. In-memory canvas example output
Needless to say, the more caches you create, the more memory you consume. You have to consider the trade-off between speed and memory.
If you are planning to create game engines or middleware, you need to determine which shape is effective for caching. If you cache the shape but it’s drawn only once, this is an obvious waste. If you make caches whenever you want, memory issues will be critical soon. You should improve the cache hit ratio by considering which images should be stored and which should not.
It makes sense to redraw every frame if your target devices have the capability to achieve it, but unfortunately most current devices have trouble with performance. To reduce redrawing, it is a good idea to reuse existing drawn data on Canvas. You can restrict the area of drawing frame by frame to gain speed. This method is called Dirty Rect, and it improves the performance significantly in some kinds of games.
Dirty Rect is simple; you register whenever you have a dirty region that needs to be drawn. The region is represented as a rectangle. There are two dirty region types. One is the region that a disappearing object occupied, and the other is one that a newly appearing object is occupying. Considering moving objects, the object disappears from the previous position and appears in the current position (Figure 16-7).
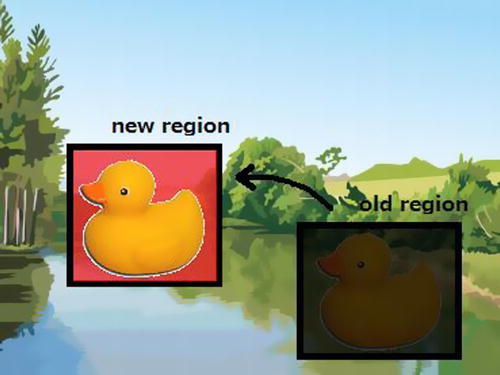
Figure 16-7. Dirty Rect
There are two major implementations of Dirty Rect with the Canvas API (Figure 16-8). One is registering all dirty regions as clipping regions using clip() method, and drawing all shapes inside the clipping area. The other is clipping only one big rectangle as a clipping region, which includes all dirty regions, and drawing all the shapes inside.

Figure 16-8. Two types of Dirty Rect
The former fits when there are few moving objects, and the latter fits when there are lots of moving objects. You should choose the best method for your game after considering their pros and cons.
If your game needs to redraw full screen every frame because you have to register the entire screen as dirty region, you can avoid the Dirty Rect method. But in this case, it is good idea to have a flag to determine whether to draw or not. The flag will help to prevent consuming battery power. I will discuss this in detail later in the “Battery Problems” section.
Color Transformation
When a character is damaged in a game, you might want to make the character red as an effect. You can achieve this with pixel-by-pixel processing using get/putImageData, which I showed earlier in the “Bitmap API Example” section, but it takes a lot time. So you need a faster way to transform color.
The solution is the globalCompositeOperation property. This property is useful to filter images. You can specify how to draw shapes over existing images by using this property. You can see the effect of each of the operators in Listing 16-10.
Listing 16-10. Global Composite Operations
onload = function() {
  var operations = ["source-over", "source-atop", "source-in", "source-out",
            "destination-over", "destination-atop", "destination-in", "destination-out",
            "lighter", "copy", "xor", "darker"];
  for(var i = 0; i < operations.length; i++) {
    var div = document.createElement("div");
    div.innerHTML = ":" + operations[i];
    document.body.appendChild(div);
    var canvas = document.createElement("canvas");
    canvas.width = canvas.height = 75;
    div.insertBefore(canvas, div.firstChild);
    var ctx = canvas.getContext("2d");

    ctx.fillStyle = "#03f";
    ctx.fillRect(5, 5, 50, 50);
    ctx.beginPath();
    ctx.fillStyle = "#f50";
    ctx.arc(45, 45, 25, 0, Math.PI * 2, false);
    ctx.globalCompositeOperation = operations[i];
    ctx.fill();
    ctx.globalCompositeOperation = "source-over";
    ctx.strokeRect(0, 0, 75, 75);
  }
};
Figure 16-9 shows the results of using the globalCompositeOperation property.
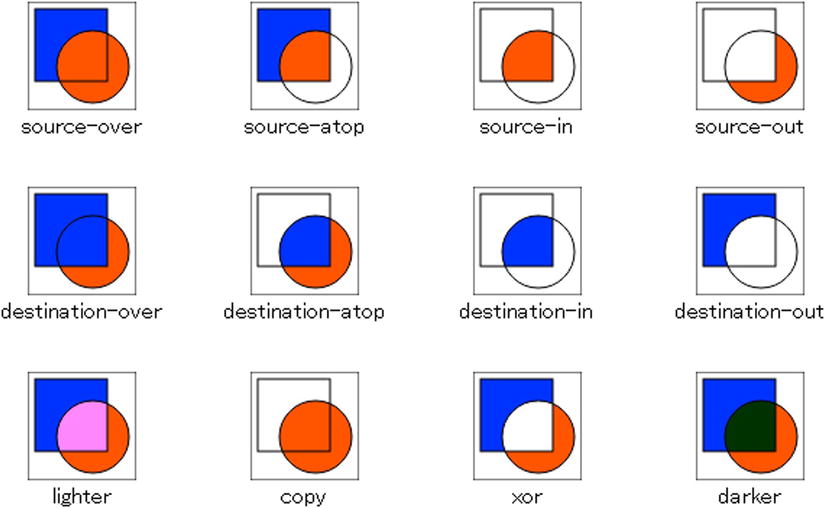
Figure 16-9. The results of global composite operations
Please keep in mind that the “darker” operator is non-standard, but almost all modern mobile browsers, including Chrome, Android Legacy Browser, and MobileSafari support this operator. There are some effects that are unable to show without the darker operator.
If you are interested in the browser implementation of each operator, see Table 16-1.
Table 16-1. Global Composite Operators
Operator |
FA |
FB |
|---|---|---|
source-over |
1 |
1-aA |
destination-over |
1-aB |
1 |
source-in |
aB |
0 |
destination-in |
0 |
aA |
source-out |
1-aB |
0 |
destination-out |
0 |
1-aA |
source-atop |
aB |
1-aA |
destination-atop |
1-aB |
aA |
Xor |
1-aB |
1-aA |
Copy |
1 |
0 |
Lighter |
1 |
1 |
Figure 16-10 shows the meaning of FA and FB.
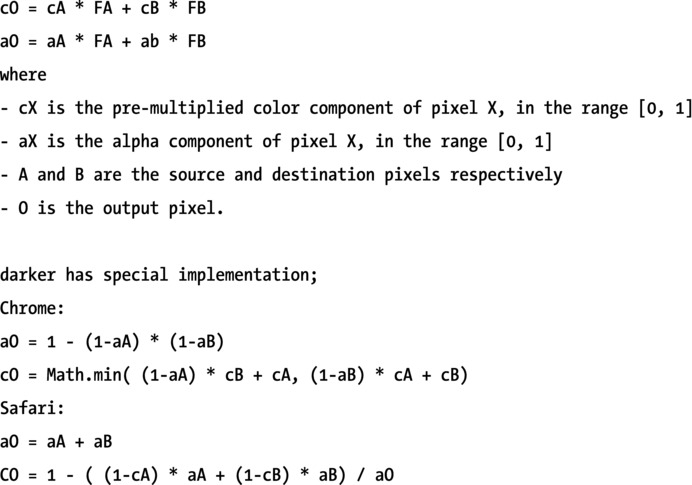
Figure 16-10. Formula of global composite operations
Color Transformation Using Alpha
The easiest method of color transformation is to use alpha transparency. This method is not only easy but very fast, so you can use this aggressively.
The code in Listing 16-11 draws a transparent image with color transformation using the "source-atop" operator.Browsers avoid drawing the transparent pixels, and draw an alpha-blended green color on existing pixels. As a result, the image shows a green face (Figure 16-11). You can use this effect for damaging effects in your game.
Listing 16-11. Color Transform with Alpha
onload = function() {
  var img = document.createElement("img");
  img.onload = function() {
    var canvas = document.createElement("canvas");
    canvas.width = img.width;
    canvas.height = img.height;
    document.body.appendChild(canvas);
    var ctx = canvas.getContext("2d");
    ctx.drawImage(img, 0, 0);

    ctx.globalCompositeOperation = "source-atop";
    ctx.fillStyle = "rgba(0, 255, 0, 0.6)";
    ctx.fillRect(0, 0, canvas.width, canvas.height);
  };
  img.src = "http://www.w3.org/html/logo/downloads/HTML5_Logo_512.png";
};
Figure 16-11. Color transform with alpha output
If you want to adjust color transformations in detail, you can separate and merge RGB channels using globalCompositeOperation operators. This is effective for game engines.
The code in Listing 16-12 separates each channel using the darker operator (Figure 16-12). You can modify each image precisely with alpha-blending. After finishing modifications, the code merges all channels using the lighter operator. As I said, darker is a non-standard operator but almost all mobile browsers support it.
Listing 16-12. Separate RGB Channels
onload = function() {
  var img = document.createElement("img");
  img.onload = function() {
    var canvas = document.createElement("canvas");
    canvas.width = img.width;
    canvas.height = img.height;
    document.body.appendChild(canvas);
    var ctx = canvas.getContext("2d");
    ctx.drawImage(img, 0, 0);

    ctx.globalCompositeOperation = "source-atop";
    ctx.fillStyle = "rgba(0, 255, 0, 0.6)";
    ctx.fillRect(0, 0, canvas.width, canvas.height);
  };
  img.src = "http://www.w3.org/html/logo/downloads/HTML5_Logo_512.png";
};
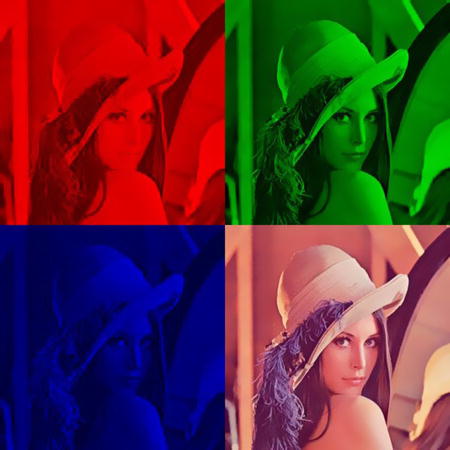
Figure 16-12. Separate RGB channels output
This method is slow because it invokes drawImage seven times, but it’s much faster than put/getImageData. If you want more speed, it’s good idea to cache each channel. With cached channels, you can make a fading colors animation.
Some games use Paths a lot. When you are planning to support vector images on your game engine, it’s especially important to draw Paths fast.
If your target browsers support the Path object (such as on iOS7), you may use it aggressively. With the Path object, you can reuse the shape of a drawing. But please note that currently quite a few browsers support the Path object, so it’s better to check that your target browsers are supporting the Path object before using it.
It is common to build Paths from outside data sources like JSON. In this case, you don’t need to parse and build draw functions every time you need them. With new Function, you can reduce the overhead drastically.
Listing 16-13 generates the drawing code in Listing 16-14.
Listing 16-13. Generating JavaScript Codes
onload = function() {
  var canvas = document.createElement("canvas");
  canvas.width = canvas.height = 300;
  document.body.appendChild(canvas);
  var ctx = canvas.getContext("2d");

  var svg = ("M 51.35 38.55 L 30.35 0 L 21 0 L 0 38.55 L 8.3 38.55" +
        " L 12.7 30.3 L 38.65 30.3 L 43.05 38.55 L 51.35 38.55" +
        " M 34.9 23.5 L 16.5 23.5 L 25.7 6.45 L 34.9 23.5").split(" ");
  var body = "ctx.beginPath();";
  for(var i = 0; i < svg.length; i+=3) {
    var pos = svg[i + 1] + "," + svg[i + 2];
    if(svg[i] == "M") { body += "ctx.moveTo(" + pos + ");"; }
    if(svg[i] == "L") { body += "ctx.lineTo(" + pos + ");"; }
  }
  var func = new Function("ctx", body + "ctx.fill();");
  func(ctx);
};
Listing 16-14. The Generated Codes
ctx.beginPath();ctx.moveTo(51.35,38.55);ctx.lineTo(30.35,0);ctx.lineTo(21,0);
ctx.lineTo(0,38.55);ctx.lineTo(8.3,38.55);ctx.lineTo(12.7,30.3);ctx.lineTo(38.65,30.3);
ctx.lineTo(43.05,38.55);ctx.lineTo(51.35,38.55);ctx.moveTo(34.9,23.5);ctx.lineTo(16.5,23.5);
ctx.lineTo(25.7,6.45);ctx.lineTo(34.9,23.5);ctx.fill();
After generating drawing codes as a function, just use this function. No more parsing is needed. To adjust position or scaling, you just use an affine transformation.
Use GPU Effectively
In the old days, browsers drew Canvas with software rendering using the CPU, not GPU. But almost all current modern browsers support GPU rendering, increasing the importance of techniques that utilize the GPU.
When you need to draw with the GPU, you have to transfer the image data from CPU to GPU. You don’t need to transfer every time because your browser tries to cache the image data inside the GPU. You need to transfer image data if you want to draw an image not existing in the GPU cache.
Optimizations for using the GPU are very effective when you use drawImage a lot. drawImage is very fast as is, with significant advantages when internally utilizing the GPU cache. It is a very good idea to design to use the GPU cache effectively.
However, there is no obvious way to use the cache precisely; it depends on the implementation of browsers. So you need to struggle to put the image in the cache area preferably. The basic strategy is to use a small number of images. Sometimes it is also effective to avoid large images because the browser may need to clear and overwrite the existing GPU cache area.
In addition, please keep in mind that browsers never use the cache when you indicate Canvas at the first argument of drawImage. If you want to use the GPU cache with canvas such as in-memory canvas, you can convert the Canvas element to img element. See Listing 16-15.
Listing 16-15. Convert from Canvas to Img
var src = canvas.toDataURL();
var img = document.createElement("img");
img.src = src;
It needs initial costs to convert from canvas to img, but after that you can push the image to the GPU cache. This is an especially effective technique for game engines.
Keeping Canvas Applications Stable
It is very hard to keep canvas applications stable. As I mentioned, compatibility issues are critical. Additionally, mobile devices don’t have a large amount of memory. And finally, despite PC browsers having no power limits, for mobile devices you have to take care regarding battery usage.
If you want to create a technical one-time demo, this section is not so important. But if you are planning to create games, which many users play for a long time, it’s important to support several devices, avoid crashing browsers, and prevent excessive battery consumption. I will show you techniques to work around these issues in this section.
There are less compatibility issues on Canvas than CSS. Nevertheless we have to struggle to support a range of browsers on existing devices. It is especially tough to support Android legacy browsers; it will annoy you very much.
As mentioned earlier, Android makers customize their browser excessively, so you may face many kinds of problems around compatibility issues. For example, the simple code in Listing 16-16 won’t work well on several devices.
Listing 16-16. A Famous Troublesome Code
ctx.clearRect(0, 0, w, h);
If you face compatibility issues, you should throw away any preconceived notion that such simple code must work well, and be completely suspicious about browser implementations.
To find troublesome code, it’s reasonable to comment out several lines or blocks of code from the entire code to locate the problem via bisecting. Next, try to make the smallest problem code, which can reproduce the same issue. Finally, you will find the workaround to avoid the problem. The workaround for Listing 16-16 is shown in Listing 16-17.
Listing 16-17. Workaround
ctx.clearRect(0, 0, w + 1, h + 1);
To find out the real problem, it’s good idea to try to think like a browser writer. Imagine what kind of processing goes on inside the browser that may cause the problem. To get the fastest result, consider how you would implement the browser. It’s the easiest way to fix the issue: you make a hypothesis about implementation, and validate it time after time.
Sometimes the GPU causes the compatibility bugs. There is no option to disable GPU rendering, but you can disable it by just setting the target canvas width or height to more than 2048px. It turns off GPU rendering, and turns on CPU rendering. If you find a bug in GPU rendering, you can avoid it by preparing a large canvas for particular devices.
Again, you’ll need to struggle a great deal to support all Android devices. Therefore, it’s sometimes a good idea to give up supporting devices whose market share is insignificant.
It’s important not to consume too much memory, because mobile devices have very limited amounts of RAM. If you use memory over the limit, the browser will crash, will freeze, and will skip drawing in the browser. When you face those kinds of problems, you should investigate memory usage.
You must also confirm that garbage collection successfully collected the unused canvases, especially when you use In-Memory Canvas. Some mobile browsers seem not to collect canvas elements at all, so if you find this kind of problem, you need to prepare a large In-Memory Canvas and reuse it again and again.
You also need to be aware of memory leaks. Every image and canvas consumes lot of memory, so you should release the reference to them properly. You can check the memory leak with your PC using the Heap Snapshot feature in Chrome Dev Tools.
You should control garbage collection itself. It takes about 10ms for one minor garbage collection (GC), so it is critical for 60fps games. Sometimes a major GC can stop the world for a second or more, which kills the fun of games like action games. To control GC, you need to allocate all the memory including Canvasses and arrays on initialization, and never allocate any more during the game.
It’s ideal if you can prevent excessively consuming the battery. Mobile game users are very sensitive to games consuming a lot of battery. They’ll avoid playing games eventually if they feel the game is battery hungry. It’s important to design games not to consume too much power.
Generally speaking, the consumption of battery correlates with CPU utilization. So one good solution is to keep CPU utilization low if you can. Unfortunately, usually mobile CPUs have little margin. If you have any available CPU, you might want to increase frames per second. However, you should consider an option to drop framerate to save battery for particular scenes, such as a main menu.
The GPU can also consume a lot of battery. For example, the code in Listing 16-18 consumes battery rapidly, even though the CPU is not working much at all.
Listing 16-18. Consuming Battery
(function draw() {
  setTimeout(draw, 16);
  ctx.fillRect(0, 0, ctx.canvas.width, ctx.canvas.height);
})();
By reducing drawing, the Dirty Rect method I mentioned earlier helps with battery management. You don’t need to adopt the entire Dirty Rect method. It can be effective to simply skip frames properly when you don’t need to redraw.
I described many techniques around mobile HTML5; however, the most important is to profile correctly on a real device. You should gather the real time profiling data of drawing codes from not a PC but from mobile devices, and improve your game based on the real data.
If you are developing on Android, you may use Android Debug Bridge or Chrome Remote debugging. If you are developing on iOS, you may use Inspector. Modern browsers support remote debug features so you can check the status of a mobile device on your PC in real time. By doing this investigation you can choose the best method to resolve current problems.
As you see from the information provided in this chapter, making mobile HTML5 games is like exploring minefields. However, I believe that the benefits of mobile browser games are quite significant. I hope you agree with me, and you create lots of fine mobile browser games.