
![]()
Implementing a Main Loop in Dart
At the heart of your favorite games is the game loop. At the core of the game loop is control over the game clock. In each frame the game does some or all of the following: updates the game state, triggers timers, processes user inputs, renders graphics, and plays audio. Each of these operations must be synchronized using a virtual clock controlled by the game loop. This chapter explains how to implement a deterministic and efficient main loop for any type of game designed from the ground up to run in the browser.
This chapter uses the Dart programming language (www.dartlang.org/) for reference code but the focus of this chapter is not on Dart. Dart should be familiar to programmers coming from languages like Java or C#, and the code does not make use of any of Dart’s higher-level features. All DOM calls can be easily mapped to their JavaScript equivalents.
Implementing a main loop must be done with respect to the browser’s execution model. The Dart program cannot execute endlessly; it must yield control back to the browser every frame. User inputs are delivered via asynchronous event callbacks and the rendering is synchronized with the browser by performing rendering in the frame callback.
User inputs are delivered as discrete events through callbacks registered with the browser. The browser delivers a different input event per device type. For example, there are four separate event sources for key down, key up, mouse button down, and mouse button up. The main loop should record all user inputs into a single stream of input events between frames, allowing input code to process all inputs in one location. Processing complex user inputs like chords or sequences will be covered as well.
When you finish this chapter you will be able to build a robust, reusable, main loop upon which you can build games.
Sample Code
The source code included with this chapter is written in Dart. Dart is an object-oriented programming language that can run in any browser by being compiled to JavaScript or run in a version of Chromium that includes the Dart virtual machine (VM). Even though the source code is written in Dart, the focus of this chapter is on the main loop for games, and the concepts, design, and algorithms discussed in this chapter do not depend on Dart functionality.
Dart is an object-oriented programming language designed to be familiar to programmers coming from object-oriented languages like Java or C#. The Dart language is stricter than JavaScript and, in turn, programs written in Dart can run significantly faster than programs written in JavaScript. An example of Dart is shown in Listing 20-1.
Listing 20-1. An Example of Dart
main() {                              // This is where the app starts executing.
  print(new Fibonacci(10));           // Print a new object's value.
}

class Fibonacci {                     // Define a class.
  int original, fibo;                 // Declare variables with (optional) types.
  String toString() => ‘$fibo’;       // Define a method using shorthand syntax.

  Fibonacci(int value) :              // Define a constructor with list initializer.
    original = value, fibo = fib(value) {
  }

  static int fib(int n) {             // Define a class method.
    if (n < 2) {                      // Control flow and expressions.
      return n;
    } else {
      return fib(n-1) + fib(n-2);     // Arithmetic operators.
    }
  }
}
// Want terser code? Write a one-line function instead:
// fib(n) => n < 2 ? n : (fib(n - 1) + fib(n - 2));
Dart provides a familiar but modern syntax. Contrary to JavaScript, Dart has first-class support for classes and allows for (optional) type annotations, which are used only during development to catch programmer errors early.
The sample code provided in this chapter is part of the game_loop package available via Dart’s package management tool, pub. If you decide to write your next game in Dart, you can use the code directly. However, if you decide to use a different language, it should be trivial to port the code from Dart to your language of choice.
The easiest way to get game_loop is to add it as a dependency in your project’s pubspec.yaml. You can always find the source code for the latest version of game_loop in its GitHub repository at http://github.com/johnmccutchan/game_loop.
Interfacing with the Browser
Before discussing main loops in detail, it is important to understand that the browser is in control of the main loop. The browser places constraints on the main loop because it is in control of when the loop executes and provides the inputs (time, render signal, and user input) needed to make progress. An example of the browser controlling the main loop is requestAnimationFrame, which dictates when the main loop must render the game into the page for compositing. This is the display synchronization point. You request to receive this event by registering a frame callback with requestAnimationFrame. The next time your game should draw itself to the screen, the frame callback will be executed. It is important to understand that the browser tells you when to render, not the other way around. This example demonstrates how, in general, the browser is in control of the main loop.
This section covers the inputs that your main loop will receive from the browser. This includes user input as well as the display synchronization event and time.
Time
A monotonically increasing count of the number of milliseconds since the page was loaded is passed as a parameter to the callback registered with window.requestAnimationFrame. You can query this time source on demand with window.performance.now. Relying on different sources of time can lead to hard-to-track-down bugs. Be sure to only use the time parameter passed into window.requestAnimationFrame and the time values read from window.performance.now.
Display Sync
This is the game’s heartbeat. It doesn’t matter how your game is rendered (2D canvas, WebGL, or just plain DOM); render updates must be performed inside the frame callback registered with window.requestAnimationFrame. By relying on requestAnimationFrame to initiate rendering, your game will be in synchronization with the display’s v-blank and with the browser’s internal rendering system. Expect requestAnimationFrame to be called every 16.6 ms (60 FPS) in ideal circumstances, but, when system load is high or the user is looking at another tab, the rate will be throttled down. Your main loop must execute correctly with any time gap between successive frame callback calls.
User Input
In the browser, user input is received via many different event streams. Each event stream is dedicated to a certain type of event. Examples include
- TouchStart
- TouchEnd
- TouchCancel
- TouchMove
- KeyDown
- KeyUp
- MouseMove
- MouseDown
- MouseUp
- MouseWheel
All of the above streams deliver events independently. Developing a system that unifies all of the different event sources with the game logic update loop is essential to a good main loop.
This section covers the outputs from your main loop. This includes unseen internal game states as well as audio and video output.
Game State
Game state is not (directly) displayed to the player. It is used to drive the output that the player sees displayed on the screen and hears through the speakers. The main loop controls when and at what rate the game state is updated, thus it is considered an output of the main loop.
Display
The main loop is told when to display the game via requestAnimationFrame. The entire game view should be rendered whenever requested by the browser.
Audio
Unlike rendering, audio can be scheduled to play in the future by the developer. Inside the frame callback, audio will be scheduled for playback.
Designing a successful main loop requires understanding and working with the browser, which activates the main loop with timers, rendering requests, and user input events.
Your First Main Loop and What’s Wrong with It
The code snippet in Listing 20-2 is an example of the typical main loop that many programmers start with. It rests on top of requestAnimationFrame and updates game state and then renders the game before registering for the next display synchronization signal.
Listing 20-2. Typical main Loop
var lastTime;  // null.
void frame(num time) {
  if (lastTime == null) {
    // Determine an origin in time.
    lastTime = time;
    // Skip this frame.
    window.requestAnimationFrame(frame);
    return;
  }
  // Compute delta time.
  var dt = time - lastTime;
  lastTime = time;
  // Update game.
  update(time, dt);
  // Render game.
  render(time, dt);
  // Register for next display signal.
  window.requestAnimationFrame(frame);
}

main(List<String> args) {
  // Setup game.
  ...
  // Startup main loop.
  window.requestAnimationFrame(frame);
}
At first glance, the above main loop is quite reasonable, but it has subtle and important flaws. The largest bug is that it does not have a fixed time step, which means the game logic will run non-deterministically. Non-deterministic game logic can have real impacts on gameplay. For example, a user on a fast machine may be able to complete the game but a user on a slower machine may not be able to make a jump or might get stuck in a wall because the time step used to update the game world changes each frame.
Quest for Determinism
A good main loop provides a deterministic framework that the game-specific logic can be built on. This section explains how to build a robust main loop that incorporates all input sources and updates the game deterministically.
Fixed Time Step
The first step is to lock the time delta used to update your game state. This means no matter how much time has elapsed between frame callbacks, the game state is updated as if a fixed amount of time has elapsed, like so:
// Update game.
const fixedDt = 16.0;  // milliseconds
update(gameTime, fixedDt);
gameTime += fixedDt;
The above code snippet is sufficient to get deterministic game update behavior but suffers from another problem: it leaks time. Consider the case when 18 milliseconds elapses between frame callbacks but you only move the game forward by 16 milliseconds. You’ve lost 2 milliseconds. Not much time, but the game will lose around 3.6 seconds per minute. It adds up.
The fix for leaking time is straightforward. Extra time must be accumulated across frames and fed back in, like so:
// Compute delta time.
var dt = time - lastTime;
lastTime = time;
accumulatedDt += dt;
const fixedDt = 16.0;  // milliseconds
while (accumulatedDt >= fixedDt) {
  // Update game.
  update(gameTime, fixedDt);
  accumulatedDt -= fixedDt;
  gameTime += fixedDt;
}
The wall clock time delta is accumulated each frame, and when the accumulated time delta is greater than or equal to the fixed time step, it calls the game update function with a fixed time step. With the above code, the main loop doesn’t leak time and provides a deterministic update step. It can suffer from a problem on slow machines: the update method takes longer to execute than the fixed time step. When this happens, the accumulated time delta grows unbounded and the application spends more and more time inside the update loop.
On slow machines, it’s possible that the wall clock time required to update the game state is greater than the fixed time step. When this happens, the game clock falls behind the wall clock. There are a few ways of handling falling behind. If the game can support it, scale back on some of the computation so that the game update requires less time than the fixed time step. If the game cannot be simplified, you may want to indicate to the player that their machine may be too slow to enjoy the game. Regardless, you must guard against the accumulated time delta growing too large because it can happen even on fast machines: when a user switches away from the tab for a few minutes and comes back, suddenly you have a couple minutes of game updates to process.
A better solution is the following code:
// Compute delta time.
var dt = time - lastTime;
lastTime = time;
accumulatedDt += dt;
const fixedDt = 16.0;  // milliseconds
if (accumulatedDt > 2.0 * fixedDt) {
  // Lose time.
  accumulatedDt = 2.0 * fixedDt;
}
while (accumulatedDt >= fixedDt) {
  // Update game.
  update(gameTime, fixedDt);
  accumulatedDt -= fixedDt;
  gameTime += fixedDt;
}
This code will drop as much time as is necessary to keep the accumulated delta time below a threshold. In this code, that threshold is twice the fixed game step update time.
Seeing into the Future
There is one last issue to consider and that is the remaining accumulated time. If there is any remaining time and you render without taking it into consideration, you are displaying the state of the game that is already out of date. How you can work around this will be covered in the section below on rendering with interpolation.
The browser delivers each input event with a separate callback invocation. The callback invocations transition execution from C++ code in the browser to your script code and then back. As quickly as possible the script code should add the input event to a queue of events and exit. Processing the queued input events is done in the frame callback synchronized with the game state update.
Detecting and classifying user input is done on the queue of input events and is game-specific. For example, a first person shooter game needs to know if the W, A, S, or D keys are down and how much the mouse has moved since the last frame. The main loop is only responsible for providing the buffer of input events to the game.
Timers
The internal game clock (gameTime) is managed by the main loop. Any in-game timers, such as the timer tracking the door that stays unlocked for two seconds after the player steps from a pressure plate, must be kept in sync with the game clock. If the in-game timers used a different clock than the game update, the timers would not fire when expected. You can solve this by moving the timer time forward inside the main loop, like so:
// Compute delta time.
var dt = time - lastTime;
lastTime = time;
accumulatedDt += dt;
const fixedDt = 16.0;  // milliseconds
if (accumulatedDt > 2.0 * fixedDt) {
  // Lose time.
  accumulatedDt = 2.0 * fixedDt;
}
while (accumulatedDt >= fixedDt) {
  // fire timers.
  fireTimers(gameTime, fixedDt);
  // Update game.
  update(gameTime, fixedDt);
  accumulatedDt -= fixedDt;
  gameTime += fixedDt;
}
Include support for both periodic (repeating) and single shot timers as well as support for cancelling timers.
Rendering
The final task of the main loop is to trigger rendering of the game. Rendering is always done in the frame callback, which is synchronized with the browser’s own rendering pipeline.
Rendering is done on demand and initiated when the browser invokes the frame callback registered with window.requestAnimationFrame. After updating the game timers and state, the game is rendered. When the browser tab holding the game is not focused, the rate at which the frame callback is executed drops, possibly to 0.
Interpolation
Consider what happens when the render frame callback is fired but the accumulated time is not enough to trigger a game logic update. The render is supposed to use the current state, but the game state is from the past (see Figure 20-1). It is possible to compensate for this by projecting the game object’s display transformation from the last game update to the current time. This can be done either through interpolation or extrapolation.
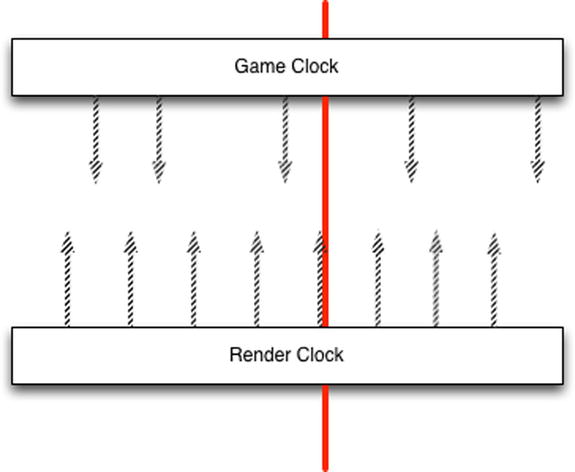
Figure 20-1. Render and game clock (arrows represent renders/updates, and the line is the current time)
Interpolation requires that the game keep the two most recent game states, and the renderer interpolates between the two states. This is done in code as follows:
renderTransform(frame, x) = transform(state[1]) * (x) + transform(state[0]) * (1.0 - x);
The render transform is interpolated between the transform at state[1] and the transform at state[0], resulting in a smooth motion even if a render occurs between game state updates.
Extrapolation can be used by factoring in object velocity:
renderTransform(frame, x) = transform(state) + integrate(velocity(state), x);
The extrapolated transformation may end up being wrong. For example, the object may disappear from the scene before it gets to the extrapolated position. Extrapolation has the added benefit of only requiring a single snapshot of the game state.
Whether the renderer uses stale, interpolated, or extrapolated object transforms depends on the game and rendering engine. Generally a game looks better, because animations will be smoother, if it compensates for the discrepancy between the game clock and the renderer clock.
User input processing is game-specific, but the main loop can provide generalized input type support for mapping from raw input events to game input events, along with chord (multiple simultaneous buttons down or up) detection and sequence (a specific sequence of input events) detection.
Digital inputs are either on or off. Keys, mouse buttons, digital gamepad buttons are either up or down. Digital inputs have the following properties:
- Digital input id (key code, button id, and so on)
- Last time pressed
- Last time released
Detecting if a digital button is up or down can be implemented by the following code:
bool get down => lastTimePressed >= lastTimeReleased;
bool get up => lastTimeReleased < lastTimePressed;
Analog inputs have a value inside a limited range (e.g., -1.0 to 1.0 or 0.0 to 1.0). Analog sticks and buttons on gamepads are examples of analog inputs. Analog inputs have the following properties:
- Analog input id (key code, button id, and so on)
- Last time updated
- Value
Users of analog inputs may want to consider applying a dead zone filter to the value. Dead zone filters cancel small movements in the analog value by mapping the value back to 0.0. This helps the input feel less twitchy.
Positional Input
Positional inputs are positions in a 2D coordinate system. Mouse cursor and finger positions are examples of positional inputs. Positional inputs have the following properties:
- Positional input id (mouse id, touch id)
- X position
- Y position
- Delta x position
- Delta y position
- Time
In each frame there may be many positional input values for a specific device. A first person shooter may accumulate the delta x and delta y position values for the entire frame and use the aggregate to adjust the view angle of the player. A touch-based game may move a kinematic object through the scene based on the input values.
Game-Specific Code
Mapping from raw input values to game-specific input values allows game controller code to be reconfigured by the player. The player can decide which button or combination of buttons is used for the jump action (see Figure 20-2). Game-specific inputs are modeled using the same three generalized input types mentioned above, but the state of these virtual inputs have values set by game-specific code.

Figure 20-2. The player decides which button or combination of buttons is used for the jump action
Chords are another virtualized input type. A chord is active when multiple event states occur simultaneously, such as when the analog stick is held up and the A button is pressed (see Figure 20-3). A chord may or may not be triggerable when other buttons are pressed. Chords can be detected by tracking the state of the individual inputs involved in the chord over time and checking if the chord is active after each input event.
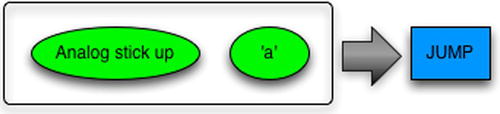
Figure 20-3. The analog stick is held up and the A button is pressed
Sequences are active when multiple event states occur in a specific order and within a certain amount of time. A famous example is the Konami code: UP, UP, DOWN, DOWN, LEFT, RIGHT, LEFT, RIGHT, A, B, A, B, START. A directed graph state machine can model sequences. The sequence starts off in the READY state, and as each input event is processed, the sequence can move forward to the next state or back to the READY state if an invalid input is encountered (see Figure 20-4).
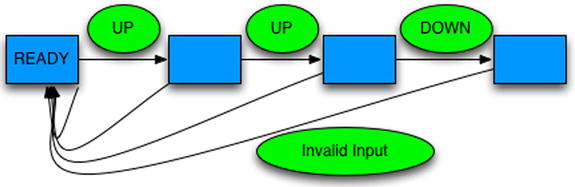
Figure 20-4. A sequence starts off in the READY state, processes each input event, and can move forward to the next state or back to the READY state
Conclusion
This chapter has covered the design and implementation of a deterministic main loop that was designed to run in a browser. If you are a Dart programmer, you can use this library today by adding the game_loop package as a dependency in your pubspec.yaml. If you are still using JavaScript, keep in mind the following when implementing your own main loop:
- Your main loop is driven by your frame callback registered with requestAnimationFrame.
- Your game update function needs a stable time delta: your frame callback must track how much time has elapsed and call the update function when enough time has elapsed.
- Watch out for leaking time and unbounded time accumulation.
- Game timers should be built into the main loop so they are kept in sync with the game time.
- User input from the browser should be buffered and available to be processed in the game update function.
- Render time may be ahead of game time. Use extrapolation or interpolation to get smooth graphics.
- Abstract inputs into digital (down or up), analog (-1.0 to 1.0), and positional (touch and mouse cursor).
By building on a solid main loop you can easily add support for detecting chorded inputs and sequence inputs.