
![]()
Saving Bandwidth and Memory with WebGL and Crunch
When it comes to optimization, both real-time 3D applications and web pages happen to share a common target: images. Images, whether they take the form of textures or <img> tags, often make up the majority of the visual information on your screen at any given time. The metrics for optimization differ based on the medium, however. 3D apps, such as games, need images that can be loaded quickly, drawn fast, and take up as little memory as possible by taking advantage of hardware-supported texture compression formats. Web pages, on the other hand, are primarily concerned with the bandwidth required to download the images to your device, skewing heavily towards small, lossy formats like JPG. In other words, 3D apps are concerned about the size of the image in video memory and web apps are concerned about the size of the file on the server.
WebGL sits at the intersection between these two worlds and, unfortunately, it’s not always easy to satisfy the demands of both. This chapter will examine the Crunch compression format as a way to achieve both low memory usage and small file size, making it the best of both worlds!
The Goal
In this chapter, you will be constructing a library that can be used to load compressed textures, both from DDS and CRN files. In order to demonstrate the library, I’ve created a simple WebGL image gallery that demonstrates loading and displaying the file types discussed, illustrated in Figure 21-1.
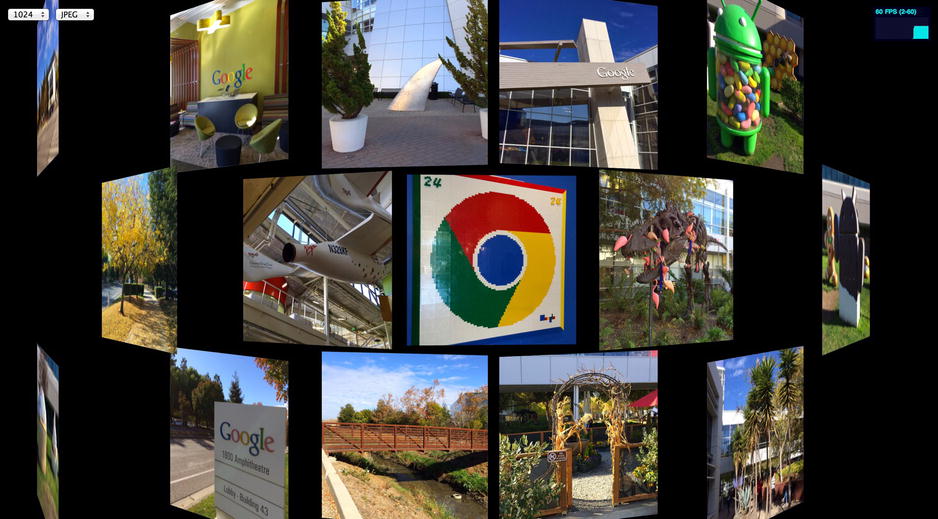
Figure 21-1. Simple WebGL image gallery
The gallery application isn’t very complex, but it’s designed to stress a couple of aspects of the texture-loading library in order to compare various approaches:
- It continuously downloads new images. This stresses the amount of bandwidth used, and it favors image files that are as small as possible.
- Textures are constantly being swapped in and out of memory, so the app favors textures whose video memory footprint is as small as possible.
Although this particular example is fairly contrived, the requirements are not unheard of for real-world applications. For example, the virtualized texturing techniques used in id Software’s Rage (http://rage.com), on both game consoles and iOS, rely on a constantly-updated texture pool and well-compressed images on disk to display a large world in which every surface is uniquely textured. While most WebGL apps won’t require that level of complexity, there are very few apps that wouldn’t benefit from faster load times and less memory usage.
Before diving into the details of texture compression, let’s first review the formats that browsers support natively. This may be old news to many developers, but it’s still interesting to look at the numbers involved. Since we’re looking at reducing load times, we’ll focus our attention on the file sizes produced by each format, taking into account the capabilities and limitations of each.
For the gallery application, I took several pictures at various locations around the Google campus in Mountain View, as seen in Figure 21-2. The images were then saved in the various browser-supported formats using GIMP’s default export settings for each. Each image is 1024×1024 pixels with no opacity information. I’ve picked three of them to use for the comparison.
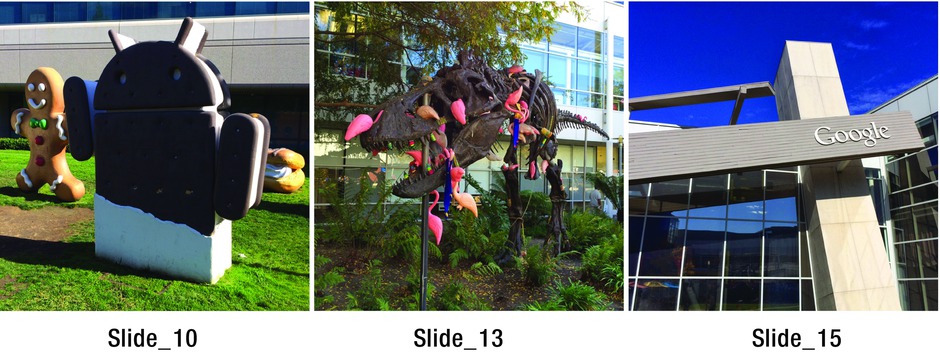
Figure 21-2. Photos taken at various locations around Google’s Mountain View campus
Look at Table 21-1. Which two formats can you quickly take out of the running?
Table 21-1. Files Sizes of Various Browser-supported Formats
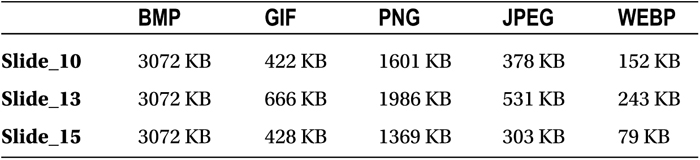
Every browser supports BMPs, but they’re almost never used, and Table 21-1 demonstrates why. BMPs are raw, uncompressed RGB data. As such, they make for pretty huge image files. If you need lossless data, PNGs are always smaller and support an alpha channel, so there’s no good reason to use BMP.
GIFs are an odd historical artifact that refuses to die. Sporting unimpressive compression and palletized color, their only upside (animation) is not one that WebGL can use effectively. Don’t even bother with them for 3D content.
The rest of the image formats have pros and cons, and which one you use depends on your needs.
PNGs have several things going for them. First of all, they’re lossless, which is very important for certain types of texture information like normals. They can also store an alpha channel, which is obviously necessary for transparent textures, but it can also be used to store extra data channels like specular information if transparency is needed. This makes PNGs very versatile and, as such, they tend to be the default choice for many WebGL applications. You can see from Table 21-1, however, that the resulting images can still be fairly large, which is something that needs to be weighed against the technical benefits. If you do find that you need to use PNGs I recommend looking at tools like http://pngcrush.com to reduce their size.
JPEG is the defacto image format of the Internet. It is popular because it produces images that are pretty tiny compared to the other formats. That small footprint comes at the cost of precision, however, since JPEG is a lossy format. As such, it tends to work well for photo-like images (such as our sample textures), but it can make a mess of textures that require more precision, such as normal maps. JPEG also lacks an alpha channel, which makes it inappropriate for anything that needs transparency. Still, if your texture can deal with the format restrictions, JPEG is clearly the winner on the file size front.
WebP is the most interesting file format you probably can’t use. On paper, it looks like the perfect format: it supports both lossless and lossy compression, alpha channels, and typically provides better compression than even the mighty JPEG! The singular downside is browser support: as of this writing, only Chrome and Opera support the format. (Firefox has expressed interest in the format, but it does not support it at this time.) Depending on your target audience, however, this may still be a viable option. If you are building a Chrome App, for example (https://developer.chrome.com/apps/), WebP would easily be the best format to use. You can find out more about this up-and-coming format at http://webp.org.
For the gallery application, you don’t need transparency and you’re not concerned about artifacts caused by lossy compression. Thus you’ll use JPEGs as your default to take advantage of the small file size.
If the only thing that you had to worry about was bandwidth, the choice would be easy. You would go with PNG for lossless or transparent textures, JPEG when you can afford to be lossy, or WEBP if your projects scope allows it. Done! As mentioned earlier, however, bandwidth only covers half of the optimization story. The other half is how much memory the image takes up in video memory.
The problem is that your GPU doesn’t know how to decode a JPEG. Nor should it! Decoding an image format like a JPEG is relatively slow, and your rendering speed would plummet if your GPU had to parse every frame of the file. As a result, when you use any of the native browser image formats as the source of a WebGL texture, they are uploaded to GPU memory fully decoded and uncompressed. This means that while your 1024×1024 JPEG may only take up 250KB on your disk, it expands to a whopping 3MB in your GPU’s memory! (1024 * 1024 * 24 bits-per-pixel = 3MB) In other words, no matter what image format you use, when it reaches your video card, every image is the size of a BMP. At those sizes, you can fill up your video memory pretty quickly.
There’s also a secondary problem related to the large image size: the image can take a long time to upload. The exact time varies by browser and hardware, but on my reasonably beefy 15" Retina MacBook uploading a 1024×1024 JPEG to the GPU via texImage2D using Chrome usually takes somewhere between 11 and 18ms, during which time the rest of the JavaScript is blocked. You can see this for yourself by running the gallery application and opening up the browser’s JavaScript console. For the purposes of this demonstration, each texture upload is timed and output to the development console, so you should see output like this:
Upload Texture: 16.233ms webgl-util.js:54
Upload Texture: 17.495ms webgl-util.js:54
Upload Texture: 14.923ms webgl-util.js:54
Upload Texture: 11.640ms webgl-util.js:54
Upload Texture: 11.645ms webgl-util.js:54
Upload Texture: 14.235ms webgl-util.js:54
Upload Texture: 15.599ms webgl-util.js:54
Upload Texture: 11.946ms webgl-util.js:54
This is problematic for real-time 3D applications, which typically strive to render at 60 frames per second. This means that each frame must complete within about 16ms. If a single texture takes 18ms to upload, it means that you’ve completely missed one frame update and have eaten into the next one just to put one texture on your graphics card! Even an upload time of 11 or 12ms is bad, however, because it only leave 4ms to 5ms to render the rest of your scene. That’s plenty for a simple scene like our gallery, but it’s not nearly enough for even moderately complex 3D scenes.
The solution is to use compressed textures, a staple of 3D games for many years. Unlike compressed image formats like JPEG or PNG, which examine the entire file and then compress based on large features and common patterns, compressed textures use fixed-rate compression schemes that operate on small blocks of pixels. The GPU is optimized to decompress those blocks on the fly during rendering. This allows the texture to remain compressed in memory, taking up a fraction of the memory that it otherwise would have. The compression is lossy, which typically makes compressed textures inappropriate for data textures like normal maps, but they usually work well for diffuse information (much like JPEGs).
There are multiple compressed texture formats, each with different compression characteristics and hardware support. One of the most common ones is S3 Texture Compression (S3TC), which is more commonly known as DXT due to its inclusion in Direct X from version 6 forward. At this point, DXT compressed textures are supported by almost any PC you can purchase, and are also available on many mobile devices.
Using compressed textures on phones or tablets is still somewhat tricky because each device tends to have a preferred compression format that is usually owned by the device’s GPU manufacturer. For example, all iOS devices support Imagination’s PVRTC format, but none of them support DXT. Since iOS devices don’t support WebGL as of this writing, however, and DXT is one of the more common formats, we’ll focus on it for the purposes of this article. Just be aware that if you’re targeting mobile, you’ll first need to check for support and have fallback textures encoded in a different format to ensure that your app runs correctly.
There are five DXT variants, each with different properties, of which WebGL supports three via the WEBGL_compressed_texture_s3tc extension (http://www.khronos.org/registry/webgl/extensions/WEBGL_compressed_texture_s3tc):
- DXT1 is the smallest variant, sporting a 6:1 compression ratio. (For every 6 bytes of uncompressed data, DXT1 only requires 1 byte.) That shrinks your 1024×1024 images from 3MB to 512KB! The downside is that DXT1 doesn’t support alpha channels but, depending on the texture, that may or may not be a problem.
- DXT3 has a compression ratio of 4:1, and it supports 4 bits of alpha data per pixel. This makes DXT3 best suited for images that have sharp alpha transitions.
- DXT5 also has a 4:1 compression ratio, but it handles smooth alpha transitions better than DXT3.
DXT compressed textures are often read from DDS files, which is a container format developed by Microsoft. The format is fairly simple and well documented, consisting of little more than a header followed by the texture data. Because the browser doesn’t support it natively, however, it requires you to parse the file manually in JavaScript. Fortunately this isn’t very difficult! Let’s walk through building a simple DDS parser library. There’s a fair bit of code involved, but taken piece by piece there’s nothing too complicated here. I’ll refer to this library as dxt_util.js. You can find the completed version in the source code for this chapter.
First off, you’ll need to define some utility functions, so look at Listing 21-1.
Listing 21-1. DDS Parsing Utility Functions
// Builds a numeric code for a given fourCC string
function fourCCToInt32(value) {
  return value.charCodeAt(0) +
    (value.charCodeAt(1) << 8) +
    (value.charCodeAt(2) << 16) +
    (value.charCodeAt(3) << 24);
}

// Turns a fourCC numeric code into a string
function int32ToFourCC(value) {
  return String.fromCharCode(
    value & 0xff,
    (value >> 8) & 0xff,
    (value >> 16) & 0xff,
    (value >> 24) & 0xff
  );
}

// Calcualates the size of a DXT texture level in bytes
function dxtLevelSize(width, height, bytesPerBlock) {
  return ((width + 3) >> 2) * ((height + 3) >> 2) * bytesPerBlock;
}
Now let’s define some constants, as shown in Listing 21-2.
Listing 21-2. DDS Constants
// DXT formats, from:
//http://www.khronos.org/registry/webgl/extensions/WEBGL_compressed_texture_s3tc/
var COMPRESSED_RGB_S3TC_DXT1_EXT  = 0x83F0;
var COMPRESSED_RGBA_S3TC_DXT1_EXT = 0x83F1;
var COMPRESSED_RGBA_S3TC_DXT3_EXT = 0x83F2;
var COMPRESSED_RGBA_S3TC_DXT5_EXT = 0x83F3;

// DXT values and structures referenced from:
//http://msdn.microsoft.com/en-us/library/bb943991.aspx/
var DDS_MAGIC = 0x20534444;
var DDSD_MIPMAPCOUNT = 0x20000;
var DDPF_FOURCC = 0x4;

var DDS_HEADER_LENGTH = 31; // The header length in 32bit ints.

// Offsets into the header array.
var DDS_HEADER_MAGIC = 0;

var DDS_HEADER_SIZE = 1;
var DDS_HEADER_FLAGS = 2;
var DDS_HEADER_HEIGHT = 3;
var DDS_HEADER_WIDTH = 4;

var DDS_HEADER_MIPMAPCOUNT = 7;

var DDS_HEADER_PF_FLAGS = 20;
var DDS_HEADER_PF_FOURCC = 21;

// FourCC format identifiers.
var FOURCC_DXT1 = fourCCToInt32("DXT1");
var FOURCC_DXT3 = fourCCToInt32("DXT3");
var FOURCC_DXT5 = fourCCToInt32("DXT5");
Next, you’ll add the function that actually parses the DDS file and extracts the necessary information from it. This function will take an array buffer containing the file contents (which I’ll cover how to get in a moment) and two callbacks, one which is called when the file is parsed correctly and one that’s called in the case of an error. The parsed callback will accept six arguments: the raw DXT texture data as a TypedArray, the width and height of the highest texture level, the number of levels the DXT data contains, the internal format of the data (one of the COMPRESSED_* codes defined in Listing 21-2), and finally, the number of bytes per block for this format, to make size calculations easier. If that sounds like a lot of information, don’t stress! The DDS file provides all of that information for you!
Listing 21-3. Parsing a DDS File
// Parse a DDS file and provide information about the raw DXT data it contains to the given callback.
function parseDDS(arrayBuffer, callback, errorCallback) {
  // Callbacks must be provided.
  if (!callback || !errorCallback) { return; }

  // Get a view of the arrayBuffer that represents the DDS header.
  var header = new Int32Array(arrayBuffer, 0, DDS_HEADER_LENGTH);

  // Do some sanity checks to make sure this is a valid DDS file.
  if(header[DDS_HEADER_MAGIC] != DDS_MAGIC) {
    errorCallback("Invalid magic number in DDS header");
    return 0;
  }

  if(!header[DDS_HEADER_PF_FLAGS] & DDPF_FOURCC) {
    errorCallback("Unsupported format, must contain a FourCC code");
    return 0;
  }

  // Determine what type of compressed data the file contains.
  var fourCC = header[DDS_HEADER_PF_FOURCC];
  var bytesPerBlock, internalFormat;
  switch(fourCC) {
    case FOURCC_DXT1:
      bytesPerBlock = 8;
      internalFormat = COMPRESSED_RGB_S3TC_DXT1_EXT;
      break;

    case FOURCC_DXT3:
      bytesPerBlock = 16;
      internalFormat = COMPRESSED_RGBA_S3TC_DXT3_EXT;
      break;

    case FOURCC_DXT5:
      bytesPerBlock = 16;
      internalFormat = COMPRESSED_RGBA_S3TC_DXT5_EXT;
      break;

    default:
      errorCallback("Unsupported FourCC code: " + int32ToFourCC(fourCC));
      return;
  }

  // Determine how many mipmap levels the file contains.
  var levels = 1;
  if(header[DDS_HEADER_FLAGS] & DDSD_MIPMAPCOUNT) {
    levels = Math.max(1, header[DDS_HEADER_MIPMAPCOUNT]);
  }

  // Gather other basic metrics and a view of the raw the DXT data.
  var width = header[DDS_HEADER_WIDTH];
  var height = header[DDS_HEADER_HEIGHT];
  var dataOffset = header[DDS_HEADER_SIZE] + 4;
  var dxtData = new Uint8Array(arrayBuffer, dataOffset);

  // Pass the DXT information to the callback for uploading.
  callback(dxtData, width, height, levels, internalFormat, bytesPerBlock);
}
Now that you have a function to read data out of a DXT file, let’s work on actually allowing users to load one. To make the process as user-friendly as possible, you’ll define a class called DXTLoader that provides the interface for loading these textures. In order to use DXT textures, you have to first query for the WEBGL_compressed_texture_s3tc extension. You do that in the loader classes constructor, and users can check to make sure the extension is supported by calling the supportsDXT method on the class instance (see Listing 21-4).
Listing 21-4. DXTLoader Constructor and SupportsType Method
// This class is our public interface.
var DXTLoader = function(gl) {
  this.gl = gl;

  // Load the S3TC (DXT) extension, if it's available
  this.ext = null;
  var vendorPrefixes = ["", "WEBKIT_", "MOZ_"];
  for(i in vendorPrefixes) {
    this.ext = gl.getExtension(vendorPrefixes[i] + "WEBGL_compressed_texture_s3tc");
    if (this.ext) { break; }
  }
}

// Check to see if compressed textures are supported by this browser/device.
DXTLoader.prototype.supportsDXT = function() {
  return !!this.ext;
}
Next you’ll add a function to take the DXT data provided by parseDDS and upload it to the GPU, as shown in Listing 21-5.
Listing 21-5. _uploadDXT Method
// Uploads the compressed DXT data to the GPU.
DXTLoader.prototype._uploadDXT = function(dxtData, width, height, levels, internalFormat, bytesPerBlock, texture, callback) {
  var gl = this.gl;
  gl.bindTexture(gl.TEXTURE_2D, texture);

  var offset = 0;

  // Loop through each mip level of DXT data provided and upload it to the given texture.
  for (var i = 0; i < levels; ++i) {
    // Determine how big this level of DXT data is in bytes.
    var levelSize = dxtLevelSize(width, height, bytesPerBlock);
    // Get a view of the bytes for this level of DXT data.
    var dxtLevel = new Uint8Array(dxtData.buffer, dxtData.byteOffset + offset, levelSize);
    // Upload!
    gl.compressedTexImage2D(gl.TEXTURE_2D, i, internalFormat, width, height, 0, dxtLevel);
    // The next mip level will be half the height and width of this one.
    width = width >> 1;
    height = height >> 1;
    // Advance the offset into the DXT data past the current mip level's data.
    offset += levelSize;
  }

  // We can't use gl.generateMipmaps with compressed textures, so only use
  // mipmapped filtering if the DXT data contained mip levels.
  if (levels > 1) {
    gl.texParameteri(gl.TEXTURE_2D, gl.TEXTURE_MAG_FILTER, gl.LINEAR);
    gl.texParameteri(gl.TEXTURE_2D, gl.TEXTURE_MIN_FILTER, gl.LINEAR_MIPMAP_NEAREST);
  } else {
    gl.texParameteri(gl.TEXTURE_2D, gl.TEXTURE_MAG_FILTER, gl.LINEAR);
    gl.texParameteri(gl.TEXTURE_2D, gl.TEXTURE_MIN_FILTER, gl.LINEAR);
  }

  // Notify the user that the texture is ready.
  if (callback) { callback(texture, null); }
}
In the case that something fails, you don’t want to leave the user with an unrenderable texture or a texture with old data in it, so you’ll also define a function to clear the texture to a 1x1 opaque black pixel in the case of an error (see Listing 21-6).
Listing 21-6. _clearOnError Method
// When an error occurs set the texture to a 1x1 black pixel
// This prevents WebGL errors from attempting to use unrenderable textures
// and clears out stale data if we're re-using a texture.
DXTLoader.prototype._clearOnError = function(error, texture, callback) {
  console.error(error);

  var gl = this.gl;
  gl.bindTexture(gl.TEXTURE_2D, texture);
  gl.texImage2D(gl.TEXTURE_2D, 0, gl.RGB, 1, 1, 0, gl.RGB, gl.UNSIGNED_BYTE, new Uint8Array([0, 0, 0]));
  gl.texParameteri(gl.TEXTURE_2D, gl.TEXTURE_MAG_FILTER, gl.NEAREST);
  gl.texParameteri(gl.TEXTURE_2D, gl.TEXTURE_MIN_FILTER, gl.NEAREST);

  // Notify the user that an error occurred and the texture is ready.
  if (callback) { callback(texture, error); }
}
Finally, tying it all together, you define the function that users of this library will actually call to load a texture: loadDDS. This function queries the texture from the server, parses the returned bytes, and sends the parsed results to either our upload or error functions.
The code to load a DDS file from the server is a relatively simply AJAX request, with the biggest difference being that you request the responseType be an Array Buffer, which makes it faster and easier for you to parse (and is what the parseDDS function already expects), as shown in Listing 21-7.
Listing 21-7. loadDDS Method
// Loads a DDS file into the given texture.
// If no texture is provided one is created and returned.
DXTLoader.prototype.loadDDS = function(src, texture, callback) {
  var self = this;
  if(!texture) {
    texture = this.gl.createTexture();
  }

  // Load the file via XHR.
  var xhr = new XMLHttpRequest();
  xhr.addEventListener('load', function (ev) {
    if (xhr.status == 200) {
      // If the file loaded successfully parse it.
      parseDDS(xhr.response, function(dxtData, width, height, levels, internalFormat, bytesPerBlock) {
        // Upload the parsed DXT data to the texture.
        self._uploadDXT(dxtData, width, height, levels, internalFormat, bytesPerBlock, texture, callback);
      }, function(error) {
        self._clearOnError(error, texture, callback);
      });
    } else {
      self._clearOnError(xhr.statusText, texture, callback);
    }
  }, false);
  xhr.open('GET', src, true);
  xhr.responseType = 'arraybuffer';
  xhr.send(null);

  return texture;
}
This function takes in a source URL (src) and optionally an existing texture handle and a callback that will be called when the texture is finished loading. If not, the existing texture is provided. You create one here and return it as a convenience for the user. The basic code to load a DDS texture then looks like this:
var dxtLoader = new DXTLoader(gl);
var dxtTexture = dxtLoader.loadDDS(imageUrl);
And that’s it! You can now use this compressed texture like you would any other, but it takes up 1/4th to 1/6th the space of the alternative. When all is said and done, the code to load a DDS file into a WebGL texture is about 130 lines, which isn’t bad at all. It should be noted, however, that this code only targets DDS files that WebGL can support. Some of the more advanced DDS features, like cubemap support, have been ignored for the sake of simplicity.
To see DDS loading in action, open up the gallery application again and select “DDS” from the format drop-down menu in the upper-left corner. You shouldn’t notice any difference in the images being shown but, on the back end, it will begin loading the textures from DDS files rather than JPEGs. Also, if you open the JavaScript console, it will show the amount of time it takes to upload the DXT data using the compressedTexImage2D call. (The time it takes to parse the file should be negligible.) You should notice a stark difference from the upload times for the JPEGs! While the uncompressed image data takes 11ms to 18ms to upload, the compressed data loads in well under a millisecond, usually only taking 0.15ms to 0.2ms with Chrome!
The unfortunate part is that since these formats use fixed rate compression, they are pretty much guaranteed to be noticeably larger than that of their JPEG counterparts. Table 21-2 shows the new compressed sizes of the images shown previously in Table 21-1.
Table 21-2. Comparison of DDS and JPEG Image File Sizes
DDS (DXT1) |
JPEG |
|
|---|---|---|
Slide_10 |
683 KB |
378 KB |
Slide_13 |
683 KB |
531 KB |
Slide_15 |
683 KB |
303 KB |
You can see that, in some cases, the JPEGs are half the size of the DXT files! Compressed formats like DXT are great for saving video memory, but at the cost of extra bandwidth. Luckily for you, however, there’s a newer format that provides the best of both worlds!
Crunch
The Crunch texture format (https://code.google.com/p/crunch/) was developed in 2009 by Rich Geldreich. It is essentially another level of compression on top of the fixed-rate DXT compression format. Because of this it yields file sizes that are as good as, and often better than, JPEG! See Table 21-3.
Table 21-3. Comparison of Crunch (CRN) File Sizes with DDS and JPEG
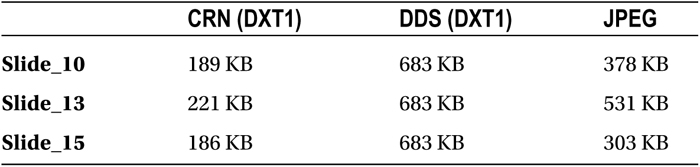
These three sample images show significantly smaller file sizes than JPEG— something that’s true of every image in your gallery application. That’s not always the case with every image, and is highly dependent on image content. Nonetheless, you can generally count on CRN files being seriously small. Even better, since you can also store DXT3/5 formats with CRN as well, it allows you to save transparent textures that are almost always far smaller than their PNG counterparts. Unfortunately, since DXT compression is inherently lossy, PNGs are still your best bet if you need lossless textures.
The downloads on the Crunch site provide Windows command-line tools that make it very easy to convert images of various formats into CRN files. (Mac and Linux users can build the compression tools from source.) Converting a JPEG file, for instance, is as easy as the following:
crunch.exe /DXT1 -file input_image.jpg
This code snippet creates an input_image.crn file in the current directory. You can also convert larger sets of image files by using wildcard characters. There are a lot of options to control how the conversion process proceeds, and you can find out more about the various flags available by running crunch.exe without any arguments. There’s enough flexibility here that the compression process should feel right at home as part of your build process or art pipeline.
Using CRN files in a 3D application is a two-step process. The file is first run through a decompressor, which very quickly transcodes from the Crunch format into a buffer of DXT texture data. This is then uploaded to the GPU as a normal compressed DXT texture. The Crunch source code includes a lightweight C++ header file that handles all of the decompression. Since you’re using WebGL, however, you’ve got to do the transcoding in JavaScript.
The truth be told, it would be entirely possible to write a Crunch decoding routine in JavaScript by hand, but it wouldn’t be anywhere near as simple as the DDS reader shown earlier. Not only that, but after writing the initial decoder, you would have to update it manually any time the Crunch C++ library is updated with new features or bug fixes. That’s hardly an attractive idea to someone that just wants smaller texture files.
Fortunately, you have Emscripten at your disposal. While the tool has already been covered in Chapter 18, I’ll briefly review it again in case you skipped that chapter. Emscripten, written by Alon Zakai, is a C++-to-JavaScript cross-compiler. Within certain limitations, it can take many C++ files or projects and produce JavaScript that can run on most browsers. The resulting script resembles assembly code and isn’t typically human readable, but the benefit of not needing to re-code entire projects by hand makes that a small price to pay. Furthermore, Emscripten’s outputs conform to the asm.js spec, which means that the resulting code can be further optimized by some browsers, such as Firefox, and it can achieve performance that is within 2X of native code.
The self-contained nature of Crunch’s decoder (a single .h file) makes it very easy to compile with Emscripten. The only additional thing required on your part is a small C++ wrapper to indicate those functions you need to be able to access. Evan Parker, who created a proof-of-concept Crunch loader with Emscripten in 2012, originally did this work, and the code in Listing 21-8 is a minor modification of his original work. This source is also available at crunch_js/crunch_lib.cpp in the chapter’s source code.
Listing 21-8. Emscripten/Javascript Interface
#define PLATFORM_NACL // This disables use of 64 bit integers, among other things.

#include <stddef.h>   // For NULL, size_t
#include <cstring>    // for malloc etc

#include "crn_decomp.h"

extern "C" {
  unsigned int crn_get_width(void *src, unsigned int src_size);
  unsigned int crn_get_height(void *src, unsigned int src_size);
  unsigned int crn_get_levels(void *src, unsigned int src_size);
  unsigned int crn_get_dxt_format(void *src, unsigned int src_size);
  unsigned int crn_get_bytes_per_block(void *src, unsigned int src_size);
  unsigned int crn_get_uncompressed_size(void *p, unsigned int size, unsigned int level);
  void crn_decompress(void *src, unsigned int src_size, void *dst, unsigned int dst_size, unsigned int firstLevel, unsigned int levelCount);
}

unsigned int crn_get_width(void *src, unsigned int src_size) {
  crnd::crn_texture_info tex_info;
  crnd::crnd_get_texture_info(static_cast<crn_uint8*>(src), src_size, &tex_info);
  return tex_info.m_width;
}

unsigned int crn_get_height(void *src, unsigned int src_size) {
  crnd::crn_texture_info tex_info;
  crnd::crnd_get_texture_info(static_cast<crn_uint8*>(src), src_size, &tex_info);
  return tex_info.m_height;
}

unsigned int crn_get_levels(void *src, unsigned int src_size) {
  crnd::crn_texture_info tex_info;
  crnd::crnd_get_texture_info(static_cast<crn_uint8*>(src), src_size, &tex_info);
  return tex_info.m_levels;
}

unsigned int crn_get_dxt_format(void *src, unsigned int src_size) {
  crnd::crn_texture_info tex_info;
  crnd::crnd_get_texture_info(static_cast<crn_uint8*>(src), src_size, &tex_info);
  return tex_info.m_format;
}

unsigned int crn_get_bytes_per_block(void *src, unsigned int src_size) {
  crnd::crn_texture_info tex_info;
  crnd::crnd_get_texture_info(static_cast<crn_uint8*>(src), src_size, &tex_info);
  return crnd::crnd_get_bytes_per_dxt_block(tex_info.m_format);
}

unsigned int crn_get_uncompressed_size(void *src, unsigned int src_size, unsigned int level) {
  crnd::crn_texture_info tex_info;
  crnd::crnd_get_texture_info(static_cast<crn_uint8*>(src), src_size, &tex_info);
  const crn_uint32 width = tex_info.m_width >> level;
  const crn_uint32 height = tex_info.m_height >> level;
  const crn_uint32 blocks_x = (width + 3) >> 2;
  const crn_uint32 blocks_y = (height + 3) >> 2;
  const crn_uint32 row_pitch = blocks_x * crnd::crnd_get_bytes_per_dxt_block(tex_info.m_format);
  const crn_uint32 total_face_size = row_pitch * blocks_y;
  return total_face_size;
}

void crn_decompress(void *src, unsigned int src_size, void *dst, unsigned int dst_size, unsigned int firstLevel, unsigned int levelCount) {
  crnd::crn_texture_info tex_info;
  crnd::crnd_get_texture_info(static_cast<crn_uint8*>(src), src_size, &tex_info);

  crn_uint32 width = tex_info.m_width >> firstLevel;
  crn_uint32 height = tex_info.m_height >> firstLevel;
  crn_uint32 bytes_per_block = crnd::crnd_get_bytes_per_dxt_block(tex_info.m_format);

  void *pDecomp_images[1];
  pDecomp_images[0] = dst;

  crnd::crnd_unpack_context pContext =
      crnd::crnd_unpack_begin(static_cast<crn_uint8*>(src), src_size);

  for (int i = firstLevel; i < firstLevel + levelCount; ++i) {
    crn_uint32 blocks_x = (width + 3) >> 2;
    crn_uint32 blocks_y = (height + 3) >> 2;
    crn_uint32 row_pitch = blocks_x * bytes_per_block;
    crn_uint32 total_level_size = row_pitch * blocks_y;

    crnd::crnd_unpack_level(pContext, pDecomp_images, total_level_size, row_pitch, i);
    pDecomp_images[0] = (char*)pDecomp_images[0] + total_level_size;

    width = width >> 1;
    height = height >> 1;
  }

  crnd::crnd_unpack_end(pContext);
}
If you’re primarily a JavaScript developer, this C++ code can look pretty dense and difficult to read, but it’s mostly fairly mechanical data transformation to ensure that you have entry points that JavaScript can communicate with once the library has been compiled with Emscripten. Don’t worry if it doesn’t make much sense to you, just use the crunch_lib.cpp file provided with the book source. What you’re really concerned about is getting the compiled JavaScript code.
To compile this shim using Emscripten, you’ll first need to install the Emscripten SDK (https://developer.mozilla.org/en-US/docs/Emscripten/Download_and_install) and the Crunch source code (https://code.google.com/p/crunch/), then copy the crunch_js folder from this chapter’s source into the Crunch source folder. Finally, open the crunch_js folder and run the command line shown in Listing 21-9.
Listing 21-9. Emscripten Compile Command Line
emcc -O3 crunch_lib.cpp -I../inc -s EXPORTED_FUNCTIONS="['_malloc', '_free', '_crn_get_width', '_crn_get_height', '_crn_get_levels', '_crn_get_dxt_format', '_crn_get_bytes_per_block', '_crn_get_uncompressed_size', '_crn_decompress']" -o crunch_lib.js
This will output a file called crunch_lib.js, which contains the JavaScript result of the compile. Don’t bother trying to read it; it’s been optimized using the closure compiler into a blob of characters that’s not at all human readable. (If you want a slightly less obfuscated version, remove the -O3 flag.) Don’t worry, though, all you need to know is that the functions that were listed in the EXPORTED_FUNCTIONS array can now be called on the Module object when you load that code file.
Now let’s go back to the DXTLoader library you were working on earlier and add Crunch support! You’ll need to load the contents of the newly built crunch_lib.js somehow. You can do this by including the file in your HTML headers like any normal JavaScript, but you can make life a little easier for users of your library by embedding it in the file itself.
At the top of the dxt_utils.js file add a function named LoadCrunchDecoder which returns a variable named Module, like so:
function LoadCrunchDecoder() {
  // Emscripten compiled code goes here.
  return Module;
}
Then copy the entire contents of crunch_lib.js into this function. You’re putting it inside a function for two reasons. One is that it prevents any variables that Emscripten may create from accidentally polluting the global scope and two is so that you can decide when you want to initialize the crunch reader, which will come in handy in just a moment.
Next, just like with the DDS loading code you’ll need a few constants defined to assist in the Crunch loading. Add the code in Listing 21-10, just below the DDS constants you defined earlier.
Listing 21-10. Crunch Constants
// Taken from crnlib.h
var CRN_FORMAT = {
  cCRNFmtInvalid: -1,

  cCRNFmtDXT1: 0,
  // cCRNFmtDXT3 is not currently supported when writing to CRN - only DDS.
  cCRNFmtDXT3: 1,
  cCRNFmtDXT5: 2

  // Crunch supports more formats than this, but we can't use them here.
};

// Mapping of Crunch formats to DXT formats.
var DXT_FORMAT_MAP = {};
DXT_FORMAT_MAP[CRN_FORMAT.cCRNFmtDXT1] = COMPRESSED_RGB_S3TC_DXT1_EXT;
DXT_FORMAT_MAP[CRN_FORMAT.cCRNFmtDXT3] = COMPRESSED_RGBA_S3TC_DXT3_EXT;
DXT_FORMAT_MAP[CRN_FORMAT.cCRNFmtDXT5] = COMPRESSED_RGBA_S3TC_DXT5_EXT;
Next, you’re going to add the code that calls into the Emscripten-compiled code to decode a Crunch file. This is probably the most complicated part of the entire library, so get ready! First off, in order to decompress the crunch files you will need a buffer of data to decode the DXT information into. That can be somewhat large and a bit expensive to create, so you only want to do it once if you can help it. Similarly, you want to be able to load the Emscripten modules only once and only when needed. In order to accomplish this, you’re going to use some functional scoping tricks to create some “private” variables, as shown in Listing 21-11.
Listing 21-11. decompressCRN function, Part 1
// Parse a crunch file and decompress the contained texture into raw DXT data, which is then passed to the callback.
var decompressCRN = (function() {
  // Variables which are cached between calls to the function, hidden here with some function scoping tricks.
  var dst = null;
  var dxtData = null;
  var cachedDstSize = 0;

  // The emscripten module.
  var Module = null;

  // Copy an array of bytes into or out of the emscripten heap.
  function arrayBufferCopy(src, dst, dstByteOffset, numBytes) {
    var i;
    var dst32Offset = dstByteOffset / 4;
    var tail = (numBytes % 4);
    var src32 = new Uint32Array(src.buffer, 0, (numBytes - tail) / 4);
    var dst32 = new Uint32Array(dst.buffer);
    for (i = 0; i < src32.length; i++) {
      dst32[dst32Offset + i] = src32[i];
    }
    for (i = numBytes - tail; i < numBytes; i++) {
      dst[dstByteOffset + i] = src[i];
    }
  }

  return // Decompression function (we’ll fill this in in a moment.)
})();
What’s happening here is that you’re creating an anonymous function (and with it a new variable scope), creating your “private” variables and a utility function within that scope, and returning the actual decompression function. You then immediately call the anonymous function and assign its return value to decompressCRN, which will be what you call to decompress the texture.
The actual decompression function looks like the code in Listing 21-12. (It gets inserted at the return statement in the code from Listing 21-11.)
Listing 21-12. decompressCRN function, Part 2
// This is the actual function that is executed when you call decompressCRN.
return function(arrayBuffer, callback, errorCallback) {
  // Callbacks must be provided.
  if (!callback || !errorCallback) { return; }

  // If the emscripten module has not been loaded yet do so now.
  // Executes the massive code blob at the top of the file.
  if (!Module) {
    Module = LoadCrunchDecoder();
  }

  // Copy the contents of the arrayBuffer into emscriptens heap.
  var srcSize = arrayBuffer.byteLength;
  var bytes = new Uint8Array(arrayBuffer);
  var src = Module._malloc(srcSize);
  arrayBufferCopy(bytes, Module.HEAPU8, src, srcSize);

  // Determine what type of compressed data the file contains.
  var format = Module._crn_get_dxt_format(src, srcSize);
  if (!DXT_FORMAT_MAP[format]) {
    errorCallback("Unsupported image format");
    return;
  }

  // Gather basic metrics about the DXT data.
  var levels = Module._crn_get_levels(src, srcSize);
  var width = Module._crn_get_width(src, srcSize);
  var height = Module._crn_get_height(src, srcSize);
  var bytesPerBlock = Module._crn_get_bytes_per_block(src, srcSize);

  // Determine the size of the decoded DXT data.
  var dstSize = 0;
  var i;
  for (i = 0; i < levels; ++i) {
    dstSize += dxtLevelSize(width >> i, height >> i, bytesPerBlock);
  }

  // Allocate enough space on the emscripten heap to hold the decoded DXT data
  // or reuse the existing allocation if a previous call to this function has
  // already acquired a large enough buffer.
  if(cachedDstSize < dstSize) {
    if(dst) { Module._free(dst); }
    dst = Module._malloc(dstSize);
    dxtData = new Uint8Array(Module.HEAPU8.buffer, dst, dstSize);
    cachedDstSize = dstSize;
  }

  // Decompress the DXT data from the Crunch file into the allocated space.
  Module._crn_decompress(src, srcSize, dst, dstSize, 0, levels);

  // Release the crunch file data from the emscripten heap.
  Module._free(src);

  // Pass the DXT information to the callback for uploading.
  callback(dxtData, width, height, levels, DXT_FORMAT_MAP[format], bytesPerBlock);
};
Here’s what’s happening. First off, if this is the first time you’re calling this function, you load the Emscripten module by calling LoadCrunchDecoder. That way none of that potentially expensive code is executed at all unless you actually need it. (See, I told you that putting it in a function would come in handy!)
Next, you copy the bytes of the Crunch data you’ve been given into Emscripten’s virtual “heap.” In Emscripten compiled code, the C++ heap is represented by a large, pre-allocated TypedArray, which is accessed with Module.HEAPU8 in the code in Listing 21-12. (As the name suggests, this is a Uint8Array view of the heap buffer.) Under this setup, memory allocations are simply reserved ranges of the array and pointers are integer offsets into the array (which is pretty close to how native memory management works anyway). This means that anytime you want Emscripten to operate on any data, you have to copy it into that heap manually. You’re using a simple helper function here (arrayBufferCopy) to handle the copy.
Once the data has been copied into the heap, you use a “pointer” to it (an integer offset into the heap typed array) to call several functions to query information about the DXT data the Crunch file contains, such as the width and height, number of mip levels, etc. Once you have all that, you calculate how large the decompressed DXT will be. You use this to “malloc” the appropriate amount of space on the Emscripten heap to receive the decoded data.
Finally, you get to call the all-important _crn_decompress function, which does all the heavy lifting of decompressing the bytes of the Crunch file into the plain old DXT information the GPU needs! Once that’s done, you free up the memory that you allocated to copy the Crunch data into and then call the provided callback, giving it the newly decoded DXT data and all the necessary numbers to go with it. Note that you didn’t actually need to copy the decoded data out of the Emscripten heap, but instead you just created a view of the heap data at the appropriate offset and size. This is because the Emscripten heap is already a TypedArray, which is what compressedTexImage2D requires anyway. As such, as long as you don’t allow anything to overwrite the Emscripten data before you’ve uploaded the texture, you can simply give compressedTexImage2D the view. Less copying equals faster code, so this is definitely a win!
So now that you can decode the Crunch data, let’s tie it all together by adding another method to the DXTLoader class (see Listing 21-13).
Listing 21-13. loadCRN Method
// Loads a CRN (Crunch) file into the given texture.
// If no texture is provided one is created and returned.
DXTLoader.prototype.loadCRN = function(src, texture, callback) {
  var self = this;
  if(!texture) {
    texture = this.gl.createTexture();
  }

  // Load the file via XHR.
  var xhr = new XMLHttpRequest();
  xhr.addEventListener('load', function (ev) {
    if (xhr.status == 200) {
      // If the file loaded successfully parse and decompress it.
      decompressCRN(xhr.response, function(dxtData, width, height, levels, internalFormat, bytesPerBlock) {
        // Upload the parsed and decompressed DXT data to the texture.
        self._uploadDXT(dxtData, width, height, levels, internalFormat, bytesPerBlock, texture, callback);
      }, function(error) {
        self._clearOnError(error, texture, callback);
      });
    } else {
      self._clearOnError(xhr.statusText, texture, callback);
    }
  }, false);
  xhr.open('GET', src, true);
  xhr.responseType = 'arraybuffer';
  xhr.send(null);

  return texture;
}
This is practically identical to the loadDDS function, so there’s not much to say about it. The only real difference is that you’re calling decompressCRN on the xhr.response instead of parseDDS!
So now you can load, decompress, and upload a Crunch texture! Let’s see how well it works. First, open up the gallery application again, and select “CRN” from the format select. This will start loading images from Crunch compressed files rather than JPEGs. As with the other formats, you output the time spent uploading to the console, and you should see that the upload times match the DDS files closely (after all, it’s almost the same data.) You’re also logging the amount of time spent decompressing the file from the Crunch format to the DXT data, and unfortunately that number isn’t as pretty. On my machine, decompressing typically takes 8ms to 13ms for each 1024×1024 texture. That puts us back in the same timeframe as uploading the JPEG, and it is a big step back from the parsing and upload times of the DDS files. Nevertheless, there’s one crucial difference: since the majority of the time is now spent in JavaScript that’s not interacting with WebGL, you can move much of the processing into a Web Worker.
Workers
Web Workers are a limited form of parallel processing for JavaScript, similar to using multiple threads but with more safety mechanisms built in. The biggest limitation of workers is that they have no DOM access, nor can they access anything derived from the DOM. This means that no WebGL interaction can occur within a worker. The best you can do is to process everything into a form where it’s ready to be passed directly into WebGL when it’s passed back to the main thread.
Getting the code to use Web Workers isn’t as difficult as you may think. The first step is to move the Crunch constants, the LoadCrunchDecoder function, and the decompressCRN function into a new file, which you’ll call crunch-worker.js. Then add the code in Listing 21-14 to the bottom of the file.
Listing 21-14. crunch-worker.js Message Handling
// Worker message handler
onmessage = function(msg) {
  // Calls to the worker contain a URL to load and the associated pending texture ID.
  var src = msg.data.src;
  var id = msg.data.id;

  // Notifies the main thread that DXT data is ready.
  function uploadCallback(dxtData, width, height, levels, internalFormat, bytesPerBlock) {
    postMessage({
      id: id,
      dxtData: dxtData,
      width: width,
      height: height,
      levels: levels,
      internalFormat: internalFormat,
      bytesPerBlock: bytesPerBlock
    });
  }

  // Notifies the main thread that an error has occured.
  function errorCallback(error) {
    postMessage({
      id: id,
      error: error
    });
  }

  // Load the file via XHR
  var xhr = new XMLHttpRequest();
  xhr.addEventListener('load', function (ev) {
    if (xhr.status == 200) {
      // If the file loaded successfully parse and decompress it.
      decompressCRN(xhr.response, uploadCallback, errorCallback);
    } else {
      errorCallback(xhr.statusText);
    }
  }, false);
  xhr.open('GET', "../" + src, true);
  xhr.responseType = 'arraybuffer';
  xhr.send(null);
};
To communicate with the worker “thread,” you will send it messages, which is this case will be a simple JSON object containing a URL to load and a unique ID to identify which texture is being loaded. onmessage is the function that will handle those messages as you send them. You may notice that the code shown here is very similar to that of the previously defined loadCRN function. In fact, it is mostly the same—the big difference being that once the decompression is complete, or if an error occurs, you call postMessage with the results rather than making any WebGL calls. This is because workers cannot access any part of the DOM, and since WebGL is tightly bound to the canvas tag it means WebGL cannot be used in a worker either. Instead you need to pass the decompressed data back to the main script, which is what postMessage does.
That’s it for the worker file, so now let’s go back to dxt-util.js to add the code to create the worker and communicate with it. First off, since the texture decompression will now be asynchronous and handled in a different thread, you need a way to track textures between the time you request it be loaded and the time the worker sends it back. For this purpose you’ll define a very simple CrunchPendingTexture class, as shown in Listing 21-15.
Listing 21-15. CrunchPendingTexture Class
var nextPendingTextureId = 0;
var CrunchPendingTexture = function(texture, callback) {
  this.id = nextPendingTextureId++;
  this.texture = texture;
  this.callback = callback;
}
As you can see, each CrunchPendingTexture is given a unique ID which will be passed to the worker and back, and holds the texture that is being loaded and the callback the library user specified should be called when the loading was completed.
Next, you’ll update the DXTLoader constructor function, as shown in Listing 21-16.
Listing 21-16. Worker-enabled DXTLoader Constructor
var DXTLoader = function(gl) {
  this.gl = gl;

  // Load the S3TC extension, if it's available
  this.ext = null;
  var vendorPrefixes = ["", "WEBKIT_", "MOZ_"];
  for(i in vendorPrefixes) {
    this.ext = gl.getExtension(vendorPrefixes[i] + "WEBGL_compressed_texture_s3tc");
    if (this.ext) { break; }
  }

  // When using a worker process we must keep track of the pending texture
  // loads so that we can correctly correlate the DXT data to the desired
  // texture when the worker completes.
  this.pendingTextures = {};

  // Reload this file as a worker.
  this.worker = new Worker("crunch-worker.js");

  var self = this;
  // The worker's message handler.
  this.worker.onmessage = function(msg) {
    // Find the pending texture associated with the data we just received
    // from the worker.
    var id = msg.data.id;
    var pt = self.pendingTextures[id];
    if (!pt) { return; }

    // Remove the pending texture from the waiting list.
    delete self.pendingTextures[id];

    // If the worker indicated an error has occured handle it now.
    if (msg.data.error) {
      self._clearOnError(msg.data.error, pt.texture, pt.callback);
      return;
    }

    // Upload the DXT data returned by the worker.
    self._uploadDXT(
        new Uint8Array(msg.data.dxtData),
        msg.data.width,
        msg.data.height,
        msg.data.levels,
        msg.data.internalFormat,
        msg.data.bytesPerBlock,
        pt.texture,
        pt.callback);
  };
}
The first few line have stayed the same, but the remainder is the other half of the worker communication. First, you define a dictionary to store pending textures in, then you create the worker object, giving it the name of the script to load. Then you define the worker’s onmessage handler, which is what gets called any time the worker calls postMessage. The code it contains is pretty simple: look up which texture was loaded with the ID that was passed back and then either call _clearOnError if the worker gave you an error message or _uploadDXT if you got back valid data.
Finally, you need to replace the logic of loadCRN. This function actually gets significantly simpler now that the AJAX request and decode is being handled in the worker. Instead all the new loadCRN needs to do is track a new CrunchPendingTexture and send the message to the worker to begin loading the Crunch file (see Listing 21-17).
Listing 21-17. Worker-enabled loadCRN Method
DXTLoader.prototype.loadCRN = function(src, texture, callback) {
  if(!texture) {
    texture = this.gl.createTexture();
  }

  // If we're using a worker to handle the decoding create a pending texture
  // and put it on the waiting list.
  var pending = new CrunchPendingTexture(texture, callback);
  this.pendingTextures[pending.id] = pending;
  // Then tell the worker to load the CRN file.
  this.worker.postMessage({id: pending.id, src: src});

  return texture;
}
And just like that, you’ve worker-ized your loading! Now all the heavy-duty decompression happens in the worker while the WebGL calls remain on the main thread where they belong.
To see this in action, open up the gallery application once more, select the “CRN” format, and then choose “Decompress in a Worker” from the new select that appears. The decompression times will no longer appear in the console, but they should be roughly the same as what you were seeing earlier when the decompression was taking place in the main thread. The difference now is that the decompression can happen in parallel to the main thread, which only needs to handle the quick upload.
Now you are able to load your tiny crunched textures, decompress them asynchronously, and upload them to the GPU as compressed DXTs. You’ve achieved your goal of minimizing bandwidth and video memory, not blocking your rendering pipeline as much, and used some cool new web technologies to do it! Hooray!
This approach isn’t without a downside, however. In order to send the decoded DXT data over the worker thread, the data must be copied. This creates “trash” for the garbage collector to clean up, and it can lead to longer or more frequent garbage collects. Typically, you could avoid this copy by using a Transferable Object, which allows you to give ownership of an object like an ArrayBuffer over to another worker or to the main thread without copying. That’s not an option in your case, however, because you can only transfer buffers, not views. To do that would require you to transfer the entire Emscripten “heap” to the main thread and back again. That’s not only overkill but it would also prevent other Crunch textures from being decoded until you returned the buffer to the worker. In the end, the copy and subsequent garbage collection is an unfortunate but necessary side effect of using Emscripten.
The version of dxt-util.js that is included with the source code for this chapter performs all of the same logic that you walked through, but has a couple of differences that make it easier to use as a drop-in library for any project. First off, the library puts everything in a DXTUtil “namespace,” which lessens the chance of collisions with other libraries and protects the variables you declare within that scope from outside modification, which is a fairly common and prudent thing for JavaScript libraries to do. This means that you actually create an instance of the loader class by calling
var loader = new DXTUtil.Loader(gl, true);
The second argument given there is a Boolean to indicate whether or not Crunch files should be decoded in a Worker. Given the benefits described in this chapter, most of the time you’ll want this set to true, but it’s convenient for demonstrations like the Gallery app to be able to toggle it off and on.
Another convenience is that there’s no separate worker file. The worker logic has been packaged into dxt-util.js itself and the file loads itself again as the worker script. This means you only have one file to deploy.
The code is distributed under a BSD license, so feel free to use it in any project you wish!
Conclusion
WebGL applications must be sensitive to both download times and GPU memory use, metrics that often conflict with one another. By using Crunch you can create texture files as small or smaller than the equivalent JPEGs while also using a fraction of the video memory. Emscripten allows you to make use of the existing C++ decoding library without needing to rewrite it by hand in JavaScript, which reduces both development time and maintenance. Finally, by performing the texture decode in a Web Worker, you can avoid blocking the main thread for everything but the texture upload, which is far faster than uploading an uncompressed image of the same size.